Baumalight STUMP BLASTER 3P34 User manual

STUMP BLASTER 3P24, 3P34 and 3P40
OPERATOR’S MANUAL
Issue Date July 2018
D001655

TABLE OF CONTENTS
1. INTRODUCTION................................................................................................................................... 1
1.1 Overview....................................................................................................................................... 1
1.2 Intended Use And Foreseeable Misuse ..................................................................................... 1
2. SAFETY ................................................................................................................................................ 2
2.1 Safety Alert Symbol And Safety Words..................................................................................... 2
2.2 Operational Hazards.................................................................................................................... 2
Prepare for Emergencies ............................................................................................................ 3
Replace Safety Signs .................................................................................................................. 3
Do Not Allow Riders .................................................................................................................... 3
Lower Operating Speed .............................................................................................................. 3
Avoid Rollover ............................................................................................................................. 3
Avoid Powerlines & Underground Utilities ............................................................................... 4
Detach Stump Grinder Safely..................................................................................................... 4
Hazards from Modifying Equipment .......................................................................................... 4
Avoid Wood Dust Inhalation ....................................................................................................... 5
2.3 Maintenance Hazards.................................................................................................................. 6
3. SAFETY SIGNS .................................................................................................................................... 8
4. ASSEMBLY ......................................................................................................................................... 10
4.1 Remove Stump Grinder From Pallet........................................................................................ 10
4.2 Attach Driveline ..........................................................................................................................11
4.3 Driveline Dimension .................................................................................................................. 12
5. OPERATION ....................................................................................................................................... 13
5.1 Preparation For Use .................................................................................................................. 13
5.2 Pre-Operation Check List ......................................................................................................... 14
5.3 Machine Components ............................................................................................................... 14
5.4 Attaching Stump Grinder To Tractor........................................................................................ 15
5.5 Detaching Stump Grinder From Tractor.................................................................................. 17
5.6 Transporting............................................................................................................................... 18
5.7 Adjusting Swing Speed............................................................................................................. 18
5.8 Carbide Teeth Break-In.............................................................................................................. 19
5.9 First Time User Tips .................................................................................................................. 19
5.10 Field Operation ........................................................................................................................ 20
6. SERVICE AND MAINTENANCE......................................................................................................... 22
6.1 Service........................................................................................................................................ 22
6.1.1 Replace Cutting Teeth ........................................................................................................ 22
6.1.2 Replace Hydraulic Hoses................................................................................................... 23
6.1.3 Adjust Slip Clutch............................................................................................................... 24
6.2 Maintenance............................................................................................................................... 25
6.2.1 Every 6 Hours ..................................................................................................................... 25
6.2.2 Every 10 Hours ................................................................................................................... 25
6.2.3 Every 200 Hours ................................................................................................................. 26
7. TROUBLESHOOTING........................................................................................................................ 27
8. STORAGE........................................................................................................................................... 28
8.1 Storing Grinder .......................................................................................................................... 28
8.2 Removing Grinder From Storage............................................................................................. 28
9. WARRANTY........................................................................................................................................ 29
ii

1. INTRODUCTION
Congratulations on your choice of a Baumalight
3-Point Stump Grinder to complement your stump
grinding operation. This equipment has been
designed and manufactured to meet the needs
of a discriminating buyer for efcient grinding of
stumps.
Model 3P24 has 34 teeth on a 24 in. cutter and
models 3P34 and 3P40 have 54 teeth on a 34
in. cutter. This means less cutting for each tooth
resulting in longer tooth life and smoother cutting
for less wear on the tractor. Heavy tooth population
makes ner mulch and smoother operation.
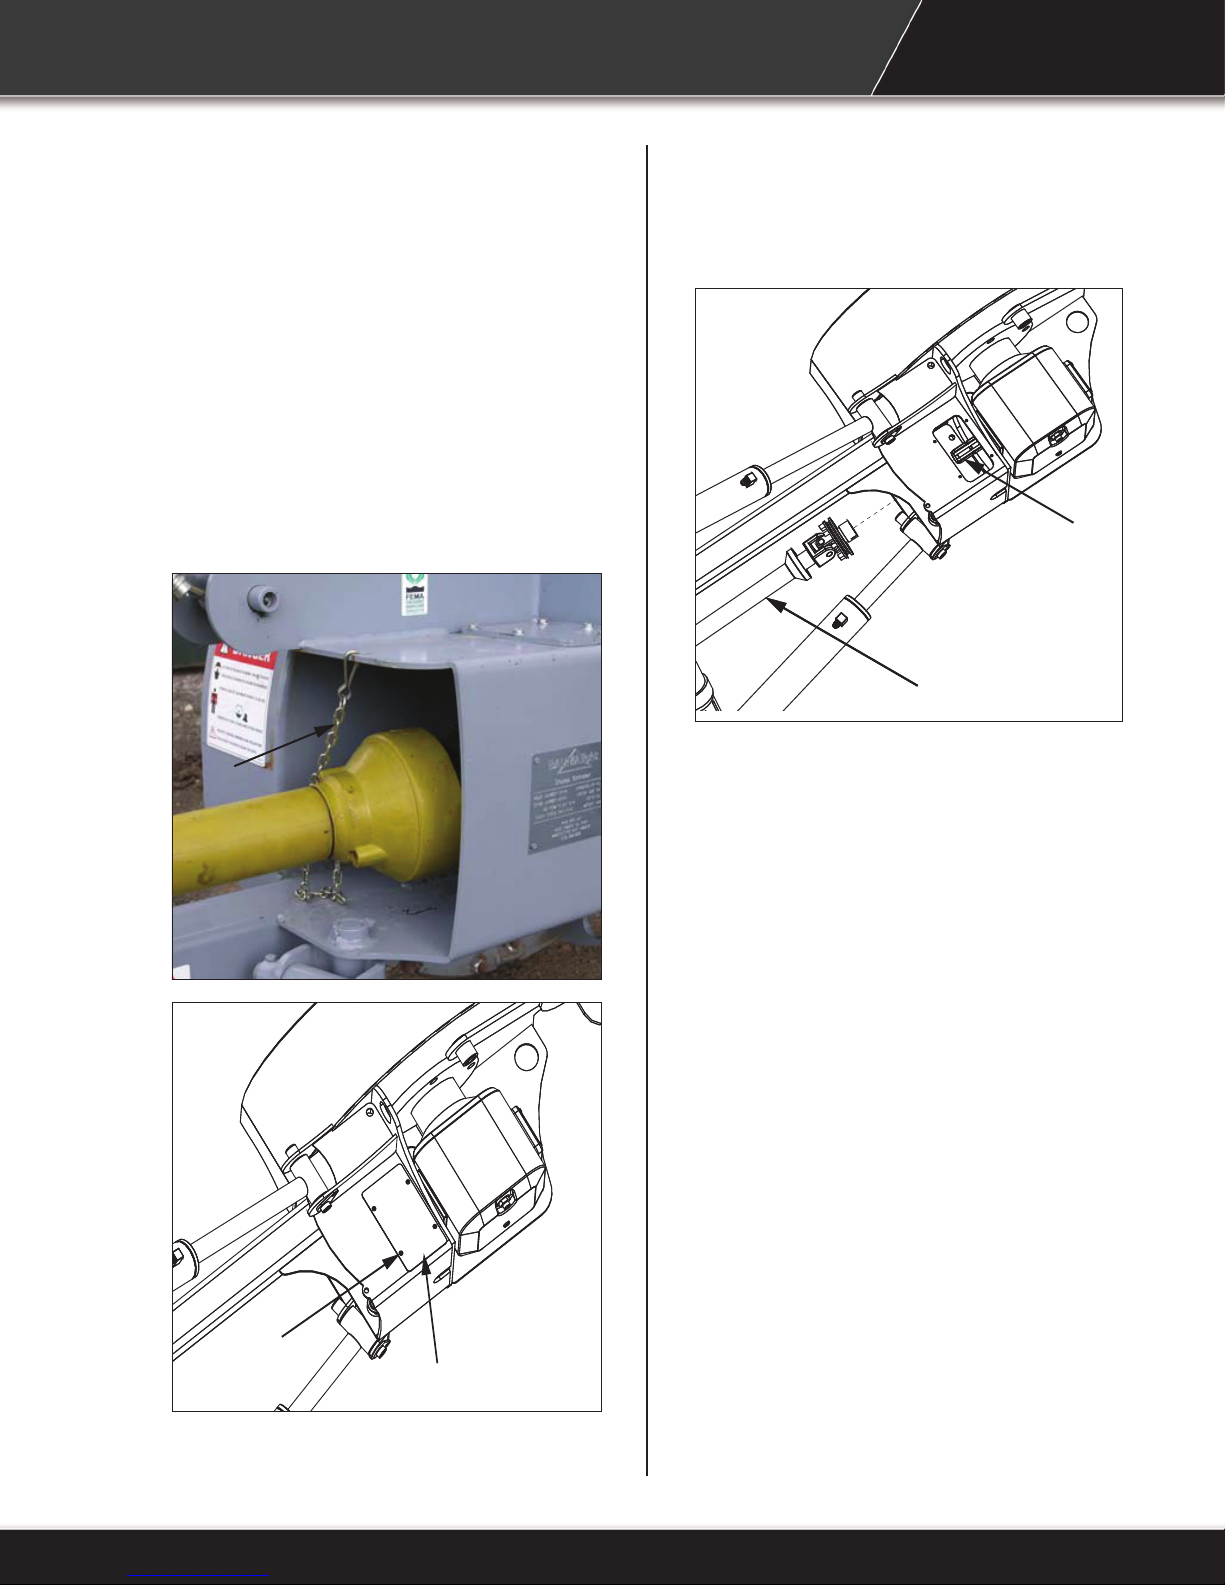
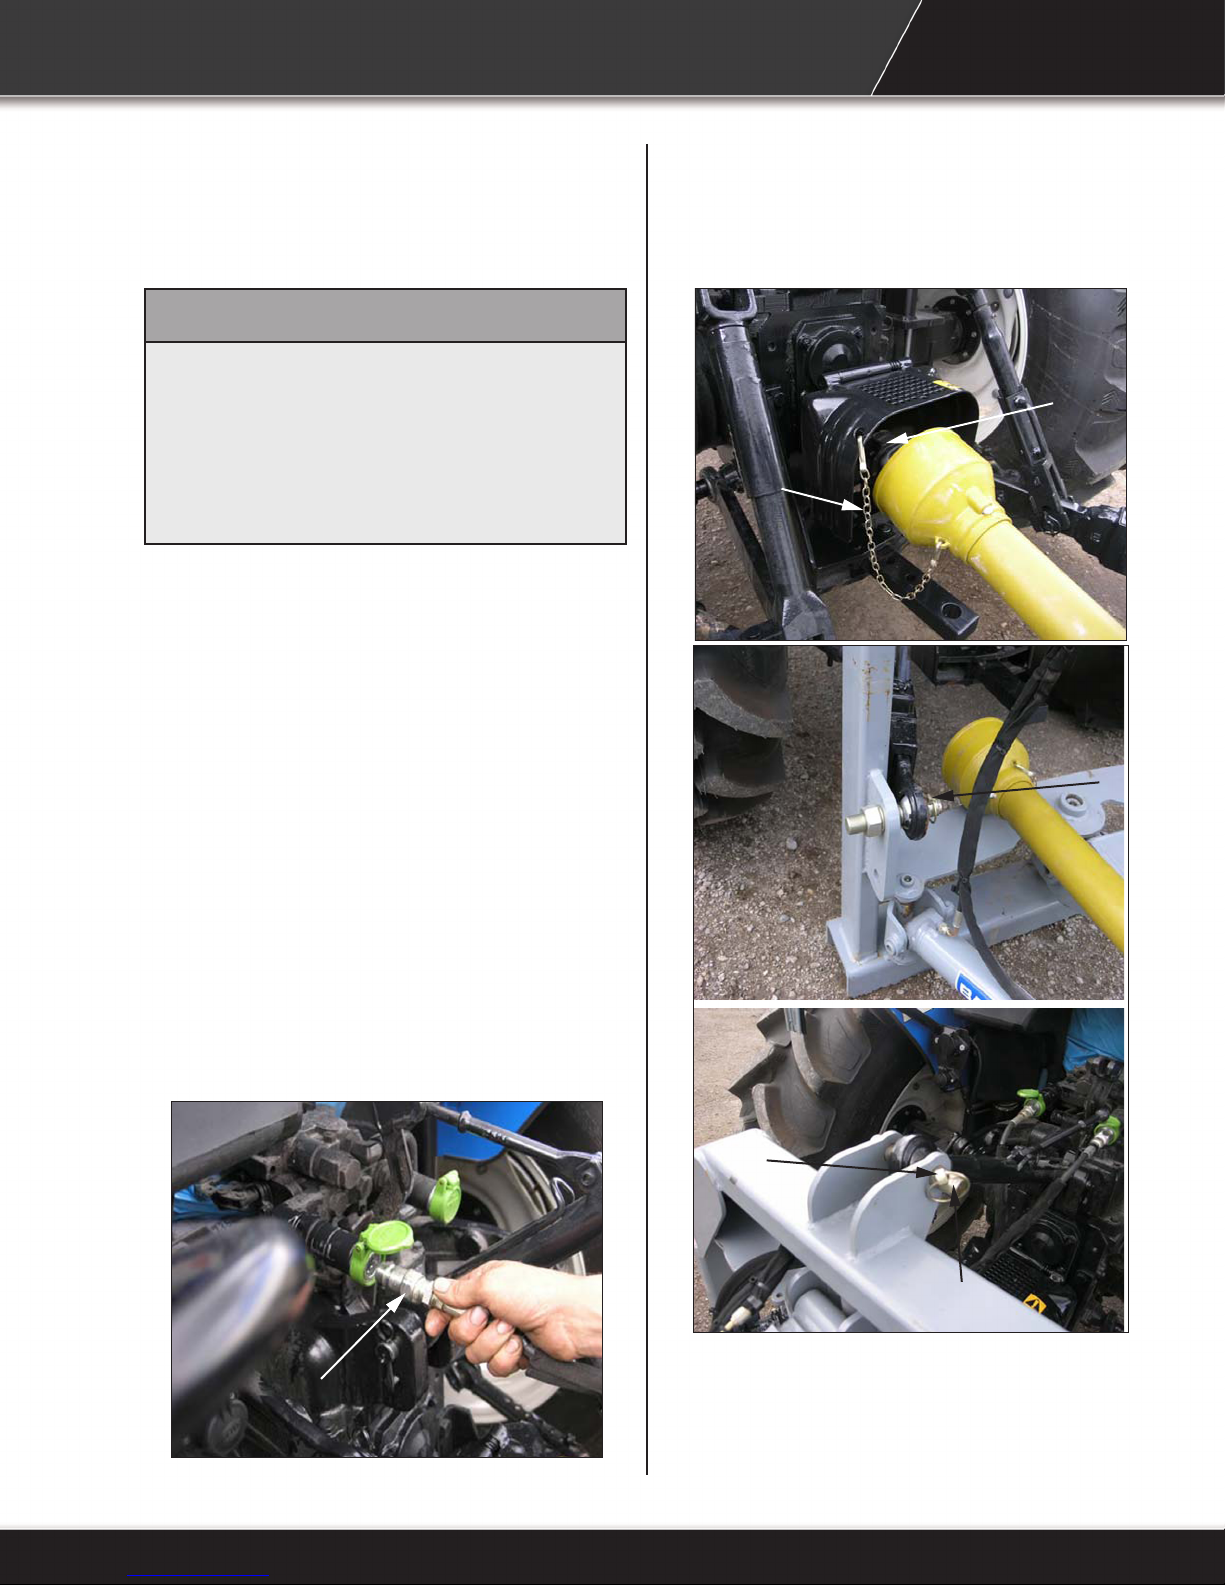
The cutting wheel is powered by the PTO (540)
on your tractor with the swing and lift cylinders
activated by the standard remote hydraulic
connectors on the tractor.
Grease zerks and replaceable brass bushings are
provided at major pivot points for extended service
life.
The debris shields is standard equipment on all
stump grinders. It is recommended that the stump
grinder never be operated without one.
Safe, efcient and trouble free operation of your
Stump Grinder requires that you and anyone
else who will be operating or maintaining the
Stump Grinder, read and understand the Safety,
Operation, Maintenance and Troubleshooting
information contained within the Operator’s
Manual.
This manual covers the Baumalight 3-Point Stump
Grinder, models 3P24, 3P34 and 3P40. Use the
Table of Contents as a guide to locate required
information.
Keep this manual handy for frequent reference
and to pass on to new operators or owners. Call
your Baumalight dealer, distributor or the factory
if you need assistance, information or additional
copies of the manuals.
1.1 Overview
When this machine is worn out and no longer in
use, it should be returned to the retailer or other
party for recycling.
OPERATOR ORIENTATION - The directions left,
right, front and rear, as mentioned throughout this
manual, are as seen from the tractor driver’s seat
and facing in the direction of travel.
1.2 Intended Use And Foreseeable
Misuse
The stump grinding tool is designed to be used
by experienced operators, trained in the safe
operation of a tractor and trained in the hazards
related to using the stump grinder and the safe use
of the grinder for the intended purpose. Operators
will require personal protective equipment to
reduce the risk from some hazards that cannot be
completely eliminated or controlled by the design
of the tool.
Each model in the family is intended to be used
within the stump size limits shown in the catalog
and in the implement specications in the manual.
Care is required to ensure that the stump grinding
tool will not come across metallic objects, stones
or other materials harder than a typical stump
while grinding.
The Stumpblaster stump grinding tools are not
designed for use in hazardous atmospheres
where there is a risk of re or explosion due to
ammable gases or vapors. Use in hazardous,
explosive atmospheres is prohibited.
Serious injury or death of the operator or
bystanders may be caused if the tool is misused.
Misuse may also cause damage to the tractor
carrying the implement.
1

2. SAFETY
You must read, understand and follow the
instructions given by the operating unit
manufacturers, as well as the instructions in this
manual.
The safety information in this manual is denoted by
the safety alert symbol:
^
This symbol means ATTENTION! BECOME
ALERT! YOUR SAFETY IS INVOLVED!
The level of risk is indicated by the following signal
words:
^ DANGER
DANGER - Indicates a hazardous
situation, which, if not avoided, WILL
result in death or serious injury.
^ WARNING
WARNING - Indicates a hazardous
situation, which, if not avoided, could
result in death or serious injury.
^ CAUTION
CAUTION - Indicates a hazardous
situation, which, if not avoided, could
result in minor or moderate injury.
NOTICE
NOTICE - Indicates a situation that could
result in damage to the equipment or
other property.
2.1 Safety Alert Symbol And Safety
Words
2.2 Operational Hazards
^ WARNING
Prevent serious injury or death.
Read and understand this manual before
operating stump grinder.
Always stop engine and remove key
before leaving operators seat.
Never allow anyone near the stump
grinder during operation.
Travel at a safe speed.
^ WARNING
Prevent serious injury or death from
moving parts.
Moving parts can crush and dismember.
Do not operate without guards and
shields in place.
Disconnect and lock out power source
before adjusting or servicing.
^ WARNING
Use stump grinder only for the designed
applications.
Any other use may result in personal
injury, damage to equipment and may
void the warranty.
^ WARNING
Prevent serious injury or death.
Verify stump grinder is attached to
tractor before operation or transport.
2

Carefully read all safety messages in this manual
and on equipment safety signs. Keep safety signs
in good condition and replace missing or damaged
safety signs.
New equipment components and repair parts must
include the current safety decal.
Learn how to properly operate equipment.
NEVER operate or work around this equipment
without proper instruction, while fatigued or under
the inuence of alcohol, prescription or non-
prescription medication or if feeling ill.
Keep your equipment in proper working condition.
Know the regulations and laws that apply to you
and your industry. This manual is not to replace
any regulations or laws. Additional information
may be found at: www.asae.org or www.osha.gov.
If you do not understand any part of this manual,
contact Baumalight at 866-820-7603.
Prepare for Emergencies
• Be prepared in case of emergencies.
• Keep a re extinguisher and rst aid kit close
to the machine.
• Keep emergency phone numbers close to your
phone.
• Know your address so emergency services
can locate you if an emergency arises.
Replace Safety Signs
• Replace missing or damaged safety signs.
• Safety signs are identied in Section 3 of this
manual.
• Replacement safety signs are available from
your Baumalight dealer.
Do Not Allow Riders
• NEVER lift or carry anyone with stump grinder.
• NEVER use stump grinder as a work platform.
• NEVER allow passengers on stump grinder.
Lower Operating Speed
• Lower operating speed while loading,
unloading or performing heavy operations.
• Keep load low and move at slow speeds on
rough or uneven terrain.
Avoid Rollover
The equipment may rollover, resulting in death or
serious injury. To help prevent rollover:
• Travel at a slow speed.
• Avoid sharp turns & sudden movement on
slopes.
• Carry loads close to the ground.
• Avoid holes, ditches and other obstructions
which may cause equipment to rollover.
• Balance load so weight is evenly distributed
and load is stable.
• Use caution when operating on slopes and do
not operate on excessively steep slopes.
• Do not exceed load capacity of equipment.
3

Avoid Powerlines & Underground
Utilities
• Check clearance before raising equipment.
• Have local utilities locate and mark buried
wires, cables, pipelines and other hazards
before grinding.
^^ DANGER
Prevent electrocution.
Death or serious injury can result if
equipment comes near or contacts
power lines.
Electrocution can occur without direct
contact.
DO NOT leave the operator’s seat if any part of the
equipment contacts electric lines or cables.
Detach Stump Grinder Safely
Detach stump grinder on a rm and level surface.
Stump grinder may fall over if detached on sloping
or soft surface. Be sure people, livestock and pets
are clear of machinery.
Relieve hydraulic pressure before disconnecting
hydraulic hoses. See your tractor Operator’s
Manual.
Raised Attachment
^ WARNING
Crushing hazard.
Raised, unsupported stump grinder can
fall, resulting in death or serious injury.
Never enter the area under a raised stump
grinder unless properly supported.
A raised stump grinder can lower unexpectedly,
resulting in death or serious injury.
NEVER enter area under a raised stump grinder
unless stump grinder is properly and safely
supported.
Lower stump grinder to ground, engage parking
brake, shut off engine and remove key before
servicing.
Avoid Loud Noise
^ WARNING
Prolonged exposure to loud noise can
cause impairment or loss of hearing.
Wear a suitable hearing protective
device such as earmuffs or earplugs
to protect against objectionable or
uncomfortable loud noises.
Hazards from Modifying Equipment
Do not make any alterations to your stump
grinder. Altering the equipment may cause unsafe
conditions and may void the manufacturer’s
warranty.
Stay Clear of Rotating Drivelines
^ WARNING
Entanglement in a rotating driveline can
cause serious injury or death.
Keep tractor shields and driveline
shields in place at all times. DO NOT
operate without drive line guards.
DO NOT wear loose tting clothing.
4

Avoid High Pressure Fluids
^ WARNING
Pressurized uids can penetrate the
skin.
Hydraulic hoses can fail from age,
damage and exposure.
Use body and face protection while
searching for leaks. A tiny, almost
invisible leak can penetrate the skin,
thereby requiring immediate medical
attention.
Use wood or cardboard to detect
hydraulic leaks, never use your hands.
Escaping uid under pressure can penetrate the
skin causing serious injury.
Prevent the hazard by relieving pressure (See
tractor Operator’s Manual.) before connecting or
disconnecting hydraulic lines. Verify all connections
are tight before applying pressure.
Search for leaks with a piece of cardboard or wood.
Protect hands and body from high pressure uids.
If an accident occurs, see a doctor immediately.
Any uid injected into the skin must be surgically
removed within a few hours or serious infection
may result.
Avoid Wood Dust Inhalation
^ WARNING
Wear an approved respirator (N95 Type
as a minimum).
Follow local, state and federal
regulations.
The health effects from exposure to wood dust
are due to chemicals in the wood or chemical
substances in the wood created by bacteria, fungi,
or moulds.
5

2.3 Maintenance Hazards
Before servicing, park machine on a rm and
level surface, set parking brake, chock wheels,
and place a “Do Not Operate” tag on control
panel. Read and understand this manual. If you
do not understand any part of the manual, contact
Baumalight at 866-820-7603.
Always wear face and/or eye protection, safety
shoes, and other protective equipment appropriate
for the job.
Do not make unauthorized modications. Contact
Baumalight at 866-820-7603 before you weld, cut/
drill holes, or make any other modications.
Always use Baumalight replacement parts.
^ WARNING
Moving parts can crush and cut.
Keep clear of moving components.
Follow lockout procedure before
servicing.
^ WARNING
Crushing hazard.
Before performing inspections, service
or maintenance:
Park machine on rm, level surface.
Engage parking brake.
Turn engine off and remove key.
Place “Do Not Operate” tag on control
panel.
^ WARNING
Entanglement hazard.
Keep clear of moving components.
Wear proper protective equipment
appropriate for the job.
^ WARNING
Burn hazard.
Hot and high pressure hydraulic oil.
Allow oil to cool before servicing.
6

7

3. SAFETY SIGNS
Dashes lines indicate items hidden from
view.
A. MTB-108 Safety Sign
8

D. MTB-182 Safety Sign
C. MTB-175 Safety Sign
B. MTB-180 Safety Sign
E. MTB-179 Safety Sign
9

^ WARNING
Approximate weight of grinder is:
• 3P24 - 642 lbs (291 kg)
• 3P34 - 1231 lbs (558 kg)
• 3P40 - 1280 lbs (581 kg)
Stump Grinder is top heavy when
attached to pallet. Move with caution.
Do not position feet around or under
pallet.
To prevent injury from accidental
lowering of grinder, attach an adequate
lifting device to lifting eye on stump
grinder.
1. Remove crate material from pallet.
2. Attach an adequate lifting device to lifting eye
(A) on stump grinder.
3. Remove all shipping bands, wires and loose
parts from around stump grinder.
4. Slowly lift the weight of stump grinder off the
pallet. Remove pallet from work area.
5. Lower stump grinder, so that the stabilizing foot
reaches the ground.
6. Stabilize the machine and continue lowering
the rest of the way down.
7. Remove lifting device.
4. Assembly
4.1 Remove Stump Grinder From
Pallet
A
10

4.2 Attach Driveline
1. Remove four cap screws (A), washers and
cover (B).
2. Remove nut and bolt from drive line.
3. Attach drive line (C) to gear box shaft (D).
4. Install nut and bolt in drive line.
5. Install cover, four washers and cap screws.
6. Attach safety shield chain (E) as shown.
E
A
B
C
D
11

4.3 Driveline Dimension
To accompany the variety of 3 point hitch geometry
available today, the driveline can be too long for
some machines or too short for others. It is very
important that the driveline be free to telescope but
not to bottom out when going through its working
range. If the driveline bottoms out, the bearings
on both the machine and tractor PTO shaft will be
overloaded and fail in a short time.
To determine the proper length of the driveline,
follow this procedure:
1. Attach stump grinder to tractor but do not
attach driveline.
2. Raise grinder until the input shaft is level with
tractor PTO shaft.
3. Measure dimension (A) between locking
grooves on tractor PTO shaft and grinder input
shaft.
4. Measure same dimension (B) on compressed
driveline.
5. If compressed driveline dimension (B) exceeds
the machine dimension (A), driveline must be
cut.
When cutting driveline, follow this procedure:
1. Subtract machine dimension (A) from uncut
driveline dimension (B). This dimension
determines how much too long the driveline is.
2. Add 1 in. (25 mm) to the dimension to be sure
it doesn’t bottom out, to determine cut off
dimension (C).
3. Use a hacksaw to cut dimension (C) from both
ends. Cut both plastic tubes and metal cores.
4. Use a le to remove burrs from cut edges.
5. Assemble shaft.
6. Make sure shaft can telescope freely. If it does
not, separate and inspect for burrs or cuttings
on shaft ends. Be sure it telescopes freely
before installing.
12

^ WARNING
Wear an approved respirator (N95 Type
as a minimum).
Follow local, state and federal
regulations.
The health effects from exposure to
wood dust are due to chemicals in the
wood or chemical substances in the
wood created by bacteria, fungi, or
moulds.
Although the Stump Grinder has been carefully
inspected and checked prior to shipment from
manufacturer, it is recommended that the unit be
thoroughly inspected.
Check all bolts for tightness and remove all shipping
tags, bags, skids, and blocking. Check swing
frame to ensure that it is free from obstruction and
can operate smoothly without binding.
Remove any masking materials afxed during
painting. Inspect the tractor and any accessory
equipment to verify that nameplates and all safety
warning, caution signs and decals provided with
the equipment are in place and clearly visible.
Verify the three linch pins are securely fastened.
Visually inspect the unit before each start up.
Check for loose or missing parts and any damage
that may have occurred during moving or shipping.
Review all tractor pre-start instructions, and ensure
that all recommended steps and procedures have
been followed. Never bar over the rotor, This could
cause damage and result in personal injury or
equipment damage.
NOTE: Always keep the weight of the machine in
mind. Never position body in line of impact.
5. OPERATION
5.1 Preparation For Use
13

Check-mark Check these items: Frequency
Check the three lynch pins on the hitch to verify they are
securely fastened.
Each operation.
Check the hydraulic uid level to verify there is sufcient uid
in the system.
Each operation.
Check hydraulic lines for breaks and punctures. Each operation.
Verify hydraulic lines are plugged in securely. Each operation.
Verify hydraulic lines are tied well away and cannot bind or
be pinched.
Each operation.
Check the cross bolts that secure the 9 pivot pins. Each operation.
Verify the pins on each end of the drive shaft are secured. Each operation.
Verify the safety chains on the drive shaft are securely
attached to the cover.
Each operation.
Verify the cutting tips on the cutting wheel are tight. Every 4 hours.
Grease 2 pins on the deector shield. Every 6 hours.
Grease all 9 pivot pins. Every 10 hours.
Check the oil in the stump grinder’s gearbox. For type and
quantity refer to the maintenance section.
Every 200 hours.
5.2 Pre-Operation Check List
A. Manual Storage Tube
B. 3-Point Top Link
C. 3-Point Lift pins
D. Raise/Lower Cylinder
E. Cutting Wheel Shield
F. Debris Shield
G. Cutting Wheel
H. Gear Box
I. Slip Clutch Shield
J. Swing Cylinder
K. Resting Foot
L. Drive Line w/ Slip Clutch
5.3 Machine Components
A
B
C
D
E
F
G
H
I
JK
L
14

5.4 Attaching Stump Grinder To
Tractor
^ WARNING
To prevent injury or machine damage
put transmission in “Park” and check
the full range of hitch for interference,
binding or PTO separation.
Never position yourself between tractor
and stump grinder.
Only experienced and properly trained
operator’s should operate the tractor
and stump grinder.
1. Back up tractor to stump grinder with hitch
points approximately in alignment.
2. Engage tractor park brake and/or place
transmission in “Park”.
3. Shut off engine and remove key.
4. Attach lower links to grinder and retain using
lynch pins (A). To avoid machine damage,
verify lynch pins are locked on lower links.
5. Align top link with hole in top of frame and
retain with pin (C) and lynch pin (B). To avoid
machine damage, verify lynch pin is locked on
pin (C).
6. Pull collar (D) back toward the grinder. Align
splines on tractor PTO shaft and drive line by
rotating grinder drive line. Push drive line onto
PTO shaft until it snaps into place.
7. Pull back on drive line to make sure it is locked
on shaft.
8. Attach safety shield chain (E) as shown.
A
B
C
D
E
15

9. Plug in hydraulic hoses (F) to the tractor’s rear
SCV’s. See your tractor Operator’s Manual.
F
10. Verify hydraulic hoses are clear of pinch areas.
11. Retain hydraulic hoses to top bar of hitch. Verify
hoses do not interfere with drive line.
12. Adjust top link so that the stump grinder A-frame
is vertical to the ground.
^ WARNING
Pressurized uids can penetrate the
skin.
Hydraulic hoses can fail due to physical
damage, age, kinks and exposure. Check
hoses regularly. Replace damaged
hoses.
Use body and face protection while
searching for leaks. A tiny, almost
invisible leak can penetrate the skin,
thereby requiring immediate medical
attention.
Use wood or cardboard to detect
hydraulic leaks, never use your hands.
13. If equipped with S1050 Adapter Bracket -
Remove lock pins from positions (G) and
pivot S1050 adapter brackets to a comfortable
operating position. Install lock pins at positions
(G).
G
16

5.5 Detaching Stump Grinder From
Tractor
^ WARNING
Prevent serious injury or death caused
by unexpected movement:
1. Park tractor on a level surface.
2. Engage tractor park brake.
3. Disengage PTO.
4. Shut off engine and remove key.
1. Park tractor on a level surface.
2. Lower grinder to the ground.
3. Shut off engine and remove key.
4. Relieve hydraulic pressure. See your tractor
Operator’s Manual.
5. Disconnect hydraulic hoses (A).
6. Disconnect drive line safety chain (B).
7. Support drive line with your hand.
8. Pull collar (C) back toward grinder and slide
off shaft.
9. Remove lynch pin (F) and pin (E).
10. Place top link in storage position.
11. Remove lynch pins (D) from both lower links.
A
C
B
D
E
F
17

1. Verify all reectors and Slow Moving Vehicle
(SMV) sign are visible.
^ WARNING
Prevent injury and equipment damage.
S1050 adapter bracket may contact
operator or tractor when stump grinder
is raised.
Place adapter bracket in fully retracted
position before raising stump grinder.
2. If equipped with S1050 Adapter Bracket -
Remove lock pins from positions (A) and pivot
S1050 adapter bracket to the fully retracted
position as shown. Install lock pins in positions
(A).
A
5.6 Transporting
5.7 Adjusting Swing Speed
1. The swing speed of the grinder can be adjusted
by turning the adjustment knob (A) on the ow
control valve. Do this with grinder in raised
position.
2. To adjust the speed of the grinder to the slowest
setting, turn the adjustment knob (A) until 1 is
visible on the white stalk in the center of the
knob. As you turn the knob, the stalk moves
from 1 to 4, with 1 being the slowest speed and
4 the highest speed.
3. It is recommended to start at position 1. Adjust
the speed up from that point.
A
3. Raise stump grinder to fully raised position.
4. Center the grinder directly behind the tractor
for greater stability.
5. Verify tractor PTO is disengaged.
6. Travel at a reasonable and safe speed.
^ WARNING
To prevent bodily injury from rotating
cutting wheel, be sure to disengage
PTO before transporting grinder.
18
This manual suits for next models
2
Table of contents
Other Baumalight Grinder manuals

Baumalight
Baumalight WB44 User manual

Baumalight
Baumalight S16 User manual

Baumalight
Baumalight STUMP BLASTER 3P24 User manual

Baumalight
Baumalight STUMP BLASTER S24 User manual

Baumalight
Baumalight S40 User manual

Baumalight
Baumalight STUMP BLASTER S24 User manual

Baumalight
Baumalight WLWB44 User manual

Baumalight
Baumalight S14 User manual

Baumalight
Baumalight GXM350 User manual

Baumalight
Baumalight HGW30 User manual