Baumalight GXM350 User manual

GXM350, GXM550 And GXM750
Stump Grinder
OPERATOR’S MANUAL
Issue Date: March 2022

TABLE OF CONTENTS
1 INTRODUCTION ��������������������������������������������������������������������������������������������������������������������������������� 1
1�1 Overview������������������������������������������������������������������������������������������������������������������������������������� 1
1�2 Intended Use And Foreseeable Misuse����������������������������������������������������������������������������������� 1
2 SAFETY������������������������������������������������������������������������������������������������������������������������������������������������ 2
2�1 Safety Alert Symbol And Safety Words����������������������������������������������������������������������������������� 2
2�2 Operational Hazards������������������������������������������������������������������������������������������������������������������ 2
Prepare For Emergencies ���������������������������������������������������������������������������������������������������������� 3
Replace Safety Signs ����������������������������������������������������������������������������������������������������������������� 3
Do Not Allow Riders ������������������������������������������������������������������������������������������������������������������� 3
Lower Operating Speed ������������������������������������������������������������������������������������������������������������� 3
Avoid Rollover ���������������������������������������������������������������������������������������������������������������������������� 4
Avoid Powerlines & Underground Utilities ������������������������������������������������������������������������������ 4
Detach Stump Grinder Safely���������������������������������������������������������������������������������������������������� 4
Hazards From Modifying Equipment ���������������������������������������������������������������������������������������� 5
2�3 Maintenance Hazards���������������������������������������������������������������������������������������������������������������� 6
3 SAFETY SIGNS����������������������������������������������������������������������������������������������������������������������������������� 8
4 OPERATION �������������������������������������������������������������������������������������������������������������������������������������� 10
4�1 Preparation For Use ���������������������������������������������������������������������������������������������������������������� 10
4�2 Hydraulic Connections ����������������������������������������������������������������������������������������������������������� 10
4�3 Machine Components ������������������������������������������������������������������������������������������������������������� 12
4�4 Attach To Excavator ���������������������������������������������������������������������������������������������������������������� 12
4�5 Detach From Excavator ���������������������������������������������������������������������������������������������������������� 13
4�6 Transporting����������������������������������������������������������������������������������������������������������������������������� 13
4�7 Carbide Teeth Break-In������������������������������������������������������������������������������������������������������������ 14
4�8 First Time User Tips ���������������������������������������������������������������������������������������������������������������� 14
4�9 Field Operation ������������������������������������������������������������������������������������������������������������������������ 15
5 SERVICE AND MAINTENANCE������������������������������������������������������������������������������������������������������ 16
5�1 Rotate Cutting Teeth����������������������������������������������������������������������������������������������������������������� 16
5�2 Replace Cutting Teeth �������������������������������������������������������������������������������������������������������������� 17
5�3 Replace Tooth Holder��������������������������������������������������������������������������������������������������������������� 18
5�4 Maintenance������������������������������������������������������������������������������������������������������������������������������ 18
5�5 Zero Leak Case Drain Relief Valve������������������������������������������������������������������������������������������ 19
6 TROUBLESHOOTING ���������������������������������������������������������������������������������������������������������������������� 20
BAUMALIGHT ATTACHMENT WARRANTY������������������������������������������������������������������������������������� 21
ii

1 INTRODUCTION
Congratulations on your choice of a Baumalight
Stump Grinder to complement your stump grinding
operation. This equipment has been designed and
manufactured to meet the needs of a discriminating
buyer for ecient grinding of stumps.
This new and unique design allows us to build it
very economically and makes it a very compact
unit for storage and transport. The self feeding
design of the frame and enhanced visibility make
the stump grinder easy and ecient to operate.
Hydraulic controls are easy to adjust and operate.
The debris shield is standard equipment on all
stump grinders. It is recommended that the stump
grinder never be operated with out one.
Safe, ecient and trouble free operation of your
Stump Grinder requires that you and anyone
else who will be operating or maintaining the
Stump Grinder, read and understand the Safety,
Operation, Maintenance and Troubleshooting
information contained within the Operator’s
Manual.
This manual covers the GXM350, GXM550 and
GXM750 Baumalight Stump Grinder. Use the
Table of Contents as a guide to locate required
information.
Keep this manual handy for frequent reference
and to pass on to new operators or owners. Call
your Baumalight dealer, distributor or the factory
if you need assistance, information or additional
copies of the manuals.
OPERATOR ORIENTATION - The directions left,
right, front and rear, as mentioned throughout this
manual, are as seen from the operator’s seat and
facing in the direction of travel.
1�1 Overview
The stump grinder is designed to be used by an
experienced operator. Operator must be trained
in the safe operation of an excavator and hazards
related to using the stump grinder and the safe use
of the grinder for the intended purpose. Operators
will require personal protective equipment to
reduce the risk from some hazards that cannot be
completely eliminated or controlled by the design
of the grinder.
Care is required to ensure that the stump grinder
will not come across metallic objects, stones or
other materials.
Stump grinders are not designed for use in
hazardous atmospheres where there is a risk
of re or explosion due to ammable gases or
vapors. Use in hazardous, explosive atmospheres
is prohibited. Serious injury or death of the operator
or bystanders may be caused if grinder is misused.
Misuse may also cause damage to the machine
carrying the grinder.
1�2 Intended Use And Foreseeable
Misuse
1

2 SAFETY
You must read, understand and follow the
instructions given by the operating unit
manufacturers, as well as the instructions in this
manual.
The safety information in this manual is denoted
by the safety alert symbol:
^
This symbol means ATTENTION! BECOME
ALERT! YOUR SAFETY IS INVOLVED!
The level of risk is indicated by the following signal
words:
^^ DANGER
DANGER - Indicates a hazardous
situation, which, if not avoided, WILL
result in death or serious injury�
^ WARNING
WARNING - Indicates a hazardous
situation, which, if not avoided, could
result in death or serious injury�
^ CAUTION
CAUTION - Indicates a hazardous
situation, which, if not avoided, could
result in minor or moderate injury�
NOTICE
NOTICE - Indicates a situation that could
result in damage to the equipment or
other property.
2�1 Safety Alert Symbol And Safety
Words
2�2 Operational Hazards
^ WARNING
Prevent death or serious injury�
Read and understand this manual before
operating stump grinder�
Always stop engine and remove key
before leaving operators seat�
Never allow anyone near the stump
grinder during operation�
Travel at a safe speed�
^ WARNING
Prevent death or serious injury from
moving parts�
Moving parts can crush and dismember�
Do not operate without guards and
shields in place�
Disconnect and lockout power source
before adjusting or servicing�
^ WARNING
Use stump grinder only for the designed
applications�
Any other use may result in personal
injury, damage to equipment and may
void the warranty�
2

^ WARNING
Prevent death or serious injury�
Verify stump grinder is locked to
quick attach hitch before operation or
transport�
^ WARNING
Protect from ying debris.
Wear proper safety glasses, goggles,
or a face shield to protect from ying
debris�
Carefully read all safety messages in this manual
and on equipment safety signs. Keep safety signs
in good condition and replace missing or damaged
safety signs.
New equipment components and repair parts must
include the current safety decal.
Learn how to properly operate equipment.
NEVER operate or work around this equipment
without proper instruction, while fatigued or under
the inuence of alcohol, prescription or non-
prescription medication or if feeling ill.
Keep your equipment in proper working condition.
Know the regulations and laws that apply to you
and your industry. This manual is not to replace
any regulations or laws. Additional information
may be found at: www.asae.org or www.osha.gov.
If you do not understand any part of this manual,
contact Baumalight at 866-820-7603.
Prepare For Emergencies
• Be prepared in case of emergencies.
• Keep a re extinguisher and rst aid kit close
to the machine.
• Keep emergency phone numbers close to
your phone.
• Know your address so emergency services
can locate you if an emergency arises.
Replace Safety Signs
• Replace missing or damaged safety signs.
• Safety signs are identied in Section 3 of this
manual.
• Replacement safety signs are available from
your Baumalight dealer.
Do Not Allow Riders
• NEVER lift or carry anyone on stump grinder.
• NEVER use stump grinder as a work platform.
• NEVER allow passengers on stump grinder.
Lower Operating Speed
• Lower operating speed while loading, unload-
ing or performing heavy operations.
• Keep load low and move at slow speeds on
rough or uneven terrain.
3

Avoid Rollover
The equipment may rollover, resulting in death or
serious injury. To help prevent rollover:
• Travel at a slow speed.
• Avoid sharp turns & sudden movement on
slopes.
• Carry loads close to the ground.
• Avoid holes, ditches and other obstructions
which may cause equipment to rollover.
• Balance load so weight is evenly distributed
and load is stable.
• Use caution when operating on slopes and do
not operate on excessively steep slopes.
• Do not exceed load capacity of equipment.
Avoid Powerlines & Underground
Utilities
^ DANGER
Prevent electrocution�
Death or serious injury can result if
equipment comes near or contacts
power lines�
Electrocution can occur without direct
contact�
• Check clearance before raising equipment.
• Have local utilities locate and mark under
ground wires, cables, pipelines and other
hazards before grinding.
DO NOT leave the operator’s seat if any part of the
equipment contacts electric lines or cables.
Detach Stump Grinder Safely
Detach stump grinder on a rm and level surface.
Stump grinder may fall over if detached on unlevel
or soft surface. Be sure people, livestock and pets
are clear of machinery.
Relieve hydraulic pressure before disconnecting
hydraulic hoses.
Raised Attachment
^ WARNING
Crushing hazard�
Raised, unsupported stump grinder can
fall, resulting in death or serious injury�
Never enter the area under a raised
stump grinder�
A raised stump grinder can lower unexpectedly,
resulting in death or serious injury.
NEVER enter area under a raised stump grinder.
Lower stump grinder to ground, engage parking
brake, shut o engine and remove key before
servicing.
4

Hazards From Modifying Equipment
Do not make any alterations to your stump grinder.
Altering may cause your equipment to be unsafe
and may void the manufacturers’ warranty.
Avoid High Pressure Fluids
^ WARNING
Pressurized uids can penetrate the
skin�
Hydraulic hoses can fail from age,
damage and exposure�
Use body and face protection while
searching for leaks� A tiny, almost
invisible leak can penetrate the skin,
thereby requiring immediate medical
attention�
Use wood or cardboard to detect
hydraulic leaks, never use your hands�
Escaping uid under pressure can penetrate the
skin causing serious injury.
Prevent the hazard by relieving pressure before
connecting or disconnecting hydraulic lines. Verify
all connections are tight before applying pressure.
Search for leaks with a piece of cardboard or wood.
Protect hands and body from high pressure uids.
If an accident occurs, see a doctor immediately.
Any uid injected into the skin must be surgically
removed within a few hours or serious infection
may result.
Avoid Wood Dust Inhalation
^WARNING
Drilling, sawing, sanding or machining
wood products can expose you to wood
dust, a substance known to the State of
California to cause cancer�
Avoid inhaling wood dust or use a dust
mask or other safeguards for personal
protection� For more information go to
www�P65Warnings�ca�gov/wood�
^WARNING
Wear an approved dust mask or
respirator�
Follow local, state and federal
regulations�
Avoid Loud Noise
^ WARNING
Prolonged exposure to loud noise can
cause impairment or loss of hearing�
Wear a suitable hearing protective device
such as earmus or earplugs to protect
against objectionable or uncomfortable
loud noises�
5

2�3 Maintenance Hazards
Before servicing, park machine on a rm and
level surface, set parking brake and place a “Do
Not Operate” tag on control panel. Read and
understand this manual. If you do not understand
any part of the manual, contact Baumalight at 866-
820-7603.
Always wear face and/or eye protection, safety
shoes, and other protective equipment appropriate
for the job.
Do not make unauthorized modications. Contact
Baumalight at 866-820-7603. Before you weld,
cut/drill holes, or make any other modications.
Always use Baumalight replacement parts.
^ WARNING
Moving parts can crush and cut�
Keep clear of moving components�
Follow lockout procedure before
servicing�
^ WARNING
Crushing hazard�
Before performing inspections, service
or maintenance:
Park machine on rm, level surface.
Engage excavator parking brake�
Turn engine o and remove key.
Place “Do Not Operate” tag on control
panel�
^ WARNING
Entanglement hazard�
Keep clear of moving components�
Wear proper protective equipment
appropriate for the job�
^ WARNING
Burn hazard�
Hot and high pressure hydraulic oil�
Allow oil to cool before servicing�
^WARNING
Drilling, sawing, sanding or machining
wood products can expose you to wood
dust, a substance known to the State of
California to cause cancer�
Avoid inhaling wood dust or use a dust
mask or other safeguards for personal
protection� For more information go to
www�P65Warnings�ca�gov/wood�
^WARNING
Wear an approved dust mask or
respirator�
Follow local, state and federal
regulations�
6

7
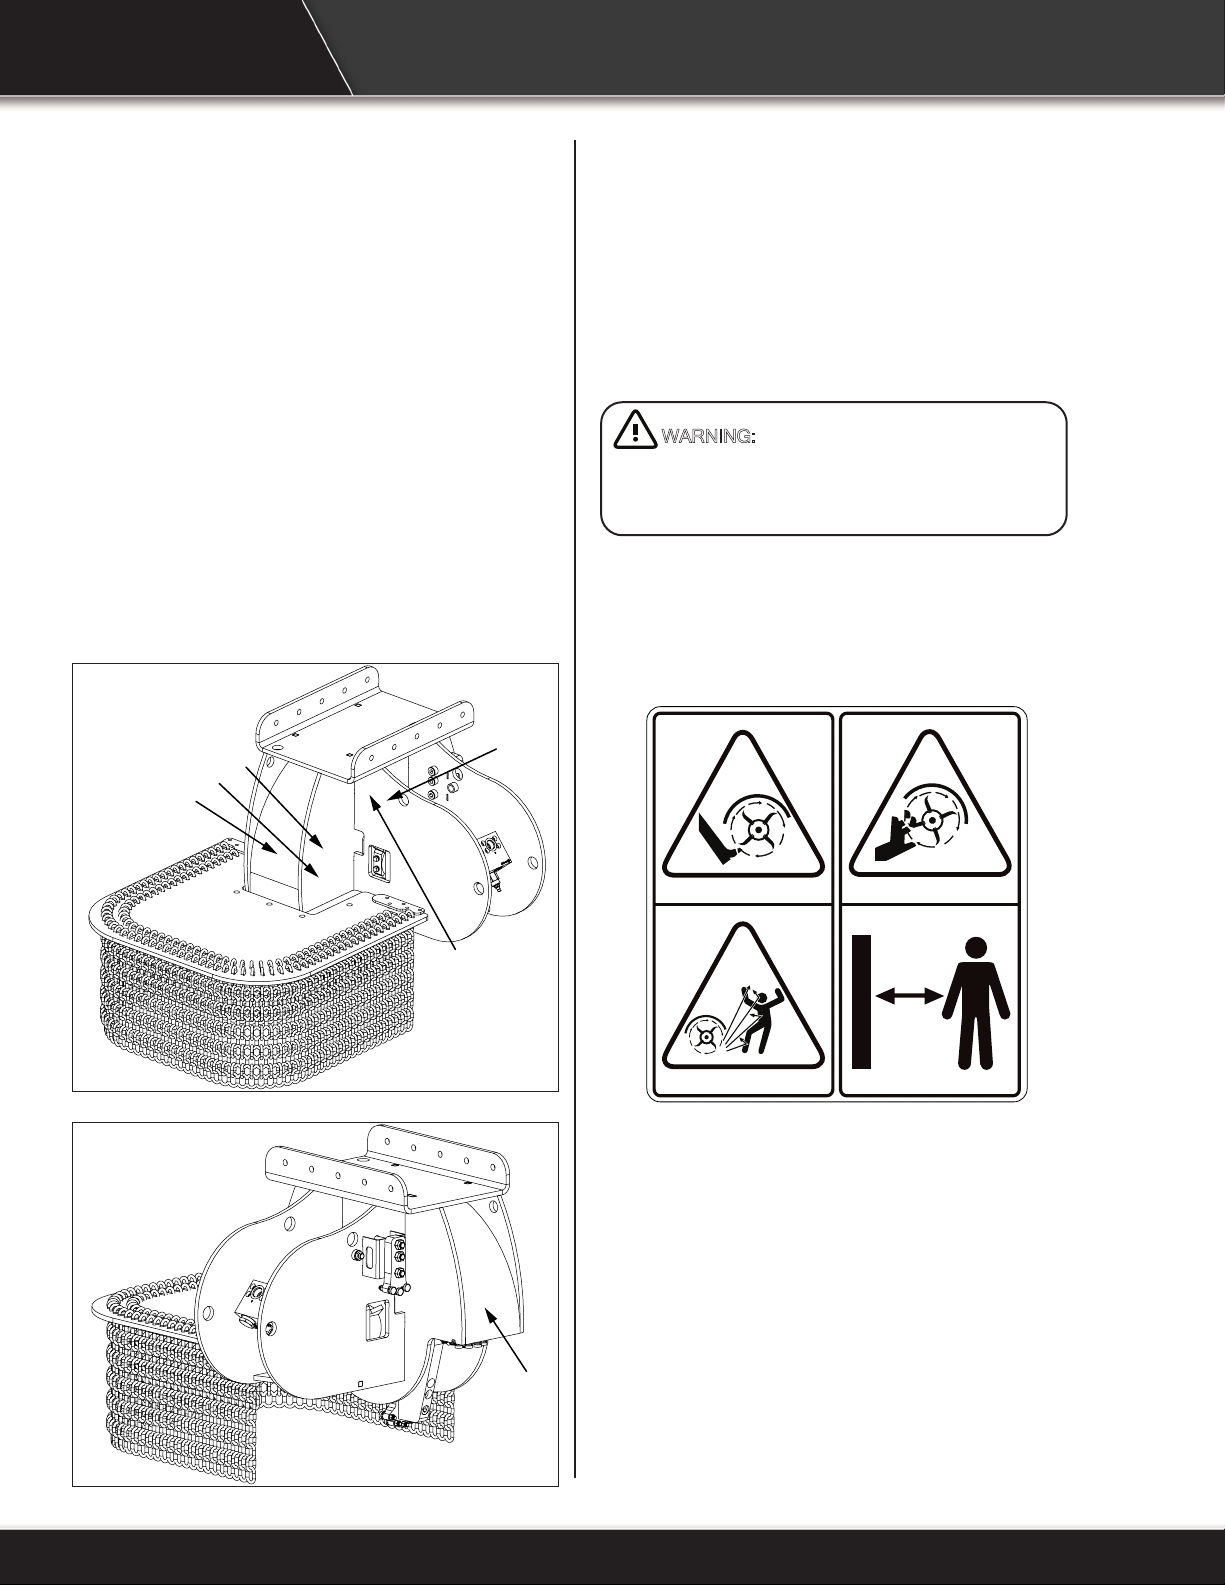
3 SAFETY SIGNS
The two and four panel safety decals are pictorial
and have a yellow background. The panel with a
triangle indicates the potential hazard. The panel
without a triangle indicates how to avoid the
hazard.
If any of the decals are missing, are damaged, or
if you do not understand the decal, please contact
your dealer.
Dashes lines indicate items hidden from view
unless cover is opened.
B
E
D
C
A
B
A. D005262 ^WARNING - P65 warning
information.
WARNING: This product can expose you to chemicals
including 1,3-Butadiene and lead, which are known to the state of
California to cause cancer and birth defects or other reproductive
harm. For more information go to www.P65Warnings.ca.gov.
D005262
B. D005223 ^WARNING - Rotating blade
hazard. Keep back 75m while machine is
operating. Wait for blade to stop before
approaching machine.
D005223
75 M
8

C. D005126 ^ WARNING - Pressurized uid
hazard. Keep away from machine.
D005126
D. D005517 ^WARNING - Remove key before
servicing.
D005517
E. D005125 ^WARNING - Read and understand
safety signs on the machine and operating
instructions in this manual before operating
machine.
D005125
9

^WARNING
Drilling, sawing, sanding or machining
wood products can expose you to wood
dust, a substance known to the State of
California to cause cancer�
Avoid inhaling wood dust or use a dust
mask or other safeguards for personal
protection� For more information go to
www�P65Warnings�ca�gov/wood�
^WARNING
Wear an approved dust mask or
respirator�
Follow local, state and federal
regulations�
Although the stump grinder has been carefully
inspected and checked prior to shipment from
manufacturer, it is recommended that the unit be
thoroughly inspected.
Check all bolts for tightness and remove all
shipping tags, bags, skids, and blocking.
Inspect equipment to verify that nameplates and all
safety warning, caution signs and decals provided
with the equipment are in place and clearly visible.
Visually inspect the stump grinder before each
start up. Check for loose or missing parts and any
damage that may have occurred during moving or
shipping.
Review all excavator pre-start instructions, and
ensure that all recommended steps and procedures
have been followed. The stump grinder must be
lifted in a vertical direction only. Due to the weight of
the rotor the device must be adjusted accordingly.
4 OPERATION
4�1 Preparation For Use 4�2 Hydraulic Connections
^ WARNING
Pressurized uids can penetrate the
skin�
Disconnect and lock out power source
before disconnecting and/or connecting
hydraulic hoses�
The stump grinder is not equipped with hydraulic
hoses. You must connect your excavator pressure,
return and case drain hoses to stump grinder
motor.
Remove caps (A) and connect your pressure hose
to connector (B), return hose to connector (C) and
case drain hose to connector (D).
NOTICE
Prevent equipment damage.
Failure to connect excavator case drain
hose to motor case drain connector (D)
may blow out motor shaft seal.
10

11

^ WARNING
To prevent injury or machine damage
put transmission in “Park”�
Never position yourself between
excavator and stump grinder�
Only experienced and properly trained
operator’s may operate the excavator
and stump grinder�
1. Read and follow all safety instructions.
2. Attach excavator to stump grinder. See
excavator operator’s manual.
3. Verify pins are secure in the correct position.
4. Connect hydraulic hoses. Verify hydraulic
hoses are clear of pinch areas and moving
parts.
5. Move to a clear open area to test functions.
4�4 Attach To Excavator
A. Debris Shield / Backll Blade
B. Hydraulic Motor
C. Mounting Plate
D. Rotor Shield
E. Rotor Wheel
4�3 Machine Components
12

4�5 Detach From Excavator
^ WARNING
Prevent death or serious injury caused
by unexpected movement:
1� Park excavator on a level surface�
2� Engage excavator parking brake�
3� Disconnect hydraulic hoses�
4� Shut o engine and remove key.
1. Park excavator on a level surface.
2. Lower stump grinder to the ground.
3. Shut o engine and remove key.
4. Disconnect hydraulic hoses.
5. Detach excavator from stump grinder. See
excavator Operator’s Manual.
^ WARNING
Prevent death or serious injury�
Disengage hydraulic drive before
transporting�
1. Verify all reectors and Slow Moving Vehicle
(SMV) sign are visible.
2. Raise stump grinder slightly o ground.
3. Verify hydraulics are disengaged.
4. Travel at a reasonable and safe speed.
4�6 Transporting
13

During the rst few hours of use, avoid hitting
stones as much as possible to allow the carbide
teeth to wear slightly. This can be done by keeping
the rotor above ground level. Brand new carbide
tips are razor sharp and can chip and shatter
easily when they hit hard objects. Once the razor
sharpness has worn away, the tips do not chip as
easily. Observing these precautions will extend
the life of the carbide teeth and reduce operating
expenses.
4�7 Carbide Teeth Break-In
Before starting, stand to side of stump grinder and
look at center point on bottom of rotor, this will
appear dierent from the excavator seat and can
be very deceiving.
Operate all functions in an open area with
excavator in idle to get a good feel for the controls,
do not expect to get rst stump done fast.
Run throttle only at half speed for rst time users.
^ WARNING
Always turn o excavator and disengage
hydraulic drive before getting o the
seat and approaching the stump grinder�
^WARNING
Drilling, sawing, sanding or machining
wood products can expose you to wood
dust, a substance known to the State of
California to cause cancer�
Avoid inhaling wood dust or use a dust
mask or other safeguards for personal
protection� For more information go to
www�P65Warnings�ca�gov/wood�
^WARNING
Wear an approved dust mask or
respirator�
Follow local, state and federal
regulations�
4�8 First Time User Tips
14

4�9 Field Operation
^ WARNING
Prevent serious injury or death caused
by unexpected movement:
1� Park excavator on a level surface�
2� Engage excavator parking brake�
3� Disengage hydraulic drive�
4� Shut o engine and remove key.
^ WARNING
Never operate stump grinder when other
people are in the vicinity�
Keep all shields in place�
Do not allow riders on excavator�
^WARNING
Drilling, sawing, sanding or machining
wood products can expose you to wood
dust, a substance known to the State of
California to cause cancer�
Avoid inhaling wood dust or use a dust
mask or other safeguards for personal
protection� For more information go to
www�P65Warnings�ca�gov/wood�
^WARNING
Wear an approved dust mask or
respirator�
Follow local, state and federal
regulations�
1. Attach stump grinder to excavator. See
Attaching/Detaching in this section.
2. If stump is on a grade, position excavator in
low area. This will position stump grinder in
high area for a greater advantage of weight for
stable cutting.
3. Move over stump so rotor torques downward
pushing frame up to avoid binding.
4. Engage rotor and slowly lower it in a controlled
manor to desired cutting depth. Always lower
rotor beside stump, never try cutting down,
always cut sideways.
5. Slowly move into the stump.
6. If rotor stalls, stop motion and rise slightly.
7. After a complete pass, move to home position
and lower rotor to desired position for next
pass.
8. Continue lowering the passes in this manor
until stump is completely removed.
9. When grinding is completed, use backll blade
to level work site.
15

5 SERVICE AND
MAINTENANCE
^ WARNING
Prevent serious injury or death caused
by unexpected movement:
1� Park excavator on a level surface�
2� Engage excavator parking brake�
3� Disengage hydraulic drive�
4� Shut o engine and remove key.
^WARNING
Drilling, sawing, sanding or machining
wood products can expose you to wood
dust, a substance known to the State of
California to cause cancer�
Avoid inhaling wood dust or use a dust
mask or other safeguards for personal
protection� For more information go to
www�P65Warnings�ca�gov/wood�
^WARNING
Wear an approved dust mask or
respirator�
Follow local, state and federal
regulations�
Each tooth can be rotated up to two times before
replacement is necessary.
1. Park excavator and grinder
on a level surface.
2. Lower grinder to the ground.
3. Shut o engine and remove
key.
5�1 Rotate Cutting Teeth
4. Inspect teeth for wear on top edge (A). Once
top edge is worn, rotate tooth so a new edge is
on top (cutting) edge.
5. Loosen locknut on tooth and rotate tooth 1/3
turn. Flat shoulder (B) on tooth will t against
shoulder (C) on tooth holder.
6. Tighten tooth locknut to 65 lb/ft (88 Nm) of
torque.
Note: Parts breakdown can be found on
Baumalight’s website. www.baumalight.com
16

^ WARNING
Prevent serious injury or death caused
by unexpected movement:
1� Park excavator on a level surface�
2� Engage excavator parking brake�
3� Disengage hydraulic drive�
4� Shut o engine and remove key.
^WARNING
Drilling, sawing, sanding or machining
wood products can expose you to wood
dust, a substance known to the State of
California to cause cancer�
Avoid inhaling wood dust or use a dust
mask or other safeguards for personal
protection� For more information go to
www�P65Warnings�ca�gov/wood�
^WARNING
Wear an approved dust mask or
respirator�
Follow local, state and federal
regulations�
1. Park excavator and grinder on a level surface.
2. Lower grinder to the ground.
3. Shut o engine and remove key.
4. Inspect cutting teeth (A) for damage and wear.
Replace individual teeth as needed.
5. Remove locknut, spacer and tooth. Install new
tooth. Flat shoulder (B) on tooth will t against
shoulder (C) on tooth holder.
6. Install spacer and locknut.Tighten locknut to
65 lb/ft (88 Nm) of torque.
5�2 Replace Cutting Teeth
Note: Parts breakdown can be found on
Baumalight’s website. www.baumalight.com
17

5�4 Maintenance
Check cutting teeth every 4 hours of use.
Inspect for any buildup of contamination (dirt,
stones, etc.).
Check hydraulic hoses and ttings for leaks.
Keep cutting teeth in good condition. Unit will cut
faster and remaining teeth will last longer if broken
teeth are replaced.
^ WARNING
Prevent serious injury or death caused
by unexpected movement:
1� Park excavator on a level surface�
2� Engage excavator parking brake�
3� Disengage hydraulic drive�
4� Shut o engine and remove key.
^WARNING
Drilling, sawing, sanding or machining
wood products can expose you to wood
dust, a substance known to the State of
California to cause cancer�
Avoid inhaling wood dust or use a dust
mask or other safeguards for personal
protection� For more information go to
www�P65Warnings�ca�gov/wood�
^WARNING
Wear an approved dust mask or
respirator�
Follow local, state and federal
regulations�
1. Park excavator and grinder on a level surface.
2. Lower grinder to the ground.
3. Shut o engine and remove key.
4. Inspect tooth holders (A) for damage and wear.
Replace individual tooth holders as needed.
5. Remove cutting teeth from holder.
6. Remove mounting hardware on tooth holder
(A). Install new tooth holder, install and tighten
mounting hardware.
5�3 Replace Tooth Holder
7. Install cutting teeth into new tooth holder.
8. Tighten cutting teeth locknuts to 65 lb/ft (88
Nm) of torque.
Note: Parts breakdown can be found on
Baumalight’s website. www�baumalight�com
18
This manual suits for next models
2
Table of contents
Other Baumalight Grinder manuals

Baumalight
Baumalight WB44 User manual

Baumalight
Baumalight S14 User manual

Baumalight
Baumalight STUMP BLASTER S24 User manual

Baumalight
Baumalight S40 User manual

Baumalight
Baumalight STUMP BLASTER S24 User manual

Baumalight
Baumalight STUMP BLASTER 3P24 User manual

Baumalight
Baumalight S16 User manual

Baumalight
Baumalight STUMP BLASTER 3P34 User manual

Baumalight
Baumalight HGW30 User manual

Baumalight
Baumalight WLWB44 User manual


