Baumatic BGT1 User manual

16
SERVICE CENTRE
AUTHORIZED DEALER
CHAP. 8 - DISPOSAL OF THE MACHINE
8.1 - PUTTING THE MACHINE OUT OF SERVICE
If for some reason, you decide to put the machine out of service, make sure
nobody can use it: disconnect it from the mains and eliminate the electrical
connections.
8.2 - DISPOSAL
When the machine is out of service, it can be eliminated. To dismantle the
machine contact a Specialized Centre, paying attention to the different materials
used ( see chap. 1 par. 3.2 ).
WARNING: Before performing any cleaning operation, disconnect the machine
plug from the mains to insulate it from the rest of the installation.
CHAP. 7 - MAINTENANCE
7.1 - GENERAL FEATURES
Before performing any maintenance operations, it is necessary to disconnect the
plug from the socket to insulate completely the machine from the rest of the
system.
7.2 - POWER SUPPLY CORD
Periodically check whether the power supply cord is worn-out and, if this is the
case, please call the “SERVICE CENTRE” to have it replaced.
7.3 - QUARZ TUBES (TOASTERS)
Periodically check whether the quartz tubes of the TOASTERS are worn-out,
because the place of the pliers on the grid and or the moving of the machine from
one place to another, could provoke the breakage of the tubes. In this case, please
call the “SERVICE CENTRE” to have them replaced
1
OPERATING AND MAINTENANCE MANUAL
GRILLERS “EC”line:
ELIO R / ELIO L;
PDM / PDR / PDL / PDX / P2L;
CORT L / CORT R / CORT X / CORT CRÊPES / P1L;
TOP L / TOP M / TOP R / TOP X.
TOASTERS “EC” line:
4Q / 6Q / 12Q.

2
• This manual is meant to provide customers with information on the machine
and its specifications and the necessary operating and maintenance
instructions in order to guarantee the best possible use of the machine and
preserve its efficiency in the long term .
• This manual is to be used by qualified and skilled people well informed about
the use of the machine and its periodical maintenance .
CONTENTS
CHAP. 1 - INFORMATION ON THE MACHINE pag. 4
1.1 - GENERAL PRECAUTIONS
1.2 - SAFETY DEVICES INSTALLED ON THE MACHINE
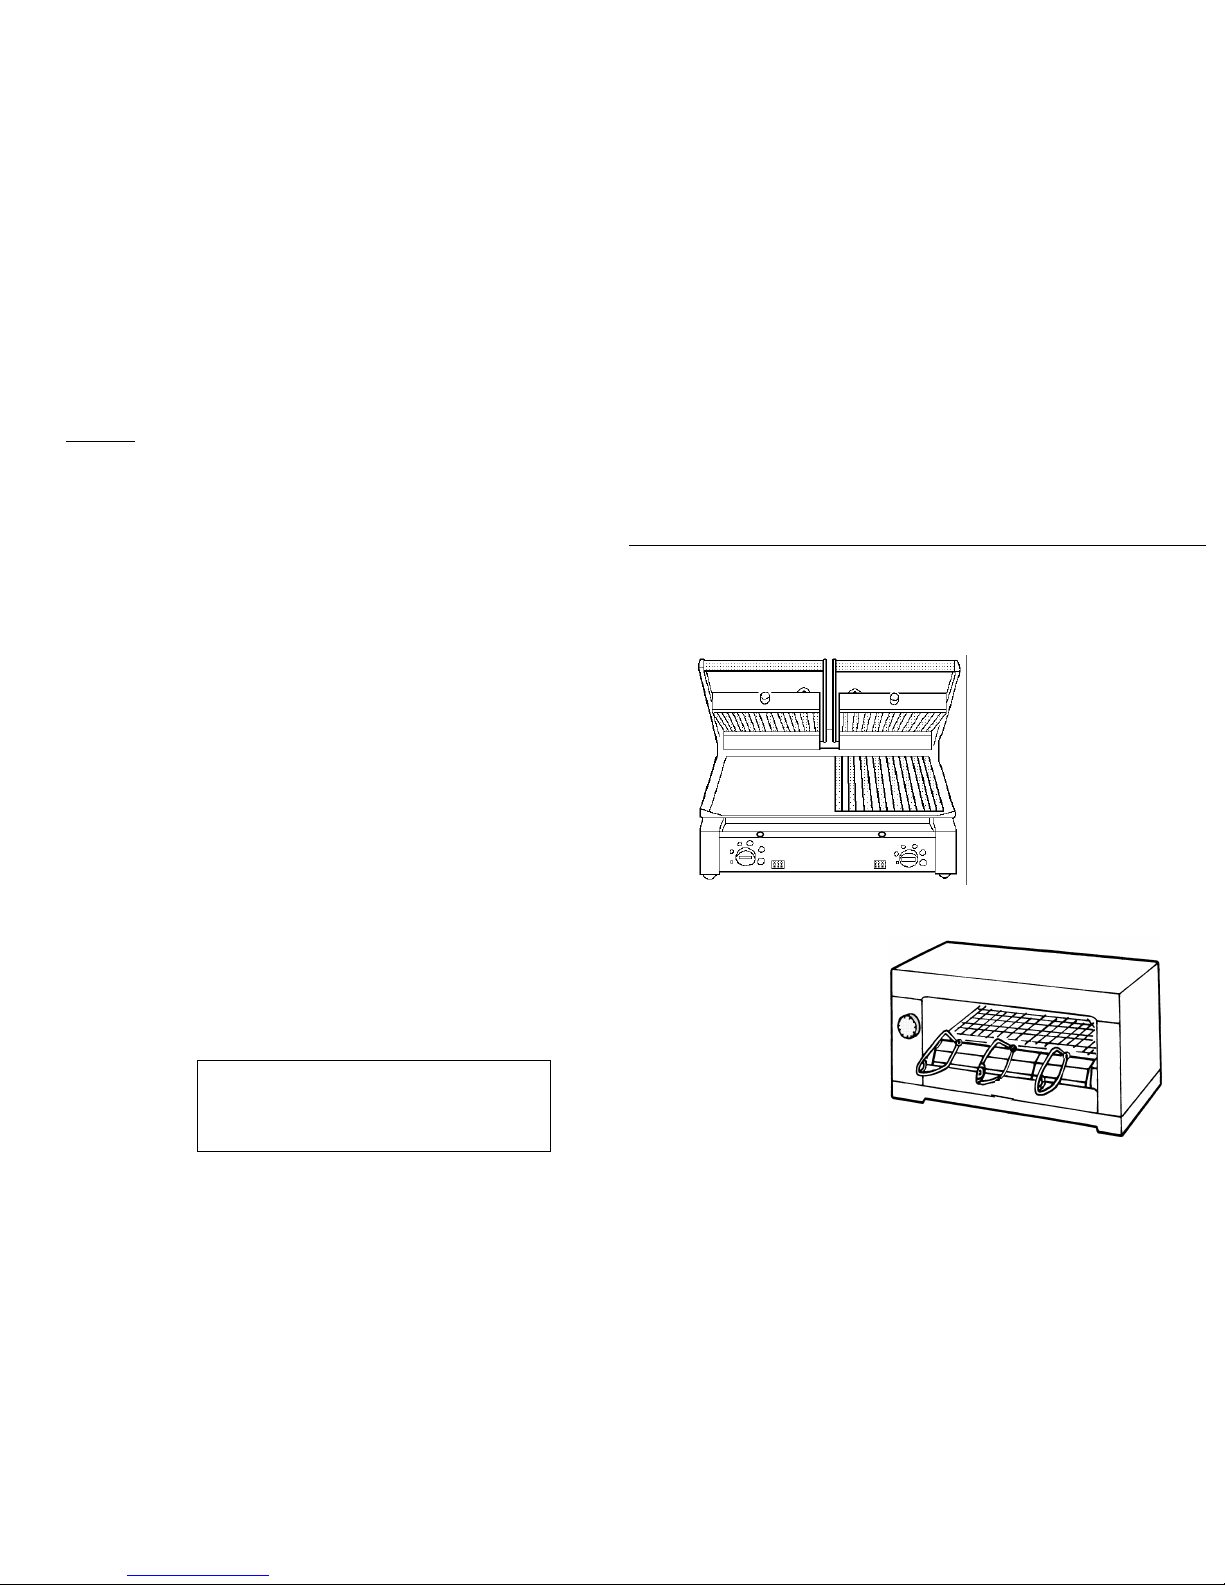
1.3 - DESCRIPTION OF THE MACHINE
1.3.1 - general description
1.3.2 - manufacturing features
1.3.3 - machine components
CHAP. 2 - TECHNICAL DATA pag. 6
2.1 - OVERALL DIMENSIONS , WEIGHT , CHARACTERISTICS . . .
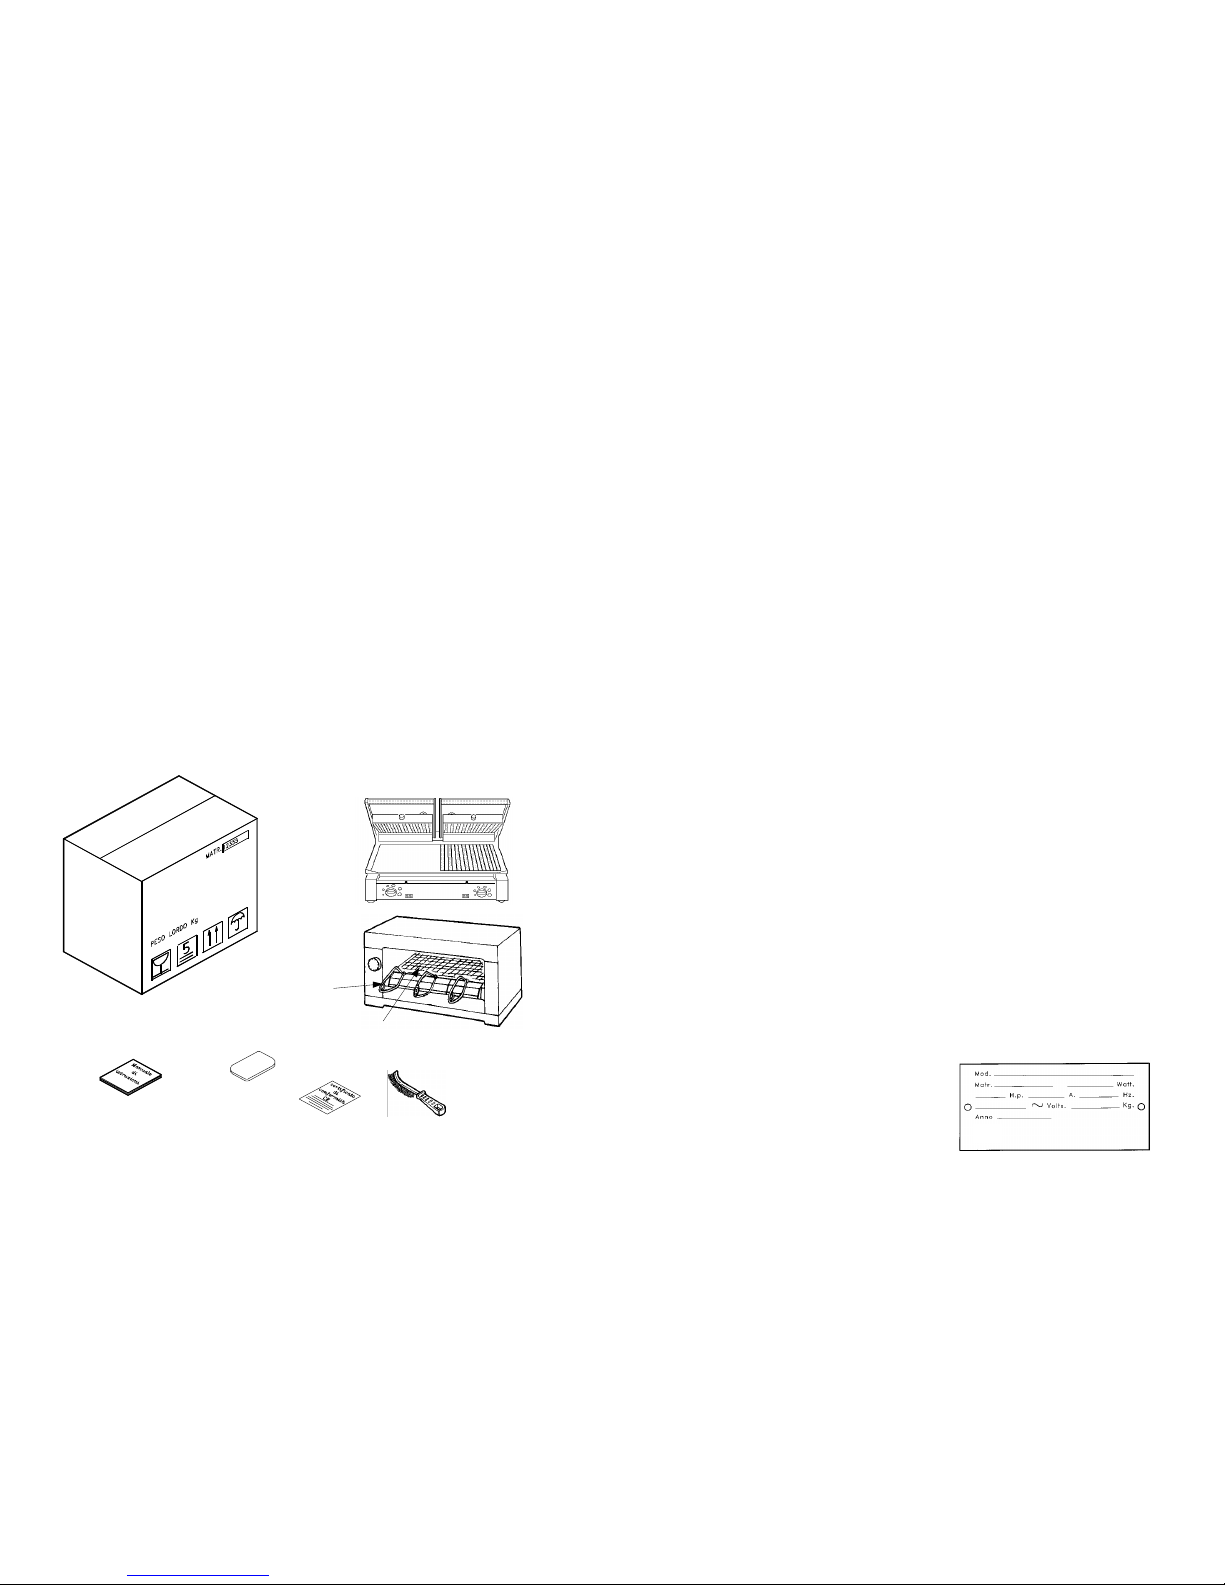
CHAP. 3 - THE ARRIVAL OF THE MACHINE pag. 8
3.1 - DESPATCH OF THE MACHINE
3.2 - PACKAGE CHECK UPON RECEIPT
3.3 - PACKAGE DISPOSAL
CHAP. 4 - INSTALLATION pag. 9
4.1 - SETTING UP OF THE MACHINE
4.2 - ELECTRICAL CONNECTIONS
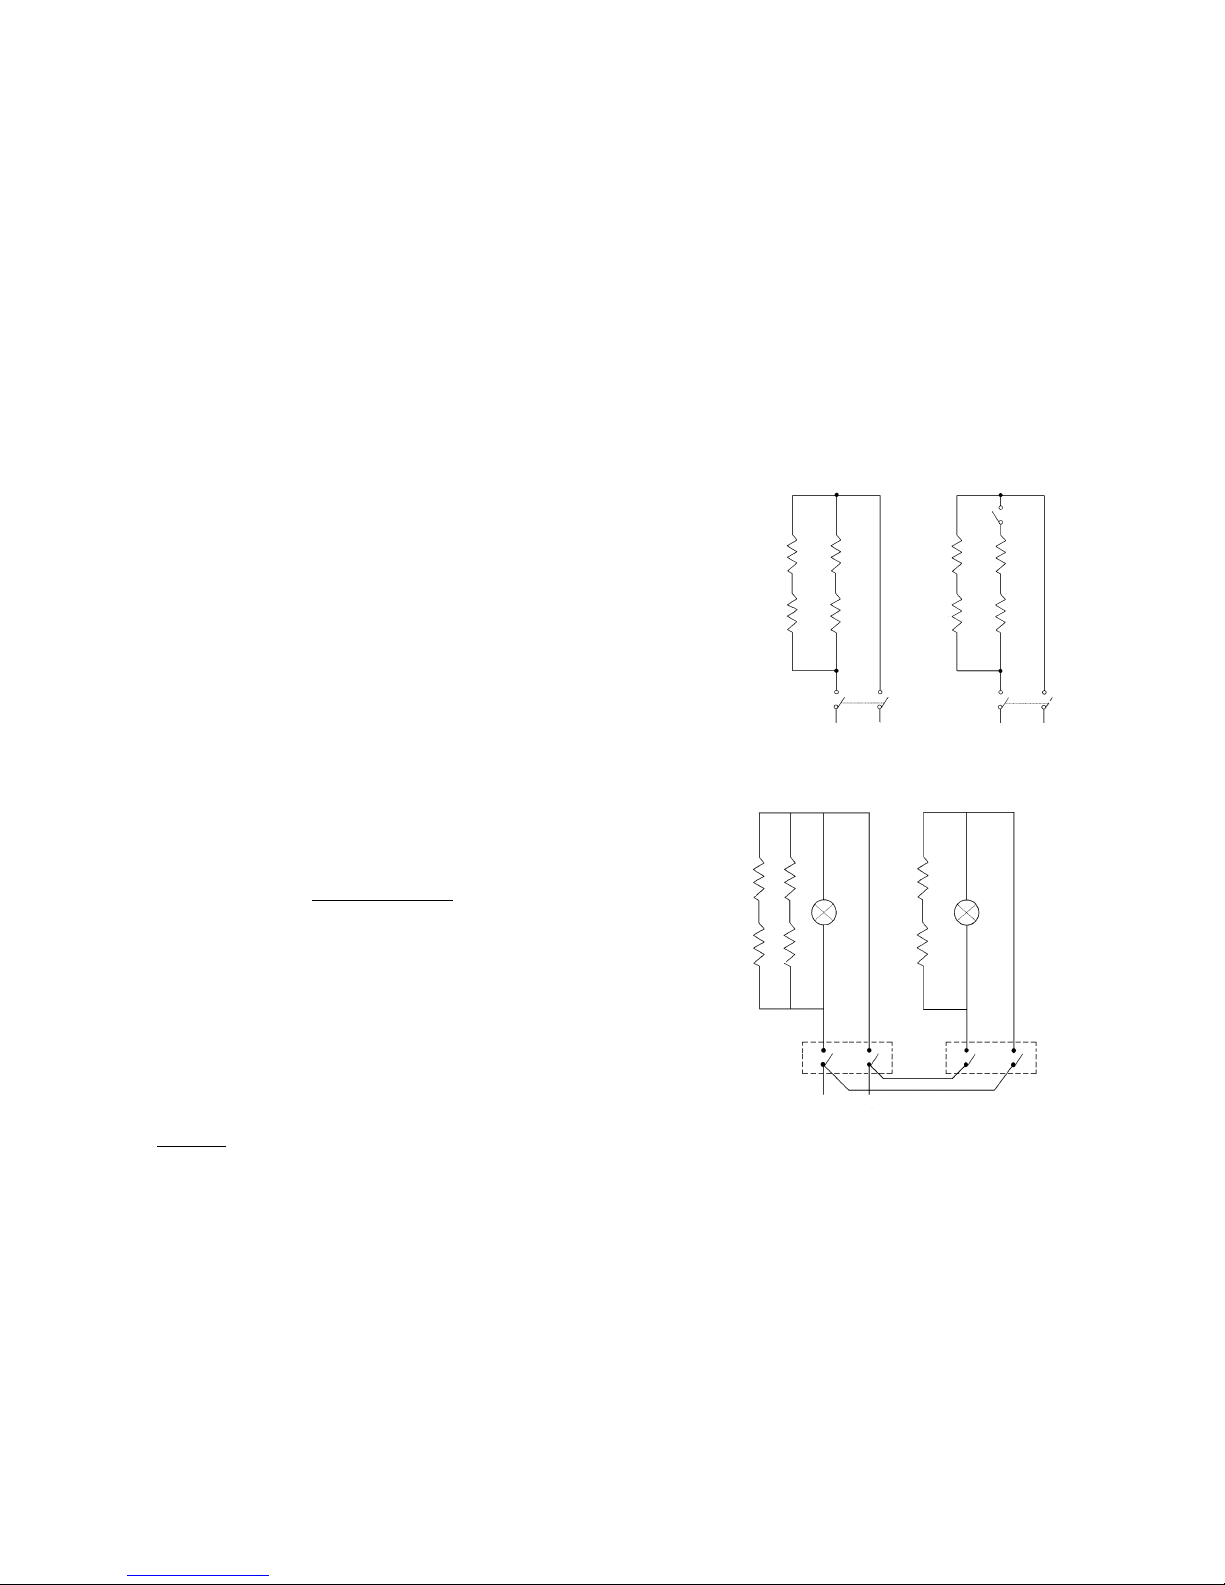
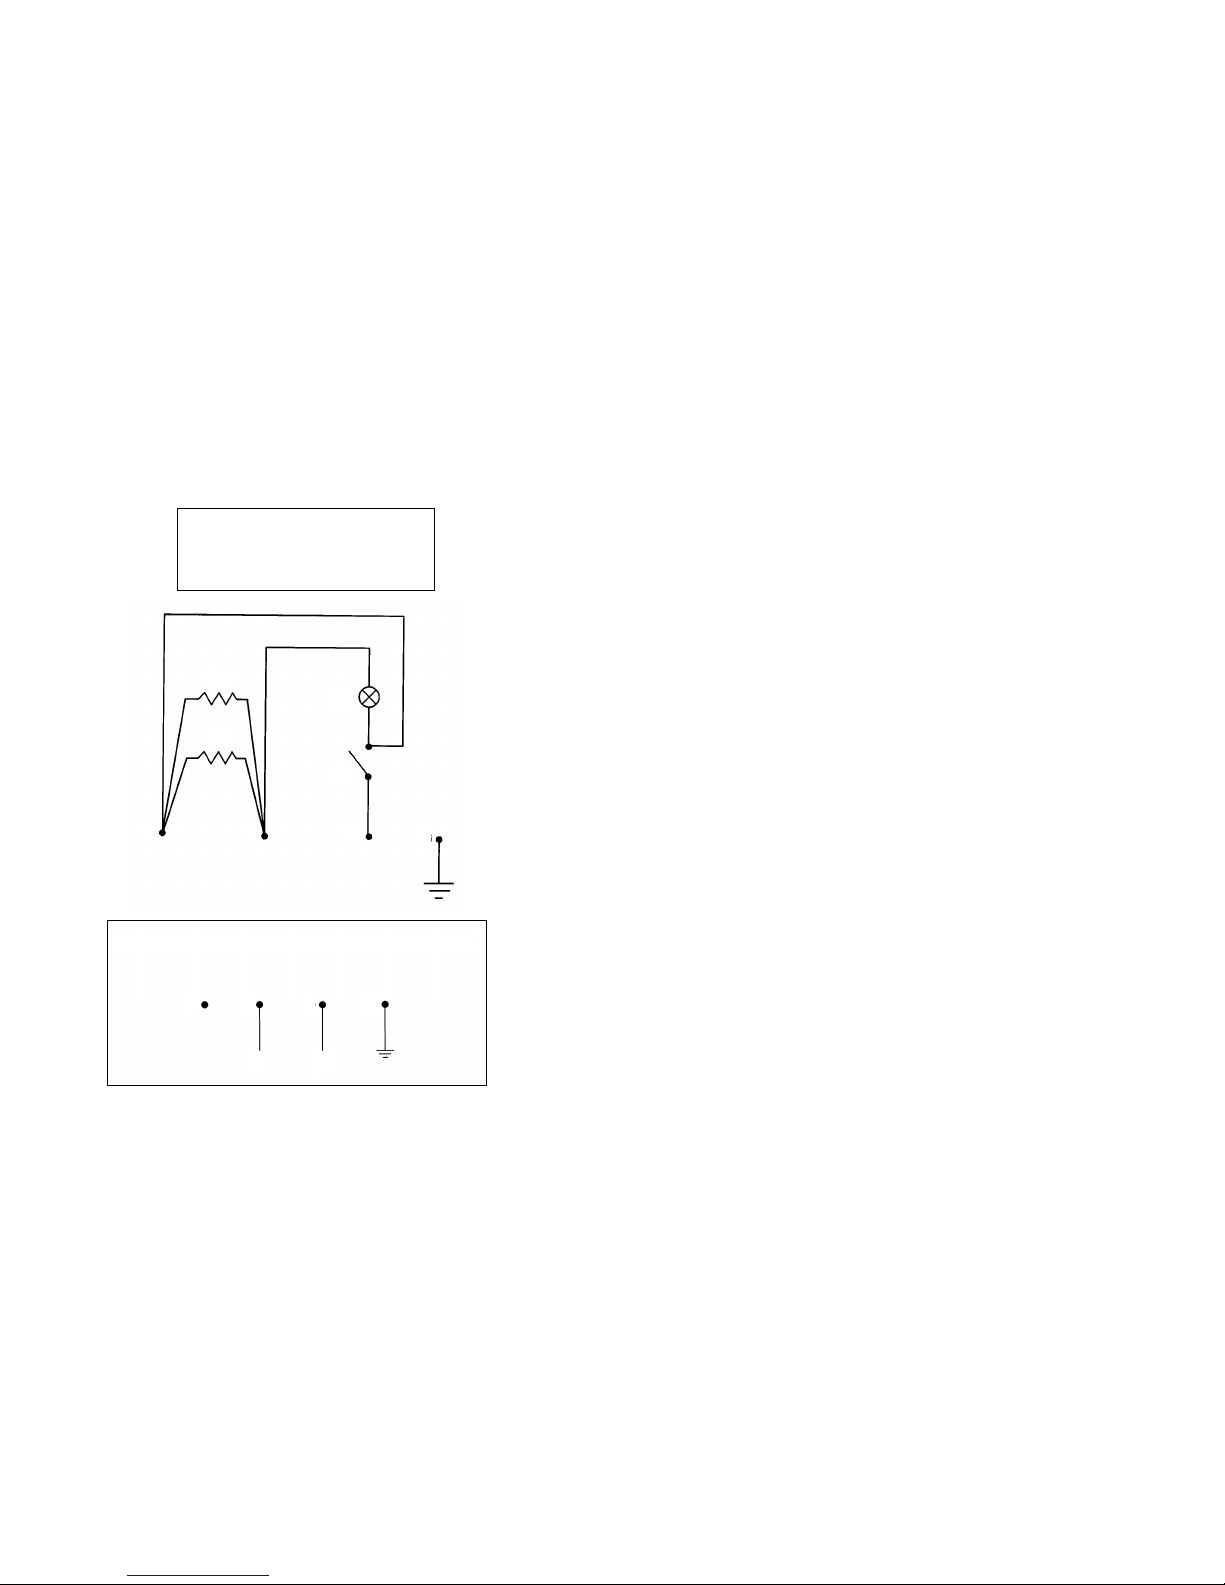
4.3 - ELECTRIC CIRCUIT DIAGRAM OF THE GRILLERS
4.3.1 - electric circuit diagram of the GRILLERS: PDM/R/L/X ; P2L
4.3.2 - electric circuit diagram of the GRILLERS: TOP M/R/L/X
4.3.3 - electric circuit diagram of the GRILLERS: CORT R/L/X; CORT
CRÊPÊS; ELIO R/L; P1L
4.4 - ELECTRIC CIRCUIT DIAGRAM of the TOASTERS
4.4.1 - electric circuit diagram of the TOASTERS: 4Q and 6Q
4.4.2 - electric circuit diagram of TOASTERS: 12Q
4.5 - FUNCTIONING CHECK
INTRODUCTION
15
CHAP. 6 - GENERAL CLEANING
6.1 - INTRODUCTION
• the machine cleaning is an operation that has to be performed at least once a
day and, if necessary more often.
• All the machine parts, that are in contact with the product, must be cleaned
accurately .
• Never clean the machine by means of compressed water or water jets.
• The cleaning of the TOASTERS must be performed when the machine is cold,
clean the quartz lamps with a coton flock soaked in alcohol.
• The cleaning of the GRILLER can be performed when it is hot, scrape with a
metallic brush on the cooking grid several times, pay the maximum
ATTENTION not to touch the cooking surface because this could cause
dangerous burns.
• Take the same care when emptying the collecting tray for gravy.
• It is advisable to perform these cleaning operations when the GRILLER
temperature is at the minimum so that the residual grease which sticks to the
grid can melt.
• It is absolutely forbidden to pour water or other liquids on the grid when it is
hot, because the changes of temperature can provoke their breaking.
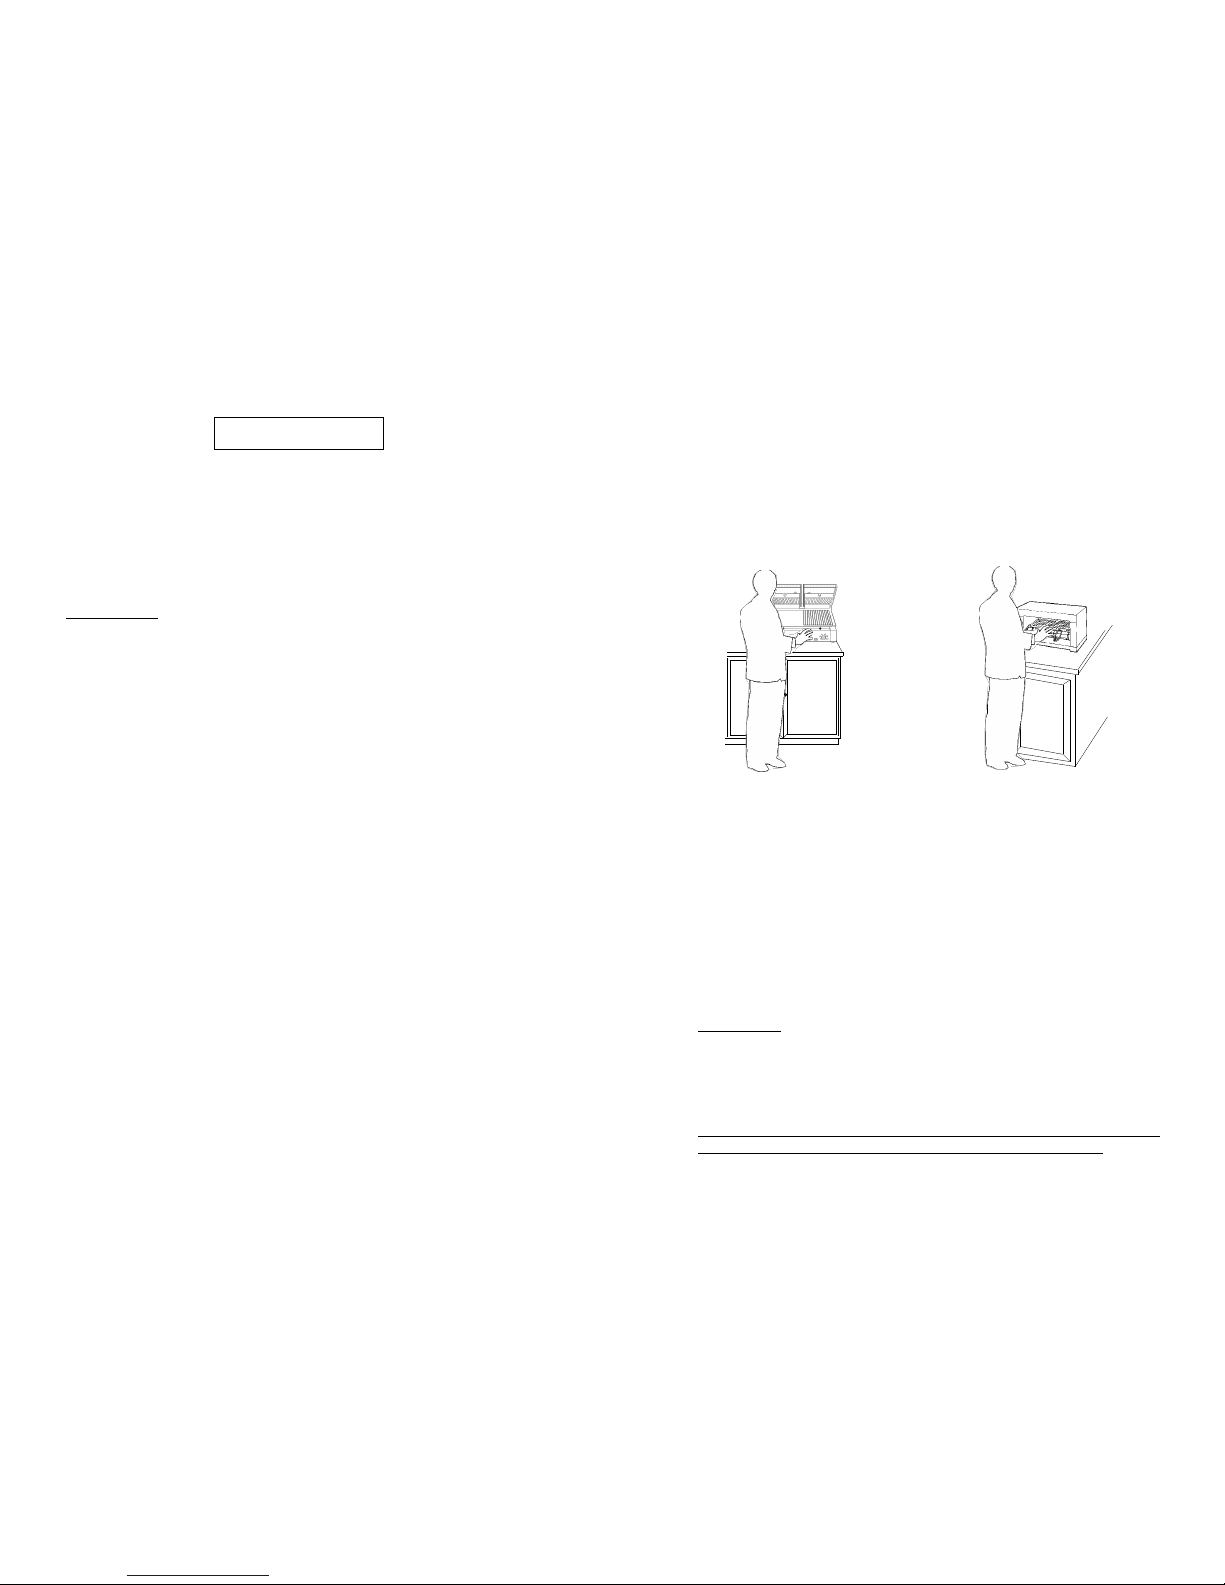
FIG. n°12 - Correct position for cooking
1. place yourself in a correct position (FIG. n°12), avoiding any contact with the
machine;
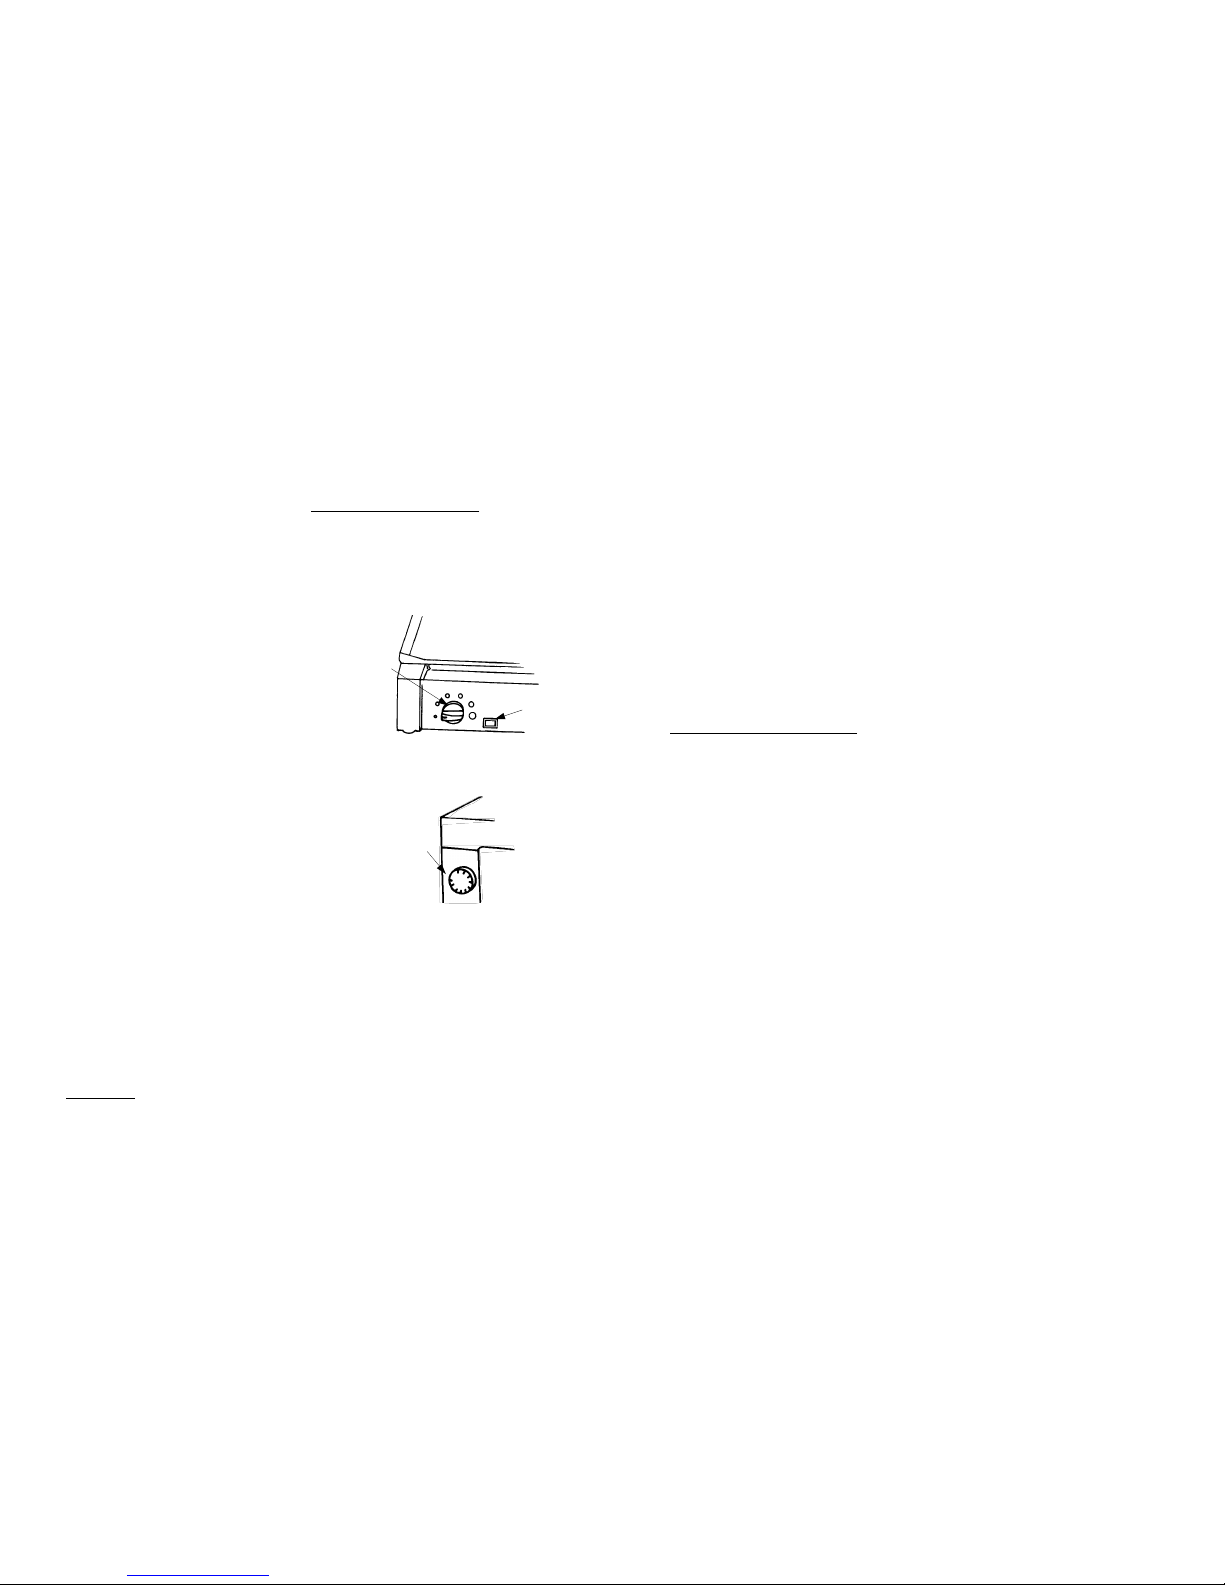
2. choose the correct temperature using the knob (for the grillers) and regulate
the heating intensity for the toasters;
3. when the griller or the toaster is hot, place the product and start the cooking ;
4. at the end of the cooking, remove the residuals from the grid;
5. if the griller is inactive for a long period (f.i. one or two hours), place the knob
to 0°C.

14
4.5 - FUNCTIONING CHECK
To check the machine functioning, just turn the “start” regulator knob clockwise
(placing yourself in front of the knob), and starting from the minimum, observe if
the pilot lamp turns on .
When the pilot lamp is on, it means that the machine is functioning.
CHAP. 5 - USE OF THE MACHINE
5.1 - CONTROLS ON THE GRILLERS
The controls are placed on the machine has shown in the figure below.
5.2 - CONTROLS ON THE TOASTERS
The controls are placed on the machine as shown in the figure below.
FIG. n°10 - Controls position on the grillers
FIG. n°11 - Controls position on the toasters
1
2
1. Thermostat
2. Pilot lamp, it indicates that the resistors are on.
1. Timer, for cooking time regulation.
5.3 - FIRST USE OF THE MACHINE
When the machine is delivered, the steel surfaces are protected with a nylon
anti-scratch film. This film has to be removed accurately before starting the
machine and pay attention to remove eventual residuals of glue.
To perform this operation, do not use sharpening tools, inflammable or abrasive
substances.
The insulating materials used during the manufacturing and the residuals of
grease due to the mechanical installation of single parts, heat and produce smoke,
for this reason, it is necessary to start the machine outside, putting it at the
maximum for 15-20 minutes.
WARNING
:When you place the product on the grid to cook it, this must be hot,
so payattention to residual risks due to burning dangers.
To load the product follow this procedure:
1
3
CHAP. 5 - USE OF THE MACHINE pag. 14
5.1 - CONTROLS
5.2 - FIRST USE OF THE MACHINE
CHAP. 6 - GENERAL CLEANING pag. 15
6.1 - INTRODUCTION
CHAP. 7 - MAINTENANCE pag. 16
7.1 - GENERAL FEATURES
7.2 - POWER SUPPLY CORD
7.3 - QUARTZ TUBES (TOASTER)
CHAP.8 - DISPOSAL OF THE MACHINE pag. 16
8.1 - PUTTING THE MACHINE OUT OF SERVICE
8.2 - DISPOSAL OF THE MACHINE
LIST OF THE FIGURES
FIG. n°1 - General view of the machine pag. 6
FIG. n°2 - Overall dimensions pag. 6
FIG. n°3 - Package description pag. 8
FIG. n°4 - Rating plate - serial number pag. 9
FIG. n°5 - Electric circuit diagram of the GRILLERS: PDM/R/L/X; pag. 10
P2L
FIG. n°6 - Electric circuit diagram of the GRILLERS: TOP R/L/X pag. 11
FIG. n°7 - Electric circuit diagram of the GRILLERS: CORT R/L/X pag. 12
CORT CRÊPES; ELIO R/L; P1L
FIG. n°8 - Electric circuit diagram of the TOASTERS: 4Q / 6Q pag. 13
FIG. n°9 - Electric circuit diagram of the TOASTERS: 12Q pag. 13
FIG. n°10 - Position of controls on the GRILLERS pag. 14
FIG. n°11 - Position of controls on the TOASTERS pag. 14
FIG. n°12 - Correct position to use the machine pag. 15

4
CHAP. 1 - INFORMATION ON THE MACHINE
• 1.1 - GENERAL PRECAUTIONS
• The machine must be operated only by highly qualified people who are fully
aware of the safety measures described in this manual.
• In case of a personnel turn over, training is to be provided in advance.
• Before starting cleaning and maintenance operations, disconnect the plug
from the supply socket.
• Assess the residual risks carefully to carry out cleaning and maintenance.
• Cleaning and maintenance require great concentration.
• A regular control of the electric supply cord is absolutely necessary; a
worn-out or damage cord is very dangerous.
• If the machine shows malfunctions, it is recommended not to use it and to
abstain from trying to repair it; please call the “Service Centre”.
• The GRILLERS and TOASTERS are used for cooking, heating, toasting, and
to grill foodstuffs. Do not use the machine for other uses or for any products
other than foodstuffs.
• The manufacturer is not liable in the following cases:
⇒ if the machine has been tampered by non-authorized personnel;
⇒ if some parts have been substituted by non original spare parts;
⇒ if the instructions contained in this manual are not followed accurately;
⇒ if the machine surface is not cleaned with the right product.
1.2 - SAFETY DEVICES INSTALLED ON THE MACHINE
The mechanical safety devices installed on the machine, described in this manual,
complies with EC 89/392 and mod. EC 91/368, 92/31, 93/44, 93/68.
The electrical safety devices installed on the machine, described in this manual,
complies with EC 73/23, 89/336, mod. EC 91/368, 92/31, 93/44, 93/68 and
regulations EC EN 60335-1, EN 55014.
Even though the GRILLERS and TOASTERS are provided with electrical and
mechanical protections (when the machine is working and for maintenance and
cleaning operations), there are still RESIDUAL RISKS (EEC 89/392 point
1.7.2) that cannot be eliminated completely, these risks are mentionned in this
manual under WARNING
. These risks are scalds caused by the loading and
13
4.4 - ELECTRICAL CIRCUIT DIAGRAM OF THE TOASTERS (see
figure n°8/9)
FIG. n°8 - electrical circuit diagram of the TOASTERS: 4Q; 6Q
4.4.2 - electrical circuit diagram of the TOASTERS: 12Q
FIG. n°9 -Electrical circuit diagram of the TOASTERS: 12Q
NORMAL COMMUTATOR
R
R
RR
R
R
TIMER TIMER
230 V 230 V
R
R
LS LS
R
RR
R
TIMER TIMER
230V
R
R

12
4.3.3 - electrical circuit diagram of the GRILLERS: CORT R/L/X; CORT
CRÊPÊS
ELECTRICAL CIRCUIT DIAGRAM
R1 - R2 = RESISTORS
LS = PILOT LAMP
T1 = THERMOSTATS
FIG. n°7 - electrical circuit diagram of the GRILLERS: CORT R/L/X; CORT
CRÊPES ; ELIO R/L; P1L
CONNECTION 115 V MN / 220 ÷ 240 V MN
F N
23G
1
3 G21
T1
R2
R1
LS
5
unloading of the product, or other kind of injuries due to the maintenance
operations.
1. 3 - DESCRIPTION OF THE MACHINE
1.3.1 - General description
Our firm has designed and manufactured the GRILLERS and TOASTERS to
cook, heat, toast, grill foostuffs (as fish, meat, vegetables, etc.) and to guarantee:
• the highest degree of safety in functioning, cleaning and maintenance;
• the highest hygienic standard due to an accurate choice of materials which
come into contact with the foodstuffs;
• the lowest loss of heat produced by the resistances;
• solidity and stability of all the elements;
• great handiness.
1.3.2 - Manufacturing features
The TOASTERS are completely made of stainless steel AISI 430. This material
guarantees the contact with the food (hygienic) and high resistance to acids, salts
and oxidation processes.
The structure of the GRILLERS PD-R,M,L; CORT R-L; ELIO R-L is made of
stainless steel AISI 430 and the cooking gridirion is made of a special cast iron
treated with vetrified food enamel, this guarantees hygienic conditions and high
resistance to acids, salts and oxydation processes. The structure of the PD-X and
the CORT-X is made of stainless steel AISI 430 and the cooking grid is made of
stainless steel AISI 304.

6
GRILLERS TOASTERS
1 Lower cooking gridirion Frame
2 Thermostat Upper cover
3 Functioning pilot lamp Timer
4 Feet Feet
5 Collecting tray for gravy Grid
6 Upper cooking grid Pliers
7 Crumb collecting tray
1.3.3 - Machine components
FIG. n°1 - General view of the machine
LEGEND :
CHAP. 2 - TECHNICAL DATA
2.1 - OVERALL DIMENSIONS, WEIGHT, CHARASTERISTICS...
FIG. 2 - Overall dimensions drawing
6
1
23
5
4
1
567
3
2
4
A
B
C
D
AB
C
11
4.3.2 - electrical circuit diagram of the GRILLERS : TOP L/M/R/X
FIG. n°6 -electrical circuit diagram of the GRILLERS: TOP L/M/R/X
R1 - R2 = RESISTORS
LS = PILOT LAMP
T1 - T2 = THERMOSTATS
ELECTRICAL CIRCUIT DIAGRAM
TERMINAL BOARD
CONNECTION 220 ÷ 240 V
F
N
2 3 G1 2 3
1 G
TERMINAL BOARD
CONNECTION 400 V + N
SN
2 3 G1 2 3
1 G
R
2 3 G
1 2 31
T2T1
R2R1
LS
LS

10
4.3 -ELECTRICAL CIRCUIT DIAGRAM OF THE GRILLERS (see figure
n°5/6/7)
FIG. n°5 -electrical circuit diagram of the GRILLERS: PDM/R/L/X; P2L
ELECTRICAL CIRCUIT DIAGRAM
R1 - R2 - R3 - R4 = RESISTORS
LS = PILOT LAMP
T1 - T2 = THERMOSTATS
M1 - 3 = TERMINALS
K
TERMINAL BOARD
CONNECTION 400 V + N
TERMINAL BOARD
CONNECTION 220 ÷ 240 V
FN
2 3 G1 2 31 G
2 3 G1 2 31 G
R N S
2 3 G
1 2 3
1
T2T1
R4
R2
R3
R1 LSLS
7
TAB. n°1 - Overall dimensions and technical features of the GRILLERS.
Models U.m. ELIO
L/R CORT L/R/X
CORT
CRÊPÊS P1L
PD
R/L/M/X
P2L
TOP
R/L/M/X
Lenght A mm 260 380 515 515
Width B mm 500 500 500 340
Height C mm 500 500 500 170
Cooking space
dimension mm 240x255 355x255 500x255 500x255
Supply 230V / 50-60Hz
115V / 50-60Hz 230V / 50-60Hz
230-400V / TF+N 50-60Hz
Power W 1550 W 1550 W 3100 W 1700 W
Net weight Kg 15 21 31 18
Models U.m. 4 Q 6 Q 12 Q
Lenght mm 360 475 475
Width B mm 265 265 265
Width C mm 400 400 400
Height D mm 240 240 365
Number of
toasts n° 4612
Supply Mn 230V / 50Hz 230V / 50Hz 230V / 50Hz
Power W 1600 W 2000 W 3000 W
Net weight Kg 678
WARNING: The electrical characteristics for which the appliance is designed
are indicated on the reference plate applied on the side of the machine; before
connecting to power supply, please read paragraph 4.2.
TAB. n°2 - Overall dimensions and technical features of the TOASTERS.

8
FIG. n°3 - Package description
c)
b)
a)
d)
e) f)
g)
h)
CHAP.3 - THE ARRIVAL OF THE MACHINE
3.1 - DESPATCH OF THE MACHINE (see FIG. n°3)
The GRILLERS and the TOASTERS are accurately packed and then despatched
from our warehouse.
The package of the grillers includes:
a) a strong cardbox + inside protections;
b) the machine;
c) this manual;
d) scraper or brush (f) in accordance with the model;
e) EC conformity declaration;
The package of the toasters includes:
a) a strong cardbox + inside protections;
b) the machine;
c) this manual;
e) EC conformity declaration;
g) the pliers;
h) the protective grids.
9
3.2 - PACKAGE CHECK UPON RECEIPT
If no external damage is evident on the package upon its arrival, open it and check
that all the components are inside (see FIG. n°3). If the package has suffered
rough handling, bumps or crashes, the carrier must be informed about any
damage; moreover a detailed report on the extent of the damage caused to the
machine must be filled within three days from the delivery date shown in the
shipping documents.. Do not overturn the package!! When the package is
transported, make sure the box is lifted by the 4 corners (parallel to the ground).
3.3 - PACKAGING DISPOSAL
The components of the packaging (cardboard, eventual pallets, plastic straps and
polyurethane) are urban solid waste; therefore they can be easily disposed.
If the machine has to be installed in countries where specific regulations are in
force, packaging must be disposed in compliance with them.
CHAP. 4 - INSTALLATION
4.1 - SETTING UP OF THE MACHINE
The machine must be installed on a working table suitable for its overall
dimensions shown in Tab. 1-2, therefore it must be adequately large, well
levelled, dry, smooth, resistant, stable and placed at a height of 80 cm from the
ground.
Moreover the machine must be installed in a room with max. 75% not saline
humidity at a temperature between +5°C and +35°C; that is to say in a place that
does not provoke the machine failure.
4.2 - ELECTRICAL CONNECTIONS
The machine is equipped with a power supply cord which section is adequate to
the absorb power and a plug.
To connect the machine, follow the indication of the rating plate - serial number
(see FIG. n°4).
Check that the earthing is fully operational.
Moreover check that the features on the rating plate - serial number (see FIG. n°4)
correspond to the features shown in the consignment and delivery note, and that
the disconnecting plug and the socket are easy to reach when the machine is
functioning.
FIG.n°4 Rating plate-serial number
Table of contents
Other Baumatic Grill manuals