Bayby BBP 1000 User manual

Manual breast pump EN
1
Table of Contents
Introduction .......................................................................... 2
Safety instructions and important notes ..................................................... 3
Description of the product ............................................................... 4
Assembling and disassembling the breast pump .............................................. 5
Assembling and disassembling feeding bottles ................................................ 5
Using the breast pump ................................................................. 6
Tips and advice for using the breast pump .................................................. 7
Storing and heating up breast milk . . . . . . . . . . . . . . . . . . . . . . . . . . . . . . . . . . . . . . . . . . . . . . . . . . . . . . . . . 7
Troubleshooting ....................................................................... 8
Cleaning and sterilisation ................................................................ 8
Storage ............................................................................. 9
Technical specifications ................................................................. 9
Explanation of symbols used on the product, its accessories and packaging ......................... 9

Manual breast pump
EN
2
Introduction
■It is generally accepted that breast milk is the natural diet for an infant providing the necessary nutrients
for growth and protection against infections. A breast milk pump is a suitable additional accessory for
breastfeeding mothers. It is particularly useful in situations where the mother is not able to breastfeed at
regular intervals or when it is not possible to breastfeed directly from the breast, e.g. due to painful or fissured
breast nipples and last but not least it helps alleviate engorgement, a painful condition where breasts are
overfilled and expression of a certain amount of milk is necessary.
■The BBP 1000 Bayby manual breast pump is equipped with a two-phase system that simulates an infant's
natural sucking action. In the first phase, the fast suction cycle is emulated, by which the breast nipple is
stimulated to induce the lactation of breast milk from the mammary gland, resulting in gentle expression.
This is followed by the second phase where a deeper slower suction action of the infant is emulated. In this
phase, breast milk is expressed from the breast nipple and pumped into a bottle.
■The silicone breast flange is equipped with a massaging function that effectively stimulates the breast to
evoke the breast milk lactation process, whilst designed to prevent reverse milk flow when it is pumped out.
■The basic accessories for the breast pump include a wide-neck feeding bottle and an adapter enabling the
use of narrow-neck feeding bottles.

Manual breast pump EN
3
Safety instructions and important notes
■Only use the breast pump in accordance with the instructions included in this user's manual. Not adhering
to these instructions may result in incorrect operation of the breast pump or may damage it. Keep this user's
manual for future use.
■This breast pump may be handled by children 8 years of age and older or by persons with physical or
mental impairments or by inexperienced persons, if they are properly supervised or have been informed how
to handle it in a safe manner and understand the potential dangers. Children must not play with the breast
pump and its accessories.
■Only use the breast pump with original accessories.
■For hygiene reasons, the breast pump is intended for repeated use by only a single user.
■Do not use the breast pump outdoors, do not expose it to direct sunlight or put it down on an electric or
gas stove.
■The breast pump is not intended to be used in the shower or bath.
■Do not use the breast pump in the event of excessive fatigue or sleepiness or while driving a motor vehicle.
■We do not recommend using the breast pump during pregnancy as this could induce childbirth.
■Do not attempt to take the breast pump off the breast while milk is being expressed. First, stop expressing
milk and only then release the breast from the breast flange A2.
■In the event that you feel an unpleasant or painful pressure while the milk is being expressed, stop
expressing milk and take the breast out of the breast flange A2. Perform a gentle massage and heat up the
breast in the shower and then repeat the expression process. If problems persist, please consult a lactation
consultant or your doctor.
■Clean and sterilise the breast pump according to the instructions contained in chapter "Cleaning and
sterilisation".
■Cleaning may be performed by children if they are older than 8 years of age and under supervision. However,
they must not perform sterilisation due to the risk of scalding.
■Do not use the breast pump if it is in any way damaged.
■Have all repairs or adjustments performed at an authorised service centre. By tampering with the appliance
you risk voiding your legal rights arising from unsatisfactory performance or quality warranty.
■We recommend saving the original box, packaging material, receipt and responsibility statement of the
vendor or warranty card for the duration of warranty. It is appropriate to move the breast pump in its original
box.

Manual breast pump
EN
4
Description of the product
A
19
8
0
qa
qs
qd
qf
qg
2
3
4
5
6
7
1Dust cap for the silicone breast pad
2Silicone breast pad
3Breast pump body
4Protective nipple cap
5Silicone nipple
6Bottle opening cap
7Bottle adaptor for the bottle opening cap A6
together with the nipple A5to be screwed on
to a narrow-neck feeding bottle
8Cylinder cover
9Silicone diaphragm
0Piston
qa Handle
qs Flap
qd Wide-neck feeding bottle (volume 140ml)
qf Bottle cover
qg Bottle stand
Replacement accessories contained in the original packaging of the breast pump:
1x flap Aqs, 1x piston A0.
All parts are made from a material that does not contain BPA (Bisphenol A).

Manual breast pump EN
5
Assembling and disassembling the breast pump
■Before you start assembling the breast pump, clean and sterilise the individual parts according to the
instructions contained in the chapter "Cleaning and sterilisation" and thoroughly wash your hands.
■Always assemble the breast pump according to the following instructions. Otherwise the suction intensity
may decline.
■Check that no part of the breast pump is damaged or worn out and that all parts that will be used during the
assembly are dry. Damaged or worn out parts must be replaced with new ones. To order replacement parts,
please contact an authorised service centre.
■Slide the piston A0into the hole in the silicone diaphragm A9and push it until the piston A0passes
through the hole in the silicone diaphragm A9down to its bottom edge.
■Insert the silicone diaphragm A9into the breast pump body A3and push it in until the silicone diaphragm
A9properly fits into the breast pump body A3and its edges are located over the rim of the breast pump
body A3.
■Place the groove of the handle Aqa under the piston A0and gently push it in until you hear it click in. The
objective is for the handle Aqa to fit into the tab on the breast pump body and for it to be properly fastened
on the breast pump body A3.
■For gentle stimulation expression, place the handle Aqa in the first position on the piston A0. For strong
expression, which emulates the deeper and slower sucking action of the baby, place the handle Aqa on to
the second position on the piston A0. Figure B 1and2.
B
1First stimulation phase with gentle expression 2Second expression phase with strong expression
■Place the cylinder cover A8on to the breast pump body A3with the handle Aqa positioned according to
the procedure above, so that the handle Aqa fits into the hole in the cylinder cover A8and gently push it in
so that the cylinder cover A8snaps on to the breast pump body A3and correctly holds the handle Aqa .
■Insert the silicone breast pad A2into the brace on the breast pump body A3and check that it fits tightly
in the brace on the body of the breast pump A3.
■Attach the flap Aqs by pushing its wider part into the bottom part of the breast pump body A3so that the
narrower part of the flap points outwards from the breast pump body A3.
■Screw a bottle Aqd on to the underside of the breast pump body A3. Place the bottle into the bottle stand
Aqg.
■To disassemble the breast pump proceed in the reverse sequence.
Assembling and disassembling feeding bottles
■The instruction below describe how to assemble a feeding bottle and how to close it if you wish to store
breast milk in it.

Manual breast pump
EN
6
■Before you start assembling the feeding bottle, clean and sterilise the individual parts according to the
instructions contained in the chapter "Cleaning and sterilisation" and thoroughly wash your hands.
■Assemble the feeding bottle by placing the nipple A5into the bottle screw ring A6and then screw the
bottle opening cap A6together with the nipple A5on to the feeding bottle Aqd. If you wish to use a
narrow-neck feeding bottle, connect the adapter A7to the bottle opening cap A6and nipple A5from
underneath and then screw this assembly on to the narrow-neck bottle. If you do not use the feeding bottle
immediately after assembling it, we recommend that you place the protective nipple cap A4on to the bottle
opening cap A6and nipple A5, which will protect the nipple A5against dust.
■If you wish to store the milk in the bottle, close it according to the following instructions: Turn the bottle screw
ring A6so that the opening with the thread for screwing on the feeding bottle Aqd points downwards. Place
the bottle closing cap Aqf with the convex side pointing downwards in the centre of the bottle screw ring
A6and push it down thoroughly along its perimeter until an audible click is heard.
■Turn the bottle bottle cover Aqf so that the bottle screw ring A6is pointing upwards and screw it on to the
neck of the feeding bottle Aqd. Now the feeding bottle Aqd is closed.
■You can check for leaks by turning the feeding bottle Aqd with the bottle bottle cover Aqf upside down.
Note
Store and heat the milk according to the instructions contained in chapter Storing and heating up breast
milk.
■For disassembly of the feeding bottle, proceed in the reverse sequence.
Using the breast pump
■Prior to expressing breast milk, thoroughly wash your hands and wipe the breast with a wash cloth (ideally
a disposable type) dipped in clean warm water.
■Seat yourself comfortably in a chair or armchair and rest your back against a backrest. It is not appropriate
to express breast milk when bending over. Take the breast pump out of the bottle stand Aqg.
■Check the position of the handle Aqa on the piston A0and check that it is in the correct expression phase
position that you wish to use.
Setting the expression phase and intensity:
■For gentle stimulation expression, place the handle Aqa in the first position on the piston A0.
■For strong expression, which emulates the deeper and slower sucking action of the baby, place the handle
Aqa on to the second position on the piston A0. Figure C 1and2.
C
1First stimulation phase with gentle expression 2Second expression phase with strong expression

Manual breast pump EN
7
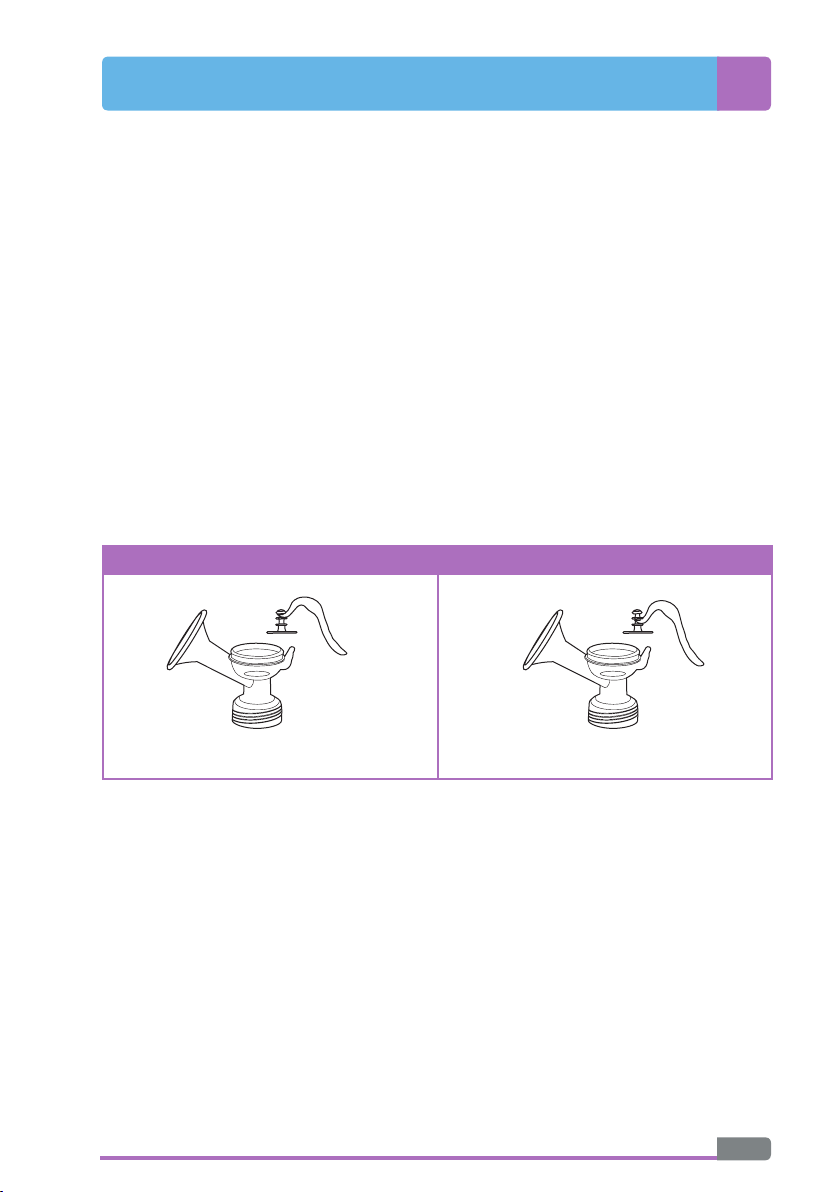
■Place the breast pad A2against the breast in such a way that the nipple is located in the middle of the
breast pad A2. Use your thumb and index finger to hold the breast pad A2against the breast and use
the palm of the same hand to support the breast. The breast pad A2must perfectly adhere to the breast.
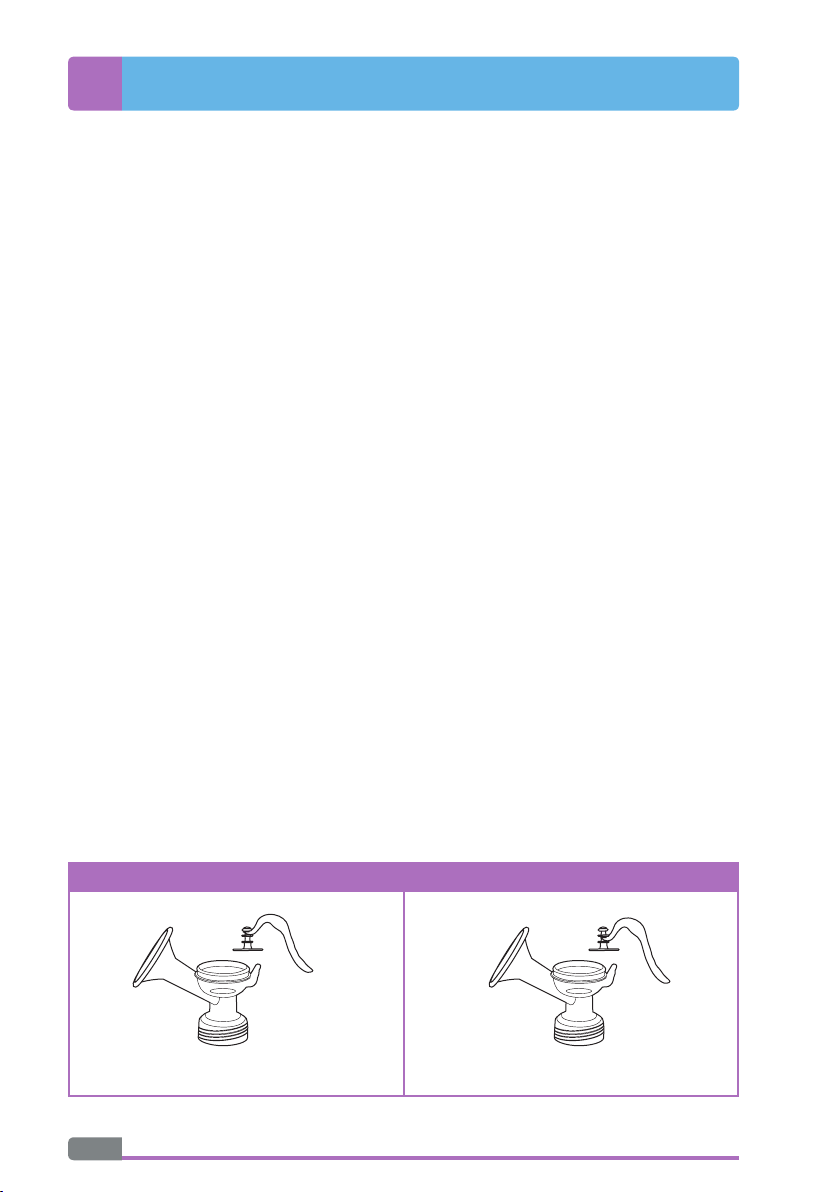
■Press the handle Aqa and then release it slowly. At the same time, press the breast flange A2gently against
the breast so that it is tightly seated and no air is drawn in.
■You can change the expression phase intensity at any time as required so that the expression is as pleasant
as possible for you as described in chapter Using the breast pump – Setting the expression phase and
intensity.
■After you have finished expressing milk, place the breast pump with the feeding bottle Aqd into the bottle
stand Aqg. The breast pump must not be tipped over, milk could flow out. Ideally, immediately upon finishing
expressing milk, remove the bottle Aqd with milk out of the breast pump body A3.
■Screw the bottle opening cap A6with the nipple A5on to the bottle Aqd if you wish to feed the expressed
milk immediately or close it according to the instructions contained in the chapter Assembling and
disassembling feeding bottles.
Note:
To prevent spillage, do not fill the feeding bottle Aqd with more than 140 ml of milk.
■Clean all used parts according to the instructions in chapter Cleaning and sterilisation.
Tips and advice for using the breast pump
■If you feel an unpleasant pressure, lower the expression intensity.
■You can express milk first from one breast and then continue expressing milk from the other breast.
■If you are not successful expressing any milk within the time interval of approx. 5 minutes, stop the breast
pump. First try relaxing for a while and warm the breasts up in a warm shower. Then try again to express the
milk or postpone it to a later time when more milk has been created.
■Usually, 10 minutes should be sufficient to express the milk. This time is only indicative and may vary from
person to person.
Storing and heating up breast milk
■Only breast milk collected using a clean and sterilised breast pump is suitable for storage. Store the milk
in sterilised containers designed for storing breast milk or in special disposable breast milk storage bags.
■To prevent the milk from leaking or absorbing other odours from an area in which it is stored, thoroughly
close containers or bags before placing them in the refrigerator or freezer.
■Breast milk can be stored for up to 48 hours in a refrigerator (except for the door area) and up to 3 months
in a freezer at a temperature of -18 °C.
■If you express the milk gradually and wish to mix the individual batches together into a single container and
freeze them, do so no later than within 24 hours. It is only possible to mix batches that are cooled to the
same temperature.
■Mark the containers or bags that you place in the freezer with a date.
Note
The feeding bottle Aqd can be stored in a refrigerator or freezer.

Manual breast pump
EN
8
■Before this milk is fed to an infant, it should be heated up to a temperature of approx. 37 °C. Frozen milk can
be left overnight to defrost in a refrigerator. Defrosting in a refrigerator must not, however, take longer than 24
hours. Heat the milk gently in a feeding bottle warmer or in a container with warm water. Do not use boiling
water as this could destroy the nutrients through high temperatures. Microwave ovens are not particularly
suitable for heating breast milk, namely because of uneven heating.
■All parts of the bottle from which the milk is fed to the infant must be sterilised before they come into contact
with the breast milk. Before feeding, always first shake the bottle and check the temperature of the milk.
Dispose of any unused milk that has already been defrosted or heated up.
Troubleshooting
■In this chapter you will find possible solutions to problems that you may encounter when using the breast
pump. If you are unable to remedy the problem according to the following instructions, please contact an
authorised service centre.
■Low or no suction intensity
– Check whether the breast pump is correctly assembled and whether the individual parts are properly
attached to one another. The connections between the individual parts of the breast pump must not
be loose.
– Check that the breast pad A2has properly adhered to the breast. Do not hold the breast pump by the
breast pump body A3. While expressing milk, hold the breast pad A2on the breast with your thumb
and index finger and support the breast with your palm.
Cleaning and sterilisation
Cleaning the breast pump
■Disassemble the breast pump into its individual parts, see chapter Assembling and disassembling the breast
pump
■Before first use and after every use, thoroughly wash all parts in warm drinking water with a gentle
dishwashing detergent. Then thoroughly rinse all these parts under clean drinking water and wipe dry with
a wiping cloth or allow it to dry naturally. The above mentioned parts may also be washed in a dishwasher
(in the top rack).
Note
In the event that you do not use the bottle opening cap A6, bottle adapter A7or the nipple A5then it is
sufficient to clean these parts directly before their planned use.
Sterilising the breast pump
■Before first use and every subsequent use, sterilise everything in a steam steriliser or boil in a pot for
approximately 5 minutes.
!
Attention:
All parts must be clean prior to sterilisation. Cleaning instructions are provided in the preceding subchapter
Cleaning the breast pump.
■It is not necessary to sterilise the bottle stand Aqg, the cylinder cover A8and the handle Aqa because these
parts do not come into contact with breast milk or the breast.

Manual breast pump EN
9
Storage
■Place the cleaned breast pump into, for example, a clean box or wrap it in a clean wiping cloth to protect it
from dust. The breast pump can be stored assembled or disassembled. To protect it against dust, you can
put on the dust cap for the silicone breast padA1.
Technical specifications
Model number ..................................... BBP 1000
Operating conditions ............................ Ambient temperature: 5 to 40 °C
Relative humidity .................................. ≤ 65 %
Explanation of symbols used on the product, its
accessories and packaging
This symbol indicates that this appliance meets all the basic requirements of EU directives related to it.
This symbol serves to designate the production lot number.
This symbol indicates that a fee has been paid to an organisation performing recollection and utilisation
of the packaging waste.
This symbol indicates the material from which the packaging is made.
The Czech language is the original version of the user's manual. Changes to text and technical parameters are
reserved.
Table of contents
Other Bayby Breast Pump manuals