Bayby BBP 1010 User manual

EN
EN-1 Single Electric 2-Phase Breast Pump EN
1
Table of Contents
Introduction .......................................................................... 2
Safety instructions and important notes ..................................................... 3
Description ........................................................................... 5
Assembling and disassembling the breast pump .............................................. 7
Power source ......................................................................... 8
Using the breast pump .................................................................. 8
Tips and advice for using the breast pump ................................................... 9
Storing and heating up breast milk ......................................................... 9
Troubleshooting ...................................................................... 10
Cleaning and sterilization ............................................................... 11
Storage ............................................................................ 12
Technical specifications ................................................................ 12
Explanation of symbols used on the product, its accessories and packaging ........................ 12
Disposal of used batteries. . . . . . . . . . . . . . . . . . . . . . . . . . . . . . . . . . . . . . . . . . . . . . . . . . . . . . . . . . . . . . . 13
Instructions and information about the handling of used packaging ............................... 13

EN-2
Single Electric 2-Phase Breast Pump
EN
2
Introduction
■It is generally accepted that breast milk is the natural diet for an infant providing the necessary nutrients
for growth and protection against infections. A breast milk pump is a suitable additional accessory for
breastfeeding mothers. It is particularly useful in situations where the mother is not able to breastfeed at
regular intervals or when it is not possible to breastfeed directly from the breast, e.g. due to painful or fissured
breast nipples and last but not least it helps alleviate engorgement, apainful condition where breasts are
overfill and expression of acertain amount of milk is necessary.
■The BBP 1010 Bayby breast pump is equipped with atwo-phase system that simulates an infant'snatural
sucking action. In the first stage, the fast suction cycle is emulated, by which the breast nipple is stimulated
to induce the lactation of breast milk from the mammary gland. This is followed by the second phase where
adeeper slower suction action of the infant is emulated. In this phase, breast milk is expressed from the
breast nipple and pumped into abottle. The stimulation and expression intensity level can be adjusted as
necessary in 9 levels.
■Aclearly arranged LCD display shows the set operating mode, suction intensity, pumping speed and time
remaining until automatic shut off. The memory function automatically stores the most recent operating
mode and suction intensity settings.
■The 3-in-1 silicon breast pad combines three functions: breast massage, breast pressing and breast milk
expression. All these actions take place simultaneously to induce the feeling of natural breastfeeding. The
specially designed shape of the silicon breast pad separates milk from air and prevents milk from flowing
in reverse.
■The basic accessories for the breast pump include awide-neck baby bottle and a bottle adaptor enabling
the use of narrow-neck baby bottles.
■Thanks to its compact dimensions, you can always have the breast pump on hand. Because of its quiet
operation and battery or power adaptor powered operation, it can be used both at home and when travelling.

EN
EN-2 Single Electric 2-Phase Breast Pump EN
3
Safety instructions and important notes
■Only use the breast pump in accordance with the instructions
included in this user's manual. Not adhering to these instructions
may result in incorrect operation of the breast pump or may damage
it. Keep this manual for future use.
■This breast pump may be handled by children 8 years of age and
older or by persons with physical or mental impairments or by
inexperienced persons, if they are properly supervised or have been
informed how to handle it in a safe manner and understand the
potential dangers. Children must not play with the breast pump and
its accessories.
■Only use the breast pump with the original power adaptor and
accessories.
■Before connecting the power adaptor to apower socket, make sure
the voltage stated on its rating label corresponds to the voltage in the
power socket.
■For hygiene reasons, the breast pump is intended for repeated use
by only asingle user.
■Do not start the breast pump if there is water inside the silicon tubing
Aqk.
■Do not use the breast pump outdoors, do not expose it to direct
sunlight or put it down on an electric or gas stove.
■The breast pump is not intended to be used in the shower or bath.
■Do not use the breast pump in the event of excessive fatigue or
sleepiness or while driving amotor vehicle.
■We do not recommend using the breast pump during pregnancy as
this could induce childbirth.
■Do not attempt to take the breast pump off the breast while milk is
being expressed. First, turn off the breast pump and only thereafter
release the breast from the silicon breast pad A2.

EN-4
Single Electric 2-Phase Breast Pump
EN
4
■In the event that you feel an unpleasant or painful pressure while
the milk is being expressed, turn off the breast pump and take the
breast out of the silicon breast pad A2. Perform agentle massage
and heat up the breast in the shower and then repeat the expression
process. If problems persist, please consult alactation consultant or
your doctor.
■Do not leave the breast pump without supervision when it is
connected to apower socket.
■If the breast pump is powered using an external power supply, always
disconnect it from the power socket after use.
■Clean and sterilize the breast pump according to the instructions
contained in chapter "Cleaning and sterilization". Never submerge
the pump unit or power adaptor in water or any other liquids or
sterilize these parts because they do not come into contact with the
breast milk or the breast.
■Cleaning may be performed by children if they are older than 8 years
of age and under supervision. However, they must not perform
sterilization due to the risk of scalding.
■Do not use the breast pump if it is in any way damaged, if its power
adaptor is damaged or if any part that must not be submerged in
water fell into water or another liquid.
■Have all repairs or adjustments performed at an authorised service
centre. By tampering with the appliance you risk voiding your legal
rights arising from unsatisfactory performance or quality warranty.
■We recommend saving the original box, packaging material, receipt
and responsibility statement of the vendor or warranty card for the
duration of warranty. It is appropriate to move the breast pump in its
original box.

EN
EN-4 Single Electric 2-Phase Breast Pump EN
5
Description
Description of accessories
A
PLQ
1
qf
qg
qh
qj
qk
ql
w;
2
3
4
5
6+7
8
9
0
qa
qs
qd
1Dust cap for the silicon breast pad
2Silicon breast pad
3Plastic breast brace
4Bottle connector
5Protective nipple cap
6Valve
7Flap
8Bottle opening cap
9Bottle adaptor
enables the bottle opening cap A8with nipple
Aqa to be screwed on to anarrow-neck baby
bottle.
0Bottle seal cap
qa Silicon nipple
qs Wide-neck baby bottle (volume 120 ml)
qd Bottle stand
qf Bladder cap
qg Inner cap stopper
qh Silicon bladder
qj Pump unit
qk Silicon tubing
ql Silicon tubing connector
is located on both ends of the tubing Aqk.
w; AC adaptor
Replacement accessories contained in the original packaging of the breast pump:
1 pc silicon tubing Aqk +2 pcs silicon tubing connectors Aql, 2 pcs flap A7.
Parts A1–ql are made from amaterial that does not contain BPA (Bisphenol A). On the pump unit Aqj
this relates to the cover and control panel.
++

EN-6
Single Electric 2-Phase Breast Pump
EN
6
Description of the pump unit
B
min
STIMULATION
1
qs
qd
qf
2
3
5
4
6
7
8
9
0
qa
1LCD display
2Battery power level indicator
3Stimulation mode indicator
In the stimulation mode, the display shows
"STIMULATION".
4Expression mode indicator
In the expression mode, the display shows
"EXPRESSION".
5"SUCTION" scale
shows the suction intensity setting.
6Power adaptor socket
7"SPEED" scale
shows the speed of stimulation/expression.
8Increase suction intensity button
9Decrease suction intensity button
0Stimulation and expression mode toggle
button
qa Switch for turning the pump unit on and off
qs Time remaining until the breast pump turns off
automatically
qd Silicon tubing socket for connecting the silicon
tubing
qf Battery compartment
is located at the rear of the pump unit.

EN
EN-6 Single Electric 2-Phase Breast Pump EN
7
Assembling and disassembling the breast pump
■Before you start assembling the breast pump, clean and sterilize the individual parts according to the
instructions contained in the chapter "Cleaning and sterilization" and thoroughly wash your hands.
!
Attention:
Never submerge the pump unit Aqj or power adaptor Aw; in water or any other liquids or sterilize these
parts because they do not come into contact with the breast milk or the breast.
■Always assemble the breast pump according to the following instructions. Otherwise the suction intensity
could be lowered.
■Check that no part of the breast pump is damaged or worn out and that all parts that will be used during the
assembly are dry. Damaged or worn out parts must be replaced for new ones. To order replacement parts,
please contact an authorised service centre.
■Insert the silicon pad A2into the plastic brace A3and push it in all the way. Push down the edge along
the plastic brace A3with your fingers so that it attaches well.
■Place the plastic brace A3with the silicon pad A2on to the nozzle, which is located on the front part of
the bottle connector A4. Tilt the plastic brace A3with the silicon pad A2slightly upwards so that the lip
located on the nozzle slides in first. Then carefully push the plastic brace A3on to the bottle connector A4
so that these parts are connected.
■Into the top part of the bottle connector A4, insert the bladder Aqh and put the bladder cap Aqf on to
it. Turn the bladder cap Aqf clockwise to properly connect it to the bottle connector A4. The hole in
the bladder cap Aqf for connecting the silicon tubing Aqk with tubing connector Aql should point in the
opposite direction to the plastic brace A3with the silicon pad A2. Connect the tubing connector Aql with
the silicon tubing Aqk to the hole in the bladder cap Aqf.
!
Attention:
There must be no water in the holes of the bladder cap Aqf and inside the silicon tubing Aqk with tubing
connector Aql.
■Connect the flap A7to the valve A6so that the semicircular-shaped stub on the underside of the flap A7
fits into the hole of the same shape in the valve A6. To ensure that the flap A7properly adheres to the
valve A6, push it down with your thumb.
■Mount the valve A6with the flap A7into the underside of the bottle connector A4.
■Screw the bottle Aqs on to the underside of the bottle connector A4. Place the bottle Aqs into the bottle
stand Aqd.
■Connect the free end of the silicon tubing Aqk with the tubing connector Aql to the socket Bqd on the right
side of the pump unit Aqj.
■To disassemble the breast pump proceed in the reverse sequence.

EN-8
Single Electric 2-Phase Breast Pump
EN
8
Power source
Selecting apower source
External power source
■Only use the power adaptor (output 6V , 1A) that is supplied with this breast pump.
■Insert the connector of the power adaptor Aw; to the socket B6on the left hand side of the pump unit Aqj.
Insert the plug of the power adaptor Aw; into the power socket.
Internal power source
■To power the breast pump using an internal power source, use 4 alkaline batteries type LR6/AA (4 × 1.5 V).
■Make sure that the pump unit Aqj is disconnected from the mains power socket. Remove the cover of the
battery compartment Bqf from the underside of the pump unit Aqj. The battery compartment Bqf has
atextile band for easier removal of batteries. Prior to inserting the batteries, stretch out this band across
the battery compartment Bqf and hold down its free end with your thumb. One by one, insert the batteries
into the battery compartment Bqf, ensuring their correct polarity. Release the band and close the cover.
Note:
Do not combine new and used batteries or batteries of various types, e.g. alkaline batteries and rechargeable
batteries.
Instructions for using power sources
■After connecting the pump unit Aqj to the external power source or inserting batteries, the display B1will
show all the segments for ashort time and then the pump unit Aqj will switch to Stand-by mode.
■When the breast pump is powered from an internal power source, the display B1will show the battery
power level B2.
■The approximate operating time of the breast pump when new batteries are used is 60 minutes. After
approximately 60 minutes of operation, suction intensity will decline even when the battery power level
indicator B2is still showing 2 segments, the batteries may be weak and it is necessary to replace them
with new ones. In the event that the battery power level indicator B2is flashing, the battery is almost flat.
Replace the batteries.
■When not using the breast pump for an extended period of time, we recommend that you remove the
batteries.
■When apump unit Aqj with inserted batteries is connected to amains power socket, the external power
source will be used as the primary power source. However, we do not recommend powering the pump
unit Aqj from amains power socket with the batteries inserted inside. In such acase, remove the batteries
as soon as possible. Before removing the batteries, disconnect the pump unit Aqj from the mains power
socket.
Using the breast pump
1. Prior to expressing breast milk, thoroughly wash your hands and wipe the breast with awash cloth (ideally
adisposable type) dipped in clean warm water.
2. Seat yourself comfortably in achair or armchair and rest your back against abackrest. It is not appropriate to
express breast milk when bending over. Take the breast pump out of the bottle stand Aqd. Place the silicon
pad A2against the breast in such away that the nipple is located in the middle of the silicon breast pad
A2. Use your thumb and index finger to hold the silicon pad A2against the breast and use the palm of the
same hand to support the breast. The silicon pad A2must perfectly adhere to the breast.

EN
EN-8 Single Electric 2-Phase Breast Pump EN
9
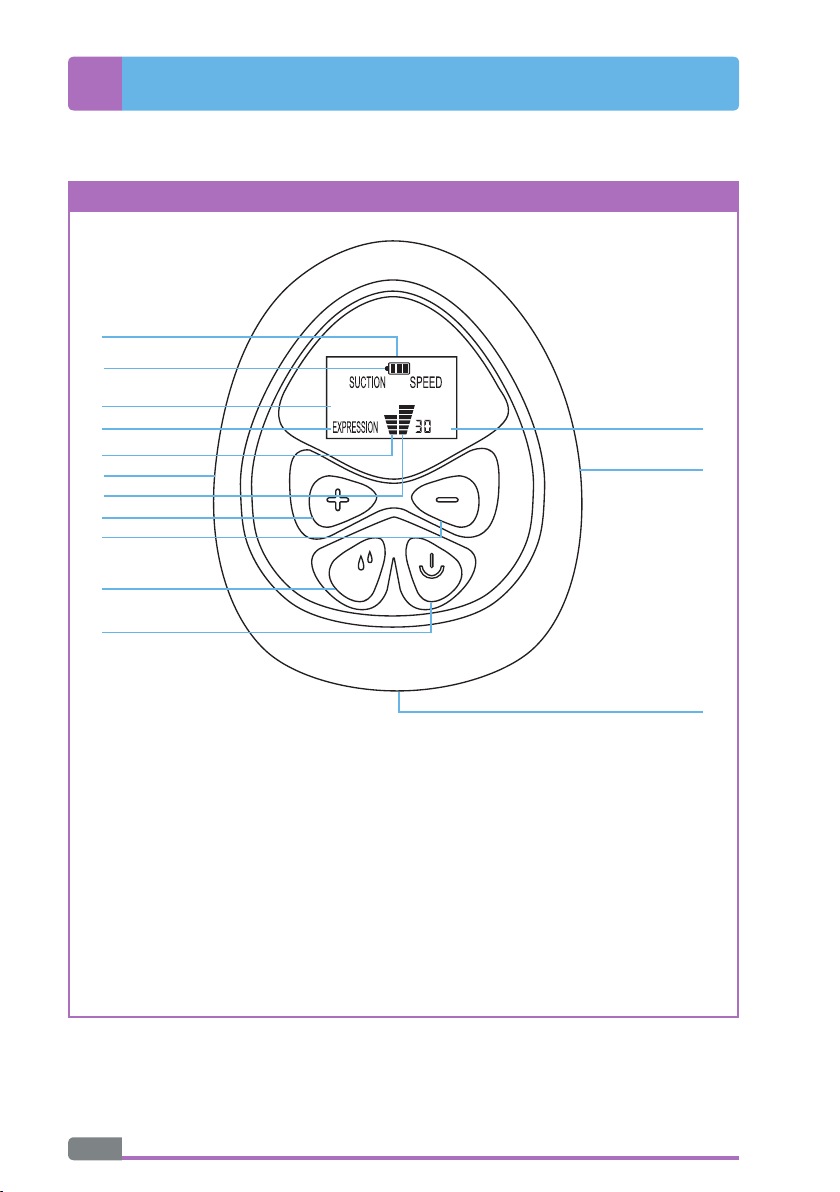
3. On the control panel of the pump unit Aqj, press the Power On/Off button Bqa. When started for the first time,
the display B1will show indicator B3– "Stimulation" and the breast pump will start the stimulation mode.
The stimulation phase takes 2 minutes. The suction intensity in the stimulation phase is set to the lowest level
1. This is indicated by the corresponding number of segments on the scale B5. The display B1shows the
default time of 30 minutes. The remaining time counts down until the breast pump turns off automatically.
You may regulate the suction intensity range from 1 to 9 as required. The intensity setting will be shown on
the scale B5. In the stimulation mode an unchangeable speed is set that corresponds to 100 cycles per
minute.
4. Upon completion of the stimulation phase, the breast pump automatically switches to the expression
mode. In the event that milk starts to flow sooner, switch the breast pump to the expression mode using
button B0. The indicator B4– "Expression" will be shown on the display B1. The suction intensity in the
expression mode is preset to level 4 and can be changed in the range from 1 to 9 as required. The scale
B5will show the corresponding number of segments. The speed of expression changes automatically
depending on the suction intensity and is shown on the scale B7. The time remaining until automatic shut
off is counted down on the display B1.
5. To end expression, turn off the pump unit Aqj, by pressing the Power On/Off button Bqa.
Note:
The next time when the breast pump is turned on, the mode in which the breast pump was running prior to
being turned off will be renewed as well as the previously set suction intensity. If batteries were removed or
the breast pump was disconnected from the external power source before repeat use, the default settings
will be renewed as when the breast pump was started for the first time.
6. Take the breast out of the silicon pad A2always only after turning off the pump unit Aqj. Place the bottle
Aqs with the expressed milk in the bottle stand Aqd to prevent it from being tipped over. When using an
external power source, disconnect the pump unit Aqj from the mains power socket. Screw the bottle Aqs
out of the bottle connector A4and close it with the seal cap A0.
Note:
Do not fill the bottle Aqs with more than 120 ml of milk so as to prevent spilling it.
7. When you have finished expressing milk, clean out all parts that were used according to the instructions in
chapter Cleaning and sterilization. Clean the bottle Aqs with its seal cap A0later, after using up its contents.
Tips and advice for using the breast pump
■If you feel an unpleasant pressure, lower the suction intensity.
■You can express milk first from one breast and then continue expressing milk from the other breast. Prior to
taking the breast pump off the breast, it is necessary to turn off the pump unit Aqj and only then release the
breast from the silicon pad A2. Then you can continue expressing milk from the other breast.
■If you are not successful expressing any milk within the time interval of approx. 5 minutes, stop the breast
pump. First try relaxing for awhile and warm the breasts up in awarm shower. Then try again to express the
milk or postpone it to alater time when more milk has been created.
■Usually, 10 minutes should be sufficient to express the milk. This time is only indicative and may vary from
person to person.
Storing and heating up breast milk
■Only breast milk collected using aclean and sterilized breast pump is suitable for storage. Store the milk
in sterilized containers designed for storing breast milk or in special disposable breast milk storage bags.
■To prevent the milk from leaking or absorbing other odours from an area in which it is stored, thoroughly
close containers or bags before placing them in the refrigerator or freezer.

EN-10
Single Electric 2-Phase Breast Pump
EN
10
■Breast milk can be stored for up to 48 hours in arefrigerator (except for the door area) and up to 3 months
in afreezer at atemperature of -18 °C.
■If you express the milk gradually and wish to mix the individual batches together into asingle container and
freeze them, do so no later than within 24 hours. It is only possible to mix batches that are cooled to the
same temperature.
■Mark the containers or bags that you place in the freezer with adate.
Note
The bottle Aqs with the seal cap A0can be stored both in the refrigerator and in the freezer.
■Before this milk is fed to an infant, it should be heated up to atemperature of approx. 37 °C. Frozen milk can
be left overnight to defrost in arefrigerator. Defrosting in arefrigerator must not, however, take longer than
24 hours. Heat the milk gently in ababy bottle warmer or in acontainer with warm water. Do not use boiling
water as this could destroy the nutrients through high temperatures. Microwave ovens are not particularly
suitable for heating breast milk, namely because of uneven heating.
■All parts of the bottle from which the milk is fed to the infant must be sterilized before they come into contact
with the breast milk. To assemble the baby bottle that comes with the breast pump, insert the nipple Aqa
into the bottle opening cap A8and then attach the bottle opening cap A8to the bottle Aqs. If you wish
to use anarrow-neck bottle to feed an infant, attach the bottle adaptor A9to the underside of the bottle
opening cap A8and then screw this assembly on to the respective bottle. When necessary, you can use
adifferent baby bottle with anipple. Before feeding, always first shake the bottle and check the temperature
of the milk. Dispose of any unused milk that has already been defrosted or heated up.
Troubleshooting
In this chapter you will find possible solutions to problems that you may encounter when using the breast pump.
If you are unable to remedy the problem according to the following instructions, please contact an authorised
service centre.
■The breast pump does not start when the Power On/Off button Bqa is pressed.
– Check that the pump unit Aqj is connected to aworking power socket. In the case where an internal
power source is used, check that the batteries were inserted correctly and that they are not flat.
■Low or no suction intensity
– Check whether the breast pump is correctly assembled and whether the individual parts are properly
attached to one another. The connections between the individual parts of the breast pump must not
be loose.
– Weak or almost flat batteries. Even when the battery power level indicator B2is still showing 2
segments, the batteries may be weak and it is necessary to replace them with new ones.
– Check that the silicon pad A2has properly adhered to the breast. Do not hold the breast pump by the
bottle connector A4. Express milk seated with astraight back. Hold the silicon pad A2on the breast
with your thumb and index finger and support the breast with your palm.
– Check that the silicon tubing Aqk is not twisted and that there is no water inside it. Prior to starting
expressing milk, all components must be dry and the silicon tubing Aqk must not be bent. In the event
that there is water inside the silicon tubing Aqk, you may use the dry tubing from the replacement
accessories.

EN
EN-10 Single Electric 2-Phase Breast Pump EN
11
Cleaning and sterilization
Cleaning the breast pump
■Make sure that the breast pump is turned off and disconnected from the power socket. Disassemble the
breast pump into its individual parts, see chapter Assembling and disassembling the breast pump.
Note:
For the purposes of cleaning it is not necessary to remove the flap A7from the valve A6.
■Before first use and after every use
– Thoroughly wash the dust cap A1, silicon pad A2, plastic brace A3, bladder Aqh, bottle connector
A4, bottle Aqs, seal cap A0, bottle stand Aqd, bottle opening cap A8, bottle adaptor A9, nipple
Aqa and nipple cap A5in warm drinking water with agentle kitchen detergent. Then thoroughly rinse
all these parts under clean drinking water and wipe dry with awiping cloth or allow it to dry naturally.
The above mentioned parts may also be washed in adishwasher (in the top rack).
Note:
In the event that you do not use the bottle opening cap A8, bottle adaptor A9or the nipple Aqa then
it is sufficient to clean these parts directly before their planned use.
– Carefully wash the valve with flap A6–7in warm drinking water with gentle kitchen detergent. Then
rinse it under clean drinking water and dry carefully with aclean wiping cloth or allow it to dry naturally
on aclean wiping cloth.
– Wipe the bladder cap Aqf and the tubing Aqk with the connected tubing connectors Aql using alightly
dampened cloth. Then dry both parts using aclean wiping cloth. These parts do not come into contact
with breast milk or with the breast and therefore need not be washed under running water. If you do,
however, wash these parts, it will be necessary to wait for the water that entered inside the tubing Aqk
or the bladder cap Aqf to dry.
– Never wash the pump unit Aqj or power adaptor Aw; under running water or submerge in water or
any other liquid. If it becomes dirty, you can wipe the surface of the pump unit Aqj with aclean lightly
dampened cloth and then wipe dry.
Sterilizing the breast pump
■Before first use and every subsequent use:
– Sterilize the dust cap A1, silicon pad A2, plastic brace A3, bladder Aqh, bottle connector A4, valve
with flap A6–7, bottle Aqs, seal cap A0, bottle opening cap A8, bottle adaptor A9, nipple Aqa and
nipple cap A5in asteam sterilizer or boil in apot for approx. 5 minutes.
!
Attention:
All parts must be clean prior to sterilization. Cleaning instructions are provided in the preceding
subchapter Cleaning the breast pump.
– Neither the bottle stand Aqd nor the bladder cap Aqf need to be sterilized because these parts do not
come into contact with breast milk or the breast.
– Do not sterilize the pump unit Aqj, power adaptor Aw;, silicon tubing Aqk and tubing connectors Aql.
These parts do not come into contact with breast milk or the breast. Sterilization would damage the
pump unit Aqj and the power adaptor Aw;.

EN-12
Single Electric 2-Phase Breast Pump
EN
12
Storage
■Place the cleaned breast pump into, for example, aclean box or wrap it in aclean wiping cloth to protect it
from dust. The breast pump can be stored assembled or disassembled. To protect it against dust, you can
fit the dust cap A1on to the silicon pad A2.
Technical specifications
Model number ...................................... BBP 1010
Voltage and power input....................... 6 V , 3.6 W
Power source ....................................... power adaptor, model number: GEO101T-0610,
input: 100–240 V~, 50/60 Hz, 0.3 A, output: 6 V , 1 A
or
4 × LR6/AA batteries (not included)
Protection class against injury
by electrical shock................................ Pump unit – protection class III
Power adaptor – protection class II
Noise level ........................................... 60 dB(A)
Suction intensity ................................... Max. –0.016 MPa (stimulation mode)
Max. –0.034 MPa (expression mode)
Stimulation/expression speed ............... 100 cycles/minute (stimulation mode)
26 to 60 cycles/minute (expression mode)
Automatic shut off timer........................ 30 minutes
Operational conditions.......................... Ambient temperature: 5 to 40 °C
Relative humidity: ≤90 %
Explanation of symbols used on the product, its
accessories and packaging
This symbol indicates that prior to using the product, the user should read the user'smanual.
This symbol indicates that this appliance meets all the basic requirements of EU directives related to it.
This symbol indicates that the product has protection class III.
This symbol indicates that the product has protection class II.
This symbol indicates the polarity of the power cord connector.
This symbol indicates that it is aproduct that may be used indoors only.
This symbol serves to designate the production lot number.

EN
EN-12 Single Electric 2-Phase Breast Pump EN
13
This symbol indicates that afee has been paid to an organisation performing recollection and utilisation
of the packaging waste.
This symbol indicates the material from which the packaging is made.
This symbol on products or original documents means that used electric or electronic products must
not be added to ordinary municipal waste. For proper disposal, renewal and recycling hand over these
appliances to determined collection points. Alternatively, in some European Union states or other
European countries you may return your appliances to the local retailer when buying an equivalent
new appliance. Correct disposal of this product helps save valuable natural resources and prevents
potential negative effects on the environment and human health, which could result from improper
waste disposal. Ask your local authorities or collection facility for more details. In accordance with
national regulations penalties may be imposed for the incorrect disposal of this type of waste.
For business entities in European Union states
If you want to dispose of electric or electronic appliances, ask your retailer or supplier for the necessary
information.
Disposal in other countries outside the European Union.
This symbol is valid in the European Union. If you wish to dispose of this product, request the necessary
information about the correct disposal method from the local council or from your retailer.
Disposal of used batteries
Batteries contain environmentally damaging compounds and therefore do not belong in standard
household waste. Take the batteries to an appropriate collection point, which will take care of their
ecological disposal. You can obtain the contact for the nearest collection point from you town council
or from your retailer.
Instructions and information about the handling of used
packaging
Dispose of used packaging material at asite designated for waste in your municipality.
Changes to text and technical parameters are reserved.
Table of contents
Other Bayby Breast Pump manuals