BBT BBT-LM-SPBSES User manual
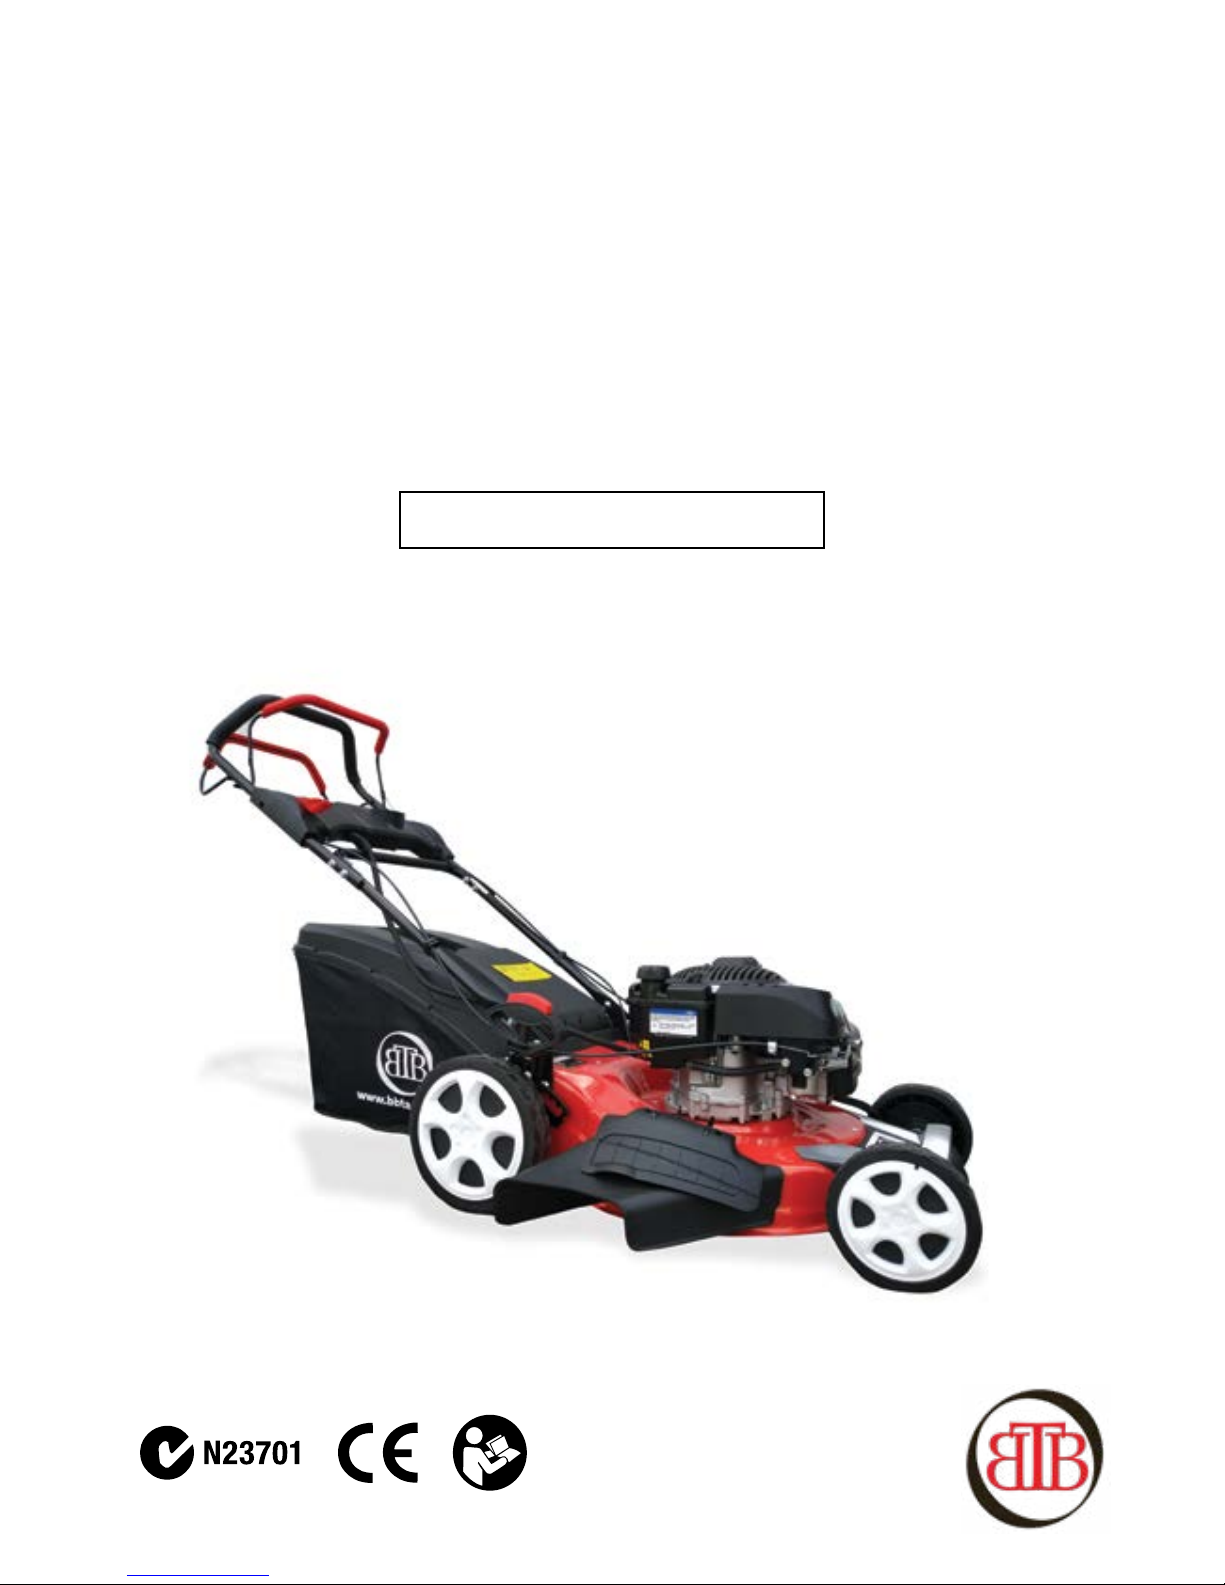
OWNER’S MANUAL
Assembly & Operating Instructions
BBT 21” ELECTRIC START B&S
SELF PROPELLED LAWN MOWER
MODEL NO. BBT-LM-SPBSES

2
WWW.BBTA.COM.AU BBT-LM-SPBSES
To the Owner
Thank you for purchasing our BBT 21” Electric Start Self Propelled B&S Lawn Mower. It was carefully engineered
to provide excellent performance when properly operated and maintained.
Please read this entire manual prior to operating the Lawn Mower. It instructs you how to safely and easily set
up, operate and maintain your Lawn Mower. Please be sure that you and any other persons who will operate
the Lawn Mower carefully follow the recommended safety practices at all times. Failure to do so could result in
personal injury or property damage.
All information in this manual is relative to the most recent product information available at the time of printing.
Review this manual frequently to familiarise yourself with the machine, its features and operation. Please be
aware that this Owner’s Manual may cover a range of product specifications for various models. Characteristics
and features discussed and/or illustrated in this manual may not be applicable to all models. We reserve the right
to change product specifications, designs and equipment without notice and without incurring obligation.
All the power testing information used to establish the power rating of the engine equipped on this Lawn
Mower can be found in the engine manufacturer’s manual or website. If you have any problems or questions
concerning the machine, please contact our Customer Support Department.
Throughout this manual, all references to right and left side of the Lawn Mower are observed from the operating
position. The engine manufacturer is responsible for all engine-related issues with regards to performance,
power-rating, specifications, warranty and service. Please refer to the engine manufacturer’s Owner’s Manual
packed separately with your Lawn Mower for more information.
Customer Support
Please do NOT return the Lawn Mower without first contacting the Customer Support Department at
bbt@bbta.com.au.
If you have difficulty assembling this product or have any questions regarding the controls, operation, or
maintenance of this Lawn Mower, please contact our Customer Support Department.
SAVE THESE INSTRUCTIONS

3
WWW.BBTA.COM.AUBBT-LM-SPBSES
TABLE OF CONTENTS
Page(s)
To the Owner .........................................................................................................................................................2
Customer Support..................................................................................................................................................2
TABLE OF CONTENTS .............................................................................................................................3
IMPORTANT SAFETY INFORMATION ................................................................................................. 4-5
Additional Information and Potential Changes...................................................................................................4
Key to Symbols.......................................................................................................................................................5
GENERAL SAFETY RULES ................................................................................................................... 6-7
General Safety Rules..............................................................................................................................................6
Specific Safety Rules ..............................................................................................................................................6
Spark Plug Safety Rules .........................................................................................................................................7
Fire and Burn Hazards ...........................................................................................................................................7
PARTS LOCATION....................................................................................................................................8
ASSEMBLING .................................................................................................................................... 8-11
Grass Catcher..........................................................................................................................................................8
Handle ....................................................................................................................................................................9
Armrest Panel.........................................................................................................................................................9
Assembly and Remove the battery .......................................................................................................................9
Starting Electric Start Engine ..............................................................................................................................10
Cutting Height Ajustments..................................................................................................................................10
Safety Precautions ...............................................................................................................................................11
OPERATIONS................................................................................................................................... 12-13
Engine Starting ....................................................................................................................................................12
Gear Box ...............................................................................................................................................................12
3 in 1 Function (Mulching, Side-discharge, Rear-discharge) .............................................................................13
MAINTENANCE CARE...........................................................................................................................14
Maintenance and Storage...................................................................................................................................14
Blade.....................................................................................................................................................................14
SPECIFICATIONS....................................................................................................................................15
WARRANTY & SERVICE ........................................................................................................................15
EXPLODED DIAGRAM & PARTS LIST.............................................................................................. 16-17
YOU MAY ALSO LIKE ...........................................................................................................................18

4
WWW.BBTA.COM.AU BBT-LM-SPBSES
IMPORTANT SAFETY INFORMATION
Additional Information and Potential Changes
We reserve the right to discontinue, change, and improve our products at any time without notice or obligation
to the purchaser. The descriptions and sections contained in this manual were in effect at the time of printing.
Equipment described within this manual may be optional. Some illustrations may not be applicable to your
machine.
WARNING: Read and thoroughly understand all instructions in this manual and on the safety decals
before assembling or operating this Lawn Mower. Failure to do so may cause serious injury or death.
Do not allow anyone to operate this Lawn Mower who has not read this manual. As with all power
equipment, a Lawn Mower can be dangerous if assembled or used improperly. Do not operate
this Lawn Mower if you have any questions concerning its safe operation. To get answers to any
questions, call our Customer Support Department.
This SAFETY ALERT SYMBOL identifies important safety messages in this manual. Failure to follow
this important safety information may result in serious injury or death.
DANGER! This Lawn Mower was built to be operated according to the safe operation practices in
this manual. As with any type of power equipment, carelessness or error on the part of the operator
can result in serious injury. This Lawn Mower is capable of amputating hands and feet and throwing
debris. Failure to observe the following safety instructions could result in serious injury or death.
The following signals, words and meanings are intended to explain the levels of risk associated with this product.
DANGER indicates a hazardous situation which, if not avoided, will result in serious injury or
death.
WARNING indicates a hazardous situation which, if not avoided, could result in serious injury
or death.
CAUTION indicates a hazardous situation which, if not avoided, could result in minor or
moderate injury.
NOTICE is important information about the proper use of your Lawn Mower. Failure to follow
this instruction could result in damage to your Lawn Mower or property.
WARNING! Your Responsibility—Restrict the use of this power machine to persons who have read,
understood and will follow the warnings and instructions in this manual and on the machine.
SAVE THESE INSTRUCTIONS!
5
WWW.BBTA.COM.AUBBT-LM-SPBSES
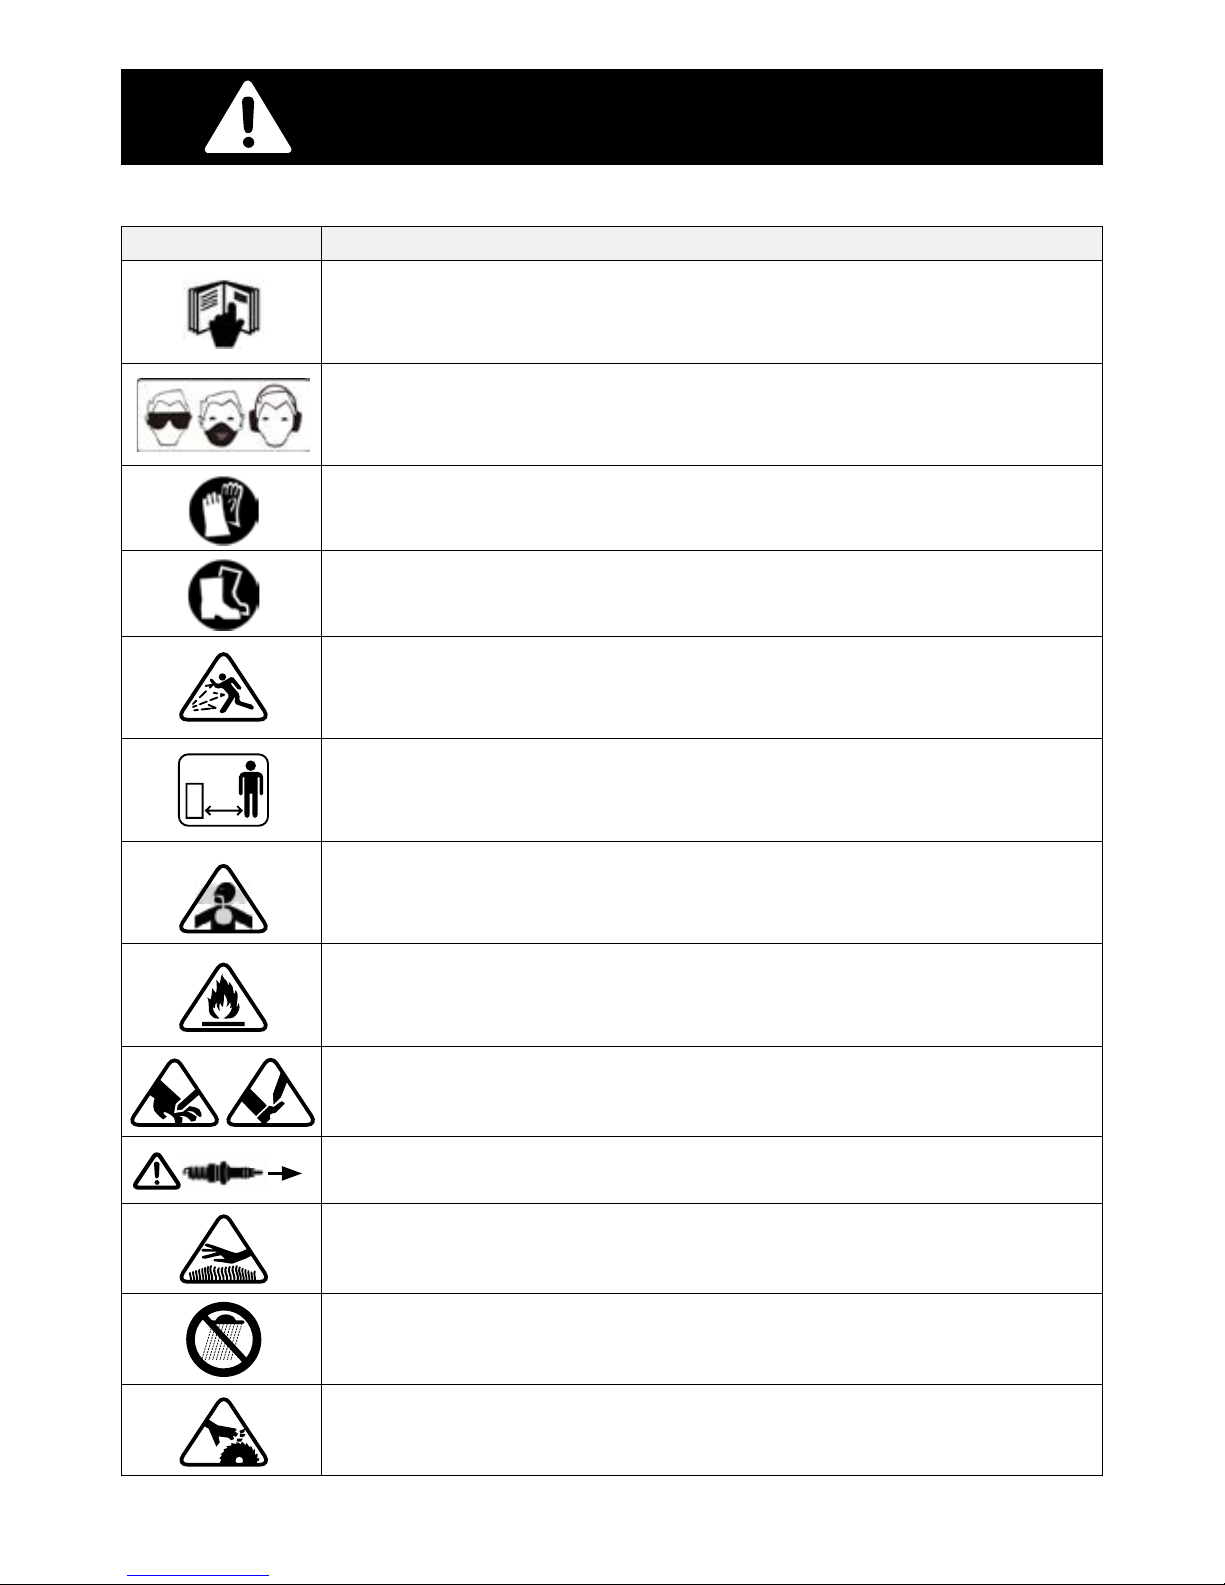
IMPORTANT SAFETY INFORMATION
Key to Symbols
Symbol Description
READ THE OWNER’S MANUAL(S)
Read, understand and follow all instructions in the manual(s) before attempting to
assemble and operate.
FACE PROTECTION
Always wear safety goggles or safety glasses with side shields or a face shield when
operating this product as well as ear protection.
WEAR GLOVES
Always wear non-slip, heavy-duty protective gloves when operating this product.
WEAR SAFETY FOOTWEAR
Always wear non-slip steel-toed safety footwear when operating this product.
BEWARE OF FLYING OBJECTS
Beware of thrown objects which can ricochet causing serious injury to the eyes.
Always wear eye & ear protection when operating.
BYSTANDERS
Keep bystanders, helpers, pets, and children at least 25 metres from the machine
while it is in operation. Stop machine if anyone enters the area.
TOXIC FUMES
Breathing exhaust fumes can cause loss of consciousness and may lead to death.
DO NOT operate the machine in an enclosed space.
PETROL IS FLAMMABLE
Petrol is extremely flammable. Allow the engine to cool for at least ten minutes
before refuelling.
DANGER! Keep your hands and feet away from the cutting element!
Remove the spark plug before carrying out repairs.
CAUTION! Tool surfaces can be hot.
DO NOT use in the rain.
Blades continue to rotate after the engine stops.
Rotating blades are capable of amputating hands and feet and throwing objects.
25M

6
WWW.BBTA.COM.AU BBT-LM-SPBSES
GENERAL SAFETY RULES
• These models of petrol lawn mowers are intended for grass mowing, other uses are not permitted.
• It is only suitable for private use in home and hobby gardens. Mowers for private home and hobby garden
use are considered to be those used for the care of private grass areas and lawns, but not for use in public
areas, parks, sports areas, and in agriculture and forestry.
• Read, understand, and follow all instructions on the machine and manual before attempting to assemble
and operate. Keep this manual in a safe place for future and regular reference. Anyone who uses this Lawn
Mower must read the instructions and be familiar with the mower.
• Please, read and take note of the following comments that regard your protection against the risk of injury
and fire.
General Safety Rules
• This machine is to be used exclusively for cutting natural grass. NEVER use the mower for any other purposes.
Any other utilization can involve danger to your safety and can involve damage to the mower.
• People under 16 years and people who are not familiar with the Owner’s Manual must not use the mower.
• The user is responsible of the safety of other people in the working area. Keep children and animals at a safe
distance while the mower is in use.
• Before mowing, remove all foreign objects from the lawn which may be thrown by the machine, stay alert
for any foreign object which may have been missed.
• Check that all nuts, bolts and screws are well tightened.
• Before mowing, place the grass catcher in its position.
• Before mowing, make sure that the blade and the blade fixing screw are securely fastened. When cutting
edges, blades may require re sharpening, this must be done evenly on both sides, in order to prevent any
imbalance. If the blade is damaged, it must be replaced.
• When mowing, always wear long trousers and protective footwear.
• NEVER run the engine in an enclosed and/or poorly ventilated area, engine exhaust contains carbon
monoxide, a colourless and odourless gas. Breathing exhaust fumes can cause loss of consciousness and may
lead to death.
• Work only when there is sufficient light.
• DO NOT use your Lawn Mower when it is raining or when the grass is wet.
• Particular precautions must be taken while mowing on slopes or downing stretches. Mow across the face of
slopes, NEVER down or up.
• Turn off the engine if you must leave the lawn mower unattended, displace the lawn mower or incline it.
• NEVER lift the rear of the mower while starting the engine and NEVER place your hands and feet underneath
the deck or into the rear discharge chute while the engine is running.
• NEVER change in any way the rated speed of the engine.
• NEVER lift or carry the mower while the engine is running.
• Disconnect the self-propelled system before starting the engine.
Specific Safety Rules
• Always use the BBT Lawn Mower with the grass catcher (7) or/and the deflector (9) in position.
• Stop the engine before emptying the grass catcher (7) or before you change the cutting height.
• While the engine is running, NEVER place your hands or feet under the lawn mower or under the grass
ejection area.
• Before mowing, remove all foreign objects from the lawn, which maybe thrown by the machine.
• Keep children, bystanders and domestic animals at a safe distance when the lawnmower is in use.
• NEVER lift the mower while starting the engine.
DO NOT operate your Lawn Mower whilst under the influence of alcohol, drugs or medication.
WARNING

7
WWW.BBTA.COM.AUBBT-LM-SPBSES
Spark Plug Safety Rules
• Stop the engine and remove the spark plug cover in these cases:
»before carrying out any maintenance or work under the deck or near the grass rear discharge chute.
»before any maintenance, repairing or checking operations.
»before carrying, lifting or removing the mower.
»if you leave the mower unattended or changing the cutting height.
»to remove and emptying the grass catcher.
»after hitting a foreign object, stop the engine and check thoroughly the mower in order to see there is
damage. Take the mower to an authorized service station to do the repairing if necessary.
• If the mower vibrates in an abnormal way, try to find the reasons why, or take your mower to an authorized
service station.
• Check all nuts, bolts and screws are tight to be sure the equipment is in a safe working condition.
Fire and Burn Hazards
• Always store petrol in an approved, tightly sealed container. Store container in a cool, dry place.
• Always fill up the tank with a funnel, always fill up your fuel tank outside. DO NOT smoke. DO NOT use
mobile phone.
• Fill up with petrol and oil before starting the engine. NEVER open the cap of
• the fuel tank to add petrol while the engine is running or still hot.
• DO NOT start the engine if there is spilt petrol, wipe it off the engine and equipment, and move the mower
to another area, wait 5 minutes before starting the engine.
• Close tightly the fuel tank cap.
GENERAL SAFETY RULES
After you have stopped the engine, the blade is still in motion for a few seconds. Wait till blades have come
to a complete stop.
WARNING

8
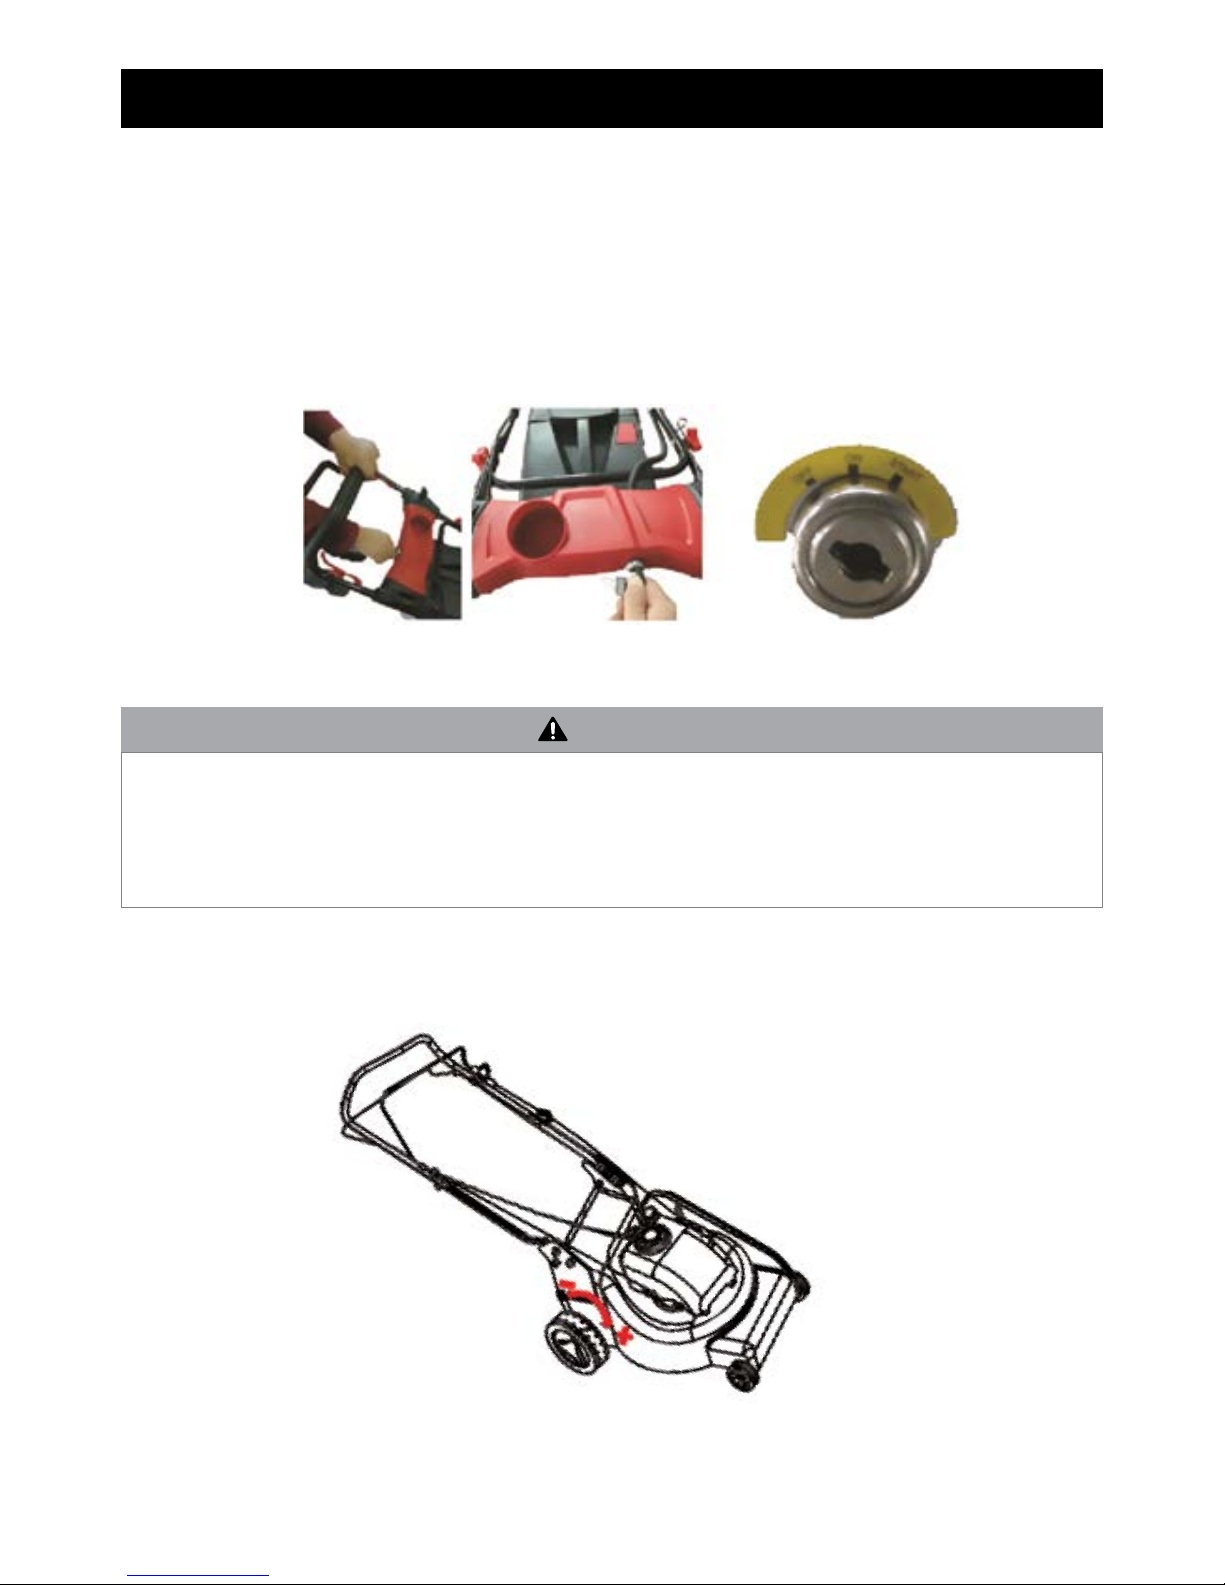
WWW.BBTA.COM.AU BBT-LM-SPBSES
A. Put the metallic frame inside the grass catcher.
B. Fix the bag on the metallic frame.
C. Pull up the deflector and place the grass catcher in its place.
1. Upper handle
2. Lower handle
3. Engine control bar
4. Throttle control
5. Engine
6. Chassis
7. Self-propelled function control bar
8. Electrical start key
PARTS LOCATION
ASSEMBLING
Grass Catcher

9
WWW.BBTA.COM.AUBBT-LM-SPBSES
ASSEMBLING
Handle
• Open out the handle and screw the handle parts with the two
screws and plastic nuts. Put the recoil starter on the right of the
handle and fix the cable with the plastic collar.
• Introduce the rope of the recoil starter handle on its support
guide rope.
Armrest Panel
Accessories:
• 1x plastic panel in red
• 2x plastic washers in black
• 4x self-tapping screws
Installation steps:
Assembly and Remove the battery
Assembly
1. First find the support catch and insert the black
plastic washers into the support catch with their
mounting holes facing outward (as shown in the
following figures).
2. Properly position the backing panel so that the back
plate screw holes can match the plastic washers for
proper mounting.
3. Tighten the screws, end of assembly.
1. Press and hold the
battery latch buttons
at both sides of the
battery pack.
2. Make sure latch on
bottom of battery
pack snaps in place
and that battery pack
is fully seated.
1. Press and hold the
battery latch buttons
at both sides of the
battery pack.
2. Remove battery pack
from the mower.
Remove
10
WWW.BBTA.COM.AU BBT-LM-SPBSES
1. The unit is equipped with a rubber boot over the
end of the spark plug, make certain the metal
loop on the end of the spark plug wire (inside the
rubber boot) is fastened securely over the metal
tip on the spark plug.
2. Standing behind the unit, grasp the brake control
handle and hold it against the upper handle as
shown in (Fig. F).
3. Turn the ignition key fully to the right in the
ignition lock. (Fig. F/G)
4. As soon as the motor starts running, release the
ignition key. (Fig. H)
ASSEMBLING
Starting Electric Start Engine
Cutting Height Ajustments
F G H
• Start the engine carefully according to instructions and with feet well away from the blade.
• Do not tilt the lawn mower when starting the engine. Start the mower on a level surface, free of high
grass or obstacles.
• Keep hands and feet away from rotating parts. Do not start the engine when standing in front of the
discharge opening.
CAUTION
11
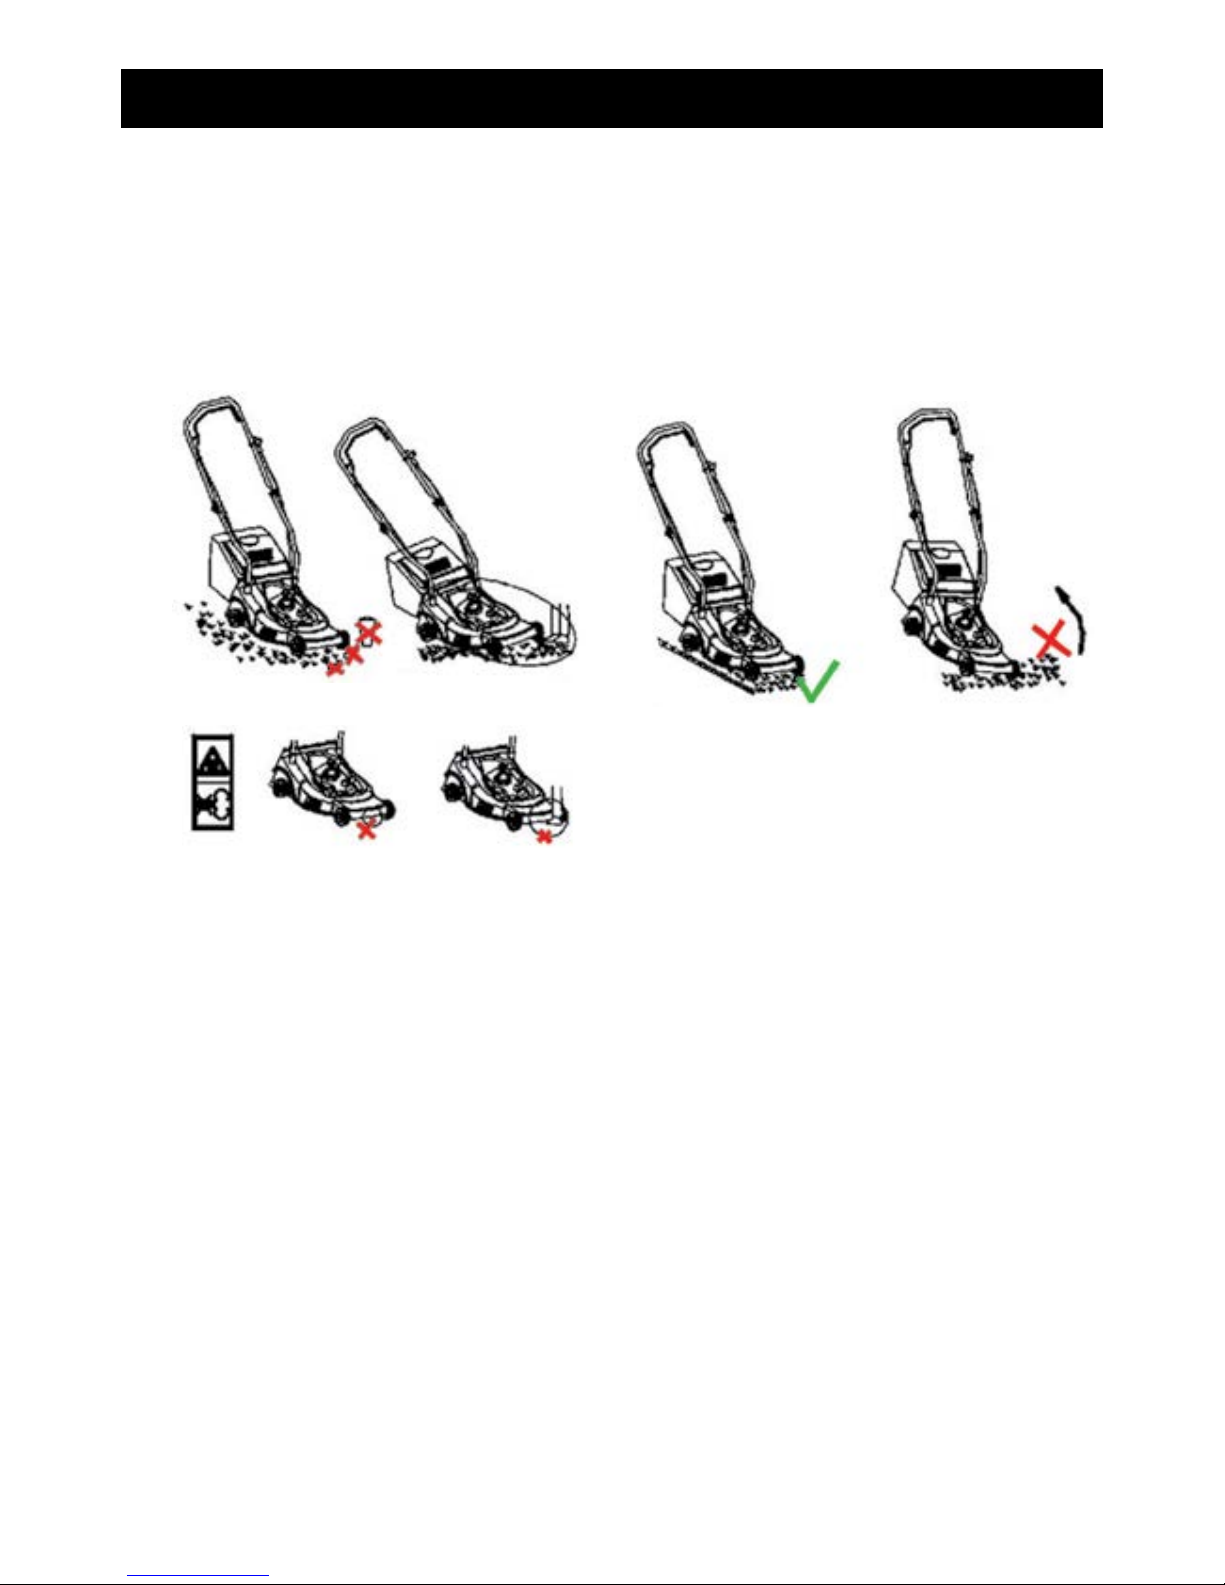
WWW.BBTA.COM.AUBBT-LM-SPBSES
a. Always use the lawn mower with the grass catcher
or/ and the deflector in position.
b. Stop the engine before emptying the grass catcher
or before you change the cutting height.
c. While the engine is running, never place your
hands or feet under the lawn mower or under the
grass ejection area. (Fig. I)
d. Before mowing, remove all foreign objects from
the lawn, which may be thrown by the machine.
(Fig. J)
e. Keep children, other people and domestic animals
at a safe distance when the lawn mower is in use.
f. NEVER lift the mower while starting the engine.
(Fig. L)
Safety Precautions
ASSEMBLING
I J
K

12
WWW.BBTA.COM.AU BBT-LM-SPBSES
Engine Starting
Once the machine has been set up properly, start the engine as follows:
• Put the lever on the START position or
• Hold lever handle (3) and maintain it against the superior handle, Turn the ignition key fully to the right in
the ignition lock. As soon as the motor starts running, release the ignition key.
• Put the lever on RUN position or .
Blade is in action as soon as engine is started. While the machine is working, maintain the security handle (3) in
working position. The engine will stop as soon as you release the engine control bar.
The Self Propelled Function
To engage the self-propelled system, pull on the inferior lever
of the handle and maintain it engaged together with the
brake lever. fig H
Gear Box
Check frequently the self-propelled system. Polish the gear in the wheels and put grease on them. Do the same
check on the ball bearing if any.
OPERATIONS
• All mowers are delivered without oil. Add 0.6 litres of oil before starting the
engine.
• Before using the machine you must read the Engine instruction book.
CAUTION
Engine control bar (3)
Pour Avancer

13
WWW.BBTA.COM.AUBBT-LM-SPBSES
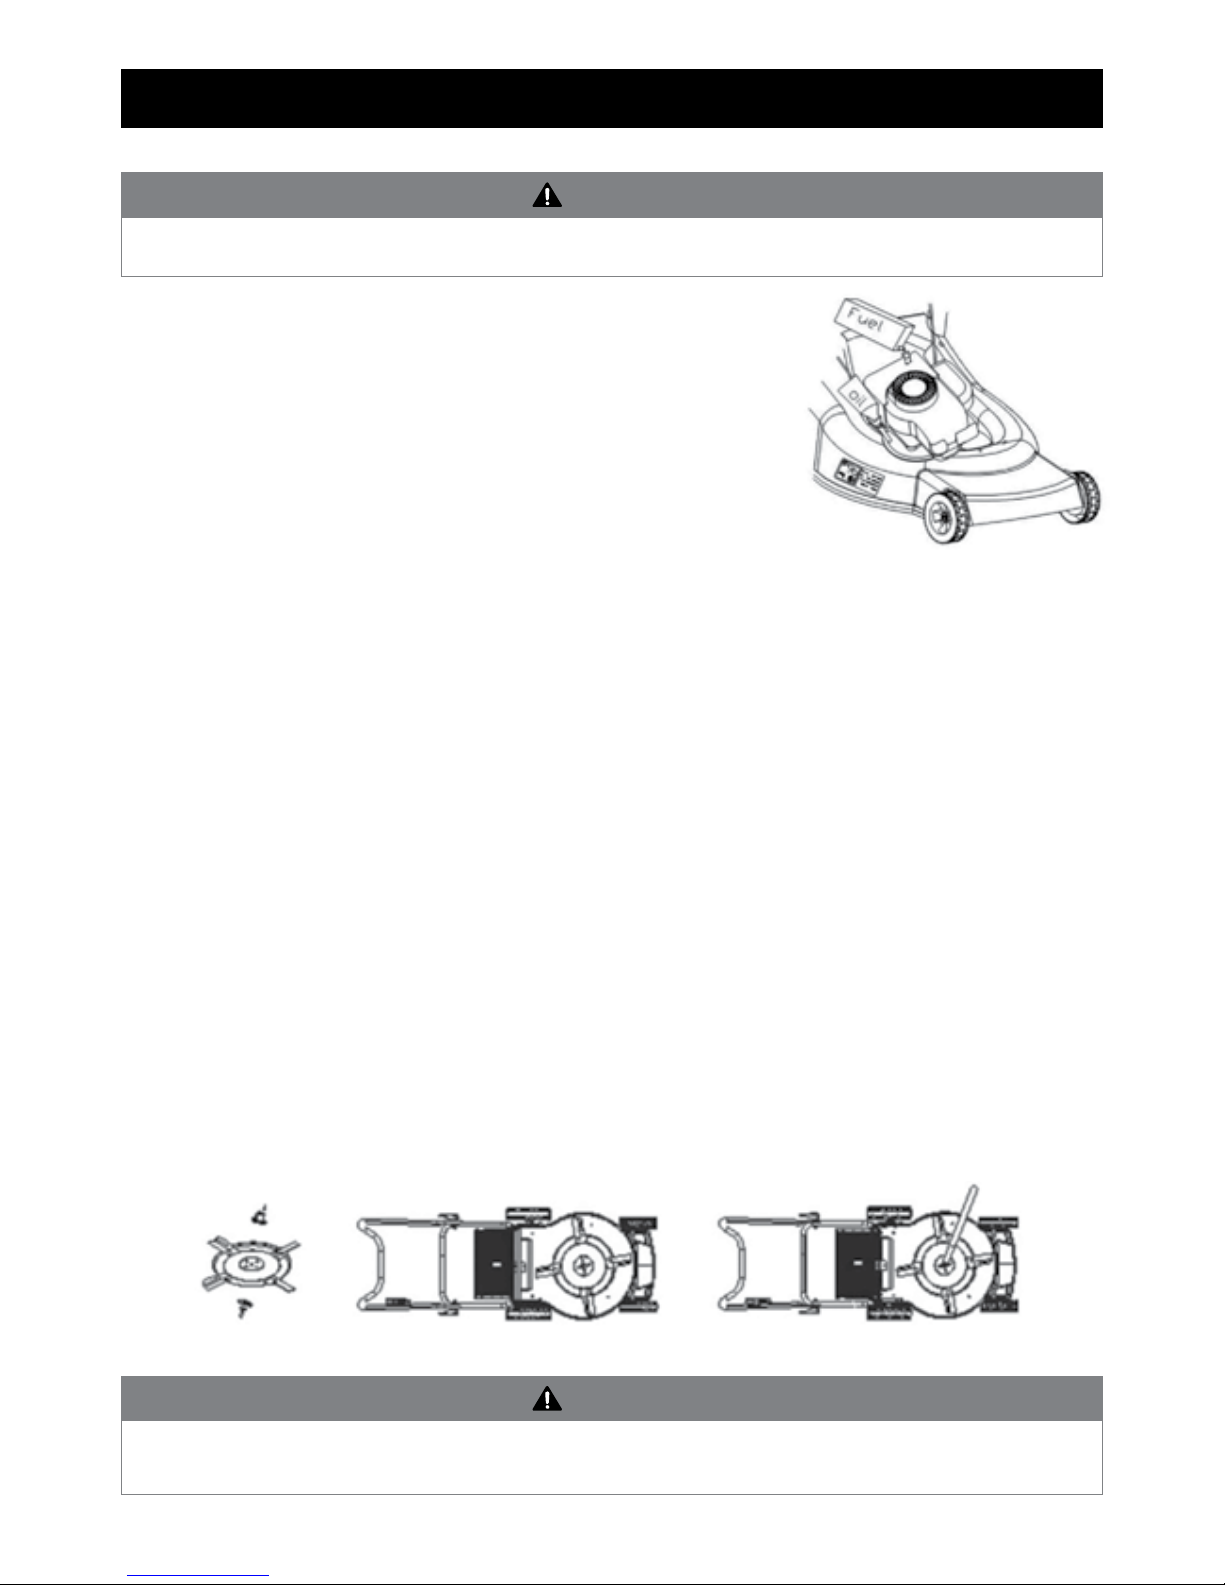
3 in 1 Function (Mulching, Side-discharge, Rear-discharge)
This Lawn Mower can be retrofitted from its normal function, based on the
application purpose from Lawn Mower with Rear Discharge to Mulching Mower
or as Side-discharge Mower.
What is mulching?
When mulching, the grass is cut in one working step, then finely chopped and
returned to the grass strip as natural fertilizer.
Hints for mulch-mowing:
• Regular cut-back by max. 2 cm from 6 cm to 4 cm grass height.
• Use a sharp cutting knife.
• DO NOT mow wet grass.
• Set max. motor speed.
• Only move at walking pace.
• Regularly clean mulching plug, housing inner side and mowing blade.
Starting operation
Note: The number in front of the text (e.g.3) refers to the figures.
Retrofitting for mulching plug
Only when motor and cutter are at standstill!
• Lift the discharge flap and remove the grass catcher chute.
• Push the mulching plug into the discharge channel. Lock the mulching plug
with housing—the nose on the bottom side of mulching wedge grip must
snap into the opening on the housing. (Picture 1 and 2)
• Lower the discharge flap again.
Resetting for side-discharge mowing
Only when motor and cutter are at standstill!
• Lift the discharge flap and remove the grass catcher.
• Mount the mulching plug. (see Mulch Mowing)
• Lift rear flap for side discharge. (Picture 3 and 4)
• Mount the discharge channel for side discharge on the support pin of the rear
flap. (Picture 5)
• Lower the rear flap—the rear flap lies on the Discharge channel. (Picture 6)
Mowing with the grass catcher chute
For mowing with the grass catcher, remove the mulching plug and discharge
channel for side discharge and mount the grass catcher.
Removing the mulching wedge:
Only when motor and cutter are at standstill!
• Lift discharge flap and remove the mulching wedge by unlocking on the
housing and removing it. (Picture 7)
Removing the discharge channel for side discharge
Only when the Engine has stopped and blade has stopped rotating!
• Lift rear flap and remove discharge channel. The rear flap automatically closes
the discharge opening on the housing by means of spring force.
• Regularly clean the rear flap and discharge opening from grass and dirt
buildup.
OPERATIONS
14
WWW.BBTA.COM.AU BBT-LM-SPBSES
MAINTENANCE CARE
Maintenance and Storage
• Make sure that all nuts, bolts and screws are kept well tightened to keep
the Lawn Mower in a safe operating condition.
• NEVER store the Lawn Mower with petrol in the tank or in an enclosed
area where petrol fumes could reach a strong heat source or a flame.
Allow the engine to cool down before you store your lawn mower in a
storage place.
• In order to reduce any risk of fire, clean the lawn mower in particularly
the engine, the muffler, and the fuel tank. Suppress all grass traces,
leaves or excess of grease.
• Check frequently the condition of the deflector and the grass catcher,
replace them if there is any damage.
• If you have to drain oil from the tank before winter, do this operation outside.
• Wear thick gloves before mounting or sharpening the blade. Be sure that the blade is always well balanced.
• Check regularly the oil level, add oil or replace it if necessary.
• Frequently check the lawn mower and make sure that all grass deposits are removed from beneath the deck.
• Lubricate regularly the wheel axle and the bearing with grease.
• Check blades often, in order to obtain clean work the blade should always be sharp and well balanced.
• At regular intervals check and tighten all bolts and screws. Wear off or badly tightened nuts and bolts can
cause damages to the engine or to the frame.
• If the blade hits violently an obstacle, stop the lawn mower and take your mower to an authorized service
centre.
Blade
• The blade is made of pressed steel, in order to obtain a clean work, sharpen the blade frequently, about
every 25 hours of work. Be sure that the blade is always well balanced.
• Introduce a small iron axle (2 or 3 mm of diameter) in the central hole of the blade:
• It should stay horizontal. If the blade does not stay horizontal, balance it by taking off some of the metal on
the side which is down.
• To remove the blade, unscrew the screw, check the blade support and change all spare parts if they are worn
out or damaged.
• To sharpen the blade, place it in a vice and file the cutting edge evenly, checking its balance.
• When reassembling the blade, make sure that the cutting edges face in the direction of the engine’s rotation.
The blade screw must be torque to
• 3.7Kg*m/s2(37Nm) with a dynamometric tool.
Stop the engine and unplug the spark plug before any repairing or maintenance work is carried out.
WARNING
Use only original spare parts. Spare parts of bad quality can cause damages to your lawn mower and
compromise your safety.
WARNING

15
WWW.BBTA.COM.AUBBT-LM-SPBSES
SPECIFICATIONS
Model BBT-LM-SPBSES
Rated power 3800 W
Displacement 190 cc
Rated speed 2750 RPM
Max torque 8 Nm
Cutting height range 20 - 55 mm
Number of cutting height adjustments 8
Cutting width 21 inches
Cutting height adjustment Central height adjust
Wheels diameter (rear-front) 152 - 152 mm
Catcher volume 70 L
Weight 31,5 Kg
Sound pressure 88 dB(A)
Sound power 98 dB(A)
Quantity of strokes of work of the Engine 4
Type of engine cooling Air cooling
Starting mode Electric Key Start
Drive system Self Propelled
Fuel tank capacity 1,5 L
Max permitted slope 20 degrees
Technical Data subject to change without notice.
WARRANTY & SERVICE
Warranties
Bigger Boyz Toyz offer a 1-year parts warranty on all products used for domestic use from the date of purchase.
For all commercial use, a 3-month parts warranty period applies, unless specified in the item listing. All conditions
below are based upon the product being faulty or not performing as described. In the instance where a return
is required, the purchaser is liable for any shipping cost. Warranties will only be determined by a Bigger Boyz
Toyz Technician upon inspection.
Warranties do not cover accidents, misuse, neglect, natural disaster or act of God or other external causes, or
damage caused by operating the equipment in a manner that is not described in the instructions.
Our products come with guarantees that cannot be excluded under the Australian Consumer Law. You are entitled
to a replacement or refund for a major failure and for compensation for any other reasonably foreseeable loss or
damage. You are also entitled to have the goods repaired or replaced if the goods fail to be of acceptable quality
and the failure does not amount to a major failure.
Parts purchases, consumable components and accessories such as chains, carry bags, batteries, hoses, grinding
discs, covers, belts, cable, wheels and blades are not covered by standard warranty.
Spare Parts
Spare parts are available. Please see our website (www.bbta.com.au) or contact us at bbt@bbta.com.au for more
details.

16
WWW.BBTA.COM.AU BBT-LM-SPBSES
EXPLODED DIAGRAM & PARTS LIST

17
WWW.BBTA.COM.AUBBT-LM-SPBSES
EXPLODED DIAGRAM & PARTS LIST
NO SKU DESCRIPTION QTY
1BBT-LM-SPBSES -001 Deck 1
2BBT-LM-SPBSES -002 Height Adjuster Bar 1
3BBT-LM-SPBSES -003 Board 1
4BBT-LM-SPBSES -004 Front Wheel Disc 2
5BBT-LM-SPBSES -005 Screw M6 x 16 4
6BBT-LM-SPBSES -006 Washer 4
7BBT-LM-SPBSES -007 Bearing 8
8BBT-LM-SPBSES -008 Front Wheel 2
9BBT-LM-SPBSES -009 Washer 12 4
10 BBT-LM-SPBSES -010 Front Axle 1
11 BBT-LM-SPBSES -011 Uncork Pin 2
12 BBT-LM-SPBSES -012 Front Axle Support 2
13 BBT-LM-SPBSES -013 Nut M6 12
14 BBT-LM-SPBSES -014 Spring 2
15 BBT-LM-SPBSES -015 Press Plate 2
16 BBT-LM-SPBSES -016 Pulley 1
17 BBT-LM-SPBSES -017 Belt Cover 1
18 BBT-LM-SPBSES -018 Screw ST4.8 x 13 2
19 BBT-LM-SPBSES -019 Long Key 4.775*5*34 1
20 BBT-LM-SPBSES -020 Blade Holder 1
21 BBT-LM-SPBSES -021 Cushion 1
22 BBT-LM-SPBSES -022 Blade 1
23 BBT-LM-SPBSES -023 Wing Washer 1
24 BBT-LM-SPBSES -024 Screw 1
25 BBT-LM-SPBSES -025 Air Path 1
26 BBT-LM-SPBSES -026 Deflector 1
27 BBT-LM-SPBSES -027 Rear Wheel Disc 2
28 BBT-LM-SPBSES -028 Rear Wheel 2
29 BBT-LM-SPBSES -029 Axes Circle 2
30 BBT-LM-SPBSES -030 Left Output Gear 1
31 BBT-LM-SPBSES -031 Right Output Gear 1
32 BBT-LM-SPBSES -032 Pin 2
33 BBT-LM-SPBSES -033 Dust-proof Wheel Cover 2
34 BBT-LM-SPBSES -034 Bearing 2
35 BBT-LM-SPBSES -035 Bearing Sheath 2
36 BBT-LM-SPBSES -036 Washer 22.5 2
37 BBT-LM-SPBSES -037 Axes Circle 2
38 BBT-LM-SPBSES -038 Rear Axle 1
39 BBT-LM-SPBSES -039 Height Adjuster 1
40 BBT-LM-SPBSES -040 Screw M6 x 12 4
41 BBT-LM-SPBSES -041 Screw M6 x 55 4
42 BBT-LM-SPBSES -042 Screw MI 025 3
43 BBT-LM-SPBSES -043 Screw ST4.8 x 16 10
44 BBT-LM-SPBSES -044 washer 3 x 20 x 1.5 4
45 BBT-LM-SPBSES -045 Collapsible 2
46 BBT-LM-SPBSES -046 Screw M5 x 12 8
47 BBT-LM-SPBSES -047 Gearbox Cover 1
48 BBT-LM-SPBSES -048 Sealed Washer 1
49 BBT-LM-SPBSES -049 Driving Axes 1
NO SKU DESCRIPTION QTY
50 BBT-LM-SPBSES -050 Umbellate Gear 39 1
51 BBT-LM-SPBSES -051 Washer 13 x 20 x 0.8 1
52 BBT-LM-SPBSES -052 Pin 1
53 BBT-LM-SPBSES -053 Umbellate Pinion 1
54 BBT-LM-SPBSES -054 Spring Washer 1
55 BBT-LM-SPBSES -055 Ball Bearing 1
56 BBT-LM-SPBSES -056 Screw M6 x 16 4
57 BBT-LM-SPBSES -057 Height Dial 1
58 BBT-LM-SPBSES -058 Screw M6 x 16 8
59 BBT-LM-SPBSES -059 Handle Support 2
60 BBT-LM-SPBSES -060 Spring 1
61 BBT-LM-SPBSES -061 Pulley Guider Bar 1
62 BBT-LM-SPBSES -062 Pin 5 x 60 1
63 BBT-LM-SPBSES -063 Follower Pulley 1
64 BBT-LM-SPBSES -064 Gearbox 1
65 BBT-LM-SPBSES -065 Axles 2
66 BBT-LM-SPBSES -066 Axles Bush 1
67 BBT-LM-SPBSES -067 Belt 850Li 1
68 BBT-LM-SPBSES -068 Side Discharge Pole 1
69 BBT-LM-SPBSES -069 Side Discharge Support 1
70 BBT-LM-SPBSES -070 Spring 1
71 BBT-LM-SPBSES -071 Side Discharge Guider 1
72 BBT-LM-SPBSES -072 Side Sealed Sheet 1
73 BBT-LM-SPBSES -073 Plastic Grass Catcher 1
74 BBT-LM-SPBSES -074 Screw M8 8
75 BBT-LM-SPBSES -075 Lower Handle 1
76 BBT-LM-SPBSES -076 Break Cable 1
77 BBT-LM-SPBSES -077 Screw M8 x 46 2
78 BBT-LM-SPBSES -078 Screw with Plastic Nut 2
79 BBT-LM-SPBSES -079 Hook 1
80 BBT-LM-SPBSES -080 Screw M6 2
81 BBT-LM-SPBSES -081 Washer 6 x 12 x 1.5 6
82 BBT-LM-SPBSES -082 Upper Handle 1
83 BBT-LM-SPBSES -083 Screw M6 x 35 2
84 BBT-LM-SPBSES -084 Foam Protector 1
85 BBT-LM-SPBSES -085 Driving Holder Bar 1
86 BBT-LM-SPBSES -086 Break Holder Bar 1
87 BBT-LM-SPBSES -087 Decorative Sheet 1
88 BBT-LM-SPBSES -088 Rear Cover 1
89 BBT-LM-SPBSES -089 Damper Grip 1
90 BBT-LM-SPBSES -090 Single Throttle Control 1
91 BBT-LM-SPBSES -091 Screw ST4.2 x 16 4
92 BBT-LM-SPBSES -092 Driving Cable 1
93 BBT-LM-SPBSES -093 Engine 1
94 BBT-LM-SPBSES -094 Spring 1
95 BBT-LM-SPBSES -095 Rear Cover 1
96 BBT-LM-SPBSES -096 Pole 1
97 BBT-LM-SPBSES -097 Spring 1
Drive Unit

Log Splitters
YOU MAY ALSO LIKE
COPYRIGHT © BIGGER BOYZ TOYZ AUSTRALIA PTY.LTD.
Unit 2/3 Delta Place, Albion Park Rail NSW 2527
BBT-LM-SPBSES-MNL1809
Cultivators / Tillers
Mulcher
Chainsaws
Table of contents
Other BBT Lawn Mower manuals


Popular Lawn Mower manuals by other brands


Spearhead
Spearhead ROLLIFLAIL 150 Operator's instruction manual

Brill
Brill 32 EH Hattrick Basic manual

Cushman
Cushman Turf Truckster 84043 Parts & maintenance manual

Stiga
Stiga TURBO 53 SE COMBI Instructions for use

Craftsman
Craftsman 917.273280 owner's manual

Craftsman
Craftsman 917.28928 Operator's manual