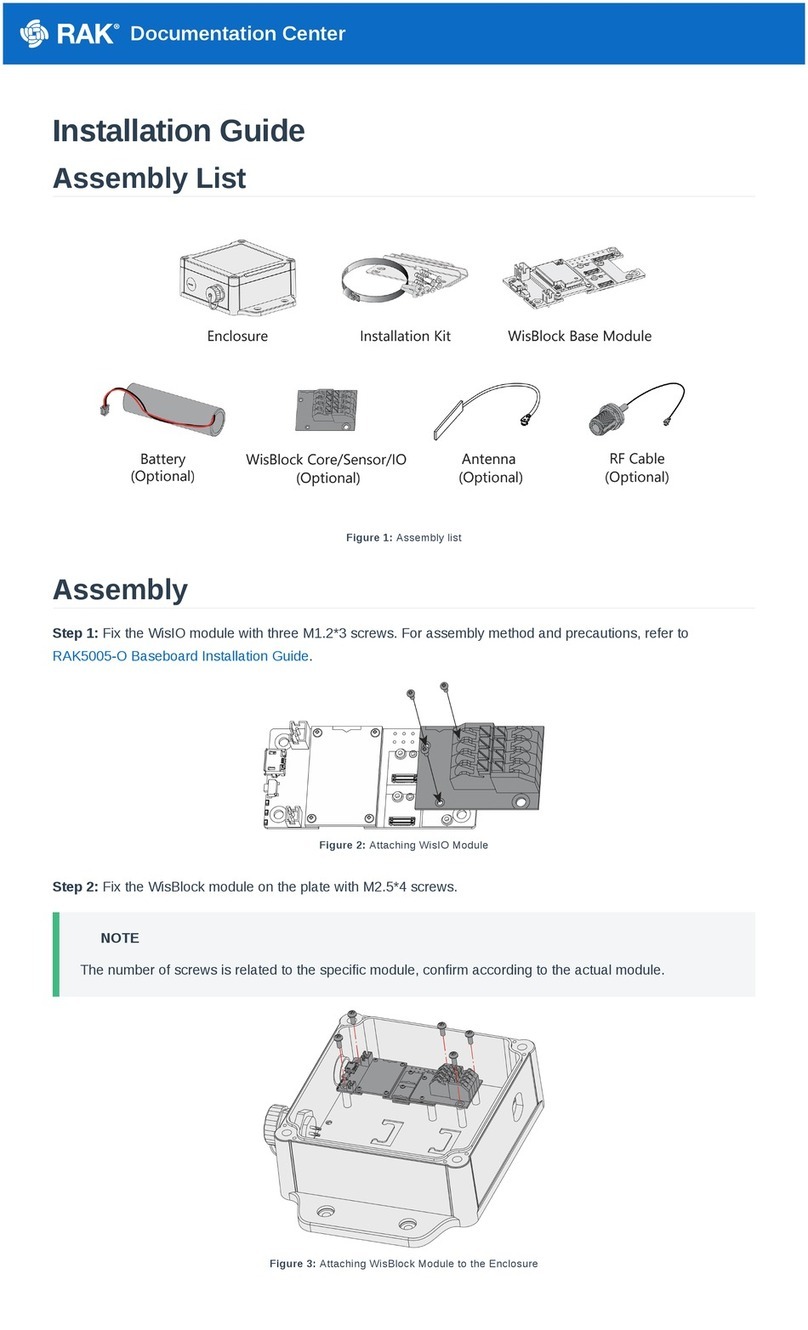
bca Tracker3 User manual

Owner’s Manual
Bedienungsanleitung
Manuel D’Utilisation
Manuale Di Istruzioni
Manual De Instruccions

Figure A
•Direction Lights
•Richtungsanzeige
• Achage de la Direction
•Spie Luminose di Direzione
•Luces Direccionales
•Distance Indicator/Battery Power Display
•Distanzanzeige/Batterieladeanzeige
•Indicateur de Distance/Témoin de Batterie
•Indicatore di Distanza/Display del Livello Batteria
•Indicator de Distancia/Estado de Bateria
•Multiple Burial Indicator
•Mehrfachverschüttetenanzeige
•Indicateur Multi Victimes
•Led Indicatore di
Seppellimento Multiplo
•Luz Indicadora de Entierros
Múltiples
•Loudspeaker
•Lautsprecher
•Haut-parleur
•Altoparlante
•Altavoz
•Transmit Light
•Sendekontrolllampe
•Témoin d’Émission
•Spia Luminosa di Trasmissione
•Indicador de Transmisión
•Options Button
•Optionstaste
•Bouton Options
•Pulsante Opzioni
•Botón de opciones

3
•Dial Switch
•Drehschalter
•Composer Passer
•Pulsante di Accensione
•Interruptor
•Sliding Lock
•Schiebeverriegelung
•Curseur de Verrouillage
•Blocco Scorrimento
•Pestaña Deslizante de
Bloqueo
•Dial Switch
•Drehschalter
•Composer Passer
•Pulsante di Accensione
•Interruptor
•Transmit Mode
•Sendemodus
•Mode Émission
•Modalità Trasmissione
•Modo de Transmisión
•Search Mode
•Suchmodus
•Mode Recherche
•Modalità Ricerca
•Modo de Búsqueda
•Battery Door
•Batteriefach
•Logement des Piles
•Sportello Batterie
•Compartmento de Bateria
•Options Button
•Optionstaste
•Bouton Options
•Pulsante Opzioni
•Botón de opciones

4
No avalanche beacon can save lives without a fully trained user. Practice
frequently with your Tracker3 before going into the backcountry. Learn
and understand the inherent dangers of backcountry travel. Become
educated in avalanche hazard evaluation, route selection, and self-rescue.
In addition to your beacon, always carry a probe and shovel—and always
travel with a partner. We also recommend the use of avalanche airbags
and group communication devices, such as two-way radios.
Make sure all rescue equipment is functioning properly before venturing
into the backcountry. Perform a beacon trailhead test every time you use
your Tracker3. Check that all transceivers transmit and receive properly—
and that all receive a signal at a minimum distance of 20 meters.
Do not place cellular phones, communication radios, GPS devices, digital
cameras, or any other electronic equipment within 16” (40 cm) of Tracker3
while performing a transceiver search. In receive mode, irregular readings,
decreased range and multiple burial indications can be caused by these
and other sources of electrical interference, such as power lines, electrical
storms, and electrical generating equipment. In transmit mode, keep
Tracker3 at least 1” (2.5 cm) from other electronic equipment. Use only
alkaline batteries of identical age and brand. Do not use rechargeable,
lithium, Oxyride, PowerPix, or any other non-alkaline battery.
This owner’s manual covers the basic techniques required to use
Tracker3 effectively. To increase your efficiency, order our training
DVD’s and refer to the Advanced Tracker3 Manual on our website:
www.backcountryaccess.com. Here you will also find important
resources for obtaining avalanche education and updates on regional
avalanche conditions.
To ensure warranty protection and to be notied of software updates,
please complete an online warranty registration at:
www.backcountryaccess.com/warranty.
Conforms to the R&TTE harmonized version of the EN 300 718 and meets
or exceeds the requirements of Articles 3.1, 3.2, and 3.3.
Disclaimer:

ENGLISH
5
Avalanche Awareness
This is a basic introduction to avalanche safety and awareness.
We encourage you to read this manual thoroughly. On our website,
you will also nd a list of avalanche instructors. We strongly suggest
taking an avalanche course in your area before venturing into the
backcountry.
Before leaving, call your local avalanche forecast center and determine
the danger level in the area you intend to visit.
U.S. www.avalanche.org
Canada www.avalanche.ca
Europe www.lawinen.org
Figure B Avalanche Forecasts
N
S
E
W
Low
Moderate
Considerable
High
Extreme
Pockets of next danger level
N
S
E
W
Low
Moderate
Considerable
High
Extreme
Pockets of next danger level
Bulletins from your local avalanche forecast center will enable you to
identify the avalanche problems to avoid when planning your route.
Avalanche Awareness
At the trailhead, check that each person has a working beacon, probe
and shovel—and knows how to use them. We also recommend the
use of avalanche airbags and group communication devices, such as
two-way radios.
Learn to recognize avalanche terrain:
• Does this slope have a history of sliding?
• What is the angle and aspect of the slope?
• Will recent weather impact snow stability?
Learn to avoid avalanche terrain:
• Is there any evidence of recent avalanche activity?
• Is the slope angle between 30 and 45 degrees?
• Does the slope you plan to use have dangerous terrain traps
(rocks, trees, gullies, clis, etc.)?

6
Avalanche Awareness
Travel with considerate partners:
• Cross potentially dangerous terrain one at a time.
• Identify and practice stopping in safe zones.
• Have an escape route in mind if the slope does avalanche.
• Communicate with your partners before moving on to the slope.
When traveling in a group, be aware of the errors groups typically
make:
• Recreating at an area that’s been visited without incident before
and feeling condent in its stability.
• Not speaking out or communicating concerns about a path
or slope, fearing conict.
• Being overcondent in the groups’ abilities.
• Determination to reach a destination without re-evaluating terrain
and conditions.
If in doubt, it is always best to avoid questionable terrain and return
when the snow is stable.
If you are caught in an avalanche:
• Yell “avalanche” and wave your arms to alert your group.
• Deploy your avalanche airbag if you have one.
• Try to escape the slide by grabbing trees or rocks or “swimming”
to the side.
• Try to keep your airway clear of snow.
• When you feel the slide slowing, thrust a hand upward in hopes
of it being seen.
• Place your other hand in front of your face to increase the
air space.
• Remain calm, breathe slowly and conserve your air.
Searching for victims:
• Do not go for help! You are the victim’s only chance of survival!
• Establish a last seen point.
• Conrm you are not in danger of a second avalanche occurring.
• Look for visual clues to the victim’s location.
• Begin your signal search for the victim using your avalanche beacon.

ENGLISH
7
Familiarization
Thank you for choosing Tracker3, featuring Tracker2’s famous
ease-of-use in a smaller, lighter package.
Remember, beacon searches are only part of the avalanche rescue
process. It is equally important to practice the probing and shoveling
techniques found later in this section. For training videos on beacon
searching, probing, and strategic shoveling techniques, please visit
www.backcountryaccess.com/education.
Transmit mode: From the ‘O’ position, pull the sliding lock nin the
direction of the arrow and turn the dial switch jon top of Tracker3 to
the transmit (“TR”) position (see Figure C).
Figure C
Top view of
Tracker3.
The battery life is then shown in the distance/battery power display k
in Figure A.
After displaying battery power, Tracker3 ashes “TR” and enters transmit
mode. The transmit light l ashes with every other transmit pulse.
This light will not ash if the battery power is below 20 percent.
In addition to being displayed at startup, the battery power level can also
be checked in transmit mode by pressing the Options button o.
Note: the battery percentage is approximate. Replace batteries mwell
before reaching 20 percent.
When in transmit mode, the Tracker3 cannot be turned to o or search
without pulling back the sliding lock.
Search mode: Pull the sliding lock nand rotate the dial switch to the
search (“SE”) position. In search mode, the display will periodically ash
“SE”until a signal is detected. Upon detecting a transmitting signal,
Tracker3 will begin to display distance and directional readings.
Return to transmit: When in search mode, the sliding lock does not need
to be moved in order to return to transmit mode. Simply rotate the switch
back to the transmit position.The display will ash “TR” and beep for ve
seconds before it begins to transmit.
After 30 minutes in search mode, Tracker3 will beep every ten minutes. After
12 hours in transmit mode, it will beep every two minutes. These beeps are
reminders that there has been no user input and Tracker3 is still on.

8
Familiarization
Adjustment/Fitting
Tracker3 can be worn with or without its harness. When used with a
harness, Tracker3 should be worn underneath your outer garments,
as shown in Figure D.
Shoulder Strap
Waist Attachment Buckle
Waist Strap Lanyard
Lanyard Attachment Loop
Figure D
Distance/directional display should be against your body and transmit light
should be exposed and visible.
To search, remove Tracker3 from its pouch, but keep the harness on and
lanyard attached. If using without a harness, keep Tracker3 in a secure
pocket, preferably in your pants or other garment that won’t be removed
while traveling in the backcountry. Attach the lanyard clip to a zipper or
other solid xture. If the lanyard is removed from harness or clothing for
searching, keep it attached to your wrist with the loop provided.
Power Supply
Tracker3 operates with three AAA alkaline batteries. Use only high-quality
alkaline batteries of identical age and brand. Do not use rechargeable,
lithium, Oxyride, PowerPix or any other non-alkaline battery. Replace with
fresh batteries at the beginning of every season.
If Tracker3 is exposed to excessive moisture, open the battery door m
to help allow the unit to dry. To prevent corrosion of contacts, remove
batteries during extended periods of inactivity. The manufacturer does not
warranty damage caused by battery corrosion.

ENGLISH
9
Operating Instructions
Searching
Tracker3 operates using the 457 kHz international standard frequency.
It is fully compatible with all avalanche transceivers adhering to this
standard. Do not use with 457 kHz transceivers designed for reghter
rescue.
When searching, keep Tracker3 at least 16” (40 cm) away from
electrical equipment, including cell phones and video cameras.
Turn all electrical equipment o if possible.
The search process includes four phases: the signal search, the coarse
search, the ne search, and the pinpointing/probing phase (See Figure E).
Figure E
20 m
20 m
20 m
avalanche path
40 m
Objective: Locate signal
• If no "last seen point," search entire path
• Rotate Tracker in all directions
• Max 40 m between searchers or switchbacks
Objective: Locate smallest distance reading
(strongest signal)
• Use Tracker3 close to snow surface
• Ignore fluctuations in distance and direction
• Begin probing at lowest distance
• Probe in concentric circles 10” (25 cm) apart
Objective: Move quickly to 10m, slowly to 3 m
• Follow general direction of center 3 lights
• Make sure distance readings are decreasing
• Slow down at 10 m
SIGNAL
SEARCH
> 40 m
FINE
SEARCH
< 3 m
COARSE
SEARCH
3–40 m
Signal Search: The signal search refers to the process of establishing a
search pattern and looking for a signal. The search pattern will be dened
by the victim’s last seen area, the size of the slide, and the number of
searchers. Refer to Figure F to establish a signal search pattern. If the slide
is less than 40 meters wide, the signal search path will be directly up or
down the center. If the victim’s last seen area is well dened, the signal
search will follow a direct path along the fall line (up or down) from this point.

10
Operating Instructions
20 m20 m
avalanche path
40 m40 m
Figure F
20 m
20 m
20 m
20 m
avalanche path
40 m
40 m
last seen area
last seen area
Signal search path with one searcher
(slide wider than 40 meters).
Signal search path with multiple searchers
(slide wider than 40 meters).
If the slide is wider than 40 meters and there is no last seen point, cover
the entire slide area by using switchbacks in the search pattern (Figure F).
If multiple rescuers are available, establish a search pattern where the
space between searchers is no more than 40 meters and the distance to
the edges is no more than 20 meters.
Prior to the signal search, be sure that all transceivers are turned to search
mode. Rotate Tracker3 slowly in all directions (Figure G) while moving
along your signal search pattern. While searching, be aware of other
physical clues, such as equipment or extremities protruding from the
snow surface. When no signal is detected, “SE” will ash in the distance
indicator. Once a signal is detected consistently, mark this spot and begin
the coarse search.

ENGLISH
11
Operating Instructions
Slowly rotate the Tracker horizontally and
vertically in your hand, but move rapidly
during the signal search. Do not abandon
your search path until you have captured
a strong, steady signal. Ignore irregular
signals, which can sometimes be caused
by electrical interference.
Figure G
Coarse Search: The coarse search is the portion of the search from where
you have detected a steady signal to where you are close to the victim.
Once the signal is consistently detected, rotate Tracker3 slowly on a
horizontal plane until the center direction light pis blinking.
Tracker3 is now pointed in the direction of the strongest signal. The four
lights on either side of center tell you which way to rotate Tracker3 to
engage the center light. The distance indicator ktells you, in approximate
meters, how far you must travel (1 meter = 1.1 yards or 3.3 feet). If the
number on the distance indicator is increasing, you are on the same axis
as the victim’s signal, but moving in the opposite direction. Turn 180
degrees, engage the center search light again, and continue your search
in the direction Tracker3 is pointing. If you are stationary, but the distance
is signicantly changing, you are probably detecting the signal of another
rescuer. Make sure all rescuers are in search mode before continuing.
You may nd that, while following the directional lights, your route follows
an arc. This is because Tracker3 follows the shape of the electromagnetic
signal coming from the transmitting beacon’s antenna. The distance
displayed is the distance to be traveled along that signal, not the straight-
line distance from you to the victim.

12
Operating Instructions
Fine Search: The ne
search is the nal part of
the beacon search, which
is performed on foot with
the beacon positioned at
or near the snow surface.
The objective of the ne
search is to locate where
the signal is strongest
(distance reading is
lowest) and to reduce
the area to be probed.
Move Tracker3 slowly
in a straight line along
the surface of the snow
during the nal three
meters of the ne search.
The directional lights do
not illuminate in the nal
two meters, so only pay
attention to the distance
readings. From the point
where you have located the smallest reading, “bracket” at 90-degree angles
to the left and then to the right in search of a lower reading (Figure H).
Repeat if necessary along both axes. Begin probing at the lowest distance
reading.
Pinpointing/Probing
At your lowest distance reading, probe in concentric circles, with each
probe hole about 10 inches (25 cm) apart (Figure I). Your probe should
enter the snow perpendicular to the slope. Once you have conrmed the
victim’s location, leave the probe in the snow.
90° 10” 10”
25 cm25 cm
Figure I
3.0
2.0
1.0
2.0
3.0
1.6
1.6
Bracketing: Make sure
you go well past the
low reading to conrm
it is the lowest. When
bracketing, ignore the
directional lights, which
no longer illuminate at
less than two meters.
Do not rotate the
beacon during this
process, as it can
change the distance
readings.
Figure H

ENGLISH
13
Operating Instructions
Shoveling
Shoveling is dicult and consumes the majority of time during an
avalanche rescue. For best results, start shoveling just downhill of the
probe (Figure J). Make sure your hole is at least one “wingspan” wide.
In burials deeper than one meter, excavate downhill about 1.5 times the
burial depth.
1.5 x
burial depth
Figure J
Multiple Burials
Complex multiple burials are rare in recreational settings and usually can
be treated as a series of single burials. When more than one transmitting
victim is within the receiving range of Tracker3, the multiple burial icon q
will illuminate and stay solid. (Note: this icon can occasionally illuminate
irregularly in the presence of electromagnetic noise or when detecting
older analog transceivers). If there are more than two transmitting victims
within range, then the “+” icon will illuminate.
If the multiple burial icon is illuminated and/or Tracker3 displays more than
one distance and direction, then there are probably several victims within
range. Stay in search mode and focus on the closest distance reading,
attempting to engage that signal in the center search light.
Once you are signicantly closer to one signal than the other, Tracker3
will “lock” onto that signal and mask out the others. Once this signal is
isolated, Tracker3 will behave very similar to how it does in a single beacon
search. Once you have located and excavated the rst victim, turn his or
her beacon o if you determine the conditions are safe. If you have a clear
signal, then begin searching for the next victim.
If the close proximity icon “[ ]” is illuminated around the multiple burial
icon, then there are at least two victims in close proximity, both within
approximately ve meters of the searcher. If the searcher is moving fast
and not paying attention, it is possible to move past a signal without
seeing it displayed. In complicated, close-proximity multiple burial
situations where it is not possible to turn o the found victims’ beacons,
it can be helpful to use one or more of the advanced search techniques
found in the Advanced Tracker3 Manual.

14
Advanced Options
For detailed descriptions and operating instructions for the following
Tracker3 features, please read the Advanced Tracker3 Manual at
www.backcountryaccess.com.
• Isolating multiple victims
• Special techniques for close-proximity multiple burials
• Automatic revert from search to transmit mode
• Muting the sound
• Downloading software updates
• Tracker3 diagnostics and eet testing

Bedienungsanleitung

16
Kein Verschüttetensuchgerät (VS-Gerät) kann Leben retten ohne einen
gut ausgebildeten Anwender. Üben Sie regelmäßig mit Ihrem Tracker3,
bevor Sie ins freie Skigelände gehen. Lernen Sie die typischen Gefahren
der Natur kennen und verstehen. Besuchen Sie einen Ausbildungskurs zur
Einschätzung von Lawinengefahr, Routenplanung und Kameradenrettung.
Führen Sie immer zusätzlich eine Sonde und eine Schaufel mit – und
gehen Sie nie allein auf Tour. Wir empfehlen zudem die Verwendung
eines Lawinenairbags und Gruppenfunkgeräte, zum Beispiel Zwei-Wege-
Funkgeräte.
Vergewissern Sie sich, dass die Notfallausrüstung funktionstüchtig ist,
bevor Sie auf Tour gehen. Führen Sie jedes Mal einen VS-Geräte-Check
durch, wenn Sie Ihren Tracker3 benutzen. Überprüfen Sie, ob alle VS-
Geräte richtig senden und empfangen. Die Empfangsreichweite muss
mindestens 20 Meter betragen.
Wenn Sie Mobiltelefone, Funkgeräte, GPS-Geräte, Digitalkameras, oder
andere elektrische Geräte mitführen, müssen diese einen Mindestabstand
von 40 cm zum Tracker3 haben, wenn Sie eine Suche durchführen. Im
Suchmodus können sonst irreführende Anzeigen, eine geringe Reichweite
oder fälschlicherweise Mehrfachverschüttete angezeigt werden. Störungen
können durch Hochspannungsleitungen, bei Gewittern oder durch
elektrische Geräte verursacht werden, die elektromagnetische Felder
aussenden. Im Sendemodus müssen andere elektrische Geräte einen
Mindestabstand von 2,5 cm zum Tracker3 haben. Verwenden Sie nur
Alkalibatterien gleichen Alters und gleicher Marke. Verwenden Sie keine
wiederauadbaren, Lithium-, Oxyride-, PowerPix- oder andere nicht
alkalische Batterien.
Diese Bedienungsanleitung beinhaltet das Basiswissen zur eektiven
Anwendung des Tracker3. Um Ihre Sucheektivität zu erhöhen,
bestellen Sie unsere Trainings-DVDs und lesen Sie die Suchanleitung für
Fortgeschrittene (Advanced Tracker3 Manual) auf unserer Homepage:
www.backcountryaccess.com. Dort nden Sie zudem wichtige Hinweise
zu Anbietern, die Lawinenkunde vermitteln sowie aktuelle Informationen
über regionale Verhältnisse bezüglich der Lawinengefahr.
Für Leistungen im Garantiefall und für Software-Updates füllen Sie bitte
eine Garantieregistrierung online auf: www.backcountryaccess.com/
warranty aus.
Der Tracker3 erfüllt die harmonisierte R&TTE-Version der Norm EN 300
718 und entspricht oder übertrit die Anforderungen der Abschnitte 3.1,
3.2 und 3.3.
Haftungsbeschränkung:

DEUTSCH
17
Lawinenkunde
Der folgende Abschnitt vermittelt Basiswissen zur Lawinengefahr und
Lawinenkunde.
Bitte lesen Sie diese Anleitung sorgfältig durch. Auf unserer Webseite
nden Sie zudem eine Liste von Bergführern und weiteren Spezialisten für
Lawinensicherheit. Wir empfehlen Ihnen, einen Lawinenkurs zu belegen,
bevor Sie sich ins freie Skigelände begeben.
Rufen Sie den Lawinenlagebericht ab und informieren Sie sich über die
regionale Lawinengefahrenstufe, bevor Sie aufbrechen.
USA www.avalanche.org
Kanada www.avalanche.ca
Europa www.lawinen.org
Lawinenlageberichte
N
O
NO
NW
SW SO
W
S
1
2
3
4
5
Bild B
Lawinenkunde
Prüfen Sie, ob jede Person ein funktionstüchtiges VS-Gerät, eine Sonde
und eine Schaufel mit sich führt und mit der Ausrüstung umgehen kann.
Wir empfehlen zudem die Verwendung eines Lawinenairbags und
Gruppenfunkgeräte, zum Beispiel Zwei-Wege-Funkgeräte.
Lernen Sie, lawinengefährliches Gelände zu erkennen
• Zeigt das Gelände Anzeichen früherer Lawinenabgänge?
• Welche Steilheit und welche Ausrichtung hat der Hang?
• Wie beeinusst das Wetter die Schneestabilität?
Lernen Sie, lawinengefährliches Gelände zu vermeiden
• Gibt es Anzeichen jüngster Lawinenaktivität?
• Beträgt die Steilheit des Hanges zwischen 30° und 45°?
• Hat der Hang, den Sie betreten wollen, gefährliche Geländefallen
(Steine, Bäume, Löcher, Felsen, usw.)?

18
Lawinenkunde
Gehen Sie mit aufmerksamen Partnern auf Tour
• Überqueren Sie potentiell gefährliches Gelände einzeln.
• Halten Sie an sicheren Geländepunkten.
• Merken Sie sich im Voraus einen Fluchtweg, falls tatsächlich eine
Lawine abgeht.
• Besprechen Sie sich mit Ihren Partnern, bevor Sie in einen Hang einfahren.
Falls Sie in einer Gruppe unterwegs sind, denken Sie an die typischen
Fehler, die Gruppen machen:
• Falls eine Route schon einmal ohne Vorfall begangen wurde, fühlt sich
die Gruppe dort sicher bezüglich der Schneedeckenstabilität.
• Vorbehalte gegenüber einer Route oder eines Hanges werden aus
Angst vor Konikten nicht ausgesprochen oder diskutiert.
• Das Wissen und die Fähigkeiten der Gruppe werden überschätzt.
• Der Entschluss das Ziel zu erreichen, wird bezüglich des Gelände und
der Verhältnisse nicht überdacht.
Im Zweifel ist es immer besser, fragwürdiges Gelände zu vermeiden.
Versuchen Sie die Tour zu einem anderen Zeitpunkt wenn die
Bedingungen stabil sind.
Falls Sie von einer Lawine erfasst werden:
• Rufen Sie „Lawine“ und geben Sie Zeichen, um die Gruppe zu alarmieren.
• Falls Sie einen Lawinen Airbag tragen lösen Sie diesen sofort aus.
• Versuchen Sie, sich an Bäumen oder Felsen festzuhalten, um nicht
mitgerissen zu werden. Oder versuchen Sie, seitlich aus der Lawine
zu „schwimmen“.
• Versuchen Sie, Ihre Atemwege frei zu halten.
• Wenn Sie fühlen, dass die Lawine langsamer wird, stoßen Sie einen
Arm nach oben. Eventuell werden Sie dann besser gesehen.
• Halten Sie sich die andere Hand vor den Mund, um eine Atemhöhle
zu bilden.
• Bleiben Sie ruhig, atmen Sie langsam. Das spart Luft.
Suche nach Verschütteten:
• Versuchen Sie zunächst nicht, Hilfe von außen zu holen! Sie sind
die einzige Überlebenschance des Verschütteten!!
• Markieren Sie den Punkt, an dem Sie das Opfer zuletzt gesehen haben.
• Vergewissern Sie sich, dass Sie nicht durch eine zweite Lawine
gefährdet sind.
• Suchen Sie das Lawinenfeld mit den Augen nach Hinweisen auf den
Verschütteten ab.
• Suchen Sie mit Ihrem VS-Gerät nach dem Signal des Verschütteten.
Einführung
Herzlichen Dank, dass Sie sich für den Tracker3 entschieden haben. Er ist
eine leichtere, kompaktere Version des extrem bedienerfreundlichen Tracker2.
Bitte machen Sie sich bewusst, dass die Suche mit dem VS-Gerät nur
ein Teil der Kameradenrettung ist. Es ist genauso wichtig, das Sondieren

DEUTSCH
19
Einführung
und Graben zu üben! Weitere Informationen nden Sie weiter hinten in
diesem Kapitel. Trainingsvideos zur Verschüttetensuche, zum Sondieren
und strategischen Schaufeln nden Sie auf unserer Website unter
www.backcountryaccess.com/education.
Sendemodus: Ziehen Sie die Schiebeverriegelung n von der „O“-
Position in Pfeilrichtung und drehen Sie den Wahlschalter jauf der
Oberseite des Tracker3 in Sendeposition („TR“) (siehe Bild C). Die
Batteriekapazität wird im Distanz-/Batterieladedisplay kin Prozent
angezeigt (siehe Bild A).
Bild C
Ansicht
von oben
Trackere3.
Nach der Anzeige der Batteriekapazität erscheint „tr“ im Display und der
Tracker3 schaltet in den Sendemodus. Die Sendekontrolllampe lblinkt
bei jedem zweiten Sendeimpuls. Die Sendekontrolllampe blinkt nicht, falls
die Batteriekapazität weniger als 20 Prozent beträgt.
Beim Anschalten des Tracker3 wird die Batteriekapazität automatisch
angezeigt. Während des Sendens kann die Kapazität zudem durch
Drücken der Optionstaste oüberprüft werden.
Hinweis: Es wird nur die ungefähre Batteriekapazität angezeigt.
Tauschen Sie die Batterien mfrühzeitig aus, bevor eine Restkapazität
von 20 Prozent unterschritten wird.
Der Tracker3 kann im Sendemodus nur ausgeschaltet oder auf
Suchmodus umgeschaltet werden, wenn die Schiebeverriegelung
zurückgezogen wird.
Suchmodus: Ziehen Sie die Schiebeverriegelung nzurück und drehen
Sie den Wahlschalter in Suchposition („SE“). Im Suchmodus blinkt im
Display die Anzeige „SE“, bis ein Signal gefunden wird. Empfängt der
Tracker3 ein Signal, werden Distanz und Richtung im Display angezeigt.
Rückkehr zum Sendemodus: Im Suchmodus muss die
Schiebeverriegelung zum Umschalten in den Sendemodus nicht
betätigt werden. Drehen Sie stattdessen einfach den Wahlschalter in
Sendeposition. Im Display erscheint „tr“ und es ertönt ein Warnton für fünf
Sekunden, bevor das Gerät wieder sendet.
Nach 30 Minuten im Suchmodus ertönt alle zehn Minuten ein Warnton.
Nach 12 Stunden im Suchmodus ertönt alle zwei Minuten ein Warnton.
Die Warnungen dienen als Erinnerung, dass das Gerät nicht umgeschaltet
oder ausgeschaltet wurde.

20
Einführung
Anlegen des Tragesystems
Der Tracker3 kann mit oder ohne Tragesystem verwendet werden. Bei
Verwendung des Tragesystems sollte der Tracker3 unter der äußersten
Kleidungsschicht getragen werden (Bild D). Das Gerät sollte so getragen
werden, dass die Distanz-/Richtungsanzeige auf den Körper gerichtet ist
und die Sende-LED nicht verdeckt und sichtbar ist.
Shoulder Strap
Waist Attachment Buckle
Waist Strap Lanyard
Lanyard Attachment Loop
Bild D Schultergurt
Sicherheitsschnur
Sicherheitsschnur
befestigungsschlaufe
Bauchgurt
Schnalle für den Bauchgurt
Bei der Suche wird der Tracker3 aus dem Holster genommen.
Tragesystem und Sicherheitsschnur bleiben am Körper befestigt. Falls
Sie den Tracker3 ohne Tragesystem verwenden, tragen Sie ihn in einer
sicheren Tasche, zum Beispiel in einer Hosentasche mit Reißverschluss
oder in einem anderen Kleidungsstück, das Sie nicht ausziehen, während
Sie unterwegs sind. Den Klipp der Sicherheitsschnur xieren Sie dann an
einem Reißverschluss oder an einem anderen soliden Punkt ihrer Kleidung.
Wenn Sie die Sicherheitsschnur zur Suche vom Tragesystem oder von der
Bekleidung lösen, sichern Sie das Gerät mit der vorgesehenen Schlaufe an
Ihrem Handgelenk.
Stromversorgung
Der Tracker3 arbeitet mit drei AAA-Alkalibatterien. Verwenden Sie nur
qualitativ hochwertige Alkalibatterien gleichen Alters und gleicher Marke.
Verwenden Sie keine wiederauadbaren, Lithium-, Oxyride-, PowerPix-
oder andere nicht alkalische Batterien. Ersetzen Sie die Batterien am
Beginn einer neuen Saison.
Wird der Tracker3 feucht oder gar nass, dann önen Sie das Batteriefach
m, um ihn trocknen zu lassen. Entfernen Sie die Batterien, falls das
Gerät über längere Zeit nicht eingesetzt wird, um eine Korrosion an den
Batteriekontakten zu vermeiden. Der Hersteller ersetzt im Garantiezeitraum
keine Geräte, die durch Batteriekorrosion beschädigt wurden.
Other manuals for Tracker3
3
Table of contents
Languages:
Other bca GPS manuals
