BCP SKY6263 User manual

SKY6263
Ver. 1
6V Compact Sewing Machine
INSTRUCTION
MANUAL

Power
Input
Output
Stitch patterns
Stitch length
7.2 watts
100-240V~50/60Hz
DC 6V 1200mA / 4 AA batteries
12
2mm
Max sewing speed 330 SPM (stitches/min.)
Max thickness 2.5mm
SPECIFICATIONS
• This machine is not a toy; it is not meant to be used by or near children.
• Never leave machine unattended while plugged in. Turn o and unplug when not in use.
• Keep machine away from direct sunlight and other sources of heat (stove, heater, etc.).
• Do not run power cord over sharp edges/corners or a hot surface.
• Do not close a door on the power cord as it could damage the cord.
• Do not open the main motor case of the machine. The mechanism has been factory adjusted.
• Do not submerge the unit or power cord in water or any other liquid.
• Do not operate machine with wet hands, without shoes, or while standing in water or on a wet surface.
• Do not touch the plug with wet hands.
• Always check the threading of the lockstitch before sewing a seam. Improper threading or placement of
the bobbin will damage the machine.
• Gently guide the fabric as you sew. Do not pull fabric when sewing as it could break the needle and
damage the machine.
• Do not sew clothing as it is being worn.
• Do not unplug the appliance by pulling on the power cord. Always grasp the plug firmly and pull
straight out from the outlet.
• Do not touch needle or thread machine while unit has power.
• Unplug or remove power supply (including batteries) when changing needle or threading machine.
• Remove batteries before storage or if machine is unused for a long period of time.
WARNING
•Please read instructions carefully before installing or operating machine.
•Make sure to inspect the machine periodically to ensure it is in good condition.
•This product is not intended for use by persons (including children) with reduced physical, sensory or mental capabilities, or
lack of experience and knowledge, unless they have been given supervision or instruction concerning use of the appliance by
a person responsible for their safety.
•If any parts are missing, broken, damaged, or worn, stop using this item until repairs are made and/or factory replacement
parts are installed.
•Do not use this item in a way inconsistent with the manufacturer’s instructions as this could void the product warranty.
Please retain these instructions for future reference.
NOTICE

| 3
PARTS
1 PC
SEWING MACHINE
A
1 PC
FOOT PEDAL
B
1 PC
POWER ADAPTOR
C
ACCESSORIES
1
1 PC
NEEDLE
THREADER
SPOOL BOBBIN
2
2 PCS
3
2 PCS
NEEDLE (#14)
4
1 PC

4|
MAIN DIAGRAM
TAKEUP
LIFTER
UPPER THREAD
TENSION DIAL
PATTERN
SELECTION
DIAL
THREAD
CUTTER
NEEDLE CLAMP
SCREW
PRESSER
FOOT
TRANSPARENT
COVER
LIGHT
BOTTOM
BOBBIN
HAND
WHEEL
REVERSE
BUTTON
POWER OFF
& SPEED SWITCH
(LOW/HIGH)
UPPER THREAD TENSION DIAL: Higher number indicates a tighter upper thread
REVERSE BUTTON: Only works with straight stiches (stiches 1 to 4)

MAIN DIAGRAM
SPOOL
PRESSING
BOBBIN
WINDER
BOBBIN
WINDER
STOP
DRAWER
BATTERY COMPARTMENT
BOBBIN WINDER
TENSION DISK
PRESSER FOOT
LIFTER
SPOOL PIN
PRESSER BAR
DC INPUT
FOOT PEDAL
INPUT
| 5
PRESSER FOOT
LOCK
UNDER
6|
PREPARING MACHINE
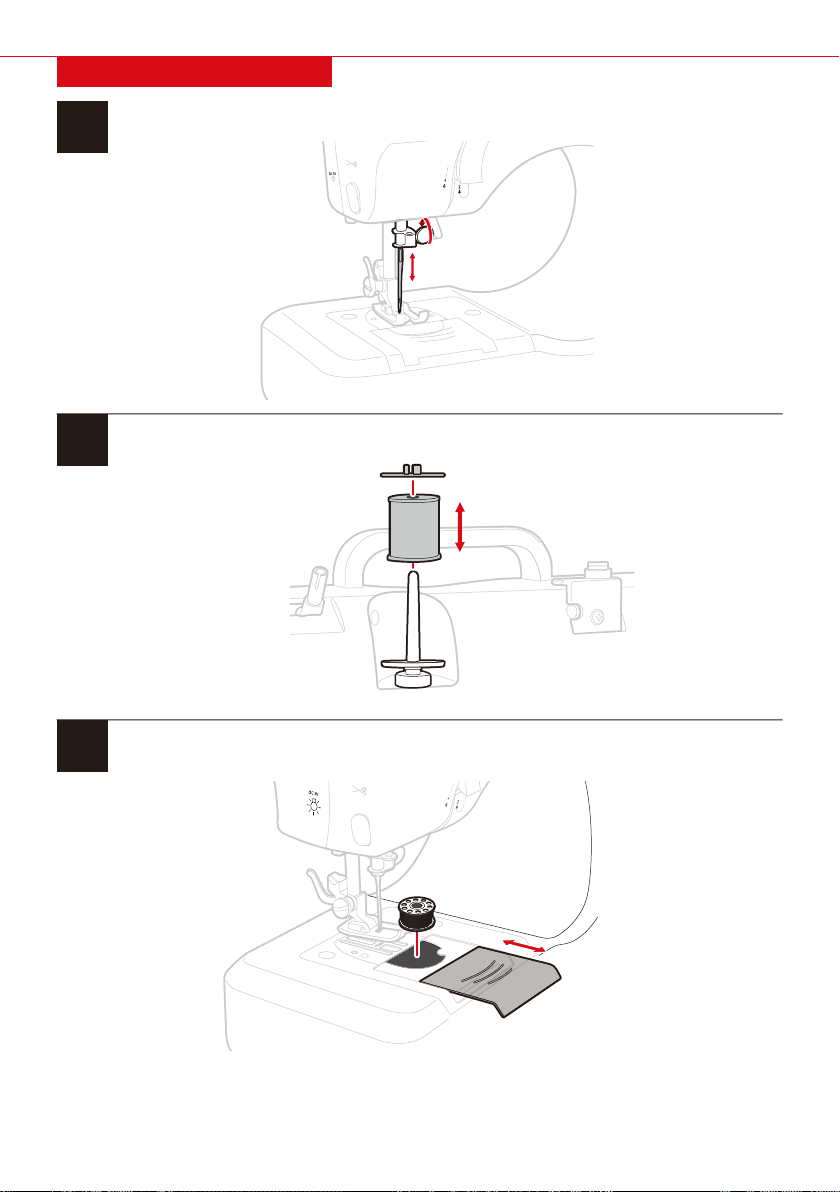
1Position the flat surface of the needle towards the presser bar, then insert the needle. Tighten
the needle clamp to secure the needle.
2Remove the spool pressing, then place a spool on the spool pin.
3Remove the transparent cover, then place the bottom bobbin in the bobbin holder.
NOTE: Machine is pre-threaded. Please note the threading carefully before replacing the
bobbin, then follow steps to re-thread the machine.

THEADING MACHINE
1. Install the top spool.
2. Route the thread through the bobbin winder tension disk.
NOTE: It is very important that the machine is threaded correctly. Machine will not function properly if
threaded incorrectly.
| 7

8|
THREADING MACHINE
3. Route it through the crevice next to the thread tension dial.
4. Hook it around the thread compression tab.
5. Thread it through the take-up lever from right to left.
6. Route it through the threading hole.
7. Thread the needle eye from front to back.

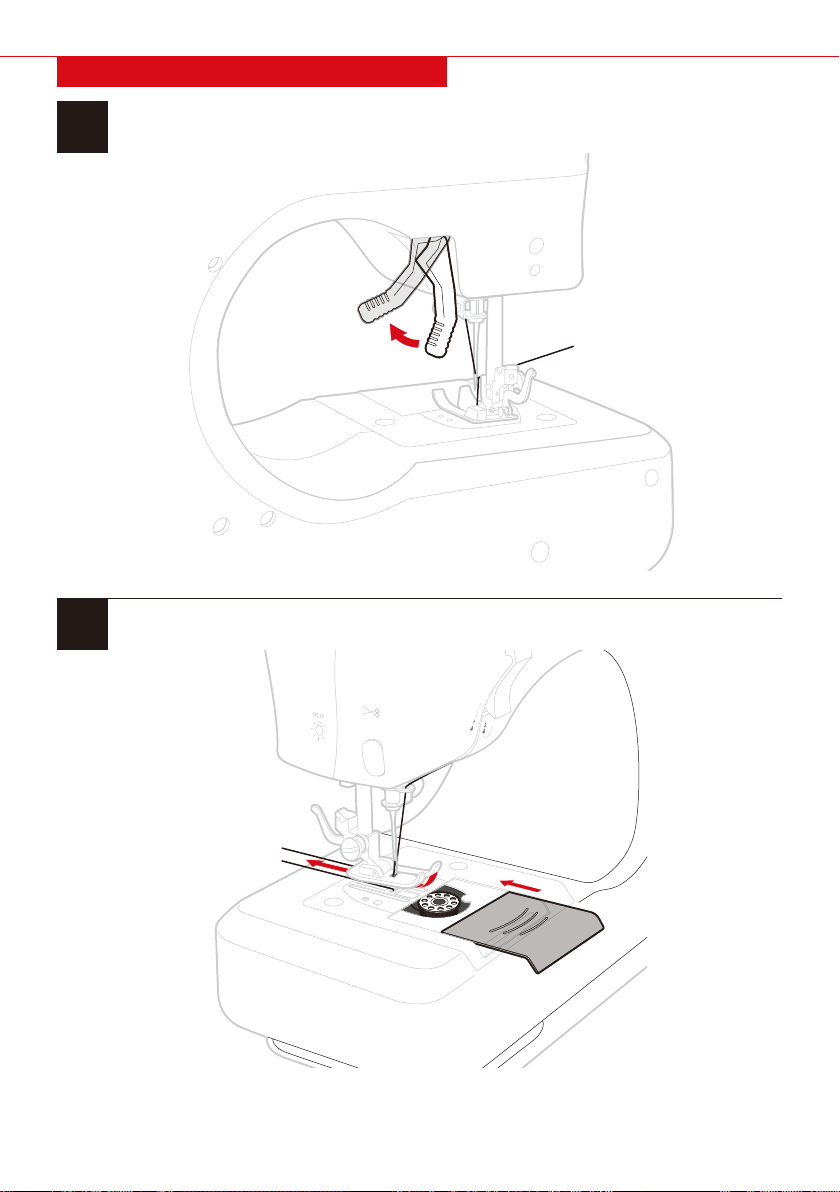
DRAWING UP BOTTOM THREAD
1Remove the transparent cover.
3Turn the hand wheel counterclockwise to draw up the bottom thread.
2Pull the thread out from the bottom
bobbin approximately 4 inches. Hold the
upper thread from the needle eye.
| 9
10 |
DRAWING UP BOTTOM THREAD
4Raise the pressure foot lifter and position the top and bottom thread under the presser foot.
5Pull both threads out 4 inches. Replace the transparent cover.
Table of contents


