BD BDS4012-50 User manual

bello-digital.com
A316
Bell’O International Corp; 711 Ginesi Drive, Morganville, NJ 07751
Made in China • Printed in China • Fabricado en China • Impreso en China • Fabriqué en China • Imprimé en Chine
www.tsicustomerservice.com
bello-digital.com
1-888-235-7646
Twin-Star International, Inc. Delray Beach, FL 33445
Made in China • Printed in China • Fabricado en China • Impreso en China • Fabriqué en Chine • Imprimé en Chine
MODEL/ MODÈLE/ MODELO:
BDS4012-60 / BDS4012-50
Sound Shelf

bello-digital.com
A316 1
If at any time you are unclear about the directions and believe you need further assistance, contact
customer service at: 1-888-235-7646 (US/Canada) from 8:30am – 5:30pm EST, Monday through
Friday.
NEVER EXCEED THE MAXIMUM LOAD CAPACITY OF: 80 lbs (36.3kg) WHEN INSTALLED INTO
2 OR MORE STUDS, CONCRETE OR CONCRETE BLOCK WALLS.
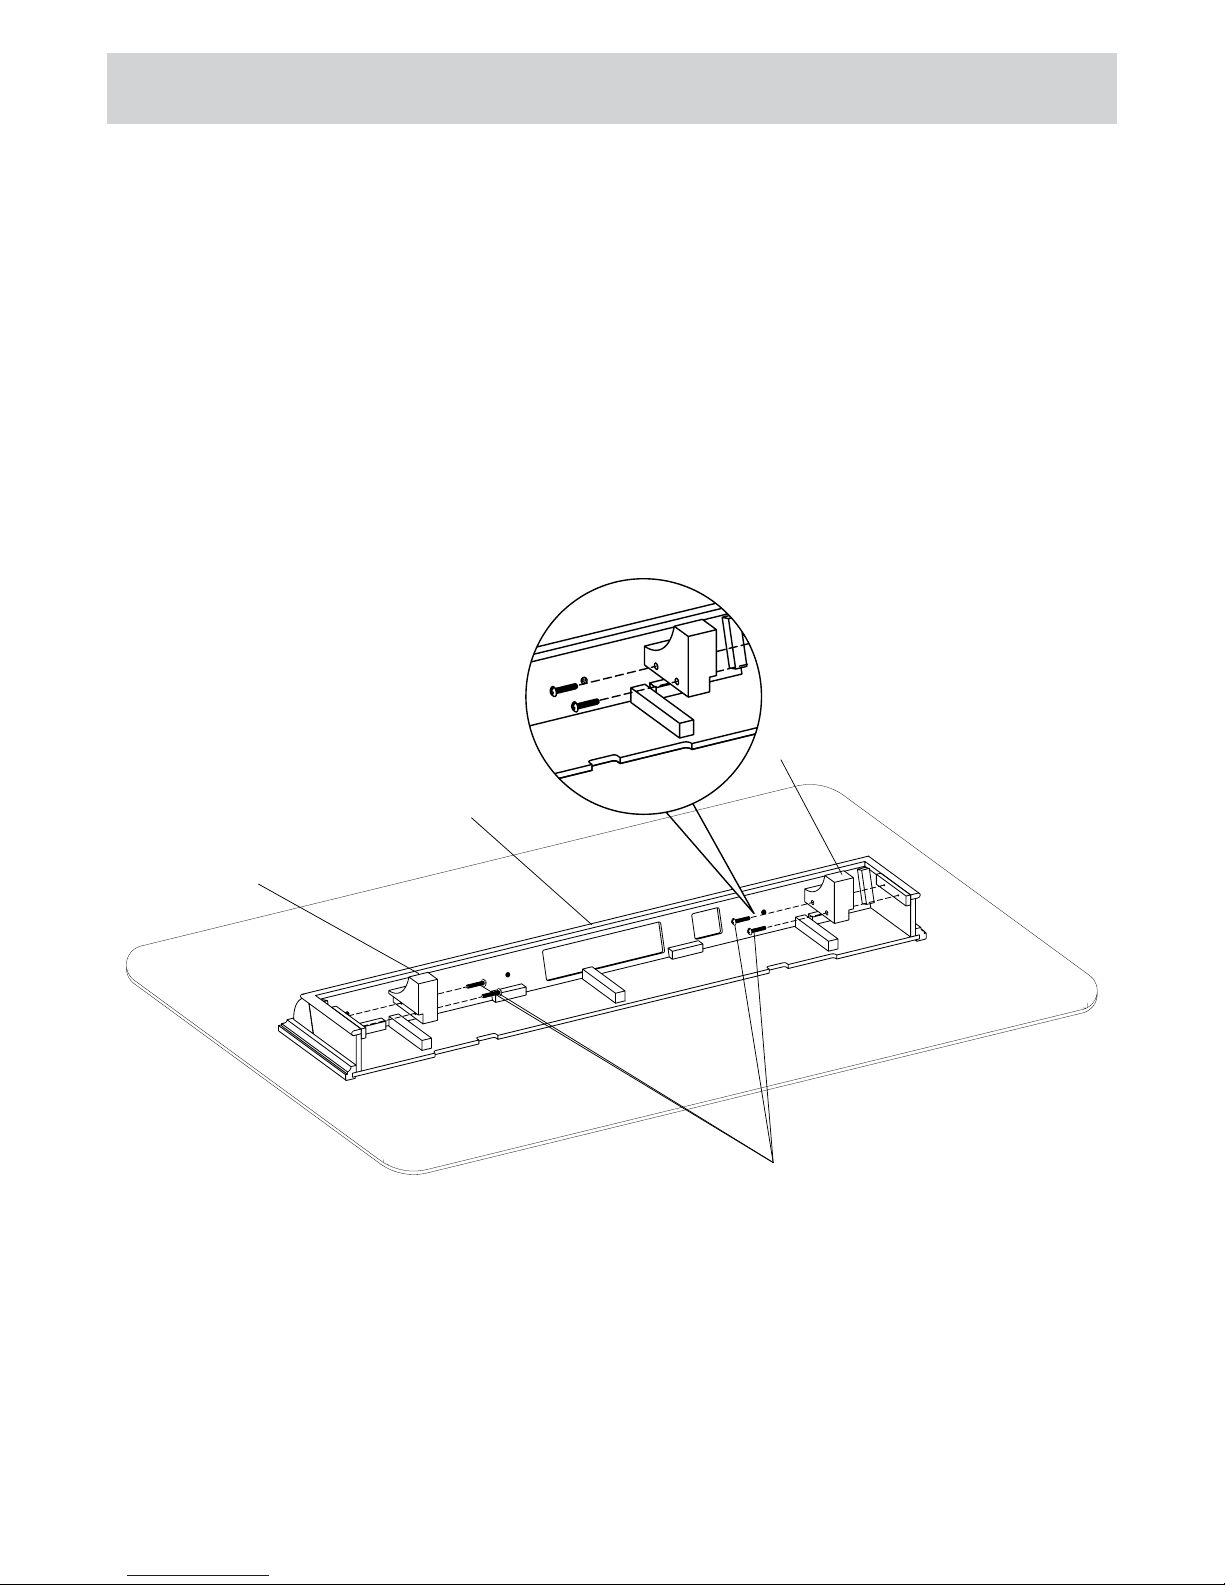
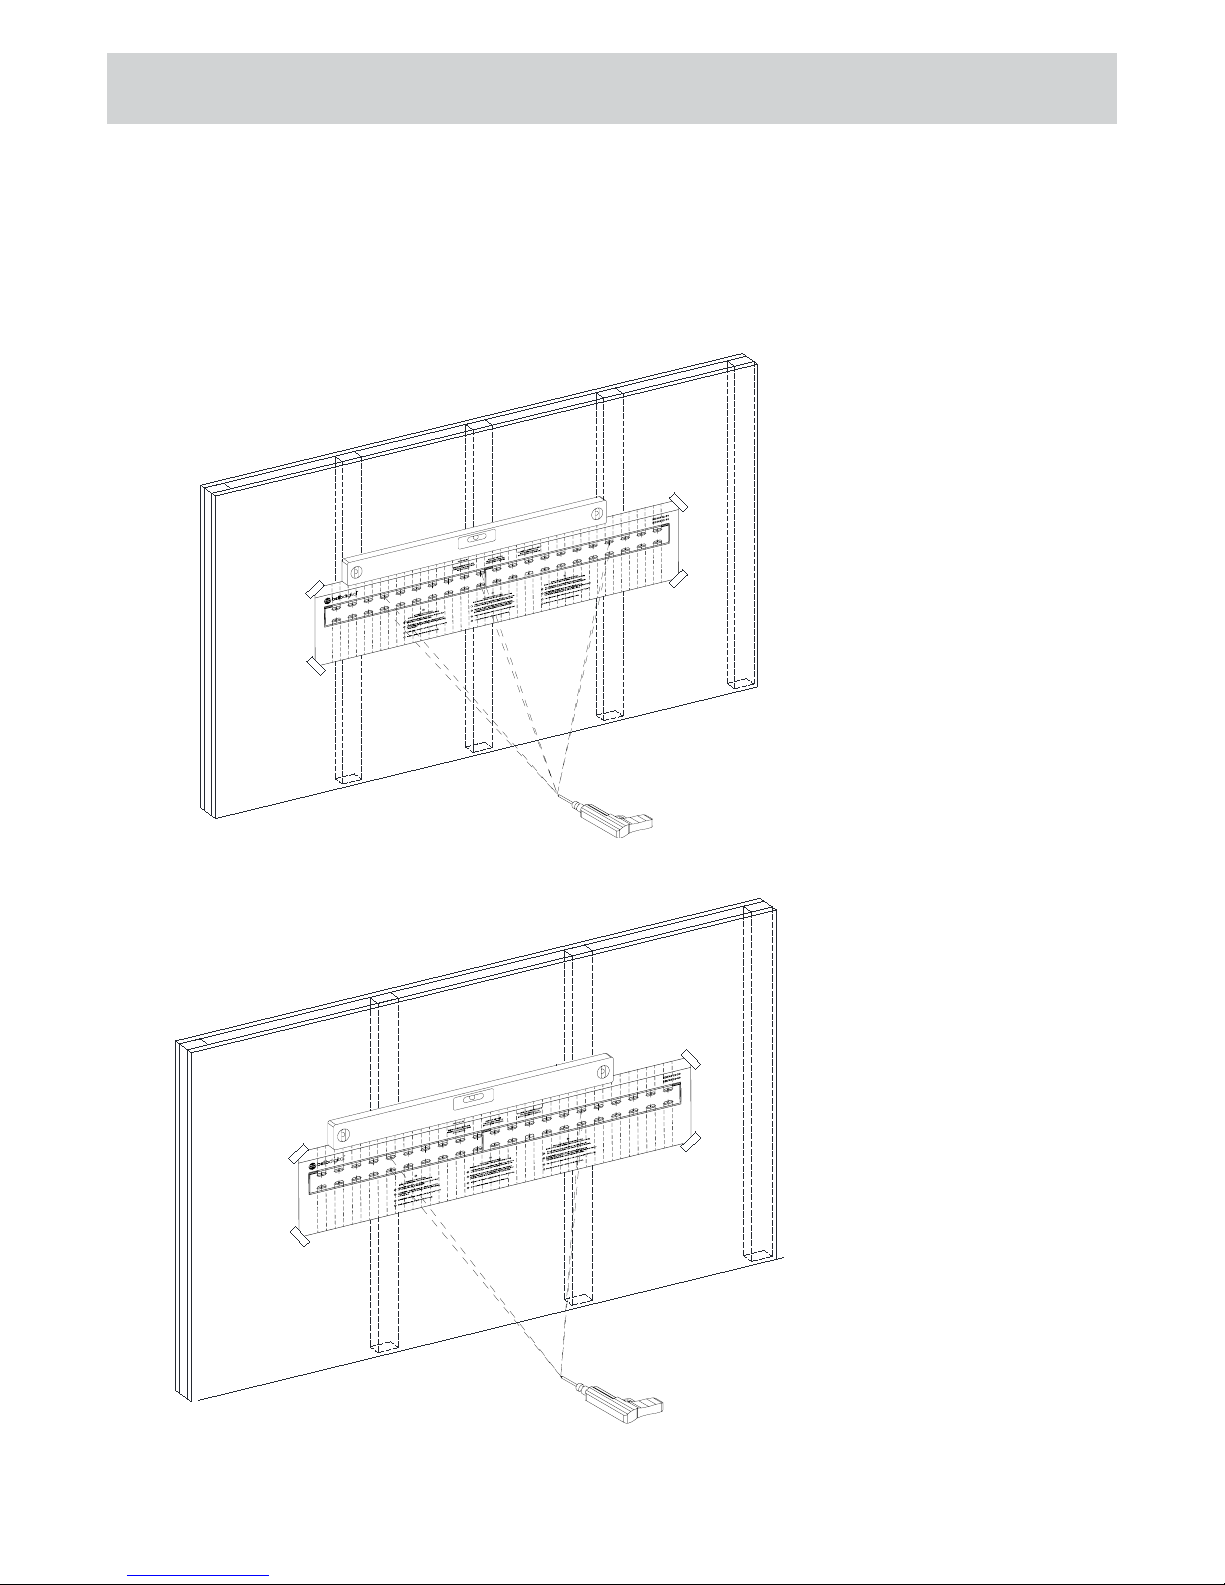
Wood studs should be 2” x 4”, at minimum: 1.5” x 3.5” (38mm x 89mm). Designed to be
mounted to 2” x 4” wood studs that are spaced 16” on center.
is speaker shelf was designed to be installed and utilized ONLY as specied in this manual.
Twin-Star International. will not be responsible for failure to assemble as directed or for the
improper assembly, use, or incorrect assembly.
If the mounting bracket will be attached to any structure other than specied in this
manual, only a licensed professional contractor/installer should perform this installation.
e supporting structure must support, at minimum, four times the combined weight of
the sound shelf, plus anything place on top of it. It is the responsibility and liability of the
installer to ensure the suitability of the supporting structure.
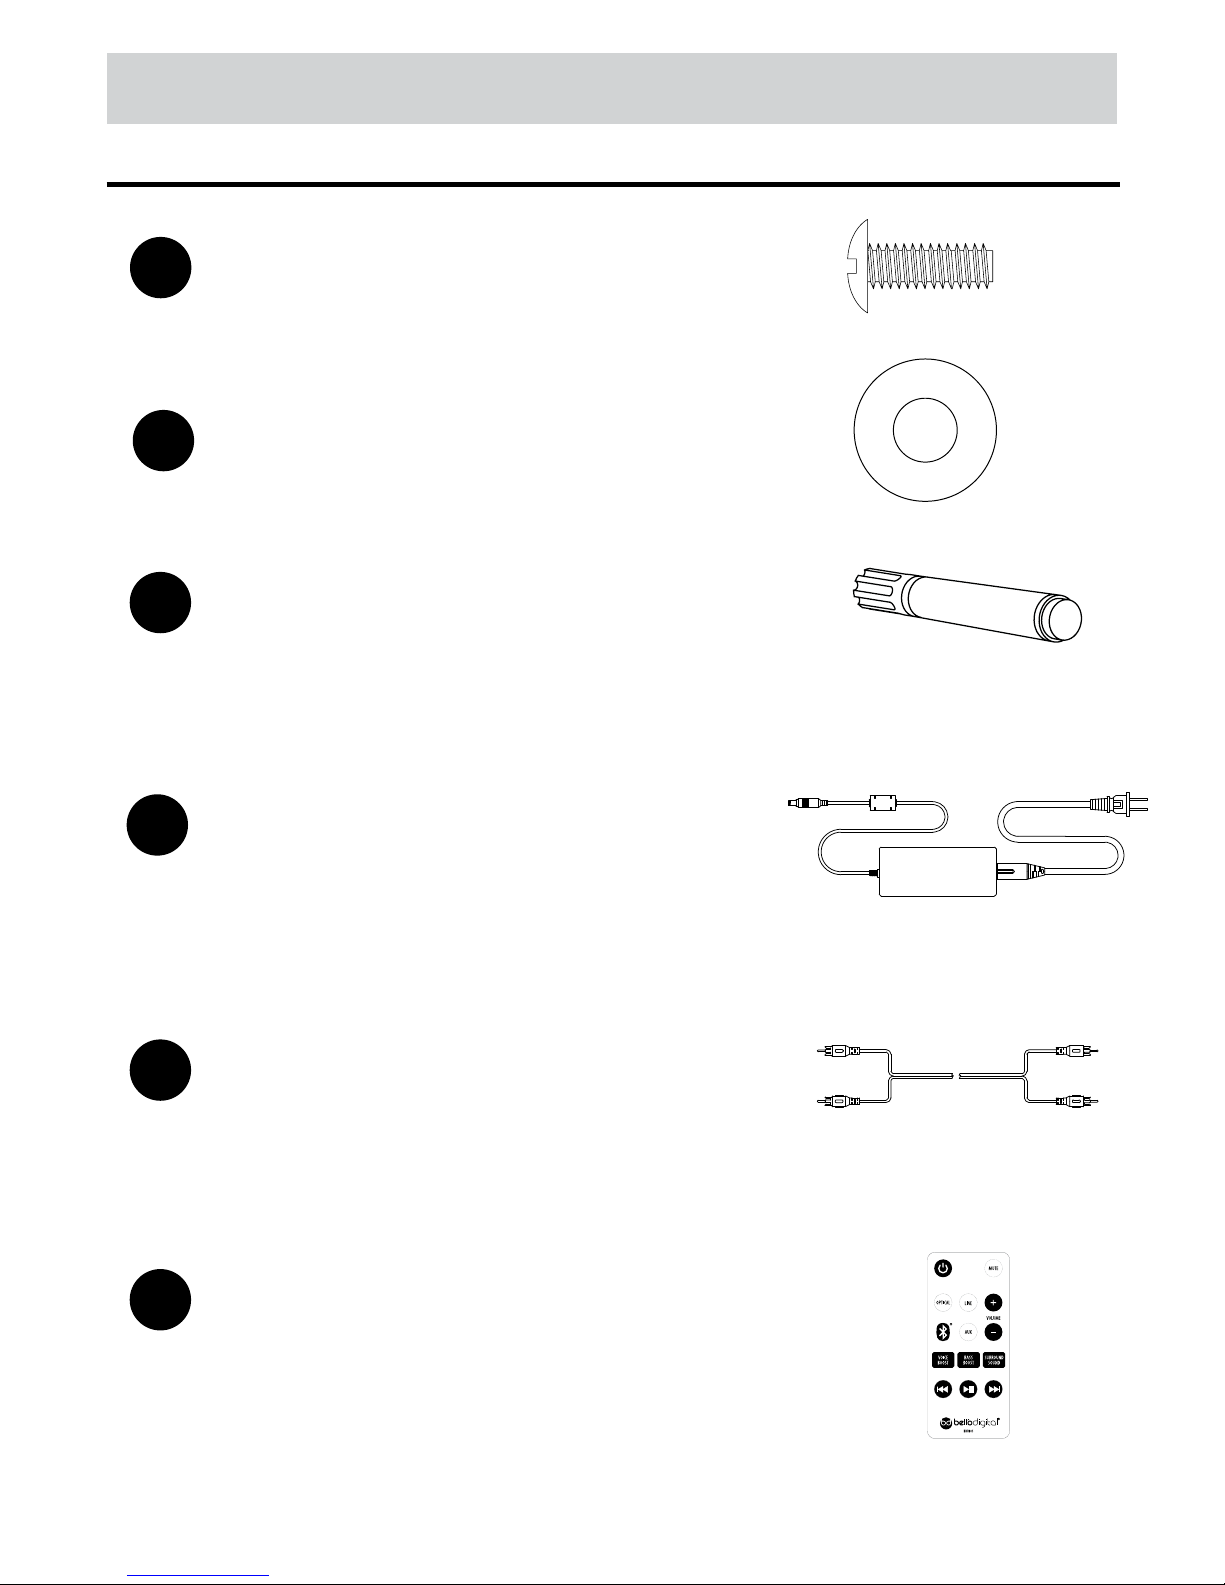
Check carefully to ensure that there are no missing or damaged parts. Never use defective parts.
To receive replacement or missing part(s) under this Warranty, visit our website at www.bello-
digital.com or call our Customer Service Department at 1-888-235-7646. Please have the model
number, lot code, part number(s) and your sales receipt or other proof of purchase available for
reference. We will ship you any necessary replacement parts in the Continental United States or
Canada.
Specications are subject to change without notice.
Precautions
Furniture Guideline
It is best to keep your furniture in a climate-controlled environment. Temperature and humidity
changes can cause fading, warping, shrinking and splitting of wood. It is advised to keep
furniture away from direct sunlight as sun may damage the nish. Proper care and cleaning
at home will extend the life of your purchase. Following these important and helpful tips will
enhance your furniture as it ages.
A touch-up pen has been provided to repair any small nicks or scratches that may occur during
assembly or shipping.
We hope you enjoy your purchase for many years. ank you for your purchase!

bello-digital.com
A316 2
Packing Content
Hardware Kit
Part Desciption Qty
AInstallation Template 1
B Wall Bracket 1
CSound Shelf 1
DLe Corbel 1
E Right Corbel 1
A
B
CD
E
Part Description Quantity Picture
Lag Bolt
0.3 in. x 2.68in.
7.6 mm x 62 mm
Masonry Anchor
0.48 in. x 1.75 in.
12.3 mm x 44.5 mm
Washer
outer dia. 19 mm (0.75in.)
inner dia. 8.5 mm( 0.33in.)
6
6
BB
AA
6
CC
4
DD
Screw
0.25 in. x 1.1 in.
6.3 mm x 25 mm

bello-digital.com
A316 3
Hardware Kit
Part Description Quantity Picture
1
GG Touch-up Pen
1
HH Power Supply
1
II RCA Stereo Cable
1
JJ Remote Control
Screw (installed in bracket)
0.25 in. x 1.1 in.
6.3 mm x 25 mm
6
EE
Washer (installed in bracket)
outer dia. 19 mm (0.75in.)
inner dia. 6.5 mm( 0.25in.)
6
FF

bello-digital.com
A316 4
Necessary Tools
Phillips head
Screwdriver
Pencil
Drill Bit
Wood: 3/16”
Masonry:1/2”(12.5mm)
Masking Tape
Socket Wrench
(optional)
Stud Finder Drill
Level

bello-digital.com
A316 5
• Carefully place the shelf upside down on a so surface so the wood is not damaged. Loosen
the bolt EE on the wall plate and remove the wall plate B from the speaker shelf C.
• Keep the bolts EE and washers FF for reinstalling the sound shelf to the wall bracket aer the
wall bracket has been installed on the wall (see page 11).
Remove the wall plate
EE
FF
EE
FF

bello-digital.com
A316 6
• Attach Le Corbel D and right Corbel E to the back of Sound Shelf C as shown. Carefully
screw the corbels in as shown using screws DD.
Attaching e Corbel
D Le Corbel
E Right Corbel
C Sound Shelf
DD Screw
0.25 in. x 1.1 in.
6.3mm x 28mm

bello-digital.com
A316 7
• FIND THE WOOD STUD:
Using a stud nder, nd the exact location of the studs to which you want to attach the wall
mount. Mark the right and le side to determine the center of each stud.
Installing e Sound Shelf Bracket In Wood
FOR WOOD STUD WALLS INSTALLATIONS, SEE PAGE 8.
FOR MASONRY INSTALLATIONS, SEE PAGE 9.

bello-digital.com
A316 8
Installing e Sound Shelf Bracket In Wood
A
BB
BB
BB
BB
BB
B
AA
AA
AA
AA
AA
AA
BB EE
EE
EE
EE
EE
EE
• DETERMINE INSTALLATION LOCATION:
Use the Installation Template in order to determine the location on the wall that you want to
install the shelf.
Carefully drill six holes at 2.5” deepth through apppropriate points “A”, “B”, ‘’C’’, “D”, “E” and
“F” in the installation template.
Mount into 3 studs as shown above.
If the bracket will not line up with 3 studs,
Center the bracket on 2 studs.
A

bello-digital.com
A316 9
Installing e Sound Shelf Bracket In Masonry
• DRILL PILOT HOLES
Aer you have determined your desired Sound Shelf location, Line up the Installation
Template to ensure you will not drill into any mortar joints. Tape the Installation Template in
place securely on the wall with masking tape. Use a Level. Carefully drill six holes using a
1/2” (or 12.5 mm) masonry drill bit Into holes A, B, C, D, E and F. Each hole should be at
least 2.5” (63mm) deep.
Note: Each hole should be at least 5” apart.
at means the hole on the top row of the wall bracket should be three slots away from the
hole on the bottom row of the wall bracket.
DO NOT DRILL INTO MORTAR JOINTS! DRILL HOLES AT LEAST 1” (25.4 MM) FROM
THE JOINTS. USE A NEW DRILL BIT TO ENSURE OPTIMUM HOLDING ABILITY. DO
NOT USE A HAMMER DRILL!
• Insert the anchors CC:
Place the anchors CC, the end that spreads open rst, into the hole, Tap the anchor with a
hammer until it is ush with the wall.
EE
EE
EE
EE
EE
EE
BB
BB
CC
A
CC
CC
CC
CC
63mm
2.5
EE
EE
EE
EE
EE
EE
BB
BB
CC
A
CC
CC
CC
CC
63mm
2.5

bello-digital.com
A316 10
Installing e Sound Shelf Bracket on Wall
• Install e Wall Bracket:
Aer you have prepared the holes, place the Wall Bracket B over them and screw in the Lag
Bolts AA and washers BB about half way. Use a level to make sure the Wall Bracket B is level
and make any necessary adjustments. Once straight, tighten all of the Lag Bolts completely
(do not over tighten!).
NOTE: If you were only able to use 2 studs, it is important
to center the Wall Bracket on these 2 studs to evenly sup-
port the weight.
A
BB
BB
BB
BB
BB
B
AA
AA
AA
AA
AA
AA
BB
EE
EE
EE
EE
EE
EE

bello-digital.com
A316 11
• Mount the Sound Shelf:
With the help of an assistant, li the shelf onto the Wall Bracket as shown. Have an assistant
hold the shelf in place while you use the 6 bolts EE and washers FF that have been loosen
from the wall bracket from step on page 6, to secure the sound shelf to the wall bracket. Aer
installation apply some light pressure to the shelf to insure it is stable and properly installed.
Installing e Sound Shelf Onto e Wall Bracket
FF
EE FF
EE
FF
EE FF
EE
FF
EE FF
EE
A
BB
BB
BB
BB
BB
B
AA
AA
AA
AA
AA
AA
BB EE
EE
EE
EE
EE
EE

MODEL/ MODÈLE/ MODELO:
BDS4012-60 / BDS4012-50
ÉTAGÈRE SONORE
A316
www.tsicustomerservice.com
bello-digital.com
1-888-235-7646
Twin-Star International, Inc. Delray Beach, FL 33445
Made in China • Printed in China • Fabricado en China • Impreso en China • Fabriqué en Chine • Imprimé en Chine

bello-digital.com
A316 12
si à tout moment vous avez questions concernant les instructions ou pour tout besoin d’aide
supplémentaire, contactez le service clientèle: 1-888-235-7646 (US / Canada ) depuis 8:30 am
--5:30pm,de lundi à vendredi.
NE JAMAIS DÉPASSER LA CAPACITÉ DE CHARGE MAXIMALE DE: 80 IBS (36,6 KG)
LORSQU’IL EST INSTALLÉ DANS DEUX OU PLUSIEURS POTEAUX, MURS EN BÉTON
OU EN BÉTON BLOC.
poteaux de bois devraient être 2 ” x 4 ”, au minimum: 1,5 ” × 3,5 ” (38mm x 89mm). destiné à être
monté à 2 ” x 4 ” des montants en bois qui sont espacées 16 ” sur cave.
cette étagère du haut-parleur a été conçu pour être installé et utilisé UNIQUEMENT comme
indiqué dans ce manuel. Twin-star international, ne sera pas responsable de l’impossibilité de se
réunir aux instructions ou pour le montage incorrect, l’utilisation ou montage incorrect.
si le support de montage sera attaché à un structure autre que celle spéciée dans ce manuel,
seul un professionnel de l’entrepreneur / installateur agréé devrait eectuer cette installation.
la structure portante doit soutenir, au minimum, quatre fois le poids combiné de la tablette
de son, plus quoi que ce soit placer sur le dessus de celui-ci. il est de la responsabilité et le
devoir de l’installateur de s’assurer de la pertinence de la structure porteuse.
vériez soigneusement pour s’assurer qu’il n’y a pas de pièces manquantes ou endommagées. Ne
jamais utiliser les pièces défectueuses. recevoir remplacement ou partie manquante (s) sous cette
garantie, visiter notre site Web à www.bello-digital.com ou appelez notre service à la clientèle au
1-888-235-7647. Bien garder le numéro de modèle, le code de lot, numéro (s) de pièces et le reçu
de vente ou autre preuve d’achat à disposition,s’il vous plaît. Nous vous expédieront tout les pièces
de rechange nécessaires aux états-unis continentaux ou au Canada.
les spécications sont sujets à changement sans préavis.
Précaution
Meubles directive
Il est préférable de garder vos meubles dans un environnement à température contrôlée. les
changements de température et d’humidité peuvent provoquer la décoloration, la déformation,
le rétrécissement et le fractionnement de bois. il est conseillé de garder les meubles loin des
rayons directs du soleil que le soleil peut endommager la nition. bons soins et bons nettoyages
à la maison puissent prolonger la vie de votre achat. suivant ces conseils importants et utiles
permettra d’améliorer vos meubles à mesure qu’il vieillit.
un stylo de retouche a été fourni pour réparer les petites entailles ou des rayures qui peuvent
survenir lors de l’assemblage ou l’expédition.
nous espérons que vous appréciez votre achat pendant de nombreuses années. merci pour votre
achat!

bello-digital.com
A316 13
Contenu de l’emballage
kit de matériel
Partie Description Quantité
AModèle D’installation 1
BSupport Mural 1
CÉtagère Sonore 1
DCorbeau Gauche 1
ECorbeau Droit 1
Partie Description Quantité Photo
Tirefond
0,3 pouce. x 2,68pouce.
7,6 mm x 62 mm
Ancrage de maçonnerie
0.48 po. x 1.75 po.
12.3 mm x 44.5 mm
Rondelle
dia.exterieure. 19 mm (0,75po.)
dia. intérieure. 8.5 mm( 0.33po.)
6
6
BB
AA
6
CC
4
DD
Vis
0.25 po. x 1,1 po.
6.3 mm x 25 mm
A
B
CD
E

bello-digital.com
A316 14
1
GG stylo de retouche
1
HH source de courant
1
II Câble stéréo RCA
1
JJ Télécommande
vis (installé dans le support)
0,25 po. x 1,1 po.
6.3 mm x 25 mm
6
EE
Rondelle (installé dans le support)
dia.exterieure. 19 mm (0,75po.)
dia. intérieure. 6.5 mm( 0,25po.)
6
FF
kit de matériel
Partie Description Quantité Photo

bello-digital.com
A316 15
OUTILS NÉCESSAIRES
Tournevis Cruciforme crayon
Drill Bit
bois: 3/16”
maçonnerie: 1/2 ” (12,5 mm)
Ruban Adhésif
Clé À Douille
(en option)
L o c a l i s a t e u r D e M o n t a n t s Perceuse
Niveau

bello-digital.com
A316 16
• placer soigneusement le plateau à l’envers sur une surface douce de sorte que le bois n’est pas
endommagé. desserrer l’EE de boulon sur la plaque murale et retirer la plaque murale B de
l’étagère du haut-parleur C.
• garder les boulons EE et les rondelles FF pour réinstaller l’étagère du son pour le support
mural après la xation murale a été installé sur le mur (voir page 22).
Retirer la plaque murale
EE
FF
EE
FF

bello-digital.com
A316 17
• Attacher le corbeau gauche D et le corbeau gauche E à l’arrière de la tablette sonore C comme
indiqué. vis attentivement les corbeaux, comme indiqué dans l’aide de vis DD.
Fixer le corbeau
D le corbeau gauchegauche
E le corbeau gauche
C la tablette sonore
DD vis
0,25 po. × 1,1 po
6.3mm x 28mm

bello-digital.com
A316 18
• TROUVER LES CLOUS DE BOIS;
en utilisant un détecteur de clou, trouver l’emplacement exact des clous à laquelle vous sou
haitez attacher le support mural. marquer le côté droit et gauche pour déterminer le centre de
chaque plot.
l’installation du support d’étagère sonore en bois
POUR LES INSTALLATIONS DE MURS À OSSATURE DE
BOIS, VOIR PAGE 19. POUR LES INSTALLATIONS DE
MAÇONNERIE, VOIR PAGE 20.
This manual suits for next models
1
Table of contents
Popular Speakers manuals by other brands

volkano
volkano Fabric Series instruction manual

Toa
Toa F-160G instruction manual

Uni-rich Technology
Uni-rich Technology URBT-1081 instruction manual

Whelen Engineering Company
Whelen Engineering Company WSXPL6T Series Assembly

Sony
Sony SA-NS500 Connecting guide

Creative
Creative GIGAWORKS T20 - QUICKSTART FRONT quick start guide