manuals.online logo
Brands
  1. Home
  2. •
  3. Brands
  4. •
  5. BDI
  6. •
  7. Furniture
  8. •
  9. BDI vertica User manual

BDI vertica User manual

This manual suits for next models

1

Other BDI Furniture manuals

BDI vertica User manual

BDI

BDI vertica User manual

BDI CORRIDOR User manual

BDI

BDI CORRIDOR User manual

BDI CORRIDOR User manual

BDI

BDI CORRIDOR User manual

Popular Furniture manuals by other brands

CB2 SERAPHINA Assembly instructions

CB2

CB2 SERAPHINA Assembly instructions

Reflections Titan installation instructions

Reflections

Reflections Titan installation instructions

Agio 855552 Assembly instructions

Agio

Agio 855552 Assembly instructions

Evolur SAWYER Assembly instructions

Evolur

Evolur SAWYER Assembly instructions

Frontgate 28019 Assembly instructions

Frontgate

Frontgate 28019 Assembly instructions

Lorell 16216 Assembly instructions

Lorell

Lorell 16216 Assembly instructions

Sanus BFV353 instruction manual

Sanus

Sanus BFV353 instruction manual

CB2 SHAGREEN EMBOSSED Assembly instructions

CB2

CB2 SHAGREEN EMBOSSED Assembly instructions

CB2 MATEO Assembly instructions

CB2

CB2 MATEO Assembly instructions

Belleze 014-HG-17040 owner's manual

Belleze

Belleze 014-HG-17040 owner's manual

CB2 SUMMIT Assembly instructions

CB2

CB2 SUMMIT Assembly instructions

Garden Oasis AS-K-138-2NL Use and care guide

Garden Oasis

Garden Oasis AS-K-138-2NL Use and care guide

CB2 RYKER Assembly instructions

CB2

CB2 RYKER Assembly instructions

Crate&Barrel Casement manual

Crate&Barrel

Crate&Barrel Casement manual

Crate&Barrel Pilsen manual

Crate&Barrel

Crate&Barrel Pilsen manual

Crate&Barrel Casement manual

Crate&Barrel

Crate&Barrel Casement manual

CB2 Metro Assembly manual

CB2

CB2 Metro Assembly manual

Tesco Smith Slider 100 Assembly instructions

Tesco

Tesco Smith Slider 100 Assembly instructions

manuals.online logo
manuals.online logoBrands
  • About & Mission
  • Contact us
  • Privacy Policy
  • Terms and Conditions

Copyright 2025 Manuals.Online. All Rights Reserved.

1
Vertica is engineered for easy assembly. Carefully
follow this procedure to prevent any damage.
Placement and Maintenance
Vertica is designed for indoor use on level floors.
Clean wood veneer with a moist cloth.
Step 1
Unpack and Identify
Unpack and identify the components at left. Note
that some components are shipped inside the
cabinet. The assembly workspace should be a non-
marring surface such as carpet. For missing hardware pieces, please
contact BDI Customer Service at [email protected]. For all
other concerns, please contact your BDI Retailer.
Component List
Designed by Matthew Weatherly.
These distinctive product congurations are protected by US and international patents,
trade dress, and/or copyright laws.
BDI are trademarks of Becker Designed, Inc.
All Rights reserved. ©2014, BDI
Made in China. 8559REV012315v2
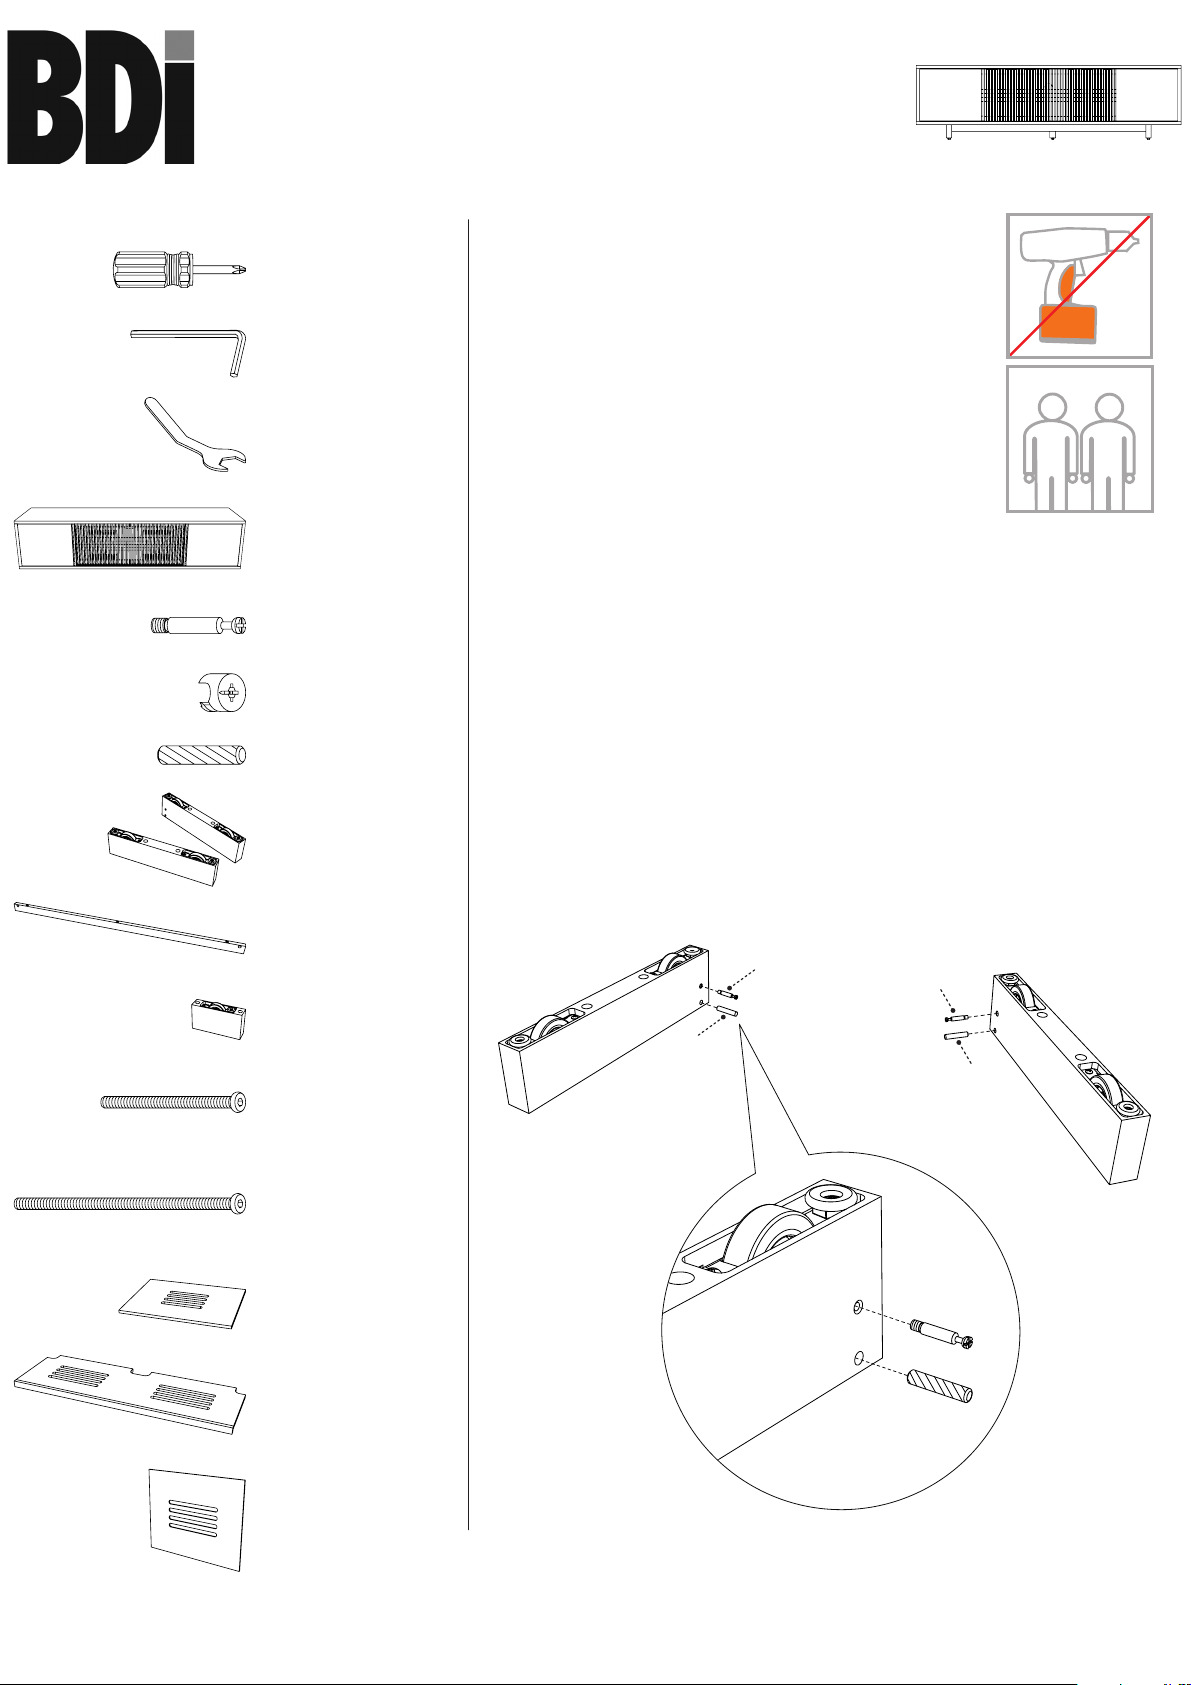
Step 2
Install and tighten Cam Bolts (D) into Side Legs (G) using Phillips
Screwdriver (A). Insert Wood Dowels (F) into corresponding holes of
Side Legs (G).
B2 - Leveler Wrench
x 1
A - Phillips Screwdriver
x 1
B1 - Hex Wrench
x 1
C - Cabinet x 1
F - Wood Dowel x 2
E - Cam Fitting x 2
D - Cam Bolt x 2
H - Base Stretcher
x 1
I - Center Leg x 1
G - Side Legs x 2
L - Adjustable Shelf
x 2
N - Back Panel
x 2
M - Large Adjustable
Shelf x 1
K - 1/4-20 x 100 mm
Machine Screw
x 6
J - 1/4-20 x 60 mm
Machine Screw
x 3
F
D
G
F
F
D
D
G
G
vertica
8559
home theater
assembly instructions
bdiusa.com [email protected]
TWO PERSON ASSEMBLY
J
2assembly instructions
bdiusa.com [email protected]
vertica
8559 home theater
Step 4
Align Cam Bolt (D) and Wood Dowel (F) of Side Legs (G) into their
respective holes in Base Stretcher (H).
Step 3
Carefully lay Cabinet (C) on its back. Attach Base Stretcher (H) to bottom
of Cabinet (C) using Screw (J). Only hand tighten screws at this point.
TWO PERSON ASSEMBLY
J x 3
J
J
J
H
C
G
G
H
H
D
F
G
3assembly instructions
bdiusa.com [email protected]
vertica
8559 home theater
Step 6
Using Hex Wrench (B1) attach Side Legs (G) and Center Leg (I) with
Screws (K). Fully tighten Base Stretcher (H) screws that were left loose in
Step 3 using Hex Wrench (B1).
Step 5
Insert Cam Fittings (E) into holes of Base Stretcher (H) with the arrow of the
Cam Fitting (E) pointing outward on each end of the Stretcher. Tighten each Cam
Fitting (E) clockwise using Phillips Screwdriver (A) until it no longer rotates.
E
E
HA
E
H
A
E
H
A
K x 6
K
K
K
K
K
K
I
G
G
B1
4assembly instructions
bdiusa.com [email protected]
vertica
8559 home theater
Adjustable Shelves
The shelf pins located inside all three cabinet spaces may be repositioned using
Phillips Screwdriver (A), allowing you to raise or lower both Adjustable Shelf
(L) and Large Adjustable Shelf (M) to the desired level.
Step 7
Position Cabinet right side up and install Back Panel (N) to the backside of
the Cabinet (C) by inserting top edge in upper channel then tipping bottom
edge forward and into lower channel.
1
2
C
N
ML
A
Optional Flat Panel TV Mount
This BDI cabinet is compatible with BDI’s Arena Flat-Panel TV
Mount #9970 and #9972 (sold separately), with the following features:
•accommodates most TVs up to 65", 175 lbs
•swivel allows rotating for optimal viewing
•allows adjustable TV mounting height
•accepts and routes cables to and from the TV
For more information, visit www.bdiusa.com