BE&SCO Beta 900 Tortilla Oven User manual

1
WARNINGS
10/15/13
Shown with the optional
Dough Trolley Loader
Shown as a Right Exit
also available as a
Straight Exit or Left Exit.
!
POWER FAILURE WARNING
IN CASE OF POWER FAILURE, TURN OFF GAS AND FOLLOW
SHUT DOWN PROCEDURES FOR OVEN.
FOR YOUR SAFETY
DO NOT STORE OR USE GASOLINE OR OTHER FLAMMABLE VAPORS
OR LIQUIDS IN THE VICINITY OF THIS OR ANY OTHER APPLIANCE.
WARNING
IMPROPER INSTALLATION, ADJUSTMENT, ALTERATION, SERVICE OR
MAINTENANCE CAN CAUSE PROPERTY DAMAGE, INJURY OR DEATH.
READ THE INSTALLATION, OPERATING AND MAINTENANCE INSTRUCTIONS
THOROUGHLY BEFORE INSTALLING OR SERVICING THIS EQUIPMENT.
THIS MANUAL MUST BE RETAINED FOR FUTURE REFERENCE.
INSTRUCTIONS AND WARNING CONTAINED IN THIS MANUAL MUST
BE READ, UNDERSTOOD AND FOLLOWED.
POST IN A PROMINENT LOCATION INSTRUCTIONS TO BE FOLLOWED IN THE
EVENT USER SMELLS GAS. THIS INFORMATION SHALL BE OBTAINED BY
CONSULTING YOUR LOCAL GAS SUPPLIER. AT A MINIMUM:
• TURN OFF GAS
• EXTINGUISH ANY EXISTING FLAMES
• CONTACT YOUR GAS SUPPLIER
• IF YOUR GAS SUPPLIER CAN’T BE REACHED, CONTACT
LOCAL FIRE DEPARTMENT
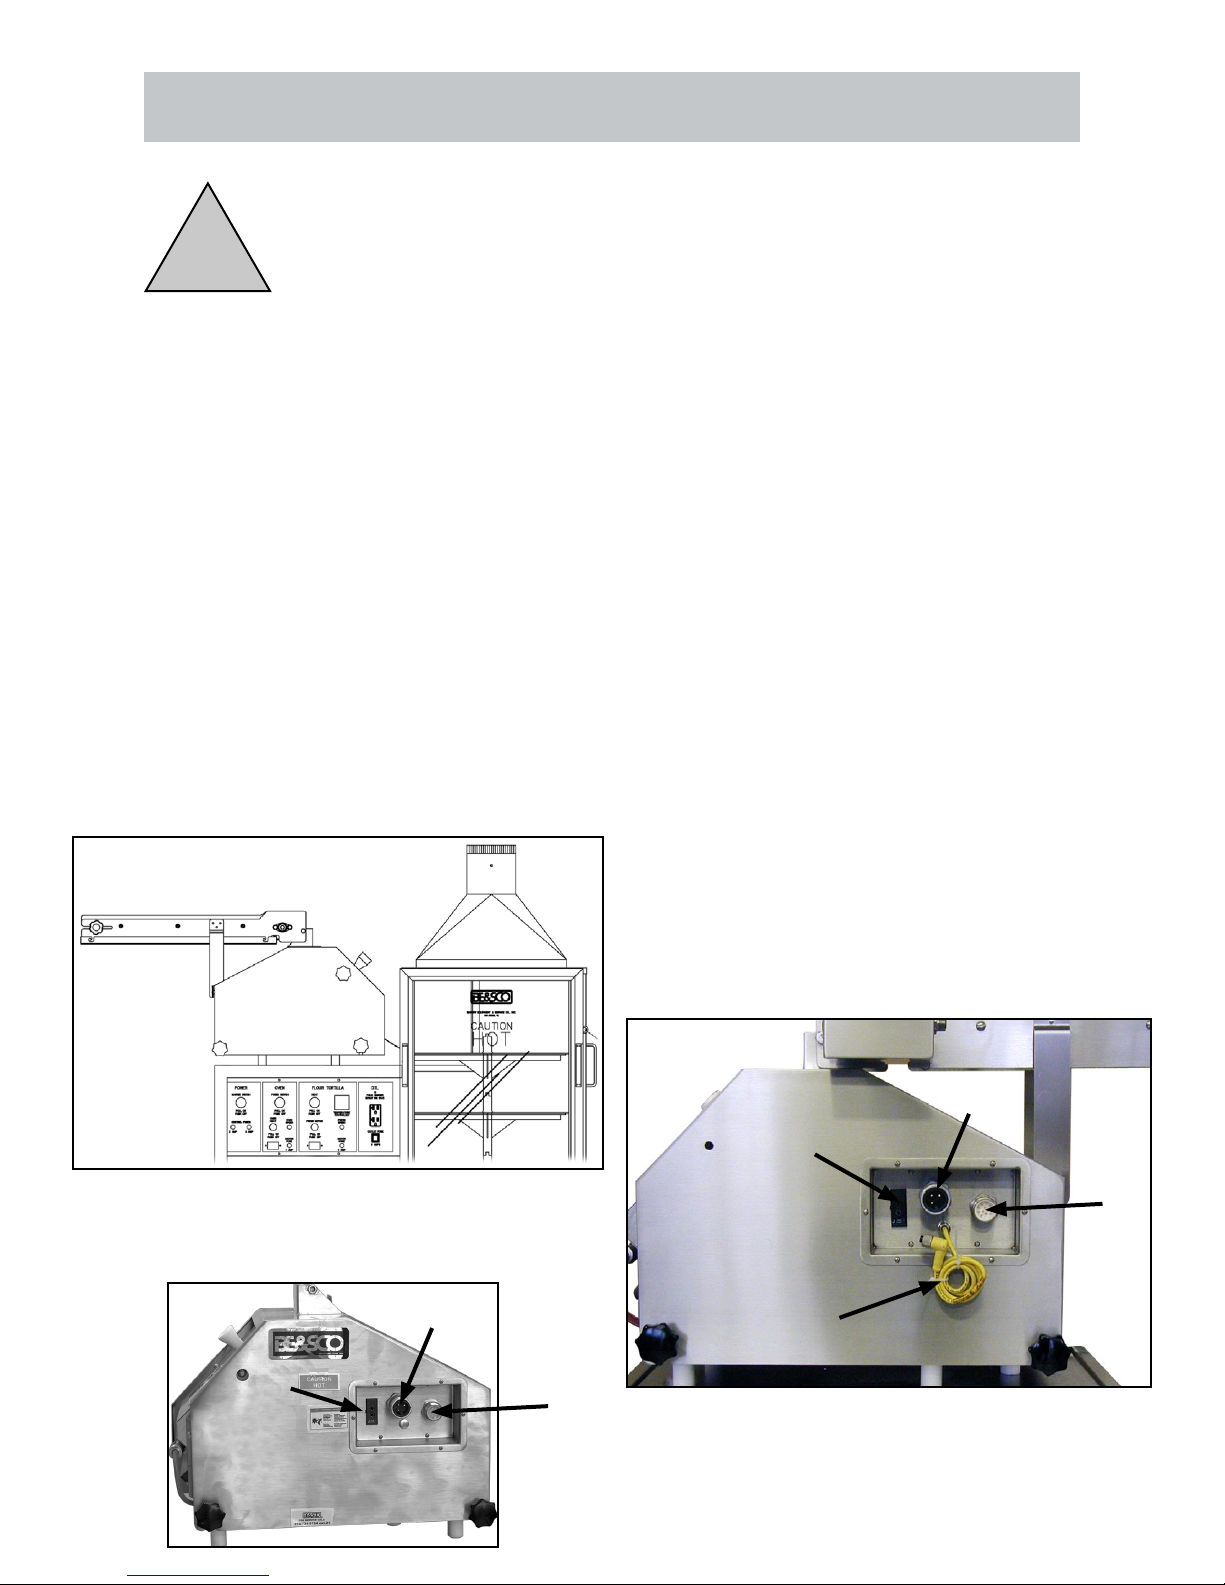
Beta 900 Tortilla Oven
Shown with Exit Conveyor and
Midwedge Tortilla Press.

2
Precautions
1623 N. San Marcos
San Antonio, Texas 78201
www.bescomfg.com
KEEP THE BETA 900 FREE AND CLEAR FROM COMBUSTIBLES.
DO NOT OBSTRUCT THE FLOW OF COMBUSTION AND VENTILATION AIR.
DISCONNECT ELECTRICAL POWER PRIOR TO MAINTENANCE AND
CLEANING.
ALL MAINTENANCE AND CLEANING MUST BE PERFORMED ACCORDING
TO THIS MANUAL.
NEVER USE ANY SHARP OBJECTS, CAUSTIC OVEN CLEANER, OR
DEGREASER TO CLEAN MACHINE OR PRESS PLATES.
FOR EMERGENCY SHUT DOWN, PUSH MASTER SWITCH.
READ AND FOLLOW ALL THE DIRECTIONS IN THIS MANUAL. DO NOT
LOSE OR THROW THIS MANUAL AWAY. DO NOT USE BETA 900 UNLESS
YOU READ THE MANUAL.
DO NOT CONNECT TO A CIRCUIT OPERATING AT MORE THAN 150 VOLTS
TO GROUND.
!
!
!
!
!
!
!
!

3
Warnings ..................................................................................................................................................... 1
Precautions.................................................................................................................................................. 2
Table of Contents......................................................................................................................................... 3
Policy & Procedure for Returning BE&SCO Parts.......................................................................................
Storyboards, Delivery & Damage, Beta 900 Manual, Training DVD............................................................ 5
Installation Requirements............................................................................................................................ 6
Location & Placement of Machine............................................................................................................... 7
..............................................................................................................................11
..................................................................................................................................... 12
Gas Piping................................................................................................................................................. 13
Ventilation ..................................................................................................................................................
Initial Adjustments......................................................................................................................................
Assembly Instructions................................................................................................................................ 15
General Guidelines.................................................................................................................................... 17
Midwedge Installation................................................................................................................................ 18
Oven Control Panel ................................................................................................................................... 19
............................................................................................................................... 21
....................................................................................................................... 22
Shutdown Operation.................................................................................................................................. 23
Dough Making ...........................................................................................................................................
Tortilla Making............................................................................................................................................ 27
Recipes...................................................................................................................................................... 32
Cleaning Supplies......................................................................................................................................
Cleaning the Beta 900............................................................................................................................... 35
Troubleshoot Guide ...................................................................................................................................
Maintenance Press & Oven ......................................................................................................................
Closing Statement .....................................................................................................................................
Parts & Pictures Warning ..........................................................................................................................
Decal Locator Assembly ............................................................................................................................ 79
Warranty ....................................................................................................................................................
Table of Contents
Neither this manual nor any part may be reproduced or transmitted in any form or by any means, electronic or mechanical,
writing from Bakery Equipment & Service Co., Inc.

Procedure for Returning BE&SCO Parts:
may request a repair and return, advance replacement or a credit of the component. The Parts Department
an RA number. You have 10 working days to return the old part for full credit or you will be invoiced for the
new part.
2. Package the component and a detailed description of what is wrong with the component. Write the RA
BE&SCO - Parts Department
RA#
1623-27 N. San Marcos
San Antonio, TX 78201
To obtain warranty on return parts the customer or the end user will be responsible for that particular item to be
shipped back to BE&SCO. Freight is not covered under warranty, going or coming. BE&SCO recommends
that you insure any parts that are being returned to BE&SCO, as BE&SCO Inc. is not responsible for any
damage or loss that occurs during shipping. If the part is damaged or lost during shipping, BE&SCO will not
be responsible for repair or replacement of the parts.
Returning BE&SCO Parts:
To return any BE&SCO parts you must follow BE&SCO’s procedure for returning. No returns will be accepted
credit. This does not include wear and tear items as stated in our manual.
This warranty does not cover any defect due to or resulting from handling, abuse, misuse, improper
maintenance and cleaning, or harsh chemical action, nor shall it extend to any unit from which the serial
number has been removed or altered, or acts of God. Adjustments such as calibrations, leveling, tightening
of fasteners or plumbing connections normally associated with original installation are the responsibility of
the dealer or installer and not of BAKERY EQUIPMENT & SERVICE CO., INC.
Policy & Procedure for Returning BE&SCO Parts

5
We tightly pack all our equipment and strap them on heavy wooden skids before giving
them to the shipping company. After we give the merchandise to the shipping company, they are
responsible for delivering your purchase; therefore, BE&SCO will not be responsible for the loss or
damage of your shipment. If you nd your purchase damaged call the shipping company.
Delivery & Damage
The Beta 900 manual covers installation, operation, maintenance, cleaning, troubleshooting
and parts. It is very important to always have a copy of the Beta 900 Manual as reference. If you
loose your Beta 900 manual or need an extra copy of the Beta 900 Manual, call the BE&SCO
Manual
Every Beta 900 comes with a Operation & Cleaning DVD in English and Spanish. This
DVD will help with training on the Beta 900. If you need additional training for the Beta 900 contact
Operation & Cleaning DVD or VHS
Storyboards
The laminated poster included in your shipment is called a Storyboard. A Storyboard
describes how to operate or care for the machine in an easy, quick format. It should be posted on
a wall close by the machine. Both front and back have the same information but in two different

6
Installation Requirements
(ForaQualiedServicePerson)
below. Anyone else doing so could easily damage the Beta Max, hurt him or himself, and void
the warranty.
1.
2. Gas Pipings
3. Ventilation
Initial Adjustments
5. Assembly Instructions
A QualiedServicePerson
1.
also obey the state or local authorities having jurisdiction in reference to the National Fuel Gas
Code, NFPA 54-1984 and ANSI z223.1-1984, Section 1.4.
2.
person must also obey safety rules and requirements of the state or local authorities having
jurisdiction in reference to the National Electrical Code, ANSI/NFPA 70
3. Canadian installations should agree with “Installation Codes for Gas Burning Appliances and
7
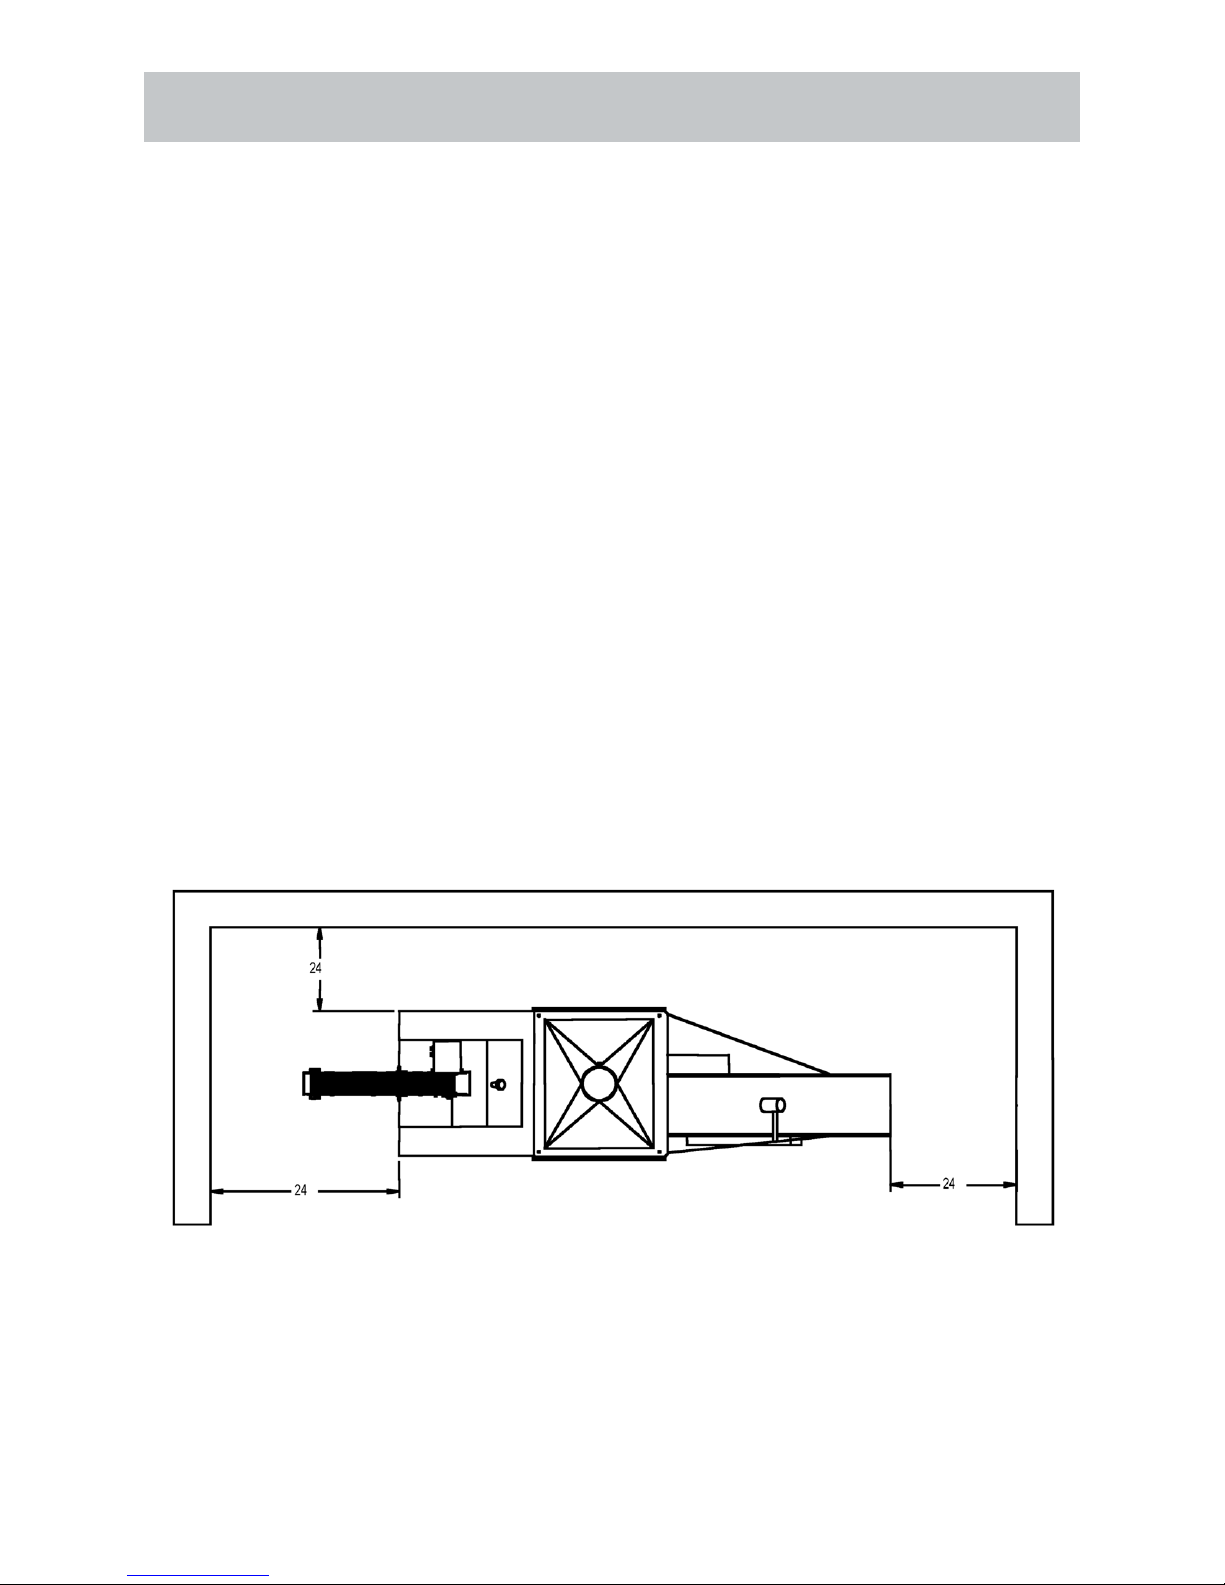
In an open work area. This way anyone can access the Beta 900 easily, especially for
maintenance.
compartment will be restricted and stop proper ventilation.
On level ground and on a curb base.
Make sure it is far from any strong air currents.
Finally, before making any connections to the BETA 900, check the rating plate on the
A good spot would be the one where you meet all the above suggestions. See the
Location and Placement of Machine
8
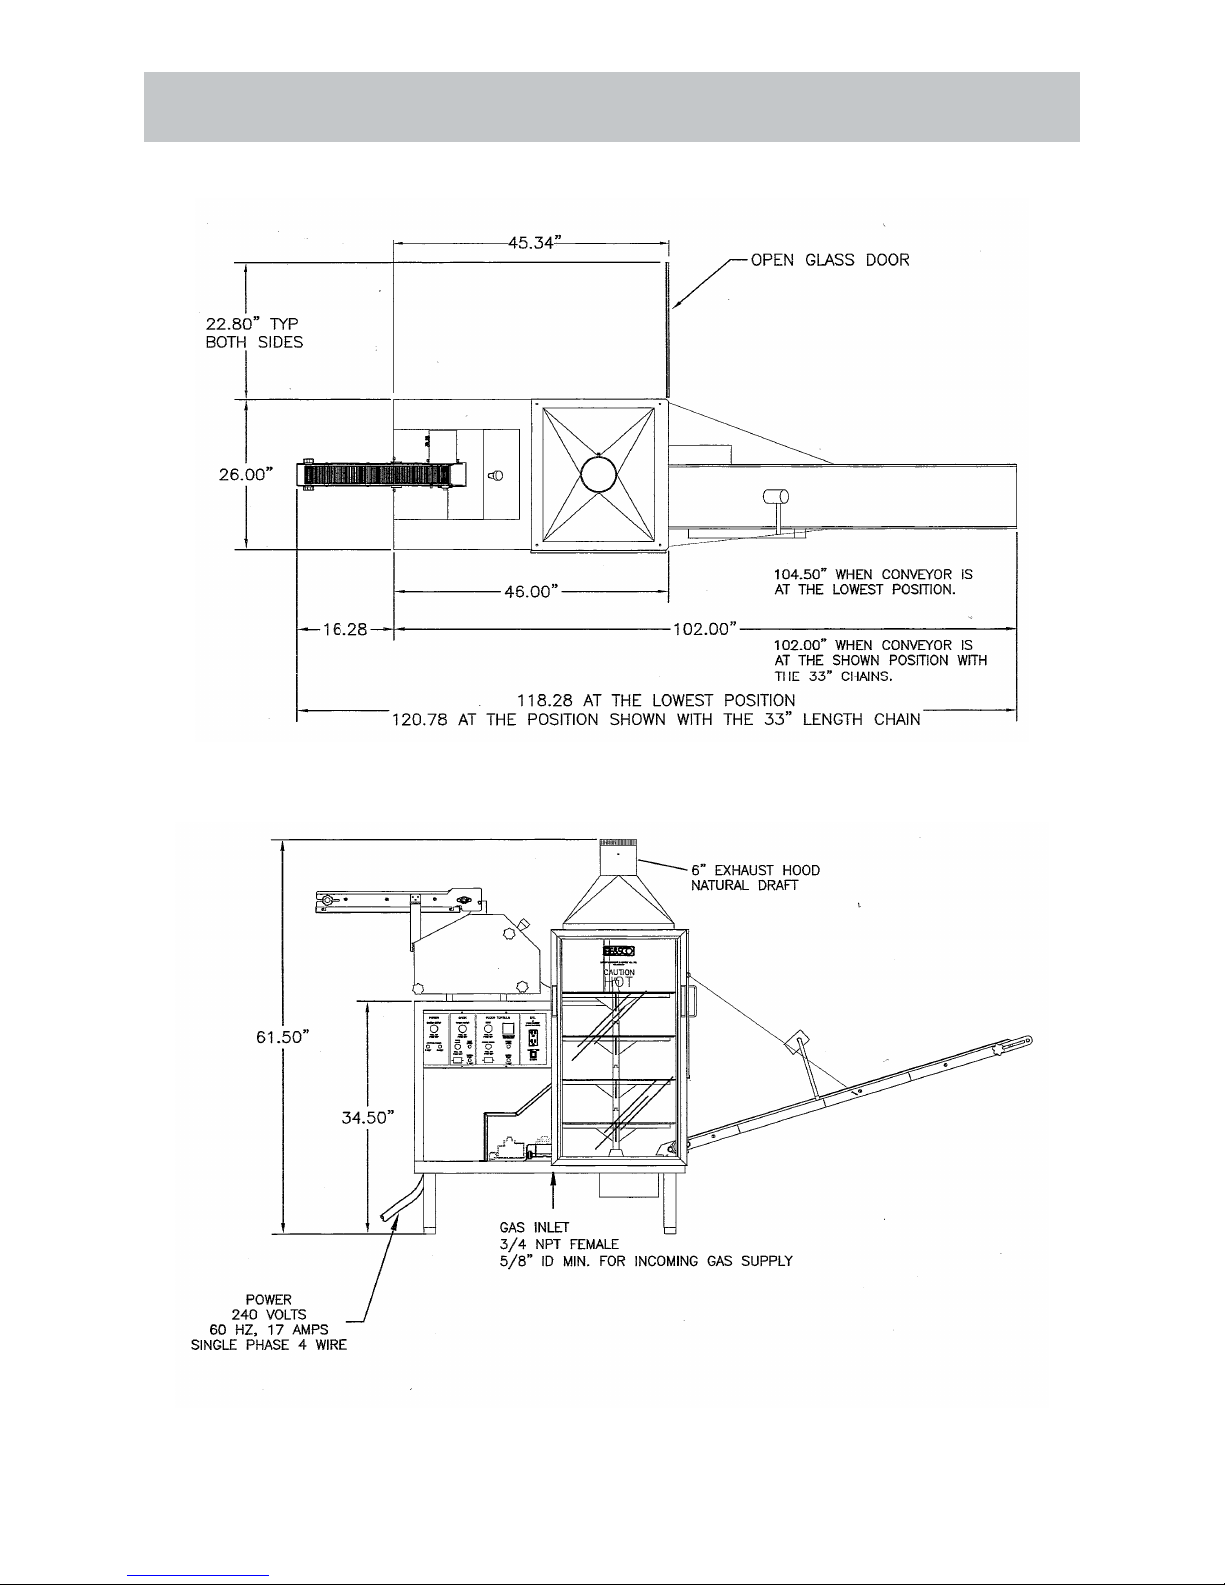
Beta 900 with Straight Exit with optional Dough Trolley Loader

9
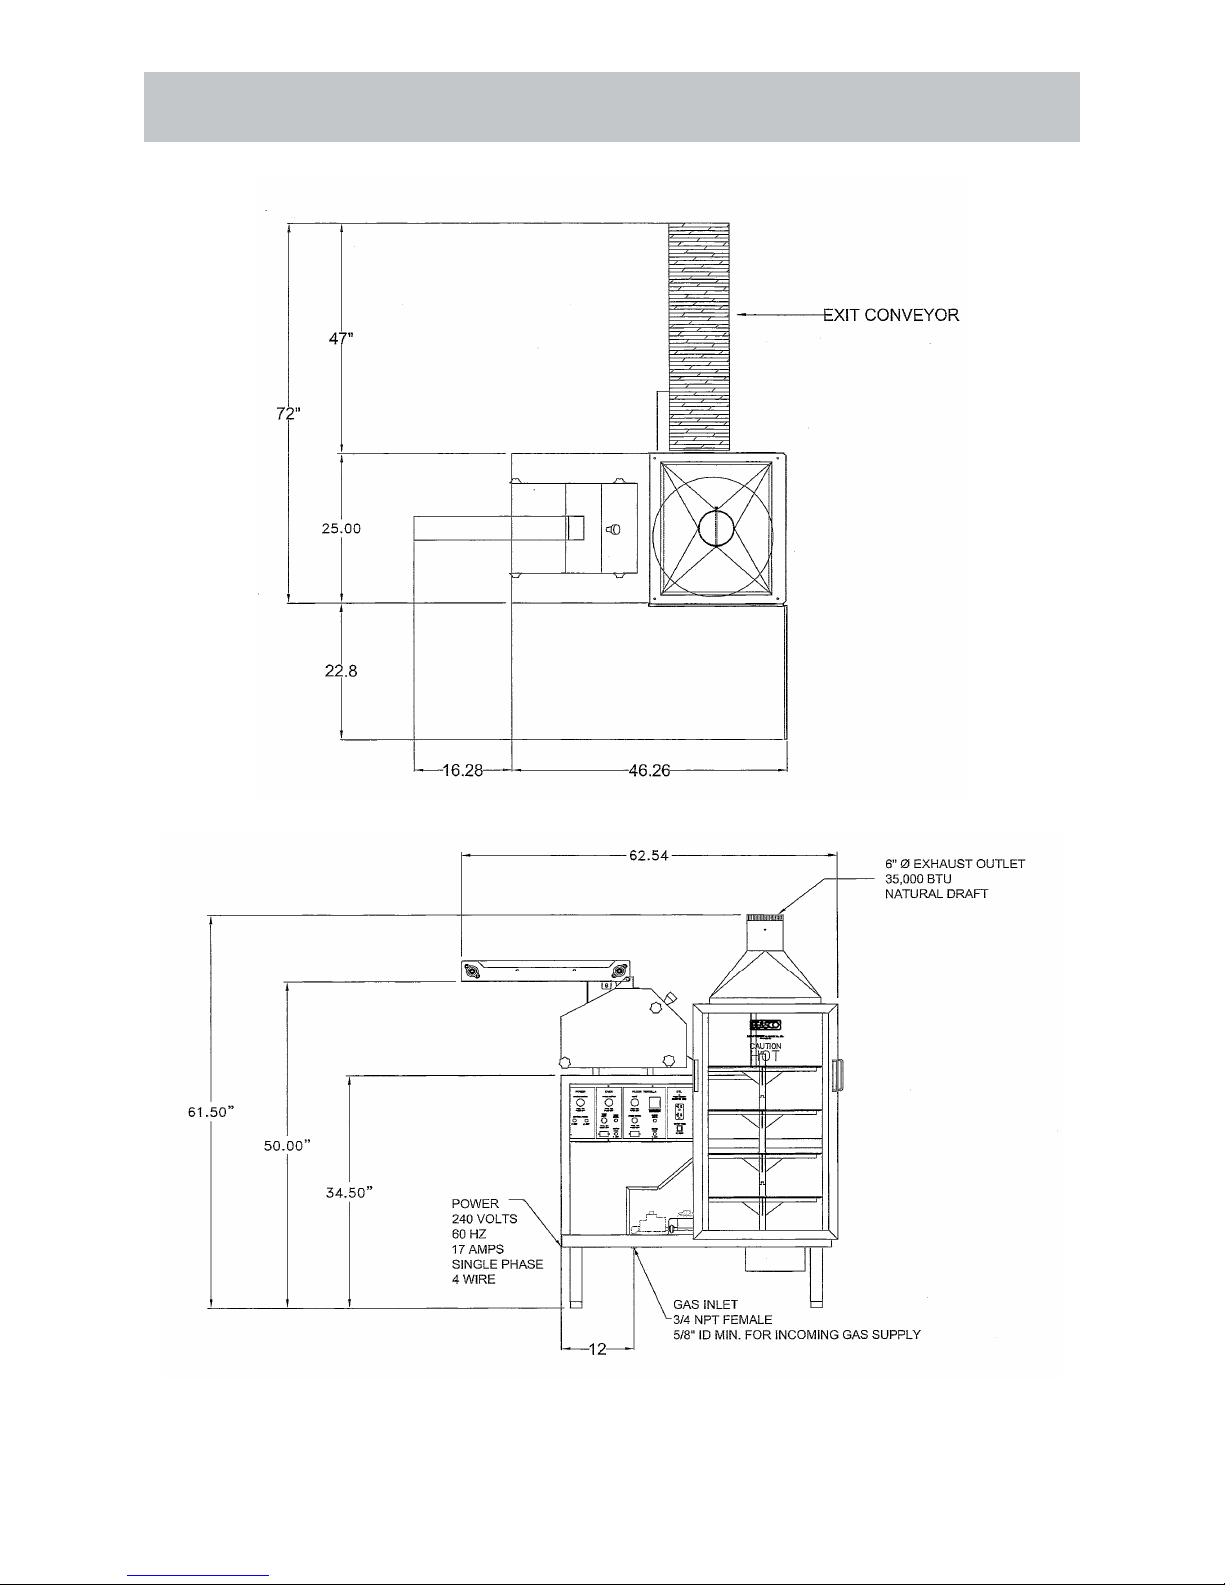
Beta 900 with Right Side Exit with optional Dough Trolley Loader
10
Beta 900 with Left Side Exit with optional Dough Trolley Loader

11
ElectricalSpecications
(ForaQualiedServicePerson)
ELECTRICAL SPECIFICATIONS:
ELECTRICAL CONNECTIONS:
plate heating elements, indicators lights, related switches and controls all function on electricity
from your electrical conduit. The voltage and phase of the BETA 900 must be compatible with
for the machine will void warranty and may damage the Beta 900. The installation and ground
of the BETA 900 must follow local codes, or in the absence of local codes, to the National
ElectricalCodeANSI/SNFPA70-1984(inCanada-CSAStd.C22.1).
WIRE COLOR CODE IS GIVEN BELOW:
Red L1
Black L2
White Neutral
Green Ground
Voltage
Cycles
Phase
Amperage
Total Power Usage 3.16KW
3000
1/8 HP / 220V / 3 Phase
Drive Motor Voltage 90 VDC
1/50 HP / 1/20 HP
Conveyor Motor Voltage 120 VAC Variable
Lighting Voltage 120 VAC

12
GasSpecications
(ForaQualiedServicePerson)
P art U. S . U nits S I Units (International S tanda rds
Gas heating Value 1000 BTU/cu.ft 37.3 MJ/cu.mm
Gas Specific Gravity Air = 1.00.63 0.63
Gas Supply Pressure 5.5" W.C. 1.35 kPa
Gas Inlet Pressure at manifold3.5" W.C 0.98 kPa
Oven heating Value 35,000 BTU/Hr 5,000 BTU/Hr 10.2 KW 13.2 KW
Burner Orifice 0.0520 1.3208 mm
Gas Inlet Pipe Sie 3/" NPT 19.05 mm NPT
MAXIMUM CAPACITY OF IRON PIPE IN
CUBIC FEET OF NATURAL GAS PER HOUR
INS T AL L A T IO N INS T R U C T IO NS
G as P iping
MAXIMUM CAPACITY OF IRON PIPE IN
CUBIC FEET OF NATURAL GAS PER HOUR
Pressure drop of 0.5 Inch W.C.
LENGTH OF PIPE NOMINAL SIZE IN INCHES
Feet 3/" 1" 1 1/2" 2"
10 360 680 2100 3950
20 250 65 160 2750
30 200 375 1180 2200
0 170 320 990 1900
50 151 285 900 1680
60 138 260 810 1520
70 125 20 750 100
80 118 220 690 1300
90 110 205 650 1220
100 103 195 620 1150
E lec tric al C onnec tions
The BETA 900 works on 22020 volt grounded circuits. The electric motor, lights,
Midwedge, plate heating elements, indicators lights, related switches and controls all function on
electricity from your electrical conduit. The voltage and phase of the BETA 900 must be
compatible with your electrical supply to safely operate. Any installation not matching the
electrical specifications for the machine will void warranty and may damage the Beta 900. The
installation and ground of the BETA 900 must follow local codes, or in the absence of local codes,
to the National E lec tric a l C ode AN S I/NF P A 70-1984 (in C ana da-C S A S td. C 22.1).
Wire color code is given below
R ed L 1
B lac k L 2
W hite Neutra l
G reen G round
NOMINAL SIZE INCHES
PIPE LENGTH

13
Gas Piping
(ForaQualiedServicePerson)
supply system is essential to run the Beta 900. Gas piping must agree with local codes, or in the
The gas usage and information of the Beta 900 is listed below.
gas manifold.
the manual shutoff valve to isolate that system.
BETA 900’s shutoff valve from that system.
Before connecting the BETA 900, make sure the gas line is all clear. After connection, check
without pressure loss.
DO NOT INSTALL AN ADDITIONAL REGULATOR WHERE THE BETA 900
CONNECTS TO THE GAS SUPPLY.

Ventilation
(ForaQualiedServicePerson)
AIR INTAKE:
The Beta 900 uses the air in the room while it
operates. The direct vent cannot restock the air
supply so make sure about 30 CFM is available
for the Beta to use. Consult a ventilation expert
to increase the supply of air entering the room if
necessary.
AIR OUT-TAKE:
A well designed and operating ventilation system
will allow the oven in the BETA 900 to release
unwanted vapors. Failure to vent the BETA 900’s
oven will result in major operational problems.
DAMPER:
The damper, in the hood of the Beta 900, is set
at the factory. If upon installation, the oven does
from the burner, the damper may need to be
adjusted.
Each BETA 900 has been thoroughly tested and inspected before shipping, however it is often
necessary to further test or adjust the BETA 900 as part of installation. These adjustments are the
responsibility of the dealer or the person installing the machine. Since these adjustments are not
Calibration of the thermostat
Burner adjustment
Leveling
Tightening of fasteners
Testing of gas pressure
The BETA 900’s legs should be adjusted so the BETA is level.
Adjust the damper in the hood to vent more rapidly
Finally, no installation should be considered complete without proper inspection
during these initial adjustments.
Initial Adjustments
(ForaQualiedServicePerson)
15
Assembly Instructions
(ForaQualiedServicePerson)
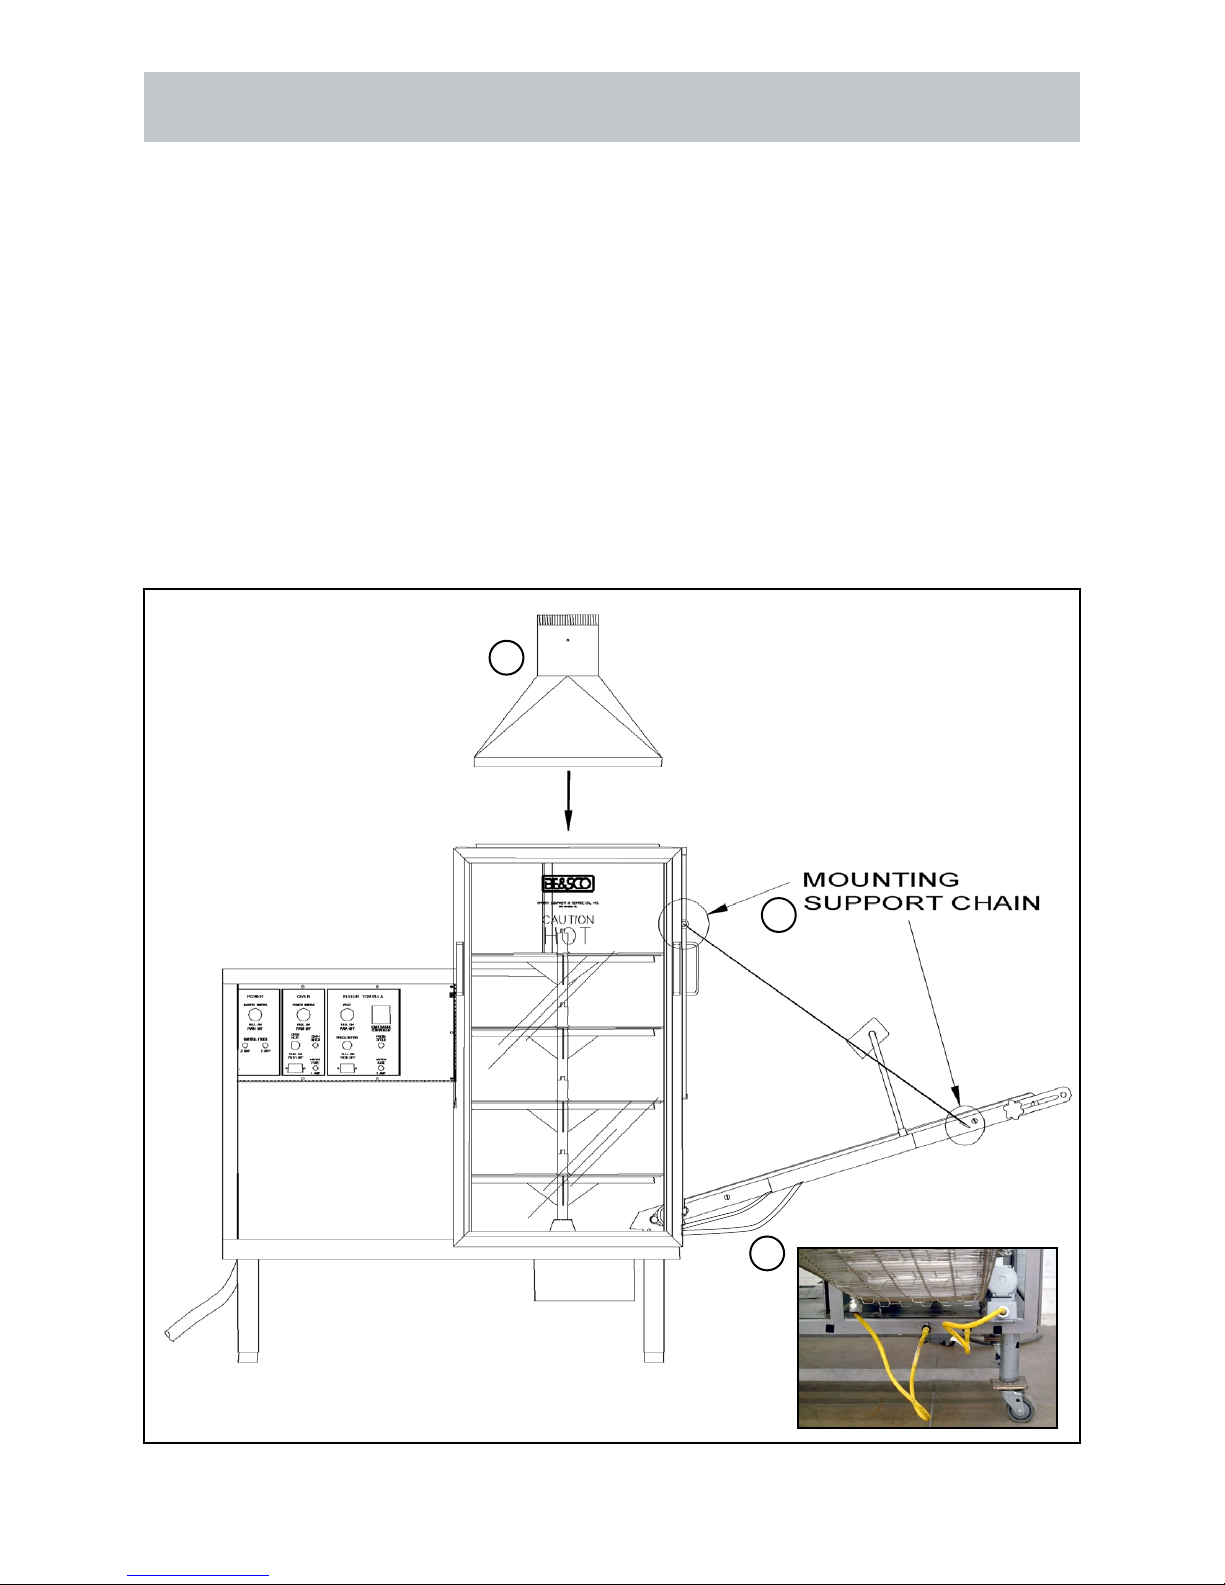
The BETA 900 is very easy to assemble. It comes put together for the most part. This section will
show you how to attach the oven hood and conveyor.
1.
2. Put the 6” vent pipe over the hood vent pipe.
3. Notice how the Mounting Tabs at the base of the oven secure the conveyor in place.
The chain supports the conveyor, and the Mounting Tabs for the chain attach to the
frame of the machine and to the conveyor. See picture B.
A
B
C

16
Assembly Instructions
(ForaQualiedServicePerson)
This section will show you how to attach the oven and press slides and scrapers. Do the following
to complete the assembly.
1.
2.
3. Attached 3 oven slides. See diagram D.
Attached 1 press slide. See diagram E.
1
2
3
D
E
1
A
B
C
1
2
3
4

17
READ INSTRUCTIONS CAREFULLY
1. DOUGH PREPARATION
2. RUNNING THE MACHINE
3. CLEANING THE MACHINE
CAREFULLY CLEAN this unit before & after operation. READ the section on cleaning and
make use of your storyboards for cleaning.
NEVER USE any sharp objects, caustic oven cleaner or degreaser to clean the plates, or on
any other part of the machine.
CLEAN the MIDWEDGE press plates every 2 to 3 hours of a production run and always at the
end of a production run.
THAW FROZEN DOUGH BALLS at such a time so it does not stop production and the machine
runs without interruptions for as long as possible.
starting the tortilla making process. The oven temperature should read between 325 F and 350
F while the set point for Midwedge temperature Should display in orange numbers below.
After cleaning the machine, and setting the operating temperature, lightly DUST THE DOUGH
BALLS WITH FLOUR and drop into the press or put them on the dough loader if you have
one.
has been properly thawed and machine properly cleaned.
rows down. Leave small spaces between each dough ball so they are not touching. Also, use
balls can be staged the night before and kept in the cooler. Do not let any air touch the dough
balls. This will form a skin on the dough and dry it out.
General Guidelines
THIS SECTION IS PROVIDED FOR THOSE WHO HAVE CAREFULLY READ
THE INFORMATION CONTAINED IN THIS MANUAL, ARE FAMILIAR WITH
THE FUNCTION OF THE BETA 900 MACHINE OR, HAVE HAD PREVIOUS
EXPERIENCE WITH THE OPERATION OF THE EQUIPMENT DESCRIBED.
18
Midwedge Installation
Placement and Installation
into the oven section and onto the top round oven plate.
The electrical controls on the side have three cables that come from the rear of the electrical panel on
Find the three cables that match the MIDWEDGE outlets and plug them in.
The MIDWEDGE is now in place and ready to begin the start up procedure.
There are no electrical controls on the MIDWEDGE because the power, speed, and
temperature are all controlled from the Electrical Control Panel of the BETA 900 Oven. For
instructions on the MIDWEDGE electrical controls, see the FLOUR TORTILLA Section of
the Electrical Control Panel on the OVEN Operation Instructions.
!
PLACEMENT OF MIDWEDGE
A
B
C
D
MIDWEDGE ELECTRICAL CONNECTIONS
INCLUDING THE OPTIONAL DOUGH TROLLEY LOADER
(OThER sIDE Of MIDwEDgE)
MIDWEDGE ELECTRICAL CONNECTIONS
WITHOUT DOUGH TROLLEY LOADER
A
B
C

19
Control Panel
1
25 6 10 1211 13
3
478914
Power Section
1. The Master Switch
is also the emergency shut down switch. Pull to turn power ON and push to turn power
OFF.
2. The Control Fuses protect the Beta 900 system against an overload in the main power
supply.
Oven Section
3. The Power Switch
to turn power ON and push to switch power OFF from the oven section.
Oven Heat button turns power ON and OFF in the oven section.
5. The Hour Meter counts time in tenths of hours while the oven section is ON.
6. The Motor Fuse protects the oven motor from a power overload.
7. The Oven Speed knob adjusts the speed of the motor and the speed of the four round
oven plates.

20
Control Panel
Flour Tortilla Section
8. The Heat Switch
the MIDWEDGE. Pull the switch to turn power ON and push to turn power OFF to the
MIDWEDGE.
9. The Temperature Controller controls the temperature for the MIDWEDGE bottom
the letters “SP” will appear in the lower display window. Then press the down or up
arrow to change the temperature. When the temperature is set, press the function
key again and wait until the “SP” letters disappear from the display window. Your
temperature has been adjusted.
Note: Pressing the function key repeatedly will scroll the controller through a variety of
readings in “SP” mode. “SP” is the adjustable mode. Other mode settings are preset
at the factory and can only be accessed by an authorized service technician.
10. The Press Motor button turns power to the MIDWEDGE on and off. Push to turn on
and Push to turn off power.
11. The Hour Meter counts time in tenths of hours while the MIDWEDGE is in operation.
12. The Motor Fuse protects the MIDWEDGE motor from a power overload.
13. The Press Speed knob adjusts the speed at which the motor raises and lowers the
bottom plate and the rate the hopper gate opens and closes.
DLT & Palm Sander Section
DLT & Palm Sander
the round plates.
Table of contents
Popular Oven manuals by other brands

Stone Bake
Stone Bake Primo 60 Assembly and operation manual

Bosch
Bosch Benchmark HBLP451LUC Specifications

Pelgrim
Pelgrim OVM216GLS Instructions for use

NEFF
NEFF B47CS34.0B User manual and installation instructions

KitchenAid
KitchenAid KFID500ESS User instructions

Nerf
Nerf B4AVH1AH0B User manual and installation instructions


Bosch
Bosch HBLP45 use and care manual

Frigidaire
Frigidaire FEB30S5DSG Use & care guide

Ovention
Ovention Matchbox M1313 Installation and operating manual

ZANKER
ZANKER KOU10412XB user manual

Havells
Havells OTG 24RSS Premia operating instructions

Siemens
Siemens HB.58.C.6B User manual and installation instructions