Beau mark 175D1807P648 User manual

Owner’s Manual
Washers
175D1807P648 49-90386 06-09 JR
Safety Instructions ..........2,3
Operating Instructions
Care and Cleaning
oftheWasher......................7
ControlPanel .......................4
Control Settings . . . . . . . . . . . . . . . . .4–5
Features..........................6,7
oading and Using
theWasher ........................7
Troubleshooting Tips . . . . . .8–10
Consumer Support
Consumer Support . . . . . . . . . . . . . . . .12
Warranty..........................11
Write the model and serial
number here:
Model #
Serial #
You can find them
under the lid of
the washer.
P648

2
Install or store where it will not be exposed to
temperatures below freezing or exposed to the
weather, which could cause permanent damage
and invalidate the warranty.
Properly ground washer to conform with all
governing codes and ordinances. Follow details
in Installation Instructions.
IMPORTA T SAFETY I FORMATIO .
READ ALL I STRUCTIO S BEFORE USI G.
WAR I G! For your safety, the information in this manual must be followed to minimize the risk
of fire or explosion, electric shock, or to prevent property damage, personal injury,
or loss of life.
WATER HEATER SAFETY
Under certain conditions, hydrogen gas may be produced in a water heater that has not been
used for two weeks or more. Hydrogen gas can be explosive under these circumstances.
If the hot water has not been used for two weeks or more, prevent the possibility of damage or injury by
turning on all hot water faucets and allowing them to run for several minutes. Do this before using any
electrical appliance which is connected to the hot water system. This simple procedure will allow any
built-up hydrogen gas to escape. Since the gas is flammable, do not smoke or use an open flame or
appliance during this process.
RO ER INSTALLATION
This washer must be properly installed and located in accordance with the Installation
Instructions before it is used. If you did not receive an Installation Instructions sheet, you can
receive one by calling, toll-free, 1.800.561.3344
.
YOUR LAUNDRY AREA
Keep the area underneath and around your
appliances free of combustible materials such as
lint, paper, rags, chemicals, etc.
Close supervision is necessary if this appliance is
used by or near children. Do not allow children to
play on, with or inside this or any other appliance.
Operating Instructions Safety InstructionsConsumer Support Troubleshooting Tips
Consumer SupportTroubleshooting TipsOperating InstructionsSafety Instructions
3
Use this
appliance
only for its
intended
purpose as
described in
this Owner’s
Manual.
WHEN USING THE WASHER
Never reach into washer while it is moving.
Wait until the machine has completely stopped
before opening the lid.
Do not mix chlorine bleach with ammonia
or acids such as vinegar and/or rust remover.
Mixing different chemicals can produce a toxic gas
which may cause death.
Do not wash or dry articles that have been
cleaned in, washed in, soaked in or spotted with
combustible or explosive substances (such as
wax, oil, paint, gasoline, degreasers, dry-cleaning
solvents, kerosene, etc.). These substances give off
vapors that may ignite or explode. Do not add
these substances to the wash water. Do not use or
place these substances around your washer or
dryer during operation.
The laundry process can reduce the flame
retardancy of fabrics. To avoid such a result,
carefully follow the garment manufacturer’s
wash and care instructions.
To minimize the possibility of electric shock,
unplug this appliance from the power supply
or disconnect the washer at the building’s
distribution panel by removing the fuse or
switching off the circuit breaker before attempting
any maintenance or cleaning.
OTE: Turning the Cycle Selector Knob to an off
position, or pressing AUSE does OT disconnect
the appliance from the power supply.
Never attempt to operate this appliance if it is
damaged, malfunctioning, partially disassembled,
or has missing or broken parts, including a
damaged cord or plug.
WHEN NOT IN USE
Turn off water faucets to relieve pressure on hoses
and valves and to minimize leakage if a break or
rupture should occur. Check the condition of the fill
hoses; they should be replaced every 5 years.
Before discarding a washer, or removing it
from service, remove the washer lid to prevent
children from hiding inside.
Do not attempt to repair or replace any part
of this appliance unless specifically recommended
in this Owner’s Manual, or in published user-repair
instructions that you understand and have
the skills to carry out.
Do not tamper with the controls.
READ AND FOLLOW THIS SAFETY INFORMATION
CAREFULLY.
SAVE THESE I STRUCTIO S
STANDARD FILL equipped
models
4
Quick Start Guide
About the control panel—for models with START button.
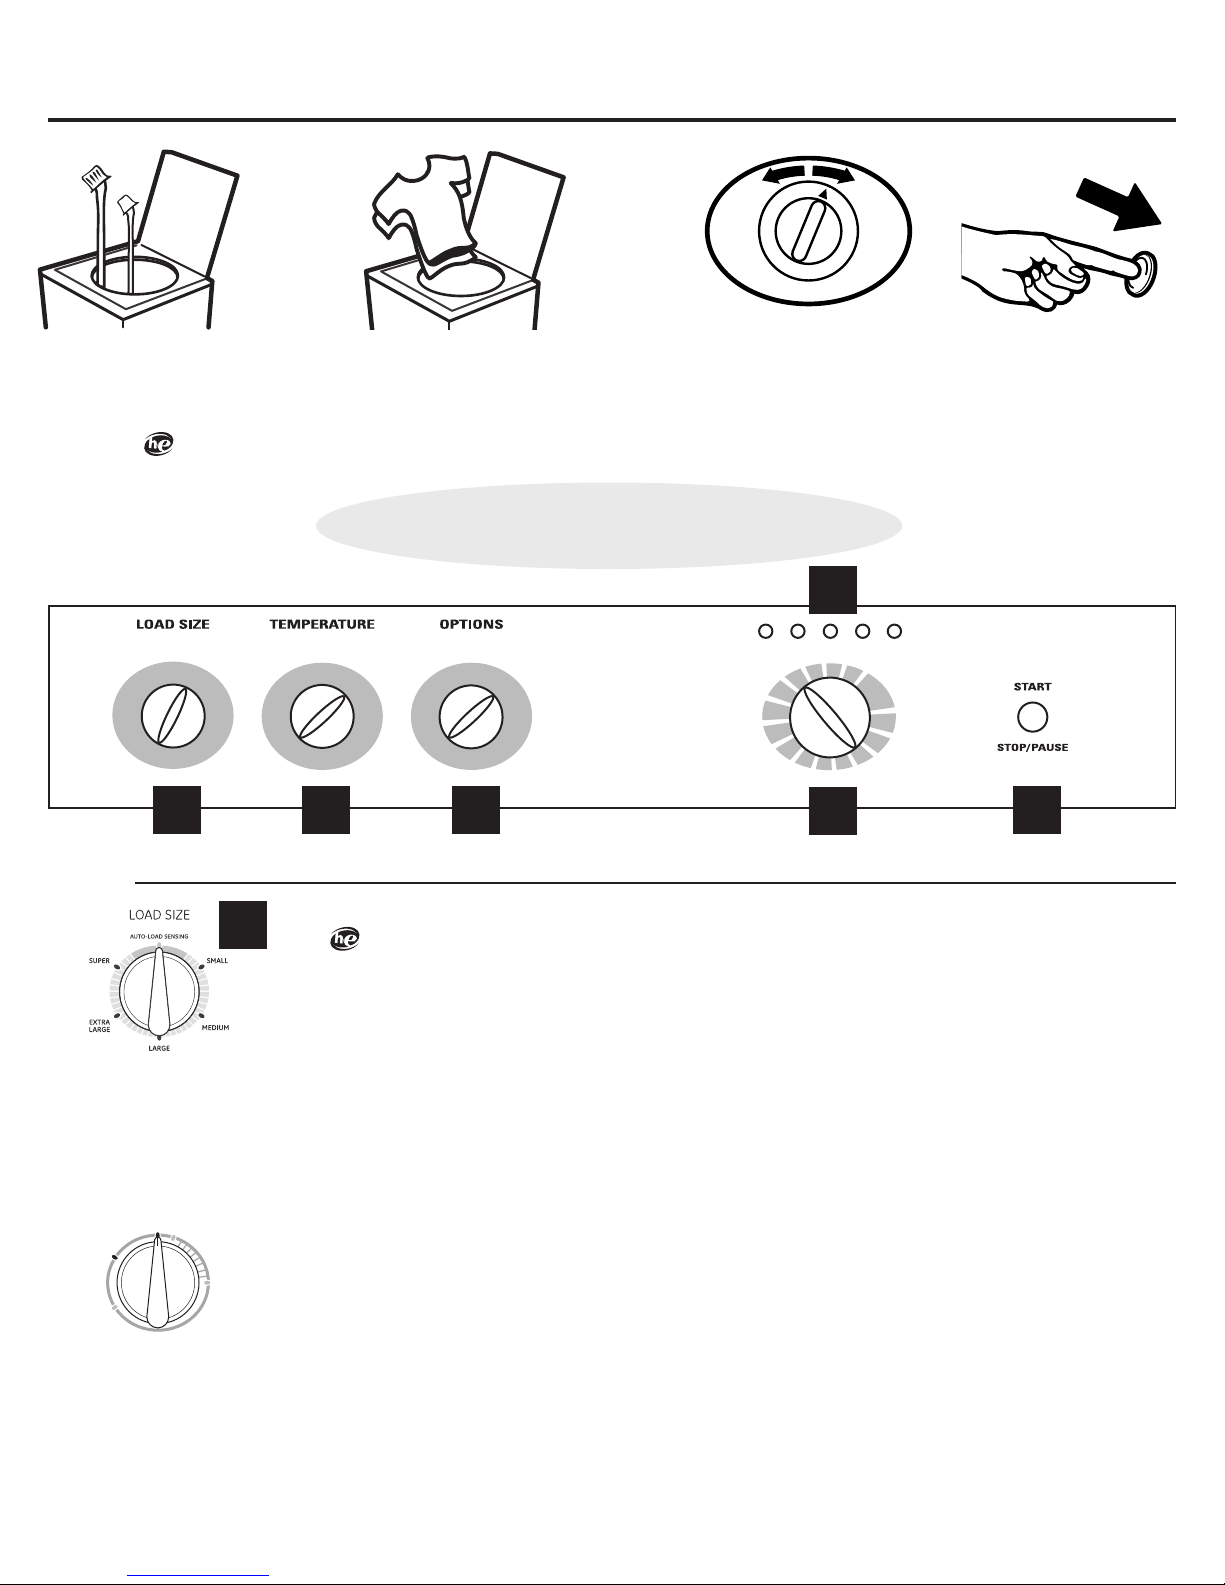
Load Size
Add detergent to the bottom of the basket and fabric softener to the dispenser prior to loading clothes.
oosely load clothes no higher than the top row of holes in the basket. For optimal performance, load items around
the outside of the basket.
Make the load selection:
For AUTOMATIC LOAD SE SI G equipped models
– For convenience, best performance and optimal efficiency, select AUTOMATIC LOAD SE SI G. This selection
automatically provides the correct amount of water suited to the size and type of load placed in the unit.
– If you prefer to manually select the water level, select SMALL through SUPER. While AUTOMATIC LOAD SE SI G is best
for most loads and general washing, you may want to manually select the load size for specialty items such as bulky,
lightweight comforters or pillows, where you want to ensure a larger water level is applied. Manual load size selections
should be made for wet items placed in the washer, such as soaked towels or garments.
– The washer will not fill with water when automatic load sensing is selected if the lid is opened.
When the lid is closed the machine is able to begin filling with water in order to sense the load size.
For standard fill equipped models
– Select the load size that matches the load placed into the washer.
– For changing the water level to a higher level AFTER the unit has filled, turn load size knob to RESET, then turn the knob
back to your new setting. DO NOT leave the knob in the RESET position.
OTE: This is a high-efficiency washing machine with Infusor™ wash action. This system requires less water while providing
effective cleaning action. You may notice that the water level is lower than on your previous washer. This is normal for an
Infusor™-equipped washer.
The water level will be just above the top of the Infusor™ when the SUPER WASH size
is selected.
A
A
B C
D
EF
Controls
SUPER RESET
SMALL
MEDIUM
LARGE
LOAD SIZE
AUTOMATIC LOAD
SENSING equipped
models
• Add fabric softener (on models
with a fabric softener dispenser);
see page 6 for details
• Add detergent. The use of High
Efficiency detergents is
recommended in all Energy
Star-rated washers
• Select load size and
other wash options,
including Fabric
Softener option
• Select wash cycle
• Push START
Step 2 Step 3 Step 4
• Add clothes
• Close lid
NOTE: Washer will not start to fill
with lid open on Auto Load sensing
settings (on some models)

5
Consumer SupportTroubleshooting TipsOperating InstructionsSafety Instructions
B
Temperature
Select the water temperature for the wash and rinse cycles. Always follow fabric manufacturer’s care label or instructions when
laundering.
PerfecTemp senses the incoming water temperature and adjusts the fill water to obtain a more precise temperature range for all
wash temperatures. For example, in a CO D wash selection, some warm water may be added to reach a temperature needed to
better dissolve detergents. Often, detergents are not completely dissolved in very cold water, especially in cooler climates.
During winter months, when the water entering your home is colder, or for locations with very cold water year round,
use the PerfecTemp plus CO D to help dissolve powdered detergents and to improve the cleaning of your clothes.
The TAP COLD feature turns the PerfecTemp feature on your washer off and uses your household tap water temperature
for a CO D wash. This can provide energy savings by reducing the amount of hot water used in your wash.
Options
Autosoak Option (on some models)
This option begins with a brief agitation, soaks for a specified period of time, then moves through the rest of the cycle
automatically. On some models, this option is located on the Cycle Selector knob.
2nd Rinse Option (on some models)
When you use extra detergent or bleach to clean heavily soiled clothes, you may want to use the 2nd Rinse option.
It provides a second deep cold rinse.
Extended Spin Option (on some models)
Use this option to extract more water from your clothes. Clothes will be drier when this option is selected and will dry
more quickly in your dryer.
Fabric Softener
Set this option when adding fabric softener to the washer.
OTE: Do not use fabric softener dispensing balls with this washer. They do not work correctly in high-efficiency
washers.
Status Indicator Lights
The Cycle Indicator ights show what stage the washer is in. When the Selector knob is set to a new cycle, the Indicator
ights will flash momentarily, showing what stages the cycle will go through. On models without an AUTO SOAK option,
the SOAK light will not light up.
Wash Cycle—Cycle Selector Knob
The wash cycle controls the length and intensity of the washing process. The knob can be turned in either direction.
Turning the Cycle Selector knob after starting a cycle will stop the washer and reset the cycle to the new selection.
Press START to begin the new cycle selection.
The chart below will help you match the wash cycle setting with your clothing.
COTTONS For heavy to lightly soiled cottons, household linens, work and play clothes.
This cycle provides
the best overall cleaning and should be used for most everyday items. Provides a high speed spin.
PREWASH For removing surface dirt from heavily soiled clothes. Make sure to follow with a
regular wash cycle.
CAS ALS For wrinkle-free and permanent press items and knits. Provides a low speed spin.
EASY CARE For wrinkle-free and permanent press items and knits. Provides a high speed spin.
DELICATES For lingerie and special-care fabrics with light soil. Provides a low speed spin.
HAND WASH For items labeled handwashable with light soil. Provides an extra low speed spin.
SPEED WASH For small loads of lightly soiled items that are needed in a hurry. Provides a high speed spin.
DRAIN & SPIN For draining the tub and spinning water out of the clothes. Provides a high speed spin.
OR
SPIN ONLY
A TO SOAK For very soiled clothes. Begins with a brief agitation, soaks for a specified period of time,
then moves through the rest of the cycle automatically.
START
Press START to begin the cycle. Pressing START again will PAUSE the cycle and the Cycle indicator light will blink.
To continue the cycle, press START again or close the lid. If machine is paused more than 24 hours, the cycle will be
cancelled. To stop the cycle, hold the button for 3 seconds. If water remains in the machine, select the DRAI & SPI
OR SPI O LY cycle to drain tub and spin water out of the washer tub.
Raising the lid will stop agitation or spin action but does not pause the cycle.
D
E
F
C
Operating Instructions Safety InstructionsConsumer Support Troubleshooting Tips
6
About washer features.
Cleaning the Fabric Softener Dispenser (on some models)
The Fabric Softener Dispenser is self cleaning. This dispenser does not require regular cleaning
like standard fabric softener dispensers. Wipe down exterior surfaces of the dispenser
as needed. If cleaning of the internal dispenser components is needed, follow these steps
after the wash cycle is complete:
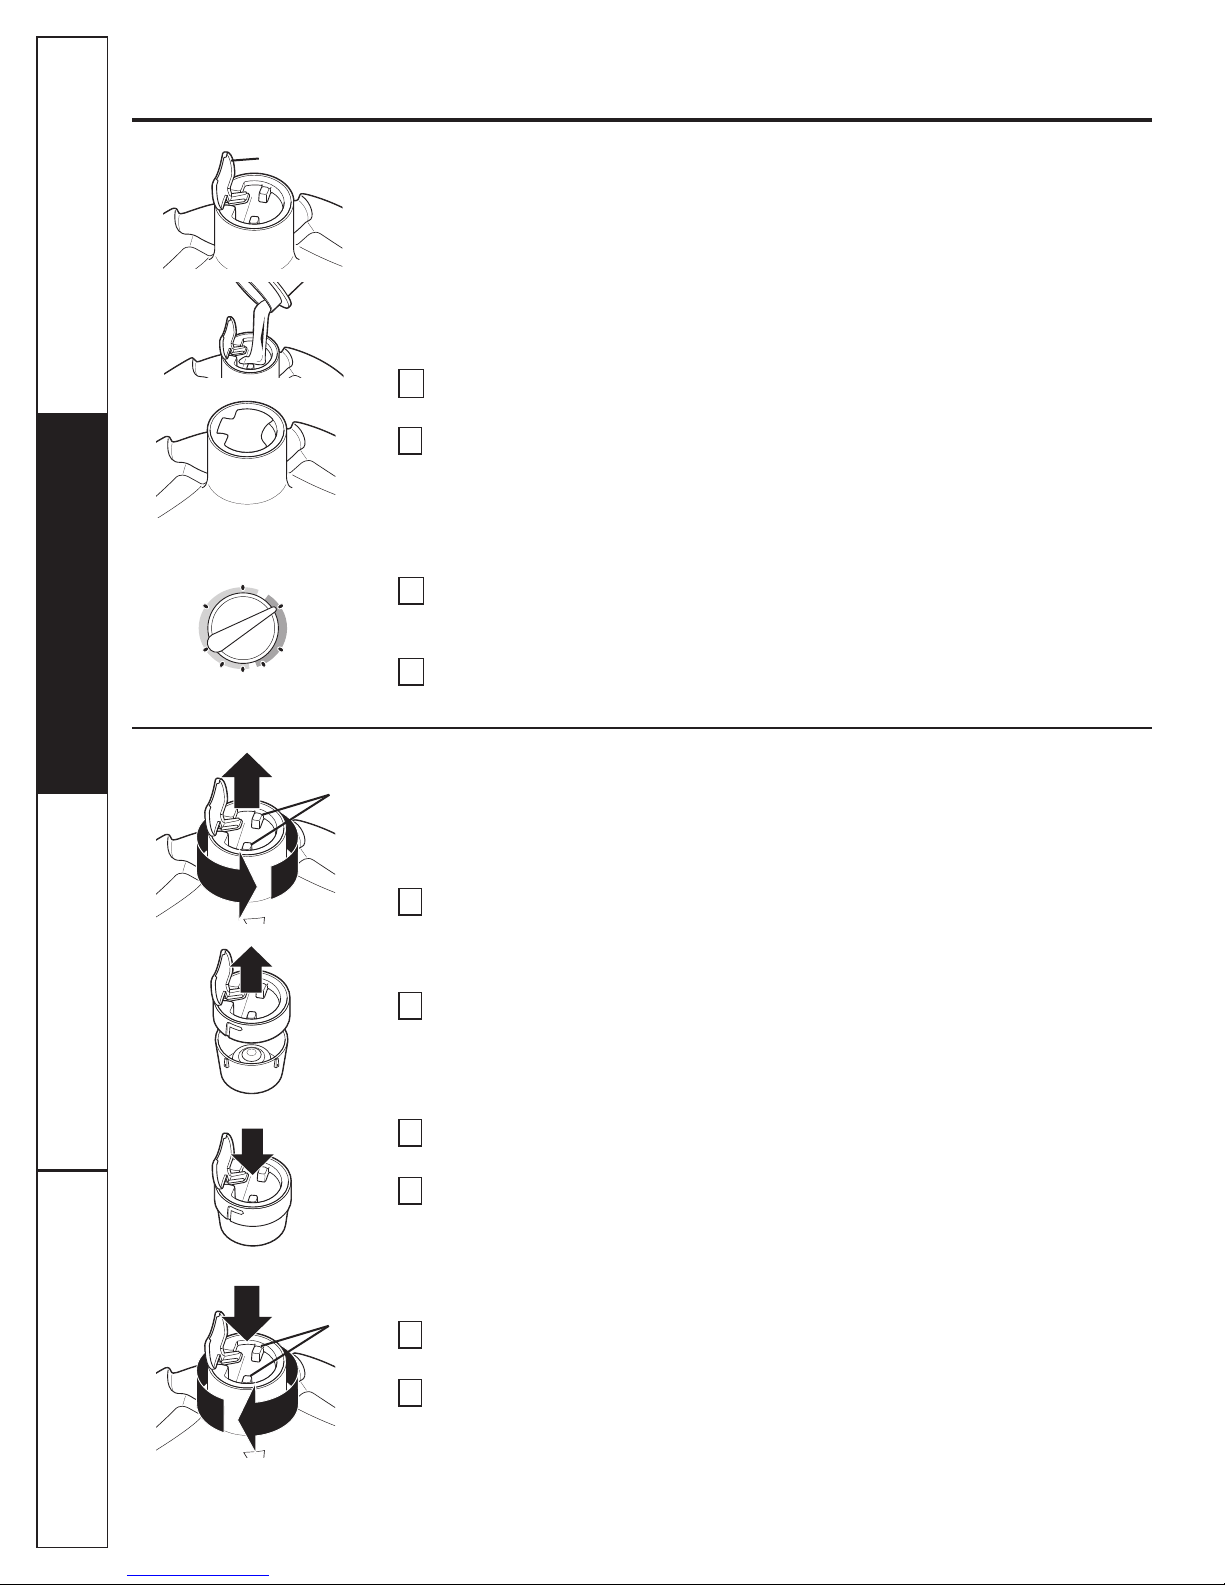
The Fabric Softener Dispenser (on some models)
ift the tab on the fabric softener
dispenser top.
Measure out fabric softener into
the cap and pour the softener into
the dispenser top. The fabric softener
will drain into the receiving cup inside
the dispenser. Use only “Ultra” or
concentrated fabric softeners.
Push down on the tab to close
the dispenser top. Make sure the tab
is pushed down fully and snaps shut.
Select FABRIC SOFTE ER from OPTIO S
on the control panel.
OTE: Overfilling the dispenser will cause
fabric softener to drain out of the holes
in the side of the Infusor™ when filling.
Do not overfill.
4
3
2
1
OFF
AUTO
AUTO SOAK
EXTENDED
2nd
RINSE
SPIN
SOAK
FABRIC SOFTENER
FABRIC SOFTENER
FABRIC SOFTENER
Set when adding
+ 2nd RINSE & EXTENDED SPIN
+ EXTENDED SPIN +2nd RINSE
OPTIONS
The fabric softener dispenser automatically releases liquid fabric softener at the proper time
during the cycle.
Do not stop the washer during the first spin. This will cause the dispenser to empty
too soon.
ever pour fabric softener directly on clothes. This may cause stains on your clothing.
To use, follow these steps:
ift the dispenser top tab and turn the top
counterclockwise using the 2 turning tabs
shown. ift the dispenser out of the
Infusor™.
Clean out any buildup from inside the
Infusor™ with a soft cloth or toothbrush.
Ensure the three rectangular holes
in the bottom which allow the fabric
softener to drain are not blocked.
Gently pull the cap away from
the dispenser cup to separate.
Wipe surfaces with a soft cloth or soak
the parts in a solution of 1 gallon warm
water, 1/4 cup liquid detergent and 1 cup
bleach. Ensure the small hole in the top
surface of the cap and associated tube
are not obstructed.
Reassemble the dispenser cup and cap
by snapping them together.
Place the dispenser assembly into
the Infusor™. Turn the top clockwise
using the 2 turning tabs shown. Push
down on the tab to close the dispenser
top. Make sure the tab is pushed down
fully and snaps shut.
2
6
5
4
3
1
1
2
3
4
Tab
Turning Tabs
Turning Tabs
1
3
5
6
Consumer SupportTroubleshooting TipsOperating InstructionsSafety Instructions
7
Loading and using the washer.
Always follow fabric manufacturer’s care label when laundering.
Sorting Wash Loads
Sort by color (whites, lights, colors), soil level,
fabric type (sturdy cottons, easy care, delicates)
and whether the fabric produces lint (terry cloth,
chenille) or collects lint (velveteen, corduroy).
roper Use of Detergent
Add detergent and fabric softener before adding
clothes so that the detergent can work effectively.
Using too little or too much detergent is a common
cause of laundry problems.
Use less detergent if you have soft water, a smaller
load or a lightly soiled load.
Add detergent. The use of High Efficiency
detergents is recommended in all Energy Star-rated
washers. HE detergents are formulated to work with
low water wash and rinse systems. HE detergents
reduce the oversudsing problems commonly
associated with regular detergents.
Loading the Washer
oad dry items loosely, no higher than the top
row of holes in the washer basket. For best results,
load items evenly and loosely around the outside
of the basket, taking care not to cover the center of
the Infusor™. To add items after washer has started,
lift the lid and submerge additional items around
the outside of the basket.
Do not place large items such as sheets, blankets
and towels across the Infusor™. Load them around
the outside of the basket.
Do not wash fabrics containing flammable
materials (waxes, cleaning fluids, etc.).
Agitation will not start with the lid up.
Wash Basket: eave the lid open after washing to
allow moisture to evaporate. If you want to clean
the basket, use a clean, soft cloth dampened with
liquid detergent; then rinse. (Do not use harsh or
gritty cleaners.)
Fill Hoses: Hoses connecting the washer to the faucet
should be replaced every 5 years.
Exterior: Immediately wipe off any spills. Wipe
with damp cloth. Try not to hit surface with
sharp objects.
Interior: The occasional use of a cycle that contains
bleach will keep the inside of the washer clean.
Moving and Storage: Ask the service technician
to remove water from drain pump and hoses.
See the Installation Instructions packed with product
for information on how to reinstall the shipping
rod to keep the tub stationary when moving
the washer. For more information, call 800.561.3344.
Do not store the washer where it will be exposed
to the weather.
Long Vacations: Be sure water supply is shut off
at faucets. Drain all water from hoses if weather will
be below freezing.
Care and cleaning of the washer.
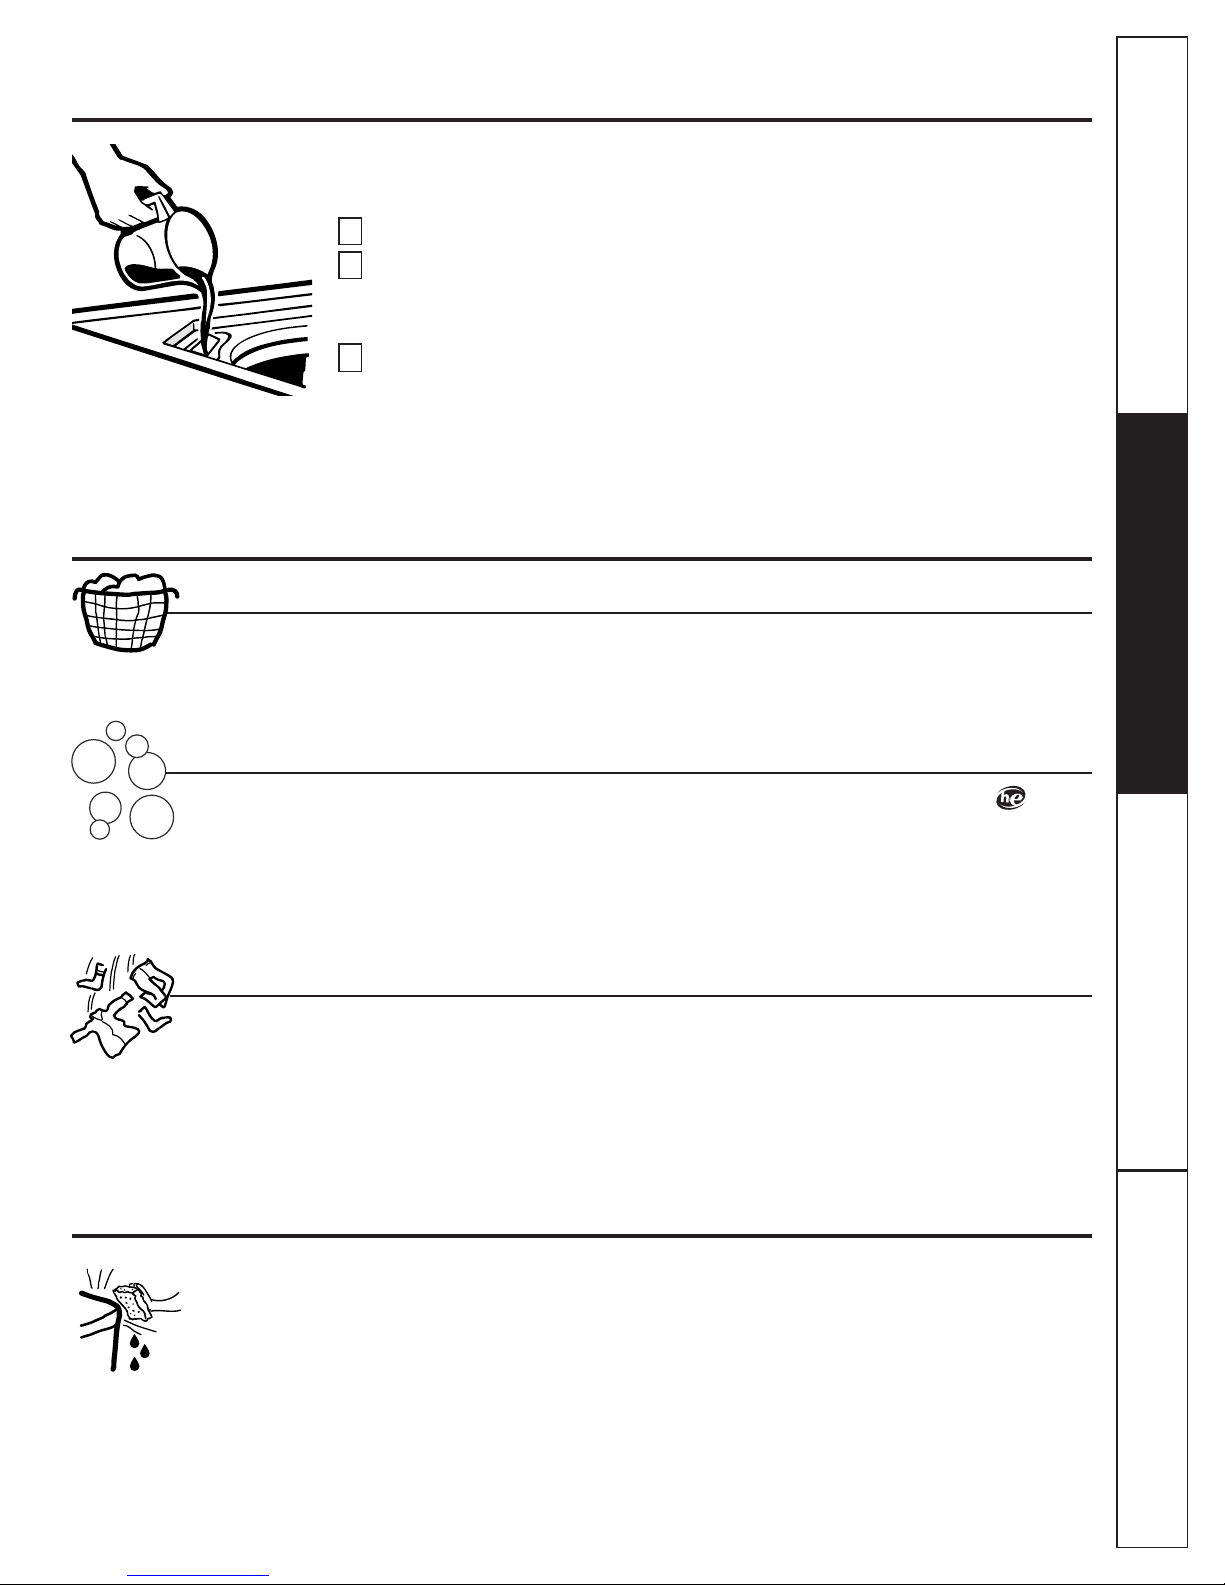
Liquid Bleach Funnel
The water fill dilutes liquid chlorine bleach as the washer fills for the wash cycle.
Check clothing care labels for special instructions.
Measure liquid bleach carefully, following instructions on the bottle.
Never pour undiluted liquid chlorine bleach directly onto clothes or into the wash basket.
Do not pour powdered bleach into bleach funnel.
Before starting the washer, pour measured amount of bleach directly into bleach funnel.
Avoid splashing or over-filling dispenser. If you prefer to use powdered bleach, add it into
the wash basket with your detergent.
Do not mix chlorine bleach with ammonia or acids such as vinegar and/or rust remover.
Mixing can produce a toxic gas which may cause death.
3
2
1
WATER Possible Causes What To Do
Water level seems low This is normal • Water may not cover the top level of the clothes.
This is normal for this high-efficiency washer.
Water fills and drains Drain stand pipe is too low • The drain stand pipe must be above 30".
at the same time
Too many suds Too much detergent • Measure your detergent carefully. Use less soap if you have
soft water, a smaller load or a lightly soiled load.
Type of detergent • Switch to HE detergent.
Soft water • Try less detergent.
Water leaks sing too much detergent • Use less detergent. Use less soap if you have soft water,
in washer a smaller load or a lightly soiled load.
Type of detergent • Switch to HE detergent.
Fill hoses or drain hose is • Make sure hose connections are tight at faucets and
improperly connected rubber washers are installed. Make sure end of drain hose
is correctly inserted in and secured to drain facility.
Household drain may • Check household plumbing. You may need to call
be clogged a plumber.
Constant water pressure • Tighten hoses at the faucets and turn the water off after
to the fill hoses at the each use.
water source •Check condition of the fill hoses; they should be replaced
every 5 years.
Water temperature Cooler water temperatures • New laundry detergents have been formulated to work
seems incorrect provide improved energy with cooler water temperatures without affecting wash
efficiency performance.
Water supply is turned off • Turn both hot and cold faucets fully on and make sure
or improperly connected hoses are connected to correct faucets.
Water valve screens are • Turn off the water source and remove the water connection
stopped up hoses from the upper back of the washer. Use a brush or
toothpick to clean the screens in the machine. Reconnect
the hoses and turn the water back on.
House water heater is • Make sure house water heater is delivering water at
not set properly 120°F–140°F (48°C–60°C).
Water pumped out before Lid lifted or cycle was put in • Reset cycle.
cycle is complete pause for over 24 hours
Water won’t drain Drain hose is kinked or • Straighten drain hose and make sure washer is not
improperly connected sitting on it.
•Top of drain outlet should be less than 6 ft (1.8 m)
above floor.
Washer pauses during The PREWASH Cycle or • This is normal. The washer alternates between agitate and
wash cycle AUTO SOAK Option was soak during these cycles to get your clothes cleaner with
chosen less wear.
Washer pauses during This is normal • The washer may pause during the spin cycle to remove
spin cycle soapy water more efficiently.
Troubleshooting Tips
Save time and money! Review the charts on the following pages
and you may not need to call for service.
Before you call for service…
8
Operating Instructions Safety InstructionsConsumer Support Troubleshooting Tips

Consumer SupportTroubleshooting TipsOperating InstructionsSafety Instructions
OPERATIO Possible Causes What To Do
Washer won’t operate Washer is unplugged • Make sure cord is plugged securely into a working outlet.
Water supply is turned off • Turn both hot and cold faucets fully on.
Controls are not set properly • Check controls.
Lid is open—safety feature • Close lid and reset cycle, to the beginning if necessary.
prevents agitation and
spinning when lid is up
Circuit breaker/fuse is • Check house circuit breakers/fuses. Replace fuses or
tripped/blown reset breaker. Washer should have a separate outlet.
Electronics need to be reset • Unplug washer, wait 2 minutes, plug back in and press START.
START was not pressed • Press START.
Lid magnet missing • Call for service.
Time not shown nit filling • This is normal. Estimated time remaining is updated during
on display fill time.
Movement inside machine Shifting mechanism is • When the machine is manually turned off, the shifter will
when shut off disengaging the motor disengage the motor before completely shutting down.
If lid is raised before the motor is disengaged, it will resume
when lid is closed.
PERFORMA CE Possible Causes What To Do
Clothes too wet Incorrect cycle selected. • Make sure the cycle selected matches the load you are
washing. Some fabrics will feel wetter when rinsed with cold water.
Wash load out of balance •
Redistribute load in washer and run through Drain & Spin cycle.
Colored spots Incorrect use of fabric • Check fabric softener package for instructions and follow
softener directions for using dispenser.
•Make sure you have selected the Fabric Softener option.
•Pretreat stain and rewash.
Dye transfer • Sort whites or lightly colored items from dark colors.
Grayed or yellowed Detergent amount • Be sure to follow detergent manufacturer’s directions.
clothes Hard water • Use a water conditioner like Calgon brand or install
a water softener.
Water is not hot enough • Make sure water heater is delivering water at
120°F–140°F (48°C–60°C).
Washer is overloaded • oosely load clothes no higher than the top row of holes in the
washer basket. For best results, load items around the outside
of the basket.
Detergent is not • Add detergent to the wash basket before you load clothes.
dissolving
Dye transfer • Sort clothes by color. If fabric label states wash separately,
unstable dyes may be indicated.
Lint or residue on Clothes are air or line dried • If you do not dry your clothes with a clothes dryer, your
clothes clothes may retain more lint.
Incorrect sorting • Separate lint producers from lint collectors.
Washing too long • Wash small loads for a shorter time than larger loads.
Detergent not dissolving • Add detergent to wash basket before you load clothes.
•Try a liquid detergent.
•Use warmer water temperature.
Overloading • oosely load clothes no higher than the top row of holes in the
washer basket. For best results, load items around the outside
of the basket.
Incorrect use of fabric • Check fabric softener package for instructions
softener and follow directions for using dispenser. 9
Operating Instructions Safety InstructionsConsumer Support Troubleshooting Tips
Before you call for service…
PERFORMA CE (cont.) Possible Causes What To Do
Pilling Result of normal wear on • While this is not caused by the washer, you can slow the
poly-cotton blends and pilling process by washing garments inside out.
fuzzy fabrics
Snags, holes, tears, rips Pins, snaps, hooks, sharp • Fasten snaps, hooks, buttons and zippers.
or excessive wear buttons, belt buckles, •Remove loose items like pins, objects in pockets and
zippers and sharp objects sharp buttons.
left in pockets •Turn knits (which snag easily) inside out.
ndiluted chlorine bleach • Check bleach package instructions for proper amount.
•Never add undiluted bleach to wash or allow clothes to
come in contact with undiluted bleach.
Chemicals like hair bleach or • Rinse items that may have chemicals on them before
dye, permanent wave solution washing.
Wrinkling Improper sorting • Avoid mixing heavy items (like work clothes) with light items
(like blouses).
•Try a fabric softener.
Overloading or incorrect • oad clothes no higher than the top row of holes in the washer
water level basket.
Incorrect wash and • Match Cycle selection to the type of fabric you are washing
dry cycles (especially for easy care loads).
Repeated washing in • Wash in warm or cold water.
water that is too hot
SOU DS Possible Causes What To Do
“Metallic clicking” Shifter mechanism is • The drive system will engage at the start of agitate and
engaging or disengaging disengage when agitate is complete. This occurs multiple
times during the wash.
Back and forth “swoosh” Electric motor reversing • This machine has a drive system that doesn’t use gears.
or light “clicking” sound direction This sound is the motor rotating back and forth to clean
during agitate your laundry.
Quick short agitation Clothing redistribution • At the end of agitate, the motor makes short agitation strokes
sounds at end of agitate to redistribute the load.
“Click” when water Relay switch • The relay makes a click sound when activated. The water
stops filling level activates the relay and stops filling.
“Clicking” behind Control Automatic Temperature • This valve mixes in cold and hot water. The “clicking” is the
Panel during fill Control Valve valve turning on and off.
Water volume changes Automatic Temperature • This valve mixes in cold and hot water. The sound changes
during fill Control Valve when the valves are turned on and off.
Motor “whining up” or Motor ramping up/down • The motor will speed up incrementally during the spin cycle.
“coasting down” in spin during spin cycle When spin is complete, it will coast until it stops.
“Humming” Water drain pump • The drain pump will make a humming sound when pumping
out water after agitation stops and continue until spin is
complete.
“Gurgling” Water drain pump • When the pump starts drawing in air, It starts to gurgle.
The washer should then begin spinning and the sound will
continue until it is done spinning.
Water “swishing” This is normal
•This washer uses a Infusor™ wash action. Water swishing while
the unit is agitating is normal, especially with smaller loads.
Washer is noisy Washer is uneven • To level the front of the washer, adjust the front leveling legs
by rotating the individual leg in the proper direction for up
or down. To level the back of the washer, lift the back
of the machine 4" (11 cm) and set down.
Shipping rod is still assembled • To remove the shipping rod from the washer, pull the yellow
in the unit tag and attached rod from the bottom right hand side
of the washer.
10
Troubleshooting Tips

Consumer SupportTroubleshooting TipsOperating InstructionsSafety Instructions
11
Staple your receipt here.
roof of the original purchase
date is needed to obtain service
under the warranty.
Beaumark Washer Warranty.
All warranty service provided by our Factory Service Centers or
authorized technicians. For service, call 1.800.561.3344.
lease have serial number and model number available when
calling for service.
What Beaumark Will ot Cover:
One Year Any part of the washer which fails due to a defect in materials or workmanship. During this
From the date of the limited one-year warranty, we will also provide, free of charge, all labor and in-home service to
original purchase replace the defective part.
For The Period Of: Beaumark Will Provide:
This warranty applies only for single family domestic use
when the washer has been properly installed according to
the instructions supplied by Beaumark and is connected to
adequate and proper utility services.
Damage due to abuse, accident, commercial use and
alteration or the removal or defacing of the serial plate,
cancels all obligations of this warranty.
Service during this warranty must be performed by an
Authorized Beaumark Service Agent.
This warranty is void if the washer is installed outside the
boundaries of Canada.
Components repaired or replaced are warranted through
the remainder of the original warranty period only.
This warranty does not cover expenses involved in making
this appliance readily accessible for servicing.
This warranty gives you specific legal rights. Additional
warranty rights may be provided by law in some areas.
Incidental or consequential damage caused by possible
defects with this appliance.
Damage to finish not reported within 48 hours following the
delivery of the appliance.
Product not accessible to provide required service.
Warrantor: MABE CANADA INC.
With the high cost of living today, buying a major appliance
can be a major expense. That’s why we want to get the best
value from the appliance we purchase.
For just pennies a day, you can ensure peace of mind. With
Beaumark Totalguard Service Protection Plan, if there are any
functional problems, you won’t have to worry about the cost
of service calls, parts or labor.
For more information, contact your Beaumark sales associate
who will direct you to your nearest warranty office.
Beaumark Totalguard Service Protection Plan:
EXCLUSIO OF IMPLIED WARRA TIES—Your sole and exclusive remedy is product repair as provided in
this Limited Warranty. Any implied warranties, including the implied warranties of merchantability or
fitness for a particular purpose, are limited to one year or the shortest period allowed by law.
This warranty is extended to the original purchaser and any succeeding owner for products purchased in Canada
for home use within Canada. In-home warranty service will be provided in areas where it is available and deemed
reasonable by Mabe to provide.

rinted in the United States
Schedule Service 1.800.561.3344
Repair service is close to you.
To arrange service for your Beaumark appliance, all you have to do is call.
arts and Accessories
Individuals qualified to service their own appliances can have parts or accessories sent directly to their homes
(VISA, MasterCard and Discover cards are accepted).
Instructions contained in this manual cover procedures to be performed by any user. Other servicing generally
should be referred to qualified service personnel. Caution must be exercised, since improper servicing may cause
unsafe operation.
You will find the nearest Mabe Service Center number in the yellow pages of your phone book.
Or, call us at 1.800.661.1616.
Contact Us
If you are not satisfied with the service you have received:
First of all, communicate with the people who repaired your appliance.
Then, if you are still not satisfied, send all information including telephone number to:
Director, Consumer Relations, Mabe Canada Inc.
Suite 310, 1 Factory ane
Moncton, N.B. E1C 9M3
Consumer Support.

Manuel
d’utilisation
Laveuses
175D1807P648 49-90386 06-09 JR
Consignes de sécurité .......2,3
Foncionnement
Chargement et utilisation
delalaveuse ......................7
Entretien et nettoyage
delalaveuse ......................7
Fonctions ........................6,7
Panneau de commande . . . . . . . . . . .4
Réglage des commandes . . . . . . .4–5
Conseils de dépannage . . .8–10
Soutien au consommateur
Garantie...........................11
Soutien au consommateur . . . . . . . .12
Inscrivez ici les numéros
de modèle et de série :
Numéro de modèle :
Numéro de série :
Ces numéros sont inscrits
sous le couvercle
de la laveuse.
P648
2
Installez ou entreposez votre appareil dans
un endroit où il ne sera pas exposé au gel ou aux
intempéries qui pourraient causer des dommages
permanents et annuler la garantie.
Mettez correctement la laveuse à la terre
conformément à tous les codes et règlements
en vigueur. Suivez tous les détails donnés dans
les Instructions d’Installation.
IMP RTANTES C NSIGNES DE SÉCURITÉ.
VEUILLEZ LIRE T UTES LES C NSIGNES AVANT UTILISATI N.
AVERTISSEMENT! Pour votre sécurité, les informations contenues dans ce manuel doivent
être suivies afin de minimiser les risques d’incendie ou d’explosion, de
chocs électriques et d’éviter les dommages à la propriété, les blessures
corporelles voire la mort.
SÉCURITÉ DU CHAUFFE-EAU
Dans certaines conditions, de l’hydrogène gazeux peut être produit dans un chauffe-eau lorsque
ce dernier n’a pas été utilisé pendant plus de deux semaines. Dans certaines conditions,
l’hydrogène gazeux peut provoquer une explosion.
Si vous n’avez pas utilisé l’eau chaude depuis plus de deux semaines, évitez tout dommage ou blessure en
ouvrant tous les robinets d’eau chaude et en les laissant couler pendant quelques minutes. Effectuez ce geste
avant d’utiliser tout appareil électroménager branché au système d’eau chaude. Cette procédure simple
permet à toute accumulation d’hydrogène gazeux de s’échapper. Comme ce gaz est inflammable,
ne fumez pas, n’utilisez pas de flamme vive ou d’appareil électroménager pendant cette procédure.
INSTALLATION CORRECTE
Cette laveuse doit être correctement installée et positionnée conformément aux Instructions
d’Installation avant toute utilisation. Si vous n’avez pas reçu de Directives d’installation avec votre
laveuse, appelez sans frais au 1.800.561.3344.
VOTRE AIRE DE LESSIVE
Gardez la zone autour et en dessous de la laveuse
propre et exempte de tout matériau combustible
tel que des charpies, du papier, des chiffons
ou des produits chimiques.
Une surveillance accrue est nécessaire lors de
l’utilisation de cet appareil en présence d’enfants.
Ne leur permettez pas de jouer sur le dessus, avec
ou dans cette laveuse ou avec tout autre appareil
électroménager.
Fonctionnement Consignes de sécuritéSoutien au consommateur Conseils de dépannage
Soutien au consommateurConseils de dépannageFonctionnementConsignes de sécurité
3
N’utilisez
cet appareil
qu’aux fins
prévues
décrites
dans le
manuel
d’utilisation.
LORS UE VOUS UTILISEZ VOTRE LAVEUSE
N’essayez jamais d’ouvrir votre laveuse lorsqu’elle
fonctionne. Attendez que la machine soit
complètement arrêtée avant d’ouvrir le couvercle.
Ne mélangez jamais de javellisant avec de
l’ammoniaque ou des acides tels que du vinaigre
et/ou de l’antirouille. e mélange des différents
produits chimiques peut produire des gaz toxiques
pouvant entraîner la mort.
Ne lavez pas et ne séchez pas des articles ayant
été nettoyés, lavés, trempés ou tachés par des
substances combustibles ou explosives (telles que
la cire, l’huile, la peinture, l’essence, les substances
dégraissantes, les solvants de nettoyage à sec,
e pétrole, etc.). Ces substances peuvent dégager
des vapeurs qui peuvent s’enflammer ou exploser.
N’ajoutez pas ces substances à l’eau de lavage.
N’utilisez pas et ne placez pas ces substances
autour de votre laveuse ou de votre sécheuse
pendant leur fonctionnement.
e processus de lavage peut réduire la résistance
aux flammes des tissus. Pour éviter de tels
résultats, suivez soigneusement les instructions
de lavage et d’entretien données par le fabricant
de vêtements.
Pour réduire le risque de choc électrique,
débranchez l’appareil de l'alimentation électrique
ou débranchez la laveuse au niveau du panneau
de distribution en retirant le fusible ou déclenchant
le disjoncteur avant d’entreprendre toute activité
d’entretien ou de nettoyage.
N TE : L’appareil N’EST PAS déconnecté de
l’alimentation électrique lorsque vous faites tourner
le bouton de sélection de programme sur la position
OFF (Arrêt) ou lorsque vous appuyez sur PAUSE
(Pause).
N’essayez jamais de faire fonctionner
cet appareil s’il est endommagé, s’il ne fonctionne
pas correctement, s’il est partiellement démonté
ou si certaines des pièces sont manquantes ou
cassées, y compris si le cordon d’alimentation
est endommagé.
LORS UE VOUS N’UTILISEZ PAS VOTRE LAVEUSE
Fermez les robinets d’eau pour réduire la pression
dans les tuyaux et les robinets et pour diminuer
le risque de fuite en cas de cassure ou de rupture.
Vérifiez l’état des tuyaux d’alimentation; ils
devraient être changés tous les 5 ans.
Avant de mettre votre laveuse au rebut ou
de la mettre hors service, retirez le couvercle pour
éviter que les enfants ne se cachent à l’intérieur.
N’essayez pas de réparer ou de remplacer une
pièce de l’appareil, à moins d'une recommandation
précise à cet effet dans ce manuel ou dans des
instructions de réparation par l’utilisateur publiées
que vous comprenez et pour lesquelles vous
possédez les compétences requises.
Ne modifiez jamais les commandes.
LISEZ ET SUIVEZ SOIGNEUSEMENT CES CONSIGNES
DE SÉCURITÉ.
C NSERVEZ CES INSTRUCTI NS

Modèles é uipés de
STANDARD FILL
(Remplissage normal)
4
Guide de démarrage rapide
A propos du panneau de commande—pour les modèles équipés
d’un bouton START (Marche).
Load Size (Taille de brassée)
Ajoutez le détergent au fond du panier et l’assouplissant dans le distributeur avant de charger les vêtements dans la laveuse.
Placez les vêtements sans les comprimer en ne dépassant pas la dernière rangée de trous dans le panier de la laveuse. Pour une
efficacité optimale, placez les articles sur l’extérieur du panier.
Sélectionnez la brassée :
Pour les modèles équipés de l’AUT MATIC L AD SENSING (Détection automatique de brassée)
– Pour plus de commodité, une meilleure performance et une efficacité optimale, sélectionnez AUT MATIC L AD SENSING (Détection
automatique de brassée). Cette sélection vous donne automatiquement la quantité d’eau appropriée pour la taille et le type de
brassée placée dans la laveuse.
– Si vous préférez sélectionner manuellement le volume d’eau, choisissez de SMALL (Petite brassée) à SUPER (Grande brassée).
a fonction AUT MATIC L AD SENSING (Détection automatique de brassée) est adaptée à la majorité des brassées. Pour certains
articles particuliers, tels que des couettes ou des oreillers volumineux et légers, où un volume d’eau plus important peut être requis,
il est préférable de sélectionner manuellement la taille de la brassée. a sélection manuelle de la brassée doit être utilisée pour
des articles mouillés placés dans la laveuse, tels que des serviettes ou des vêtements.
– a laveuse ne se remplira pas d’eau si la détection automatique de brassée est sélectionnée et le couvercle n’est pas fermé.
orsque le couvercle est fermé, la laveuse commence à se remplir d’eau pour estimer la brassée.
Pour les modèles équipés du STANDARD FILL (Remplissage normal)
– Sélectionnez la taille de brassée correspondant à la brassée placée dans la laveuse.
– Pour rajouter de l’eau APRÈS que la laveuse se soit remplie, tournez le bouton de sélection de la taille de la brassée sur RESET
(réinitialiser) puis tournez le bouton sur la nouvelle taille de brassée. NE laissez PAS le bouton sur RESET (Réinitialiser).
N TE : Cette laveuse ultra-performante utilise un système de lavage Infusor™ qui demande une moins grande quantité d’eau tout
en offrant un lavage efficace. Vous remarquerez peut-être que le niveau d’eau est plus bas que dans votre précédente laveuse. Ceci est
normal pour les laveuses équipées du système Infusor™. e niveau d’eau se situera juste au-dessus de l’Infusor™ lorsque la taille SUPER
WASH (Grande brassée) sera sélectionnée.
A
A
B C
D
EF
Commandes
SUPER RESET
SMALL
MEDIUM
LARGE
LOAD SIZE
Modèles é uipés de
l’AUTOMATIC LOAD
SENSING (Détection
automati ue de
brassée)
• Ajoutez l’assouplissant (sur les
modèles équipés d’un distributeur
d’assouplissant); voir page 6 pour
plus d’information
• Ajoutez le détergent. L’utilisation
de détergent à grande efficacité
est recommandée dans toutes
les laveuses homologuées Energy
Star
• Sélectionnez la taille
de la brassée ainsi que
les autres options de
lavage, y compris la
fonction Fabric Softener
(Assouplissant)
• Sélectionnez le
programme de lavage
• Appuyez sur
S AR (Marche)
Étape 2 Étape 3 Étape 4
• Ajoutez les vêtements
• Fermez le couvercle
NO E : Lorsque la laveuse est sur le
mode Auto Load Sensing (Détection
automatique de la brassée), elle ne
commencera pas à se remplir si le
couvercle est ouvert (sur certains
modèles)

5
Soutien au consommateurConseils de dépannageFonctionnementConsignes de sécurité
B
Température
Choisissez la température de l’eau pour les programmes de lavage et de rinçage. Observez toujours les recommandations indiquées
sur les étiquettes d’entretien du fabricant ou ses instructions pour le lavage.
PerfecTemp détecte la température de l’eau d’alimentation et ajuste l’eau de remplissage pour obtenir une gamme de température plus précise
pour toutes les températures de lavage. Par exemple, pour un lavage CO D (Froid), de l’eau tiède peut être ajoutée pour obtenir la température
optimale de dissolution du détergent. Souvent, les détergents ne se dissolvent pas complètement dans une eau très froide, surtout dans les pays
à climat plus froid.
Pendant les mois d’hiver, lorsque l’eau d’alimentation est plus froide, ou aux endroits où l’eau est très froide durant toute l’année, utilisez PerfecTemp
plus CO D (Froid) pour aider à la dissolution des détergents en poudre et ainsi améliorer le lavage de vos vêtements.
a fonction TAP C LD (Eau froide du robinet) désactive la fonction PerfecTemp et effectue un lavage CO D (Froid) à la température de l’eau froide
du robinet. Ceci permet d’économiser de l’énergie par la réduction de la quantité d’eau chaude utilisée pour le lavage.
ptions
ption Autosoak (Trempage automatique) (sur certains modèles)
Cette option débute par une courte agitation suivie d’un trempage pour une durée spécifiée pour ensuite terminer le programme
automatiquement. Sur certains modèles, cette option est située sur le bouton de Sélection du Programme.
ption 2nd Rinse (2ème rinçage) (sur certains modèles)
orsque vous utilisez du détergent ou du javellisant supplémentaire pour nettoyer des vêtements très sales, vous pouvez choisir
l’option 2nd Rinse (2ème rinçage), qui effectue un 2ème rinçage intense à froid.
ption Extended Spin (Essorage prolongé) (sur certains modèles)
Utilisez cette option pour extraire une plus grande quantité d’eau de vos vêtements. es vêtements seront plus secs lorsque cette
option est activée et sècheront plus rapidement dans votre sécheuse.
Assouplissant
Activez cette option lorsque vous ajoutez de l’assouplissant dans votre laveuse.
N TE : N’utilisez pas de boule distributrice dans cette laveuse. Elles ne fonctionnent pas correctement dans les laveuses
ultra-performantes.
Voyants d’état
es Voyants du Programme indiquent l’étape du cycle à laquelle se trouve la laveuse. orsque le bouton de Sélection est réglé
sur un nouveau programme, les Voyants clignotent momentanément indiquant les différentes étapes du cycle. Sur les modèles sans
option AUT S AK (Trempage automatique), le voyant SOAK (Trempage) ne s’allumera pas.
Programme de lavage—Bouton de Sélection du Programme
es programmes de lavage contrôlent la durée et l’intensité du processus de lavage. Il est possible de faire tourner le bouton dans les
deux sens. Si vous faites tourner le bouton de Sélection du Programme après avoir lancé un programme, la laveuse s’arrêtera et sera
réglée sur le nouveau cycle. Appuyez sur START (Marche) pour débuter le nouveau programme.
e tableau ci-dessous vous aidera à sélectionner les programmes de lavages adaptés à vos vêtements.
CO ON (Coton) Pour le coton, le linge de maison, les vêtements de travail ou de sport peu sales à très sales. Ce programme
vous offre le lavage le plus performant pour la majorité des vêtements et est adapté à une utilisation
quotidienne. Se termine par un essorage à grande vitesse.
PREWASH Pour retirer les salissures en surface des vêtements très sales. Veillez à le faire suivre d’un programme
(Prélavage) de lavage normal.
CASUALS (Sport) Pour les vêtements infroissables et sans repassage et les vêtements en maille. Se termine par un essorage
à faible vitesse.
EASY CARE Pour les vêtements infroissables et sans repassage et les vêtements en maille. Se termine par un essorage
(Entretien facile) à grande vitesse.
DELICA ES (Délicats) Pour la lingerie et les textiles fragiles peu sales. Se termine par un essorage à faible vitesse.
HAND WASH Pour les articles étiquetés « lavage à main » peu sales. Se termine par un essorage à très faible vitesse.
(Lavage à main)
SPEED WASH Pour des petites brassées de linge peu sale dont on a un besoin urgent. Se termine par un essorage
(Lavage rapide) à grande vitesse.
DRAIN & SPIN Pour vidanger la cuve et essorer les vêtements. Se termine par un essorage à grande vitesse.
OR SPIN ONLY
(Vidange & Essorage
ou Essorage)
AU O SOAK Pour les vêtements très sales. Cette option débute par une courte agitation suivie d’un trempage pour
( rempage automatique)
une durée spécifiée pour ensuite terminer le programme automatiquement.
START (Marche)
Appuyez sur START (Marche) pour démarrer le programme. Si vous appuyez de nouveau sur START (Marche), le programme se met
en PAUSE et le Voyant du Programme clignote.
Pour continuer le programme, appuyez de nouveau sur START (Marche) ou fermer le couvercle. Si la machine est mise en pause
pendant plus de 24 heures, le programme sera annulé. Pour arrêter le programme, maintenez le bouton appuyé pendant 3
secondes. S’il reste de l’eau dans la machine, sélectionnez le programme DRAIN & SPIN (Vidange & essorage) U SPIN NLY
(Essorage) pour vidanger la cuve et pour essorer l’eau restant dans la cuve.
Si vous levez le couvercle, l’agitation ou l’essorage seront arrêtés, mais le programme ne sera pas mis en pause.
D
E
F
C

Fonctionnement Consignes de sécuritéSoutien au consommateur Conseils de dépannage
6
A propos des fonctions de la laveuse.
Nettoyage du Distributeur d’Assouplissant (sur certains modèles)
e distributeur d’assouplissant est autonettoyant. Ce distributeur ne demande pas un entretien
régulier comme sur les distributeurs d’assouplissant standards. Si nécessaire, essuyez les
surfaces extérieures du distributeur. Si les composants internes du distributeur doivent être
nettoyés, suivez les étapes ci-dessus après un programme :
Distributeur d’Assouplissant (sur certains modèles)
Soulevez le couvercle sur le haut du
distributeur d’assouplissant.
Mesurez la quantité d’assouplissant
requise dans le bouchon puis versez-le
par le haut du distributeur. ’assouplissant
s’écoulera dans le compartiment situé
à l’intérieur du distributeur. Utilisez
uniquement des assouplissants
« Ultra » ou concentrés.
Fermez le couvercle en appuyant dessus.
Assurez-vous que le couvercle est
correctement fermé et enclenché.
Choisissez FABRIC S FTENER
(Assouplissant) parmi les PTI NS
sur le panneau de commande.
N TE : Si vous remplissez trop le distributeur,
l’assouplissant s’écoulera par les trous situés
sur les côtés de l’Infusor™. Ne le remplissez
pas trop.
4
3
2
1
OFF
AUTO
AUTO SOAK
EXTENDED
2nd
RINSE
SPIN
SOAK
FABRIC SOFTENER
FABRIC SOFTENER
FABRIC SOFTENER
Set when adding
+ 2nd RINSE & EXTENDED SPIN
+ EXTENDED SPIN +2nd RINSE
OPTIONS
Le distributeur d’assouplissant libère automatiquement l’assouplissant liquide au moment
approprié du programme.
N’arrêtez pas la laveuse pendant son premier essorage, sinon le distributeur se videra
précocement.
Ne versez jamais l’assouplissant directement sur les vêtements. Ceci pourrait les tâcher.
Pour utiliser le distributeur, suivez les étapes suivantes :
Soulevez le couvercle du distributeur et
faites tournez le distributeur dans le sens
antihoraire en utilisant les 2 languettes
comme indiqué. Sortez le distributeur
de l’Infusor™.
Nettoyez tout dépôt à l’intérieur de
l’Infusor™avec un chiffon doux ou une
brosse à dent. Assurez-vous que les trois
trous au fond du distributeur permettant
à l’assouplissant de s’écouler ne sont pas
bouchés.
Écartez délicatement le couvercle
du compartiment distributeur pour
les séparer.
Essuyez les surfaces à l’aide d’un chiffon
doux ou faites tremper les pièces dans
une solution de 3,8 litres (1 gallon) d’eau
contenant 1/4 tasse de détergent liquide
et 1 tasse de javellisant. Assurez-vous
que le petit trou sur le dessus du
couvercle et le tube correspondant
ne sont pas obstrués.
Réassemblez le compartiment
distributeur et le couvercle en les fermant
d’un coup sec.
Replacez l’ensemble distributeur dans
l’Infusor™. Faites tourner le haut dans
le sens horaire à l’aide des 2 languettes
comme indiqué. Appuyez sur le couvercle
pour fermer le distributeur. Assurez-vous
que le couvercle est correctement fermé
et enclenché.
2
6
5
4
3
1
1
2
3
4
Couvercle
Languettes
permettant
la rotation
du distributeur
Languettes
permettant
la rotation
du distributeur
1
3
5
6

Soutien au consommateurConseils de dépannageFonctionnementConsignes de sécurité
7
Chargement et utilisation de la laveuse.
Observez toujours les recommandations indiquées sur les étiquettes d’entretien du fabricant pour le lavage.
Tri du linge
Triez par couleur (blancs, couleurs claires, couleurs), niveau
de saleté, type de tissu (coton, entretien facile, délicats) et,
au cas où le tissu produit de la charpie (tissu éponge,
chenille) ou accumule de la charpie (velours de coton,
velours côtelé).
Utilisation correcte du détergent
Ajoutez le détergent et l’assouplissant avant les vêtements
pour que le détergent puisse être vraiment efficace.
'utilisation d’une quantité insuffisante ou trop importante
de détergent est une cause courante de problème de
lavage.
Vous pouvez utiliser moins de détergent si vous avez une
eau douce, une brassée plus petite ou du linge peu sale.
Ajoutez le détergent. ’utilisation de détergent à grande
efficacité est recommandée dans toutes les laveuses
homologuées Energy Star. es détergents HE sont formulés
pour fonctionner avec des programmes utilisant un faible
volume d’eau de lavage et de rinçage. es détergents
HE réduisent les problèmes de moussage trop important
associés aux détergents habituels.
Chargement de la laveuse
Ajoutez les articles secs sans les comprimer et sans
dépasser la rangée supérieure de trous de la cuve de
la laveuse. Pour de meilleurs résultats, ajoutez les articles
régulièrement, sans les comprimer, sur l’extérieur du panier.
Faites attention pour ne pas couvrir le centre de l’Infusor™.
Pour ajouter du linge après avoir démarré un programme,
soulevez le couvercle et submergez les articles
supplémentaires sur l’extérieur du panier.
Ne placez pas de linge de grande taille tel que des draps,
des couvertures ou des serviettes sur l’Infusor™. Placez-les
sur l’extérieur du panier.
Ne lavez pas les tissus imbibés de substances
inflammables (cires, liquides de nettoyage, etc.).
L’agitation ne se mettra pas en marche tant que
le couvercle n’est pas fermé.
Panier : aissez le couvercle ouvert après une lessive pour
permettre l’évaporation de l’humidité. Si vous souhaitez
nettoyer le panier, utilisez un linge propre et doux
légèrement imbibé de détergent liquide, puis rincez.
(N'utilisez pas de produits nettoyants abrasifs).
Tuyaux de remplissage : es tuyaux se connectante la
laveuse au robinet devraient être changés tous les 5 ans.
Extérieur : Essuyez immédiatement tout produit renversé à
l’aide d’un chiffon humide. Evitez de frapper la surface avec
des objets tranchants.
Intérieur : ’utilisation occasionnelle d’un programme
contenant du javellisant maintiendra votre laveuse propre.
Déménagement et entreposage : Demandez à un
réparateur de vidanger l’eau de la pompe et des tuyaux.
Consultez les Instructions d’Installation fournie avec
l’appareil pour des informations sur la procédure à suivre
pour réinstaller la cale d’expédition qui immobilise la cuve
pendant le déménagement. Pour avoir d’autres
informations, écrivez au : Directeur, Relations avec les
consommateurs, Mabe Canada Inc., 1 Factory ane, Suite
310, Moncton, N.B. E1C 9M3. Ne rangez pas la laveuse dans
un endroit où elle sera exposée aux intempéries.
Vacances prolongées : Coupez l’alimentation en eau
au niveau des robinets. Vidangez l’eau des tuyaux en cas
de risque de gel.
Entretien et nettoyage de la laveuse.
Distributeur de javellisant liquide
Au moment du remplissage de la laveuse, l’eau dilue le javellisant.
Vérifiez l’étiquetage des vêtements en cas d’instructions particulières.
Mesurez soigneusement la quantité de javellisant en suivant les instructions sur la bouteille.
Ne versez jamais de javellisant non dilué directement sur les vêtements ou dans le panier
de la laveuse.
Ne versez pas de javellisant en poudre dans le distributeur de javellisant.
Avant de démarrer la laveuse, versez la quantité de javellisant mesurée directement dans
le distributeur de javellisant. Évitez les éclaboussures et évitez de trop remplir le distributeur. Si vous
préférez utilisez du javellisant en poudre, ajoutez-le dans le panier de lavage avec votre détergent.
Ne mélangez jamais du javellisant avec de l’ammoniaque ou des acides tels que du vinaigre
et/ou de l’antirouille. Le mélange peut produire des gaz toxiques pouvant entraîner la mort.
2
3
1
EAU Causes Possibles Que faire
Le niveau d’eau semble bas Ceci est normal • ’eau ne couvre pas nécessairement le linge. Ceci est normal
pour les laveuses ultra-performantes.
La laveuse se remplit d’eau Le tuyau de vidange vertical • e tuyau de vidange vertical doit être au-dessus
et se vide en même temps est trop bas de 76 cm (30 po).
Moussage excessif rop de détergent • Mesurez soigneusement la quantité de détergent. Utilisez
moins de détergent si vous avez une eau douce, une brassée
plus petite ou du linge peu sale.
ype de détergent • Adoptez un détergent HE .
Eau douce • Utilisez moins de détergent.
Fuites d’eau Utilisation d’une trop grande • Utilisez moins de détergent. Utilisez moins de détergent si vous
quantité de détergent dans avez une eau douce, une brassée plus petite ou du linge peu
la laveuse sale.
ype de détergent • Adoptez un détergent HE .
Les tuyaux de remplissage ou • Assurez-vous que les branchements d’eau soient bien serrés
de vidange sont mal branchés au niveau des robinets et les rondelles en caoutchouc ont bien
été mises en place. Assurez-vous que l’extrémité du tuyau de
vidange est correctement insérée et fixée à l’évacuation.
La canalisation d’évacuation • Vérifiez la plomberie du domicile. Vous aurez peut-être besoin
du domicile est peut être bouchée
d’appeler un plombier.
Pression d’eau constante • Resserrez les tuyaux au niveau des robinets et fermez
vers les tuyaux de remplissage les robinets après chaque utilisation.
•Vérifiez l’état des tuyaux de remplissage, ils doivent être
remplacés tous les 5 ans.
La température L’utilisation d’eau aux • es nouveaux détergents ont été formulés pour obtenir
de l’eau semble incorrecte températures plus basses une bonne performance de lavage à des températures plus
permettra une meilleure basses.
efficacité énergétique
L’alimentation en eau est • Ouvrez complètement les robinets d’eau chaude et froide
fermée ou branchée et assurez-vous que les tuyaux soient branchés aux bons
incorrectement robinets.
Les filtres des soupapes sont • Fermez le robinet et retirez les raccords de tuyaux à l’arrière
obstrués supérieur de la laveuse. Nettoyez les filtres de la laveuse à
l’aide d’une brosse ou d’un cure-dent. Rebranchez les tuyaux
et ouvrez les robinets.
Le chauffe-eau n’est pas réglé • Assurez-vous que le chauffe-eau produit une eau à une
correctement température variant de 48 à 60°C (120 à 140°F).
L’eau est vidangée avant Le couvercle n’est pas fermé • Réinitialisez le programme.
la fin du programme ou le programme a été en pause
pendant plus de 24 heures
La laveuse ne se vidange Le tuyau de vidange est • Redressez le tuyau de vidange et assurez-vous que la laveuse
pas entortillé ou mal branché ne soit pas posée dessus.
•a partie supérieure du tuyau de vidange doit être à moins
de 1,8 m (6 pi) du sol.
La laveuse s’arrête L’option PREWASH (Prélavage) • Ceci est normal. a laveuse alterne entre agitation et
pendant le programme ou AUT S AK ( rempage trempage pendant ces programmes pour obtenir des
automatique) a été sélectionnée vêtements plus propres avec moins d’usure.
La laveuse s’arrête Ceci est normal • a laveuse peut s’arrêter pendant l’essorage pour éliminer plus
pendant l’essorage facilement l’eau savonneuse.
Conseils de dépannage—Économisez du temps et de l’argent!
Consultez d’abord les tableaux qui suivent et vous pourrez
peut-être éviter de faire appel à un réparateur.
Avant d’appeler à un technicien…
8
Fonctionnement Consignes de sécuritéSoutien au consommateur Conseils de dépannage
Table of contents
Languages:
Other Beau mark Washer manuals


