Bebcare Motion User manual
A smart digital video baby monitor
for the active tot
BEBCARE MOTION

INDEX
Featues of Bebcare Motion ………..……………………………………………
Warning…………………………………………………………………………......
Control layout and Icons…………………………………………………………
Power Supply………………………………………………………………………
Pairing the camera to parent unit and movement sensor mat……………
OPERATION
Camera……………………………………………………………………………….
Parent unit……………………………………………………………………………
Movement sensor mat……………………………………………………………...
Precautions…………………………………………………………………………
Standard accessories included in packaging………………………………..
Trouble Shooting guide…………………………………………………………..
Specification………………………………………………………………………..
P2
P2
P3
P4
P5
P7
P8
P18
P21
P21
P22
P23
1

Features
- 4.3-inch ultra-clear “True Colour” screen
- 2.4GHz interference free digital communication
- Night vision with IR LED
- Lens with 60° field of view
- Horizontal 330° Vertical 110° lens movement by motorized mount
- Baby’s room temperature indication with Hi/Lo alarm
- Night light and lullaby function
- Talk back function
- Automatic tracking of baby movement
- Baby movement detection alarm
- 300m (1,000 ft) operating range between camera and parent unit
- Automatically reduce radiation to minimum level under standby mode
- Expandable up to four cameras
- Optional movement sensor mat to monitor baby’s breathing
Thank you for purchasing our Bebcare Motion digital video baby monitor. Your
unit has been manufactured and checked under the strictest possible quality control
to ensure that each monitor leaves the factory in perfect condition. In the unlikely
event you find any defects or have any problem, please contact our dealer or service
center.
Please read this manual carefully to obtain maximum performance and
extended service life from the unit.
2
WARNING
The Bebcard Motion should not be regarded as a medical device. Premature
babies or those considered to be at risk should be under the supervision of your
doctor or health personnel.
Direct supervision of your baby at a regular interval by a responsible adult is
strongly recommended in addition to using this baby monitor.

CONTROLS LAYOUT
3
27
29
28
Parent Unit (PU)
Movement Sensor Mat
Camera
Camera pan left button
(left button in menu mode)
Camera pan right button
(right button in menu mode)
Power ON/Charging indicator
Talk back button
(OK button in menu mode)
TFT colour screen
USB socket
Power ON/OFF/Vibration switch
Volume up/down button
Speaker
Menu button
Pairing button
Movement indicator
Movement sensitivity adjustment knob
Alarm hold button
Power ON/OFF button
Power ON indicator
Transmit indicator
Night light
Microphone
USB socket
SD card slot
Night light intensity up button
Night light intensity down button
Speaker
Pairing button
LED level meter
Microphone
Camera tilt up button
(up button in menu mode)
Camera tilt down button
(down button in menu mode)
1
2
3
4
5
6
7
8
9
10
11
12
13
14
15
16
17
18
19
20
21
22
23
24
25
26
27
28
29
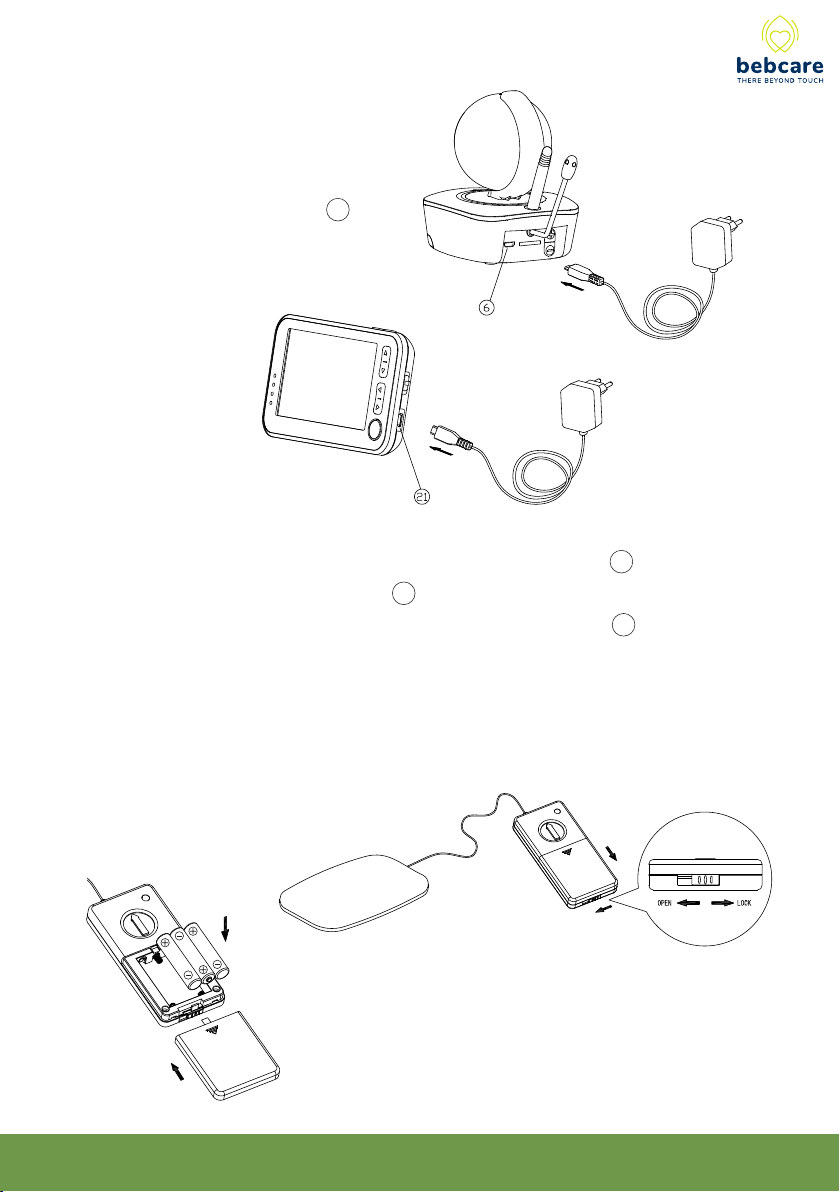
4
A Li polymer battery is already incorporated in the unit. To charge up the battery,
connect the output plug of supplied 5V 1A AC adapter to USB port 21 . With the unit
being switched off, the power indicator 18 will light up red. Once the battery is fully
charged up (normally it takes around 4 hours), the power indicator 18 will go off or
turn steady green (if unit is switched on). Now the unit is ready for operation. Either
you can disconnect the AC adapter or keep connecting will cause no damage to the
battery. In the latter case, when the battery is being consumed and voltage falls to a
certain level, the AC adapter will automatically start charging up the battery again.
Set the lock lever to open position, slide open the battery
door in direction as shown. Install 3 pcs AA (UM-3) alkaline
batteries, observe correct polarities. Slide back battery
door and set the lever back to lock position. The battery life
can last for 90 days when using battery such as Duracell.
POWER SUPPLY
(A) Camera
Insert the output plug of supplied
5V 1A AC adapter to USB port 6 .
(B)Parent Unit (PU)
(C)Movement Senor Mat (optionally purchased)
5
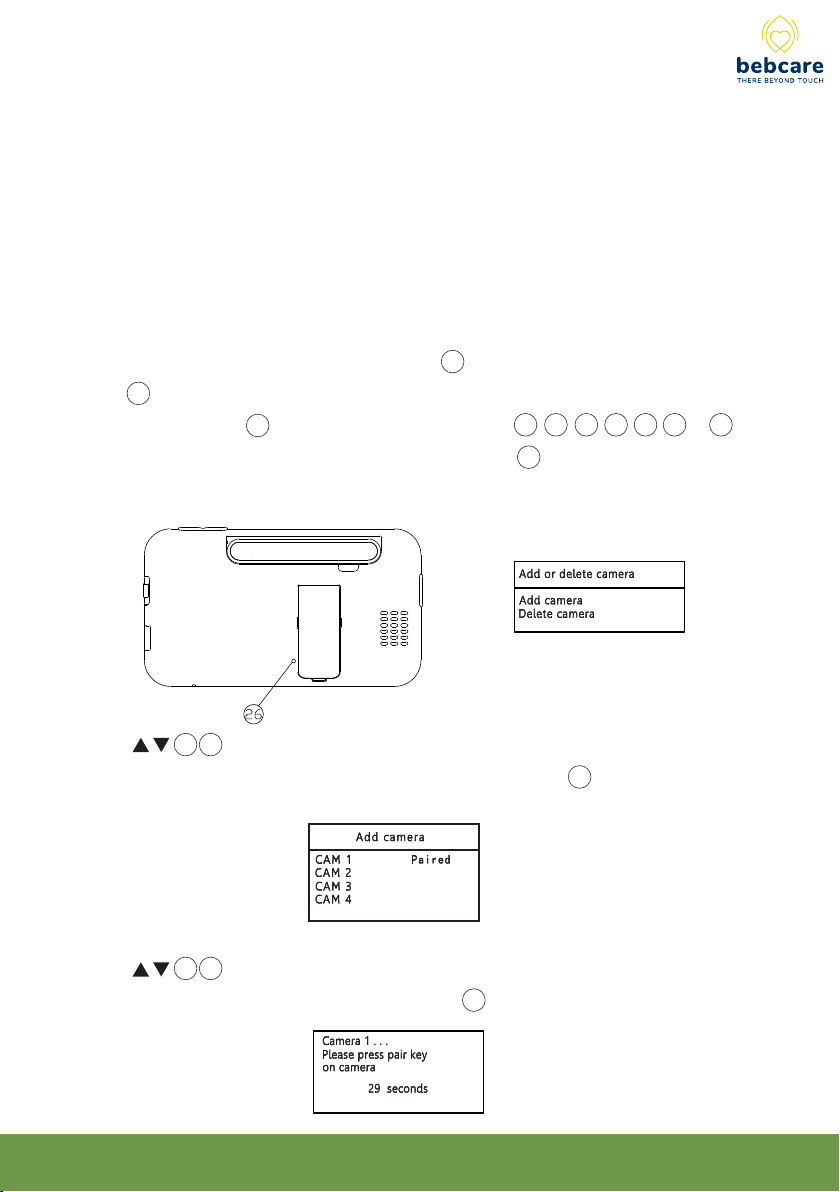
PAIRING
This process is the match the PU with camera and movement sensor mat so that
they can communicate with each other while no other devices (even baby monitor of
identical model) can interfere with you or receiving your signal.
The PU and camera are already paired when they are shipped out from
factory. However, it is necessary to perform pairing again when an extra camera is
added to work with PU.
1. Switch on PU using the power on/off switch 22 and camera by long press power
button 1 .
2. Turn on PU screen 20 by short press any one button 14, 15, 16, 17, 18. 23 or 25.
3. Using a pointed object, short press the pairing button 26 of PU and the screen will
show :
4. Use 14 15 button to select “Add camera” (in case you need to delete a camera
already paired, select “Delete camera”), then press OK button 19 .
5. Use 14 15 button to select a number assigned to the camera being paired (or
the camera to be deleted), then press OK button 19 .

6
6. Now short press pairing button 11 at bottom of camera, wait for around 5 sec and two
beep sound will be heard which indicate pairing become successful and the screen 20
will show the image as captured by camera lens (if not successful, short press
pairing button 11 again or repeat step 4-6 when the time elapsed exceed 30 sec) :
7. Repeat above steps for other cameras. Note if you pair a new camera but selecting a
number that is already paired, the new camera will override the originally paired
camera.
8. The pairing between camera and movement sensor mat should be performed after the
successful pairing between camera and PU or otherwise the system will not operate
properly.
9. Press and hold the pairing button 11 at bottom of camera while switching on the unit
by long press of power button 1 until the transmit indicator 3 starts flashing.
10. Now press and hold the alarm hold button 29 while switch on the movement sensor
mat by turning the knob 28 clockwise, wait for the movement indicator to start
flashing, two beep sound will be heard in camera, indicating pairing is successful.
11. Switch off both camera and movement sensor mat, switch them on again for normal
operation.
12. The mat is now ready for use, probably you will hear the breathing alarm in PU (if the
movement monitoring function is set to ON) after 20 sec in case nothing is placed on
the mat. Slight tap the mat few times and the alarm will stop, this show the system is
working properly.
N.B. When it is no longer necessary to monitor the baby’s breathing as he
grows older, the movement sensor mat is required to unpair from camera to
avoid unnecessary alarms. To achieve this perform pairing process between
camera and PU by repeating above steps 1- 6 but leave out steps 9 -10.

7
OPERATION
Camera
1. Place the camera onto a stable table top or installed on wall but out of reach of baby
(preferably 1m away).
2. Switch on camera by long press of power button 1 , the power indicator 3 will light
up green.
3. Adjust the microphone sensitivity (set on PU side) such that the camera will be
triggered to transmit baby’s voice whenever the microphone 5 picks up a sound at
your desirable loudness level. Once the camera starts to transmit, the transmit
indicator 3 will light up blue. When the baby becomes silent and microphone 5 does
not pick up any sound, the camera will stop transmitting and go into standby mode. At
the same time, transmit indicator 3 will go off. Under such mode, the radiation is
reduced to minimum level.
4. The night light 4 can be set to OFF, ON or VOX (on when detecting sound) using the
PU. The light intensity can be adjusted using + - buttons 8 9 .
5. This camera is incorporated with lullaby function which can be remotely turned on or
off using PU. There are 6 different factory preset song/sound, parents can also
download their preferred music (in MP3 format) to a SD card and insert into the slot 7
for more song selection. The volume of music heard in speaker 10 can be adjusted by
PU.
N.B. insert the SD card only when camera is switched off, otherwise its content
may not be able to be detected by camera.
6. When there is sufficient light intensity, the screen 20 will show a colourful image.
Once the environment getting dark, the IR LED in camera will automatically turn on to
illuminate the surroundings and the screen 20 will show a black white image.
7. Using the buttons 14 15 16 17 on PU, parents can be pan (330º) or tilt
(110º) the camera lens to capture the different view of baby.
8. When baby grows up to become a toddler, parents can activate the motion tracking
function in PU and the camera lens will automatically track the movement of toddle .
8
Parent unit
1. Switch on PU by setting the power ON/OFF/vibration switch to either I or
position. (In position, the unit will start to vibrate once there is sound from baby.
Such vibration is to alert the parents in case they are not watching the screen). At
the same time, the power on indicator 18 show steady green. If this indicator starts
flashing green, the Li batteries have run down and need to be recharged using the
supplied 5V AC adapter.
2. The image captured by the camera lens should be shown on screen 20 while the
sound picked up by microphone 5 should be heard from speaker 24 . In case the
screen 20 shows the text “ No signal or Out of Range “, it means the units are not
properly paired (refer to PAIRING SECTION).
3. Adjust the volume of speaker 24 to obtain a comfortable listening level using the
qqqq volume up/down button 23, a corresponding bar graph will be shown on
screen 20. In case the parents prefer to keep the environment quiet, just press the
volume down button until the icon shows up and the speaker 24 become
muted. To resume the speaker sound output, press the volume up button again.
4. Use 14, 15, 16, 17 button to control the pan/tilt of camera lens. Note only
one button should be pressed each time.
5. The parent can talk back to baby anytime they prefer by using the talk back function :
a. Press and hold the talk back button 19 , will show up on screen 20.
b. Speak towards the microphone 13 .
c. Your voice will be heard from speaker 10 in camera .
d. Adjust the volume of speaker using the Setting menu.
e. Release the talk back button 19 to listen to baby.

9
6. For easy viewing, the PU can be placed on table top by pulling out the lever
support at the back. Besides, to achieve a better reception and longer
communication range, rotate the antenna to a vertical position.
7. Short press menu button 25 to call up the main menu on screen 20, use the
qqqq qqbutton 14,15,16 and 17 to select the functions to be set, then short
press OK button 19 to confirm.
After performing the setting, short press menu button 25 to return to upper menu
or exit from menu mode.
This function is to select the camera to be viewed. If PU is paired to more than one
camera, parent can select to view two cameras on screen at the same time or view
each camera sequentially under auto scan mode.
Use button 14 15 to select the camera no. to be viewed. Short press OK
button 19 to confirm.
Setting
Light Movement

10
Under split screen mode ( CAM 1+2 or CAM 3+4), only the sound from either one camera
can be heard (as indicated by a flashing CAM No.), short press OK button 19 can switch
to listen to the other camera.
Note : Auto motion tracking function is not available under split screen mode.
Under auto scan mode, the screen 20 will show the image of each camera in turn for a
period of 8 sec. After 32 sec, if no camera detects any sound, the screen 20 will be off
(subjected to screen always on mode is not selected) until any one of the camera detects
a sound, PU will stay to view that camera until the sound goes off.
The viewing of camera has following priority :
CAM 1 > CAM 2 > CAM 3 > CAM 4
This means while PU is viewing CAM 3, if CAM 1 detects a sound, PU will immediately
switch to view CAM 1 until the sound is off, then it will switch back to view CAM 3.
To enable parent not to miss the activity of other camera, when PU is viewing a camera
and another camera of lower priority detects a sound, its camera no. will be shown
flashing on screen 20. If parents prefer to view this camera, by short press OK button 19,
PU can toggle to view between these two cameras
This function is to select between VOX on or screen on mode
Use button 14 15 16 17 to select, then short press OK button 19 to confirm.
Under VOX on mode, the screen 20 will be turned on automatically whenever the camera
detects baby cry and shut down automatically after a delay of 5 - 25 sec (as selected by
parents) once the baby stop making sound. This way the PU will consume less battery
power and the radiation from camera is reduced to a minimum level.

11
Under screen on mode, the screen 20 will always stay on or auto shut off after a period of
time (30 sec/1 minute/2 minutes/3 minutes) as selected by parents. Please note the
battery running time will become less.
This function is to set the feeding alarm ON or OFF and select the feeding time interval.
Use button 14 15 16 17 to select, then short press OK button 19 to confirm.
Once the feeding alarm is activated, a count down timer will be shown on screen 20 .
When it is time to feed, an alarm will be heard which can be muted by short press anyone of
button 14 15 16 17 18 23 & 25 .
To initiate alarm, enter menu & select icon then set feeding alarm to ON again.

12
This function is to set the night light in camera to ON, OFF or VOX mode
Use button 14 15 to select, then short press OK button 19 to confirm.
Under VOX mode, the night light will be on once the camera detects baby’s cry and
go off when the environment become silence.
Light
This function is to select the lullaby/nature sound to be played in camera and its volume
Use button 14 15 16 17 to select, then short press OK button 19 to confirm.
The lullaby will be played sequentially (when is selected) or repeat itself (when is
selected). Note the lullaby/nature sound will be played for 20 min and stop automatically if
no baby sound is detected. In case baby starts crying, the music will be played for
another 20 min.
This function is to select between screen magnification x 1 or x 2
Use OK button 19 to select. If x 2 is selected, will show up on screen.
Zoom x 2

13
This function is to set the movement alarm ON or OFF.
Use button 14 15 16 17 to select, then short press OK button 19 to confirm.
When set to ON, the icon will show up in screen 20. Under “ Alarm only “ mode,
whenever the camera detects baby movement, the screen 20 will be turned on (even
baby remains silent) and a beep tone being heard. The screen will be off automatically
if baby stops making movement.
Under “Alarm + tracking” mode, in addition to providing the movement alarm, the
camera will auto track the movement of baby. The camera lens needs to face directly
towards the baby location. Once the baby starts moving, the camera will automatically
follow the same direction.
Note in case there are several moving objects within the view as captured by
camera lens, this tracking function may not operate accurately.
Movement
(N.B. This function does not operate under split screen mode)
Parents can select the movement detection sensitivity according to their preference.
Higher value means the camera is more sensitive to movement.
Setting
This function is to set the various parameters
Use button 14 15 16 17 to select, short press OK button 19 to confirm.

14
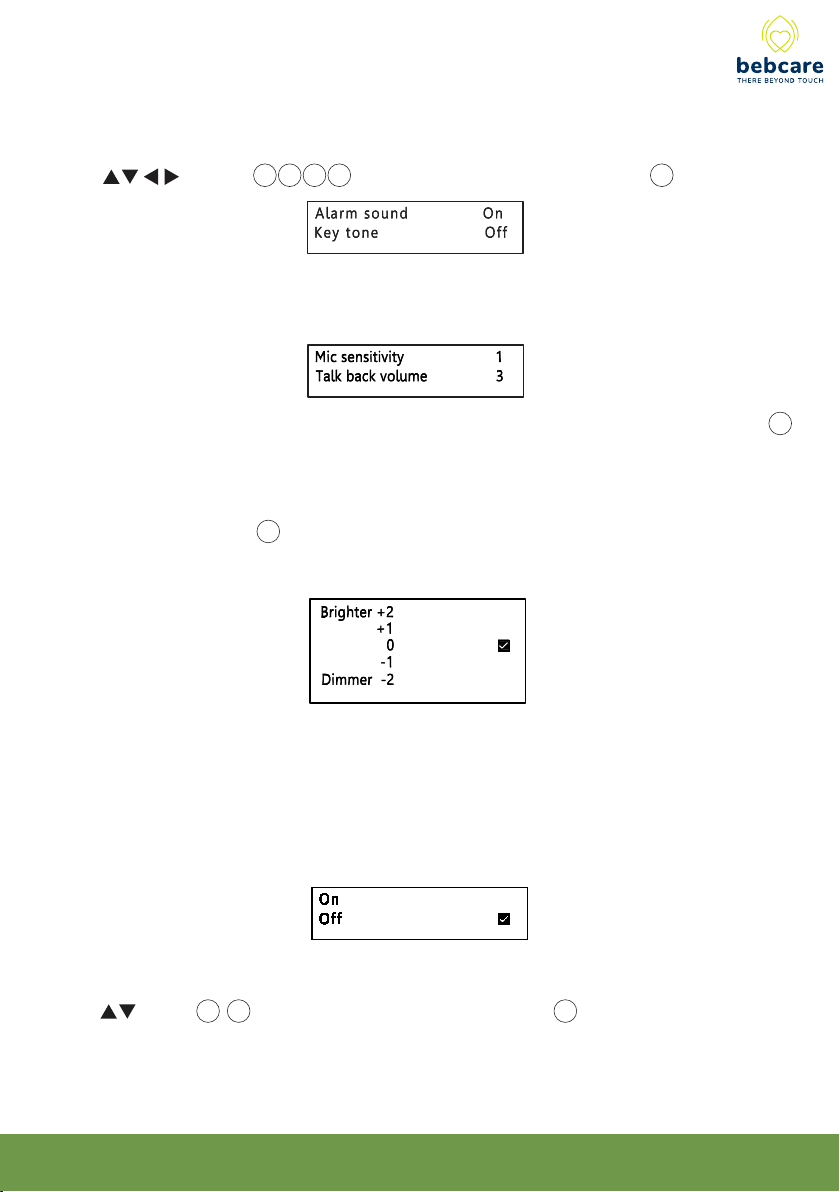
Display
Brightness
Select from one of the 5 levels of screen brightness.
(N.B. It is not possible to adjust the brightness when there is no image displayed on
screen).
Flip
Select normal or 180º inverted image depending on how the camera is installed.
(N.B. It is not possible to adjust the flip when there is no image displayed on screen).
Temperature
Once the temperature alarm is set to ON, PU will provide an alert (both visual and audio)
in case the camera detects baby’s room temperature become higher or lower than the
preset limits.
The selectable range for high limit is +15º to + 48º C and low limit is - 9º to + 25ºC.
In case you have made a illogical entry (e.g. you have selected 20°C as high limit and
22°C as low limit), the unit will not accept your entry and will automatically correct it to a
setting 2° higher or lower, depending you have set the high or low limit first.
Please note the setting of temperature limits are same for all cameras
15
Movement sensor Mat
This is to set the monitoring function of movement sensor mat to ON or OFF.
Use button 14 15 to select, then short press OK button 19 to confirm.
When set to ON, the unit will provide an alarm in case the movement sensor mat does
not detect any activity of baby in 20 sec ( including breathing movement ) and the screen
will show following:
Cam Mic sensitivity and Volume
Mic sensitivity
Select from one of the 5 levels of sensitivity, higher value means the camera microphone 5
is more sensitive to sound.
Talk back volume
This control the speaker 10 volume when parents talk back to baby, it is independent from
the music volume which is adjusted within the menu of lullaby function.
Night vision changeover
The screen image will change to black white colour when the camera environment becomes
dark. This setting controls at what light intensity the changeover to black white image will
occur. Brighter means the changeover will take place at more bright environment.
Alarm sound & Key tone
This function is to switch the alarm sound and key tone ON or OFF
Use button 14 15 16 17 to select, then short press OK button 19 to confirm.

16
Within the operating range when signal strength icon shows full 4 bars, a colourful and
smooth image can be seen on screen 20. However, as the distance between the camera
and PU increases, the signal strength icon show less no. of bar and the image become
less smooth. Further increase in distance will cause the image to become still and until a
point where the screen 20 will show the text “ No signal or Out of Range”. Such text will
be shown on the screen 20 at regular intervals. At the same time, the visual level meter
12 starts flashing and an audible alarm will be heard to alert the parents.
8. There are 5 icons displayed at the top of screen :
battery icon
temperature icon image magnification iconcamera number
signal strength icon 23
Setting
Light Movement
7. Whenever baby is making sound and camera becomes activated, the visual level
meter 12 will light up. The louder the baby’s voice, the more segments will light up. This
feature is useful in case the parents prefer to turn down the speaker 24 volume to keep
the environment quiet while still able to monitor the activity of baby.

17
The battery icon shows the status of PU battery, once the battery level falls below 20%,
this icon will start flashing and an audible alarm will be heard, urging the parents to
charge up the battery.
During charging process, the segments within battery icon will flash in turn and the
power on indicator 18 will remain red until the battery is fully charged up, then it will turn
green.
9. Under VOX mode or screen on mode, when the camera is under standby and screen
20 is dark, parents are still able to see the image of baby while he is asleep (i.e. when
the baby is not making any sound). Short press any one of button 14,15,16,17,18 ,23
and 25 can activate the camera and the screen 20 will show the baby image for 10 sec.
10. When PU is sounding an audible alarm, it can be muted by short press anyone of
button 14,15,16,17,18, 23 and 25 but the text on screen 20 will keep showing until the
condition is rectified.
18
Whenever the parent unit falls back within the operating range, the audible alarm will
stop and the visual level meter 12 stops flashing.
The camera number shows PU is viewing which camera
The temperature icon indicates the current temperature of baby’s room.
In case the temperature falls outside the preset high and low limits, an audible alarm will
be heard and the screen 20 will show :
The image magnification icon will show up when x 2 is being selected.
8℃40℃
18
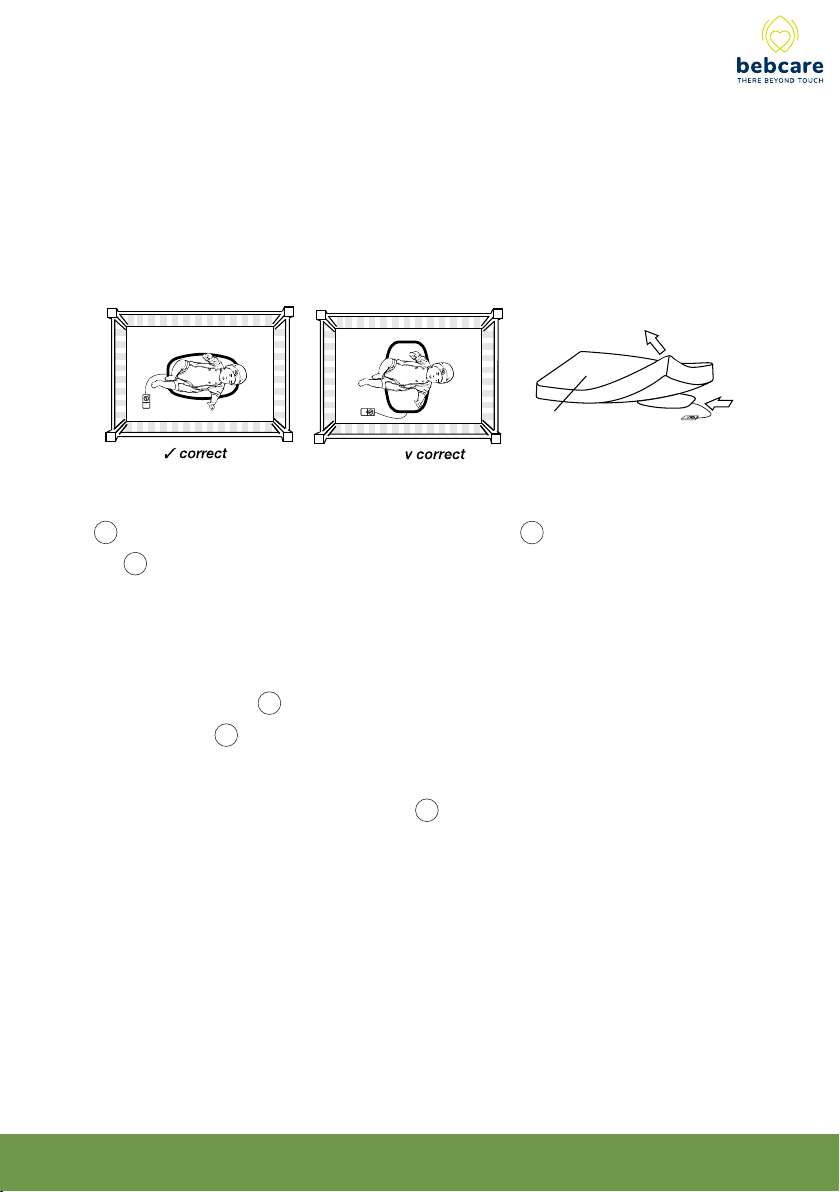
Movement sensor mat
1. Place the movement sensor mat underneath the mattress, lengthwise direction and
directly under where your baby sleeps. For optimum performance, there should be no
bedclothes tucked between the sensor mat and the mattress. Besides, if the mattress
support is too soft (such as box spring or underpadding), a hard board is required to be
placed underneath the mat to provide a firm surface for it. The size of the board should
be larger than the sensor mat.
2. With the baby placed in crib, switch on sensor mat by turning the movement sensitivity
knob 28 in clockwise direction. Adjust the position of knob 28 such that the movement
indicator 27 will blink in pace with the breathing movement of baby.
Slip the control box underneath the mattress to keep out of reach of baby and place it as
far away from the senor mat as possible.
According to the change in weight as baby grows, it may be necessary to adjust the
sensitivity setting of knob 28 again. In case the sensitivity setting is not appropriate, the
movement indicator 27 will always stay ON or OFF and false alarm may occur.
N.B. Before attempting to adjust the knob 28 , wait for at least 15 -20 min until the
baby has settled down or fallen asleep.
3. For environment with continuous vibration from the floor, the sensor mat may has false
detection and delay or prevent the alarm from sounding. Under such circumstance, move
the crib to the corner of the room or near a solid supporting wall. Moreover, keep the crib
away from strong draft and air current
Mattress

19
5. Once the sensor mat cannot detect any activity of baby ( including breathing movement )
for over 20 sec., PU will provide on audible alarm to alert parent and the screen will show
following:
4. Besure the BU and sensor mat is within the same room or apart from each other not
more than a distance of 10m, otherwise they may lost connection with each other and
breathing movement of baby cannot be monitored.
Mat out of range
When battery of sensor mat is running low, PU will provide an alarm and the screen will
show following, urging parent to replace with new battery:
Once battery become completely flat, the screen will show the text “Mat out of range”
Table of contents
Other Bebcare Baby Monitor manuals


