Beijing Dahao Technology BECS-D56 User manual

刺绣机电脑
Computerized Control System for Embroidery
Machine
BECS-D56
(General Unit)
Version:2017-01
操作手册
OWNER’S MANUAL


Index
Index
Chapter 1 General Descriptions .....................................................................................................1
1-1 Warnings and Cautions.....................................................................................................1
1-2 Main Features....................................................................................................................3
1-3 Technical Specifications ...................................................................................................6
Chapter 2 Operation Instruction.....................................................................................................7
2-1 Configuration and Direction of the Control Panel............................................................7
2-2 Instruction of Control Panel..............................................................................................8
2-3 Instruction of the Main Screen........................................................................................11
2-4 Notes on Menu Status.....................................................................................................14
2-5 How to Input Numerals, Letters and Symbols................................................................15
2-6 Moving of the cursor.......................................................................................................15
2-7 Procedure of Embroidery................................................................................................15
2-8 Normal Embroidery, Returning and mending.................................................................21
2-9 Relations between Normal Embroidery, Idling and Position Idling...............................21
2-10 Operation Bar and Turn Shaft Button...........................................................................22
2-11 Thread-breakage detection and mending switch...........................................................22
2-12 System's Working Status...............................................................................................23
Chapter 3 Disk Management........................................................................................................24
3-1 Disk Selection.................................................................................................................24
3-2 Design Preview ...............................................................................................................27
3-3 Select One or Several Designs........................................................................................28
3-4 Design import..................................................................................................................29
3-5 Design Export .................................................................................................................30
3-6 Directory Operation ........................................................................................................32
3-7 Deleting Objects in Disk (Including Design Files and Folders).....................................32
3-8 Formatting a Disk............................................................................................................32
Chapter 4 Memory Design Management .....................................................................................34
4-1 Memory Design Management Screen and Other Memory Design Operation Screens ..34
4-2 Select One or Several Designs........................................................................................37
4-3 Selecting a Design for Embroidery.................................................................................37
4-4 Design Preview ...............................................................................................................38
4-5 Copy the memory design ................................................................................................39
4-6 Delete the memory design...............................................................................................40
4-7 Add applique design........................................................................................................41
4-8 Satin stitch compensation................................................................................................43
4-9 Edit packed design..........................................................................................................44
4-10 Design division .............................................................................................................45
4-11 Combine the designs.....................................................................................................46
4-12 “High speed design”......................................................................................................47
4-13 Compile Packed Design................................................................................................47
4-14 Create design from parameter.......................................................................................48
4-15 Move frame to make design..........................................................................................48
4-16 Create outline design from normal design....................................................................49
BECS-D56 computerized embroidery machine owner’s manual I

Index
4-17 Copy design with varied switch length.........................................................................50
4-18 Design parameters operation ........................................................................................50
4-19 Import design from PC .................................................................................................51
4-20 Network Management Function...................................................................................52
Chapter 5 Management of Machine Parameters.......................................................................... 54
5-1 Normal Parameters ......................................................................................................... 54
5.1.1 Design directions...............................................................................................................55
5.1.2 Setting of rotation ..............................................................................................................55
5.1.3 Setting of X-scale...............................................................................................................55
5.1.4 “Rep. Prior” .......................................................................................................................56
5.1.5 “Rep. Mode”......................................................................................................................57
5.1.6 “X&Y Reps”......................................................................................................................57
5.1.7 “X&Y Interval”..................................................................................................................57
5.1.8 “Prior Mode” .....................................................................................................................57
5-2 Setting of other embroidery parameters ......................................................................... 57
5.2.1 Setting Procedure for Other Parameters ...................................................................................58
5.2.2 Introduction of Functions in Other Parameters.........................................................................59
5-3 Set User-defined parameter ............................................................................................ 60
5-4 Purview of Machine Parameter Manage......................................................................... 62
5.4.1 Unlock/Change the administrator password......................................................................63
5.4.2 Machine Administrator cancels machine lock ...................................................................64
5.4.3 Administrator reset (or save) the optimized parameter......................................................65
5.4.4 Change the factory password.............................................................................................66
5.4.5 Unlock the factory password .............................................................................................67
5.4.6 Factory Save/Reset Parameters..........................................................................................67
5-5 Initialize Parameters .......................................................................................................67
5-6 Save all parameter to disk...............................................................................................68
5-7 Read all parameter from disk..........................................................................................69
5-8 Adjust Parameters of X&Y Servo Drivers .................................................................... 70
5.8.1 Set the parameter ...............................................................................................................71
5.8.2 To inquire servo driver status.............................................................................................71
5.8.3 Fix driver parameters.........................................................................................................71
5.8.4 Restore default driver parameters......................................................................................71
Chapter 6 Assistant Operation .....................................................................................................72
6-1 Assistant embroidery operation...................................................................................... 72
6.1.1 Resume Design Start..........................................................................................................72
6.1.2 Save design start ................................................................................................................73
6.1.3 Auto to start position..........................................................................................................73
6.1.4 Stitch stop down.................................................................................................................74
6.1.5 Setting another start ...........................................................................................................75
6.1.6 Set B Point.........................................................................................................................76
6.1.7 Operation onAFC, Sequin and Coiling Devices ...............................................................77
6.1.8 Upper thread hold operation..............................................................................................77
6-2 Other assistant operation................................................................................................. 77
6.2.1 View Embroidery Parameter..............................................................................................78
II BECS- D56 computerized embroidery machine owner’s manual

Index
6.2.2 View Statistics Information............................................................................................... 79
6.2.3 Power resume setting/ frame start setting.......................................................................... 79
6.2.4 Power resume.................................................................................................................... 80
6.2.5 Set embroidery scope in software...................................................................................... 81
6.2.6 Set system clock................................................................................................................ 82
6.2.7 Language Choice............................................................................................................... 83
6.2.8 Machine Soft Information ................................................................................................. 83
6.2.9 Help................................................................................................................................... 84
6.2.10 Machine Test ..................................................................................................................... 84
Chapter 7 Other Operation...........................................................................................................86
7-1 Operation on color-changing order.................................................................................86
7.1.1 Input Color Line................................................................................................................ 86
7.1.2 Modify color line............................................................................................................... 87
7.1.3 Replace a needle................................................................................................................ 87
7.1.4 Set color of showing design .............................................................................................. 88
7-2 Design border operation..................................................................................................89
7.2.1 Check the boundary of a design ........................................................................................ 89
7.2.2 Move the frame along the boundary of a design............................................................... 90
7.2.3 Create design from outline................................................................................................ 91
7.2.4 Frame to generate design, then embroider back................................................................ 91
7.2.5 Embroider a “+” in current position.................................................................................. 92
7.2.6 Frame and embroider back for one line............................................................................. 93
7.2.7 Embroider the boundary of current design........................................................................ 94
7.2.8 Embroider true boundary of current design....................................................................... 95
7-3 Positioning Idling............................................................................................................95
7.3.1 Go ahead stitches............................................................................................................... 96
7.3.2 Go back stitches................................................................................................................. 96
7.3.3 Next Color Code................................................................................................................ 97
7-4 Reset X/Y Displacements ...............................................................................................97
Chapter 8 Memory Design Edition ..............................................................................................98
8-1 Start Editing Design........................................................................................................98
8-2 Design Edition Operation................................................................................................98
8.2.1 Summary ........................................................................................................................... 98
8.2.2 Document and View Operation......................................................................................... 99
8.2.3 Key for Positioning Stitch and Editing Stitch.................................................................... 99
Chapter 9 Letter Design .............................................................................................................101
9-1 Enter Letter Design Operation......................................................................................101
9-2 Input Char String and Basic Parameter.........................................................................101
9-3 Character Pattern Save..................................................................................................106
Chapter 10 JF Type Sequin Embroidery....................................................................................107
10-1 Brief Introduction on Sequin Embroidery ..................................................................107
10-2 Embroider sequin........................................................................................................108
10-3 Input sequin design .....................................................................................................108
10-4 Sequin design edition..................................................................................................109
10-5 Parameter about multi-sequin embroidery..................................................................113
BECS-D56 computerized embroidery machine owner’s manual III

Index
10-6 Change color order and set sequin mode....................................................................117
10-7 Manual operation of sequin embroidery..................................................................... 120
10-8 Debugging multi-sequin embroidery..........................................................................121
10-9 Sequin mending..........................................................................................................122
Chapter 11 Directions on Coiling, Taping and Zigzag Embroidery..........................................123
11-1 Function Introductions................................................................................................123
11-2 Main Technical Specification.....................................................................................123
11-3 Parameters and setting................................................................................................124
11-4 Relative Operations of Special Embroidery ...............................................................126
11.4.1 Shift between Flat Stitch Head and Special Head.................................................................126
11.4.2 M Axis Operation of Special Embroidery.............................................................................128
11.4.3 Operations of Clamp Foot.....................................................................................................129
11-5 Debug Special Embroidery.........................................................................................129
11-6 Steps on Special Embroidery......................................................................................130
11-7 Mechanical Category and Driving Mode Selection for Special Embroidery Machines130
Chapter 12 Instruction on Operating High-Efficiency System..................................................133
12-1 Descriptions of Parameters in High- Efficiency Mode...............................................133
12-2 Setting of Software for High-Efficiency Mode.......................................................... 133
Chapter 13 Updating Control Program......................................................................................137
13-1 Update Data Software (Upper Machine)....................................................................137
13-2 Updating Control Program (Down Machine).............................................................140
Chapter 14 Updating Peripheral Equipment Program ...............................................................144
Appendix ⅠParameter Setting List........................................................................................ 147
Appendix ⅡDirections on USB operations............................................................................ 162
Appendix ⅢError Information & Instruction of System Level Mistake................................163
Appendix ⅣMake Special Multi-Sequin Design ................................................................... 167
Appendix ⅤNetwork Connection of Embroidery Machines .................................................178
All rights reserved. Beijing Dahao Technology Corp., Ltd.
IV BECS- D56 computerized embroidery machine owner’s manual

Chapter 1 General Descriptions
Chapter 1 General Descriptions
Thanks for using the Computerized Embroidery Control System produced by
Beijing Dahao Technology Corp., Ltd. User are recommended to read this manual
carefully, so as to operate the machine correctly and effectively. Besides, user
should keep this manual for future use.
1-1 Warnings and Cautions
In order to reduce the occurrence of the fire, electronic shock and personal injury at using this product, user
shall strictly follow the basic security prevention measures at below:
Matters forAttention at Usage
Danger
During the operation, do not try to open the machine box. The high voltage
contained in some parts can be deadliness. Rotating parts may cause serious
injury.
Forbidden Don't expose the machine to humidity gas, poisonous gas, water, and dust.
Forbidden Don’t store or operate the machine in vibrating area, which may cause
trouble to the machine.
Caution Please abide all the warnings and safety requirements to ensure the security
of person and property
Caution LCD is fragile item. Do not use hard materials to click on the screen.
Caution
Before plugging in, user has to pay attention to the direction of the floppy
disk and the U disk. Don’t attach force when the inserting direction is
wrong, or it may cause the damage of the floppy driver, disk, U disk and
USB port. When the indicator on floppy driver is on, please don’t insert or
pull out the disk.
Caution We will add appendix if necessary, if there is any difference between the
manual and appendix, please the appendix will take precedence.
In Transportation
Caution Don't hold the cable when moving..
Caution Please abide all the warnings and safety requirements to ensure the security
of person and property
BECS-D56 computerized embroidery machine owner’s manual 1
Chapter 1 General Descriptions
Compulsory
Overloading may cause serious loss. P
lease load according to the
instruction on the box..
Installation
Caution
Don't jam the vent on the device. Don’t plug up the machine, or it may
cause fire or electronic shock.
Caution Make sure the installation direction is correct..
Caution Don't expose the machine to humidity gas, poisonous gas, water, and dust.
Cable Connection
Forbidden Don't test the insulation of the circuit loop.
Forbidden Never try to connect overloading electronic device on the connector or the
power socket.
Caution Make sure the insulation cover of each cable is fine.
Caution Communication cable and power cable should be separated.
Caution
All the cables should be well fixed. Don’t put any strength on cables. Make
sure the turning point of cable is well protected. Add pipes to increase
insulating capability.
Caution
Machine should be grounded. The resistance should be no larger than 10
Ω.
Operating Direction
Danger
Don't operate the machine when there is any damage on the protection
shell.
Forbidden When machine is running, do not touch any running part.
Caution
Make sure the configuration of power supply in normal. Use stabilized
voltage power supply when the voltage rebound is between -10%~10%.
Caution In case of warning, please check out the problem. Operation can only be
carried out again when problem is solved.
Caution
The power supply has over-currency protection function. There is a 3 mins
time lag before the function can be used again.
2BECS- D56 computerized embroidery machine owner’s manual

Chapter 1 General Descriptions
Maintenance
Warning
If you need to open the machine cover, cut out the power supply first. Due
to the capacitance after power off, operator must wait for one minute before
opening the machine cover.
Caution Circuit boards can be damaged by static. Non-professional technician can
not disassemble circuit boards.
Caution
If machine is inactive for a while, users must power on the machine
regularly (once in 2 or 3 days, more than an hour for each time).
Caution If machine is inactive for a long time, users should hav
e the machine
checked before power on.
Rejection
Caution Rejection should obey the rules and regulations set by national industrial
electronic standards.
1-2 Main Features
1. LCD Displayer
It offers delightful operation and easy learning. The beautiful screen display turns everyday
work into joyful experiences.
2. Timing Turn-off of LCD Displayer
Following measures were taken to extend the LCD life: LCD will turn off automatically in case
of no operation in 15 minutes (the time can be changed in parameter setting). A touch of the
screen or any key will reboot the LCD.
3. Super-Large Memory Capacity
The memory capacity reaches 100 million stitches, in which 800 designs can be stored. Its
super-large memory capacity can meet demands of different customers.
4. Maximum One Million Stitches for Single Design
At present a single design in the system has the maximum of 1,000,000 stitches and 980 times
of automatic color changing.
5. Multi-Task Parallel and Free Shift among Tasks
During embroidering, actions like design input & output, preparation for the following designs
and modification of parameters can be carried out. Flexible shift among tasks can be realized by
using the task-shifting key.
BECS-D56 computerized embroidery machine owner’s manual 3

Chapter 1 General Descriptions
6. Storage of Frequently Used Parameters and Color-Changing Order for Each
Design
Design will be saved along with its parameters, color-changing orders and needle bar colors.
System can memorize the operational details for each design. Users can set parameters for a
design during the embroidery process of the previous design, which will save time and improve
the efficiency. More importantly, it is one basis to realize network management.
7. Group Management of Parameters
Parameters can be divided into groups based on their functions and embroidery types. The
system can also save and recover the parameters used by technician at end-user and the
parameters used by the manufacturer of machine. And for the machine with password-setting
function, user can set password on the machine.
8. Design Input & Output with USB
Except for DOS, FDR and ZSK format floppy disk, users can use USB disk for data transfer.
USB disk supports DIR operation, which is easy for design management. For each directory,
system supports the storage of 800 designs or the sub-directory operation. There is no limitation
on directory levels. Design formats like DSB, DST, ZSK and FDR can be loaded.
9. Input of Several Design Files at One Time
Both floppy and USB disks support multi-design input under one directory.
10.Input design through network, color-changing order, etc.
Network connector is available, which help user input design, color-changing order, applique,
etc.
11.Network Function
A surveillance LAN can be built with connectors and linked to the factory LAN, which realizes
network management, improves production efficiency and reduces possible mistakes. It’s the
best choice of embroidery equipment for enterprises to take the modern enterprise management.
For details, please refer to appendix Ⅴ.
12.Patch Embroidery (Applique)
This function can set a patch code after the color code or stop code, and when the machine
embroiders to the patch code, it will halt and move frame out for patching. After sticking a
patch, user would pull the operation bar to let the frame move back and continue embroidering.
4BECS- D56 computerized embroidery machine owner’s manual

Chapter 1 General Descriptions
13.Starting Point Saving
This function can save the start point of each design and waive the work of user to repeat
moving frame manually to find the design origin when user selects the same design.
14.Maintenance and Test of Machine
This function is to easily judge the malfunctions at maintenance and test, which consists of
encoder testing, main shaft speed testing, machine parts testing and the main shaft stopping at
any position, etc.
15.Multi-Language Support
The system supports Chinese / English /Spanish/Turkish and other languages.
16.Design Output
Design can be output and saved into floppy disk or USB disk. Adoption of TAJIMA’s binary
system enables user to enjoy the advantage of data transmitting through the World Wide Web
(other formats may not be transmitted directly).
17.Repetition Embroidery
The machine can increase embroidery productivity by repetition embroidery, which can also be
used with cyclic embroidery.
18.Cyclic Embroidery
The user also can increase embroidery productivity by using cyclic embroidery function, by
which the machine automatically returns to the origin point and starts the same embroidery
design again when finishing the design one time.
19.Design Compiling
(1) Compile the Data of Selected Design to Generate New Design
Users can compile any design according to zoom ratio, rotate angle, normal repetition or partial
repetition to generate a new design and save it in the memory card. The newly generated design
can be used for embroidery, output or other operations.
(2) Compile the Combined Design
System can compile the pre-set combined design to generate a new one and save it to the
memory card. The newly generated design can be used for embroidery, output or other
operations.
20.Letter Design
There are altogether 28 letter-bases. Users can make groups and change the letter order
according to different tasks. This operation is simple and easy managing.
BECS-D56 computerized embroidery machine owner’s manual 5

Chapter 1 General Descriptions
21.Design Editing
By using this function, users may insert, modify or delete certain stitch at the selected point.
New designs can be created by this function too.
22.Speed Adjusting
The highest speed for embroidering can be set. During the process of embroidering, speed
changes automatically when the needle interval changes.
23.Thread Trimming
Thread trimming can be manually controlled. Trimming acts automatically at the end of
embroidery process or color changing.
24.Thread Breakage Detection
In case of thread breakage or run-out of bottom thread, machine stops and warning lights start
to blink.
25.Color Changing
At the color changing point, user can either act color changing manually or let the system do
according to the preset order automatically.
26.Special Embroidery
BECS-D56 computerized embroidery has special embroidery functions (coiling, taping and
Zigzag embroidery).
1-3 Technical Specifications
1. Maximum design saving quantity: 800 designs
2. Memory capability: 100 million stitches
3. Screen resolution: 800*480
4. Network transfer speed: 10Mbps
5. Data transfer mode supported: floppy disk, USB disk and network
6. Stepping Precision: minimum stepping precision is 0.1mm
7. Stitch range: 0.1mm to 12.7mm
6BECS- D56 computerized embroidery machine owner’s manual
Chapter 2 Operation Instruction
Chapter 2 Operation Instruction
2-1 Configuration and Direction of the Control Panel
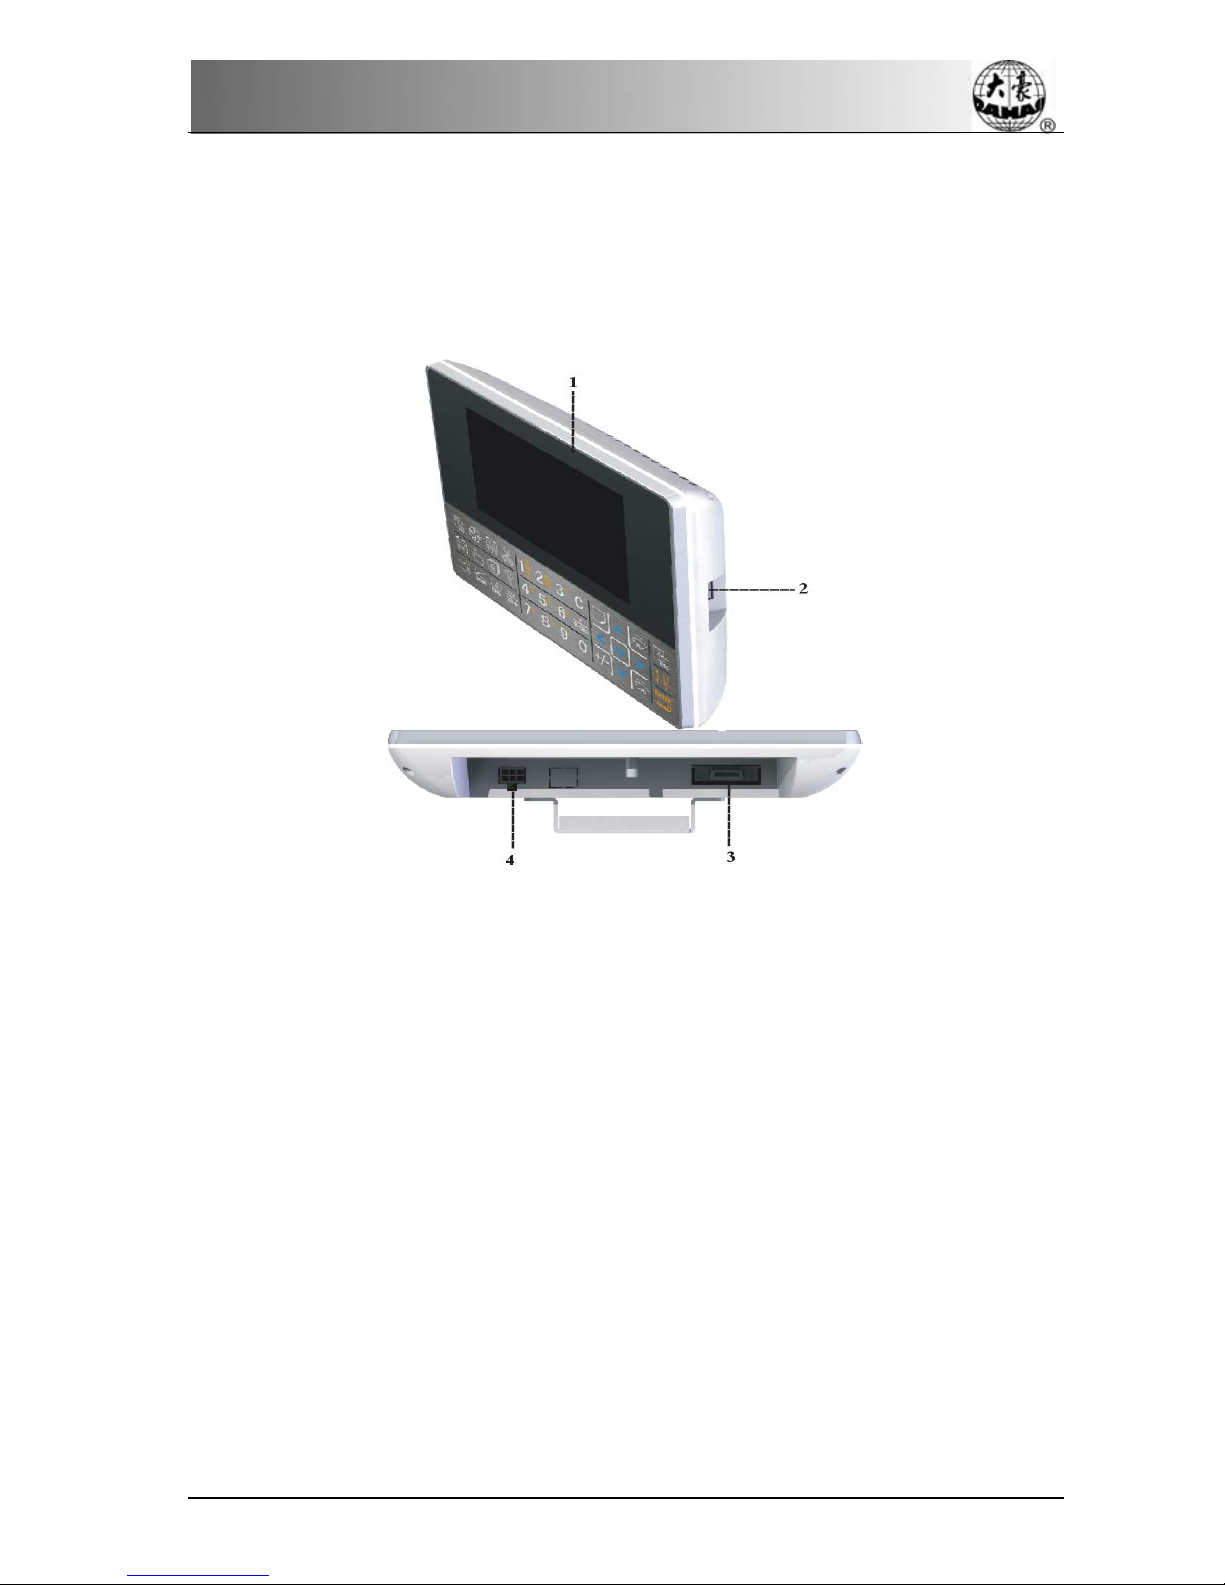
A. Configuration of the Control Panel
1. LCD Screen
D56 adopts high-luminance LCD display.
2. Main USB Interface
USB disk can be plugged in for data input/output. The external floppy driver is also
connected by USB interface.
3. Serial Port to Mother Board
4. Power Port
B. Direction in Using the Floppy Disk
This external floppy driver uses USB port. Make sure the plug-in direction is correct. Try to
avoid using force with incorrect plug-in direction, or it may destroy the floppy driver and disk.
C. Direction in Using the USB Disk
Please pay close attention to electrostatic phenomenon. Don’t forget to discharge before
plugging in/out the USB disk.
BECS-D56 computerized embroidery machine owner’s manual 7
Chapter 2 Operation Instruction
USB disk features plug-in direction. Users should avoid plugging out during writing or loading
data, because it may result in loss of data. We highly recommend users to check the data
integrality in case of data missing.
Note: During the process of USB format, sudden loss of electricity or plugging out the disk may
break down the USB.
D. Direction of Network Connection
Preset the network parameters before the connecting. Otherwise other machines in the network
maybe can’t communicate.
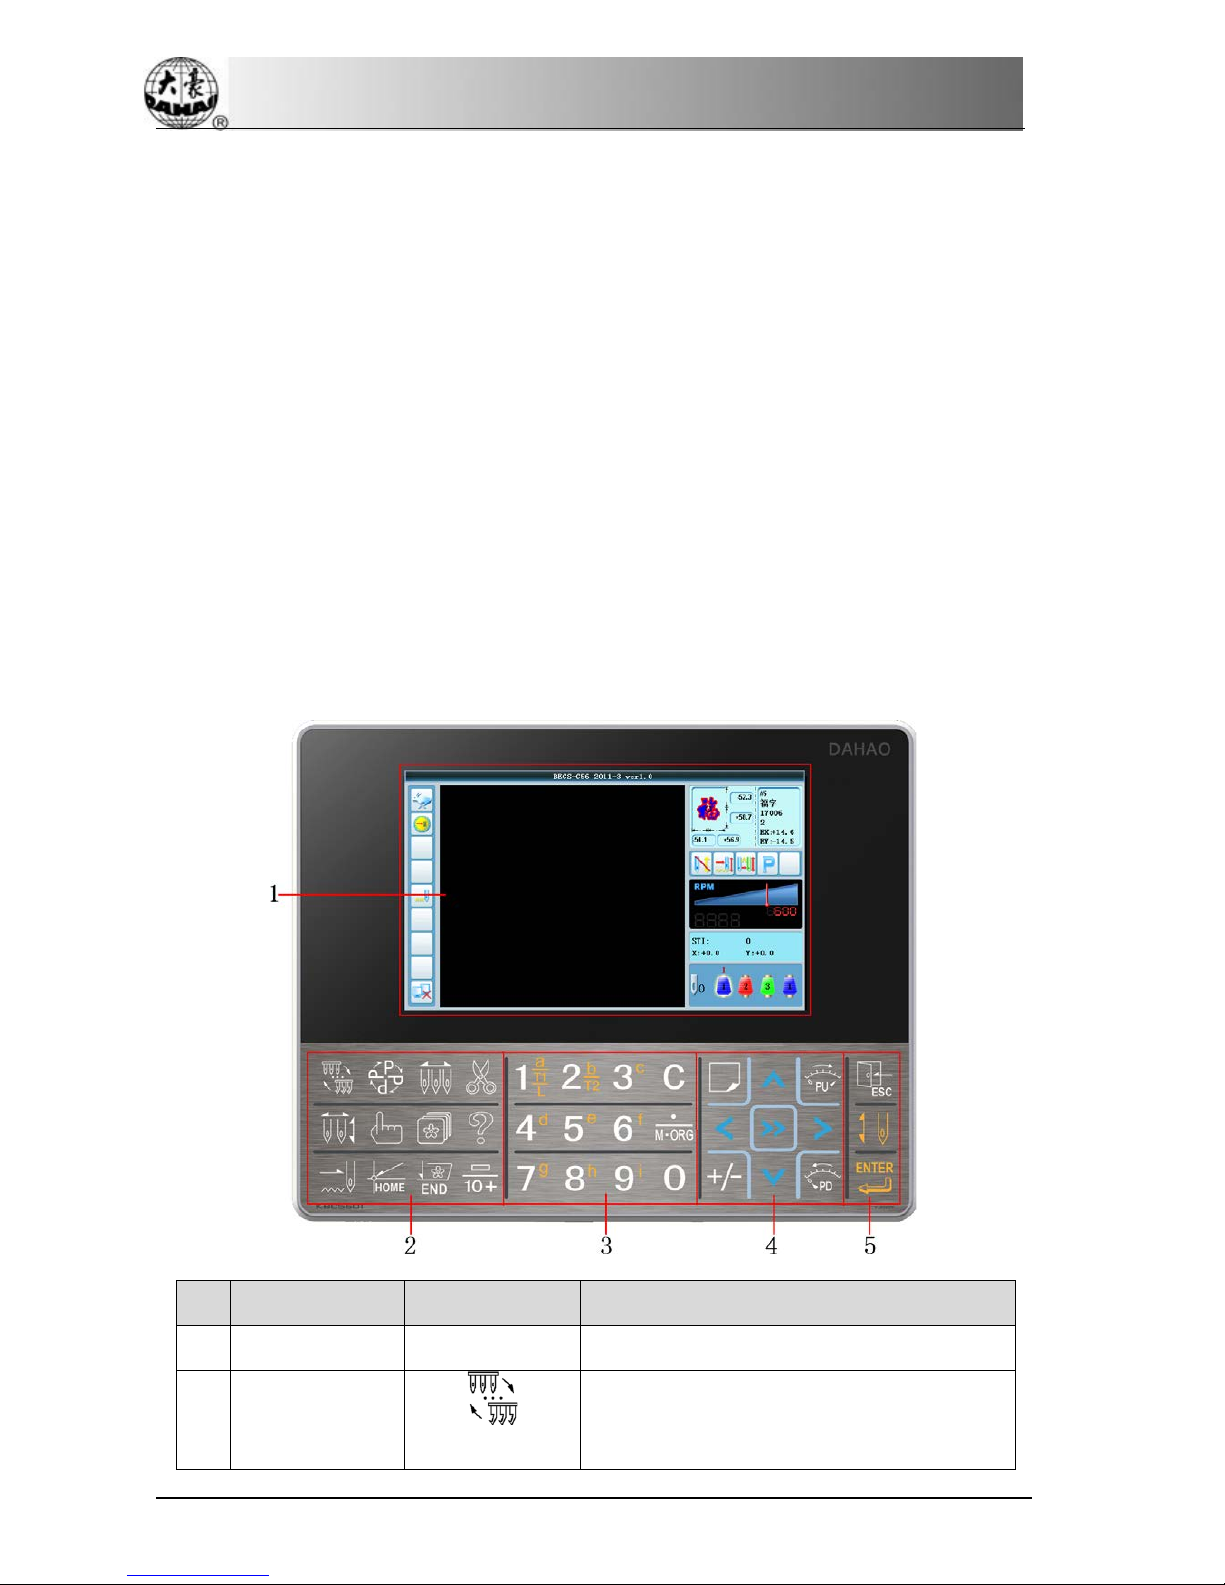
2-2 Instruction of Control Panel
The key on the keyboard can be used along with LCD. If you want to operate function in any
menu on the LCD, just press relative shortcut key on the keyboard. The status of that key will
be shown on the screen.
No. Name Figure Description
1 LCD Displayer Displays the operation interface.
2 Function Area
Reserved
Functions
Unused Temporarily
8BECS- D56 computerized embroidery machine owner’s manual

Chapter 2 Operation Instruction
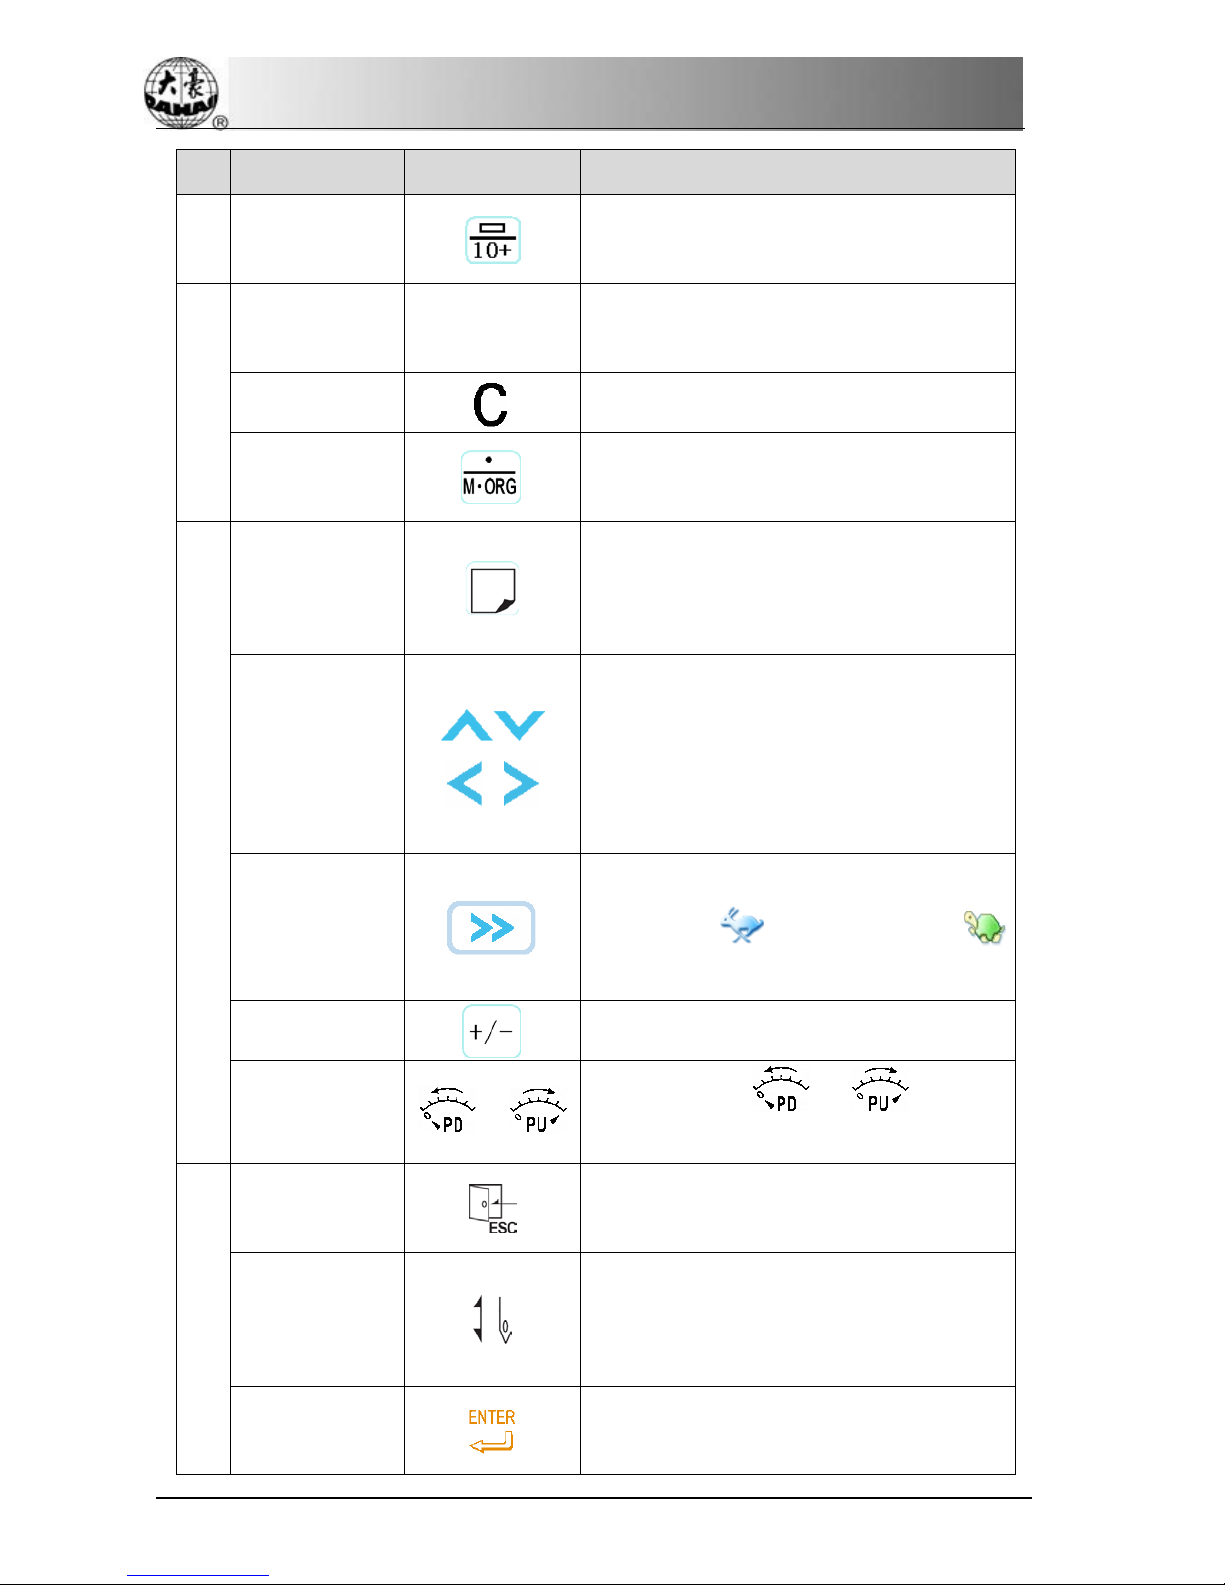
No. Name Figure Description
Pattern Direction
T
his key can turn the pattern among eight
directions.
Color-changing
Press this button to enter the color-changing
operation
Thread-trimming
After stop, press this button to enter the
interface for selecting upper thread-trimming
or upper& bottom thread-trimming
, where
user can select the corresponding
thread-trimming method.
Color-chang
ing &
Start Method Shift
Button
P
ress this button to shift among Manual
Color, Auto Start/Auto Color, Manual Start/
Auto Color and Auto Start
Other Management The operations about parameters and patterns
Management of
Pattern and Disk
Operation a
bout pattern edition and disk
management
This button can be available only when the
main control software supports the special
embroidery function
Embroidery/ Idling
Shift Button
Press this button to shift among embroidery,
high speed idling and low speed idling
Return to start
point
After stop, press this button to let frame
return to the start point of the current pattern
automatically
Return to stop
point
A
fter stop, user can press the manual
frame-
moving to move the frame (like
applique), then press this button to have the
frame to return to the
stop point
automatically
BECS-D56 computerized embroidery machine owner’s manual 9
Chapter 2 Operation Instruction
No. Name Figure Description
It is used for editing design or input needle
number.
3
Number keys T
hey are used to select menu items or set
parameters
used for deleting the last letter you typed in
Manual Moving
I
t is used for manual moving or inputting
point
4
Task Shifting
When user activates several interfaces, he can
use this button to shift the activated interface
in order
Manual
Frame-moving
Press it to move the frame. T
he manual
frame-moving keys support the combining
direction (pressing two neighboring direction
buttons can move the frame along the
45degree to the pressed directions).
Manual
Frame-moving
Speed
Press this button to shift the frame-moving
speed among (High speed)and
(Low speed).
To show plus & minus of inputted number.
Speed
Adjustment 、Press the button or
to reduce
or increase the embroidery speed.
5
ESC
Press this button to quit the corresponding
operation
Embroidery
Confirm
(Release)
Press this button to confirm or release the
embroidery
Enter
Press this button to conform the relating
operation
10 BECS- D56 computerized embroidery machine owner’s manual
Chapter 2 Operation Instruction
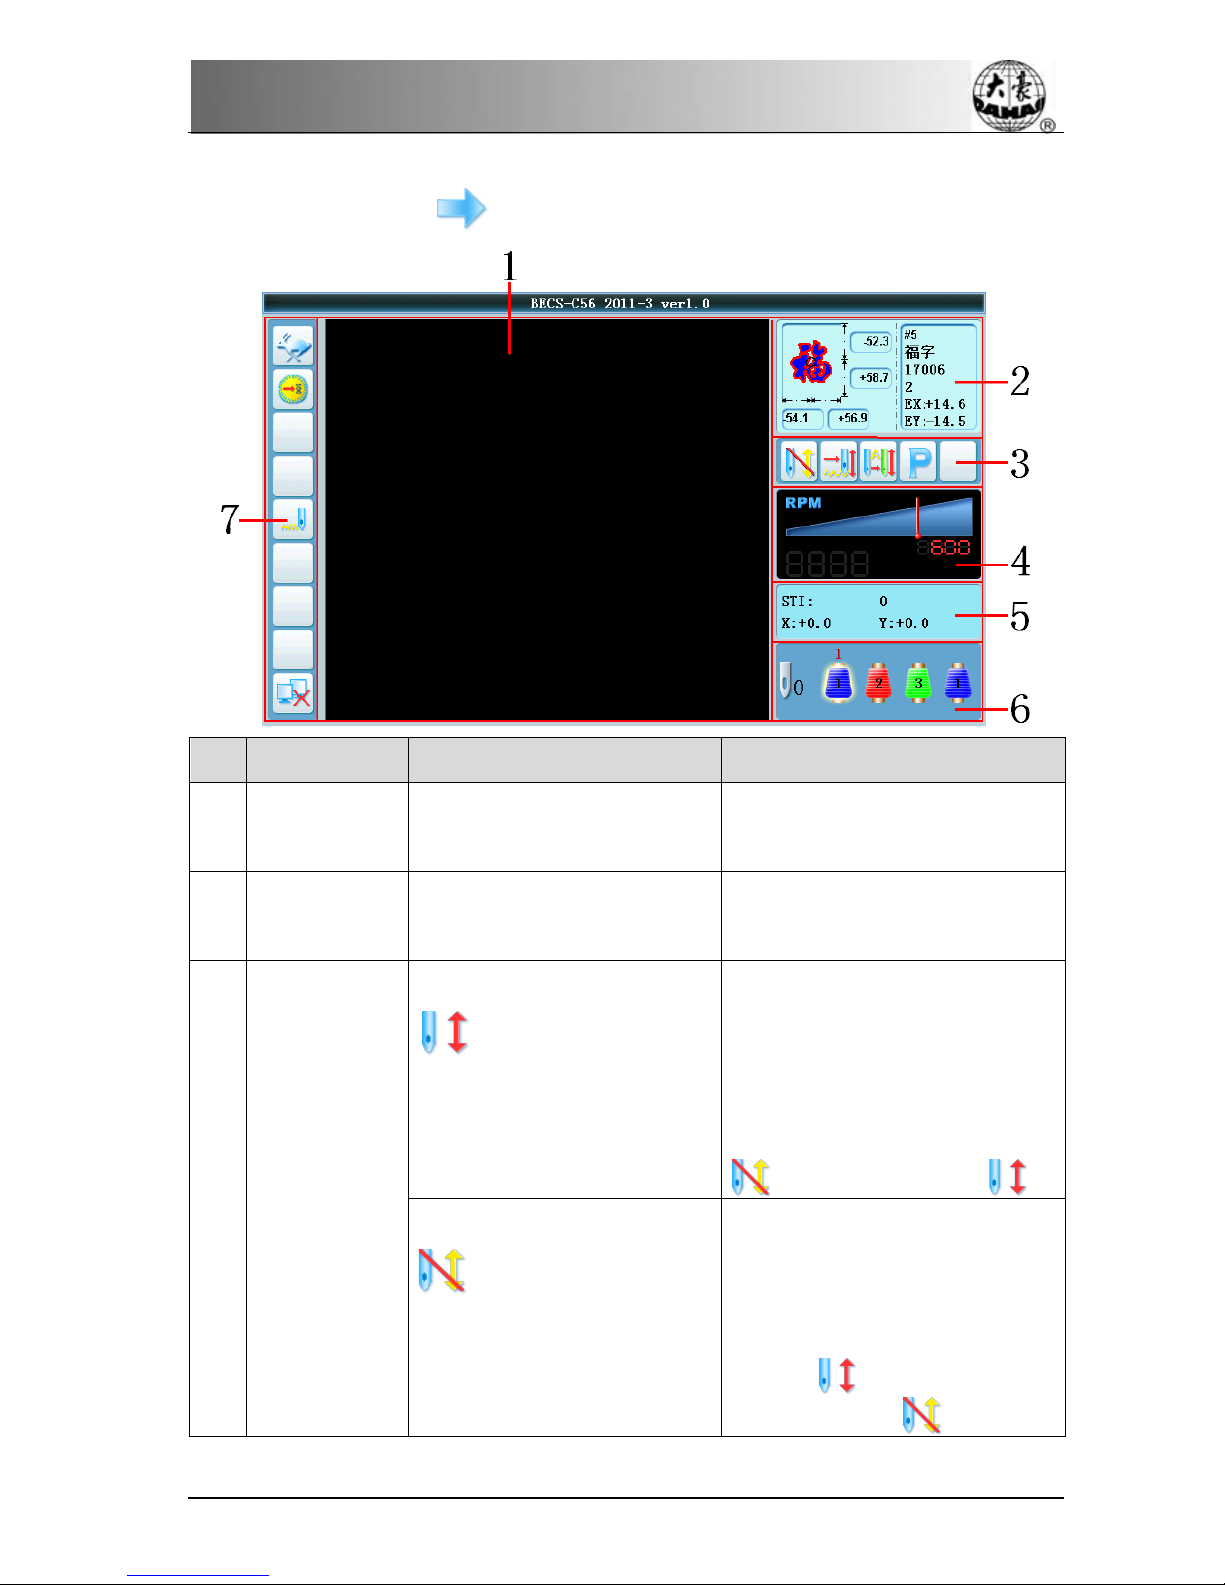
2-3 Instruction of the Main Screen
Note: Press the button can shift between the following two pages.
No. Name Figure Description
1 Real time
tracking
Stitch forms or patterns are
displayed in this area.
2 Pattern
information
R
elated pattern information is
displayed in this area.
3 Current status
Embroidery confirmation
status
(Embroidery can be cancelled)
In embroid
ery preparation status,
you can select pattern, set
parameter and etc. Press this key
and confirm, then machine status is
changed from preparation status
to confirmation status .
Embroidery preparation
status, user can confirm the
embroidery
In e
mbroidery confirmation status,
you can pull bar to embroider.
When machine stops, press this key
to confirm to cancel confirmation
status
and back to
preparation status .
BECS-D56 computerized embroidery machine owner’s manual 11

Chapter 2 Operation Instruction
No. Name Figure Description
Normal embroidery
System is now in normal
embroidery status. W
hen you pull
ba
r, the main shaft rotates and
frame moves along the pattern
trace. Pull bar to go back, machine
idles back in low speed. When
machine stops, press this key to
shift to low speed idling .
Low-speed Idling
The machine is currently in
low-speed idling status. When user
pulls
the bar for normal
embroidery, the main shaft remains
inactive and the frame advances
along the stitch trace. When pulling
the bar for returning, the main shaft
remains inactive and the frame
returns along the stitch trace. When
the machine stops, click this key to
switch to high-speed idling status
.
High speed idling
System is now in high speed idling
status. P
ull bar but main shaft and
frame don’
t move and stitch
number increases; pull bar to stop,
the frame goes to the real position
of the current stitch. P
ull bar to
back, main shaft and frame don’t
move. Stitch number decreases as
well. P
ull bar to stop, the frame
goes back to the real position of
current stitch. When machine stops,
press this key to change to
Embroidery Status .
Manual color-changing
manual start
In this status, press related needle
position key to select a position.
P
ull bar to start embroidering.
When meeting the color-changing
code, system stops the machine
automatically and displays .
12 BECS- D56 computerized embroidery machine owner’s manual

Chapter 2 Operation Instruction
No. Name Figure Description
Then you should act manual
color-
changing. Input the position
you need, pull bar to start
embroidering
(
manual start
)
Auto color-changing
manual start
If you set machine to
auto-color-
changing, you should
first set needle color-changing
order. D
uring embroidery, no
matter where the current needle
locates, system will act
color-changing according to this
order. When you meet
color-changing code, machine will
stop automatically and change to
the needle position that already has
been set. I
f you set auto start,
machine will start automatically; if
you set to manual start, pull bar to
start.
Auto color-changing
auto start
Change pattern direction P
ress this key to shift the pattern
direction.
4
Main Shaft
Speed
Display the set speed and actual
speed of main shaft
5
Current Stitch
Information
Display the current stitch
information
6
Color-changing
Order and
Current stitch
position
7
M
achine status
information
(In the order of
left to right,
top to bottom)
Frame moving speed(use
to shift between low
speed
and high
speed )
BECS-D56 computerized embroidery machine owner’s manual 13
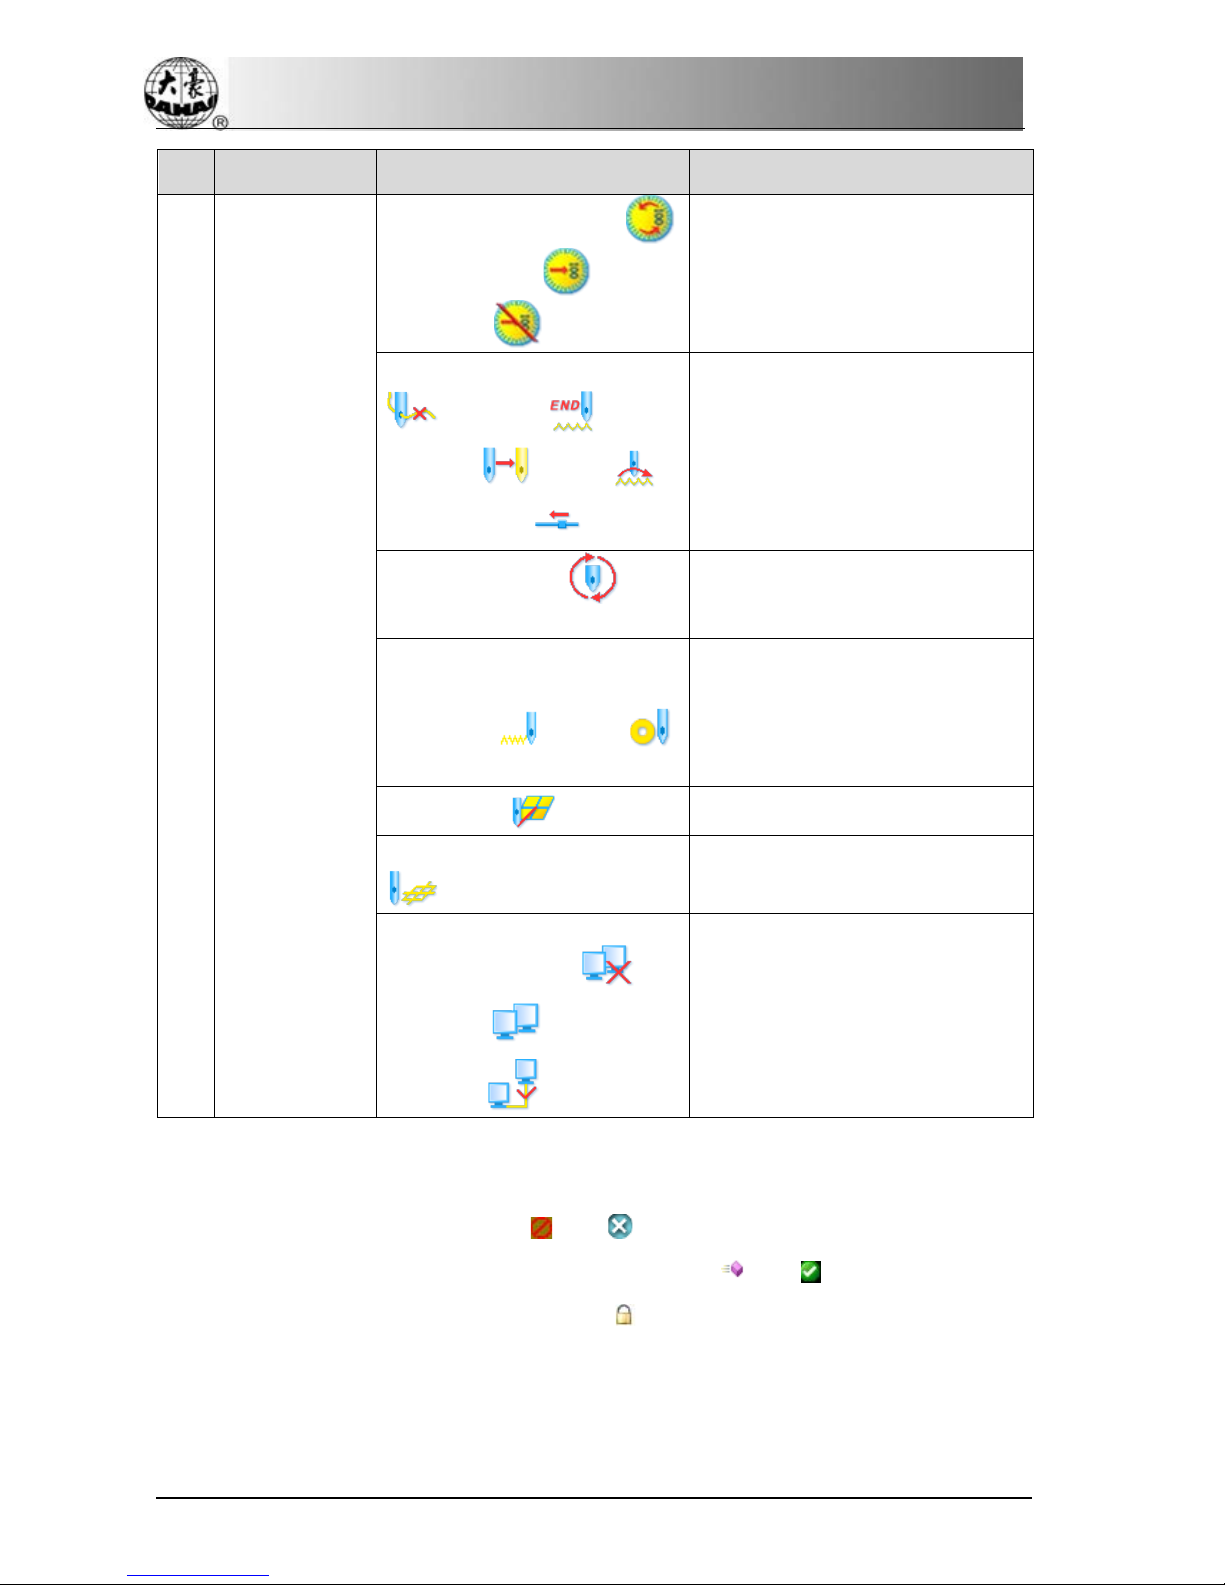
Chapter 2 Operation Instruction
No. Name Figure Description
Main shaft status(running ,
stop in position ,
not stop
in position )
Embroidery status
(
thread break
、finish 、color
changing 、jump 、
pull bar to stop
)
Cyclic embroidery
, none
cyclic embroidery
Assistant embroidery status/
lockstitch/special embroidery
(lockstitch , sequin ,
etc.)
Off-set point
Assistant embroidery mode
Network status
(disconnected 、
connected 、successfully
registered
)
2-4 Notes on Menu Status
If one menu is labeled with the mark “ ” or “ ”, this indicates that this menu can not be
accessed and modified. While if one menu is labeled with “ ” or “ ”, it indicates that this
menu can be accessed and modified. If there is a “ ”, then this parameter can be modified only
if the user relieves the password at first.
14 BECS- D56 computerized embroidery machine owner’s manual
Table of contents
Popular Sewing Machine manuals by other brands


Duerkopp Adler
Duerkopp Adler FLP Series Additional guide Additional accessories guide

Bernina
Bernina Bernette 410 Instruction book

MATRI
MATRI Matrimatic Silver manual

Janome
Janome MEMORY CRAFT 5200 - instruction manual

Husqvarna Viking
Husqvarna Viking 90 operating manual

Singer
Singer 300wl03 instructions