Beko DFS28020W User manual

www.beko.com.tr
EN
Document Number :
1501430100_AC_BEKO_D1_45_EN/06-12-16.(8:21)
Dishwasher
User’s Manual

www.beko.com.tr
Explanation of symbols
Throughout ths User Manual the followng symbols are used:
C
Important nformaton or useful
hnts about usage.
A
Warnng for hazardous
stuatons wth regard to lfe and
property.
B
Warnng for electrc shock.
Packagng materals of the
product are manufactured
from recyclable materals n
accordance wth our Natonal
Envronment Regulatons.
Do not dspose of the packagng materals together wth the domestc or other
wastes. Take them to the packagng materal collecton ponts desgnated by the local
authortes.
Please read this user manual first!
Dear Customer,
We hope that you get the best results from your product whch has been manufactured
wth hgh qualty and state-of-the-art technology. Therefore, please read ths entre
user manual and all other accompanyng documents carefully before usng the product
and keep t as a reference for future use. If you handover the product to someone else,
gve the user manual as well. Follow all warnngs and nformaton n the user manual.
Remember that ths user manual s also applcable for several other models. Dfferences
between models wll be dentfed n the manual.
Ths product was manufactured usng the latest technology n envronmentally frendly condtons.

EN
Document Number :
1501430100_AC_BEKO_D1_45_EN/06-12-16.(8:21)
Dishwasher
User’s Manual

Explanation of symbols
Throughout ths User Manual the followng symbols are used:
C
Important nformaton or useful
hnts about usage.
A
Warnng for hazardous
stuatons wth regard to lfe and
property.
B
Warnng for electrc shock.
Packagng materals of the
product are manufactured
from recyclable materals n
accordance wth our Natonal
Envronment Regulatons.
Do not dspose of the packagng materals together wth the domestc or other
wastes. Take them to the packagng materal collecton ponts desgnated by the local
authortes.
Please read this user manual first!
Dear Customer,
We hope that you get the best results from your product whch has been manufactured
wth hgh qualty and state-of-the-art technology. Therefore, please read ths entre
user manual and all other accompanyng documents carefully before usng the product
and keep t as a reference for future use. If you handover the product to someone else,
gve the user manual as well. Follow all warnngs and nformaton n the user manual.
Remember that ths user manual s also applcable for several other models. Dfferences
between models wll be dentfed n the manual.
Ths product was manufactured usng the latest technology n envronmentally frendly condtons.

CONTENTS
1 INSTRUCTIONS FOR SAFETY
AND ENVIRONMENT 4
General safety.............................................. 4
Intended use................................................. 4
Children’s safety .......................................... 5
Disposing of packaging material............... 5
Transportation of the product .................. 5
Compliance with WEEE Directive and
Disposing of the Waste Product................ 6
Compliance with RoHS Directive............... 6
Package information................................... 6
2 DISHWASHER 7
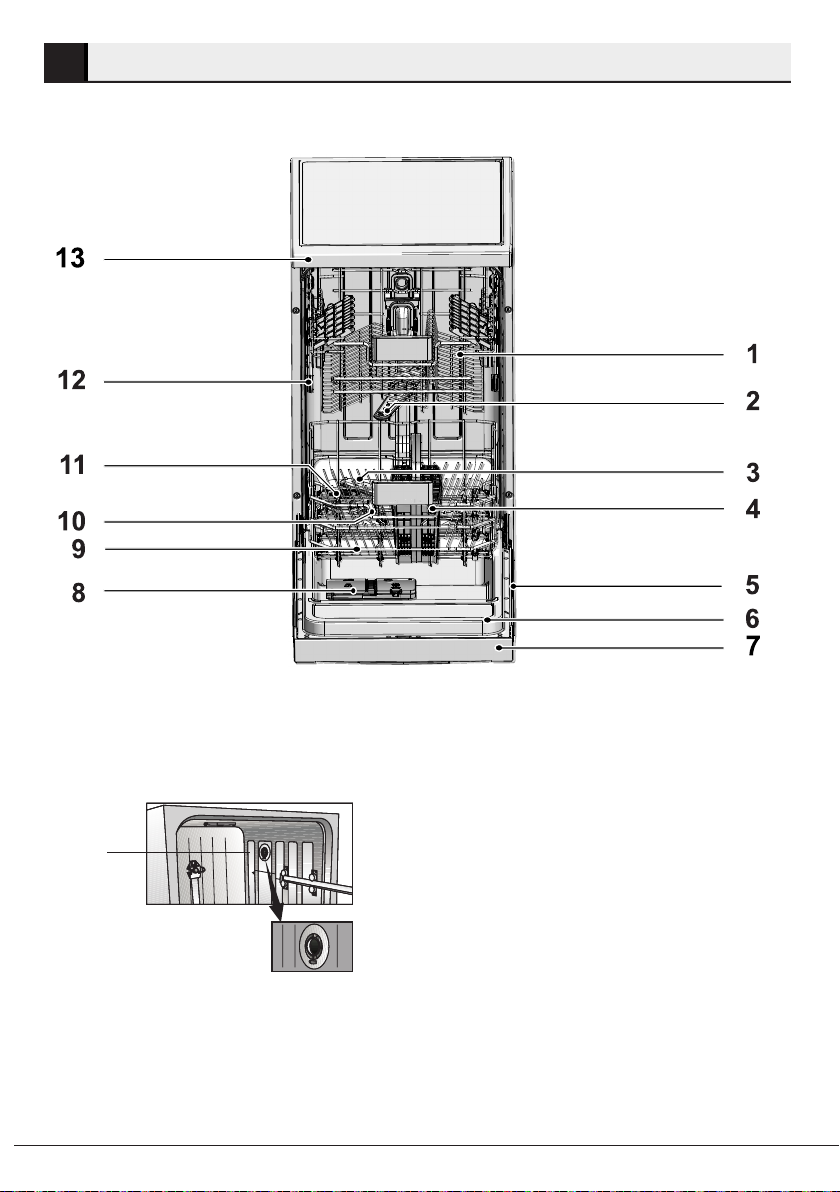
Overview ....................................................... 7
Fan drying system ....................................... 8
Technical specifications............................. 8
3 INSTALLATION 9
Appropriate installation location.............. 9
Connecting water supply ........................... 9
Aquasafe+ ..................................................10
Connection to the drain............................ 10
Adjusting the feet ..................................... 11
Electrical connection................................. 11
Initial use..................................................... 12
4 PREPARATION 13
Tips for energy saving .............................. 13
Water softening system........................... 13
Adjusting the water softening system.. 13
Adding salt .................................................. 15
Detergent.................................................... 16
Adding detergent ...................................... 16
Combined tablet detergents ...................18
Rinse aid ......................................................18
Cutlery basket ............................................ 21
Collapsible lower basket tines................. 21
Collapsible lower basket tines................. 22
Collapsable lower basket wires (2
pieces) ......................................................... 23
Collapsible upper basket tines ................ 23
Upper basket rack......................................24
Adjusting the height of the upper
basket ..........................................................24
Adjusting the height of loaded upper
basket .......................................................... 25
Height setting with empty basket..........26
5 OPERATING THE PRODUCT27
Keys..............................................................28
Preparing the machine .............................28
Programme selection................................28
Auxiliary functions ....................................30
Programming the washing time.............. 31
Cancelling the programme....................... 33
InnerClean...................................................34
End of programme .....................................34
Overowing warning ................................34
6 MAINTENANCE AND
CLEANING 35
Cleaning the outer surface of the
product ........................................................ 35
Cleaning the interior of the machine ..... 35
Cleaning the filters .................................... 35
Cleaning the hose filter ............................36
Cleaning the impellers .............................. 37
Lower impeller ........................................... 37
Upper impeller............................................ 37
7 TROUBLESHOOTING 38

4 Dshwasher / User’s Manual/43 EN
instructions for safety and environment
1
Ths secton contans safety
nstructons that wll help to
get protected from rsk of
personal njury or property
damage. Falure to follow
these nstructons shall vod all
warrantes.
General safety
•Never place the product
on a carpet-covered floor;
otherwse, lack of arflow
beneath the product wll
cause electrcal parts to
overheat. Ths wll cause
problems wth your product.
•Do not operate the product
f the power cable / plug s
damaged! Call the Authorsed
Servce Agent.
•Connect the product to a
grounded outlet protected
by a fuse complyng wth
the values n the “Techncal
specfcatons” table. Do
not neglect to have the
groundng nstallaton made
by a qualfed electrcan.
Our company shall not be
lable for any damages that
wll arse when the product
s used wthout groundng
n accordance wth the local
regulatons.
•The water supply and
dranng hoses must be
securely fastened and reman
undamaged.
•Unplug the product when not
n use.
•Never wash the product by
spreadng or pourng water
onto t! There s the rsk of
electrc shock!
•Never touch the plug wth
wet hands! Never unplug by
pullng on the cable, always
pull out by grabbng the plug.
•The product must
be unplugged durng
nstallaton, mantenance,
cleanng and reparng
procedures.
•Always have the nstallaton
and reparng procedures
carred out by the Authorsed
Servce Agent. Manufacturer
shall not be held lable for
damages that may arse from
procedures carred out by
unauthorsed persons.
•Never use chemcal solvents
n the product. They brng
forth the rsk of exploson.
•When you pull the upper
and lower baskets out
completely, the door of the
product wll bear all the
weght of the baskets. Do not
put other loads on the door;
otherwse, the product may
tlt.
•Never leave the door of
the product open apart
from loadng and unloadng
procedures.
•Do not to open the door
of the product when t s
runnng unless necessary.
Be careful for the rush of hot
vapour when you need to
open the door.
Intended use
•Ths product has been
desgned for domestc use.

Dshwasher / User’s Manual 5 / 43 EN
instructions for safety and environment
•It must be used to do the
domestc type dshes only.
•Ths applance s ntended
to be used n household and
smlar applcatons such as:
- Staff ktchen areas n shops,
offces and other workng
envronments;
- Farm houses;
- By clents n hotels, motels
and other resdental type
envronments;
- Bed and breakfast type
envronments
•Only dshwasher safe
detergents, rnse ads and
addtves must be used.
•The manufacturer waves
any responsblty arsen
from ncorrect usage or
transportaton.
•The servce lfe of your
product s 10 years. Durng
ths perod, orgnal spare
parts wll be avalable to
operate the product properly.
•Ths product should not
be used by persons wth
physcal, sensory or mental
dsorders or unlearned
or nexperenced people
(ncludng chldren)
unless they are attended
by a person who wll be
responsble for ther safety
or who wll nstruct them
accordngly for use of the
product.
Children’s safety
•Electrcal products are
dangerous for the chldren.
Keep chldren away from the
product when t s n use. Do
not let them to tamper wth
the product.
•Do not forget to close the
door of the product when
leavng the room where t s
located.
•Store all detergents and
addtves n a safe place
away from the reach of the
chldren.
Disposing of
packaging material
Packagng materals are
dangerous to chldren. Keep
packagng materals n a safe
place away from reach of the
chldren.
Packagng materals of the
product are manufactured from
recyclable materals. Dspose
of them properly and sort n
accordance wth recycled waste
nstructons. Do not dspose
of them wth normal domestc
waste.
Transportation of the
product
A
If you need to move the
product, do t n uprght
poston and hold from
the rear sde. Slantng
the product onto ts
front sde may cause
the electronc parts n t
get wet and damaged.

6 Dshwasher / User’s Manual/43 EN
instructions for safety and environment
1. Unplug the product before
transportng t.
2. Remove water dranage and
water supply connectons.
3. Dran the remanng water n
the product completely.
Compliance with
WEEE Directive and
Disposing of the
Waste Product
Ths product comples wth
EU WEEE Drectve
(2012/19/EU). Ths product
bears a classfcaton
symbol for waste electrcal and
electronc equpment (WEEE).
Ths product has been
manufactured wth hgh qualty
parts and materals whch can be
reused and are sutable for
recyclng. Do not dspose of the
waste product wth normal
domestc and other wastes at the
end of ts servce lfe. Take t to
the collecton center for the
recyclng of electrcal and
electronc equpment. Please
consult your local authortes to
learn about these collecton
centers.
Compliance with RoHS
Directive
The product you have purchased
comples wth EU RoHS Drectve
(2011/65/EU). It does not contan
harmful and prohbted materals
specfed n the Drectve.
Package information
Packagng materals of the
product are manufactured
from recyclable materals n
accordance wth our Natonal
Envronment Regulatons. Do
not dspose of the packagng
materals together wth the
domestc or other wastes. Take
them to the packagng materal
collecton ponts desgnated by
the local authortes.

Dshwasher / User’s Manual 7 / 43 EN
Dishwasher
2
Overview
1. Upper basket
2. Upper mpeller
3. Lower mpeller
4. Slverware basket
5. Ratng Label
6. Door
7. Control panel
8. Detergent dspenser
9. Lower basket
10. Flters
11. Salt reservor ld
12. Upper basket ral
13. Tabletop (depends on model)
14. Fan dryng system (depends on model)
14

8 Dshwasher / User’s Manual/43 EN
Dishwasher
Technical specications
Compliance to standards and test data / EC declaration of conformity
Ths product comples wth the followng EU drectves;
Development, producton and sales stages of ths product comply wth the safety
rules ncluded n all pertanng European Communty regulatons.
2014/35/EU, 2014/30/EU, 93/68/EC, IEC 60436/DIN 44990, EN 50242
Power nput 220-240 V, 50 Hz (see ratng label)
Total power consumpton 1800-2100 W (see ratng label)
Heater power consumpton 1800 W (see ratng label)
Total current (depends on the model) 10 A (see ratng label)
Dran pump power consumpton 30 W (see ratng label)
Water pressure 0.3 –10 bar (= 3 – 100 N/cm = 0.01-1.0
Mpa)
C
Techncal specfcatons may be changed wthout pror notce to mprove the
qualty of the product.
C
Fgures n ths manual are schematc and may not match the product exactly.
C
Values stated on the markngs of the product or n the prnted documents
accompanyng the product are obtaned n the laboratory on bass of the
relevant standards. Dependng on operatonal and envronmental condtons of
the product, these values may vary.
Note for test nsttutons:
Data requred for performance tests shall be provded upon request. Requests can be
e-maled to the followng address:
dshwasher@standardloadng.com
Do not forget to provde the code, stock and seral numbers of the product to be tested n
your request e-mal along wth your contact nformaton. Code, stock and seral numbers of
the product may be found on the type label attached to the sde wall of the door.
Fan drying system
(depends on model)
Fan dryng system ensures effcent dryng of your dshes.
It s normal to hear a dfferent sound than that of washng cycle durng fan operaton.

Dshwasher / User’s Manual 9/ 43 EN
3Installation
Refer to the nearest Authorsed Servce
Agent for nstallaton of your product. To
make the product ready for use, make sure
that the electrcty, tap water supply and
water dranage systems are approprate
before callng the Authorsed Servce
Agent. If they are not, call a qualfed
techncan and plumber to have any
necessary arrangements carred out.
C
Preparaton of the locaton
and electrcal, tap water and
waste water nstallatons at the
place of nstallaton s under
customer's responsblty.
B
Installaton and electrcal
connectons must be carred
out by the Authorsed Servce
Agent. Manufacturer shall
not be held responsble
for damages arsng from
processes carred out by
unauthorsed persons.
A
Pror to nstallaton, vsually
check f the product has any
defects on t. If so, do not have
t nstalled. Damaged products
cause rsks for your safety.
C
Make sure that the water nlet
and dscharge hoses are not
folded, pnched or crushed
whle pushng the product nto
ts place after nstallaton or
cleanng procedures.
When placng the product, pay attenton
not to damage the floor, walls, ppng, etc.
Do not hold the product from ts door or
panel to move t.
Appropriate installation
location
•Place the product on a sold and flat
floor that has suffcent load carryng
capacty! The product must be
nstalled on a flat surface n order for
the door to be closed comfortably and
securely.
•Do not nstall the product at places
where temperature may fall below
0ºC.
•Place the product at least 1 cm away
from the edges of other furnture.
•Place the product on a rgd floor. Do
not place t on a long ple rug or smlar
surfaces.
B
Do not place the product on the
power cable.
•Make sure that you select a locaton
that wll allow you to load and unload
the dshes n a fast and comfortable
manner.
•Install the product n a place close to
the tap and the dran hole. Select the
nstallaton locaton by consderng
that t wll not be changed after the
connectons are made.
Connecting water supply
C
We recommend attachng a
flter on the house/apartment
supply water nlet to protect
the machne from damages
that may arse from mpurtes
(sand, drt, rust, etc.) comng
from the urban water supply
system or from your own water
system as well as to prevent
complants such as yellowng or
sludge accumulaton at the end
of washng.

10 Dshwasher / User’s Manual/43 EN
Installation
Permtted water temperature: up
to 25°C
The dshwasher may not be connected to
open warm water devces or flow-through
water heaters.
•Do not use old or used water nlet
hose on the new product. Use the new
water nlet hose suppled wth the
product.
•Connect the water nlet hose drectly
to the water tap. Pressure comng
from the tap should be mnmum 0.3
and maxmum 10 bars. If the water
pressure exceeds 10 bars, a pressure
relef valve should be nstalled n
between.
•Open the taps completely after
makng the connectons to check for
water leaks.
C
Use a screw-on hose connector
to connect the water nlet hose
to a water tap wth a ¾ nch
external thread. If requred, use
a flter nsert to flter deposts
from the ppes.
A
For your safety, close the water
nlet tap completely after the
washng programme s over.
Aquasafe+
(depends on model)
The Aquasafe+ system protects aganst
water leaks that may occur at the hose
nlet.Water contact wth the valve box of
the system must be avoded to prevent
damage to the electrcal system. If the
Aquasafe+ system s damaged, unplug the
product and call the Authorsed Servce
Agent.
A
As the hose set contans
electrcal connectons and
assembles, never shorten
or lengthen the hose wth
extenson hoses.
Connection to the drain
Water dscharge hose can drectly be
connected to the dran hole or snk’s
dranage. The length of ths connecton
must be mn. 50 cm and max. 100 cm from
the floor. A dscharge hose longer than 4
meters causes drty washng.
Attach the water dscharge hose to the
dranppe wthout bendng t. Tghtly fx
the water dscharge hose to the dranppe
n order to prevent any dslocaton of the
water dscharge hose durng operaton of
the product.

Dshwasher / User’s Manual 11/43 EN
Installation
C
Dranppe must be connected
to the sewage system and t
should not be connected to any
surface water.
Adjusting the feet
If the door of the product cannot be closed
properly or f the product swngs when you
push t slghtly, then you need to adjust
the feet of the product. Adjust the feet of
the product as llustrated n the nstallaton
manual suppled wth the product.
Electrical connection
Connect the product to a grounded outlet
protected by a fuse complyng wth the
values n the “Techncal specfcatons”
table. Our company shall not be lable for
any damages that wll arse when the
product s used wthout groundng n
accordance wth the local regulatons.
•Connecton must comply wth natonal
regulatons.
•Power cable plug must be wthn easy
reach after nstallaton.
B
Unplug the product after the
washng programme s over.
•The voltage and allowed fuse or
breaker protecton are specfed n
the “Techncal specfcatons” secton.
If the current value of the fuse or
breaker n the house s less than 16
Amps, have a qualfed electrcan
nstall a 16 Amp fuse.
•The specfed voltage must be equal to
your mans voltage.
•Do not make connectons va
extenson cables or mult-plugs.
B
Damaged power cables must
be replaced by the Authorsed
Servce Agent.
B
If your dshwasher s equpped
wth nternal llumnaton, lamp
should only be replaced by the
Authorsed Servce Agent n
case of falures that may occur
on the lamp.
B
If the product has a falure, t
should not be operated unless
t s repared by the Authorsed
Servce Agent! There s the rsk
of electrc shock!

12 Dshwasher / User’s Manual/43 EN
Installation
Initial use
Before startng to use the product, make
sure that all preparatons are made n
accordance wth the nstructons n
sectons “Important safety nstructons”
and “Installaton”.
•To prepare the product to do the
dshes, perform frst operaton n the
shortest programme wth detergent
whle the machne s empty. Durng
the ntal use, fll the salt reservor
wth 1 ltre of water pror to fllng t
wth salt.
A
There mght be a small amount
of water left n the product
after factory qualty control
tests. Ths has no harm on the
product.

Dshwasher / User’s Manual 13/43 EN
Preparation
4
Tips for energy saving
Followng nformaton wll help you use
the product n an ecologcal and energy-
effcent manner.
Wpe away any coarse food remnants on
the dshes before puttng them n the
product. Operate the product after fllng t
completely. When selectng a programme,
consder the table of “Programme data and
average consumpton values”.
Do not put more detergent than suggested
on the detergent package.
Water softening system
C
Your dshwasher requres soft
water. If the hardness of the
water s above 6°dH, the water
must be softened and descaled.
Otherwse, ons that create
the hardness wll accumulate
on the surfaces of the dshes
and may adversely affect the
washng, shnng and dryng
performances of the product.
The product s equpped wth a water
softenng system whch reduces the
hardness of ncomng water. Ths system
softens the supply water that enters
nto the product to a level that wll allow
washng the dshes wth the requred
qualty.
Adjusting the water
softening system
Cleanng, rnsng and dryng performance of
your dshwasher wll ncrease when water
softenng system s adjusted properly.
Adjust the new water hardness level
accordng to the Water hardness level
nstructon n ths booklet.
Use the test strp suppled wth the product
accordng to the steps gven below to
determne hardness level of your supply
water.

14 Dshwasher / User’s Manual/43 EN
Installation
ab cde f
Remove the test
strip from the
packet.
Turn on the tap and
let the water run for
about a minute.
Hold the test strip in
the water for about
a second.
Remove the test
strip from the water
and shake it.
Wait for 1 minute. The test strip shows
you the hardness
level.
1 Second
1 Minute
1 min.
After determnng hardness level of the supply water:
1. Turn on the machne, press Tme Delay and P+/P keys smultaneously. After the
countdown (3,2,1) s dsplayed keep the keys pressed for a whle.
2. Press P+/P key to actvate the (r..) poston.
3. Usng Tme Delay key, adjust water hardness level accordng to the hardness of the supply
water. See “Water hardness level adjustment table” for correct settng.
4. Press On / Off key to save the settng.
Water hardness level adjustment table
Hardness
Level
English Water
Hardness °dE
German Water
Hardness °dH
French Water
Hardness °dF Water Hardness Level Indicator
0th Level 0-5 0-4 0-8 Press the Time Delay key to switch the water hardness
level to position 1. (r1)
1st Level 6-9 5-7 9-13
2nd Level 10-15 8-12 14-22 Press the Time Delay key to switch the water hardness
level to position 2. (r2)
3rd Level 16-19 13-15 23-27 Press the Time Delay key to switch the water hardness
level to position 3. (r3)
4th Level 20-24 16-19 28-34 Press the Time Delay key to switch the water hardness
level to position 4. (r4)
5th Level 25-62 20-50 35-90 Press the Time Delay key to switch the water hardness
level to position 5. (r5)
Perform the same hardness level adjustment that you have set on the control panel also wth
the regeneraton adjustment swtch. For example, f you have adjusted to “3rd level” n the
control panel, also set the regeneraton adjustment swtch to 3rd level.
Regeneration Adjustment Switch
0th Level 1st Level 2nd Level 3rd Level 4th Level 5th Level
1 1 2 3 4 5

Dshwasher / User’s Manual 15/43 EN
Preparation
C
We recommend usng granular
or powder softenng salts. Do
not use salts that are nsoluble
n water such as table salt or
common salt. Performance of
water softenng system may
get worse n tme.
C
Salt reservor wll fll wth water
when you start the product.
Therefore, add the softenng
salt before startng the
machne.
1. Frst take the lower basket out to add
softenng salt.
2. Turn the salt reservor ld counter
clockwse to open t (A, B).
If the hardness level of the supply water s
above 90 °dF or f you are usng well water,
then t s recommended to use water
purfcaton devces and specal flters.
If the hardness level of the supply water s
below 13°dF, there s no need to use salt
n your dshwasher. If ths s the case, “No
Salt Warnng Indcator” (f any) llumnates
contnuously on the panel of your machne.
If the water hardness level adjustment
s set to level 1, the “No salt warnng
ndcator” wll llumnate contnuously
although t s not necessary to use salt. If
you use salt under ths condton, salt wll
not be consumed and the Salt ndcator wll
not llumnate.
C
If you move your house, t s
necessary to readjust water
hardness level of your machne
by consderng the nformaton
gven above accordng to the
hardness level of the supply
water n your new locaton.
Your machne wll dsplay the
most recently adjusted water
hardness level.
Adding salt
Water softenng system needs to be
regenerated n order that the product
operates wth the same performance
contnuously. Dshwasher salt s used for
ths purpose.
C
Use only specal softenng salts
produced partcularly for the
dshwashers n your machne.

16 Dshwasher / User’s Manual/43 EN
Preparation
the salt, run the machne empty n the
shortest programme to dssolve and
wash away the scattered salt n the
machne.
C
Snce dfferent salt brands
n the market have dfferent
partcle szes and snce the
water hardness may vary,
dssoluton of the salt n water
may take a couple of hours.
Therefore, Salt Indcator
remans on for a whle after
addng salt nto the machne.
Loose salt grans can cause rust
marks n your machne f not
rnsed away. Only fll salt just
before a programme s run.
Detergent
You can use powder, lqud/gel and tablet
detergents n the machne.
C
Only use the detergents
produced partcularly for use
wth dshwashers. Never
use washng up lquds. We
recommend you not to use
detergents that contan
chlorne and phosphate as
they are harmful for the
envronment.
Adding detergent
C
Refer to the “Programme
Table” to determne the correct
amount of detergent for the
selected programme.
C
Salt reservor wll fll wth water
when you start the product.
Therefore, add the softenng
salt before startng the
machne.
C
Before ntal use, fll the water
softenng system wth 1 ltre of
water (C).
3. Fll the salt reservor wth salt by usng
salt funnel (D). To speed up dssoluton
rate of salt n water, str t wth a
spoon.
C
You can put about 2 kg of
dshwasher salt nto the salt
reservor.
4. Replace the ld and tghten t securely
when the reservor s full.
5. If you wll not start a washng
programme mmedately after addng

Dshwasher / User’s Manual 17/43 EN
Preparation
C
If dshes have been watng
for a long tme and have
dred resdues, fll the 5 cm
compartment too (2).
3. Close the detergent dspenser ld by
pressng on t lghtly. A “clck” wll be
heard when the ld s closed.
C
In programmes wth prewash
and hgh temperature, n whch
you use tablet detergents,
make sure that the detergent
dspenser ld s closed frmly.
C
Use powder detergent n short
programmes wthout prewash
snce the solublty of the tablet
detergent changes dependng
on the temperature and tme.
A
Excessve usage of powder
detergents wll cause the
detergent not dssolve
completely and wll also cause
scratches on the glassware.
C
In order to have good washng
and dryng results, always
follow the nstructons on the
detergent packagng. If you
have further questons, we
recommend to contact wth the
producer of the detergent.
A
Do not put solvents nto the
detergent dspenser. There s
rsk of exploson!
Put the detergent nto the detergent
dspenser just before operatng the
machne as llustrated below.
1. Push the latch to rght to open the
detergent dspenser ld (A).
2. Put suggested amount of powder,
lqud/gel or tablet detergent n the
dspenser.
C
Insde the detergent dspenser,
there are level markngs that
help you use approprate
amount of detergent. When
brmful, detergent dspenser
wll contan 40 cm of
detergent. Fll detergent up to
15 cm or 25 cm level marks
n the detergent dspenser
accordng to fullness of the
machne and/or solng degree
of the dshes (1).

18 Dshwasher / User’s Manual/43 EN
Preparation
Combined tablet detergents
Combned tablet detergents exhbt water
softenng and / or rnse ad effect n
addton to detergent effect. Some types
of these detergents also contan specal-
purpose washng chemcals such as glass
and stanless steel protectors.
Combned tablet detergents are avalable
as 3n1, 5n1, Alln1 etc. They functon
only up to a specfc degree of water
hardness. Above ths lmt regeneraton
salt and rnse ad must be added. Refer to
the nstructons on the packagng of the
combned detergent whether t s sutable
for the hardness level of the water supply.
C
Whle usng combned tablet
detergents contact wth
the detergent producers f
the dshes are wet and/or f
you notce lmescale spots
partcularly on glasses after the
washng programme s over.
C
The best washng performance
n dshwashers s obtaned
by usng detergent, rnse
ad and water softenng salt
ndvdually.
When you swtch to powder, lqud/gel or
tablet detergent from a combned tablet
detergent:
1. Make sure that salt and rnse ad
reservors are full.
2. Set the water hardness to the hghest
level and perform an empty run.
3. After the empty washng cycle, revew
the user manual and readjust the
water hardness level so as to sut the
water supply.
4. Make the approprate rnse ad
settngs.
C
Dependng on the model,
salt ndcator and/or rnse ad
ndcator must be enabled agan
f they were dsabled before.
Rinse aid
C
The rnse ad used n
dshwashers s a specal
combnaton used to ncrease
dryng effcency and prevent
water or lmescale stans on the
washed tems. For ths reason,
care must be pad to have rnse
ad n the rnse ad reservor
and to use rnse ads produced
specally for dshwashers only.
1. Open the ld of the rnse ad reservor
by pressng ts latch (B).
2. Fll the reservor untl “MAX” level.
Table of contents
Other Beko Dishwasher manuals

Beko
Beko BDFS26121XQ User manual

Beko
Beko D2731 User manual

Beko
Beko DFN39533X User manual

Beko
Beko DIN28520 User manual

Beko
Beko DSS28021X User manual

Beko
Beko DDN25402W User manual

Beko
Beko BDUN1E420X User manual

Beko
Beko DEN59533XAD User manual

Beko
Beko DFN05310W User manual

Beko
Beko DFN16420G User manual
Popular Dishwasher manuals by other brands

Amana
Amana Undercounter dishwasher installation instructions

Fisher & Paykel
Fisher & Paykel DishDrawer DD24ST Series installation instructions

Fisher & Paykel
Fisher & Paykel DD24STX6PX1 installation guide

Frigidaire
Frigidaire FDB874RB operating instructions

Merloni
Merloni EVO3 Service manual

Integra
Integra SHV68M03UC manual