Belkin RK5010 User manual

RK5010ek, RK5010ekPDR, and RK5011ek Instructions P35803ec
EN
DE
FR
Belkin Tech Support
Europe: 00 800 223 55 460
For other languages: www.belkin.com/support
RK5010ek, RK5010ekPDR and RK5011ek INSTRUCTIONS
RK5010ek Product RK5010ekPDR Product RK5011ek Product
Inventory Inventory Inventory
Perforated Door (1) Plexiglas Door (1) Perforated Door Assembly (1)
Key (2) Key (2) Key (2)
Instructions
Front Door (RK5010ek and RK5010ekPDR)
1. Take your door and place the bottom hinge pin in the lower left-hand hinge pin holder.
2. While pulling down on the upper hinge pin, move it over and release it in the upper hinge pin holder.
Rear Door Assembly (RK5011ek)
1. Take the left-hand side of your door and place the bottom hinge pin in the lower left-hand hinge pin holder.
2. While pulling down on the upper hinge pin, move it over and release it in the upper hinge pin holder.
3. Keep left-hand door open and repeat steps 1 and 2 for the right-hand side.
RK5010ek or RK5010ekPDR
RK5011ek

RK5010ek, RK5010ekPDR und RK5011ek – Anleitung P35803ec
EN
DE
FR
Belkin Technischer Support
Europa: 00 800 223 55 460
Für andere Sprachen: www.belkin.com/support
RK5010ek, RK5010ekPDR und RK5011ek – ANLEITUNG
RK5010ek RK5010ekPDR RK5011ek
Teileliste Teileliste Teileliste
Tür mit Belüftungsöffnungen (1) Plexiglastür (1) Türsatz mit Belüftungsöffnungen (1)
Schlüssel (2) Schlüssel (2) Schlüssel (2)
Anleitung
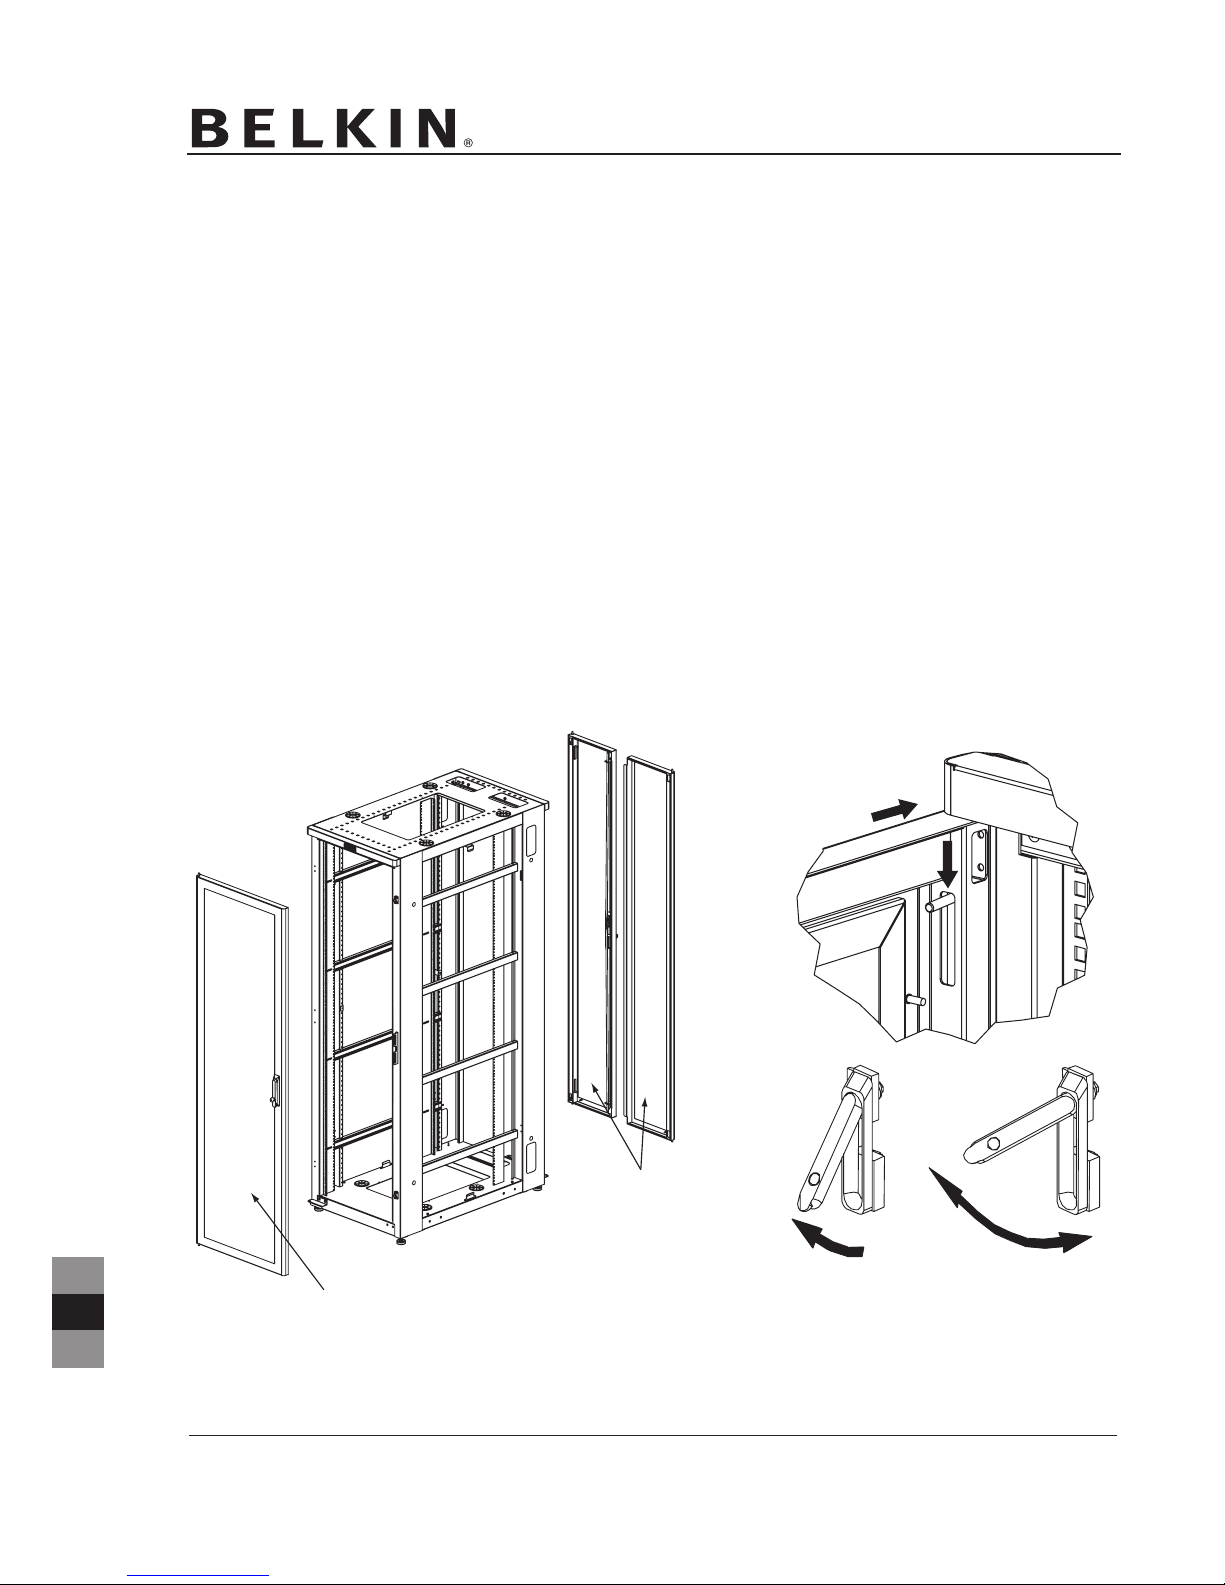
Vordertür (RK5010ek und RK5010ekPDR)
1. Setzen Sie die Tür mit dem unteren Scharnierstift in die unten links befindliche Scharnierstift-Halterung ein.
2. Ziehen Sie den oberen Scharnierstift nach unten, drücken Sie die Tür in Position, und lassen Sie den
Scharnierstift in die obere Scharnierstift-Halterung einrasten.
Rücktür-Satz (RK5011ek)
1. Setzen Sie die linke Türhälfte mit dem unteren Scharnierstift in die unten links befindliche Scharnierstift-
Halterung ein.
2. Ziehen Sie den oberen Scharnierstift nach unten, drücken Sie die Tür in Position, und lassen Sie den
Scharnierstift in die obere Scharnierstift-Halterung einrasten.
3. Lassen Sie die linke Türhälfte offen stehen, und wiederholen Sie Schritt 1 und 2 für die rechte Türhälfte.
RK5010ek oder RK5010ekPDR
RK5011ek

Instructions RK5010ek, RK5010ekPDR et RK5011ek P35803ec
EN
DE
FR
Assistance technique Belkin
Europe : 00 800 223 55 460
Pour toutes les autres langues : www.belkin.com/support
INSTRUCTIONS RK5010ek, RK5010ekPDR et RK5011ek
Produit RK5010ek Produit RK5010ekPDR Produit RK5011ek
Inventaire Inventaire Inventaire
Porte perforée (1) Porte en Plexiglas (1) Ensemble porte perforée (1)
Clé (2) Clé (2) Clé (2)
Instructions
Porte avant (RK5010ek et RK5010ekPDR)
1. Prenez la porte et placez laxe de la charnière du bas dans la retenue de laxe de la charnière inférieure
gauche.
2. Tout en tirant vers le bas sur laxe de la charnière supérieure, déplacez-le et relâchez-le dans la retenue de
laxe de la charnière supérieure.
Porte arrière (RK5011ek)
1. Prenez le côté gauche de la porte et placez laxe de la charnière du bas dans la retenue de laxe de la
charnière inférieure gauche.
2. Tout en tirant vers le bas sur laxe de la charnière supérieure, déplacez-le et relâchez-le dans la retenue de
laxe de la charnière supérieure.
3. Gardez la porte à gauche ouverte et répétez les étapes 1 et 2 pour le côté droit.
RK5010ek ou RK5010ekPDR
RK5011ek

Belkin Ltd.
Express Business Park
Shipton Way, Rushden
NN10 6GL, United Kingdom
+44 (0) 1933 35 2000
+44 (0) 1933 31 2000 fax
Belkin B.V.
Boeing Avenue 333
1119 PH Schiphol-Rijk,
The Netherlands
+31 (0) 20 654 7300
+31 (0) 20 654 7349 fax
Belkin GmbH
Hanebergstrasse 2
80637 Munich,
Germany
+49 (0) 89 143405 0
+49 (0) 89 143405 100 fax
Belkin SAS
130 rue de Silly
92100 Boulogne Billancourt,
France
+33 (0) 1 41 03 14 40
+33 (0) 1 41 31 01 72 fax
© 2005 Belkin Corporation. All rights reserved.
All trade names are registered trademarks of respective manufacturers listed.
RK5010ek, RK5010ekPDR, and RK5011ek Instructions P35803ec
This manual suits for next models
4
Table of contents
Languages:
Popular Door manuals by other brands

Ives
Ives Heavy Duty Offset Top Pivot 7230F installation instructions

Electri-Chef
Electri-Chef DR18S Features

Therma-Tru
Therma-Tru Light Commercial Doors and Frames installation manual

Ives
Ives Flush Knob Pull 428 installation instructions

Open Plan Systems
Open Plan Systems SLIDING DOOR manual

Therma-Tru
Therma-Tru Fiber-Classic Assembly & installation