Bell and Howell Disk Lights User manual
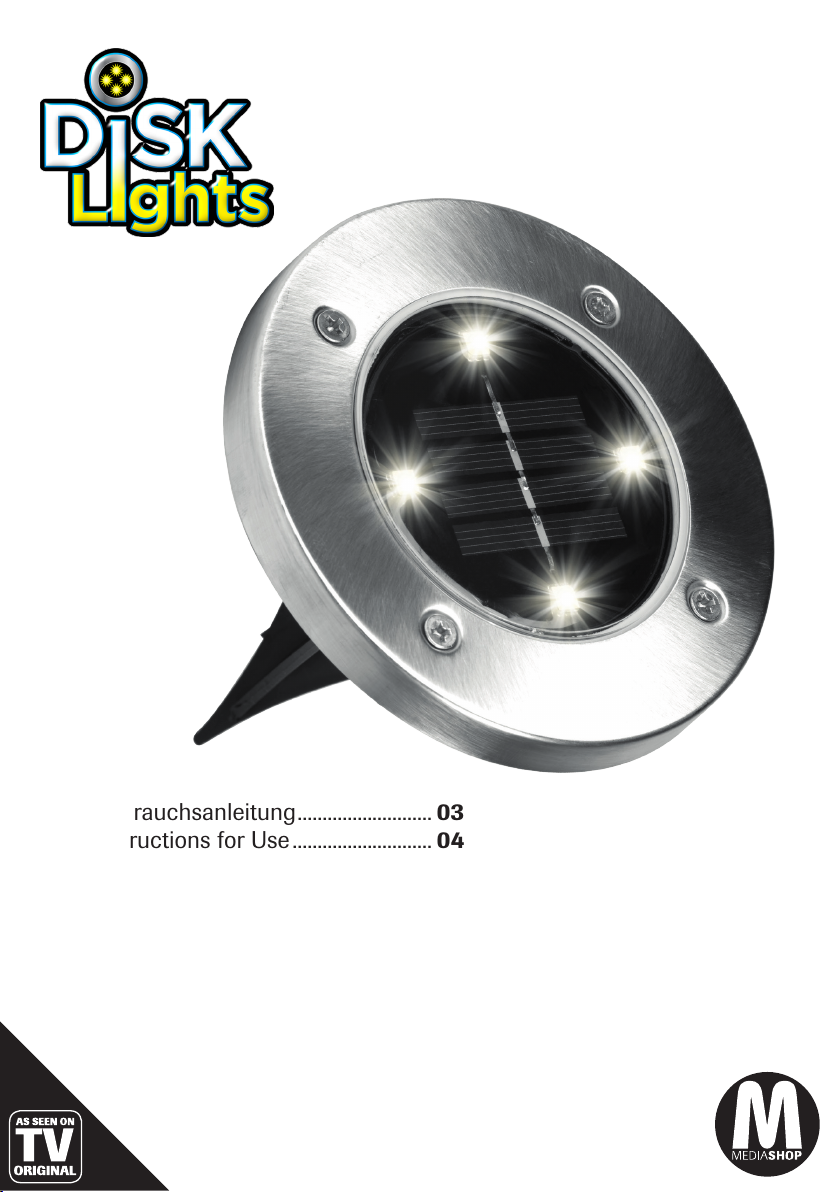
Gebrauchsanleitung........................... 03
Instructions for Use............................ 04
Mode d’emploi...................................... 05
Manuale di utilizzazione................... 07
Gebruiksaanwijzing............................ 08
Használati utasítás.............................. 09
Návod k použití .................................... 11
Návod na použitie ............................... 12
Instrucţiuni de utilizare ..................... 13
2
A
B
ON/OFF
C
#1
#2

3
DE
SICHERHEITSHINWEISE:
Lesen Sie diese Bedienungsanleitung
sorgfältig, bevor Sie die Lampe benutzen!
Beachten Sie die Sicherheitshinweise
bei der Inbetriebnahme der Lampe.
Bewahren Sie die Bedienungsanleitung
zumspäterenNachschlagenauf.Solltedie
Lampe an Dritte weitergegeben werden,
so muss diese Bedienungsanleitung
ebenfalls mit ausgehändigt werden.
• Benutzen Sie die Lampe nicht weiter,
wenn sie beschädigt ist.
• Enthaltene Kleinteile nicht
verschlucken. Kleinteile außerhalb der
Reichweite von Kindern aufbewahren.
Produkt nicht für Kinder geeignet.
• Das Produkt ist kein Spielzeug! Halten
Sie das Gerät von Kindern fern.
• Versuchen Sie nicht, die LED
auszutauschen. Die LED kann
nicht ausgetauscht werden. Bei
Beschädigung entsorgen Sie die
Lampe.
• Achten Sie darauf, dass Haut,
Augen und Schleimhäute nicht mit
Batterieflüssigkeit/-säure in Kontakt
kommen.
• Bei Kontakt mit Batterieflüssigkeit die
betroffenen Stellen sofort mit reichlich
sauberem Wasser spülen und einen
Arzt konsultieren.
SO FUNKTIONIERT ES
• Wählen Sie für Ihre Disk Lights einen Ort mit
tagsüber möglichst viel Sonnenschein.
• Vermeiden Sie Bereiche unter Bäumen oder
Sträuchern, da dies eine vollständige Ladung der
Disk Lights verhindert.
• Die Disk Lights nicht neben einer vorhandenen
Außenbeleuchtung montieren. Der eingebaute
Sensor der Disk Lights verhindert das Einschalten
der Solarleuchten.
• Wenn Sie die Disk Lights in Herbst und Winter
verwenden, bedenken Sie bitte, dass sich die
Akkus aufgrund der geringen Tageslichtstunden
möglicherweise nicht vollständig aufladen. Das
kann die Dauer des Leuchtens der Disk Lights
verkürzen.
• Für die kalten Wintermonate empfehlen wir, die
Disk Lights abzunehmen, um die Geräte vor frost-
und temperaturbedingten Schäden zu bewahren.
MONTAGE
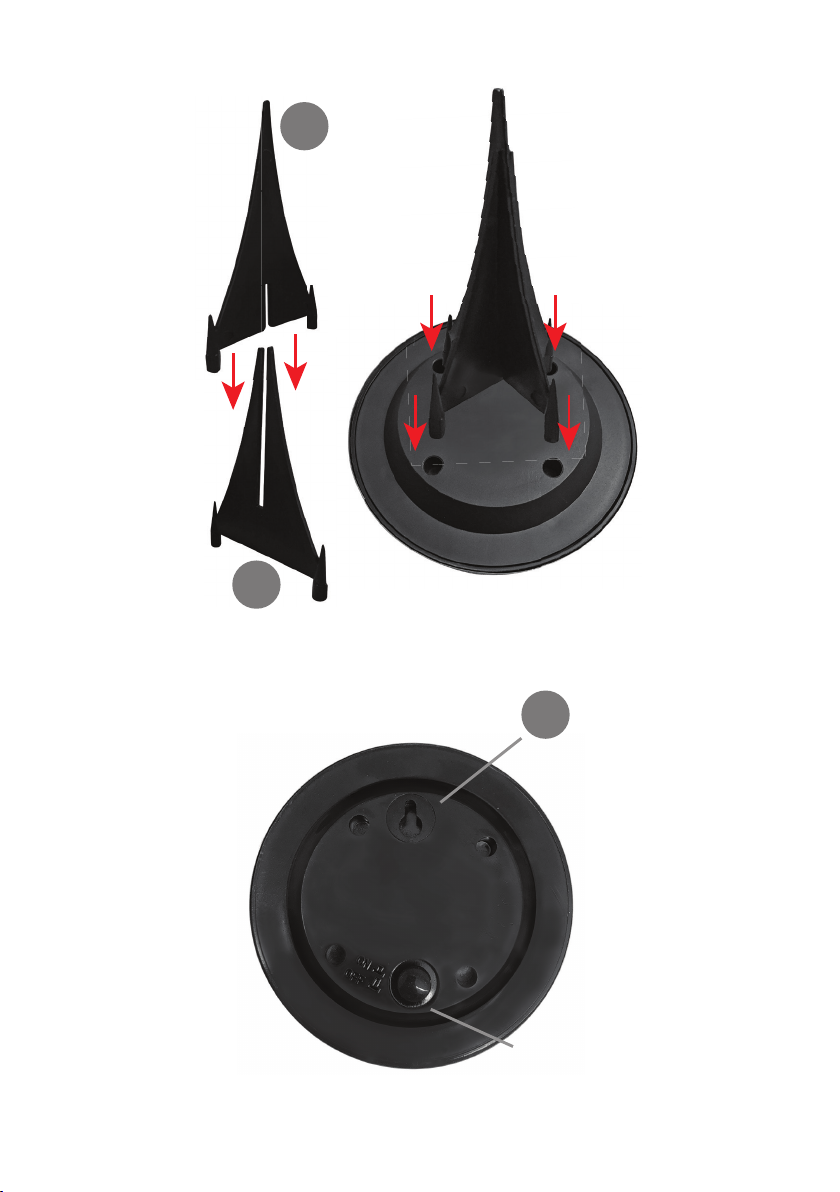
MONTAGE MIT DER HALTERUNG (#1)
(Montage in den Boden)
1. Halterung A in Halterung B schieben.
2. Unbedingt ganz hineindrücken, bis die Enden
aneinander anliegen.
3. Das Ganze in die Öffnung an der Rückseite des
Disk Lights stecken. Hineindrücken, um die
Halterung zu fixieren.
ACHTUNG: Vor der Montage der Halterungen im
Boden unbedingt sichergehen, dass der Erdboden
aufgeweicht ist. Harter Boden kann die Halterungen
beschädigen oder brechen.
MONTAGE AN DER WAND (#2)
(für Außenwand, Zaunpfosten oder Geländer)
1. Eine Schraube in Wand oder Zaunpfosten
schrauben. Die Schraube etwa 1 cm aus der
Wand ragen lassen.
2. Schraube in die Schlüsselloch-Öffnung einführen
(C).
3. Beim Einsatz auf Stufen oder anderen harten
Oberflächen, die Disk Lights flach auf die
Unterlage legen.
ANWENDUNG
1. Bei erstmaligem Einsatz das Disk Lights durch
Betätigen der ON/OFF-Taste einschalten.
Eingerastet – ON, erhoben – OFF. Das Gerät
zum Laden mindestens 8 Stunden direkter
Sonneneinstrahlung aussetzen. VOR
ERSTGEBRAUCH MUSS DAS GERÄT VOLL
AUFGELADEN SEIN. Herrscht kein starker
Sonnenschein, könnte das Aufladen der Batterien
länger dauern.
2. Sobald es dunkel wird, schaltet sich das Disk
Lights ein. Es schaltet sich dann bei Tag bzw. bei
Leerwerden der Batterie ab.
AUSWECHSELN DER BATTERIEN
1. Sind die Disk Lights auch nach vollen 8 Stunden
direkter Sonneneinstrahlung nicht voll aufgeladen,

4
müssen Sie vielleicht Ihre wiederaufladbaren
Batterien auswechseln.
2. Für das Gerät nur wiederaufladbare Ni-MH-
Batterien verwenden. Nicht alte und neue
Batterien mischen.
3. Um das Batteriefach zu öffnen, die 4
Schrauben mit einem Kreuzschraubenzieher
herausschrauben. Abdeckung mit
Gummidichtung abnehmen.
4. Neue wiederaufladbare Batterien einlegen.
Abdeckung wiederanbringen, dabei sichergehen,
dass die Dichtung richtig sitzt, um die Batterie zu
schützen.
5. Schrauben wieder anschrauben.
REINIGUNG & LAGERUNG
• Für optimale Ladeerfolge das Solarmodul
unbedingt regelmäßig mit einem feuchten Tuch
abwischen.
• Ein sauberes Solarmodul nimmt nämlich mehr
Sonnenenergie auf.
• Beim Einlagern der Disk Lights darauf achten,
dass das Gerät ausgeschaltet ist und die
Batterien entnommen sind. Lässt man die
Batterien längere Zeit im Gerät, kann es
Schaden nehmen.
DIE LEDs SIND NICHT AUSWECHSELBAR.
Lieferumfang: 4 x Disk Lights
Technische Daten: 1,2V 600mAh
Entsorgen Sie das Produkt am Ende seiner Lebensdauer nicht mit dem nor-
malen Hausmüll. Bringen Sie es zu einer Sammelstelle zum Recycling von
elektrischen und elektronischen Geräten. Dies wird durch dieses Symbol auf
dem Produkt, in der Bedienungsanleitung und auf der Verpackung angege-
ben. Informieren Sie sich über Sammelstellen, die von Ihrem Händler oder
der lokalen Behörde betrieben werden. Die Wiederverwertung und das Recycling von
Altgeräten ist ein wichtiger Beitrag zum Schutz unserer Umwelt.
Batterien gehören nicht in den Hausmüll.
Bringen Sie diese zu einer autorisierten Sammelstelle.
Dieses Produkt entspricht den Europäischen Richtlinien.
Schutzklasse III
Hergestellt in China
EN
SAFETY INSTRUCTIONS: please read
these operating instructions carefully before
using the light. Please refer to the safety
instructions when operating the light. Keep
the operating instructions in a safe place
for future use. Should the light be given to
a third party, please ensure these operating
instructions are also handed over.
• Discontinue use of the light if it is
damaged.
• Ensure the small parts are not
swallowed. Keep small parts out of the
reach of children. The product is not
suitable for children.
• This product is not a toy! Keep the
appliance away from children.
• Do not attempt to replace the LED bulb.
The LED bulb cannot be replaced. If
damaged, the light should be disposed of.
• Prevent battery fluid/acid from
coming into contact with skin, eyes
and mucous membranes.
• In case of contact with battery acid
the affected areas should rinsed
immediately with plenty of clean
water and a doctor should be
consulted.
HOW IT WORKS
• When picking a place to install your Disk Lights,
choose a location with maximum sun exposure
during the day.
• Avoid areas under trees or bushes as this will
prevent a proper charge of the Disk Lights.
• Do not install Disk Lights near an existing
outdoor light. The built-in sensor of the Disk
Lights will prevent it from turning the solar lights
on.
• When using the Disk Lights in the fall and winter,
please note that due to fewer daylight hours, the
batteries might not charge fully. This may limit the
amount of time the Disk Lights will be on.
• During cold winter months, we recommend to
remove the Disk Lights to prevent damage to the
units due to frost and freezing temperatures.
INSTALLATION
STAKE ASSEMBLY (#1)
(for in-ground installation)
1. Slide stake A into stake B.
2. Make sure to push all the way in until the ends

5
are aligned with each other.
3. Insert into the hole on the back of the Disk Lights.
Push in to secure the stake.
IMPORTANT: Before mounting the stakes into the
ground, please make sure that the soil is softened.
Hard soil may damage or break the stakes.
WALL INSTALLATION (#2)
(for outdoor wall, fence post, or deck rail)
1. Install 1 screw into the wall or fence post. Leave
about an eighth of an inch of screw above the
surface.
2. Slide the screw into the keyhole opening (C).
3. If using on steps or any other hard surface, simply
lay the Disk Lights flat on the surface.
USAGE
1. When using for the first time use, turn the Disk
Lights ON by pressing the ON/OFF Button. Pressed
in - ON, Raised up - OFF. Leave the unit under
direct sunlight for solar charging at least 8 hours.
UNIT NEEDS TO BE FULLY CHARGED BEFORE
INITIAL USE. If there isn’t ample sunlight, it may
take longer for the batteries to charge.
2. Once it becomes dark, the Disk Lights will turn
on. The Disk Lights will turn off during the day or
if unit runs out of battery.
REPLACING BATTERIES
1. If your Disk Lights are not holding a full charge
even after a complete 8 hours of direct sunlight,
you may need to change your rechargeable
batteries.
2. Unit uses Ni-MH rechargeable batteries only. Do
not mix old and new batteries.
3. To access the battery compartment, remove 4
screws using Phillips head screwdriver. Remove
the cover with rubber seal.
4. Place new rechargeable batteries. Replace the
cover and make sure the seal is placed correctly
for battery protection.
5. Replace the screws.
CLEANING AND STORAGE
• Make sure to regularly wipe down the solar panel
with a damp cloth for best charging results.
• Clean solar panel will be able to absorb more sun
energy.
• When storing Disk Lights, make sure to turn
off the unit and remove the batteries. Leaving
batteries inside the unit for an extended periods
of time may cause damage to the unit.
THE LED’s ARE NON REPLACEABLE.
Components included: 4 pieces Disk Lights
TECHNICAL DATA: 1,2V 600mAh
Do not dispose this product at the end of its service life through normal dome-
stic waste. It has to be disposed through a collection agency that recycles
electric and electronic devices. This is pointed out by the symbol on the pro-
duct, in the instruction manual, and on the packaging. Please inquire about
local collection agencies that may be operated by your distributor or your mu-
nicipal administration. By recycling, making use of the materials, or other forms of recy-
cling old units you are making an important contribution to protecting our environment.
Batteries are not part of your household waste and must be taken to an
authorized collection point.
This product complies with the European directives.
Safety Class III
Made in China
FR
CONSIGNES DE SECURITE :
Merci de lire attentivement ce mode
d’emploi avant d’utiliser la lampe !
Respectez les consignes de sécurité
lors de la mise en service de la lampe.
Conservez le présent mode d’emploi afin
de pouvoir vous y référer ultérieurement.
Si la lampe est transmise à des tiers,
merci de leur donner également ce
mode d’emploi.
• Merci de ne plus utiliser la lampe dès
qu’elle est abîmée.
• Veuillez ne pas ingérer les petites
pièces. Tenez les petites pièces hors
de portée des enfants. Le produit ne
convient pas aux enfants.
• Le produit n’est pas un jouet !
Conservez-le à l’écart des enfants.
• N’essayez pas de remplacer la LED.
La LED ne peut pas être changée. En
cas de dommages, merci de mettre au
rebut la lampe.
• Eviter que le liquide/l’acide de batterie
n’entre en contact avec la peau, les
yeux ou les muqueuses.

6
• En cas de contact avec l’acide de
batterie, rincer immédiatement les
zones atteintes en abondance avec de
l’eau claire, puis consulter un médecin.
FONCTIONNEMENT
• Lorsque vous choisirez un endroit pour installer vos
Disk Lights, choisissez l’emplacement le plus exposé
au soleil en journée.
• Évitez de les placer sous des arbres ou des buissons
puisque cela empêche la recharge appropriée des
Disk Lights.
• N’installez pas les Disk Lights à proximité d’une
lumière extérieure existante. Le capteur intégré des
Disk Lights les empêchera les lumières solaires de
s’allumer.
• Si vous utilisez les Disk Lights en automne et en
hiver, il se peut que les piles ne rechargent pas
complètement à cause du nombre d’heures réduit
de lumière naturelle. Ainsi, les Disk Lights resteront
allumés moins longtemps.
• Il est recommandé de retirer les Disk Lights pendant
la période hivernale afin que le gel et les températures
glaciales n’endommagent pas les unités.
INSTALLATION
ENSEMBLE PIQUET (#1)
(pour une installation dans la terre)
1. Faites glisser le piquet A à l’intérieur du piquet B.
2. Assurez-vous de le pousser entièrement jusqu’à
ce que les extrémités soient alignées les unes par
rapport aux autres.
3. Introduisez-le dans l’orifice arrière du Disk Lights.
Poussez pour fixer le piquet.
IMPORTANT : avant de monter les piquets dans la
terre, assurez-vous qu’elle est malléable. Une terre
dure peut endommager ou casser les piquets.
INSTALLATION MURALE (#2)
(pour mur extérieur, poteau de clôture ou terrasse)
1. Placez 1 vis dans le mur ou poteau de clôture. Laissez
environ un huitième d’un pouce (2,54 cm) de la vis
au-dessus de la surface.
2. Faites glisser la vis dans l’ouverture en trou de serrure
(C).
3. Pour une installation sur des marches ou toute autre
surface dure, posez à plat les Disk Lights sur la
surface.
UTILISATION
1. Lors de la première utilisation, allumez les Disk
Lights en appuyant sur le bouton ON/OFF.
Bouton appuyé – ON, bouton relevé - OFF Laissez
l’unité sous la lumière directe du soleil pour une
recharge solaire d’au moins 8 heures. L’UNITÉ
DOIT ÊTRE ENTIÈREMENT CHARGÉE AVANT
LA PREMIÈRE UTILISATION. S’il n’y a pas assez
de lumière solaire, il faudra compter plus de
temps pour que les piles soient rechargées.
2. Les Disk Lights s’allument à la tombée de la nuit
et s’éteignent en journée ou si la pile de l’unité est
épuisée.
REMPLACEMENT DES PILES
1. Si vos Disk Lights ne tiennent pas une recharge
complète même après 8 heures de lumière solaire
directe, il se peut que vous deviez remplacer les
piles rechargeables.
2. L’unité utilise des piles rechargeables Ni-MH
uniquement. Ne mélangez pas les piles usées et
neuves.
3. Pour accéder au compartiment des piles, retirez
les 4 vis à l’aide d’un tournevis cruciforme. Retirez
le couvercle avec joint en caoutchouc.
4. Introduisez les piles rechargeables neuves.
Remettez le couvercle en place et assurez-vous
que le joint est correctement placé pour protéger
les piles.
5. Remettez les vis en place.
NETTOYAGE ET RANGEMENT
• Assurez-vous de nettoyer régulièrement le
panneau solaire avec un chiffon humide afin
d’optimiser la recharge.
• Un panneau solaire propre absorbera plus
d’énergie solaire.
• Lorsque vous rangerez les Disk Lights, assurez-
vous d’éteindre l’unité et de retirer les piles.
Laisser les piles à l’intérieur de l’unité pendant
une période prolongée pourrait l’endommager.
LES LED NE SONT PAS REMPLAÇABLES.
Éléments inclus : 4 Disk Lights
Caractéristiques techniques: 1,2V 600mAh
Ne jetez pas le produit aux déchets ménagers à la fin de sa durée de vie.
Apportez-le à un point de collecte pour le recyclage des appareils électriques
et électroniques. Cela est indiqué par le symbole présent sur le produit, le
mode d’emploi et l’emballage. Informez-vous des points de collecte mis à di-
sposition par votre commerçant ou l’autorité locale. La réutilisation et le recy-
clage des appareils usagés sont une contribution importante à la protection de notre
environnement.
ne pas jeter les piles aux déchets ménagers. Les apporter à un point de
collecte agréé.
Ce produit satisfait aux normes européennes.
Classe de protection III
Fabriqué en Chine

7
IT
ISTRUZIONI DI SICUREZZA: Leggere
attentamente questo manuale di
istruzioni per l‘uso prima di utilizzare la
lampada! Fare attenzione alle istruzioni
di sicurezza durante l‘accensione della
lampada. Conservare il manuale per
riferimento futuro. Se la lampada viene
trasferita a terzi, dovrà essere consegnato
anche il manuale di istruzioni.
• Non utilizzare la lampada se risulta
danneggiata.
• Non ingerire i componenti piccoli. I
piccoli componenti vanno conservati
lontano dalla portata dei bambini. Il
prodotto non è adatto ai bambini.
• Il prodotto non è un giocattolo! Tenere
il dispositivo lontano dai bambini.
• Non tentare di sostituire il LED. Il LED
non può essere sostituito. In caso
di danneggiamento, gettare via la
lampada.
• Evitare che il liquido/acido della
batteria venga a contatto con pelle,
occhi o mucosa.
• In caso di contatto con l’acido della
batteria, sciacquare le aree interessate
con abbondante acqua pulita e
richiedere l’assistenza di un medico.
COME FUNZIONA
• In sede di installazione delle lampade Disk Lights,
scegliere un sito con la massima esposizione al
sole durante il giorno.
• Evitare aree coperte da alberi o cespugli, poiché
questo impedirebbe alle Disk Lights di ricaricarsi
correttamente.
• Non installare le Disk Lights in prossimità di una
lampada da esterni già esistente, poiché il senso
integrato delle Disk Lights non consentirebbe
l’accensione delle lampade solari.
• Se si utilizzano le Disk Lights in autunno o in
inverno, si prega di notare che, a causa della
minore luce solare durante il giorno, le batterie
potrebbero non ricaricarsi completamente.
Questo può limitare la durata di accensione delle
Disk Lights.
• Durante i mesi invernali più freddi, si raccomanda
di rimuovere le Disk Lights per evitare che
possano danneggiarsi a causa del gelo e delle
temperature molto basse.
INSTALLAZIONE
ASSEMBLAGGIO DEL PALETTO (#1)
(per installazione nel terreno)
1. Inserire il paletto A nel paletto B.
2. Assicurarsi di far scorrere un paletto nell’altro
finché le estremità non siano allineate.
3. Inserire il paletto nel foro presente sul lato
posteriore della Disk Lights. Spingerlo per
assicurare il paletto.
IMPORTANTE: prima di montare i palette nel terreno,
assicurarsi che quest’ultimo sia morbido, poiché un
terreno duro potrebbero danneggiare o spezzare i
palette.
INSTALLAZIONE A PARETE (#2)
(per pareti esterne, paletti da recinzione o ringhiere)
1. Installare 1 vite nella parete o nel paletto da
recinzione. Lasciare circa 3 mm di vite al di sopra
della superficie.
2. Far scorrere la vite all’interno del buco della
serratura (C).
3. Se si desidera installarle sulle scale o qualsiasi
altra superficie dura, collocare le lampade
orizzontalmente sulla superficie.
USO
1. Se si utilizzano per la prima volta, accendere le
Disk Lights premendo il tasto ON/OFF. Premuto
– ON, rialzato OFF. Collocare l’unità in modo che
sia esposta alla luce solare diretta per almeno
8 ore, in modo che possa ricaricarsi. L’UNITÀ
NECESSITA DI ESSERE COMPLETAMENTE
CARICA PRIMA DI ESSERE UTILIZZATA
PER LA PRIMA VOLTA. In caso di assenza di
luce solare sufficiente, il tempo di ricarica delle
batterie potrebbe essere maggiore.
2. Quando si fa buio, le Disk Lights si accenderanno
automaticamente, spegnendosi durante il giorno o
all’esaurimento delle batterie.
SOSTITUIRE LE BATTERIE
1. Se le Disk Lights non risultano completamente
cariche anche dopo 8 ore di esposizione alla
luce solare, potreste dover sostituire le batterie
8
ricaricabili.
2. L’unità utilizza esclusivamente batterie ricaricabili
al nickel-metallo idruro. Non mischiare batterie
vecchie e nuove.
3. Per aprire il vano batterie, svitare 4 viti utilizzando
un cacciavite a stella. Rimuovere il coperchio
utilizzando il sigillo di gomma.
4. Inserire le batterie ricaricabili nuove. Sostituire
il coperchio e assicurarsi che il sigillo sia
posizionato correttamente per proteggere le
batterie.
5. Riavvitare le viti.
PULIZIA E MAGAZZINAGGIO
• Per dei risultati ottimali, assicurarsi di pulire
regolarmente il pannello solare con un panno
umido. Un pannello solare pulito avrà una
maggiore capacità di assorbire energia solare.
• Prima di conservare le Disk Lights, assicurarsi
di spegnere le unità e di rimuovere le batterie.
Lasciare le batterie all’interno delle unità per
lunghi periodi di tempo potrebbe danneggiare le
unità stesse.
I LED NON SONO SOSTITUIBILI
Componenti inclusi: 4 pz. Disk Lights
DATI TECNICI: 1,2V 600mAh
Al termine della sua durata della vita, il prodotto non deve essere smaltito con
i normali rifiuti domestici. Si prega di portarlo in un centro di raccolta per il
riciclaggio di apparecchiature elettriche ed elettroniche. Tale procedura è
segnalata anche da questo simbolo presente sul prodotto, nelle istruzioni per
l’uso e sulla confezione dello stesso. Si prega di informarsi sui centri di rac-
colta gestiti dal proprio rivenditore o dalle autorità locali. La riutilizzazione e il riciclaggio
di vecchi apparecchi costituiscono un contributo importante per la tutela dell’ambiente.
non gettare le batterie nei rifiuti comuni. Smaltirle in un centro di raccolta
autorizzato.
Questo prodotto è conforme alle normative europee.
Classe di protezione III
Fabbricato in Cina
NL
VEILIGHEIDSINSTRUCTIES:
Lees deze gebruiksaanwijzing
zorgvuldig door, voordat u de lamp gaat
gebruiken! Volg de veiligheidsinstructies
op als u de lamp in gebruik neemt.
Bewaar de gebruiksaanwijzing goed,
zodat u deze later ook nog kunt
raadplegen. Indien deze lamp aan
derden doorgegeven wordt, dan moet
ook deze gebruiksaanwijzing mee
overhandigd worden.
• Als de lamp beschadigd is, deze niet
meer gebruiken.
• Kleine delen van de lamp niet
inslikken. Kleine delen buiten bereik
van kinderen bewaren. Product is niet
geschikt voor kinderen.
• Het product is geen speelgoed! Houd
het apparaat uit de buurt van kinderen.
• Probeer niet om de led te verwisselen.
De led kan niet verwisseld worden.
Als de lamp beschadigd is, deze op de
juiste wijze als afval afvoeren.
• Zorg dat accuvloeistof/zuur en
batterijvloeistof/zuur niet in aanraking
komt met huid, ogen of slijmvliezen.
• Bij contact met accuzuur/batterijzuur
onmiddellijk goed spoelen met ruim
schoon water en medische hulp
inroepen.
ZO WERKT HET
• Als u een plek uitzoekt om uw Disk Lights te
installeren, kies dan een locatie met maximale
blootstelling aan de zon overdag.
• Vermijd plekken onder bomen of struiken, want op
zulke plekken laden de Disk Lights niet goed op.
• Installeer Disk Lights niet in de buurt van een
bestaand buitenlicht. De ingebouwde sensor van
de Disk Lights zal verhinderen dat de zonne-
energielamp aan gaat.
• Als u de Disk Lights gebruikt in de herfst en de
winter, houd er dan rekening mee dat door het
kleinere aantal daglichturen de accu‘s niet volledig
op zullen laden. Dit zal de tijd beperken dat de
Disk Lights aan kunnen zijn.
• We adviseren om de Disk Lights in koude
wintermaanden te verwijderen, om schade door
vorst en koude temperaturen te vermijden.
9
INSTALLATIE
MONTAGE VAN DE GRONDPINNEN (#1)
(voor installatie in de grond)
1. Schuif grondpin A in grondpin B.
2. Schuif de grondpin er helemaal in, tot de
uiteinden samenvallen.
3. Steek in het gat aan de achterkant van de Disk
Lights. Druk de grondpin goed vast.
BELANGRIJK: Maak eerst de grond los, voordat u
de grondpin in de grond steekt. Door harde grond
kunnen de grondpinnen beschadigd raken of breken.
WANDINSTALLAITIE (#2)
(voor buitenmuur, hekwerkpaal of balustrade)
1. Breng 1 schroef aan op muur of hekwerkpaal.
Laat ongeveer 3 mm van de schroef boven het
oppervlak uitsteken.
2. Schuif de sleutelgat-opening over de schroef (C).
3. Bij gebruik op trappen of andere harde
oppervlakken, gewoon de Disk Lights plat op het
oppervlak leggen.
GEBRUIK
1. Zet bij de eerste keer gebruik de Disk Lights AAN
door op de AAN/UIT-knop te drukken. Ingedrukt -
AAN, niet-ingedrukt - UIT. Laat de zonne-energie-
lamp bij direct zonlicht ten minste 8 uur opladen.
DE LAMP MOET VOLLEDIG OPGELADEN
ZIJN VÓÓR HET EERSTE GEBRUIK. Als er geen
overvloedige zonneschijn is, dan kan het langer
duren totdat de accu‘s opgeladen zijn.
2. Zodra het donker wordt, gaat de Disk Lights aan.
Overdag gaat de Disk Lights uit. De Disk Lights
gaat ook uit als de accu‘s leeg zijn.
ACCU‘S VERVANGEN
1. Als de Disk Lights ook na 8 uur direct zonlicht
niet volledig opgeladen zijn, dan kan het zijn dat u
de oplaadbare accu‘s moet vervangen.
2. De lamp werkt uitsluitend op oplaadbare NiMH-
accu‘s. Gebruik niet oude en nieuwe accu‘s door
elkaar.
3. Om bij het accuvak te komen, de 4 schroeven
verwijderen met een kruiskopschroevendraaier.
Verwijder het deksel met afdichtingsrubber.
4. Plaats nieuwe oplaadbare accu‘s. Zet het deksel
er weer op, zorg dat de afdichting correct
geplaatst wordt, ter bescherming van de accu‘s.
5. Plaats de schroeven terug.
SCHOONMAKEN EN OPBERGEN
• Voor het beste oplaadresultaat, het zonnepaneel
regelmatig afvegen met een vochtige doek.
• Een schoon zonnepaneel absorbeert meer zonne-
energie.
• Voordat u Disk Lights opbergt, eerst de lamp
uitzetten en de accu‘s verwijderen. Als u accu‘s
langere tijd in de lamp laat, dat kan dat schade
aan de lamp veroorzaken.
DE LEDS KUNNEN NIET VERVANGEN WORDEN.
Inbegrepen: 4 stuks Disk Lights
TECHNISCHE DETAILS: 1,2V 600mAh
Werp het product aan het eind van zijn levensduur daarom niet bij het norma-
le huisvuil. Breng het naar een verzamelpunt voor het recyclen van elektri-
sche en elektronische apparaten. Dit wordt aangegeven door het symbool op
het product in de gebruiksaanwijzing en op de verpakking. Informeer naar
verzamelpunten die door uw dealer of uw gemeente bedreven worden. Het
hergebruik en de recycling van oude apparaten levert een belangrijke bijdrage aan de
bescherming van ons milieu.
Batterijen horen niet bij het huisvuil. Breng ze naar een geautoriseerd
inzamelpunt..
Dit product voldoet aan de Europese richtlijnen.
Veiligheidsklasse III
Made in China
HU
BIZTONSÁGI ÚTMUTATÁSOK:
A lámpa használatának megkezdése előtt
alaposan olvassa át a Kezelési útmutatót!
Ügyeljen a biztonsági útmutatások
betartására a lámpa üzembe helyezése
során. Őrizze meg a Kezelési útmutatót
későbbi használat céljából. Harmadik
félnek történő továbbadása esetén a
Kezelési útmutatót is át kell adnia.
• Ne használja tovább a lámpát, ha az
sérült.
• Ügyeljen arra, hogy ne nyelje le
gyermek az apró alkatrészeket. Tartsa
gyermekek által el nem érhető helyen
az apró alkatrészeket. Nem gyermekek
számára készült a termék.
• Nem játékszer a termék! Tartsa
gyermekektől távol a terméket.
• Ne próbálja a LED-eket kicserélni. Nem

10
cserélhetőek a LED-ek. Sérülés esetén
hulladékként helyezze el a lámpát.
• Ügyeljen arra, hogy az elemből ne
folyhasson ki folyadék/sav és az ne
érintkezhessen a bőrrel, a szemmel
vagy a nyálkahártyákkal.
• Az akkumulátorsavval való érintkezés
esetén az érintett területeket azonnal
bő vízzel le kell öblíteni, és orvoshoz
kell fordulni.
HOGYAN MŰKÖDIK
• Ha helyet keres a lemez lámpája elhelyezésére,
válasszon egy olyan területet, ami sok napfényt
kap napközben.
• Kerülje az árnyékos fák, cserjék alatti helyeket,
mert itt nem töltődik fel megfelelően.
• Ne tegye a lemez lámpákat meglévő kültéri
világítás közelébe. A lemez lámpa beépített
érzékelője megakadályozza a szolár lámpa
bekapcsolását.
• Felhívjuk a figyelmét arra, hogy ha a lemez lámpát
ősszel és télen használja, a kevesebb napfényes
óra miatt lehet, hogy az elemek nem töltődnek fel
teljesen minden nap. Ez csökkenteni fogja a lemez
lámpa világítási idejét.
• A hideg téli hónapokban, javasoljuk, hogy szerelje
le a lemez lámpákat károsodások elkerülése
érdekében, amit a fagy okoz az egységekben a
fagypont alatti hőmérséklet miatt.
TELEPÍTÉS
A CÖVEK ÖSSZESZERELÉSE (#1)
(a talajba történő behelyezéshez)
1. Csúsztassa az A jelű cöveket a B jelű cövekbe.
2. Győződjön meg róla, hogy teljesen össze legyen
nyomva, amíg a végek illeszkednek egymáshoz.
3. Illessze be a cöveket a lemez lámpa hátoldalán
lévő nyílásba. Nyomja rá szorosan a cövekre.
FONTOS: Mielőtt beverné a cövekeket a földbe,
kérjük, ügyeljen arra, hogy a talaj meg legyen lazítva.
A kemény talaj károsíthatja vagy eltörheti a cövekeket.
TELEPÍTÉS A FALON (#2)
(kültéri falhoz, kerítéshez, vagy korláthoz)
1. Szereljen fel 1 csavart a falra vagy kerítésre.
Hagyja, hogy a csavarból kb 3-4 mm kiálljon a
felület felett.
2. Csúsztassa be a csavart a kulcslyuknyi nyílásba (C).
3. Ha a lépcsőkön vagy más kemény felületen
szeretné használni, akkor egyszerűen fektesse le a
lemez lámpát a felületre.
HASZNÁLAT
1. Amikor a lámpát az első alkalommal használja,
akkor kapcsolja azt BE a BE/KI gomb
megnyomásával. Benyomva - BE, kiemelkedve - KI
Hagyja a lámpát közvetlen napfényen legalább 8
órán keresztül, hogy feltöltődjön napenergiával.
ALÁMÁT AZ ELSŐ HASZNÁLAT ELŐTT
TELJESEN FEL KELL TÖLTENI. Ha nincs
elegendő napfény, ennél hosszabb ideig is
eltarthat, amíg az elemek teljesen feltöltődnek.
2. Amint sötét lesz, a lemez lámpa bekapcsol. A
lemez lámpa kialszik napközben, vagy ha kifogy
az elem.
AZ AKKUMULÁTOROK CSERÉJE
1. Ha a lemez lámpa nem töltődik fel teljesen a
közvetlen napfénytől több mint 8 óra eltelte után,
akkor fel kell tölteni az újratölthető elemeket.
2. A lámpába csak Ni-MH újratölthető
akkumulátorokat szabad betenni. Ne keverje a
régi és az új elemeket.
3. Az elemtartó rekeszhez történő hozzáféréshez,
vegye ki a 4 csavart egy keresztfejes
csavarhúzóval. Vegye le a gumitömítéses fedelet.
4. Helyezze be az új újratölthető elemeket. Tegye
vissza a fedelet, és ellenőrizze, hogy a tömítés
megfelelően illeszkedik-e, hogy az akkumulátor
védve legyen.
5. Tegye vissza a csavarokat.
TISZTÍTÁS ÉS TÁROLÁS
• Gondoskodjon róla, hogy a lámpa rendszeresen le
legyen törölve egy nedves ruhával, hogy jobban fel
tudjon töltődni.
• A tiszta szoláris panel több napenergiát képes
elnyelni.
• Amikor a lemez lámpát elteszi, gondoskodjon
arról, hogy ki legyen kapcsolva, és vegye ki
az elemeket. Ha bennhagyja az elemeket az
eszközben huzamosabb ideig, akkor az a lámpa
károsodását okozhatja.
A LED-eket NEM LEHET KICSERÉLNI.
A csomag tartalma: 4 darab lemez alakú lámpa
Műszaki adatok: 1,2V 600mAh
Garancia: A termékre feltétel nélküli, 2 éves garancia
érvényes előállítási- és anyaghibák esetében. Ez a
garancia nincs kihatással törvényes jogaira.
EA terméket élettartama végén ne ártalmatlanítsa a normál háztartási hul-
ladékkal együtt. Vigye el az elektromos és elektronikus készülékek újrahasz-
11
nosítását célzó gyűjtőhelyre. Utóbbit ez a szimbólum jelzi a terméken, a használati
utasításon és a csomagoláson. Tájékozódjon a kereskedője vagy a helyi hatóság által
üzemeltetett gyűjtőhelyekről. A régi készülékek újrahasználata és újrahasznosítása fon-
tos hozzájárulást jelent környezetünk védelméhez.
Az elemeket ne a háztartási hulladék közé dobja! Vigye el azokat egy a
begyűjtésre felhatalmazott gyűjtőhelyre.
Ez a termék megfelel az európai irányelveknek.
Védelmi osztály III
Származási hely: Kína
CZ
BEZPEČNOSTNÍ UPOZORNĚNÍ: Před
použitím lampy si pečlivě prostudujte návod
k použití! Při uvádění lampy do provozu
respektujte bezpečnostní pokyny. Uschovejte
si návod k použití k pozdějšímu nahlédnutí.
Pokud má být lampa předána třetí osobě, je
nutno s lampou předat i návod k použití.
• Pokud je lampa poškozená, nadále ji
nepoužívejte.
• Zabraňte spolknutí malých součástí.
Malé součásti uchovávejte mimo dosah
dětí. Výrobek není vhodný pro děti.
• Výrobek není hračka! Uchovávejte jej
mimo dosah dětí.
• Nepokoušejte se LED
vyměnit. LED nelze vyměnit.
Při poškození lampu zlikvidujte.
• Zabraňte styku kapaliny/kyseliny
z baterie s pokožkou, očima a
sliznicemi.
• V případě kontaktu s kyselinou z
baterie je třeba postižené oblasti
neprodleně omýt velkým množstvím
čisté vody a je třeba se poradit s
lékařem.
JAK TO FUNGUJE
• Při vybírání místa k instalaci svých diskových
světel zvolte místo maximálně vytavené
slunečnímu záření v průběhu dne.
• • Neinstalujte disková světla pod stromy nebo keři,
protože by to bránilo jejich řádnému nabití.
• • Neinstalujte disková světla v blízkosti stávajícího
venkovního osvětlení. Zabudovaný senzor v
diskových světlech brání zapnutí solárních světel.
• • Při používání diskových světel na podzim a v
zimě mějte na paměti, že vzhledem ke kratší době
denního světla se baterie nemusí úplně nabít. To
může zkrátit dobu, kdy budou disková světla svítit.
• • V průběhu chladných zimních měsíců se
doporučuje disková světla odstranit, aby nedošlo
k jejich poškození působením mrazu a teplot pod
nulou.
INSTALACE
MONTÁŽ KOLÍKU (#1)
(k instalaci do země)
1. Nasuňte kolík A do kolíku B.
2. Plně jej zasuňte tak, aby se jejich konce vzájemně
kryly.
3. Nasuňte do otvoru na zadní straně diskového
světla. Zatlačte dovnitř pro zajištění kolíku.
DŮLEŽITÉ UPOZORNĚNÍ: Před zapíchnutím kolíku
do země zajistěte, aby byla půda zkypřená.
Ve tvrdé půdě se mohou kolíky poškodit nebo zlomit.
INSTALACE NA ZEĎ (#2)
(na venkovní zdi, sloupky plotu nebo na zábradlí na
palubě)
1. Přišroubujte 1 šroub do zdi nebo do sloupku
plotu. Ponechejte jej asi vyčnívat asi 3 milimetry
nad povrch.
2. Nasuňte šroub do otvoru ve tvaru klíčové dírky (C).
3. Při použití na schodech nebo na jiném tvrdém
povrchu prostě položte světla na povrch.
POUŽITÍ
1. Při prvním použití zapněte disková světla stiskem
tlačítka ZAP/VYP. Zatlačené - ZAP, vysunuté - VYP
Ponechejte svítilnu pod přímým slunečním
světlem k solárnímu nabití nejméně 8 hodin.
SVÍTILNA NEMUSÍ BÝT PŘED PRVNÍM
POUŽITÍM ZCELA NABITÁ. V případě
nedostatku slunečního světla může trvat déle, než
se baterie nabijí.
2. Když se setmí, diskové světlo se rozsvítí. Diskové
světlo se vypne ve dne a při vybití baterie
VÝMĚNA BATERIÍ
1. Pokud disková světla nejsou plně nabita ani po 8
hodinách na přímém slunečním světle možná je
potřeba vyměnit dobíjecí baterie.
2. Ve svítilně se používají výhradně dobíjecí baterie
Ni-MH. Nepoužívejte zároveň staré a nové baterie.
12
3. Pro přístup do oddílu na baterie vyšroubujte 4
šrouby křížovým šroubovákem. Odstraňte kryt s
gumovým těsněním.
4. Vložte nové dobíjecí baterie. Kryt opět nasaďte a
přesvědčte se, že je těsnění správně nasazeno,
aby byly baterie chráněny.
5. Opět přišroubujte šrouby.
ČIŠTĚNÍ A SKLADOVÁNÍ
• Pro dosažení nejlepších výsledků při nabíjení otírejte
solární panel pravidelně mokrým hadříkem.
• Čistý solární panel dokáže absorbovat více energie.
• Před skladováním disková světla vypněte a vyjměte z ní
baterie. Ponechání baterií ve svítilně delší dobu může
způsobit poškození svítilny.
LED NELZE VYMĚŇOVAT.
Obsah dodávky: 4 kusy diskových světel
Technické údaje: 1,2V 600mAh
Záruka: Na tento výrobek se vztahuje neomezená
dvouletá záruka na všechny vady z výroby a na vady
materiálu. Tato záruka nijak neovlivňuje vaše zákonná
práva.
LIKVIDACE
Po ukončení životnosti neodhazujte výrobek do domovního odpadu. Odevz-
dejte jej na sběrném místě k recyklaci elektrických a elektronických přístro-
jů. Je to vyznačeno tímto symbolem na výrobku, v návodu k obsluze a na
obalu. Informujte se o sběrných místech, provozované vaším prodejcem nebo
místními úřady. Opětovné zhodnocení a recyklace odpadních přístrojů jsou důležitým
příspěvkem k ochraně našeho životního prostředí.
Baterie nepatří do odpadků Odneste je na autorizované sběrné místo.
Tento výrobek odpovídá evropským směrnicím.
Třída ochrany III
Vyrobeno v Číně
SK
BEZPEČNOSTNÉ POKYNY: Pred
prvým použitím lampy si starostlivo
prečítajte tento návod na obsluhu! Dbajte
na bezpečnostné pokyny pri uvádzaní
lampy do prevádzky. Návod uschovajte
pre budúcu potrebu. Ak dávate lampu
tretej osobe, musí k nej byť priložený aj
tento návod.
• Nepoužívajte už lampu, ak je
poškodená.
• Neprehĺtať obsahujúce malé časti.
Výrobok nie je vhodný pre deti.
• Výrobok nie je hračka! Udržujte
zariadenie mimo dosahu detí.
• Nepokúšajte sa vymeniť LED diódu.
LED dióda nemôže byť vymieňaná. Pri
poškodení lampu zlikvidujte.
• Zabráňte tomu, aby sa tekutina/
kyselina z batérie dostali do kontaktu
s pokožkou, očami a sliznicami.
• V prípade kontaktu s kyselinou z
akumulátora by sa mali postihnuté
miesta ihneď vypláchnuť veľkým
množstvom čistej vody a konzultovať
to s lekárom.
AKO TO FUNGUJE
• Pri výbere miesta inštalácie sa zamerajte na
miesta s maximálnym denným slnečným svitom.
• Vyhýbajte sa miestam pod stromami, pod kríkmi.
Tieto by spôsobili nedostatočné dobíjanie svetiel.
• Neinštalujte svetlá blízko akéhokoľvek vonkajšieho
svietidla. Zabudovaný sensor zabráni zapnutiu
solárneho svetla.
• Pri používaní svetiel vo svahu alebo počas zimy
treba rátať s tým, že kvôli menšiemu slnečnému
svitu nebudú batérie úplne nabité. Táto skutočnosť
môže znížiť čas, počas ktorého budú svetlá svietiť.
• Počas studených zimných mesiacov odporúčame
svetlá vybrať a uskladniť, aby sa predišlo ich
poškodeniu mrazom
INŠTALÁCIA
MONTÁŽ KOLÍKA (#1)
(for in-ground installation)
1. Zasuňte kolík A do kolíka B.
2. Uistite sa, že konce sa zarovnajú a že kolíky sú
zasunuté poriadne
3. Vložte kolík do otvoru na zadnej časti svietidla.
Zatlačte a zaistite kolík.
DÔLEŽITÉ: Predtým, ako zasuniete kolíky do zeme,
sa uistite, že pôda v danom mieste je mäkká. Príliš
tvrdá pôda môže spôsobiť poškodenie alebo zlomenie
kolíka.

13
MONTÁŽ NA STENU (#2)
(vonkajší múr, poštová schránka atď)
1. Zaskrutkujte jednu skrutku do steny alebo do
plota. Kúsok ho nechajte vyčnievať nad povrchom.
2. Zasuňte skrutku do otvoru (C).
3. V prípade použitia na schodoch alebo inom
tvrdom povrchu svetlá jednoducho ukladajte na
plochu.
POUŽITIE
1. Pri prvom použití zapnite svetlá stlačením tlačidla
ON/OFF. Stlačením sa zapne, uvoľnením vypne.
Nechajte svetlo nabíjať na priamom slnku aspoň 8
hodín. PRED RIADNYM POUŽÍVANíM MUSIA
BYŤ SVETLÁ ÚPLNE NABITÉ. Ak nie je práve
dostatočný slnečný svit, nabitie batérií môže trvať
aj dlhšie.
2. Akonáhle sa zotmie, svetlá sa zapnú. Vypnú sa
počas dňa alebo vo chvíli keď sa vybijú batérie.
VÝMENA BATÉRIÍ
1. V prípade, že vaše svietidlá nie je možné nabiť
ani po 8 hodinách priameho slnečného svitu, je
pravdepodobné, že musíte vymeniť batérie.
2. Použite Ni-MH nabíjateľné batérie. Nemiešajte
nové so starými.
3. Vyskrutkujte 4 skrutky a odstráňte kryt s
gumovým tesnením.
4. Vložte nové batérie. Nasaďte kryt a skontrolujte či
je tesnenie umiestnené správne.
5. Vymeňte skrutky.
ČISTENIE A USKLADNENIE
• Solárny panel dôkladne a pravidelne utierajte
tkaninou. Tým dosiahnete lepšie nabíjanie.
• Čistý solárny panel absorbuje viac slnečnej
energie.
• V prípade uskladnenia svietidiel je potrebné ich
vypnúť a vybrať batérie. V prípade, že batérie
necháte vo svietidle dlhšiu dobu, môžete svietidlo
poškodiť.
LED-ky nie sú vymeniteľné.
Dodávka obsahuje 4 ks diskových svetiel
Technické údaje: 1,2V 600mAh
Záruka: Na tento výrobok sa vzťahuje neobmedzená
dvojročná záruka na všetky vady výroby a materiálu.
Táto záruka nijako
neovplyvňuje vaše zákonné právo.
Nevyhadzujte výrobok po ukončení jeho životnosti do komunálneho odpadu.
Zaneste ho na zberné miesto na recykláciu elektrických a elektronických
zariadení. Toto je udané symbolom na výrobku, v návode na použitie a na
obale. Informujte sa o zberných miestach, ktoré sú prevádzkované Vašim ob-
chodníkom alebo miestnymi úradmi. Ďalšie zhodnotenie a recyklácia starých
zariadení je dôležitým prínosom k ochrane nášho životného prostredia.
Batérie nepatria do domáceho odpadu. Odneste ich do autorizovaného zberu
takéhoto odpadu.
Tento výrobok zodpovedá európskym normám.
Trieda ochrany III
Vyrobené v Číne
RO
NSTRUCŢIUNI DE SIGURANŢĂ:
Citiţi cu grijă aceste instrucţiuni
de utilizare, înainte de a utiliza
lampa! Respectaţi instrucţiunile de
siguranţă la punerea în funcţiune
a lămpii. Păstraţi instrucţiunile de
utilizare pentru consultare ulterioară.
Dacă înstrăinaţi lampa către terţi,
atunci aceste instrucţiuni de utilizare
trebuie să fie de asemenea înmânate.
• Opriţi utilizarea lămpii, dacă este
deteriorată.
• Piese de mici dimensiuni nu trebuie
înghiţite. Piesele de mici dimensiuni
nu se vor lăsa la îndemâna copiilor.
Produsul nu este potrivit pentru
copii.
• Acest produs nu este o jucărie!
Ţineţi aparatul departe de copii.
• Nu încercaţi să înlocuiţi LED-urile.
LED-urile nu pot fi înlocuite. În caz
de deteriorare debarasaţi lampa.
• Împiedicați contactul lichidului/
acidului din baterie cu pielea,
ochii și membranele mucoase.
• În cazul contactului cu acidul din
baterie, zonele afectate trebuie
spălate imediat cu multă apă
curată și trebuie consultat un
medic.

14
MODUL DE FUNCȚIONARE
• Când alegeți un loc pentru a instala Disk Lights,
alegeți o locație cu expunere maximă la soare în
timpul zilei.
• Evitați zonele aflate sub arbori sau tufe, deoarece
acest lucru va împiedica încărcarea corectă a
Disk Lights.
• Nu instalați Disk Lights lângă o lumină exterioară
existentă. Senzorul încorporat al Disk Lights va
împiedica aprinderea luminilor solare.
• Dacă folosiți Disk Lights toamna și iarna, țineți
cont că din cauza numărului redus de ore de
lumină naturală, bateriile ar putea să nu se
încarce complet. Acest lucru poate limita durata
de timp a aprinderii Disk Lights.
• În timpul lunilor reci de iarnă, vă recomandăm să
scoateți Disk Lights pentru a preveni deteriorarea
unităților din cauza frigului și temperaturilor de
îngheț.
INSTALARE
ASAMBLAREA TIJEI (#1)
(pentru introducerea în pământ)
1. Glisați tija A în tija B.
2. Asigurați-vă că împingeți complet în interior până
ce capetele sunt aliniate între ele.
3. Introduceți tija în orificiul din partea posterioară
a Disk Lights. Apăsați în interior pentru a asigura
tija.
IMPORTANT: Înainte de a monta tijele în pământ,
asigurați-vă că solul este moale. Solul întărit poate
deteriora sau rupe tijele.
INSTALAREA PE PERETE (#2)
(pentru pereți exteriori, stâlpi de gard sau balustrade
de terase)
1. Înșurubați un șurub în perete sau în stâlpul
gardului. Lăsați aproximativ 0,3 cm din șurub
deasupra suprafeței.
2. Glisați șurubul în fantă (C).
3. Dacă le utilizați pe scări sau pe orice altă
suprafață tare, pur și simplu așezați Disk Lights
culcat pe suprafață.
UTILIZARE
1. Când le utilizați pentru prima oară, aprindeți
Disk Lights prin apăsarea butonului ON/OFF.
Apăsat în interior – ON (aprindere), Ridicat – OFF
(stingere) Lăsați unitatea sub lumina directă a
soarelui pentru încărcare solară timp de cel puțin
8 ore. UNITATEA TREBUIE SĂ FIE ÎNCĂRCATĂ
COMPLET ÎNAINTE DE PRIMA UTILIZARE.
Dacă nu există suficientă lumină solară,
încărcarea bateriilor poate dura mai mult timp.
2. Imediat ce se întunecă, Disk Lights se va aprinde.
Disk Lights se va stinge în timpul zilei sau dacă
bacteria unității se descarcă.
ÎNLOCUIREA BATERIILOR
1. Dacă Disk Lights nu au o încărcare completă,
chiar și după 8 ore de lumină directă a soarelui,
va trebui să schimbați bateriile reîncărcabile.
2. Unitatea utilizează numai baterii reîncărcabile Ni-
MH. Nu amestecați baterii vechi și noi.
3. Pentru a accesa compartimentul pentru baterii,
scoateți cele 4 șuruburi utilizând o șurubelniță cu
cap Phillips. Scoateți capacul cu etanșarea din
cauciuc.
4. Introduceți baterii reîncărcabile noi. Puneți
capacul înapoi și asigurați-vă că etanșarea este
așezată corect pentru protecția bateriilor.
5. Reînșurubați șuruburile.
CURĂȚARE ȘI DEPOZITARE
• Ștergeți în mod regulat panoul solar cu o cârpă
umedă pentru rezultate optime de încărcare.
• Panoul solar curat va putea absorbi mai multă
energie solară.
• Când depozitați Disk Lights, deconectați unitatea
și scoateți bateriile. Dacă lăsați bateriile în
interiorul unității pentru o perioadă îndelungată
de timp se poate defecta unitatea.
LED-URILE NU POT FI ÎNLOCUITE.
Componente incluse: 4 bucăți Disk Lights
Date tehnice: 1,2V 600mAh
Din acest motiv produsul, la sfârşitul duratei sale de funcţionare ,nu va fi de-
barasat împreună cu gunoiul menajer. Predaţi-l la punctele de colectare în
vederea reciclării aparatelor electrice şi electronice. Acest lucru este indicat
de acest simbol de pe produs, din instrucţiunile de utilizare şi de pe ambalaj.
Informaţi-vă cu privire la punctele de colectare pe care le administrează dis-
tribuitorul sau dumneavoastră locale. Revalorificarea şi reciclarea aparatelor uzate este
o contribuţie importantă la protecţia mediului.
Bateriile nu trebuie aruncate cu gunoiul menajer. Reciclaţi-le la un punct de
colectare autorizat.
Acest produs corespunde directivelor europene.
Clasa de protecție III
Tara de provenienta: China

15

Stand: 05/2018 | M16943
Importeur | Importer | Importateur | Importatore | Importeur | Importőr |
Dovozce | Dodávateľ | Importator:
CH: MediaShop AG
Industriering 3 | 9491 Ruggell | Liechtenstein
EU: MediaShop GmbH
Schwarzottstraße 2a | 2620 Neunkirchen | Austria
DE | AT | CH: 0800 376 36 06 – Kostenlose Servicehotline
HU: +36 96/961-000 | CZ: +420 228 880 051
SK: +421 2 33 456 362 | RO: +40 0312 294701
ROW: +423 388 18 00
www.mediashop.tv
Table of contents
Languages:
Popular Outdoor Light manuals by other brands


Philips
Philips Ecomoods 169179316 brochure

SLV Elektronik
SLV Elektronik 228980 operating manual

Yeelight
Yeelight Staria Bedside Lamp Pro user manual

Outsunny
Outsunny 84B-348 Assembly instruction

Inspire
Inspire Starla CE25613H10 Assembly, Use, Maintenance Manual

Sanuvox
Sanuvox SABER16/24-GM2 installation instructions


