Using instructions
Solar PIR Floor Lamp „Yanara 31“
1. Introduction
Dear customer, thank you for purchasing this product.
You have acquired a product that has been built according to the current
state of the art.
The product meets the requirements of the applicable
European and national guidelines. The conformity with
these requirements has been proven, and the corresponding
declarations and documents are deposited with the manu-
facturer.
In order to ensure the product continues to meet these requirements, and
to ensure safe operation, you as the user must observe these operating
instructions.
2. Safety instructions
The guarantee and the warranty expire in the event
of damage to the product caused by failure to
observe these operating instructions. We are not
liable for any consequential damage!
The same applies to property damage or personal
injury caused by improper handling or failure to
observe the safety instructions.
- Unauthorised modifications or other changes to the product are not per-
mitted. The guarantee and the CE approval expire in this event.
- Make sure that the light does not get into the hands of children. It is not
a toy!
- Keep plastic film or other packaging material away from children, there is
a risk of suffocation.
- This product is only suitable for private use!
3. Intended Use
The solar module built into the upper part converts sunlight into electricity.
The built-in battery is charged with this energy.
The light can be operated in three different modes depending on the time
of year and the installation location. These operating modes can be con-
veniently selected using a button on the PIR sensor.
When the battery is empty, the light switches off automatically. If necessary,
it can be charged via a USB port in poor sunlight or when it is first started up.
The solar light is suitable for year-round outdoor use. The nighttime lighting
duration is heavily dependent on the amount of sunlight and the angle of
incidence on the solar module during the day. Solar lights must always
be placed in the sunlight without shadows. Operation on the north
side or in the shade of trees or bushes is not recommended!
4. Installation
1. Carefully remove the parts from the
packaging.
2. The light can either be set up freely or
screwed onto a solid surface.
Note: Please note the detection range of
the motion sensor!
When screwing, please proceed as fol-
lows:
1. Use the Allen key supplied to unscrew
the 4 Allen screws on the 4 sides of the
base and remove the plastic cover.
2. Mark the 4 holes on the bottom and drill 4
holes with a diameter of 8 mm and insert
the dowels. Now take the plastic cover
and mount it with the enclosed 4 screws.
3. Now put the solar light back and screw
the 4 Allen screws back into the case.
The light is now fully assembled!
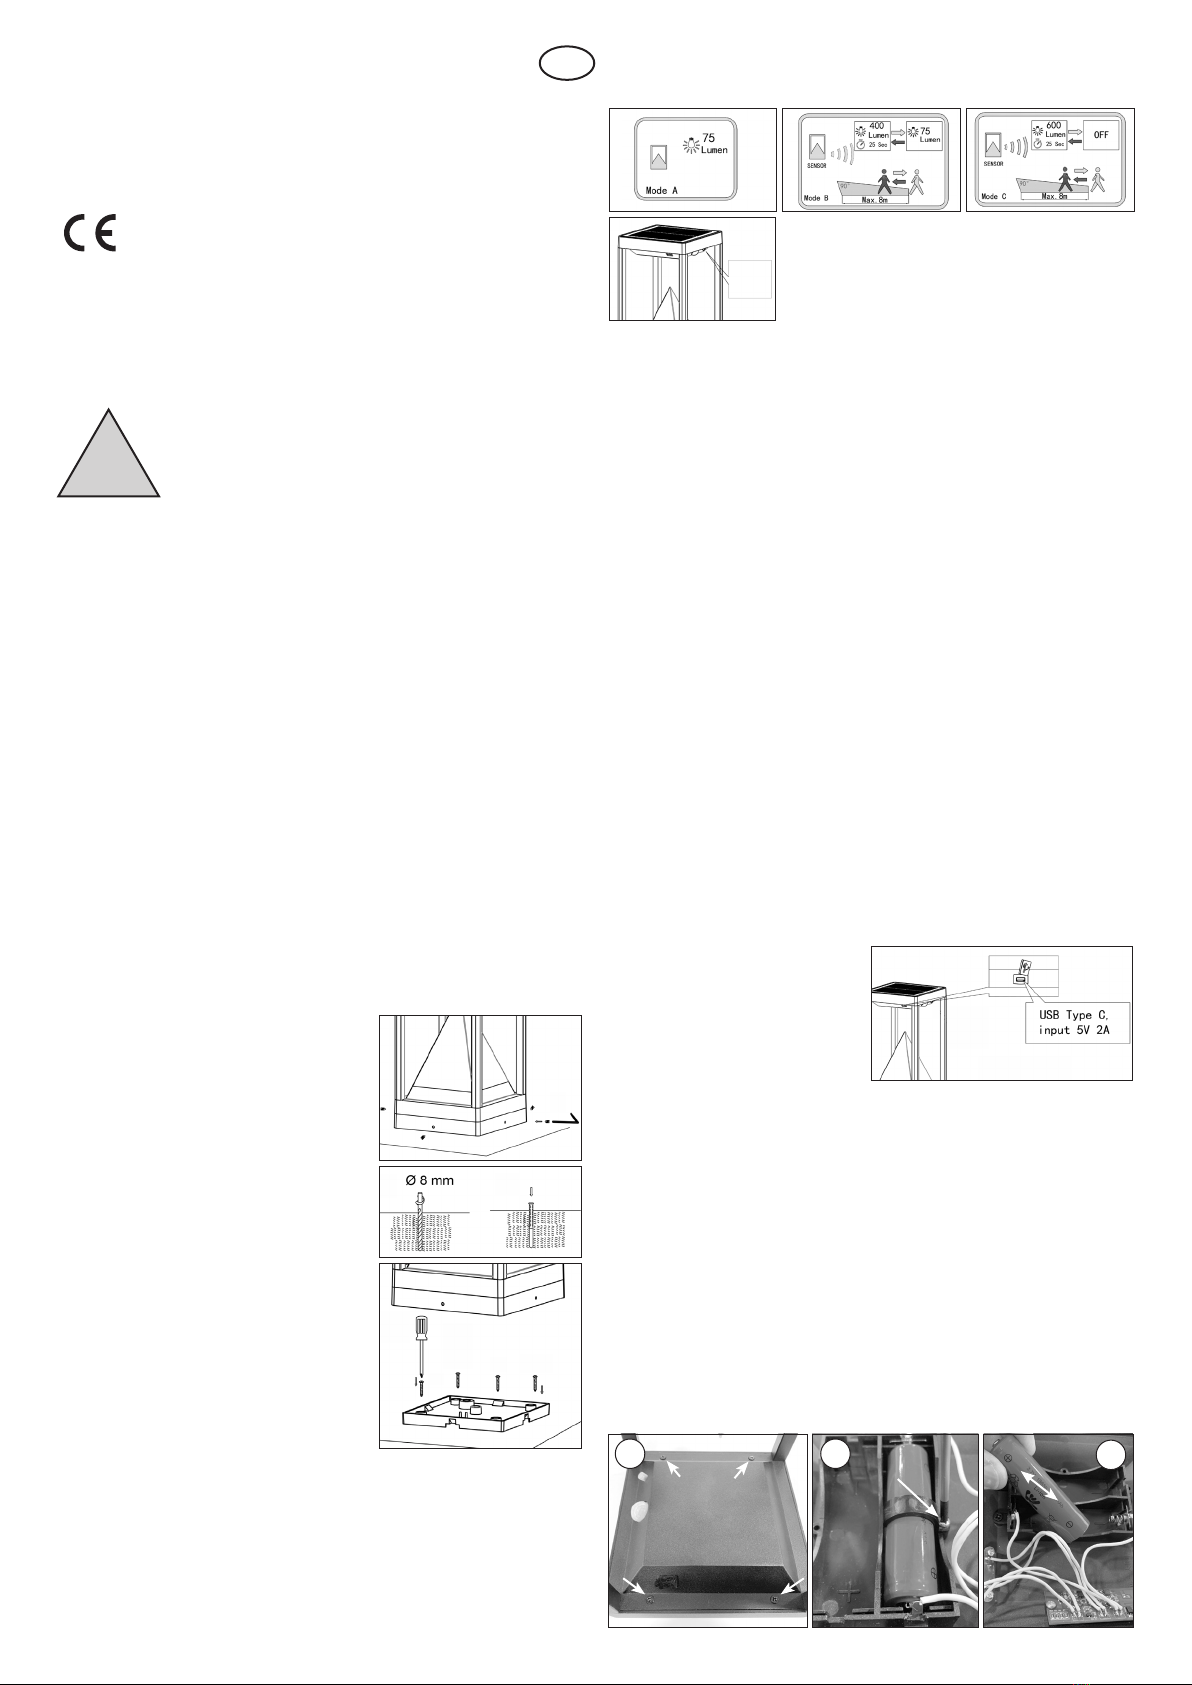
3. 4 different operating modes can be selected using the button below the
PIR sensor. Proceed as follows:
Press button for 5 seconds:
Mode A: The lamp always shines at 75 lm in the dark, PIR sensor is
switched off!
Press button for 1 second:
Mode B: The lamp lights up dimmed at 75 lm in darkness, when moving
the lamp lights up at 400 lm, 25 sec. after last movement the lamp lights
up dimmed again at 75 lm.
Press button for 1 second:
Mode C: Lamp does not light up in the dark, in case of movement the
lamp lights up again with 600 lm, 25 sec. after last movement!
Press button for 5 seconds:
Lamp switched off, battery is still being charged!
Note: The duration of the light depends heavily on the intensity and dura-
tion of sunlight during the day. In the winter months, you can generally
expect less lighting time. If the light does not light up on the first evening,
please wait for a sunny day or charge it with the USB-connector (see point
5.)
5. Charge via USB port
The battery in the light can be charged using a USB power supply unit
before it is used for the first time, after wintering or during the darker
months of the year. The charging cable is included in the scope of delivery,
the USB power supply unit is an accessory and not included in the scope
of delivery. The charging connection is located under a weatherproof cover
in the upper part of the light.
If the light is charged via a USB
power supply unit, an LED inside
the button lights up red. When the
battery is charged, the light colour
of the LED changes to green and
the charging cable can be removed
again. Close the connector cover.
The light should be switched off
during the charging process.
6. Changing the battery
1. Press the button below the PIR sensor for 5 seconds and switch off the
light.
2. Unscrew the 4 screws on the underside of the light with a suitable
screwdriver (pic. 1) and remove the upper part.
3. Unscrew the battery holder (pic. 2) and remove it from the battery.
4. Take the battery out of the compartment and reinsert an identical bat-
tery with the correct polarity (pic. 3).
5. Now close the light again in reverse order and select the desired oper-
ating mode using the button.
Note: Used batteries or accumulators must be disposed of in an envi-
ronmentally friendly manner and do not belong in the household waste.
Your dealer is legally obliged to take back old batteries.
!
GB
1. 2. 3.
button