BELLAGIO BELCMSS01 User manual

COFFEE MAKER
INSTRUCTION MANUAL
Model : BELCMSS01
Read this booklet thoroughly before using and save it for future reference.
SAVE THESE INSTRUCTIONS.

1
IMPORTANT SAFEGUARDS:
When using electrical appliances, basic precautions should always be followed, including the
following:
1. Read all instructions.
2. Do not touch hot surfaces. Use handles or knobs.
3. To protect against fire, electric shock and injury to persons do not immerse cord, plug, or in
water or other liquid.
4. Close supervision is necessary when any appliance is used by or near children.
5. Unplug from outlet when not in use and before cleaning. Allow to cool before putting on or
taking off parts, and before cleaning the appliance.
6. Do not operate any appliance with a damaged cord or plug or after the appliance malfunctions,
or has been damaged in any manner. Please return appliance to the nearest authorized service
facility for examination, repair or adjustment.
7. The use of accessory attachments not recommended by the appliance manufacturer may
result in fire, electric shock or injury to persons.
8. Do not let cord hang over edge of table or counter, or touch hot surface.
9. Do not place on or near a hot gas or electric burner, or in a heated oven.
10. Always attach plug to appliance first, then plug cord into the wall outlet. To disconnect, turn
any control to “Off”, then remove plug from wall outlet.
11. Do not set a hot container on a hot or cold surface.
12. Do not use a cracked container or a container having a loose or weakened handle.
13. Do not clean container with cleaners, steel wool pads, or other abrasive materials.
14. Never leave the empty carafe on the keeping warm plate otherwise the carafe is liable to
crack.
15. Do not use appliance for other than intended use.
16. Do not use outdoors.
SAVE THESE INSTRUCTIONS.
HOUSEHOLD USE ONLY

2
GLASS CONTAINER SAFETY INSTRUCTIONS
1. The carafe is designed for use with this appliance only. It must never be use on a range top
2. Do not set a hot carafe on a wet or cold surface
3. Do not use a cracked carafe or a carafe having a loose or weakened handle
4. Do not clean carafe with cleansers, steel wool or other abrasive material
Notes on the cord plug:
This appliance has a polarized plug, To reduce the risk of electric shock, this plug is intended to
fit into a polarized outlet only one way, If the plug does not fit fully into the outlet, reverse the plug,
If it still does not fit, contact a qualified electrician, Do not attempt to modify the plug in any way.
Notes on the cord:
A) A short power-supply cord (or detached power-supply cord) is be provided to reduce risks
resulting from becoming entangled in or tripping over a long cord.
B) Longer detachable power-supply cords or extension cords are available and may be used if
care is exercised in their use.
C) If a long detachable power-supply cords or extension cord is used,
1) The marked electrical rating of the detachable power-supply cord or extension cord should
be at least as great as the electrical rating of the appliance.
2) If the appliance if of the grounded type, the extension cord should be a grounding-type
3-wire cord,
3) The longer cord should be arranged so that it will not drape overthe counter top or table top
where it can be pulled on by children or tripped over.
3
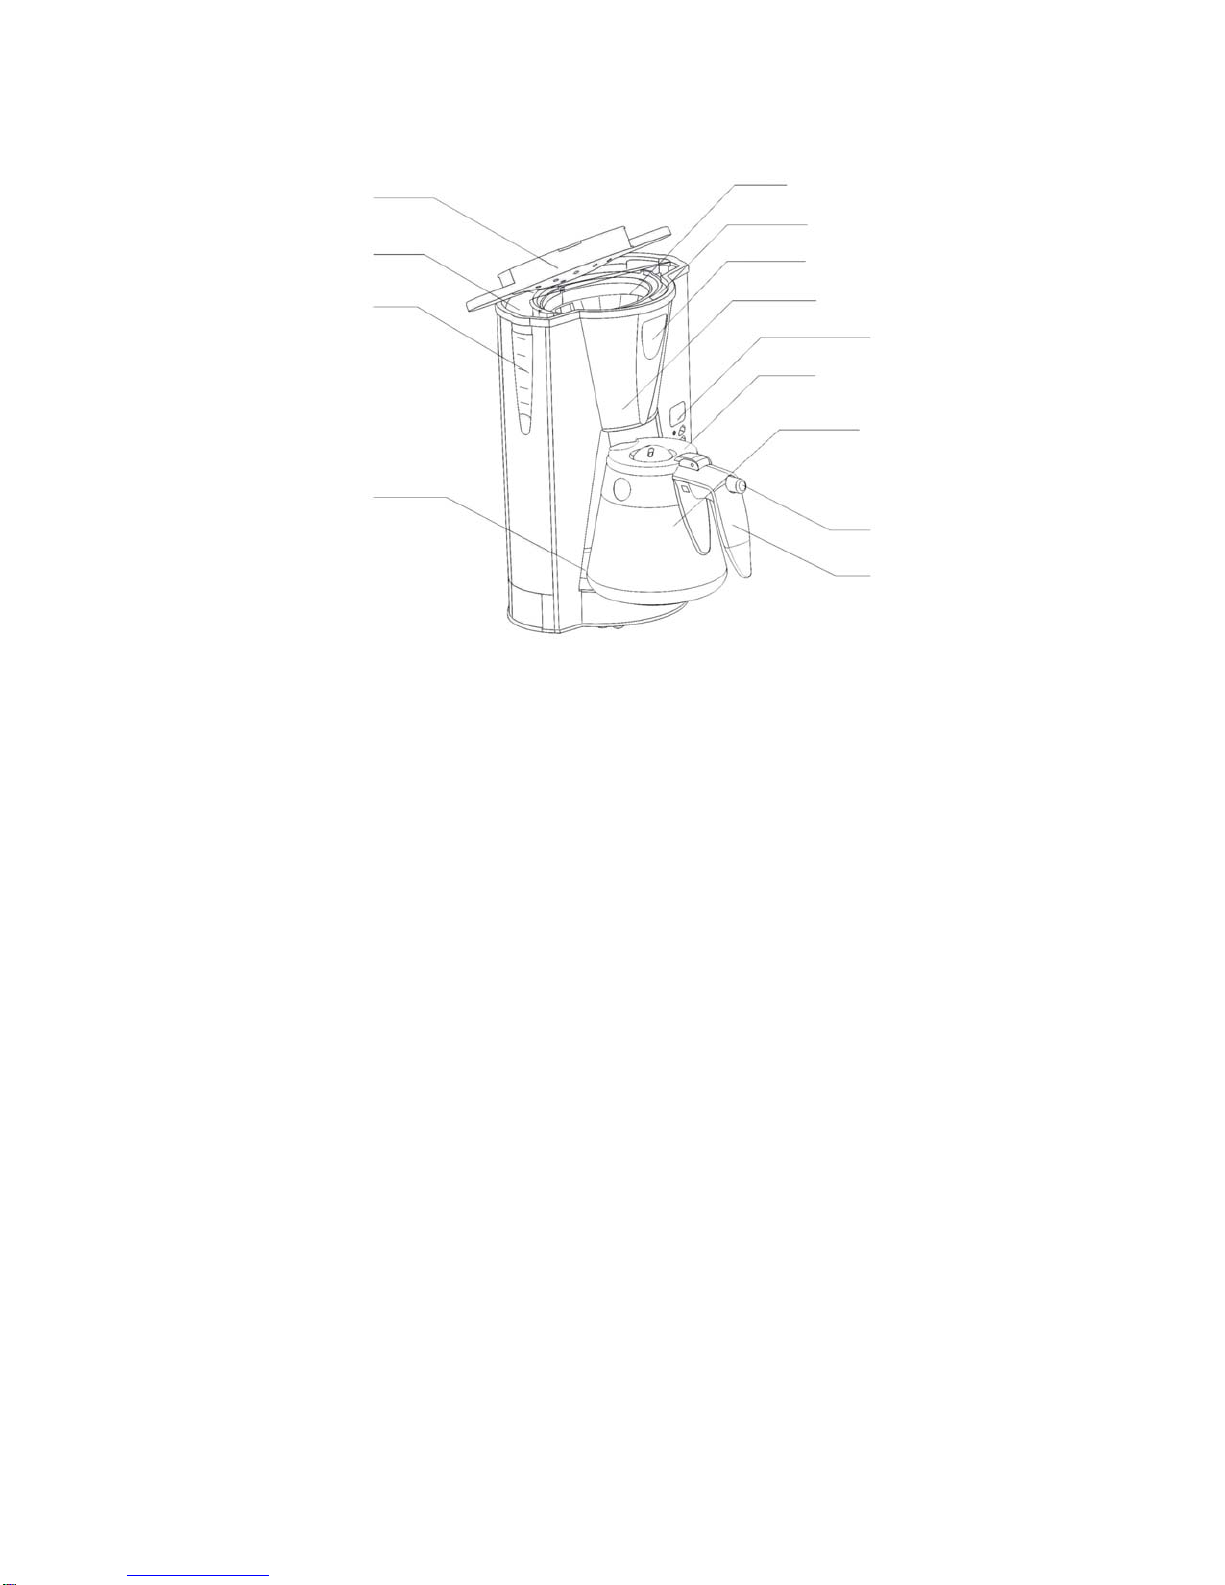
Getting to know your coffee maker:
Preparing for first use
1. Unpack the unit.
2. Check the contents against the accessories list.
3. Remove all labels and the protective film.
4. Select a suitable location for the unit on a flat, stable surface close to a power socket.
Check that the accessories are complete and the unit is not damaged. Be sure the filter and
funnel are assembled properly. In order to flush and clean the system, you must complete
two cycles of brewing only water without coffee. Brew clean water by filling the reservoir up
to the MAX marker and follow the steps below (but do not use ground coffee at this time), then
pour the cycled water out of the carafe. Repeat 2 times. Clean carafe, lid, funnel and filter
thoroughly with warm water.
Reservoir Cover
Water Reservoir
Water Level Indicator
Warming Plate
Re-Useable Filter
Funnel
Power Indicator
Funnel Support
Digital Display and
control Panel
Carafe Lid
Carafe
Open Button
Carafe handle

4
OPERATION INSTRUCTION:
1) Making Coffee immediately
1) Open the reservoir cover of coffee maker; fill proper amount water into
reservoir with carafe. The water level should be between the MAX and MIN.
2) Place the funnel into the funnel support; make sure it is assembled
correctly. Then place the filter in the funnel correctly.
3) Add coffee ground into filter. Usually, one cup of brewed coffee requires
one scoop or spoon of ground coffee. You may adjust amounts according
to your taste, and to quality of the coffee used.
4) Insert the carafe on warming plate as shown in parts picture.
Note: the carafe must be placed on the warming plate properly for brewing
to proceed.
5) Plug the power cord into the outlet, the LCD will display “AM12:00” (fig.1).
6) Press “ON/OFF” button, the “RUN” indicator will be illuminated. The appliance will begin
working.
Note: You can take out the carafeduring brewing to pour and serveat any time. The coffee maker
will stop dripping automatically; however it is important that the brewing not be interrupted for
more than 30 seconds, as this could cause an over flow.
7) Do not open the tank cover when the coffee maker is operating. The flow of hot water will may
cause a burn and possibly damage the appliance.
8) You can take out the carafe, pour and serve when finishbrewing (be sure to waitapproximately
1 min after brewing has completed to prevent any drips falling on the warming plate..)
Note: The brewed coffee will be less than the water you poured in the reservoir as some water is
absorbed by the ground coffee. As a safety measure, you should always pour coffee with
the lid in place. This will also aid in keeping the coffee warm.
9) Always turn the coffee maker off and unplug the power cord from the electrical outlet when the
coffee maker is not in use.
Note: Please pay attention when pouring the coffee. The temperature of freshly brewed coffee
is very hot and may cause burning.
RUN
AUTO
ON/OFF
PROG
HOUR
MIN
Fig.1

5
2) Automatic start function
If you wish to set the coffee maker to make coffee at a pre-set time,for example now it is 5:10 pm,
you want the coffee maker make coffee af 8:15pm, follow steps 1 to 5 of the above section, and
then you can set the automatic start function as follows:
Press “ON/OFF” twice, the “AUTO” indicator will be illuminated.
Press “PROG” button, the “LCD” will display “CLOCK”.
Set the current time by pressing the “HOUR” and “MIN”.(Fig.2)
Note: The time cycle is 12 hours, every 12 hours, the “AM” and “PM” will
transform once.
Press “PROG” button, the “LCD” will display “TIMER”, then set the automatic
start time by pressing the “HOUR” and “MIN”.(fig.3)
At 8:15 in the evening the “AUTO” indicator will be will go out, and the “RUN”
indicator will light. The appliance will start automatically. After brewing, you
can replace the carafe on keeping warm plate.
Note: If you leave the coffee maker unattended for 2 hours, the appliance will
automatically shut off.
3) CLEANING AND MAINTENANCE:
CAUTION: Be sure to unplug this appliance before cleaning. To protect against electrical shock,
do not immerse cord, plug or unit in water or liquid. After each use, always make sure plug is first
removed from wall outlet.
Clean the filter, carafe and carafe lid after each use in hot, sudsy water.
Wipe the product’s exterior surface with a soft, damp cloth to remove stains.
Water droplets may buildup in the area above the Filter and drip onto the product base during
brewing. To control the dripping, wipe off the area with a clean, dry cloth after each use of the
product.
Use a damp cloth to gently wipe the keeping warm plate. Never use abrasive cleaner to clean it.
4) CLEANING MINERAL DEPOSITS
To keep your coffee maker operating efficiently, you should regularly clean away the mineral
deposits left by the water according to the water quality in your area and the frequency of of the
appliance. Please follow these instructions: fill the carafe with one part of white vinegar and
three parts of cold water, pour the water and vinegar mixture into the resevoir, do not use coffe
grounds at this time. Brew the water-vinegar solution per “operation instruction”, repeat with
fresh water and vinegar until no yellowish liquid is produced. After solution runs clear, flush the
appliance by bewing fresh water several times until no odor of the vinegar remains.
Fig.2
Fig.3
Fig.3

6
5) HINTS FOR GREAT-TASTING COFFEE
1. A clean coffee maker is essential for making great-tasting coffee. Regularly clean the coffee
maker as specified in the “CLEANING AND MAINTENANCE” section.
2. Always use fresh, cold water in the coffee maker.
3. Store unused coffee grounds in a cool, dry place. After opening a package of coffee grounds,
reseal it tightly and store it in a refrigerator to maintain its freshness.
4. For an optimum coffee taste, buy whole coffee beans and finely grind them just before brewing.
5. Do not reuse coffee grounds since this will greatly reduce the coffee flavor.
6. Reheating the coffee is not recommended as coffee is at its peak flavor immediately after
brewing.
7. Clean the coffee maker when over-extraction causes oiliness. Small oil droplets on the surface
of brewed, black coffee are due to the extraction of oil from the coffee grounds.
8. Oiliness may occur more frequently if heavily roasted coffees are used.
6) STORAGE
Un-plug the unit and allow it to cool. Always clean the unit before storing. Store coffee maker in
it original box in a clean dry place. Never store appliance while it is hot or still plugged in. Never
wrap cord tightly around the appliance. Do not put any stress on the cord where it enters the unit,
as it could cause cord to fray and break.
BellagioTM is a trademark of:
Super Electric Co. Ltd.
280 Hillmount Road, Unit 1, Markham,
ON. Canada L6C 3A1
CANADIAN OWNED AND OPERATED.
1-800-268-7622
Table of contents


