INSTRUCTIONS MANUAL
www.bellezefurniture.com 5
5
www.bellezefurniture.com
AE
EFG
FG
Figure 1
C
12
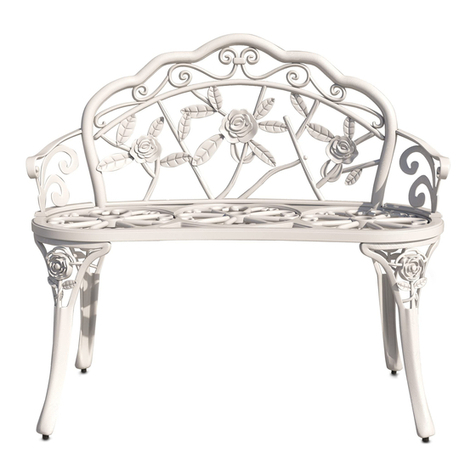
NOTE: This product is intended for residential, non-commercial use.
5. (SEE FIGURE 4) Add plastic nut cover (I)
to nut (G) located on backside of straight
back (A).
Figure 4
2
Add plastic nut cover (I)
to nut (G) located on backside of straight
Turn the bench over on a
non-scratch surface and attach middle
seat brace (J) to the slats (B) at the midway
point between legs (C) using wood screws (H).
Work from the front to back, as necessary to
Attach side seat brace (D) to the leg (C) using
bolt (K), washers (F) and nut (G), connect side
seat brace (D) to the slats (B) at the sideway
point between legs (C) using wood screws (H).
4. Ensure all fasteners are securely tightened.
Figure 3 J
D
D
H
G
G
F
F
K
K
H
H
Figure 4
(I) Plastic Nut Cover
Four places backside
**CAUTION: Do not over tighten fasteners.
1. (SEE FIGURE 1) Using bolts (E), washers (F) and nuts
(G) attach one end of the straight back (A) to the leg &
arm frame (C).
Attach the other end of the back to the second leg & arm
brace (C).
2. (SEE FIGURE 2) Attach the wood slats (B) to leg and
arm support (C) as shown. Repeat on the other side, but
do not tighten bolts until all wood slats (B) are in place
5
www.bellezefurniture.com
NOTE: This product is intended for residential, non-commercial use.
5. (SEE FIGURE 4) Add plastic nut cover (I)
to nut (G) located on backside of straight
back (A).
seat brace (J) to the slats (B) at the midway
point between legs (C) using wood screws (H).
Work from the front to back, as necessary to
Attach side seat brace (D) to the leg (C) using
bolt (K), washers (F) and nut (G), connect side
seat brace (D) to the slats (B) at the sideway
point between legs (C) using wood screws (H).
4. Ensure all fasteners are securely tightened.
Figure 3 J
D
D
H
G
G
F
F
K
K
H
H
Figure 4
**CAUTION: Do not over tighten fasteners.
1. (SEE FIGURE 1) Using bolts (E), washers (F) and nuts
(G) attach one end of the straight back (A) to the leg &
arm frame (C).
Attach the other end of the back to the second leg & arm
brace (C).
2. (SEE FIGURE 2) Attach the wood slats (B) to leg and
arm support (C) as shown. Repeat on the other side, but
do not tighten bolts until all wood slats (B) are in place
5
www.bellezefurniture.com
12
NOTE: This product is intended for residential, non-commercial use.
5. (SEE FIGURE 4) Add plastic nut cover (I)
to nut (G) located on backside of straight
back (A).
Figure 4
BC
F
G
E
Figure 2
2
Add plastic nut cover (I)
to nut (G) located on backside of straight
Turn the bench over on a
non-scratch surface and attach middle
seat brace (J) to the slats (B) at the midway
point between legs (C) using wood screws (H).
Work from the front to back, as necessary to
Attach side seat brace (D) to the leg (C) using
bolt (K), washers (F) and nut (G), connect side
seat brace (D) to the slats (B) at the sideway
point between legs (C) using wood screws (H).
4. Ensure all fasteners are securely tightened.
Figure 3 J
D
D
H
G
G
F
F
K
K
H
H
Figure 4
(I) Plastic Nut Cover
Four places backside
**CAUTION: Do not over tighten fasteners.
1. (SEE FIGURE 1) Using bolts (E), washers (F) and nuts
(G) attach one end of the straight back (A) to the leg &
arm frame (C).
Attach the other end of the back to the second leg & arm
brace (C).
2. (SEE FIGURE 2) Attach the wood slats (B) to leg and
arm support (C) as shown. Repeat on the other side, but
do not tighten bolts until all wood slats (B) are in place
5
www.bellezefurniture.com
5. (SEE FIGURE 4) Add plastic nut cover (I)
to nut (G) located on backside of straight
back (A).
seat brace (J) to the slats (B) at the midway
point between legs (C) using wood screws (H).
Work from the front to back, as necessary to
Attach side seat brace (D) to the leg (C) using
bolt (K), washers (F) and nut (G), connect side
seat brace (D) to the slats (B) at the sideway
point between legs (C) using wood screws (H).
4. Ensure all fasteners are securely tightened.
Figure 3 J
D
D
H
G
G
F
F
K
K
H
H
Figure 4
(I) Plastic Nut Cover
Four places backside
1. (SEE FIGURE 1) Using bolts (E), washers (F) and nuts
(G) attach one end of the straight back (A) to the leg &
arm frame (C).
Attach the other end of the back to the second leg & arm
brace (C).
2. (SEE FIGURE 2) Attach the wood slats (B) to leg and
arm support (C) as shown. Repeat on the other side, but
do not tighten bolts until all wood slats (B) are in place
www.bellezzafurniture.com5
INSTRUCTIONS MANUAL
ASSEMBLY INSTRUCTIONS
Attach the wood slats (B)
to leg and arm support (C) as shown.
Repeat on the other side, but do not
tighten bolts until all wood slats (B) are in
place and bench is upright on the �oor. BC
F
G
E
Figure 2
2
Figure 3 J
D
D
H
G
G
F
F
K
K
H
H
Figure 4
(I) Plastic Nut Cover
Four places backside
3. (SEE FIGURE 3) Turn the bench over on a non-
scratch surface and attach middle
seat brace (J) to the slats (B) at the midway point
between legs (C) using wood screws (H). Work from the
Attach side seat brace (D) to the leg (C) using bolt (K),
washers (F) and nut (G), connect side seat brace (D) to
the slats (B) at the sideway point between legs (C) using
wood screws (H).
4. Ensure all fasteners are securely tightened.
5. (SEE FIGURE 4) Add plastic nut cover (I) to nut (G)
located on backside of straight back (A).
ASSEMBLY INSTRUCTIONS
tighten bolts until all wood slats (B) are in BC
F
G
E
Figure 2
Figure 3 J
D
D
H
G
G
F
F
K
K
H
H
Figure 4
(I) Plastic Nut Cover
Four places backside
3. (SEE FIGURE 3) Turn the bench over on a non-
scratch surface and attach middle
seat brace (J) to the slats (B) at the midway point
between legs (C) using wood screws (H). Work from the
Attach side seat brace (D) to the leg (C) using bolt (K),
washers (F) and nut (G), connect side seat brace (D) to
the slats (B) at the sideway point between legs (C) using
wood screws (H).
4. Ensure all fasteners are securely tightened.
5. (SEE FIGURE 4) Add plastic nut cover (I) to nut (G)
located on backside of straight back (A).
ASSEMBLY INSTRUCTIONS
Attach the wood slats (B)
to leg and arm support (C) as shown.
Repeat on the other side, but do not
tighten bolts until all wood slats (B) are in
place and bench is upright on the �oor. BC
F
G
E
Figure 2
2
Figure 4
(I) Plastic Nut Cover
Four places backside
3. (SEE FIGURE 3) Turn the bench over on a non-
scratch surface and attach middle
seat brace (J) to the slats (B) at the midway point
between legs (C) using wood screws (H). Work from the
Attach side seat brace (D) to the leg (C) using bolt (K),
washers (F) and nut (G), connect side seat brace (D) to
the slats (B) at the sideway point between legs (C) using
wood screws (H).
5. (SEE FIGURE 4) Add plastic nut cover (I) to nut (G)
located on backside of straight back (A).
ASSEMBLY INSTRUCTIONS
BC
F
G
E
Figure 2
Figure 3 J
D
D
H
G
G
F
F
K
K
H
H
Figure 4
(I) Plastic Nut Cover
Four places backside
3. (SEE FIGURE 3) Turn the bench over on a non-
scratch surface and attach middle
seat brace (J) to the slats (B) at the midway point
between legs (C) using wood screws (H). Work from the
Attach side seat brace (D) to the leg (C) using bolt (K),
washers (F) and nut (G), connect side seat brace (D) to
the slats (B) at the sideway point between legs (C) using
wood screws (H).
5. (SEE FIGURE 4) Add plastic nut cover (I) to nut (G)
located on backside of straight back (A).

