Bellini BDW6WP Installation instructions

GSM Retail Australia Pty Ltd ABN: 53 007 582 475
For Warranty and technical queries: 1300 373 199 Aus Or0508123108 NZwww.belliniappliances.com.au
Model: BDW6WP-F FN5104071 Aus, BDW6XP-F FN5104072 Aus Only 60CM Freestanding Dishwasher
INSTALLATION & OPERATION
INSTRUCTIONS
60cm Dishwasher
Model No.
BDW6WP
BDW6WP-F Fineline 5104071 Aus
BDW6XP
BDW6XP-F Fineline 5104072 Aus
V.6 FEB20

GSM Retail Australia Pty Ltd ABN: 53 007 582 475
For Warranty and technical queries: 1300 373 199 Aus Or0508123108 NZwww.belliniappliances.com.au
Model: BDW6WP-F FN5104071 Aus, BDW6XP-F FN5104072 Aus Only 60CM Freestanding Dishwasher
Thank you
Thank you for choosing Bellini Appliances.
Bellini prides itself on ‘affordable living’ making sure there is
no compromise in your favourite room … The Kitchen
All Bellini appliances carry a 3 year In Home warranty,
be sure to retain your installation and user manual and
receipt.
For all warranty and technical queries please contact
1300 373 199

GSM Retail Australia Pty Ltd ABN: 53 007 582 475
For Warranty and technical queries: 1300 373 199 Aus Or0508123108 NZwww.belliniappliances.com.au
Model: BDW6WP-F FN5104071 Aus, BDW6XP-F FN5104072 Aus Only 60CM Freestanding Dishwasher
Content
Safety instructions----------------------------- 3
Operations Instruction------------------------ 5
Start using your appliance--------------------6
Maintenance and cleaning--------------------16
Installation-----------------------------------------18
Troubleshooting----------------------------------21
Warranty------------------------------------------ -24

Important Safety Instructions
This manual explains the proper installation and use of your the appliance, please read it carefully
before using even if you are familiar with the product. The manual should be kept in a safe place for
future reference.
General Warnings
Under certain conditions, Hydrogen gas may be
produced in a hot-water system that has not been
used for two weeks or more. HYDROGEN GAS IS
EXPLOSIVE. If the hot-water system has not
been used for such a period, before using the
dishwasher turn on all hot-water faucets and let
the water flow from each for several minutes. This
will release any accumulated hydrogen gas. As
the gas is flammable, do not smoke or use an
open flame during this time.
If the supply cord is damaged, the cord must be
replaced by the manufacturer, its service agent or
similarly qualified persons in order to avoid a
hazard.
This product has not been designed for any uses
other than those specified in this booklet.
Do not use the appliance in the event of a
technical fault. Any faults must be fixed by an
appropriately qualified and authorised person.
In the event of any incident caused by a technical
fault, disconnect the power and report the fault to
the service centre to be repaired.
The rules and provisions contained in this
instruction manual should be strictly observed.
Do not allow anybody who is not familiar with the
contents of this instruction manual to operate the
appliance.
Do not abuse, sit on, or stand on the door or dish
basket of the dishwasher.
Do not touch the heating element during or
immediately after use.
Do not place any heavy objects or stand on the
door when it is open. The appliance could tip
forward.
Child Safety
This appliance is not intended for use by persons
(including children) with reduced physical, sensory
or mental capabilities, or lack of experience and
knowledge, unless they’ve been given supervision
or instruction concerning use of the appliance by a
person responsible for their safety.
Children should be supervised to ensure that they
do not play with the appliance.
Avoid contact with skin and eyes, and keep
children away from the dishwasher when the door
is open.
Dishwasher detergent is corrosive! Take care to
keep it out of reach of children.
Accessible parts will also become hot when in use.
To avoid burns and scalds children should be kept
away.
Installation, Cleaning & Servicing
The appliance must be installed only by an
authorised person in compliance with the
instructions provided. Incorrect installation may
cause harm to persons, animals or may damage
property.
Before using the appliance, ensure that all packing
materials are removed from the appliance.
The unit's power cord must be connected to a
properly grounded and protected, 220-240V
electrical outlet.Always use ground fault protection
where required by the electrical code.
When transporting or storing the unit, keep it in a
dry location, free from dust, excessive vibration or
other factors, which may damage the unit.
Do not operate the appliance with a damaged cord,
plug or if the appliance has malfunctioned or has
been dropped or damaged in any manner.
Return the appliance to authorised service facility
for repair.
3
This appliance is intended for indoor domestic use only. Do not use it for anything other
than its intended purpose, and only use it as described in this manual.
GSM Retail Australia Pty Ltd ABN: 53 007 582 475
For Warranty and technical queries: 1300 373 199 Aus Or 0508123108 NZ www.belliniappliances.com.au
Model: BDW6WP-F FN5104071 Aus, BDW6XP-F FN5104072 Aus Only 60CM Freestanding Dishwasher

Only authorised personnel should carry out
servicing. (Certificate of Compliance to be
retained)
Always ensure the appliance is switched off
before cleaning or replacing parts.
THIS APPLIANCE MUST BE EARTHED.
To maintain safe operation, it is recommended
that the product be inspected every five years by
an authorised service person.
During installation, the power supply must not be
excessively or dangerously bent or flattened.
Do not tamper with controls.
The appliance is to be connected to the water
mains using new hose sets, and the old hose-sets
should not be reused.
Never use a spray cleaner to clean the door panel,
it could damage the door lock and electrical
components.
Do not use the abrasive agent or some paper
towel because of the risk of scratching or leaving
spots on the stainless steel surface.
The appliance
Do not operate your dishwasher unless all
enclosure panels are properly in place. Open the
door very carefully if the dishwasher is operating.
There is a risk of water squirting out.
When loading items to be washed:
- Locate sharp items so that they are not likely to
damage the door seal;
- Load sharp knives with the handles up to reduce
the risk of cut-type injuries;
Warning: Knives and other utensils with sharp
points must be loaded in the basket with their
points down or placed in a horizontal position.
When using your dishwasher, you should prevent
plastic items from contacting with heating
element.
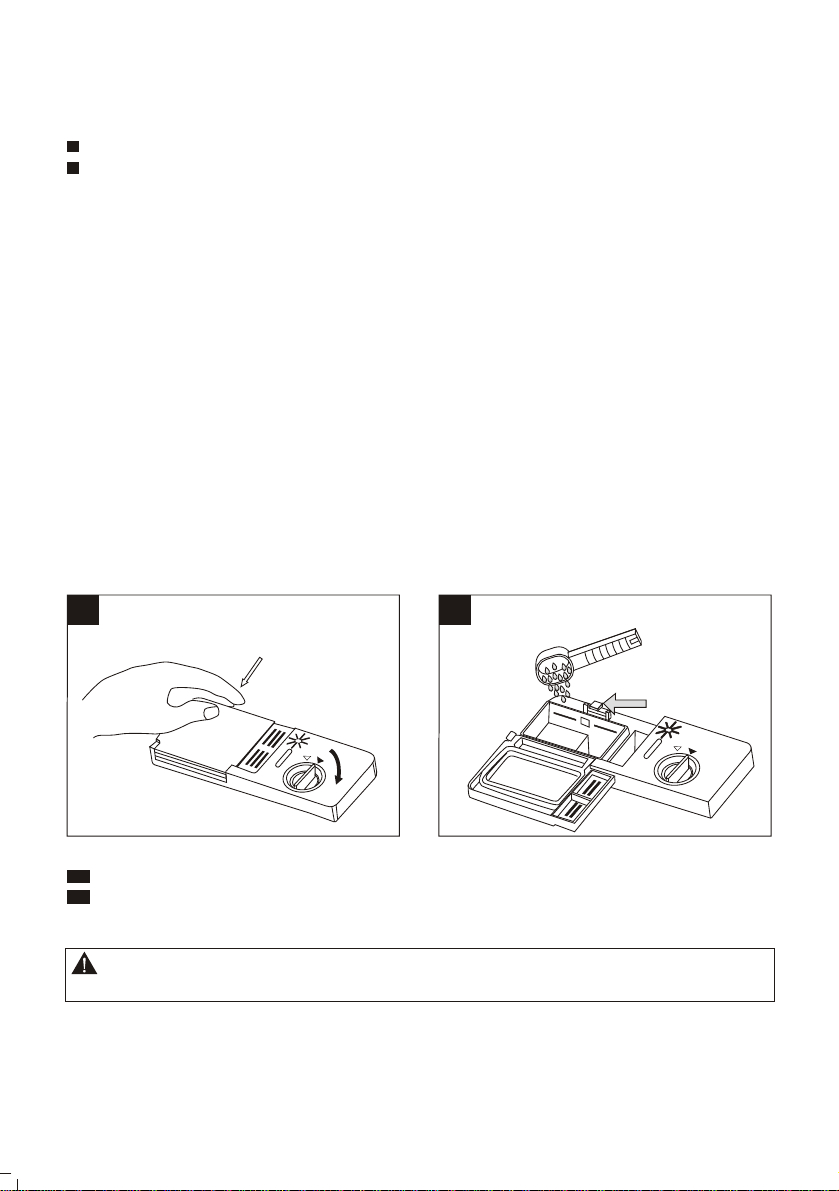
Check that the detergent receptacle is empty after
completion of the wash cycle.
Do not wash plastic items unless they are marked
dishwasher safe or the equivalent. For plastic
items not so marked, check the manufacturer's
recommendations.
Use only detergent and rinse additives designed
for an automatic dishwasher. Never use soap,
laundry detergent, or hand washing detergent in
your dishwasher.
Other means for disconnection from the supply
must be incorporated in the fixed wiring with at
least 3mm contact separation in all poles.
Dishwasher detergents are strongly alkaline. They
can be extremely dangerous if swallowed.
The door should not be left in the open position
since this could present a tripping hazard.
To avoid an accident, ensure that the appliance
shelves and fittings are always inserted into the
appliance in accordance with the instructions.
Do not use the door as a shelf.
Do not push down when the appliance door is
open.
Indoor use only.
Environmental Hints
Packaging material could be dangerous for
children!
For disposing of package and the appliance
please go to a recycling centre. Cut off the power
supply cable and make the door closing device
unusable.
Cardboard packaging is manufactured from
recycled paper and should be disposed in the
waste paper collection for recycling.
By ensuring this product is disposed of correctly,
you will help prevent potential negative
consequences for the environment and human
health, which could otherwise be caused by
inappropriate waste handling of this product.
For more detailed information about recycling of
this product, please contact your local city office
and your household waste disposal service
This product must not be disposed together with
domestic waste. This product has to be disposed
at an authorised place for recycling of electrical
and electronic appliances.
By collecting and recycling waste,
you help save natural resources, and
make sure the product is disposed in
an environmental friendly and
healthy way.
4
GSM Retail Australia Pty Ltd ABN: 53 007 582 475
For Warranty and technical queries: 1300 373 199 Aus Or 0508123108 NZ www.belliniappliances.com.au
Model: BDW6WP-F FN5104071 Aus, BDW6XP-F FN5104072 Aus Only 60CM Freestanding Dishwasher

Operation Instruction
3
Control Panel
5
1 Power switch: To control the power supply.
2 Delay time: Pressing the DELAY pad one time can select
3h delay time, continuous pressing second
time will
increase the delay hours to 6h, third time increase to 9h.
Continuous pressing the fourth
time can cancel the delay
selection.
3 Start/Pause Button: Press this button to start or pause
the dishwasher, the light will come when starting.
4 Rinse Aid Light: To come on when dispenser
needs to be refilled.
Indicator
5
6 Child lock:To lock the dishwasher controls, press and hold the
INTENSIVE & NORMAL pad at t
he
same
time
for
3
seconds .
The INTENSIVE & NORMAL light will turn on. To unlock the
dishwasher controls, press the same pad
in the same way, the
light will turn off.
7 Program Button: To select washing program when press the
button.
Drying light: To come on when the dishwasher is drying
Power 3h 6h 9h
Intensive Heavy Normal Rinse Rapid Soak
Child Lock
Delay Start/Pause
45
123
Bellini
GSM Retail Australia Pty Ltd ABN: 53 007 582 475
For Warranty and technical queries: 1300 373 199 Aus Or 0508123108 NZ www.belliniappliances.com.au
Model: BDW6WP-F FN5104071 Aus, BDW6XP-F FN5104072 Aus Only 60CM Freestanding Dishwasher

6
GSM Retail Australia Pty Ltd ABN: 53 007 582 475
For Warranty and technical queries: 1300 373 199 Aus Or 0508123108 NZ www.belliniappliances.com.au
Model: BDW6WP-F FN5104071 Aus, BDW6XP-F FN5104072 Aus Only 60CM Freestanding Dishwasher
Drain hose
hanger
AcAccceessssor y Nory Name ame cPiPicttureure QQuau y anntittity
UUserser a MManunu l aal 11
1111111
Hose
Hook
1111
Inlet pipe connector Drain pipe connector
POWER OUTLET
SINK
DISHWASHER Hose Hook
Draining Hose Hanger

Prior Using for the First Time
Before using your dishwasher for the first time:
A. Fill the rinse aid dispenser
B. Function of detergent
A. Fill the Rinse Aid Dispenser
Function of Rinse Aid
Rinse aid is automatically added during the last rinse, ensuring thorough rinsing, spot and streak
free drying.
Attention!
Only use branded rinse aid for dishwasher. Never fill the rinse aid dispenser with any other
substances (e.g. dishwasher cleaning agent, liquid detergent). This would damage the appliance.
When to Refill the Rinse Aid Dispenser
You can judge the amount of rinse-aid by the colour of the optical level indicator "D" located next to
the cap. When the rinse-aid container is full, the whole indicator will be dark .As the rinse aid
diminishes, the size of the dark dot decreases. You should never let the rinse aid get below 1 / 4 full.
As the rinse aid diminishes, the size of the black dot on the rinse aid level indicator changes, as
illustrated below.
Full
3 / 4 full
1 / 2 full
1 / 4 full - Should refill to eliminate spotting
Empty
D (Rinse-Aid indicator)
1
2
3
4
5
6
MAX
7
GSM Retail Australia Pty Ltd ABN: 53 007 582 475
For Warranty and technical queries: 1300 373 199 Aus Or 0508123108 NZ www.belliniappliances.com.au
Model: BDW6WP-F FN5104071 Aus, BDW6XP-F FN5104072 Aus Only 60CM Freestanding Dishwasher

To open the dispenser, turn the cap to the "open" (left) arrow and lift it out.
Pour the rinse aid into the dispenser, be careful not to overfill.
Replace the cap by inserting it aligned with "open" arrow and turning it to the "closed" (right)
arrow.
The rinse aid is released during the final rinse to prevent water from forming droplets on your dishes
that can leave spots and streaks. It also improves drying by allowing water to sheet off the dishes.
Your dishwashers are designed to use liquid rinse aids. The rinse aid dispenser is located inside the
door next to the detergent dispenser.
To fill the dispenser, open the cap and pour the rinse aid into the dispenser until the level indicator
turns completely black. The volume of the rinse aid container is about 140ml.
Be careful not to overfill the dispenser, because this could cause over sudsing. Wipe away any spills
with a damp cloth. Don't forget to replace the cap before you close dishwasher door.
Attention!
Clean up any rinse aid split during filling with an absorbent cloth to avoid excess foaming during the
next wash.
NOTE: Increase the dose if there are drops of water or lime spots on the dishes after washing.
Reduce it if there are sticky whitish streaks on the dishes or a bluish film on glassware or knife
blades.
Adjusting Rinse Aid Dispenser
The rinse aid dispenser has four or six settings. Always start
With the dispenser set on "4" If spots and poor drying are
Problems, increase theamount of rinseaid dispensed
by removing thedispenser lid androtating the dialto "5”.
If the dishesstill are notdrying properly orare spotted,
adjust the dialto the nexthigher number untilyour
dishes are spot-free. The dose isfactory set inposition
4.
1
2
3
Adjust lever
(Rinse)
RINSE AID DISPENSER
22
1133
1
2
3
4
5
6
MAX
B. Function of Detergent
Detergents with its chemical ingredients are necessary to remove dirt, crush dirt and transport it out
of the dishwasher. Most of commercial quality detergents are suitable for this purpose.
8
GSM Retail Australia Pty Ltd ABN: 53 007 582 475
For Warranty and technical queries: 1300 373 199 Aus Or 0508123108 NZ www.belliniappliances.com.au
Model: BDW6WP-F FN5104071 Aus, BDW6XP-F FN5104072 Aus Only 60CM Freestanding Dishwasher

Concentrated Detergent
Based on their chemical composition, dishwasher can be split in two basic types:
conventional, alkaline detergents with caustic components
low alkaline concentrated detergents with natural enzymes
The use of "normal" washing programme in conjunction with concentrated detergents reduces
pollution and is good for your dishes; these washing programmes are specially matched to the dirt-
dissolving properties of the enzymes of the concentrated detergent. For this reason"normal"
washing programme in which concentrated detergents are used can achieve the same results that
can otherwise only be achieved using"intensive" programme.
Detergent Tablets
Detergent tablets of different brands dissolve at different speeds. For this reason some detergent
cannot dissolve and develop their full cleaning power during short programmes. Therefore please
use long programmes when using detergent tablets, to ensure the complete removal of detergent
residuals.
Detergent Dispenser
The dispenser must be refilled before the start of each washing cycle following the instructions
provided in the Wash Cycle Table. Your dishwashers use less detergent and rinse aid than
conventional dishwashers. Generally, only one tablespoon of detergent is needed fora normal wash
load. Also, more heavily soiled items need more detergent. Always add the detergent just before
starting dishwasher, otherwise it could get damp and will not dissolve properly.
Amount of Detergent to Use
2
1
NOTE:
If the lid is closed: press release button. The lid springs open.
Always add the detergent just before starting each wash cycle. Only use branded detergent aid
for dishwasher.
WARNING!
Dishwasher detergent is corrosive! Take care to keep it out of reach of children
Use only detergent specifically made for use in dishwashers. Keep your detergent fresh and dry.
Don't put powder detergent into the dispenser until you're ready to wash dishes.
1122
9
GSM Retail Australia Pty Ltd ABN: 53 007 582 475
For Warranty and technical queries: 1300 373 199 Aus Or 0508123108 NZ www.belliniappliances.com.au
Model: BDW6WP-F FN5104071 Aus, BDW6XP-F FN5104072 Aus Only 60CM Freestanding Dishwasher

Fill in the detergent
Fill the detergent dispenser with detergent.
The marking indicates the dosing levels , as
illustrated on the right:
The place of main wash cycle detergent placed,
MIN means approximately 20g of detergent.
The place of pre-wash cycle detergent placed ,
approximately 5g of detergent.
""
2
1
Please observe the manufacturer's dosing and storage recommendations as stated on the
detergent packaging.
Close the lid and press until it locks in place.
If the dishes are heavily soiled, place an additional detergent dose in the pre-wash detergent
chamber. This detergent will take effect during the pre-wash phase.
NOTE:
You find information about the amount of detergent for the single programme on the last page.
Please be aware that according to the level soiling and the specific hardness of water, differences
are possible.
Please observe the manufacturer's recommendations on the detergent packaging.
1
2
3
4
5
6
MAX
2
1
GSM Retail Australia Pty Ltd ABN: 53 007 582 475
For Warranty and technical queries: 1300 373 199 Aus Or 0508123108 NZ www.belliniappliances.com.au
Model: BDW6WP-F FN5104071 Aus, BDW6XP-F FN5104072 Aus Only 60CM Freestanding Dishwasher
10

Loading the Dishwasher Baskets
For best performance of the dishwasher, follow these loading guidelines. Features and appearance
of baskets and Cutlery tray may vary from your model.
Attention before or after Loading the Dishwasher Baskets
1. Scrape off any large amounts of leftover food. It is not necessary to rinse the dishes under
running water. Place objects in the dishwasher in the following way:
A. Items such as cups, glasses, pots/pans, etc. are stood upside down.
B. Curve items, or those with recesses, should be at a slant so that water can run off.
C. They are stacked securely and can not tip over.
D. They do not prevent the spray arms from rotating while washing takes place.
2. Very small items should not be washed in the dishwasher as they could easily fall out of the
Baskets.
3. The upper and lower baskets can not be pull out in the same time when the dishwasher is
Loading, or it may lead to dumping.
Removing the Dishes
To prevent water dripping from the upper basket into the lower basket, we recommend that you
empty the lower basket first and then the upper basket.
Loading the Upper Basket
The upper basket is designed to
hold more delicate and lighter
dishware such as glasses,
coffee and tea cup and
saucers, as well as plates,
small bowls and shallow
pans (as long as they are
not too dirty). Position the
Dishes and cookware so
that they do not get moved
by the spray of water.
Upper basket
Type Item
Cup
Glass
Saucer
A
B
C
Upper Basket
Adjusting the Upper Basket
If required, the heig ht of the upper basket can be adjusted in order to c reate more space for large
utensils either in the upper basket or lower basket. The upper basket can be adjusted for height by
putting wheels of different height into the rails. Long items, serving cutlery, salad servers or knives
should be placed on the shelf so that they do not obstruct the rotation of the spray a rms. The shelf
can be folded back or removed when not be required for use.
GSM Retail Australia Pty Ltd ABN: 53 007 582 475
11
For Warranty and technical queries: 1300 373 199 Aus Or 0508123108 NZ www.belliniappliances.com.au
Model: BDW6WP-F FN5104071 Aus, BDW6XP-F FN5104072 Aus Only 60CM Freestanding Dishwasher

Lower Basket
Loading the Lower Basket
We recommend that you place large items which are most difficult to clean in to the lower basket:
pots, pans, lids, serving dishes and bowls, as shown in the figure below.
It is preferable to place serving dishes and lids on the side of the baskets in order to avoid blocking
the rotation of the top spray arm.
Pots, serving bowls, etc. must always be placed top down.
Deep pots should be slanted to allow water to flow out.
The bottom basket features fold down tine rows so that larger or more pots and pans can be loaded.
Lower basket
Folding racks
Folding racks consisting of two parts that
are located on the lower basket of your
machine are designed in order to let you
place big items easier as pots, pans, etc.
If requested, each part can be folded
separately, or all of them can be folded
and larger can be obtained. You can use
folding racks by rasing then upwards, or
by folding.
Lower basket
Type Item
Dessert plate
G
H
I
Dinner plate
Souper plate
For optional 12
GSM Retail Australia Pty Ltd ABN: 53 007 582 475
For Warranty and technical queries: 1300 373 199 Aus Or 0508123108 NZ www.belliniappliances.com.au
Model: BDW6WP-F FN5104071 Aus, BDW6XP-F FN5104072 Aus Only 60CM Freestanding Dishwasher

10 13
For washing in the dishwasher the following cutlery/dishes
Are not suitable
Cutlery with wooden, horn china or
mother-of-pearl handles
Plastic items that are not heat resistant
Older cutlery with glued parts that is not
temperature resistant
Bonded cutlery items or dishes
Pewter or cooper items
Lead crystal glass
Steel items subject to rusting
Wooden platters
Items made from synthetic fibre
WARNING!
Do not let any item extend through bottom.
Are of limited suitability
Some types of glasses can become
dull after a large number of washes
Silver and aluminium parts have a
tendency to discolour during washing
Glazed patterns may fade if machine
washed frequently
NOTE: Do not put in items that are dirty of cigarette ash, candle wax, lacquer or paint. If you buy
new dishes please make sure that they are suitable for dishwashers.
Cutlery tray
Cutlery should be placed in the cutlery tray with handles at the bottom: If the tray
has side baskets, the spoon should be loaded individually into the appropriate slots,
especially long utensils should be placed in the horizontal position at the front of the
upper basket.
Door side
GSM Retail Australia Pty Ltd ABN: 53 007 582 475
For Warranty and technical queries: 1300 373 199 Aus Or 0508123108 NZ www.belliniappliances.com.au
Model: BDW6WP-F FN5104071 Aus, BDW6XP-F FN5104072 Aus Only 60CM Freestanding Dishwasher

11
14
NOTE: Please do not overload your dishwasher. There is only space for 12 standard dishes. Do not
use dish that is not suitable for dishwashers. This is important for good results and for reasonable
energy consumption.
Before loading the dishes, you should:
Remove large left-over
Soften remnants of burnt food in pans
Loading Cutlery and Dishes
When Loading the Dishes and Cutlery, Please Note:
Dishes and cutlerymust not impede the rotation of the spray arms.
Load hollow itemssuch as cups, glasses, pans etc. with the opening downwards so that water cannot
collect in thecontainer or a deep base.
Dishes and itemsof cutlery must not lie inside one another, or cover each other
Toavoid damage to glasses, they must not touch
Load large itemswhich are most difficult to cleaninto the lowerbasket
The upper basketis designed to hold more delicate and lighter dishware such as glasses, coffee and
tea cups
Long bladed knives stored in an upright position are a potential hazard!
Long and/or sharp items of cutlery such as carving knives must be positioned horizontally in the upper
basket.
Attention!
Damage to Glassware and other Dishes
Possible causes:
Type of glass or manufacturing process. Chemical composition of detergent.
Water temperature and duration of dishwasher programme.
Suggested remedy:
Use glassware or porcelain dishes that have been marked dishwasher-proof by the manufacturer.
Use a mild detergent that is described as kind of dishes. If necessary, seek further information from
detergent manufacturers.
Select a programme with a low temperature.
To prevent damage, take glass and cutlery out of the dishwasher as soon as possible after the
programme has ended.
At the End of the Wash
When the working cycle has finished, the buzzer of dishwasher will ring for 6 times, then stop. Turn
off the appliance using the “Power" button, shut off the water supply and open the door of the
dishwasher. Wait a few minutes before unloading the dishwasher to avoid handling the dishes and
utensils while they are still hot and more susceptible to breakage. They will also dry better.
GSM Retail Australia Pty Ltd ABN: 53 007 582 475
For Warranty and technical queries: 1300 373 199 Aus Or 0508123108 NZ www.belliniappliances.com.au
Model: BDW6WP-F FN5104071 Aus, BDW6XP-F FN5104072 Aus Only 60CM Freestanding Dishwasher

Starting a Washing Programme
12 15
Starting a wash cycle...
Draw out the lower and upper basket, load the dishes and
1. push them back. It is recommended to load the lower basket first, then the upper one (see the
section entitled "Loading the Dishwasher"). Pour in the detergent .
2. Insert the plug into the socket. The power supply is 220-240V AC 50 Hz, the specification of
the socket is 12 A 250 VAC.50 Hz.
Turning on the Appliance
AS/NZS 2007.1:This programme is the test cycle. The information for comparability test
in accordance with AS/NZS.2007.1, as follows:
- Capacity: 12 settings
- Position Upper basket: upper wheels on rails
- Rinse aid setting:6( or 4 for four setting dispenser)
Wash cycle table
Program Cycle Selection
Information
Description
of Cycle
Detergent
Pre/main
Running
Time
(min)
Energy
(kWh)
Water
(L)
Intensive
Heavy
Rinse
Rapid
Soak
For the heaviest soiled loads,
such as pots, pans, casserole
dishes and dishes that have
been sitting with dried food
on them for a while.
For heavy soiled loads,
such as pots, plates, glasses
and lightly soiled pans.
standard daily cycle.
A shorter wash for lightly
soiled loads that do not
need drying.
To rinse dishes that you
plan to wash later that day
Pre-wash(40 )
Main wash(55 )
Rinse
Hot rinse(65 )
Drying
Main wash(60 )
Rinse 1
Rinse 2
Hot rinse(65 )
Drying
Main wash(45 )
Rinse
Hot rinse(49 )
Drying
Pre-wash
Hot rinse(70 )
Drying
Main wash(40 )
Hot rinse(49 )
Pre-wash
5/25g
5/25g
5/25g
15g
145
135
112
67
50
8
1.20
1.15
0.73
0.75
0.50
0.01
15.5
15.0
11.8
7.5
7.5
4.0
Normal
(AS/NZS 2007.1)
For dishes that need to be
rinsed and dried only
NOTE:
For normally soiled loads,
such as pots, plates, glasses
and lightly soiled pans.
Standard daily cycle.
We recommend you open the door slightly 50mm to assist in drying of the dishes
after every wash.
GSM Retail Australia Pty Ltd ABN: 53 007 582 475
For Warranty and technical queries: 1300 373 199 Aus Or 0508123108 NZ www.belliniappliances.com.au
Model: BDW6WP-F FN5104071 Aus, BDW6XP-F FN5104072 Aus Only 60CM Freestanding Dishwasher

13
16
NOTE: If all the lights begin to glimmer, that indicates the machine is out of order, please turn off the
main power and water supply before calling a service.
Forget to Add Dish
A forgotten dish can be added any time before the detergent cup opens.
1 Open the door a little to stop the washing.
2 After the spray arms stop working, you can open the door completely.
3 Add forgotten dishes.
4 Close the door, the dishwasher will work after ten seconds.
WARNING!
It is dangerousto open the door when washing, because the hot water may scaldyou.
Switch Off theDishwasher. Thestatus indicator lights up , only in this casethe programme has ended.
1.Switch off thedishwasher by pressing the "Power" button.
2.Turn offthe water tap!
Open the doorcarefully. Hot steam may escapewhen the door is opened!
Hot dishes aresensitive to knocks. The dishes shouldtherefore be allowed to cool down around
15 minutes beforeremoving from the appliance.
Open the dishwasher'sdoor, leave it ajar and wait a few minutes before removingthe dishes. In
this way theywill be cooler and the drying will be improved.
Unloading the dishwasher
It is normalthat the dishwasher is wet inside.
Empty the lowerbasket first and then the upper one. This willavoid water dripping from the upper
basket onto thedishes in the lower one.
Change the Programme.
Premise: A cycle that is underway can only be modified if it has only been running for a short time.
Otherwise, the detergent may have already been released, and the appliance may have already
drained the wash water. If this is the case, the detergent dispenser must be refilled (see the section
entitled " Fill in the Detergent " ).
1 Press the “Power” button to cancel the programme.
2 Turn on it again and you can change the programme to the desired cycle setting (see the section
entitled "Starting a wash cycle. . . " ).
NOTE: If you open the door when washing, the machine pauses and warning alarm rings, LED1 and
LED2 flash. When you close the door, the machine will keep on working after 10 seconds.
The 6 programme lights show the state of the dishwasher:
a) All program lights off --> stand by
b) One of the program lights on --> cycle running
c) One of the program lights blinking --> pause
NOTE: A click could be heard when the door is closed perfectly.
When the washing is over, you can shut off the switch by pressing "Power" button.
Make sure that the water supply is turned on to full pressure. Close the door, press the"Power"
button, Press the "program." button to select a desired "Wash cycle". (See the section entitled
"Wash Cycle Table".)
With a little force to ensure the door is properly closed.
LED1 LED2 LED3 LED4 LED5 LED6
GSM Retail Australia Pty Ltd ABN: 53 007 582 475
For Warranty and technical queries: 1300 373 199 Aus Or 0508123108 NZ www.belliniappliances.com.au
Model: BDW6WP-F FN5104071 Aus, BDW6XP-F FN5104072 Aus Only 60CM Freestanding Dishwasher

14 17
14
Maintenance and cleaning
Filtering System The filter is used to avoid the big remnants and other sundries getting inside
the pump. The residue can obstruct the filter in sometime.
The filter systemconsists of acoarse filter,a flat
(Main filter) anda micro filter(fine filter).
1 Flat filter
Food and debriswill be trappedby a specialjet
on the lowerspray arm.
2 Coarse filter
Big debris, suchas bone andglass that couldclog the
drain will betrapped in thecoarse filter.
Toremove an itemcaught in thisfilter, gentlysqueeze
the taps onthe top ofthis filter andlift it out.
3 Micro filter
This filter holdssoil and foodresidue in thesump area
and prevents itfrom being redepositon the dishes
during a cycle.
- Inspect thefilters for obstructionsevery time the
dishwasher has beenused.
- By unscrewingthe coarse filter, you can remove
the filter system.Remove any foodremnants and
clean the filtersunder running water.
Step 1 contrarotate the
Coarse filter ,andthen lift itup;
Step 2 lift the Flatfilter up
NOTE: If operate from step 1 to step 2, the filter system will be removed; while operate from step 2
to step 1, the filter system will be installed.
Filter assembly
For best performance and results, the filter assembly must be cleaned. The filter efficiently removes
food particles from the wash water, allowing it to be recirculated during the cycle. For this reason, it
is a good idea to remove the larger food particles trapped in the filter after each wash cycle by rinsing
the semicircular filter and cup under running water. To remove the filter assembly, pull on the cup
handle in the upward direction. The entire filter assembly should be cleaned once a week. To clean
the coarse filter and the micro filter, use a cleaning brush. Then, reassemble the filter parts as shown
in the figures above and reinsert the entire assembly in the dishwasher, positioning in its seat and
pressing downward. The dishwasher must never be used without the filters. Improper replacement
of the filter may reduce the performance level of the appliance and damage dishes and utensils.
2
1
3
1 2
GSM Retail Australia Pty Ltd ABN: 53 007 582 475
For Warranty and technical queries: 1300 373 199 Aus Or 0508123108 NZ www.belliniappliances.com.au
Model: BDW6WP-F FN5104071 Aus, BDW6XP-F FN5104072 Aus Only 60CM Freestanding Dishwasher

18
WARNING!
Never run the dishwasher without the filters in place. When cleaning the filters, don't knock on them.
Otherwise, the filters could be contorted and the performance of dishwasher could be debased.
Cleaning the Spray Arms
It is necessary to clean the spray arms regularly for hard
water chemicals will clog the spray arm jets and bearings.
To remove the spray arms, screw off the nut clockwise to
take out the washer on top of the spray arm and remove the
arm. Wash the arms in soapy and warm water and use a soft
brush to clean the jets. Replace them after rinsing thoroughly.
Caring for the Dishwasher
To clean the control panel, use a lightly dampened cloth then
dry thoroughly.
To clean the exterior, use a good appliance polish wax.
Never use sharp objects, scouring pads or harsh cleaners
on any part of the dishwasher.
Protect Against Freezing
If your dishwasher is left in an unheated place during the winter, ask a service technical to:
1.Cut off electrical power to the dishwasher.
2.Turn off the water supply and disconnect the water inlet pipe from the water valve.
3.Drain water from the inlet pipe and water valve. (Use a pan to catch the water)
4.Reconnect the water inlet pipe to the water valve.
5.Remove the filter in the tub and the bottom and use a sponge to use up water in sump
Cleaning the Door
To clean the edge around the door, you should use only a soft warm, damp rag. To prevent
penetration of water into the door lock and electrical components, do not use a spray cleaner of any
kind.
Also, never use abrasive cleaners or scouring pads on the outer surfaces because they will scratch
the finish. Some papers towels can also scratch or leave marks on the surface.
WARNING!
Never use a spray cleaner to clean the door panel for it could damage the door lock and electrical
components. It is not allowed to use the abrasive agent or some paper towel because of the risk of
scratching or leaving spots on the stainless steel surface.
GSM Retail Australia Pty Ltd ABN: 53 007 582 475
For Warranty and technical queries: 1300 373 199 Aus Or 0508123108 NZ www.belliniappliances.com.au
Model: BDW6WP-F FN5104071 Aus, BDW6XP-F FN5104072 Aus Only 60CM Freestanding Dishwasher

19
How to Keep Your Dishwasher in Shape
After Every Wash
After every wash, turn off the water supply
to the appliance and leave the door slightly
ajar so that moisture and odors are not
trapped inside.
Remove the Plug
Before cleaning or performing
maintenance, always remove the plug from
the socket. Do not run risks.
No Solvents or Abrasive Cleaning
To clean the exterior and rubber parts of
the dishwasher, do not use solvents or
abrasive cleaning products. Use only a
cloth and warm soapy water. To remove
spots or stains from the surface of the
interior, use a cloth dampened with water
and a little white vinegar, or a cleaning
product made specifically for dishwashers.
When You Go on holiday
When you go on holiday, it is
recommended that you run a wash cycle
with the dishwasher empty and then
remove the plug from the socket, turn off
the water supply and leave the door of the
appliance slightly ajar. This will help the
seals last longer and prevent odors from
forming in the appliance.
Moving the Appliance
If the appliance must be moved, try to keep
it in the vertical position. If absolutely
necessary, it can be positioned on its back.
Seals
One of the factors that cause odors to form
in the dishwasher is food that remains
trapped in the seals. Periodic cleaning with
a damp sponge will prevent this.
Attention:
The installation of the pipes
and electrical equipments
should be done by professionals.
Electrical Shock Hazard!
Disconnect electrical power before
installing dishwasher.
Failure to do so can result in death or
electrical shock.
Warning
Installation
Keep this instruction manual in a safe place for future reference. If the appliance is sold, given
away or moved, please ensure the manual is kept with the machine, so that the new owner may
benefit from the advice contained within it.
Please read this instruction manual carefully: it contains important information regarding the safe
installation, use and maintenance of the appliance.
If the appliance must be moved at any time, keep it in an upright position; if absolutely necessary,
it may be tilted onto its back.
Positioning and leveling
1. Remove the appliance from all packaging and check that it has not been damaged during
transportation. If it has been damaged, contact the retailer and do not proceed and further with the
installation process.
2. Check the dishwasher by placing it so that its sides or back panel are in contact with the adjacent
cabinets or even with the wall. This appliance can also be recessed under a single work top (see
the Assembly instruction sheet).
GSM Retail Australia Pty Ltd ABN: 53 007 582 475
For Warranty and technical queries: 1300 373 199 Aus Or 0508123108 NZ www.belliniappliances.com.au
Model: BDW6WP-F FN5104071 Aus, BDW6XP-F FN5104072 Aus Only 60CM Freestanding Dishwasher
This manual suits for next models
5
Table of contents
Other Bellini Dishwasher manuals

Bellini
Bellini BDWM26W Installation instructions

Bellini
Bellini BDW86S -F User guide

Bellini
Bellini BDDW605W User manual

Bellini
Bellini BDWM46W Installation instructions

Bellini
Bellini BDW96W Installation instructions

Bellini
Bellini BDW127W Installation instructions

Bellini
Bellini BFDM146X Installation instructions

Bellini
Bellini BDW96W-F Installation instructions