Belrobotics PARCMOW User manual

English version
English versionEnglish version
English version
PARC
PARCPARC
PARC
PARC
PARCPARC
PARC
MOW
MOW MOW
MOW
MOW
MOW MOW
MOW -
--
-
-
--
-
BIG
BIGBIG
BIG
BIG
BIGBIG
BIG
MOW
MOW MOW
MOW
MOW
MOW MOW
MOW
Read this instructions manual carefully before starting to set up the PARCMOW peripheral wire
nstr uctions
nstr uctionsnstr uctions
nstr uctions
Manual
ManualManual
Manual
EN Version 2009-02-10

PAGE 2
IMPORTANT!
Read
the
instruction manual carefully in order to understand the contents before starting
to use your PARCMOW-BIGMOW
.
WARNING!
This automatic mowing device may prove dangerous when used incorrectly. The recom-
mendations for use and safety must be respected absolutely for optimal, completely safe
use.
WARNING!
Never place your feet and hands near the rotating blades or below the cover while the
PARCMOW-BIGMOW is in operation. Do not put anything on top of the PARCMOW-
BIGMOW.
WARNING!
Never use your PARCMOW-BIGMOW when children, animals or people who are unaware
are in the mowing area. Always leave your PARCMOW-BIGMOW to operate alone.
IMPORTANT!
Always use suitable protective gloves while working on the PARCMOW-BIGMOW.
IMPORTANT!
DO NOT climb onto or sit on the machine
IMPORTANT!
Transport the machine when turned off (master switch on OFF), to places suitable for
transport
Instructions
InstructionsInstructions
Instructions
and
andand
and
picto
pictopicto
pictog
gg
g
r
rr
r
am
amam
am
PARC
PARCPARC
PARC
PARC
PARCPARC
PARC
MOW
MOW MOW
MOW
MOW
MOW MOW
MOW -
--
-
-
--
-
BIG
BIGBIG
BIG
BIG
BIGBIG
BIG
MOW
MOW MOW
MOW
MOW
MOW MOW
MOW

T
TT
Ta
aa
ab
bb
bl
ll
le of contents
e of contentse of contents
e of contents
Inst
InstInst
Instr
rr
ructions for setting up the
uctions for setting up the uctions for setting up the
uctions for setting up the peripheral wire
peripheral wireperipheral wire
peripheral wire
PARC
PARCPARC
PARC
PARC
PARCPARC
PARC
MOW
MOW MOW
MOW
MOW
MOW MOW
MOW -
--
-
-
--
-
BIG
BIGBIG
BIG
BIG
BIGBIG
BIG
MOW
MOW MOW
MOW
MOW
MOW MOW
MOW
1. Safety recommendations and pictograms . ................... 2
2. Usual distances for the
PARC
PARCPARC
PARC
PARC
PARCPARC
PARC
MOW
MOW MOW
MOW
MOW
MOW MOW
MOW -
--
-
-
--
-
BIG
BIGBIG
BIG
BIG
BIGBIG
BIG
MOW
MOWMOW
MOW
MOW
MOWMOW
MOW
. ........... 4
3. Setting up the peripheral wire: Islands .........................
4. Setting up the charging station . ................................... 9
5. Configuration: Menus ................................................ 13
. Configuration: Settings .............................................. 15
7. Configuration: Options .............................................. 17
8. Configuration: Parameterisation ................................ 20
9. Safety alert: Error message ....................................... 23
10. Important points to verify ........................................... 24
11. Conversion tables ...................................................... 27
PAGE 3
PARC
PARCPARC
PARC
PARC
PARCPARC
PARC
MOW
MOW MOW
MOW
MOW
MOW MOW
MOW -
--
-
-
--
-
BIG
BIGBIG
BIG
BIG
BIGBIG
BIG
MOW
MOW MOW
MOW
MOW
MOW MOW
MOW
IT IS ESSENTIAL TO USE THE 1.5 mm²CABLE IN A SEALED TUBE
Any cable other than the 1.5 mm²single strand wire is to be avoided. Belro-
botics does not guarantee the operation of the machine with another cable.
Any problem that occurs because of incorrect set-up annuls the guarantee.

PAGE 4
Usual distances for the
Usual distances for the Usual distances for the
Usual distances for the
PARC
PARCPARC
PARC
PARC
PARCPARC
PARC
MOW
MOW MOW
MOW
MOW
MOW MOW
MOW -
--
-
-
--
-
BIG
BIGBIG
BIG
BIG
BIGBIG
BIG
MOW
MOW MOW
MOW
MOW
MOW MOW
MOW
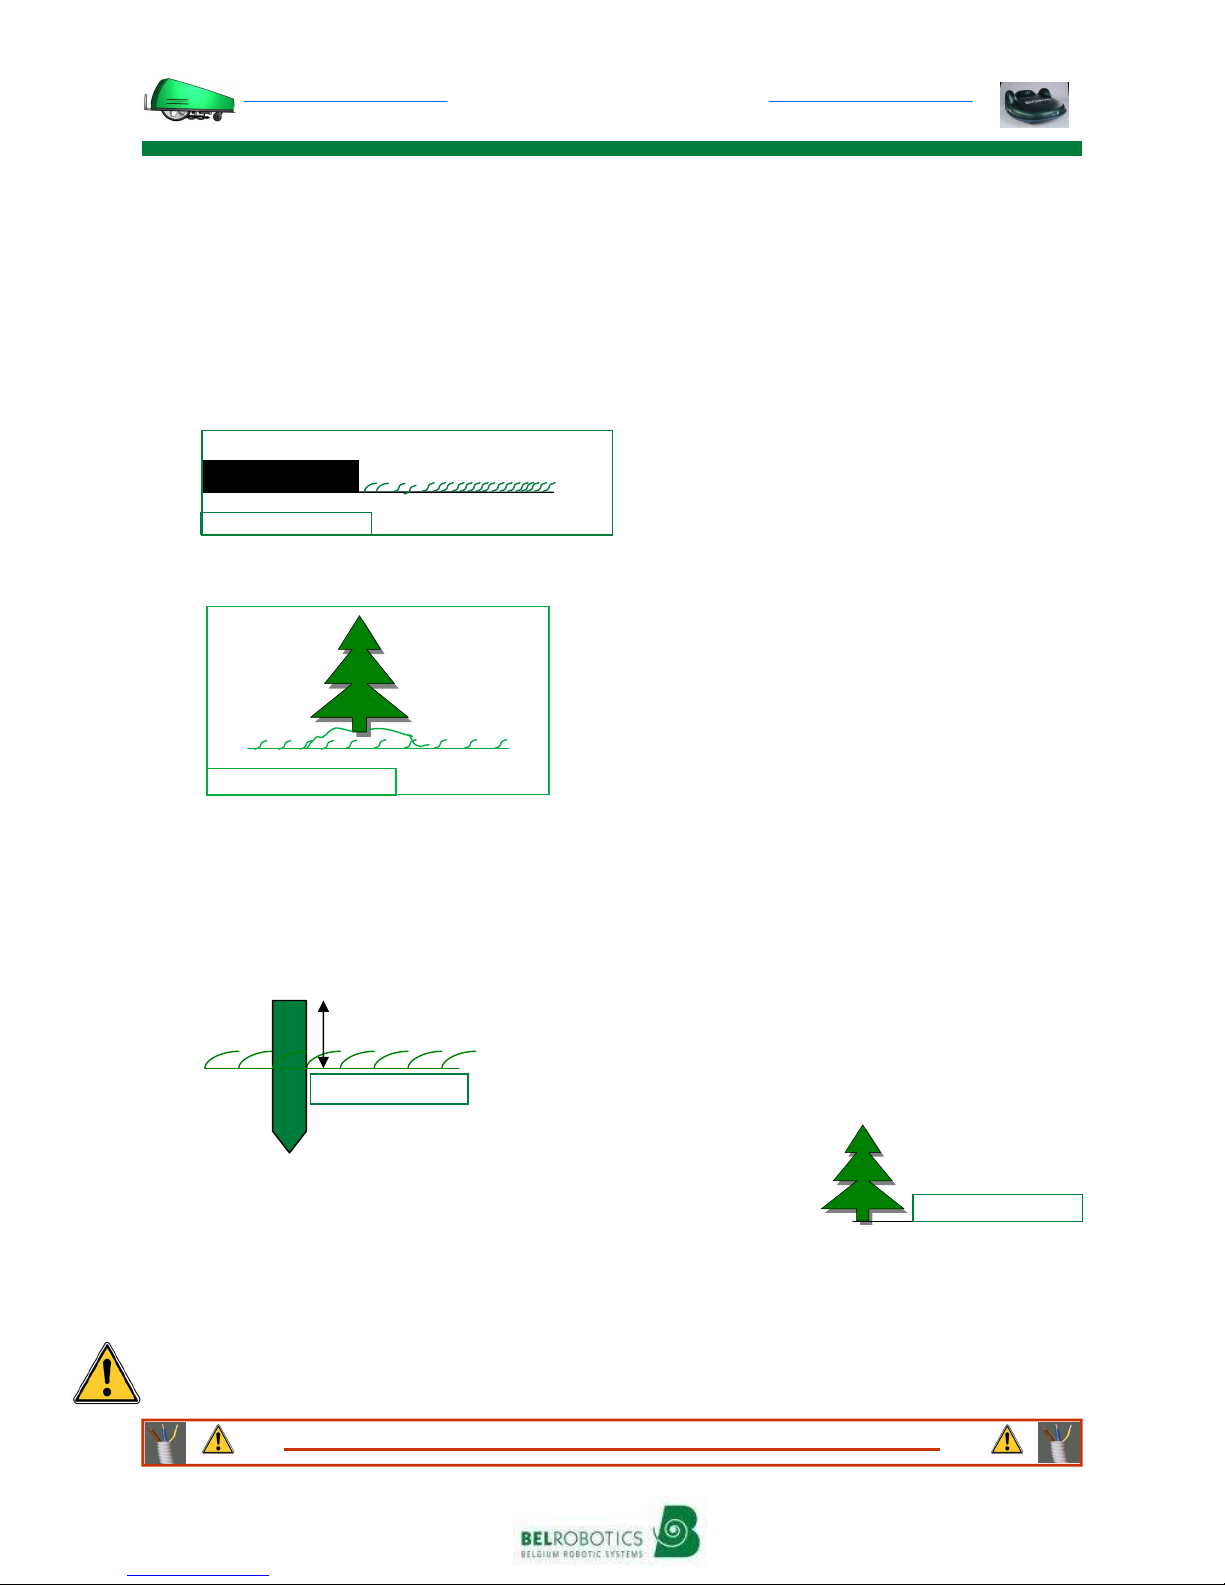
(1)
(1)
Reminder:
Length of mowing: 65 cm;
Length of machine: 95 cm.
•Generally: 45 cm from the boundary
• Edges, terraces, hollows: 50 cm
•Paths, Flowerbeds, at lawn level:between 15
cm and 30 cm
•
Reminder:
Length of mowing: 105 cm;
Length of machine: 120 cm.
•Generally: 60 cm from the boundary
• Edges, terraces, hollows: 65 cm
•Paths, Flowerbeds, at lawn level:between 15
cm and 30 cm
PARC
PARCPARC
PARC
PARC
PARCPARC
PARC
MOW
MOW MOW
MOW
MOW
MOW MOW
MOW
→These distances are used in several cases. Every terrain is different and it must be kept
in mind that different constraints are found in each case.
→During set up, the installer must work as follows:
BIG
BIGBIG
BIG
BIG
BIGBIG
BIG
MOW
MOW MOW
MOW
MOW
MOW MOW
MOW
PARC
PARCPARC
PARC
PARC
PARCPARC
PARC
MOW
MOW MOW
MOW
MOW
MOW MOW
MOW -
--
-
-
--
-
BIG
BIGBIG
BIG
BIG
BIGBIG
BIG
MOW
MOW MOW
MOW
MOW
MOW MOW
MOW
wire
Lawn
60 cm
Terrain boundary
Cross-section view
1) Begin setting up the wire from the charging station.
2) Position the wire in a clockwise direction.
3) Position the peripheral wire of an island in an anti-clockwise direction.
4) The cable is positioned between 2 and 5 cm deep
wire
Lawn
45 cm
Terrain boundary
Cross-section view
wire
Lawn
65 cm
Terrace
Cross-section view
wire
Lawn
50 cm
Terrace
Cross-section view
Flowerbed
wire
Lawn
15 cm
Cross-section view
Path 30 cm
Flowerbed
wire
Lawn
30 cm
Cross-section view
Path 50 cm
IT IS ESSENTIAL TO USE THE 1.5 mm²CABLE IN A SEALED TUBE

PAGE 5
PARC
PARCPARC
PARC
PARC
PARCPARC
PARC
MOW
MOW MOW
MOW
MOW
MOW MOW
MOW -
--
-
-
--
-
BIG
BIGBIG
BIG
BIG
BIGBIG
BIG
MOW
MOW MOW
MOW
MOW
MOW MOW
MOW
→Obstacles :
I. Located more than 1 m from the edge of the terrain: there are 2 solutions.
1.Either the wire passes normally (reminder: 45 cm)
2.Or the wire passes in front of the obstacle (the small plot behind the obstacle will not
be mowed)
II. Located less than 1 m from the edge of the terrain: the wire passes in front.
→Minimal mowing area (for demonstration): 15 m X 15 m (≈2 hundred metres squared)
→Passage: minimum distance of 5 m between the wires.
→It is worth ensuring a minimum distance of 15 m. between the peripheral wires when they
are opposite each other (//) in front of the station.
Min 5 m
Min 15 m
Min 200 m2
Plan view
II.
I
Lawn
Outside area
Peripheral
wire
Plan view
Usual distances for the
Usual distances for the Usual distances for the
Usual distances for the
PARC
PARCPARC
PARC
PARC
PARCPARC
PARC
MOW
MOW MOW
MOW
MOW
MOW MOW
MOW -
--
-
-
--
-
BIG
BIGBIG
BIG
BIG
BIGBIG
BIG
MOW
MOW MOW
MOW
MOW
MOW MOW
MOW
(2)
(2)
IT IS ESSENTIAL TO USE THE 1.5 mm²CABLE IN A SEALED TUBE
PARC
PARCPARC
PARC
PARC
PARCPARC
PARC
MOW
MOW MOW
MOW
MOW
MOW MOW
MOW -
--
-
-
--
-
BIG
BIGBIG
BIG
BIG
BIGBIG
BIG
MOW
MOW MOW
MOW
MOW
MOW MOW
MOW
PAGE 6
→Always limit the creation of islands.
→When to create an island?
1. When the part to isolate is found near a flowerbed or a boundary and there is no
physical barrier (e.g. a flowerbed in the middle of the garden).
1. When tree roots are flush to the lawn.
→Alternative solution to creating an island?
1. Create a physical boundary (edge, pickets) in such a way that the PARCMOW-
BIGMOW sonar detects them (minimum 40 cm high).
1. Certain boundaries do not need protection (trees …).
→For swimming pools, lakes, ponds, etc. (critical areas).
You must set up a boundary wire AND protect the water feature by a physical boundary.
When the station power is cut, the machine continues for 1 metre (1 second) before stopping
and therefore you must set up a physical boundary near a critical area.
Cross-section view
40 cm minimum
Ø10 cm minimum
Cross-section view
Cross-section view
Setting up the
Setting up the Setting up the
Setting up the peripheral wire
peripheral wireperipheral wire
peripheral wire:
::
:
Island
IslandIsland
Island
s
ss
s
(1)
(1)(1)
(1)
IT IS ESSENTIAL TO USE THE 1.5 mm²CABLE IN A SEALED TUBE
Lawn
Cross-section view
Boundary

PAGE 7
PARC
PARCPARC
PARC
PARC
PARCPARC
PARC
MOW
MOW MOW
MOW
MOW
MOW MOW
MOW -
--
-
-
--
-
BIG
BIGBIG
BIG
BIG
BIGBIG
BIG
MOW
MOW MOW
MOW
MOW
MOW MOW
MOW
Setting up the
Setting up the Setting up the
Setting up the peripheral wire
peripheral wireperipheral wire
peripheral wire:
::
:
Island
IslandIsland
Island
s
ss
s
(2)
(2)(2)
(2)
→Distances regarding the peripheral wire:
Case 1: distance less than 5 metres from wire to wire.
Case 2: distance from 5 metres from wire to wire.
Explanation:
→In case 1, during the return to the station,
the machine will go around the island consid-
ering the force fields connected to the island
as the terrain boundary.
→In case 2, during return to the station, the
machine will follow its exterior peripheral wire
without taking the island into account.
Peripheral wire Peripheral wire
Case 1 Case 2
Force field
Force field
40 cm
Max 5m Min 5 m
IT IS ESSENTIAL TO USE THE 1.5 mm²CABLE IN A SEALED TUBE
PAGE 8
PARC
PARCPARC
PARC
PARC
PARCPARC
PARC
MOW
MOW MOW
MOW
MOW
MOW MOW
MOW -
--
-
-
--
-
BIG
BIGBIG
BIG
BIG
BIGBIG
BIG
MOW
MOW MOW
MOW
MOW
MOW MOW
MOW
Setting up the
Setting up the Setting up the
Setting up the peripheral wire
peripheral wireperipheral wire
peripheral wire:
::
:
Island
IslandIsland
Island
s
ss
s
(3)
(3)(3)
(3)
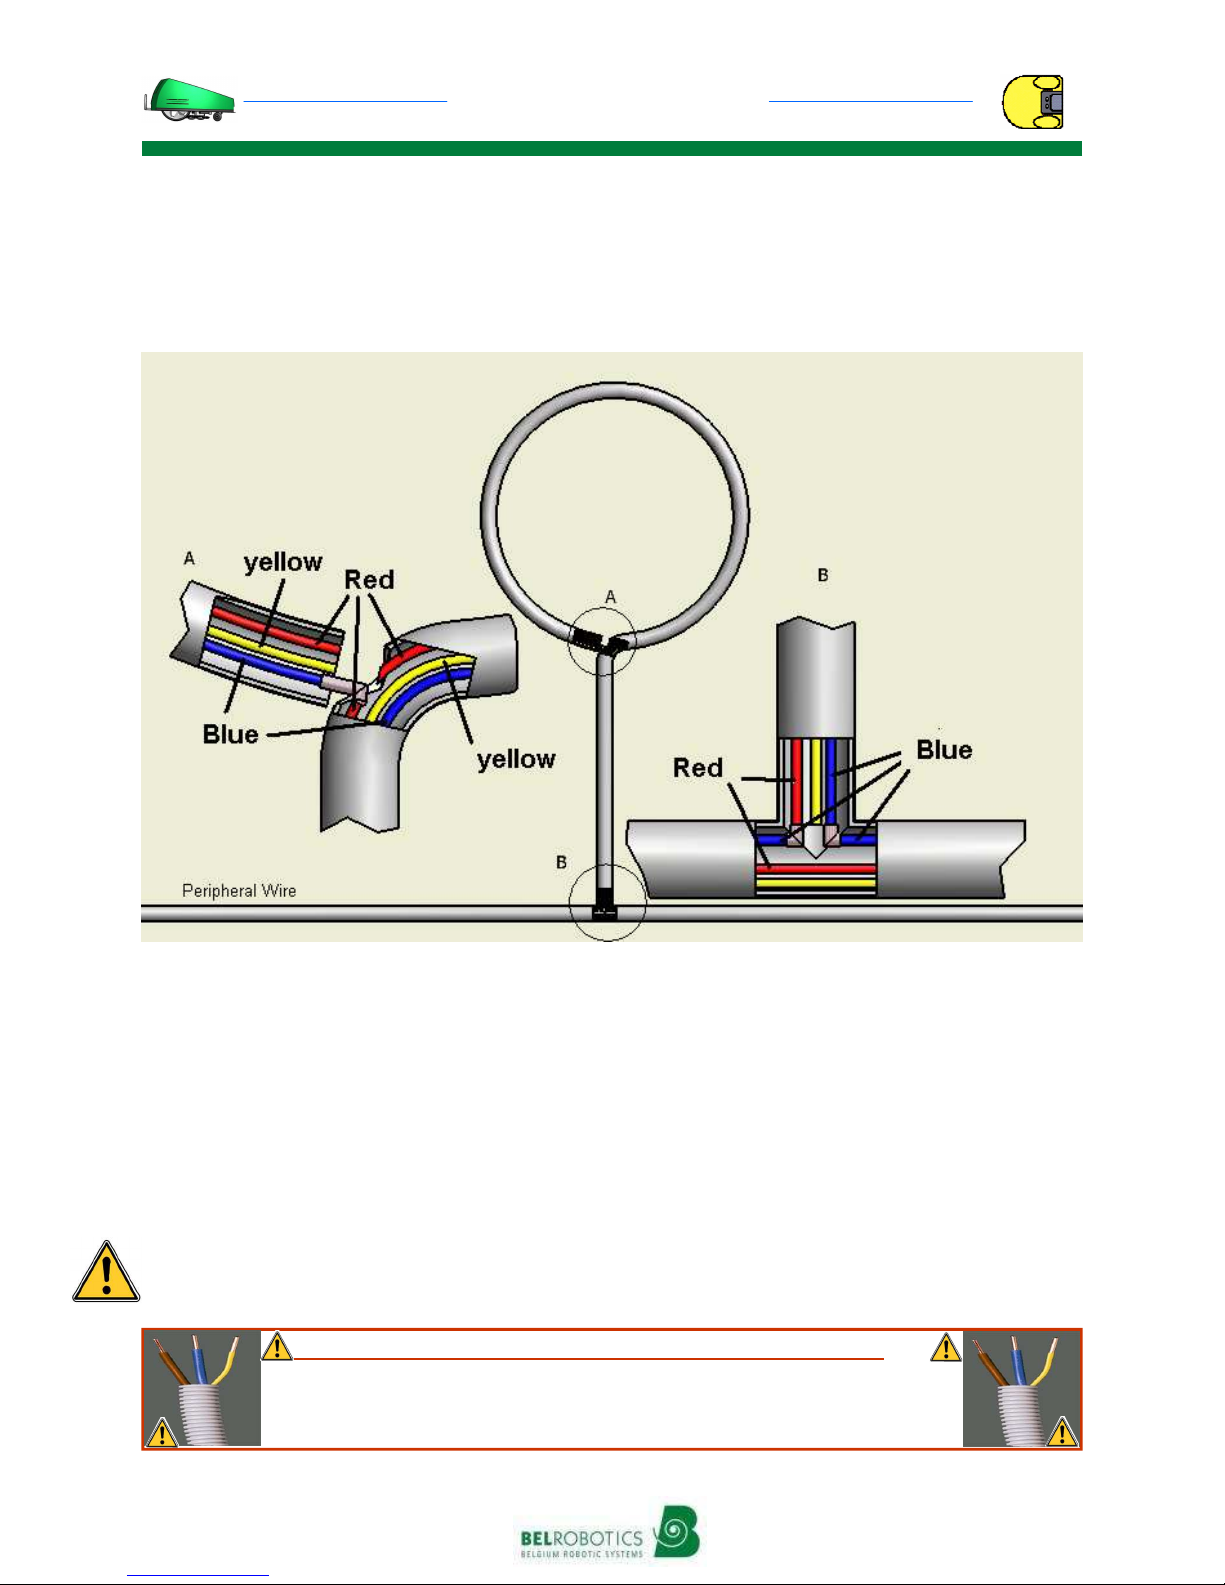
→Island connector configuration:
→The cable set up is the 1G1.5 mm² or the 3G1.5 mm², single strand wire.
→The blue or black cable is used for the peripheral wire.
→The red cable is used for the return from an island. When an island is created at more
than 5 metres from the peripheral wire, the same sheath is used for the return of the signal.
This enables the signal to be cancelled and the machine to cross.
→The yellow cable is only used for special connections.
Pay attention to the direction of the island and its connections (the cables may not be
crossed). When the peripheral wire is cabled in a clockwise direction, the island is cabled in
an anti-clockwise direction.
IT IS ESSENTIAL TO USE THE 1.5 mm²CABLE IN A SEALED TUBE
Any cable other than the 1.5 mm²single strand wire is to be avoided. Belro-
botics does not guarantee the operation of the machine with another cable.
Any problem that occurs because of incorrect set-up annuls the guarantee.

PAGE 9
PARC
PARCPARC
PARC
PARC
PARCPARC
PARC
MOW
MOW MOW
MOW
MOW
MOW MOW
MOW -
--
-
-
--
-
BIG
BIGBIG
BIG
BIG
BIGBIG
BIG
MOW
MOW MOW
MOW
MOW
MOW MOW
MOW
Setting up the charging station
Setting up the charging station Setting up the charging station
Setting up the charging station (1)
(1)(1)
(1)
For optimal operation, the charging station must be placed in the main area of the terrain,
offering the greatest clearance possible.
→Distance to keep
• Minimum 15 m between the station and the peripheral wire opposite the station
• For a
PARC
PARCPARC
PARC
PARC
PARCPARC
PARC
MOW
MOWMOW
MOW
MOW
MOWMOW
MOW
: a distance of 55 cm between the peripheral wire and the station
• For a
BIG
BIGBIG
BIG
BIG
BIGBIG
BIG
MOW
MOWMOW
MOW
MOW
MOWMOW
MOW
: a distance of 65 cm between the peripheral wire and the station
• Set up the cable in a straight line at a distance of 5 metres on either side of the station
• The station must be set up on a flat terrain
5 metres 5 metres
Min 15 m
Peripheral wire
PARC
PARCPARC
PARC
PARC
PARCPARC
PARC
MOW
MOWMOW
MOW
MOW
MOWMOW
MOW
:
::
:
:
::
:
55 cm
BIG
BIGBIG
BIG
BIG
BIGBIG
BIG
MOW
MOWMOW
MOW
MOW
MOWMOW
MOW
:
::
:
:
::
:
65 cm
IT IS ESSENTIAL TO USE THE 1.5 mm²CABLE IN A SEALED TUBE
Any cable other than the 1.5 mm²single strand wire is to be avoided. Belro-
botics does not guarantee the operation of the machine with another cable.
Any problem that occurs because of incorrect set-up annuls the guarantee.

PAGE 10
PARC
PARCPARC
PARC
PARC
PARCPARC
PARC
MOW
MOW MOW
MOW
MOW
MOW MOW
MOW -
--
-
-
--
-
BIG
BIGBIG
BIG
BIG
BIGBIG
BIG
MOW
MOW MOW
MOW
MOW
MOW MOW
MOW
Setting up the charging station
Setting up the charging station Setting up the charging station
Setting up the charging station (2)
(2)(2)
(2)
→Cabling
1. Bring the cables back below the station (make the holes ad hoc).
2. Use the sheath (tube) of the peripheral wire to bring the peripheral wires to the station
(avoid any contact with the ground).
3. Connections:
4. Constitutive components:
BREAKER
BOX
TRANSFOR-
MER
230V~/30V~
Power supply 230V~ ou115V~*
Peripheral wire
connections
Station →2008
*230V~: blue and orange wire
*115V~: blue and green wire
Station 2008 →
*230V~: specific transformer
*115V~: specific transformer
Power supply connections Peripheral wire connections
IT IS ESSENTIAL TO USE THE 1.5 mm²CABLE IN A SEALED TUBE
Any cable other than the 1.5 mm²single strand wire is to be avoided. Belro-
botics does not guarantee the operation of the machine with another cable.
Any problem that occurs because of incorrect set-up annuls the guarantee.

PAGE 11
PARC
PARCPARC
PARC
PARC
PARCPARC
PARC
MOW
MOW MOW
MOW
MOW
MOW MOW
MOW -
--
-
-
--
-
BIG
BIGBIG
BIG
BIG
BIGBIG
BIG
MOW
MOW MOW
MOW
MOW
MOW MOW
MOW
Setting up the charging station
Setting up the charging station Setting up the charging station
Setting up the charging station (3)
(3)(3)
(3)
5. Station map (ref BR15601: CI Station)
BLACK
RED
0 V WHITE
+15V~ BROWN
Cables
from the
transformer
Software version
of the map
315 mA FLASH
BP
Sonars 1 & 2
Peripheral
wire
JSEL
BLACK
BLACK
30
Cables
towards
the load arm
-15V~
0 V

PAGE 12
PARC
PARCPARC
PARC
PARC
PARCPARC
PARC
MOW
MOW MOW
MOW
MOW
MOW MOW
MOW -
--
-
-
--
-
BIG
BIGBIG
BIG
BIG
BIGBIG
BIG
MOW
MOW MOW
MOW
MOW
MOW MOW
MOW
6. Multi-station configuration
Setting up the charging station
Setting up the charging station Setting up the charging station
Setting up the charging station (4)
(4)(4)
(4)
MACHINES STATIONS
PARC
PARCPARC
PARC
PARC
PARCPARC
PARC
MOW
MOW MOW
MOW
MOW
MOW MOW
MOW
BIG
BIGBIG
BIG
BIG
BIGBIG
BIG
MOW
MOW MOW
MOW
MOW
MOW MOW
MOW
Config.
Option 0
PARC
PARCPARC
PARC
PARC
PARCPARC
PARC
MOW
MOW MOW
MOW
MOW
MOW MOW
MOW -
--
-
-
--
-
BIG
BIGBIG
BIG
BIG
BIGBIG
BIG
MOW
MOW MOW
MOW
MOW
MOW MOW
MOW
BAL
BALBAL
BAL
BAL
BALBAL
BALL-
L-L-
L-
L-
L-L-
L-
P CKER
P CKERP CKER
P CKER
P CKER
P CKERP CKER
P CKER
Config.
Option 0
BALL
BALLBALL
BALL
BALL
BALLBALL
BALL
P CKER
P CKERP CKER
P CKER
P CKER
P CKERP CKER
P CKER
Station
PARC
PARCPARC
PARC
PARC
PARCPARC
PARC
MOW
MOW MOW
MOW
MOW
MOW MOW
MOW
BIG
BIGBIG
BIG
BIG
BIGBIG
BIG
MOW
MOW MOW
MOW
MOW
MOW MOW
MOW
Waste dump station Charging station
BALL
BALLBALL
BALL
BALL
BALLBALL
BALL
P CKER
P CKERP CKER
P CKER
P CKER
P CKERP CKER
P CKER
1 — 0
1 — 1 √
1 — >2 √
>2
>2Station √0
>2
>2Station √1 √
>2
>2Station √>2 √
0 1 —
0 >2 √
PAGE 13
PARC
PARCPARC
PARC
PARC
PARCPARC
PARC
MOW
MOW MOW
MOW
MOW
MOW MOW
MOW -
--
-
-
--
-
BIG
BIGBIG
BIG
BIG
BIGBIG
BIG
MOW
MOW MOW
MOW
MOW
MOW MOW
MOW
Con
ConCon
Conf
ff
figu
iguigu
igura
rara
rat
tt
tion: M
ion: Mion: M
ion: Me
ee
en
nn
nus
us us
us (1)
(1)(1)
(1)
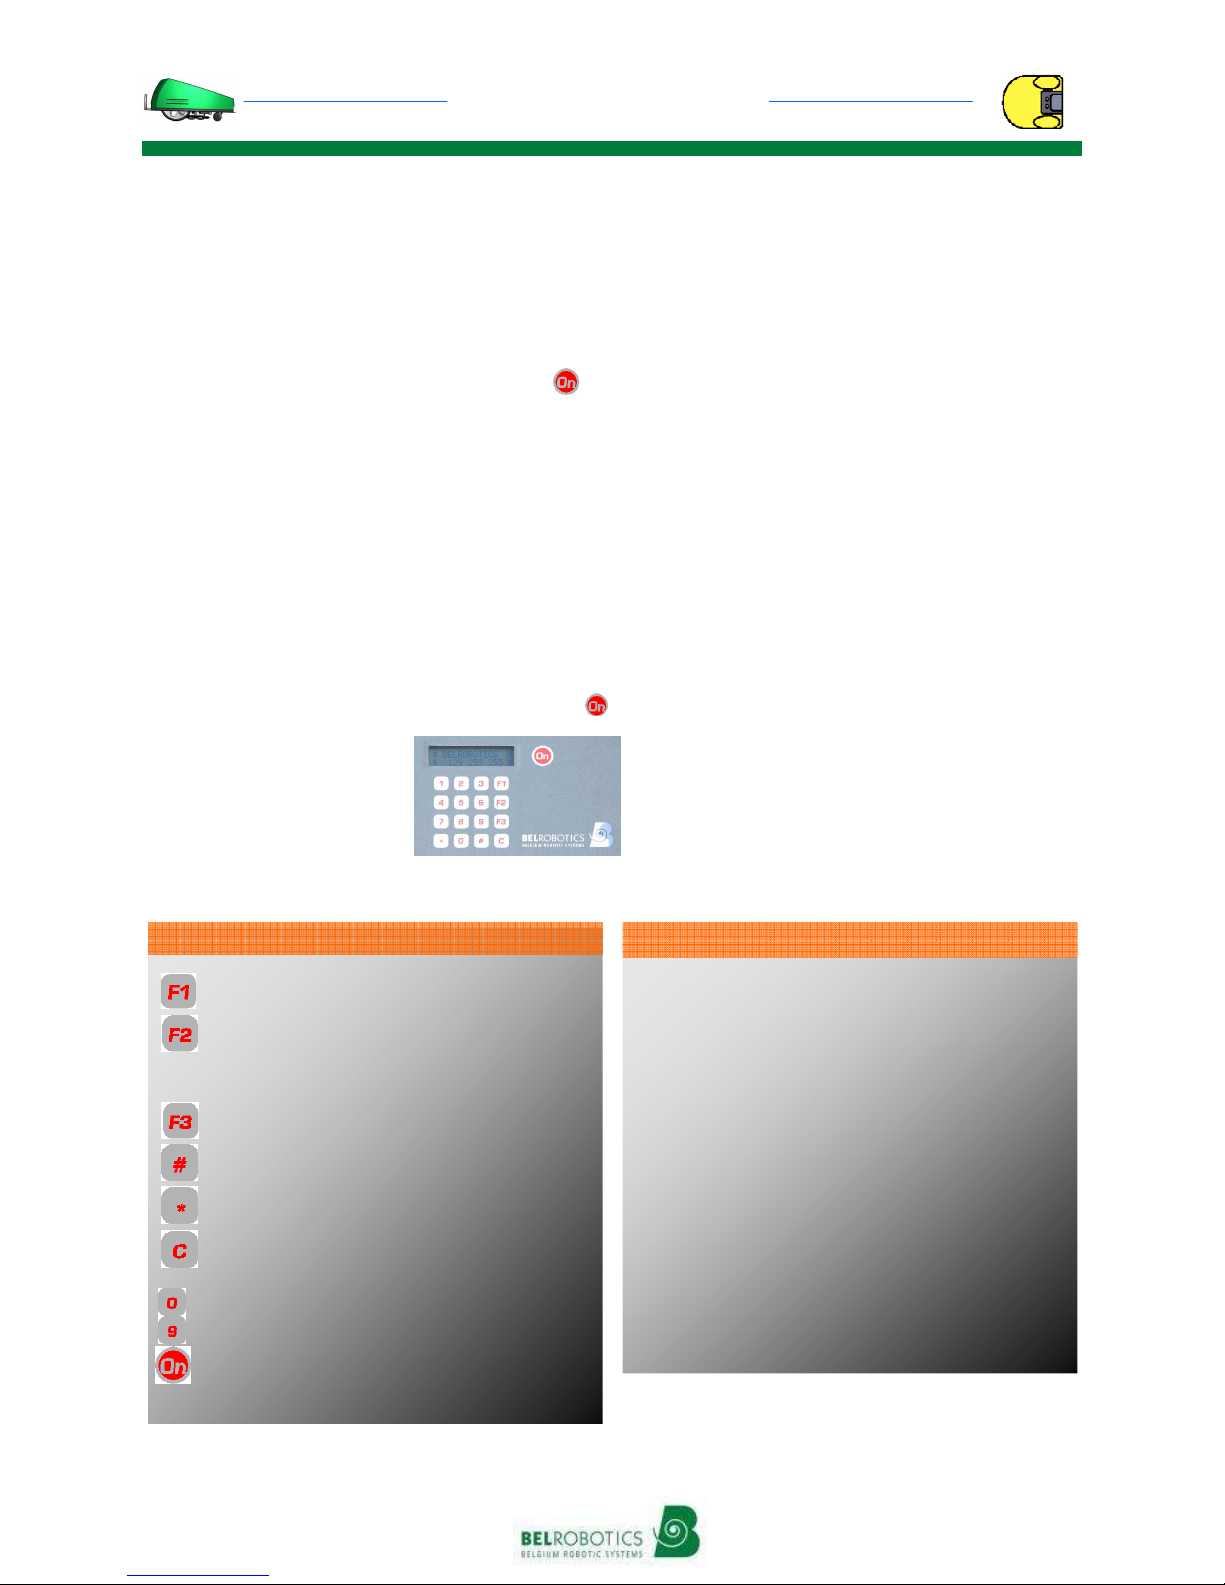
The keypad includes 16 keys (10 numbers
and 6 action keys) and 1 activation key :
• ‘F1’: Return to the charging station
• ‘F2’: Return to and wait at the charging
station
• ‘F3’: See debug, or technical indication
• ‘#’:To select the chosen action
• ‘✱’: To enter the code, or the selection of
rest days
• ‘C’: To go back to the previous menu or to
delete
To start up the machine, youhave to press
(the screen blinks), then
close the cover again
within 8 seconds. The
BIGMOW-PARCMOW will
start up its cutting heads
then start to work
Functions
2 submenus are found in the “Belrobotics”
menu:
The “Infos” menu (which is addressed to
your technician), for all information about
the operation of your BIGMOW-PARCMOW ;
The “Settings” menu, to access the user
settings.
The selection of ✱ enables the user code to
be entered and the machine to be activated
for a chosen period. After this period, the
machine stops and the code has to be
re-entered. Before a delayed start, it is
therefore advised that you re-enter the
code. Without this code, the machine will
not operate .
Use of the keypad
Menu
Infos
Statistics
History
Version
Serial
Settings
Rests settings
Clock
New code
Language
Options
Suppress Rests
‘’ + ‘ _ _ _ _’ user code
Structure of the menus
: Return to the charging station
: Return to and wait at the charging station
: go up in the menus
: See debug ; go down in the menus
: Selection
: Code entry, rest days
: Go back one level in the menu or delete
: Numeric entries
: Turn on the machine, start up
Keypad keys

PAGE 14
PARC
PARCPARC
PARC
PARC
PARCPARC
PARC
MOW
MOW MOW
MOW
MOW
MOW MOW
MOW -
--
-
-
--
-
BIG
BIGBIG
BIG
BIG
BIGBIG
BIG
MOW
MOW MOW
MOW
MOW
MOW MOW
MOW
“Infos” Menu
This menu is addressed to your technician. It
includes 4 submenus:
1) The “Statistics” menu enables general
information about the operation of your
machine to be displayed.
2) The “History” menu enables the events
recorded by the machine to be displayed.
3) The “Version” menu enables the
machine software version to be obtained.
4) The “Serial” menu enables the serial
number of the main menu to be displayed.
“Settings” Menu 7 submenus:
1) The “Rests settings” menu enables the
rest range to be programmed (see p.22).
2) Le The “Clock” menu enables the
modification of the time and the date (see
p.22).
3) The “New code” menu enables the
modification of the user code (see p.23).
4) The “Language” menu gives the choice
of the language (see p.23).
5) The “Debug-info” menu enables either
the time, or the information to be displayed
(see p.23).
6) The “Options” menu:
7) The “Suppress rests” menu enables all
CODE
CODECODE
CODE
MEANINGS
MEANINGSMEANINGS
MEANINGS
S0 Mowing time (minutes)
S1 Charging time (minutes)
S2 Total number of cycles (Mowing+Charge)
S3 Left wheel distance (metres)
S4 Right wheel distance (metres)
S5 Battery status; Capacity of the last charge
S6 Battery status; Capacity of the last dis-
charge
S7 Rest time (minutes)
CODE SIGNIFICATIONS
SBegin seeking station
Wcxx Begin Working/charged xx%
Cwxx Begin Charge/worked xx%
Rcxx Begin Rest on charge/charged xx%
→UPanel Opened by User
→Go Start to work
ON Switched on
──Switched off
AL Alarm
SC Station capture
NP New Program
AS Abort Capture Seek
O00 MultiSta O07 OutWSyst
O01 GoToChge O08 PhiInv
O02 Stay@Chge O09 HeadRotInv
O03 DemoMode O10 CCWSeek
O04 NoChgeBip O11 Chge2Sides
O05 SystMowing O12 EnCapture
O06 CCWSyst O13 Udocking
Con
ConCon
Conf
ff
figu
iguigu
igura
rara
rat
tt
tion: M
ion: Mion: M
ion: Me
ee
en
nn
nus
us us
us (2)
(2)(2)
(2)

PAGE 15
PARC
PARCPARC
PARC
PARC
PARCPARC
PARC
MOW
MOW MOW
MOW
MOW
MOW MOW
MOW -
--
-
-
--
-
BIG
BIGBIG
BIG
BIG
BIGBIG
BIG
MOW
MOW MOW
MOW
MOW
MOW MOW
MOW
Configuration: Settings (1)
“SETTINGS” MENU
• Rests settings
Allows the programming of up to four rest ranges during which the machine does not work.
1. Indication Menu (C to return to the Menu)
2. Type “# ▼”Settings “#” Rests settings “#” Rest
range 1# “#” Rest hours “#”(that is “# ▼# # # #”).
3. Encode HH:MM for the start of rest then HH:MM
end of rest. To confirm, type “#”.
4. Choose the day or days of the week during which
this timetable applies scrolling with ▼and ▲. To
select the day, type “✱”. When the days have
been chosen, type “#”.
5. You have returned to the
rest range
2#.
If you would like to encode other rest times for
other days, follow steps 2 to 5 again. A maximum 4 rest areas can be programmed.
Then, press “C” several times until the Menu is displayed on the screen.
6. Restart the machine by pressing on the keypad and close the cover within 8
seconds.
The rest ranges are programmed and operational. If you have any doubts with regard to the programming of the
rest ranges, do not hesitate to contact your dealer, who will do it for you.
• Setting the clock Enable the modification of the time and the date.
1. Indication Menu (C to return to the Menu).
2. Type “# ▼” Settings “# ▼” Clock “#” (that is “# ▼# ▼#”).
3. Enter the time “HH:MM’’ “0 … 9”.
4. Enter the day (1=Monday;…...; 7=Sunday).
5. Press “▼”.
6. Enter the date “DD/MM”.
7. Enter the year 20_ _ “0 … 9”.
8. Confirm by pressing “#”.
9. Press “C” 3 times until the Menu is displayed.
10. Restart the machine by pressing on the keypad and close the cover within 8 seconds
Range 1# : _ _ : _ _ →_ _ : _ _
Mon Tue Wed Thu Fri Sat Sun
Range 2# : _ _ : _ _ →_ _ : _ _
Mon Tue Wed Thu Fri Sat Sun
Range 3# : _ _ : _ _ →_ _ : _ _
Mon Tue Wed Thu Fri Sat Sun
Range 4# : _ _ : _ _ →_ _ : _ _
Mon Tue Wed Thu Fri Sat Sun

PAGE 16
PARC
PARCPARC
PARC
PARC
PARCPARC
PARC
MOW
MOW MOW
MOW
MOW
MOW MOW
MOW -
--
-
-
--
-
BIG
BIGBIG
BIG
BIG
BIGBIG
BIG
MOW
MOW MOW
MOW
MOW
MOW MOW
MOW
Con
ConCon
Conf
ff
figu
iguigu
igura
rara
rat
tt
tion: Settings (2)
ion: Settings (2)ion: Settings (2)
ion: Settings (2)
• Setting of the password Enables the modification of the user code.
1. Indication
Menu
(C to return to the Menu).
2. Type “# ▼” Settings “# ▼▼”
New Code
“#” (that is “# ▼# ▼▼#”).
3. Enter the old code “
✱
_ _ _ _’’ . To confirm, press “#”.
4. Enter the new code “
#
_ _ _ _’’ . To confirm, press “#”.
5. Press C3 times until the
Menu
is displayed.
6. Enter the new code before starting
7. Enter the new code “
✱
_ _ _ _”.
8. Enter the names of the day of validity of the code (except for the programme version 2009).
Warning, when the machine protection is activated, you must reintroduce its code at the end of
the validity, or the machine stops and requests its code.
• Setting the language
Give a choice between français, English, Deutsch, italiano, español and Nederlands.
1. Indication Menu (C to return to the Menu)
2. Type “# ▼” Settings “# ▼▼▼” Language “#” (that is “# ▼# ▼▼▼#”)
3. Select the language by pressing “▼” ; Validate with “#”
4. Press “C”3 times until the Menu is displayed.
5. Restart the machine by pressing on the keypad and close the cover within 8 seconds.
• See debug F3
Enables either the time, or the service information
(technical information) to be displayed.
1. Indication Menu (C to return to the Menu)
2. Type “F3”
Indication of the phase in the middle of the screen.
Technical information instead of the time:
- P03 equivalent in the place of hours (P03 in the authorised parameters)
- P04 equivalent in the place of minutes (P04 in the authorised parameters)
Φ
ΦΦ
Φ+
: Machine within its mowing area
Φ
Φ Φ
Φ −
: Machine outside ilts mowing area
Phase

PARC
PARCPARC
PARC
PARC
PARCPARC
PARC
MOW
MOW MOW
MOW
MOW
MOW MOW
MOW -
--
-
-
--
-
BIG
BIGBIG
BIG
BIG
BIGBIG
BIG
MOW
MOW MOW
MOW
MOW
MOW MOW
MOW
Con
ConCon
Conf
ff
figu
iguigu
igura
rara
rat
tt
tion: Options (1
ion: Options (1ion: Options (1
ion: Options (1)
))
)
→See the full explanations in the instruction manual ←
√: Option activated; - : Option deactivated
Press “#”
to activate
or deactivate
an
option
1. Indication Menu (C to return to the Menu).
2. Type “# ▼” Settings “# ” Options “#” (that is “# ▼# #”).
3. Indication Option 1: O01:GoToChge.
• Multi-charging station O00 MultiSta
Multi-station mode enables several stations to be managed with one or several robot.
O00 MultiSta: -The BIGMOW-PARCMOW only returns to a normal station
O00 MultiSta: √The BIGMOW-PARCMOW only returns to stations configured as Multi-station
If this option is validated, the machine no longer returns to its ‘normal’ station.
• Immediate return to the charging station O01 GoToChge
Forces the machine to return immediately to its charging station.
1. Indication Menu (C to return to the Menu)
2. Shortcut “F1” (see p.20)
O01 GoToChge: -The BIGMOW-PARCMOW does not return to its station and works normally
O01 GoToChge: √The BIGMOW-PARCMOW returns to its station
When the option O01 Return to the charging station is selected, the machine will start up again after full
recharge.
• Wait at the station after charge O02 Stay@Chge
Forces the machine, after the end of its cycle, to stay at its station and not leave it again.
Also see the commands summarised at the end of the manual.
1. Indication Menu (C to return to the Menu)
2. Shortcut “F2” (see p.20)
O02 Stay@Chge: -The BIGMOW-PARCMOW does not return to its station and works normally
O02 Stay@Chge: √The BIGMOW-PARCMOW returns to its station and stays there
When option O02 Stay at the charging station is selected, the machine will not start up until this option is
cancelled .
To force the machine to start working again, press and close the cover (the machine has to be in
contact with the station automatically )
PAGE 17

PARC
PARCPARC
PARC
PARC
PARCPARC
PARC
MOW
MOW MOW
MOW
MOW
MOW MOW
MOW -
--
-
-
--
-
BIG
BIGBIG
BIG
BIG
BIGBIG
BIG
MOW
MOW MOW
MOW
MOW
MOW MOW
MOW
Configuration : Options (2)
Configuration : Options (2)Configuration : Options (2)
Configuration : Options (2)
→See the full explanations in the instruction manual ←
√: Option activated; - : Option deactivated
Press “#” to activate or deactivate an option
• Demonstration Mode (without mowing) O03 DemoMode
Normal or demonstration (without mowing) mode.
O03 DemoMode: -The BIGMOW-PARCMOW works normally
O03 DemoMode: √The BIGMOW-PARCMOW advances without using the cutting heads
If this option is validated, the machine can operate without signal, and therefore leave the mowing area.
• Silence when charging (no charging ‘beep’) O04 NoChgeBip
Signal sounds when charging (with or without). Silent charging.
O04 NoChgeBilp -The BIGMOW-PARCMOW beeps during charging (2 long beeps/2 sec)
O04 NoChgeBip: √The BIGMOW-PARCMOW remains silent when charging
During a manual charge the machine beeps 2 short beeps/sec to warn that it is not charging automatically. To
cancel these beeps in manual charge, you can select option 2.
• Systématic mowing O05 SystMowing
Mowing mode (random standard or systematic).
O05 SystMowing: -The BIGMOW-PARCMOW operates in normal mode, i.e. in random mode
O05 SystMowing: √The BIGMOW-PARCMOW operates in systematic mode
• Anti-clockwise direction (in systematic mode) O06 CCWSyst
In systematic mode: the machine moves on the terrain in a clockwise direction or anti-clockwise towards the
centre. Only useful if the systematic mode is selected O05 SystMowing: √
O06 CCWSyst : -The BIGMOW-PARCMOW turns in a clockwise direction in systematic mode
O06 CCWSyst: √The BIGMOW-PARCMOW turns in an anti-clockwise direction in systematic mode
• Movement from the centre towards the exterior or from the exterior towards the
centre (in systematic mode) O07 OutWSyst
In systematic mode, the machine works from the interior towards the exterior. It is only useful if the
Systematic mode is selected O05 SystMowing: √
Not selected, the direction is the opposite: from the exterior towards the interior.
O07 OutWSyst: -The BIGMOW-PARCMOW moves from the exterior to the interior in systematic mode
O07 OutWSyst: √The BIGMOW-PARCMOW moves from the interior to the exterior in systematic mode
The systematic mode is very rarely used and not recommended. The random mode has a
greater efficiency and a greater aim in terms of the results of the work.
PAGE 18

PARC
PARCPARC
PARC
PARC
PARCPARC
PARC
MOW
MOW MOW
MOW
MOW
MOW MOW
MOW -
--
-
-
--
-
BIG
BIGBIG
BIG
BIG
BIGBIG
BIG
MOW
MOW MOW
MOW
MOW
MOW MOW
MOW
Configuration : Options (3)
Configuration : Options (3)Configuration : Options (3)
Configuration : Options (3)
→See the full explanations in the instruction manual ←
√: Option activated; - : Option deactivated
Press “#” to activate or deactivate an option
• Inversion of phase. O08 PhiInv
Enables inversion of the detection of the peripheral wire field.
O08 PhiInv: -Depending on the phase of the terrain
O08 PhiInv: √Depending on the phase of the terrain
To verify the phase of the terrain, use the F3 function: see debug, the indication of the phase must be positive. (Φ
ΦΦ
Φ+)
• Inversion left cutting head. O09 HeadRotInv
Make the left cutting trays turn in the opposite direction to avoid grass jam.
O09 HeadRotInv: -The heads of the BIGMOW-PARCMOW turn in the same direction
O09 HeadRotInv: √The heads of the BIGMOW-PARCMOW turn 3 times in one direction
and twice in
the other.
• Direction of return to the station: Anti-clockwis O10 CCWSeek
In random mode, force the machine to return to its charging station in an anti-clockwise or clockwise
direction.
O10 CCWSeek: -The
BIG
MOW-
PARC
MOW returns in a clockwise direction to return to the station
O10 CCWSeek: √The
BIG
MOW-
PARC
MOW returns in an anticlockwise direction to return to the
station
The machine returns to its station following its peripheral wire at a distance of approximately 1 metre
• Charging the machine from both sides O11 Chge2Sides
Allows the machine to return to its charging station in both directions (clockwise and anti-clockwise) and
cancels option 010 CCWSeek.
O11 Chge2Sides: -The
BIG
MOW-
PARC
MOW returns to the station in one direction (that of option 9)
O11 Chge2Sides: √The
BIG
MOW-
PARC
MOW returns to the station in both directions (1*
, 1*
)
Option 10 is of no use in this configuration
• Mode capture de la station O12 EnCapture
The machine returns to charge, if necessary, by passing in front of its station, it passes it, and then makes a half turn
before placing itself on its wire and entering the station. This saves time following the peripheral wire.
O12 EnCapture: -It returns to station following its wire when the batteries are low
O12 EnCapture: √Station sensor mode when the batteries are nearly low
Make a half turn after its station to charge, not taking into account option 13
• Return to the station mode O13 Udocking
If the option is selected, the machine returns to charge itself, by passing in front of its station, it passes it,
and then makes a half turn before coming to position itself on its wire and entering the station.
O13 Udocking: -It returns to station by placing itself directly on its wire once the station is detected
O13 Udocking: √It returns to station by passing in front of the station, it passes it, and then makes a half turn
coming to position itself on its wire and entering the station
PAGE 19

PARC
PARCPARC
PARC
PARC
PARCPARC
PARC
MOW
MOW MOW
MOW
MOW
MOW MOW
MOW -
--
-
-
--
-
BIG
BIGBIG
BIG
BIG
BIGBIG
BIG
MOW
MOW MOW
MOW
MOW
MOW MOW
MOW
Safety alert: Error message
PAGE 23
CODE
MEANINGS
REMARQUES
Al01→
→Al31 Blocked head(s) (1, 2, 3, 4, 5) Indication on the screen
→Check the cutting components
Al32→
→Al35 Left and/or right wheel blocked Indication on the screen
→Check the driving components
Al36→
→Al39 Body
in left and/or right collision Impact sensors
→Check the body impact components
Al40→
→Al43 Tactile sensor (touch flange)
in left and/or right collision Touch tyre flange
→Check the red pressure gauge connected in the
Al44 Code expired Follow the code entering procedure
→See manual page...
Al45 Battery too discharged →Put the machine on the station manually, and
start it again manually 2 hours later
Al46 No Peripheral Signal Check at the charging station
Al47 Station not found The machine has not found its station after
a tour of the terrain (function of the P01)
→Check P01, verify sonar machine (if it slowed
down), check the sonar station (if the machine
slowed down on approaching the station)
Al48 Outside wire boundary →Check O03: demo mode; O08: inversion phase;
P00: intensity at 30
Al49 Wire lost The machine stops when seeking its wire
after 6 m
Al50 No way out path Blocked at this location after several close
manoeuvres
Al51 Slipping Distance travelled greater than P01
→Check the state of the terrain, check P01
Al52 Blocked on wire →Check O08: investment phase
Al53 Fuse. Power surge Battery fuse broken OR main switch on
OFF when charging
Al55 Loss of Charging? Loss of charging on the station
AL56 Charge contact? The machine has detected the station but
AL57 Bat Temp Sensor Problem with the temperature sensor
Other manuals for PARCMOW
1
This manual suits for next models
1
Table of contents
Other Belrobotics Lawn Mower manuals


