Belva Bvl62 User manual
Bvl62
2-DIN DVD/CD Car Stereo with Bluetooth®and Android™Video Link
OWner’s Manual
BLUEToothcd/dvd AUX USB MICRO SDvideo link

thank you for purchasing
this belva product!
We want to thank you for your purchase of this Belva Car Stereo. We hope you
thoroughly enjoy this product. Please read through this manual carefully before
attempting to install and operate this device.

1
Installation ........................................................................................................................2
Wiring Diagram .................................................................................................................2
Remote Control Operation ...............................................................................................3
Main Interface Functions..................................................................................................4
Basic Operation ................................................................................................................4
Radio Function Operation.................................................................................................5
CD/DVD Operation ...........................................................................................................6
AUX Function Operation...................................................................................................7
Phone Link Operation.......................................................................................................7
USB Function Operation...................................................................................................8
SD Card Function Operation ............................................................................................8
Bluetooth Function Operation..........................................................................................9
System Setup .................................................................................................................10
Troubleshooting..............................................................................................................13
Specifications ................................................................................................................. 16
table of contents

2
installation
WIRING DIAGRAM
The unit is designed for a 10-16V DC negative ground operation system only. Before
installing the unit, make sure your vehicle is connected to the 10-16V DC negative
ground electrical system.
The negative battery terminal must be disconnected before making connections,
which can reduce damaging the unit from a short circuit.
Be sure to connect the color-coded leads according to the diagram. Incorrect
connections may cause the unit to malfunction or damage the vehicle’s electrical
system.
Be sure the connect the speaker (-) leads to the speaker (-) terminal. Never connect
the left and right channel speaker cables to each other or to the vehicle body. Do
not block vents or radiator panels. Blocking them will cause heat to build up inside
and may result in fire.
1. Brown: KEY1
2. Orange: Illumination +
3. Red: Ignition 12V ACC
4. White/Black: Front Left Speaker -
5. White: Front Left Speaker +
6. Pink: Parking Brake
7. Grey/Black: Front Right Speaker -
8. Grey: Front Right Speaker +
9. Purple: Rear Right Speaker +
10. Purple/Black: Rear Right Speaker -
A. Brown/Black: KEY2
B. Blue/Black: IR
C. Can-Bus Only
D. Can-Bus Only
E. Black: Ground
F. Yellow: Battery +
G. Blue: Auto Antenna/Remote +
H. Orange/Black: Reverse Input
I. Green/Black: Rear Left Speaker -
J. Green: Rear Left Speaker +
(OPTIONAL
)
Blue: Auto Antenna/Remote +
Pink: Parking Brake
Orange/Black: Reverse Input
Brown/Black: KEY2
Blue/Black: IR
Grey/Black: Front Right Speaker -
Purple/Black: Rear Right Speaker -
White/Black: Front Left Speaker - Green/Black: Rear Left Speaker -

3
A. Brown/Black: KEY2
B. Blue/Black: IR
C. Can-Bus Only
D. Can-Bus Only
E. Black: Ground
F. Yellow: Battery +
G. Blue: Auto Antenna/Remote +
H. Orange/Black: Reverse Input
I. Green/Black: Rear Left Speaker -
J. Green: Rear Left Speaker +
REMOTE CONTROL OPERATION
(OPTIONAL)
BVL62
(OPTIONAL)
BVL62
Basic Operations
Install the lithium coin battery (CR2025)
• Aim the remote control directly at the remote sensor on the unit
WARNING: To prevent accidents and damage
WARNING: To prevent accidents and damage
• DO NOT expose the remote sensor to direct sunlight or to
direct LED light.
• DO NOT install any battery other than CR2025 or its equivalent
• Store the battery in a safe place where children cannot reach
• DO NOT charge, decompose, heat up, or dispose of the battery in a fire.
• DO NOT poke or pierce the battery with tweezers or similar tools.
• Wrap the battery with tape for insulation when throwing it away or
keeping it for future use.
4
MAIN INTERFACE FUNCTION ICONS
BASIC OPERATION
Radio mode, listen to FM/AM Disc play mode - automatically
play the in disk in the device
System setup interface Device mirroring mode
USB play mode (only valid when
a USB device is connected)
Backup Camera (only valid when a
backup camera is connected)
AUX play mode (only valid
when an AUX device is con-
nected)
SD card play mode = (only valid
when an SD card is connected)
Change the background - select
between 12 different back-
ground presets
Sleep mode - turn off the display,
touch the screen to turn it back
on
Bluetooth mode - Access
hands-free calling
functionality
Display the date and time
Play/Pause and Switch
Stations/Skip Songs
You can either turn on and off your stereo automatically with your vehicle or by using the
power button on the face of the unit. Once you remove your key from the ignition, the
stereo will automatically shut off. Once you start your vehicle again, the stereo will turn on
automatically as well.
NOTE: Certain applications will not be available if there is no device detected. For example,
you will be unable to use the USB function if there is no USB device connected.
Upon start-up, the stereo will enter the last
mode used as the default. Tap the icon
to enter the main system interface. The
main interface is comprised of function
mode icons. By touching the functions you
will enter the corresponding operating mode.
Touch the icon to put the stereo’s
display in sleep mode. This will turn off the
display. Simply touch the screen again to
turn it back on.
Touch the icon to toggle between 12
different backgrounds.
Powering on/off the head unit
Main System Interface

5
RADIO FUNCTION OPERATION
To start the radio application from the main system interface, just tap the icon.
To exit, tap the icon in the top left corner to return to the main system interface.
Press and hold the scan icon to activate auto-search. The system will automatically save the channels
according to the radio frequency once found. Touch the same icon again to stop searching
In the radio interface, press and hold (minimum of 2 seconds) the icons to switch between
available radio stations. This will allow you to only select stations with strong signal strengths. You
can also just tap on the icons to step forward 200 kHz in FM and 10kHz in AM.
You can save stations by pressing and holding on to the corresponding number you want to save the
station too.
Tap the icon to switch between FM1, FM2, FM3, AM1, and AM2.
You can also quickly select particular stations by taping on a particular place on the radio
frequency line.
If you want to edit the audio settings tap the icon to enter the audio settings
NOTE: Before searching station, touch the icon to select long or short-distance searching.
When “LOC” is displayed on the screen, only the local radio stations with a strong signal can be
searched; when “LOC” is hidden, both long and short-distance radio stations will be searched for.
You can store up to 18 FM radio stations (FM 1 / 2 / 3) and up to 12 AM radio stations (AM 1 / 2).
NOTE:
1. The LOC function setup is invalid while using AM wave band
2. The TUNE button on the panel can be used to adjust the frequency steadily while searching for
radio stations
3. Touch the icon to go into station scanning mode and to be able to listen to the stations for
5 seconds each.
ENTER/EXIT
Automatic station searching
Searching & saving stations
Waveband selection
Additional radio functions

6
CD/DVD FUNCTION OPERATION
Insert the CD into the disc slot and the system will automatically read and play in sequence.
ID3 information on the current track will display in the center of the display.
Touch the icon to see all of the songs in a list format to be able to toggle between them.
Touch the up and down arrows to move the list up and down.
Tap the icon in the top left corner to return to the main system interface.
Insert the DVD into the disc slot. The system will automatically display the list of DVD files
that you can play.
Touch the file name you want to watch and it will begin to play. Touch the icon to return
back to the list.
IMPORTANT WARNING:
IMPORTANT WARNING: NEVER PLAY DVDS WHILE OPERATING A MOTOR VEHICLE. THIS IS VERY
DISTRACTING AND COULD ENDANGER YOU AND THOSE AROUND YOU.
You can display JPEGs in sequence from multiple sources including DVDs, USB Flash Drive, or
via a Micro SD card.
Touch the icon to return back to the file list.
1. If a USB or SD card contains multiple file types (MP3, MP4, JPEG), the system will enter the
music player by default.
2. Touch the icon to return back to the file list.
3. Touch the , or the icon to switch between music, videos and photos.
4. Touch the file name to start playing
In the video player interface, touch the icon to pop up the video settings box.
Adjust the brightness, contrast, and saturation to customize the display settings. To adjust any
of the settings just slightly press and hold the toggle on the bar to increase or decrease it.
In the player interface, touch the icon to pop up the audio settings box. This will give you
access to the 10 Band Graphic EQ so you can adjust your system to the exact way you prefer.
There are 4 different preset EQs to choose from including standard, pop, cinema, and rock.
Playing cds
Playing dvds
DISPlaying jpegs
Playing multiple file formats
VIDEO SETTINGS
AUDIO SETTINGS

7
1. Only supports the Android Operating system. Supports two-way control.
2. The screen must be unlocked on your mobile device.
3. Bluetooth must be connected to have sound output
1. Connect the device with a USB cable that allows for
data transfer
2. Go into developer options on your Android device and
turn on “USB Debugging”
3. Your phone then should automatically connect and the
display should appear like the following image
Exit the phone link (Quit)
Volume adjustment
Return to mobile device’s homepage
Return to previous operation
(back button)
Screensaver
Force landscape
Connection requirements
Connection steps
Phone link icon meanings
AUX Function Operation
PHONE LINK Operation
This device supports external video signal and input of two-way stereo audio signals.
When the vehicle has other multimedia equipment, the audio, and video output
signal can be connected to the audio and video input port.
1. Touch the icon to enter AUX (external audio/video) mode.
2. In playing status, touch the screen and the invisible operational icons will be displayed.
3. Touch icon to turn off screen display, touch the screen for returning to display.
4. Touch icon to exit the AUX mode to the system main interface
5. Click the on the left top of the interface can switch between and
NOTE: If the system fails to detect external audio or video signal input, the screen will
display the prompt “No Video Signal”

8
USB Function Operation
sd card Function Operation
1. Insert the flash drive with multimedia files in the USB port.
2. When you are done, make sure to exit USB play mode first, then eject the device
1. Insert the Micro SD Card with multimedia files in the SD Card Slot.
2. When you are done, make sure to exit SD Card play mode first, then tap on the SD Card to
eject the device. This will unlock the card to make it removable.
1. Touch the icon to enter the SD Card play interface
2. The system will read for supported media files. If there are any mp3 files on the device, it
will first enter music play mode.
3. Touch the icon to return back to the file list.
4. Touch the , or the icon to switch between music, videos, and photos.
5. To exit the application, touch the home icon
NOTE: Due to the limit of screen resolution and compatibility of the video file format, some
video files do not play as well.
If you are using a standard SD Card (not Micro SD), you can use an SD card reader and plug it
into the USB drive.
1. Touch the icon to enter the USB play interface
2. The system will read for supported media files. If there are any mp3 files on the device, it
will first enter music play mode.
3. From here you can control the music like you would be able to in any other application.
4. ID3 Music Data will be displayed in the middle of the display.
5. Touch the icon to return back to the file list.
6. You can scroll through the list using the up and down arrows
7. To exit the application, touch the home icon
Insert/Eject USB Device
Insert/Eject Micro SD Card
Interface operation
Interface operation
The stereo supports USB functionality. The USB must be correctly connected
before use. The system will automatically switch over to USB play mode once a
device is connected.

9
Phone dialer Dial or answer calls
Phonebook Hang up or reject calls
Download mobile contacts Bluetooth music play interface
Mute button
Call source (Change how you take phone
calls i.e. via your cell phone speaker or car
speakers)
Bluetooth settings Delete key
Answered call’s information Dialed call’s information
Missed call’s information
Start/Exit application
Dial a call
answer a call
bluetooth Function Operation
The system provides Bluetooth hands-free communication functions. If your mobile
device is Bluetooth enabled, it can establish a point-to-point connection with the
system, providing hands-free calling, phonebook, and wireless music functionality.
NOTE: Not all Bluetooth-enabled devices will be compatible with all types of functionality.
Functionality entirely depends on the hardware and software of the device.
The Bluetooth name is Belva BVL62
The Bluetooth name is Belva BVL62
1. Touch the icon to enter the Bluetooth Interface
2. To exit the application, touch the home icon
1. When your Bluetooth-enabled cell phone is connected, you can use the phone dialer to
manually type in a phone number.
2. If you incorrectly entered a number, tap the delete key to backspace.
3. Tap the icon to dial out
4. Touch the icon to switch between the source of the call. This allows you to take
calls directly from your cell phone or to make hands-free calls through your car speakers.
1. If your Bluetooth device is connected and you receive a phone call, your device will
automatically switch to the Bluetooth interface. The phone number will be displayed on the
screen.
2. Tap the icon to answer the call or hit the to reject the call
Phone dialer Dial or answer calls
Phonebook Hang up or reject calls
Download mobile
contacts Bluetooth music play interface
Mute button
Call source (Change how you
take phone calls i.e. via your cell
phone speaker or car speakers)
Bluetooth settings Delete key
Answered call’s
information Dialed call’s information
Missed call’s infor-
mation

10
telephone book
Open/Close Settings
general Settings
bluetooth music
bluetooth Function Operation (CONT.)
system setup
1. Touch the icon to open the phonebook
2. Touch the icon to upload your contact list from your device onto the phonebook of
the stereo. Scroll up and down the list using the up and down arrows
3. To make a phone call, tap the contact on the list you want to call and hit the icon
4. You can find contacts quickly by using the keyboard on the right hand side.
1. When on the main system interface tap the icon to open the main settings menu
2. To exit the application, touch the home icon
In the main settings menu, touch the icon to enter the general settings interface
1. Language - Select your default language for the entire stereo
2. Beep (on/off) - If enabled, the system will beep upon touching buttons on the unit
3. Key lights - This allows you to change the color of the button illumination on the the stereo
4. Reversing mute (on/off) - If enabled, the stereo will automatically mute itself when the car
is in reverse
1. From the Bluetooth application, hit the icon to enter music play mode
2. This will allow you to play music from your phone on your stereo
3. You can use the icons below to play/pause or skip tracks
4. Play/pause
5. Previous Song
6. Skip Song
7. Exiting the Bluetooth interface on the stereo will stop the music
This section describes the system setup information including: general settings,
audio settings, date & time, wallpaper and others.

11
general Settings (CONT.)
system setup (CONT.)
5. Panel (Touch panel calibration) - Calibrate the screen and adjust the brightness
• Brightness - Set the brightness dimmer by sliding the icon
• Touch panel calibration - Calibrate the screen by tapping the crosses in the order they
appear: top left, top right, bottom left, bottom right, then the center. After that, the
calibration will be complete and you can hit the back button to exit.
6. Radio regional settings - Select your region. “North America” will be selected by default
7. Wallpaper - Select between 12 different wallpaper options
8. Time & date - Adjust time & date of the stereo
• Year, month, & day - adjust the following with the up and down arrows
• Hour, minute, & second - adjust the following with the up and down arrows
• You can also enable a 24 hour clock system by hitting the checkbox
• Once you are done making adjustments, hit the icon to exit
9. SWC (Steering Wheel Control) - Adjust the controls steering wheel to correspond with
different actions.
IM POR TANT: You must have a SWC retention adapter to retain your steering wheel controls.
Steps for setting button functions:
Steps for setting button functions:
1. Press and hold the first button on the steering wheel and touch the selected
function icon on the screen. When the icon on the screen turns gray, release the
button on steering wheel.
2. Repeat step one for the other buttons you want to use and each should turn
different colors once they are assigned to a particular button on the steering
wheel.
3. If you want to delete any of the assigned keys touch the to clear the
assigned functions
4. When all button are assigned the way you prefer, tap the icon to save
and exit
10. About - Click here to see what software version the head unit is using

12
audio settings
video settings
default
system setup (CONT.)
In the main settings menu, touch the icon to enter the audio settings interface.
1. Sound field balance settings - Touch the to enter these settings
• Gently press and hold the icon to move the sound field balance forward, backward,
left, and right. You can make individual adjustments for each seat.
• Hit the icon to go to the equalizer settings
2. Bass - Slide the bass adjustment bar up and down to adjust the amount of bass
3. Treble - Slide the treble adjustment bar up and down to adjust the amount of treble
4. Loud (on/off) - When this option is enabled, the volume for high frequency and low
frequency sounds will be increased
5. 7 Selectable EQ Presets - Choose between Standard, Classic, Rock, Pop, Jazz, Electric, and
User (Custom)
In the main settings menu, touch the icon to enter the video settings interface.
1. Aspect ratio - Select between a 4:3 or an 18:9 screen aspect ratio
2. Adjust settings - Adjust the brightness, contrast, hue, saturation, & sharpness of videos
• Use the sliders for each setting to increase or decrease each individual setting
In the main settings menu, touch the icon to open a pop-up to restore system to
factory default settings.
Hit the icon to restore the receiver to factory settings. Hit to cancel and return to
the main settings menu.
NOTE:
This option is irreversible if selected
This option is irreversible if selected
13
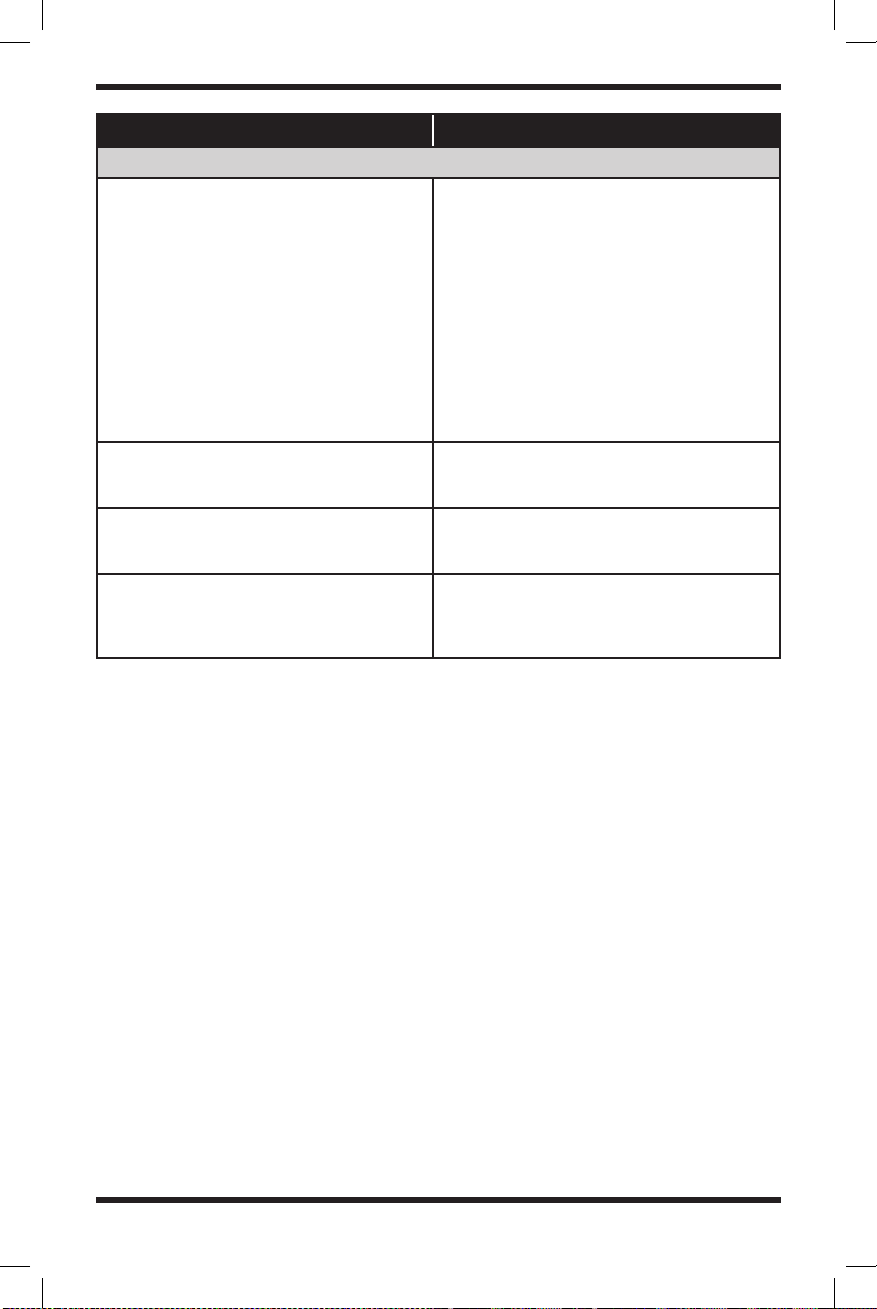
troubleshooting
The following checklist will help you remedy problems you may encounter with your
unit. Before going through the checklist below, check the connection and operating
procedures.
ISSUE potential cause/solution
general issues
No sound or the sound is very low.
The position of the fader control is not set for
a 2-speaker system. The volume of the unit
and/or connected device is very low. – Increase
the volume of the unit and connected device
• Stored stations and clock time erased.
• The fuse has blown.
• Makes a noise when the position of the
ignition is switched.
The leads are not matched correctly with the
car’s accessory power connector.
Head unit won’t power on.
Make sure there’s no short-circuiting between
the wires; Replace the old fuse with appropriate
capacity.
The display/illumination flashes.
The power supply is not sufficient.
– Check that the car battery supplies enough
power to the unit. (The power requirement is
12 V DC.)
Buttons not functioning properly.
Press the reset button on the panel.
If it still does not work, unplug the power
and plug it in again after a while.
Stations cannot be received.
The sound is hampered by noises.
The connection is not correct.
• Check the connection of the car antenna
(aerial).
• If the auto antenna (aerial) will not extend,
check the connection of the power antenna
(aerial) control lead.
Preset tuning is not possible. The broadcast signal is too weak.
cd/dvd issues
The disk does not play or the song skips. The disc is dirty and needs to be cleaned or is
too scratched and is defective.
14
ISSUE potential cause/solution
usb issues
You cannot play items via a USB hub. This unit cannot recognize USB devices via a
USB hub.
A USB device takes longer to play. The USB device contains files with a
complicated tree structure.
ISSUE potential cause/solution
bluetooth issues
The connecting device cannot detect this unit. Before the pairing is made, set this unit to
pairing standby mode.
Connection is not possible.
The connection is controlled from one side
(this unit or Bluetooth device), but not both.
– Connect to this unit from a Bluetooth
device or vice versa.
The name of the detected device does not
appear.
Depending on the status of the other device, it
may not be possible to obtain the name.
The talker’s voice cannot be heard.
The front speakers are not connected to the unit.
– Connect the front speakers to the unit. The
talker’s voice is output only from the front
speakers.
A call partner says that the volume is too low
or high.
Adjust the volume accordingly using Mic gain
adjustment.
Echo or noise occurs in phone call
conversations.
• Lower the volume.
• If the ambient noise other than the phone
call sound is loud, try reducing this noise. For
example, if a window is open and road noise,
etc., is loud, shut the window. If an air condi-
tioner is loud, lower the air conditioner.
The phone sound quality is poor.
Phone sound quality depends on the reception
conditions of the cellular phone.
– Move your car to a place where you can
enhance the cellular phone’s signal if the
reception is poor.
The volume of the connected audio device
is low.
The volume level will differ depending on the
audio device.
– Adjust the volume of the connected audio
device or this unit
15
ISSUE potential cause/solution
bluetooth issues
The sound skips during playback of a
Bluetooth audio device.
• Reduce the distance between the unit and
the Bluetooth audio device.
• If the Bluetooth audio device is stored in a
case that interrupts the signal, remove the
audio device from the case during use.
• Several Bluetooth devices or other devices
which emit radio waves are in use nearby.
– Turn off the other devices.
– Increase distance from other devices.
• The playback sound stops momentarily when
the connection between this unit and the
cellular phone is being made. This is not a
malfunction.
The connected Bluetooth audio device cannot
be controlled.
Check that the connected Bluetooth audio
device supports AVRCP.
Bluetooth function cannot operate. Turn off the unit by pressing (Power) for more
than 2 seconds, then turn the unit on again.
No sound is output from the car speakers
during hands-free calls.
If the sound is output from the cellular phone,
set the cellular phone to output the sound
from the car speakers.

16
Specifications
general
Supply voltage DC 12 V
Current consumption Max 10 A
Power Output 4 x 50 W Max
Speaker Impedance 4 Ohm
Mounting Dimensions (W x H x D): 7.25” x 2.125” x 6.375”
(W x H x D): 182mm x 53mm x 159mm
FM Tuning range 87.5 Mhz - 107.9 Mhz
AM Tuning range 530 kHz – 1,710 kHz
Signal-to-Noise Ratio 80dBA
Sensitivity 26 μV
Display 6.2” 800×480 LCD
Compatible Disks DVD, DVDR, CD, &
Compatible Audio Files MP3 & WMA
Compatible Video Files MP4 & WMV
Bluetooth Version 4.2 + A2DP Audio Streaming

NOTES
_______
_______
_______
_______
_______
_______
_______
_______
_______
_______
_______
_______
_______
_______
_______
_______
_______
_______
_______
_______
_______
_______
_______
_______
_______
_______
_______

BELVA
cs@belvaproducts.com
belvaproducts.com
10645 Freeport Dr. | Louisville, KY | 40258
Phone dialer Dial or answer calls
Phonebook Hang up or reject calls
Download mobile
contacts Bluetooth music play interface
Mute button
Call source (Change how you
take phone calls i.e. via your cell
phone speaker or car speakers)
Bluetooth settings Delete key
Answered call’s
information Dialed call’s information
Missed call’s infor-
mation
Table of contents
Other Belva Car Receiver manuals


