Belva BDMRS5 User manual

BDMRS5
Single DIN CD Car Stereo Receiver with Bluetooth®
OWner’s Manual
BLUEToothpre-out AUX USB MICRO SD

thank you for purchasing
this belva product!
We want to thank you for your purchase of this Belva Car Stereo. We hope you
thoroughly enjoy this product. Please read through this manual carefully before
attempting to install and operate this device.

1
IMPORtant reminders
1. If your vehicle is exposed to direct
sunlight and is subject to excessive
heat in the vehicle, then you should be
careful while using the device. If this
receiver experiences overheating, it
could cause permanent damage.
2. If the head unit does not power on,
please check your wiring connections.
Also, be sure to check the fuse.
3. Before installation, please pay attention
to the wiring diagram in this manual to
ensure the stereo is wired correctly.
4. This unit can play MP3/WMA files via
USB or SD Card, but this device will
not be able to play videos or display
images.
5. This unit supports Bluetooth hands-
free calling and music playback from
your mobile device; however, this
stereo does not support a phone
book function. Incoming/Outgoing
phone numbers will be displayed on
the screen.
2
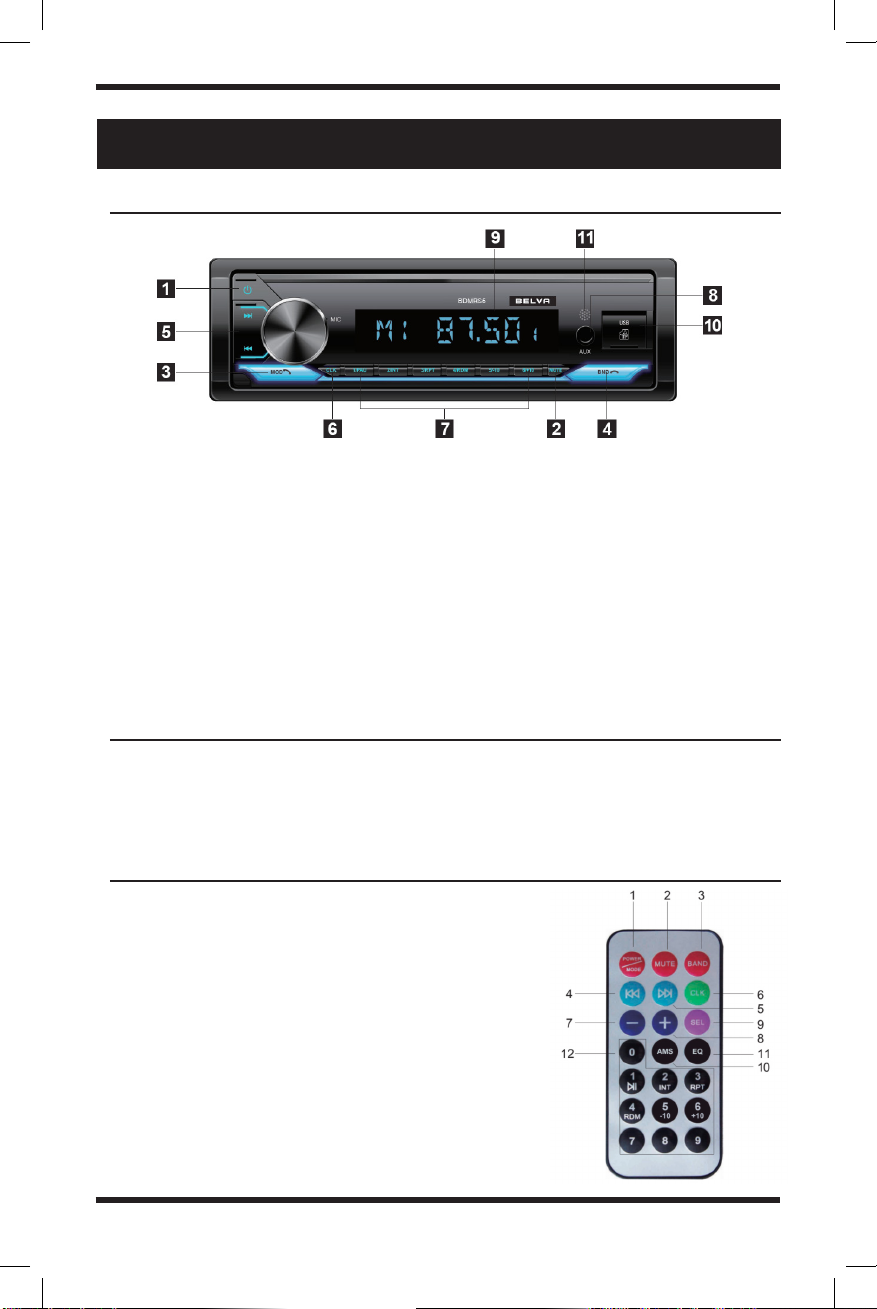
1. Power On/off - Mode
2. Mute
3. Band
4. Last Track
5. Next Track
6. Display
7. Volume Down
Turn on the unit. Find the Bluetooth name “Belva BDMRS5” on your phone then click
to connect. Once connected, the Bluetooth icon on the screen of the device will
stop flashing. To answer phone calls press “MODE” and “BAND” to hang up.
OPEration guide
Panel functions
how to connect to bluetooth
remote functions
1. On/Off
2. Mute
3. Mode/Answer a call
4. Band/Reject or hang up a call
5. Station tuning & fast forward/rewind
6. Clock adjustments
7. Preset stations
8. Aux input
9. SD Card Slot
10. USB port
11. IR remote control window (optional)
12. Display
8. Volume Up
9. Multifunctional
Selection Key
10. Radio Search
11. Digital EQ
12. 0.1.2.3.4.5.6.7.8.9.
digital key

3
troubleshooting
The following checklist will help you remedy problems you may encounter with your
unit. Before going through the checklist below, check the connection and operating
procedures.
ISSUE potential cause/solution
general issues
No sound or the sound is very low.
The position of the fader control is not set for
a 2-speaker system. The volume of the unit
and/or connected device is very low. – Increase
the volume of the unit and connected device.
• Stored stations and clock time erased.
• The fuse has blown.
• Makes a noise when the position of the
ignition is switched.
The leads are not matched correctly with the
car’s accessory power connector.
Head unit won’t power on.
Make sure there’s no short-circuiting between
the wires; Replace the old fuse with appropriate
capacity.
The display/illumination flashes.
The power supply is not sufficient.
– Check that the car battery supplies enough
power to the unit. (The power requirement is
12 V DC.)
Buttons not functioning properly.
Press the reset button on the panel.
If it still does not work, unplug the power
and plug it in again after a while.
Stations cannot be received.
The sound is hampered by noises.
The connection is not correct.
• Check the connection of the car antenna
(aerial).
• If the auto antenna (aerial) will not extend,
check the connection of the power antenna
(aerial) control lead.
Preset tuning is not possible. The broadcast signal is too weak.

4
ISSUE potential cause/solution
bluetooth issues
The connecting device cannot detect this unit. Before the pairing is made, set this unit to
pairing standby mode.
Connection is not possible.
The connection is controlled from one side
(this unit or Bluetooth device), but not both.
– Connect to this unit from a Bluetooth
device or vice versa.
The name of the detected device does not
appear.
Depending on the status of the other device, it
may not be possible to obtain the name.
The talker’s voice cannot be heard.
The front speakers are not connected to the unit.
– Connect the front speakers to the unit. The
talker’s voice is output only from the front
speakers.
A call partner says that the volume is too low
or high.
Adjust the volume accordingly using Mic gain
adjustment.
Echo or noise occurs in phone call
conversations.
• Lower the volume.
• If the ambient noise other than the phone
call sound is loud, try reducing this noise. For
example, if a window is open and road noise,
etc., is loud, shut the window. If an air condi-
tioner is loud, lower the air conditioner.
The phone sound quality is poor.
Phone sound quality depends on the reception
conditions of the cellular phone.
– Move your car to a place where you can
enhance the cellular phone’s signal if the
reception is poor.
The volume of the connected audio device
is low.
The volume level will differ depending on the
audio device.
– Adjust the volume of the connected audio
device or this unit
ISSUE potential cause/solution
usb issues
You cannot play items via a USB hub. This unit cannot recognize USB devices via a
USB hub.
A USB device takes longer to play. The USB device contains files with a
complicated tree structure.
Cont. on next page >

5
ISSUE potential cause/solution
bluetooth issues
The sound skips during playback of a
Bluetooth audio device.
• Reduce the distance between the unit and
the Bluetooth audio device.
• If the Bluetooth audio device is stored in a
case that interrupts the signal, remove the
audio device from the case during use.
• Several Bluetooth devices or other devices
which emit radio waves are in use nearby.
– Turn off the other devices.
– Increase distance from other devices.
• The playback sound stops momentarily when
the connection between this unit and the
cellular phone is being made. This is not a
malfunction.
The connected Bluetooth audio device cannot
be controlled.
Check that the connected Bluetooth audio
device supports AVRCP.
Bluetooth function cannot operate. Turn off the unit by pressing (Power) for more
than 2 seconds, then turn the unit on again.
No sound is output from the car speakers
during hands-free calls.
If the sound is output from the cellular phone,
set the cellular phone to output the sound
from the car speakers.
< Cont. from previous page

6
installation
Please pay close attention to this diagram before installing this head unit.
• Run all ground leads to a common
ground point.
• Do not get the leads trapped under
a screw, or caught in moving parts
(e.g., seat railing).
• Before making connections, turn the
car ignition off to avoid short circuits.
• Choose the installation location
carefully so that the unit will
not interfere with normal driving
operations.
• Avoid installing the unit in areas
subject to dust, dirt, excessive
AViolet - Right rear speaker (+) 1N/A
BGray - Right front speaker (+) 2N/A
CWhite - Left front speaker (+) 3Blue - Antenna/Remote 12V (+)
DGreen - Left rear speaker (+) 4Red - Ignition Switch 12V (+) ACC
EViolet & Black - Right rear speaker (-) 5N/A
FGray & Black - Right front speaker (-) 6Yellow - Battery Power 12V (+)
GWhite & Black - Left front speaker (-) 7N/A
HGreen & Black - Left rear speaker (-) 8Black - Ground
wiring diagram
CAution
preCAutions
A
E
B
F
C
G
D
H
1
5
2
6
3
7
4
8
Antenna RCA Outputs
(Sub/Front/Rear)
• Connect the yellow and red power
supply leads only after all other leads
have been connected.
• Be sure to insulate any loose
unconnected leads with electrical tape
for safety.
vibration, or high temperature, such as
in direct sunlight or near heater ducts.
• Use only the supplied mounting
hardware for a safe and secure
installation.
7
installation (cont.)
NOTE ON THE POWER SUPPLY LEAD (YELLOW):
When connecting this unit in combination with other stereo components, the
amperage rating of the car circuit to which the unit is connected must be higher
than the sum of each component’s fuse amperage rating
MOUNTING ANGLE ADJUSTMENT:
Adjust the mounting angle to less than 30°.
REMOVING THE PROTECTION COLLAR AND THE BRACKET
Before installing the unit, remove the protection collar and the bracket from the unit.
• Pinch both edges of the protection collar, then pull it out.
• Insert both release keys until they click, and pull down the bracket, then pull up
the unit to separate
MOUNTING THE UNIT IN THE DASHBOARD
Before installing, make sure the catches on both sides of the bracket are bent
inwards 2 mm (3/32 in).
• Position the bracket inside the dashboard, then bend the claws outward for a
tight fit.
• Mount the unit onto the bracket, then attach the protection collar.
NOTES:
• If the catches are straight or bent outwards, the unit will not be installed
securely and may spring out.
• Make sure the 4 catches on the protection collar are properly engaged in the
slots of the unit.
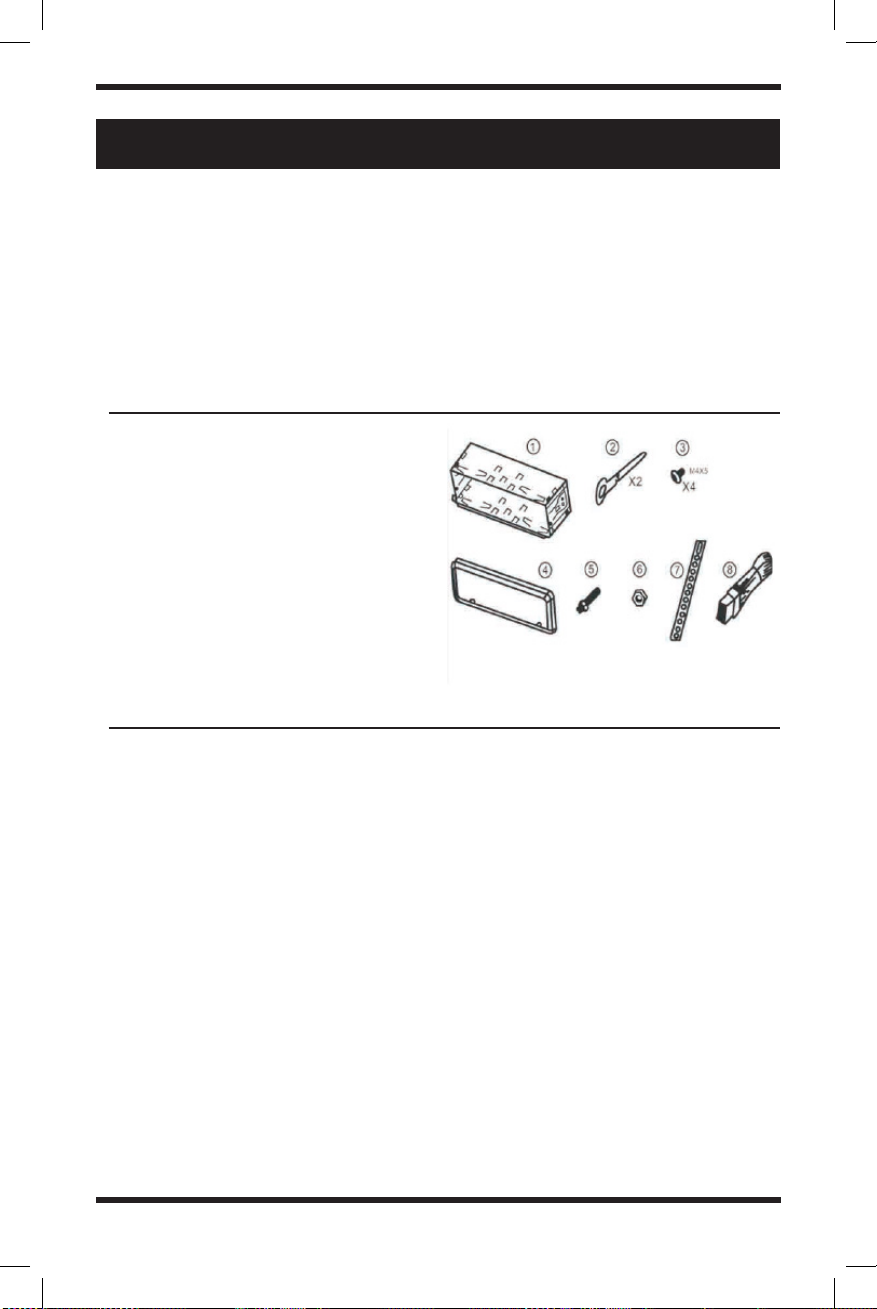
• This parts list does not include all the
package contents.
• The bracket and the protection collar
are attached to the unit before
shipping. Before mounting the unit,
use the release keys to remove the
bracket from the unit.
• Keep the release keys for future use
as they are also necessary if you
remove the unit from your car.
Parts for installation
install steps

8
Specifications
general
Supply voltage DC 12 V
Current consumption Max 10 A
Power Output 4 x 50 W
Number of Pre-Outs 3 pairs (Front, Rear and Sub)
Speaker Impedance 4 Ohm
Mounting Dimensions (W x H x D): 7” x 2” x 3-7/8”
(W x H x D): 178mm x 51mm x 98mm
fm section
Tuning range 87.5 Mhz - 107.9 Mhz
Sensitivity ≤ 20 dB
Signal-to-noise ratio ≥ 60 dB
Stereo Separation ≥ 25 dB
am section
Tuning Range 530 kHz – 1,710 kHz
Sensitivity ≤ 30 dB
Signal-to-noise ratio ≥ 45 dB
bluetooth
A2DP (Advanced Audio Distribution Profile) 1.2
AVRCP (Audio Video Remote Control Profile) 1.3

NOTES
_______
_______
_______
_______
_______
_______
_______
_______
_______
_______
_______
_______
_______
_______
_______
_______
_______
_______
_______
_______
_______
_______
_______
_______
_______
_______
_______

BELVA
cs@belvaproducts.com
belvaproducts.com
10645 Freeport Dr. | Louisville, KY | 40258
Table of contents
Other Belva Car Receiver manuals


