Belva BMV62W User manual

BMV62W
Double DIN Car Stereo with Bluetooth®Connectivity
OWner’s Manual
BLUETooth AUX USB MICRO SDvideo link

thank you for purchasing
this belva product!
We want to thank you for your purchase of this Belva Car Stereo. We hope you
thoroughly enjoy this product. Please read through this manual carefully before
attempting to install and operate this device.

1
Installation ........................................................................................................................X
Wiring Diagram .................................................................................................................X
Remote Control Operation ...............................................................................................X
Main Interface Functions..................................................................................................X
Basic Operation ................................................................................................................X
Radio Function Operation.................................................................................................X
CD/DVD Operation ...........................................................................................................X
AUX Function Operation...................................................................................................X
Phone Link Operation.......................................................................................................X
USB Function Operation...................................................................................................X
SD Card Function Operation ............................................................................................X
Bluetooth Function Operation..........................................................................................X
System Setup .................................................................................................................X
Troubleshooting..............................................................................................................X
Specifications ................................................................................................................. X
table of contents
2
installation
The unit is designed for a 12V DC negative ground operation system only. Before
installing the unit, make sure your vehicle is connected to a DC12V negative ground
electrical system.
The negative battery terminal must be disconnected before making connections,
which can decrease the chance of damaging the unit due to a short circuit.
Be sure to connect the color-coded leads correctly according to the diagram.
Incorrect connections may cause the unit to malfunction or damage the vehicle’s
electrical system.
Be sure to connect the speaker (-) leads to the speaker (-) terminal. Do not connect
the left and right channel speaker cables to each other or to the vehicle body.
Do not block vent or radiator panel, Blocking them will cause heat build-up and may
result in fire.
After the completion of the installation and begin to play the unit (including
replacing the battery), please press the RESET button on the front panel with
pointed objects (such as a ball-point pen) to set the unit to the initial status.
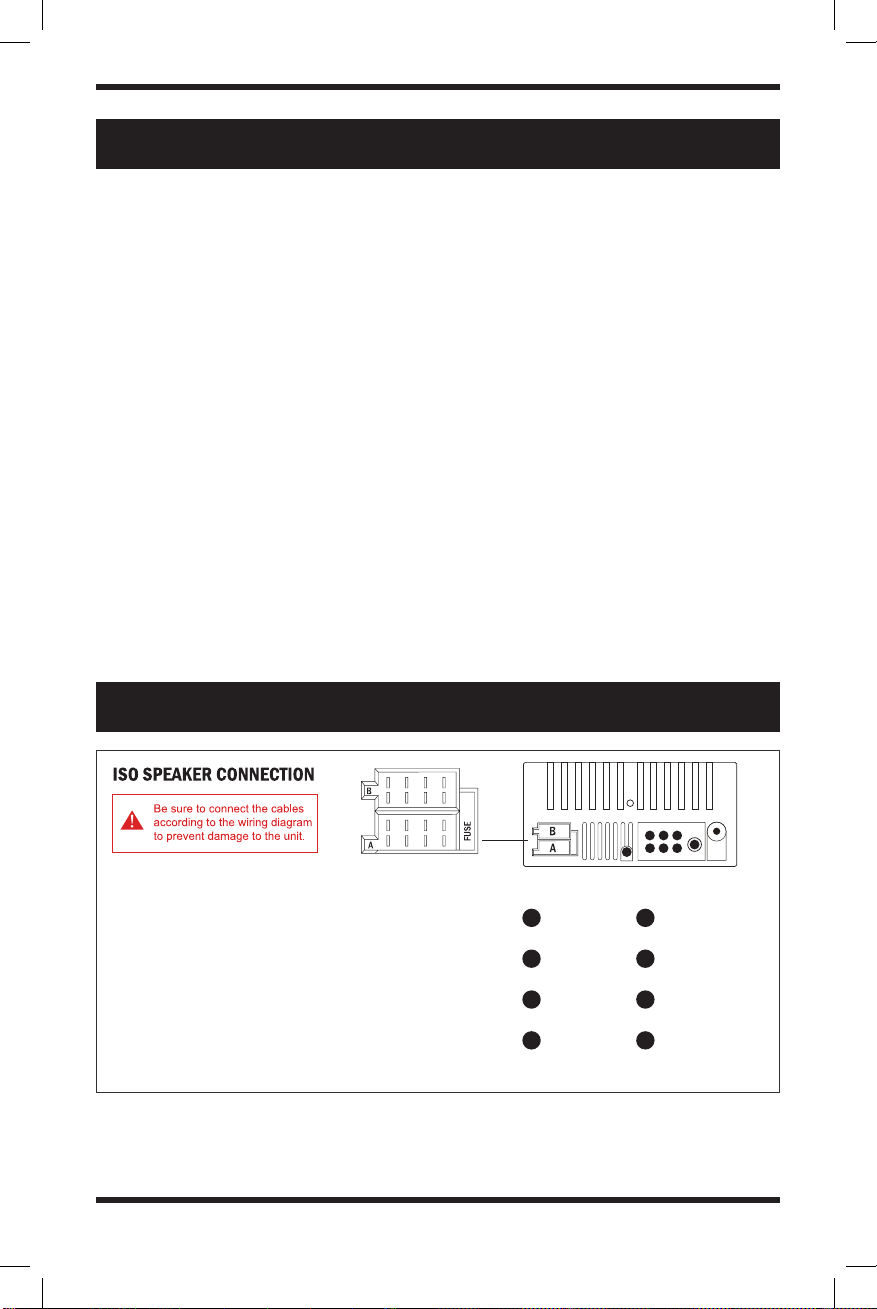
WIRING DIAGRAM
10A
1. PARKING BRAKE
2. STEERING WHEEL CONTROLS
3. ANTENNA/REMOTE OUTPUT
4. ACC+12V
5. REVERSE GEAR TRIGGER FOR
BACKUP CAMERA INPUT
6. BATTERY+
7. ILLUMINATION
8. GROUND
CONNECTOR A CONNECTOR B
9. REAR RIGHT SPEAKER (+)
10. FRONT RIGHT SPEAKER (+)
11. FRONT LEFT SPEAKER (+)
12. REAR LEFT SPEAKER (+)
13. REAR RIGHT SPEAKER (-)
14. FRONT RIGHT SPEAKER (-)
15. FRONT LEFT SPEAKER (-)
16. REAR LEFT SPEAKER (-)
ISO SOCKET HARNESS PLUGS
L-OUT
VIDEO OUT 1
VIDEO 2 INPUT
R-OUT
17
18
19
20
VIDEO OUT 2
VIDEO 1 INPUT
RADIO ANTENNA
AUX AUDIO L/R IN
21
22
23
24
9 10 11 12
1 2 3 4
13 14 15 16
5 6 7 8 17 18 19
20 21 22 23
24

3
REMOTE CONTROL OPERATION
NOTE: This remote uses a CR2025 lithium battery
NOTE: This remote uses a CR2025 lithium battery
• Aim the remote control directly at the IR sensor on the unit
• DO not expose the remote sensor to strong light (direct sunlight or artificial light)
WARNING: To prevent accidents and damage
WARNING: To prevent accidents and damage
• DO NOT install any battery other than CR2025
• Store the battery in a safe place where children cannot reach
• Make sure to safely dispose of the battery when it no longer holds a charge
1. Power switch
2. Mute
3. Up
4. Menu Button
5. Switch Modes
6. Left
7. USB / SD Card Mode
8. Previous Song
9. Band / Automatic
10. Volume Up
11. R i g h t
12. Enter/Play/Pause
13. Next Song
14. Down
15. Volume Down
16. Select
17. Answer Phone
18. Hang Up
19. Number Keys
4
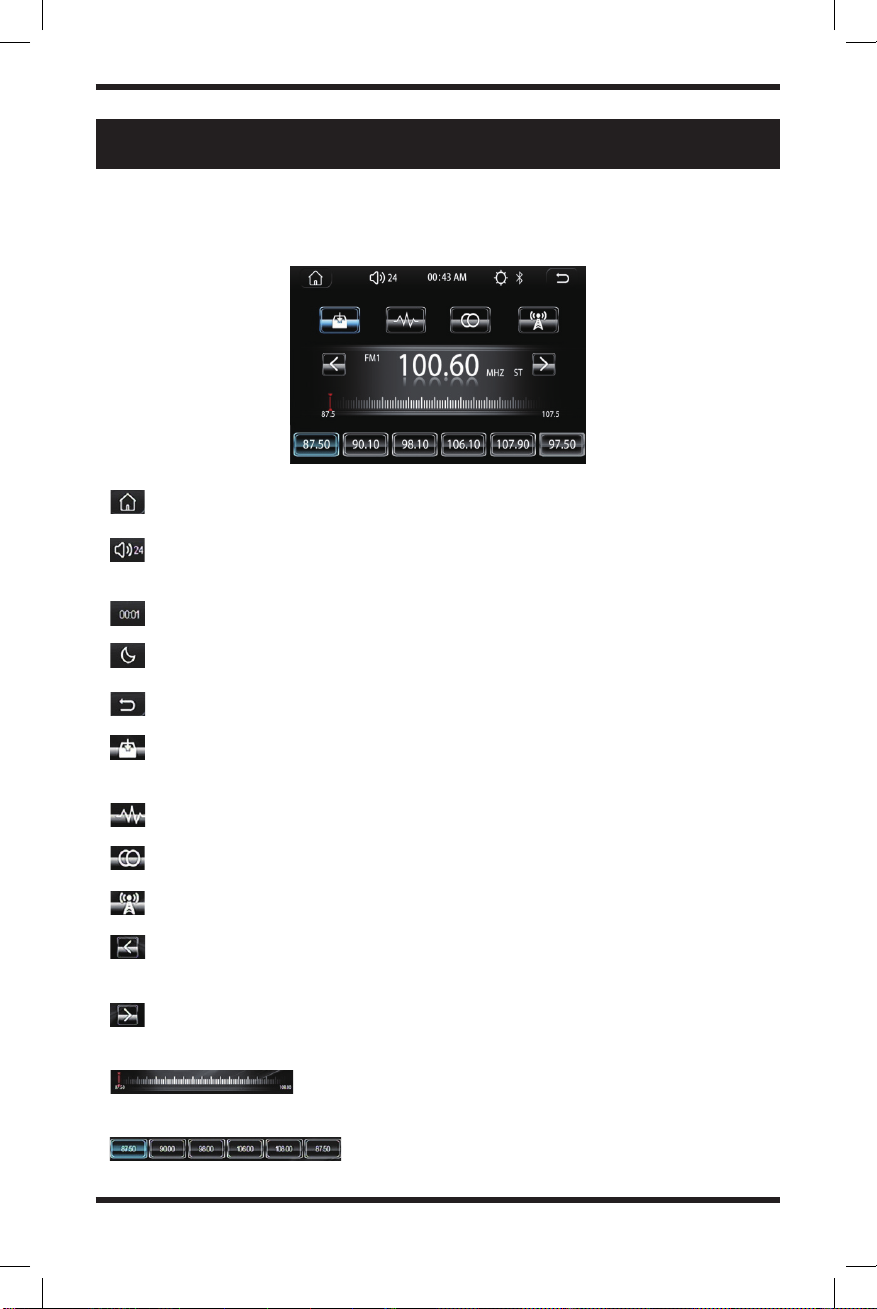
RADIO OPERATION
When the vehicle is turned on or is on accessory power, press the POWER key
button on the unit or on the remote control. The unit will turn on and enter into the
radio interface. The radio interface will appear like the image below:
Press this icon to enter into the main interface
Volume icon: Press to enter volume adjustment, touch, and slide to adjust
the volume
Time display
Press this icon to switch the backlight mode (day, night off-screen) 3 mode
Back button: Press to go back to the main interface
Short press this icon to browse radio stations. Long press the icon to search
and save stations automatically.
BAND switch: Switch between FM1/FM2/FM3/AM1/AM2
ST stereo switch: Switch ST stereo and MONO modes
Switch between LOC and DX (LOC: strong signal; DX: weak signal)
Short press to scan to the low end manually and long-press to scan to the
low end automatically.
Short press to scan to high end manually and long-press to scan to high end
automatically.
Radio progress bar: Press and slide to manually adjust
radio stations
Press to select a station, long press to store your
favorite station

5
MAIN INTERFACE
Press the icon on any interface to go back to the main interface as it
appears below:
Time & date: Tap to switch the display style
Media player quick view: This allows you to quickly view what media is
currently playing at that moment. It also allows you to play, pause, skip songs
or go back to the previous song all from the home screen.
Radio (FM/AM)
Bluetooth
USB
Phonelink
SD Card
Settings
External audio and video inputs
Rearview Camera
6
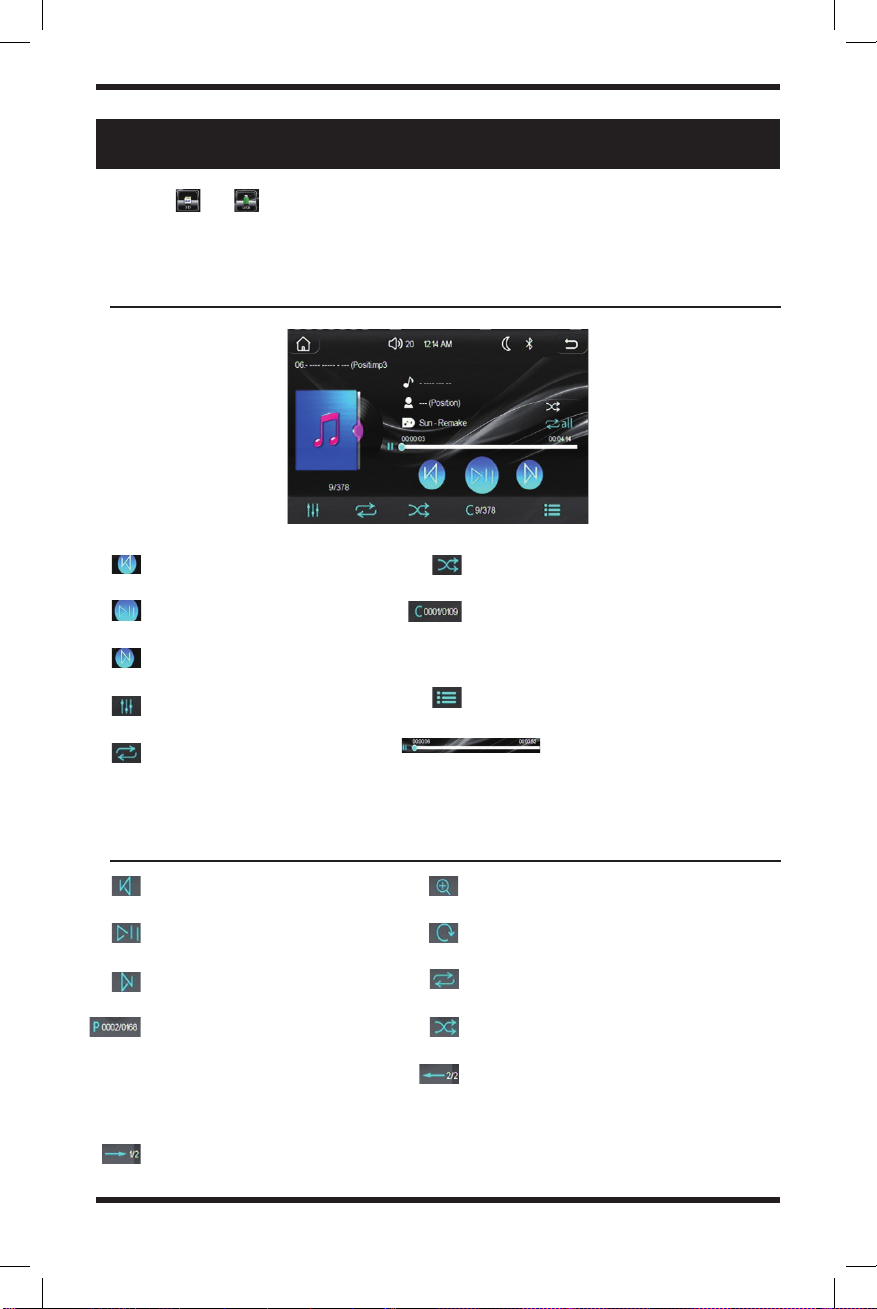
Previous song
Play/Pause music
Skip song
Digital EQ
Repeat playback
(replay song after it’s over)
Shuffle playback
File selection in folder (use the keypad
to quickly go to the file number within
the folder to start playing that file)
Song list
Play progress bar: press and
slide to quickly skip between parts of
an audio file
Previous Image
Play or Pause Image Slideshow
Next Image
File selection in folder (use
the keypad to quickly go to
the file number within the
folder to start displaying
that image)
Switch to 2/2 interface
Enlarge or zoom in on image
Rotate image
Repeat playback
Shuffle playback
Switch to ½ interface
SD Card or USB Playback
Music playback interface
Image playback interface
Choose or icon in the main interface or press the MOD (Mode) button to
upon the SD or USB playback function. This mode supports audio, video, and image
playback capabilities.
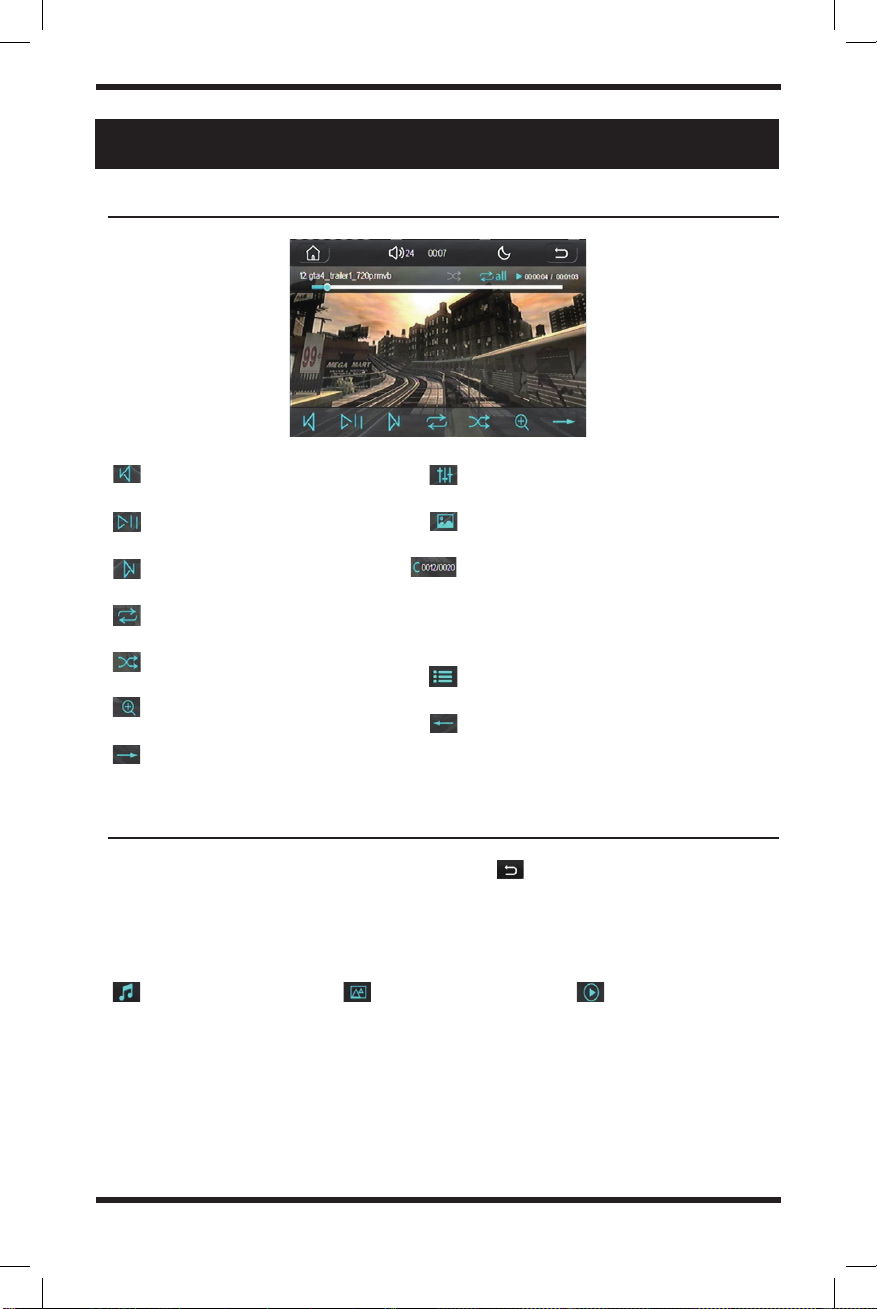
7
Previous video
Play/Pause video
Skip to next video
Repeat playback
Shuffle playback
Enlarge or zoom in on video
More functions
Adjust sound settings
Video settings
File selection in folder (use the keypad
to quickly go to the file number within
the folder to start displaying that
video)
Video list
Switch to last functions page
video playback interface
media folders
SD Card or USB Playback (CONt.)
When playing music, images, or videos, click the icon in the upper right
corner. Hit it once to view all files within the current folder and twice to view each
individual folder.
Use the corresponding icons to distinguish individual file types:
View music folder View image folder View video folder

8
Delete a single number entered
Delete all entered numbers
Dial key
Number dial keys
Received calls log
Dialed calls log
Rejected calls log
Download call log
Bluetooth Functionality
Press the icon to enter the Bluetooth calling interface
Press the icon to go to your Bluetooth call log
Choose icon in the main interface to enter Bluetooth connection mode. Turn
on the Bluetooth of your mobile device and search for the name “
Belva BMV62W
Belva BMV62W”.
Click that name to pair to the stereo.
Note:
Note: If the stereo and your Bluetooth enabled device cannot successfully connect,
please try the following steps:
• Turn off Bluetooth and back on again on your device. Then try to connect once
again. If it still fails, try to restart your device.
• If all else fails, press the reset button on the unit to reset to the factory
settings

9
Upload phonebook from your
mobile device
Delete entered characters
Keyboard
Collapse/Expand keyboard
Previous song Play/Pause song Skip song
Press the icon to enter the music playback interface.
This device also has ID3 technology to identify which song is currently playing
Press the icon to enter the music playback interface.
Press the icon to enter the Bluetooth phonebook interfaceDelete a single number entered
Bluetooth Functionality (CONT.)
Note:
Note:
You have to upload your phonebook first before you will be able to search for names.
You have to upload your phonebook first before you will be able to search for names.

10
mirrorlink
On the main interface tap the icon to go to the Mirrorlink interface
Note:
Note: Use the front USB for Mirrorlink functionality
Connection Steps:
Connection Steps:
1.
1.
Connect your Android phone to the head unit.
Connect your Android phone to the head unit.
2.
2.
Download the app.
Download the app.
3.
3.
Your phone screen will then automatically cast to your head unit.
Your phone screen will then automatically cast to your head unit.
4.
4.
For more information please refer to the help page by tapping the icon.
For more information please refer to the help page by tapping the icon.
Mirrorlink Help:
Mirrorlink Help:
1.
1.
Make sure to allow the application to have the proper permissions.
Make sure to allow the application to have the proper permissions.
2.
2.
If the APK fails, please scan the QR code to download and install the app.
If the APK fails, please scan the QR code to download and install the app.
Note:
Note:
1.
1.
Not all phones may support Mirrorlink.
Not all phones may support Mirrorlink.
2.
2.
IMPORTANT
IMPORTANT
- Also make sure to connect your phone via Bluetooth for audio. Mirrorlink
- Also make sure to connect your phone via Bluetooth for audio. Mirrorlink
only supports screen mirroring.
only supports screen mirroring.
3.
3.
If the stereo cannot display your full phone screen, try to adjust the resolution or
If the stereo cannot display your full phone screen, try to adjust the resolution or
aspect ratio on your device.
aspect ratio on your device.
4.
4.
If you have trouble connecting the device, restart your phone and press the reset
If you have trouble connecting the device, restart your phone and press the reset
button on the face of the head unit.
button on the face of the head unit.
Press the icon to enter
Wired Mirrorlink for Android
Wired Mirrorlink for Android.
Exit Mirrorlink
Sound adjustment
Turn off display
Home screen of the device
Back button
Force landscape mode
(not all phones will support this)

11
mirrorlink (CONT.)
Connection Steps:
Connection Steps:
1.
1.
Scan the QR code to download and install the Autolink Pro app
Scan the QR code to download and install the Autolink Pro app
2.
2.
Please open the app and click on BMV62W to connect
Please open the app and click on BMV62W to connect
3.
3.
Your phone screen will then automatically cast to your head unit
Your phone screen will then automatically cast to your head unit
4.
4.
For more information please refer to the help page by hitting the icon
For more information please refer to the help page by hitting the icon
Connection Steps:
Connection Steps:
1.
1.
Connect your IOS device to the stereo via USB cable
Connect your IOS device to the stereo via USB cable
2.
2.
Click “Trust this device” on your iPhone
Click “Trust this device” on your iPhone
3.
3.
Your phone screen will then automatically cast to your head unit
Your phone screen will then automatically cast to your head unit
Note:
Note:
1.
1.
If the connection fails, please restart your phone and try again.
If the connection fails, please restart your phone and try again.
2.
2.
Some devices will require Bluetooth connection for audio while others will not. If you
Some devices will require Bluetooth connection for audio while others will not. If you
have Bluetooth connected and there is no audio, then disconnect your phone from
have Bluetooth connected and there is no audio, then disconnect your phone from
Bluetooth.
Bluetooth.
Note:
Note:
1.
1.
When connected to Bluetooth you get access to two-way control (you can control
When connected to Bluetooth you get access to two-way control (you can control
the unit from your device and control your device from the unit)
the unit from your device and control your device from the unit)
Press the icon to enter
Wireless Mirrorlink for Android
Wireless Mirrorlink for Android.
Press the icon to enter
Wired Phone Mirroring for iOS
Wired Phone Mirroring for iOS
Exit Mirrorlink
Sound adjustment
Turn off display
Home screen of the device
Back button
Force landscape mode
(not all phones will support this)
Exit Mirrorlink Sound adjustment Turn off display
12
mirrorlink (cont.)
Connection Steps:
Connection Steps:
1.
1.
Open your wifi settings and connect to “DIRECT-Car-phonelink” with the password:
Open your wifi settings and connect to “DIRECT-Car-phonelink” with the password:
88888888
88888888
2.
2.
Open the control center, click “Screen mirroring”, select “Car-airplay” for screen
Open the control center, click “Screen mirroring”, select “Car-airplay” for screen
mirroring
mirroring
3.
3.
For more information, please refer to the help page. Press the icon for detailed tips
For more information, please refer to the help page. Press the icon for detailed tips
Wireless phone mirroring for iOS help:
Wireless phone mirroring for iOS help:
1.
1.
This feature only supports sharing of images and audio. Videos are not supported
This feature only supports sharing of images and audio. Videos are not supported
2.
2.
If the device is not in use and is on the lockscreen, the application will stop
If the device is not in use and is on the lockscreen, the application will stop
automatically
automatically
Note:
Note:
1.
1.
If you are unable to connect, restart your phone and press the Reset button on the
If you are unable to connect, restart your phone and press the Reset button on the
front of the stereo
front of the stereo
Press the icon to enter
Wireless Phone Mirroring for iOS
Wireless Phone Mirroring for iOS
Exit Mirrorlink Sound adjustment Turn off display

13
SETTINGs
Press the icon on the main interface to view the stereo’s settings.
Press the icon to go to your
system settings.
system settings.
Language settings
Language settings
Beep
Beep - turn on and off the key tones
Button illumination settings
Button illumination settings - choose between red, green, yellow, blue, rose red, cyan,
white and automatic
Reverse Mute switch
Reverse Mute switch - turn on and off the feature that will mute your audio when the
vehicle is in reverse
Panel
Panel - This allows you to adjust the screen settings like brightness and calibration
Radio Area
Radio Area - this allows you to adjust what region you are in so you can pick up the
correct radio frequencies near you
Logo
Logo - Change the car logo on the stereo so you can closely match what your vehicle
looks like
About
About - Software version information
Default
Default - This allows to reset the unit to factory default settings
14
SETTINGs (cont.)
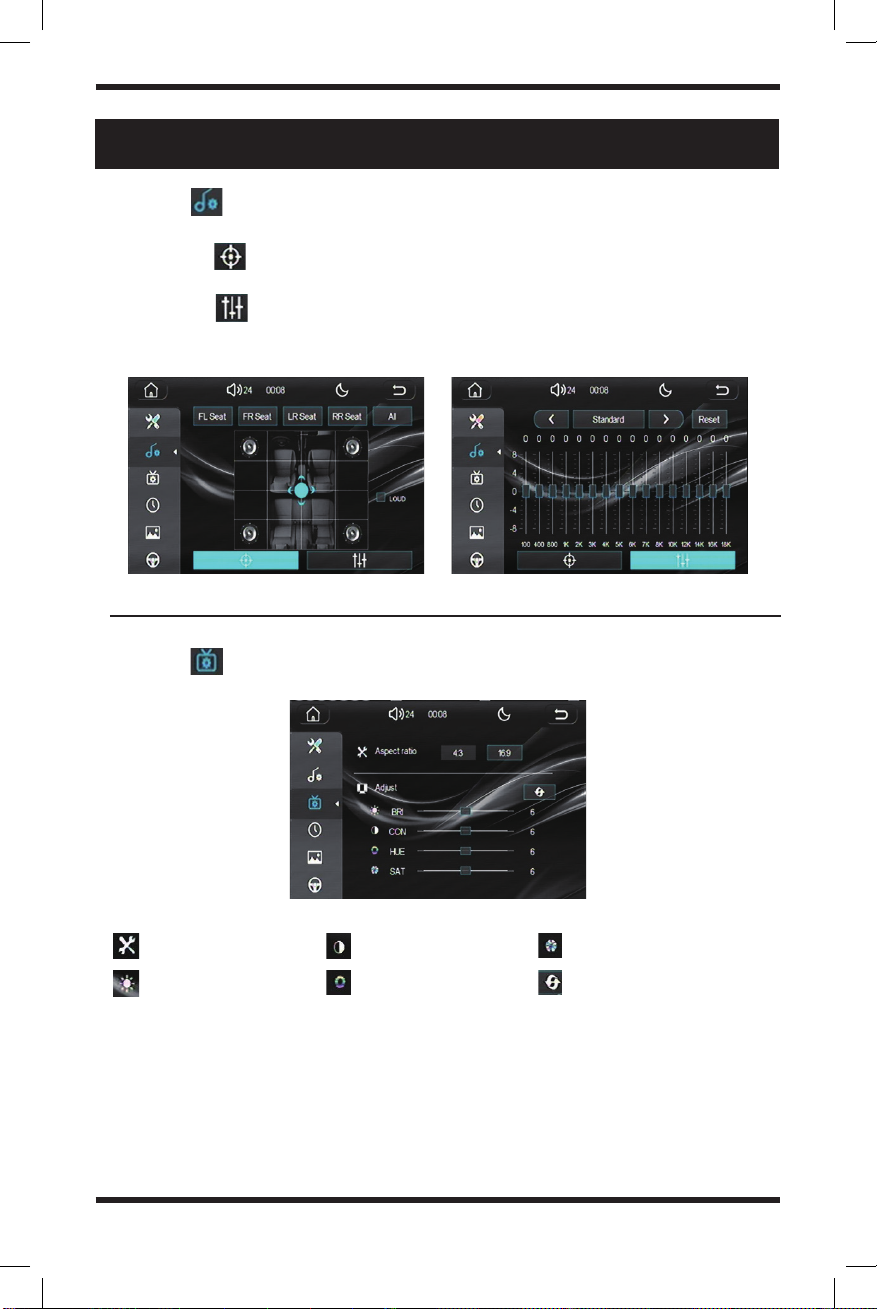
Press the icon to go to your
audio settings.
audio settings.
Press the icon to go to your
video settings.
video settings.
1.
1.
From the icon you can adjust the direction of the sound for each individual
From the icon you can adjust the direction of the sound for each individual
seat in the vehicle
seat in the vehicle
2.
2.
From the icon you can adjust your digital EQ. This will present you with a
From the icon you can adjust your digital EQ. This will present you with a
16 band EQ so you can fine tune your audio as well as toggle between multiple
16 band EQ so you can fine tune your audio as well as toggle between multiple
preset EQ modes for each genre of music
preset EQ modes for each genre of music
Aspect ratio
Brightness
Contrast
Hue
Saturation
Restore to default settings

15
Press and hold the button on the steering wheel and tap the corresponding button on the
stereo, when the color turns grey it means it was successful
SETTINGs (cont.)
Press the icon to go to your
date and time settings.
date and time settings.
Press the icon to go to your
background settings.
background settings.
Adjust up
Adjust down
Save the settings
When this option is selected the clock
will be on a 24-hour clock. When it is off,
there will be a 12-hour clock.
Save learned button
Clear all learned keys
The square in the lower right corner will
indicate that there is a voltage signal
with the button you are pressing on the
steering wheel
Steering wheel control keys
Press the icon to go to your
steering wheel control settings.
steering wheel control settings.
16
troubleshooting
The following checklist will help you remedy problems you may encounter with your
unit. Before going through the checklist below, check the connection and operating
procedures.
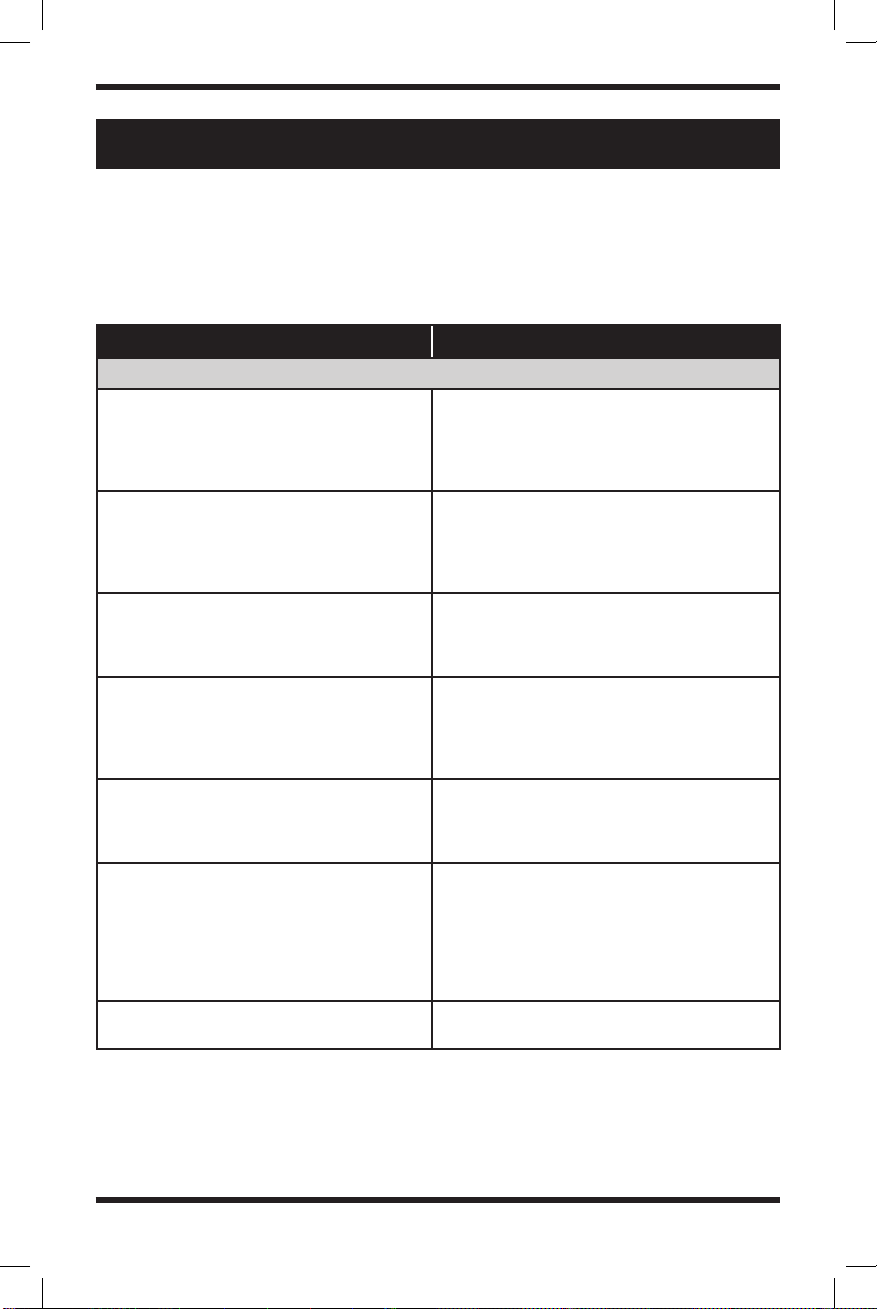
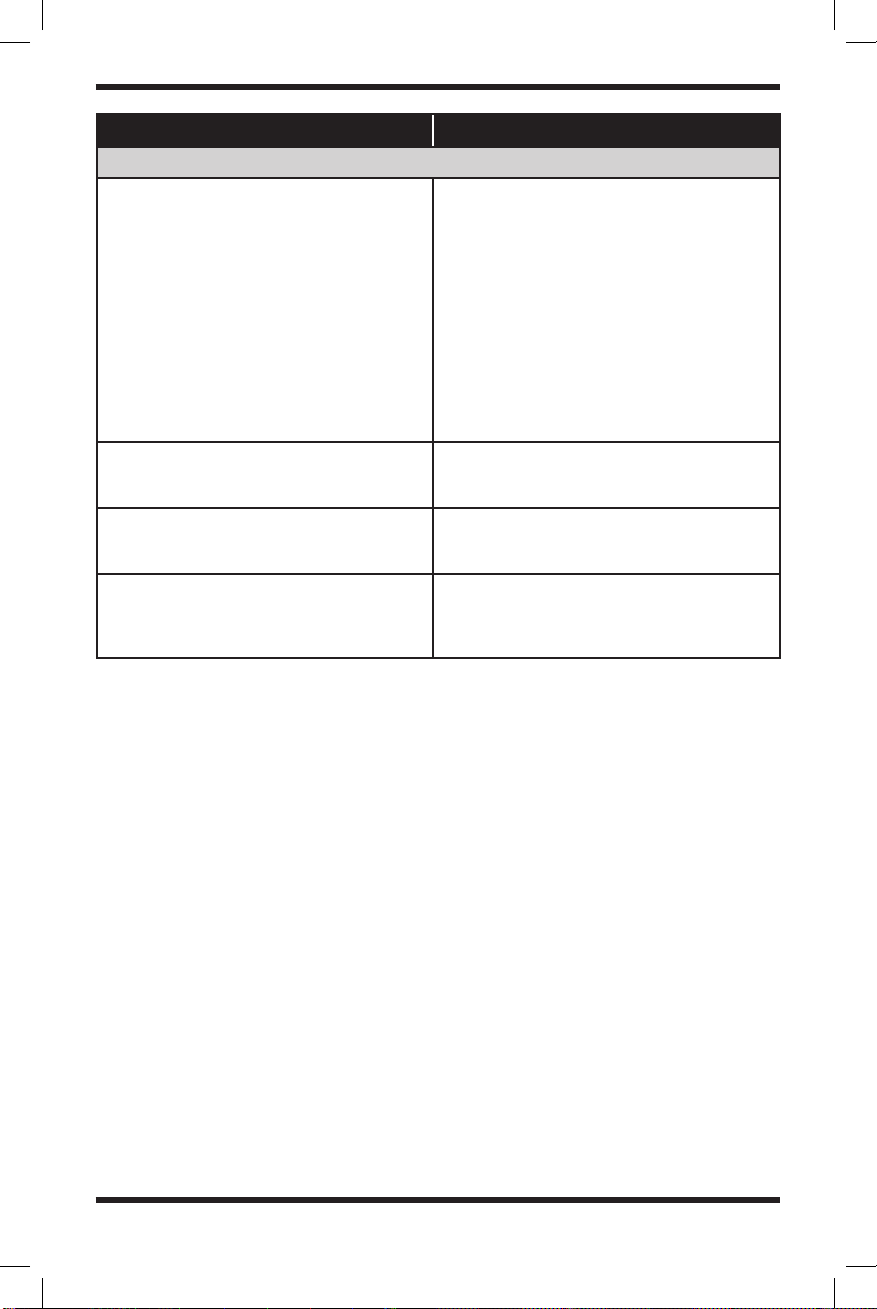
ISSUE potential cause/solution
general issues
No sound or the sound is very low.
The position of the fader control is not set for
a 2-speaker system. The volume of the unit
and/or connected device is very low. – Increase
the volume of the unit and connected device
• Stored stations and clock time erased.
• The fuse has blown.
• Makes a noise when the position of the
ignition is switched.
The leads are not matched correctly with the
car’s accessory power connector.
Head unit won’t power on.
Make sure there’s no short-circuiting between
the wires; Replace the old fuse with appropriate
capacity.
The display/illumination flashes.
The power supply is not sufficient.
– Check that the car battery supplies enough
power to the unit. (The power requirement is
12 V DC.)
Buttons not functioning properly.
Press the reset button on the panel.
If it still does not work, unplug the power
and plug it in again after a while.
Stations cannot be received.
The sound is hampered by noises.
The connection is not correct.
• Check the connection of the car antenna
(aerial).
• If the auto antenna (aerial) will not extend,
check the connection of the power antenna
(aerial) control lead.
Preset tuning is not possible. The broadcast signal is too weak.
17
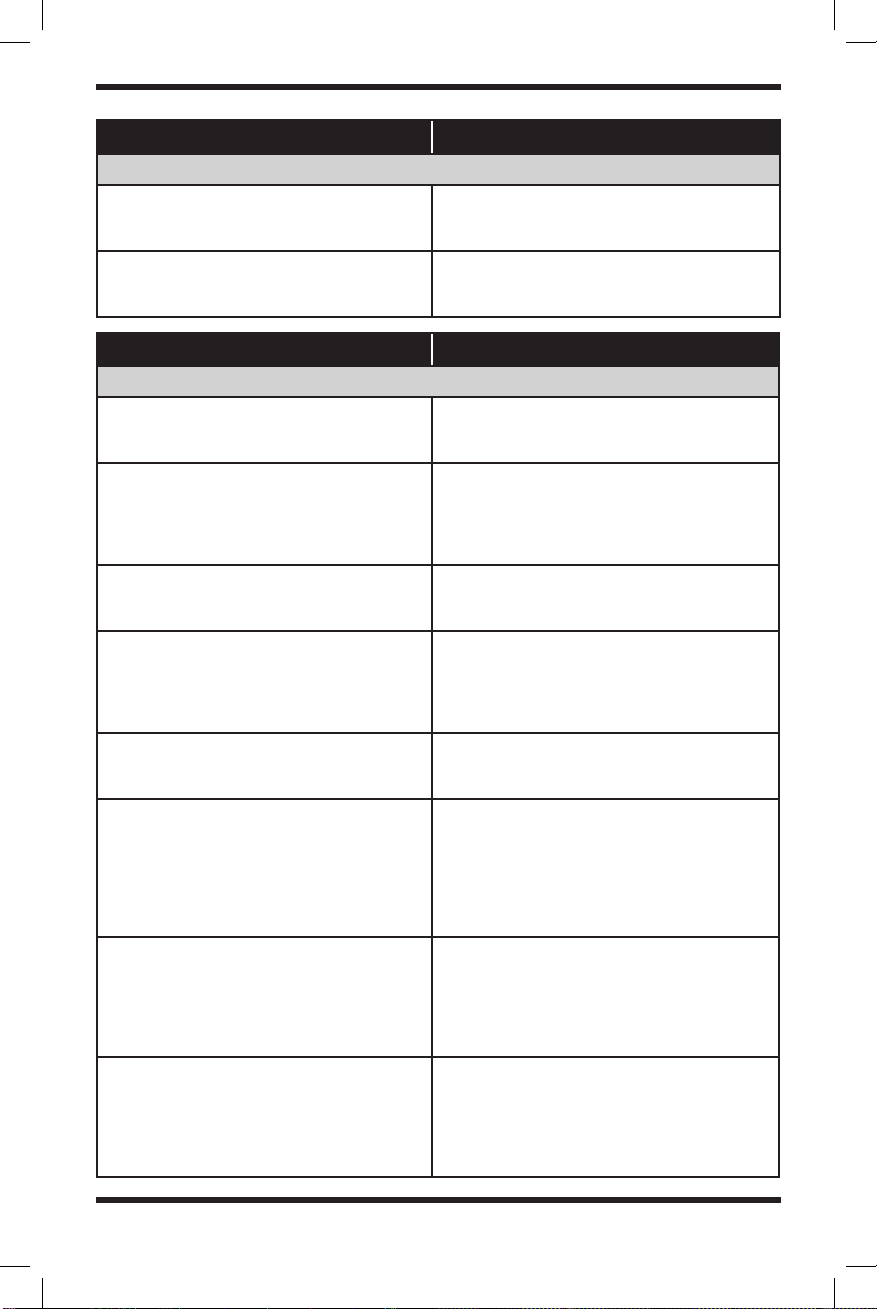
ISSUE potential cause/solution
usb issues
You cannot play items via a USB hub. This unit cannot recognize USB devices via a
USB hub.
A USB device takes longer to play. The USB device contains files with a
complicated tree structure.
ISSUE potential cause/solution
bluetooth issues
The connecting device cannot detect this unit. Before the pairing is made, set this unit to
pairing standby mode.
Connection is not possible.
The connection is controlled from one side
(this unit or Bluetooth device), but not both.
– Connect to this unit from a Bluetooth
device or vice versa.
The name of the detected device does not
appear.
Depending on the status of the other device, it
may not be possible to obtain the name.
The talker’s voice cannot be heard.
The front speakers are not connected to the unit.
– Connect the front speakers to the unit. The
talker’s voice is output only from the front
speakers.
A call partner says that the volume is too low
or high.
Adjust the volume accordingly using Mic gain
adjustment.
Echo or noise occurs in phone call
conversations.
• Lower the volume.
• If the ambient noise other than the phone
call sound is loud, try reducing this noise. For
example, if a window is open and road noise,
etc., is loud, shut the window. If an air condi-
tioner is loud, lower the air conditioner.
The phone sound quality is poor.
Phone sound quality depends on the reception
conditions of the cellular phone.
– Move your car to a place where you can
enhance the cellular phone’s signal if the
reception is poor.
The volume of the connected audio device
is low.
The volume level will differ depending on the
audio device.
– Adjust the volume of the connected audio
device or this unit
18
ISSUE potential cause/solution
bluetooth issues
The sound skips during playback of a
Bluetooth audio device.
• Reduce the distance between the unit and
the Bluetooth audio device.
• If the Bluetooth audio device is stored in a
case that interrupts the signal, remove the
audio device from the case during use.
• Several Bluetooth devices or other devices
which emit radio waves are in use nearby.
– Turn off the other devices.
– Increase distance from other devices.
• The playback sound stops momentarily when
the connection between this unit and the
cellular phone is being made. This is not a
malfunction.
The connected Bluetooth audio device cannot
be controlled.
Check that the connected Bluetooth audio
device supports AVRCP.
Bluetooth function cannot operate. Turn off the unit by pressing (Power) for more
than 2 seconds, then turn the unit on again.
No sound is output from the car speakers
during hands-free calls.
If the sound is output from the cellular phone,
set the cellular phone to output the sound
from the car speakers.
Table of contents
Other Belva Car Receiver manuals


