bem wireless Kickstand Micro User manual

®
kickstand micro

2

3
6 Product Overview
7 Features
8 Interface
10 Entry Level Operation
14 Video/Photo Source Connection
18 Customized Settings
21 Wireless connection operation for iPhones
24 Wireless connection operation for Androids
27 Specications
28 FAQ
29 FCC Statement
30 Safety Instructions
32 Warranty

4
Thank you for purchasing the Bem Wireless Kickstand Micro Projector!
Wehopethatyoundourproductseasyandfuntouse,aswellas
innovative.Inorderforyoutobetterinteractwiththeproduct,please
read the User Guide carefully and save it for future reference.
1. Read the instructions
Beforeusingthedevice,pleasereadallsafetyandoperating
instructions.
2. Cautions and Warnings
Our product has been designed to include a variety of protective
measures,butimproperuseoftheprojectormaycauseelectric
shockorre.Pleasefollowtheinstructions,payingcarefulattention
to all recommendations for proper use.
3. Clean
Beforecleaning,unplugtheprojectorpowercordfromthewall
outlet. Use a dry cloth to wipe the projector case. Do not use liquid
or aerosol-based cleaners.
4. Install
Donotputtheprojectoronanunstablecart,stand,ortable.This
may result in serious damage to the projector due to a fall. All
plasticpackagingmaterials(forprojector,accessories,andoptional
parts)shouldbeputoutofthereachofchildren.Otherwise,bags
and other packaging materials may cause suffocation.
5. The light source
To protect your vision when using the Bem Kickstand Micro
projector,donotstareorlookdirectlyintothelensandthe
projection beam.

5
6. Ventilation
This projector is equipped with intake and exhaust vents.
WARNING: Donotblocktheseopenings,otherwisetheheatmay
accumulate inside and effect picture quality or cause damage to the
projector.
7. Power
Please use the supplied power cord for the product.
8. Maintenance
Do not attempt to service this projector. It is better to contact
professional and technical personnel for any maintenance needed.
9. Replacement Parts
Whenreplacementpartsarerequired,besuretousereplacement
partsspeciedbythemanufacturer.Unauthorizedsubstitutions
maycausere,electricshock,orotherhazards.
10. Condensation
When the Micro projector is experiencing a major change in
temperature(fromverycoldtoveryhotenvironments),moisture
may condense on the lens and on the internal critical components.
Topreventdamagetotheprojector,youshouldwaitatleast2
hours before using when the temperature abruptly or suddenly
changes. Please refer to the listed operating temperatures.

6
Product Overview
ThebemwirelessKickstandMICROProjectorisahighperformance,
extraportableprojector.It’ssmallenoughtotintoyourbriefcaseor
purseforeasytransportandsetupisabreeze–kickouttheleg,stand
itup,andturniton!TheKickstandMicro'seaseofuseismatched
byit’squality.Thislittletechnologicalwonderhasasleeknishwith
amazing performance specs to match.
Package Contents
Your bēm Kickstand Micro should have included all of the following:
Kickstand MICRO x 1
Power Adapter x 1
HDMI Cable x 1
Aux Cable x 1
Quick Start Guide x 1
User Guide x 1
(Warranty can be found on page 32 in the User Guide)
Ifanyitemsaremissingordamaged,pleasecallbemwireless
customer support at 1-855-839-8616 or email

7
Your Kickstand Micro has been awarded U.S. Patents and also includes
advanced projector technology:
1.DLP®technology,upto93-inchoptimalscreensizeforyourenjoy-
ment.
2. Compact and portable with an integrated stand (utility patented) to
simply carry and set up.
3. *Built-in 3000mAh rechargeable battery supports up to 2 hours
4. **Mirroring your screen can be seamlessly transferred from your
mobile phone to your projector’s big screen.
5.Automatickeystonecorrection,freefromimageangleadjustment
issues.
6. Long-life LED light source: No need to replace light bulbs.
7. Aux out: Good for setting up a speaker
8.ContainingHDMIport,AUXport,includingfullsupportforgame
consoles(PS3,PS4,XBOX360,XBOXONE,WiiU)foraudioand
video output devices via HDMI cable and Aux cable.
*Batterychargetimemayvary,dependingonthemodeofoperation.(For
example,videostreamingmayresultinlessbatterytime).
**Mobilephonedevicesvary.Pleaserefertoyourspecicphone’suserguideto
identify and properly use the mirror function.
NOTE:PS3,PS4,XBOX360,XBOXONE,WiiUareregisteredtrademarksof
the corresponding companies.
Features of your Kickstand Micro

8
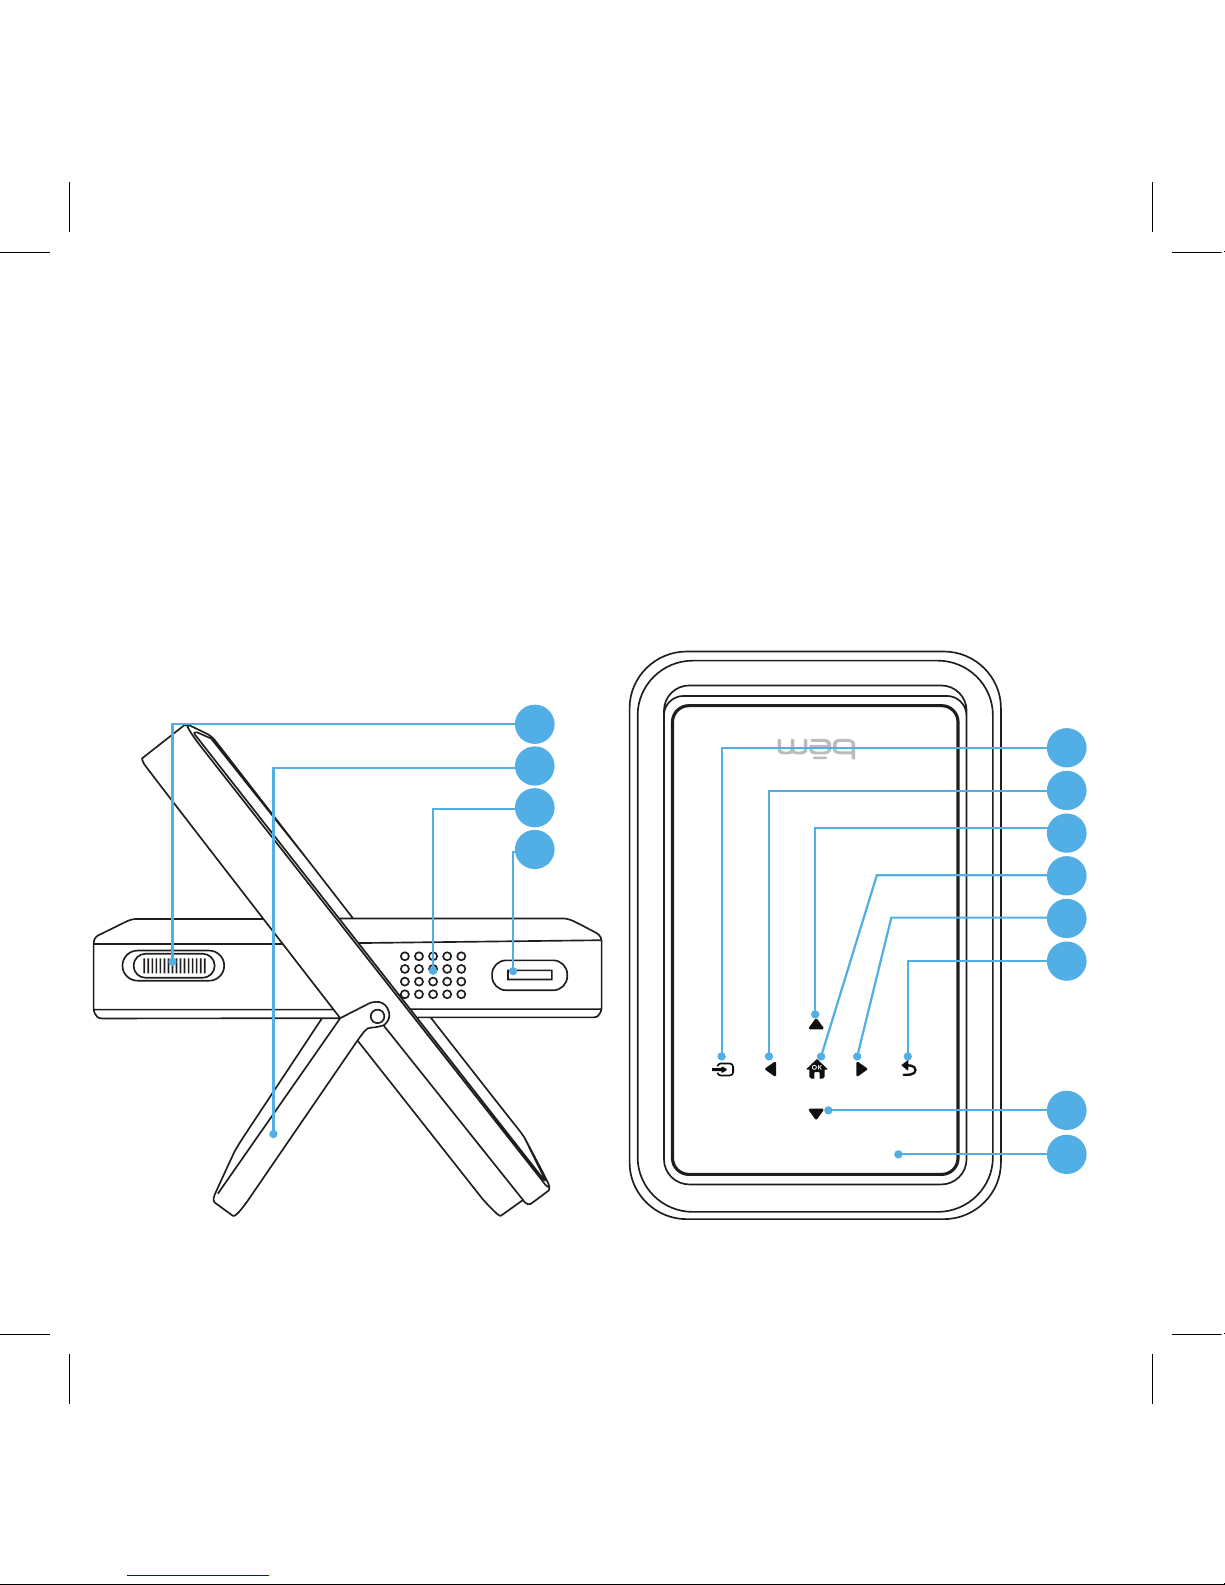
1. Lens
2. Cooling air outlets
3. HDMI input connector
Interface Ports and Functions
4. Earphone/ Speaker output
5. USB input
6. DC input (Power)
2
1
4
5
6
3
FRONT BACK
9
Interface Ports and Functions
7. Power switch
8. Support Kickstand
9. Speaker output
10. Focus Adjustment Wheel
11. Signal input key
12. Left selection key
13. Up key
8
9
10
7
11
12
13
14
15
16
17
18
14. Home key/OK
15. Right key
16. Return to prior screen key
17. Down selection key
18. Power indicator LED
light(charging)
SIDE TOP

10
Connect the power adapter to charge/use the
Kickstand Micro projector.
2.PlugthepoweradapterintoDCportontheMicroprojector,then
you can start to use the product while charging.
Entry Level Operation
focus
power
focus
power
power
focus
power
3. To Charge: Slide the power switch forward and hold
it in position. (You will see charging light on top of
housing turn on)
One minute installation guide
SetupyourMicroprojectoronasmooth,even
horizontal surface. Kick out the leg.
Werecommendthatyourstfullychargethe
product before using. Charge for approximately
3hours,ifportableuseisintended.(see3.below)
1. Slide power button in the Power ON direction for
3 seconds. You will see the main Bem screen
projected.
4. Power On: Slide the power switch back for 3
seconds.TheblueLEDlightsturnon,thesystem
starts.
5. Power Off: Slide the power switch forward
momentarily to power off.
Kick Out Leg
Power Adapter
Table of contents
Other bem wireless Projector manuals


