Benedini Oilsmoke II User manual
Building instruction for Benedini Oilsmoke II
Building this smoker needs mechanical and solder skills!
A bench drill is highly recommended!
Construction steps:
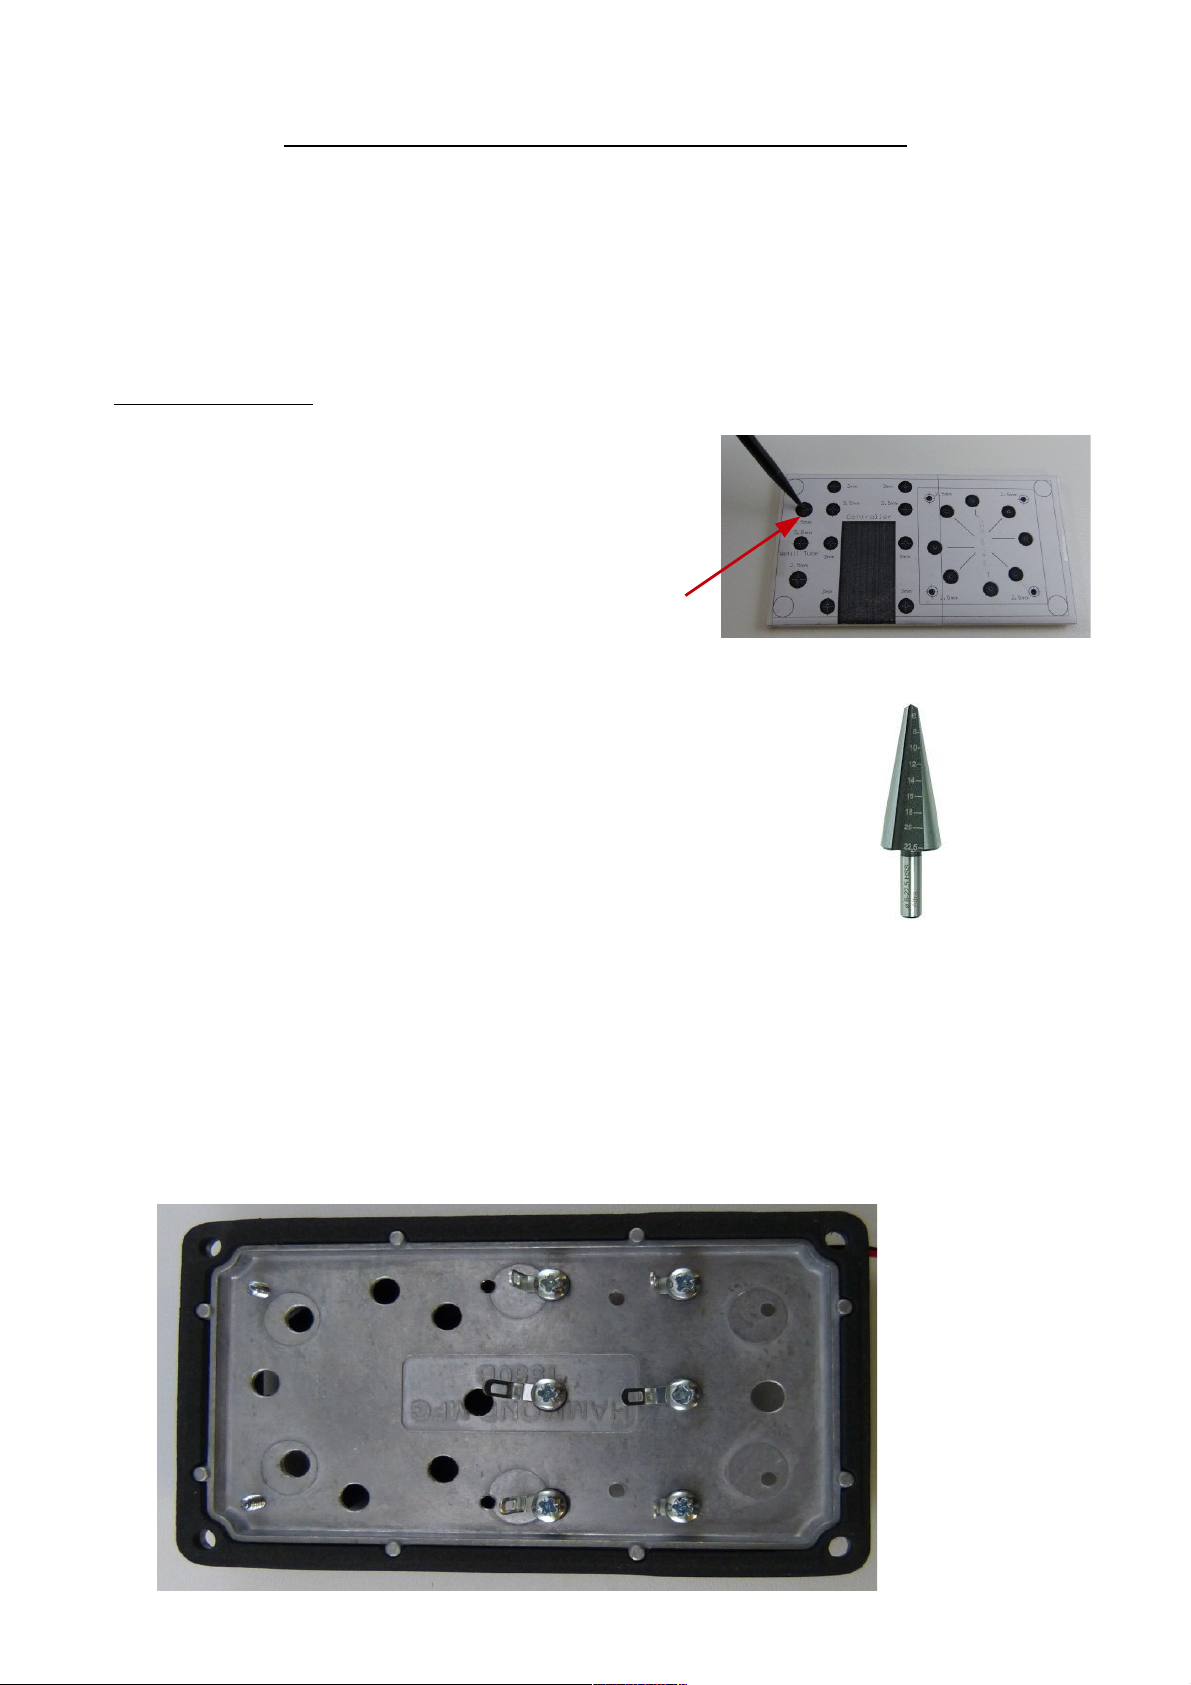
1. Cut the drilling jig out of the last page of this manual and
tape it on top of the smoke box (lid).
If the LARG smoker housing is used, the jig can be placed
in the center of the lid. Pictures below show the small box as
an example.
. Mark ALL wholes through the paper by a needle or centre
punch.
3. Drill all holes you need. Watch the labled diameters
N V R use a normal spiral drill for the large smoke outlet holes !!!
→ High danger of getting injured during drilling
Use a “hole cutter” as shown in the picture on the right →
Always use a parallel vice during drilling.
Never hold the housing by hand during drilling.
4. Mount solder lugs by the M3 x 6mm screws + nuts + top & bottom isolation
This is the most critical part. The screws must be electrically isolated to the lid.
Plug the black plastic nipples from inside the lid into the solder lug holes.
Lay the lug on it and put the screw through.
Turn the lid put the brown isolation washer on the screw, put the outside solder lug on the screw and
fix all by applying the nut.
A conductance check by measuring the resistance between screws and lid by a multimeter is highly
recommended. → All must look like the pictures below show !
Hole cutter
Lid inside view.
Watch solder lug
orientations
(small smoke box)
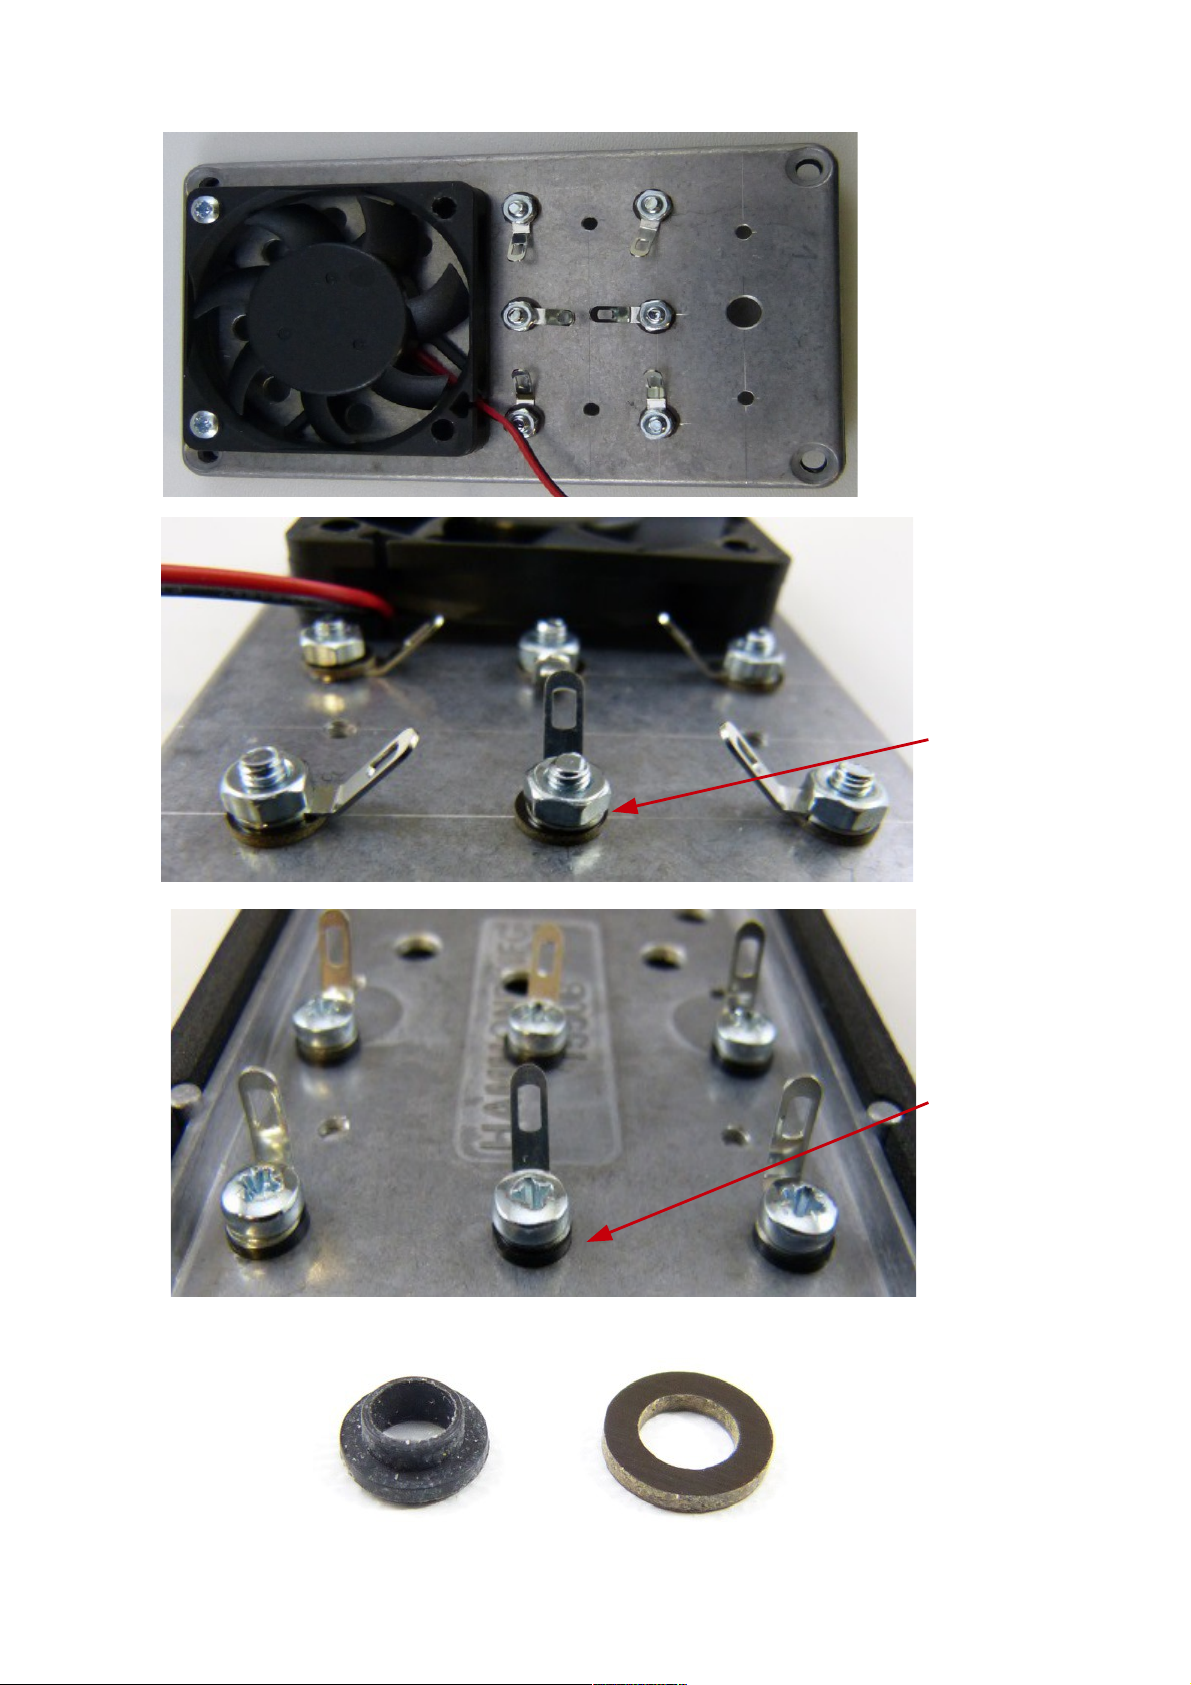
Outside view of the lid.
Watch solder lug
orientations.
Shown: 12V version
24V version does NOT need
solder lugs at the centre
contacts !
Outside view of the
lid.
Watch isolation
washers under the
solder lugs.
Inside view of the
lid.
Watch isolation
nipples under the
solde lugs.
The shroud must
be inside lid.
Isolation washer
Isolation nippel.
Watch shroud !
Shroud must be
INSIDE the lid !

5. Install the fan by .9 x 19mm self tapping screws
6. Solder all wires as shown at the end of this manual according to the desired operation voltage !!!
7. Install cover by using two of the fan screws and
two additional ones below, supported by 10mm plastic
sleeves between box and cover.
Bend the edge covering the fan slightly to top.
This ensures a free running fan.
!!! No guarantee on damaged fans !!!
Make ABSOLUT LY sure the cover does NOT touch
any electric contacts below !!!
Cover screws are supported by 10mm plastic sleeves
between box and cover.
2 vertical smoke outlets are shown on this picture.
The smoke controller is fixed by a “velcro” pad on the
cover.
9. Solder the heating elements to the solder lugs inside the box. x two heaters in series, as shown
on the picture below. The distance to the lid should be around 15mm
!!! Make sure the wires connect ONLY the solder lugs !!!
They must NOT touch the led or any other parts
Insert refilling tube here.
→ see instruction below !!!
15 mm

10. Install the lid on the box. Bend the wicks CAR FULLY to the side of the FAN to ensure laying
PARALL L on the bottom of the housing.
The proper installation can be seen on the picture below. Shown at a transparent plastic housing.
11. Tape two rubber feet on the XIT side of the
housing.
The exit side should be raised slightly to keep the
smoke oil more in the opposite edge.
1 . Insert the filling tube.
Make sure it last about 5mm until bottom
End of filling tube
x Elevation feet on filling tube side ONLY
Final installation with fixed outlet and refill tubes, using three cable ties.

Hints:
1. If accidentally drilled holes are not necessary, close it simply by inserting a screw.
. Horizontal smoke exit:
Drill holes as high as possible!
Otherwise the max. filling volume of smoke oil is reduced! Oil may flow into the exit tubes.
3. Install tubes continuously rising to the exhaust. This allows condensed smoke flowing back into
the container.
4. See operation manual for installation and operating advice for the smoker !!!
It is recommended downloading this manual from www.benedini.de for having coloured pictures.
Technical changes reserved Not suitable for kids under 14 years
Benedini Modellbauelektronik
Müllergasse 15, 5 159 Roetgen
Web: www.benedini.de
Mail: [email protected]

12V wiring
Important: This setup is ONLY compatible with the TBS Mini V1 and V2
!!! Contact us for applications with the TBS5 sound unit !!!
V RY IMPORTANT:
The +1 V battery cable MUST be fused ! Fuse holder and fuse are included in the kit.
Type of fuse: 5A fast characteristic
Any damages in the smoke controller area shown below are definitely out of any warranty !!!
Such damage results from damages on the heating
elements caused by overheating. Watch oil level !
Make also sure the right smoker type is selected in
the smoke controlling sound unit configuration.
This is very important if the smoker is operated on
the TBS5 sound unit !!!
Yellow
Orange and minus fan (black)
Isolate solder junction !
Green
+Battery distribution point:
1. Connect both solder lugs together
. Fan plus (red)
3. Red controller
4. Plus battery
Violet
Blue
- Battery:
Black AND Brown TOG TH R
+1 V battery FUS D !!!!
Fuse: 5A fast characteristic

24V wiring
Important: This setup is ONLY compatible with the TBS Mini V1 and V2
!!! Contact us for applications with the TBS5 sound unit !!!
IMPORTANT:
The + 4V battery cable MUST be fused ! Fuse holder and fuse are included in the kit.
Type of fuse: 5A fast characteristic
Any damages in the smoke controller area shown below are definitely out of any warranty !!!
Such damage results from damages on the heating
elements caused by overheating. Watch oil level !
Make also sure the right smoker type is selected in
the smoke controlling sound unit configuration.
This is very important if the smoker is operated on
the TBS5 sound unit !!!
Controller Orange to Minus Fan
Isolate solder junction
Controller Green AND Yellow
Plus Fan to resistor
Fan Resistor
Controller Blue AND Violett
Controller Black AND Brown
to Minus Battery
Controller Red
+ 4V Battery FUS D !!!
Fuse rating: 5A fast
Nothing connected at center nuts
but they are under voltage !
! NO solder lugs necessary !
Right solder lugs are connected together.
Resistor wire can be used.
Table of contents
Other Benedini Smoker manuals


