Bennett Read IND2000 User manual

USER GUIDE
IND2000
INDUCTION PRESSURE WASHER
DOUBLE-UP YOUR GUARANTEE!
SCAN* TO REGISTER YOUR EXTRA 1 YEAR GUARANTEE
* HOW? IT’S SIMPLE REALLY…
• SWITCH ON YOUR MOBILE CAMERA, POINT IT AT THE QR CODE & TAP THE LINK THAT POPS UP
• IF THAT DOESN’T WORK, YOU’LL NEED TO DOWNLOAD & USE A QR CODE SCANNER APP FROM YOUR PHONE’S
APP STORE

CONTENTS:
IMPORTANT SAFETY INSTRUCTIONS Page 2 - 3
PRODUCT OVERVIEW Page 4
ASSEMBLY Page 5 - 6
OPERATION Page 7 - 9
STORING Page 10
MAINTENANCE Page 10 - 11
TROUBLESHOOTING Page 11 - 12
GUARANTEE Page 13
ENVIRONMENTALLY FRIENDLY DISPOSAL Page 13
SAFETY SYMBOLS
To reduce the risk of injury, user
must keep all bystanders at least
15m away.
Sound power level is 92 dB(A).
Always keep the power cable
away from heat sources, oils, or
sharp edges. Immediately remove
plug from the mains if the cable is
damaged, frayed, or entangled.
Indicates aSAFETY ALERT –
precaution, a warning, or a danger.
WEAR EYE AND HEARING
PROTECTION – For protection
against injury, wear ear defenders
and safety goggles.
Double Insulation – When servicing,
use only identical replacement parts.
WARNING! Do not expose the
unit to rain or wet conditions.
Keep dry.
WARNING! Electrical shock hazard.
WARNING!Turn the machine OFF
and disconnect it from the power
supply before inspecting, cleaning,
changing accessories, or conducting
any other maintenance task.
SYMBOLS SYMBOLSDESCRIPTIONS DESCRIPTIONS
Wear non-slip footwear that will
protect your feet and improve your
footing on slippery surfaces.
Wear safety gloves during
use to protect hands.
Store indoors. Never store the
pressure washer outdoors.
If the pump freezes, permanent
damage may result.
92
The following table depicts and describes safety symbols that may appear on this product. Read, understand, and
follow all instructions on the machine before attempting to assemble and operate.

1
Thank you for purchasing a BENNETT READ IND2000
HIGH-PRESSURE WASHER.
Your IND2000 HIGH-PRESSURE WASHER incorporates the latest
technological advances in pressure cleaning systems. It imitates the most
powerful forces of nature in a sleek, elegant cleaning system to ensure easy
and effective cleaning.
Your new high-pressure washer is manufactured to a high standard of quality
and is backed by a one year, domestic use guarantee by Tevo. If you register
your guarantee online within 14 days of purchase, we will extend the
guarantee to 2 years. To activate your extended guarantee, scan the QR code
on the front cover of this user guide, tap on the link and complete the online
form. Alternatively, visit www.tevo.co.za, click the “Register guarantee” tab at
the top of the page, then complete the form provided.
Should you need any support from us, please visit: www.tevo.co.za
or call our dedicated Customer Care Department on 0861 77 88 88.
READ THIS USER GUIDE CAREFULLY BEFORE USING
YOUR BENNETT READ IND2000 HIGH-PRESSURE
WASHER FOR THE FIRST TIME.
SAVE THESE INSTRUCTIONS FOR FUTURE USE
FOR HOUSEHOLD USE ONLY
COMMERCIAL USE WILL INVALIDATE GUARANTEE

2
IMPORTANT SAFETY INSTRUCTIONS
WARNING!
• For outdoor use only. Do not use indoors
• High-pressure jets can be dangerous if subject to misuse. The jet must not be directed at people or
animals, live electrical equipment or the appliance itself
• Do not direct the jet against yourself or others in order to clean clothes or foot-wear
• This appliance is not intended for use by children, untrained personnel, or other persons without
assistance or supervision if their physical, sensory or mental capabilities prevent them from using it
safely. Children should be supervised to ensure that they do not play with the appliance
• Before starting up your machine please check it carefully for any defects. If you find any, do not
start up your machine. Contact your distributor immediately
• Use only original spare parts from the manufacturer or approved by the manufacturer
• Water that has flown through backflow preventers is considered to be non-potable
• Do not cover the machine during operation
• This high-pressure washer must not be used at temperatures below 0°C
• High pressure hoses, fittings and couplings are important for safety of the appliance. Use only
hoses, fittings and couplings recommended by the manufacturer.
• Keep the machine on a stable and flat surface during operation, handling, transportation and
storage. Sudden falling of the machine can cause injury or damage
• In the event of accident or breakdown, switch off the machine immediately
• This appliance has been designed for use with the cleaning agent supplied or recommended by the
manufacturer
DANGER! - RISK OF EXPLOSION – Do not spray flammable liquids
• Never draw in fluids containing solvents, toxic liquids or undiluted acids. This includes petrol, paint
thinner and heating oil. The spray mist is highly flammable, explosive and poisonous
DANGER! - RISK OF ELECTRIC SHOCK:
• Disconnect from the electrical power supply before carrying out user maintenance
• Never touch the mains plug or the socket with wet hands
• Check the power cord with mains plug for damage prior to every use. Do not use the machine if a
supply cord or any part of the machine is damaged
• All current-conducting parts in the working area must be protected against water
• Electrical cord on drums should always be completely unwound to prevent the cord from
overheating. Comply with the below-mentioned requirements for length and cord dimensions:
1.0 mm² : max. 12.5 m ; 1.5 mm² : max. 20 m ; 2.5 mm² : max. 30 m
• The mains plug and the coupling of an extension cable must be watertight and must never lie in
water. Extension cord couplings must never lie on the ground. It is recommended to use a cable reel
that ensures sockets are at least 60 mm above the ground
• Make sure that the power cord or extension cable is not damaged by running over, pinching,
dragging or the like. Protect the power cords from heat, oil, and sharp edges
• Always switch off the mains disconnecting switch when leaving the appliance unattended
• The machine must be disconnected from its power source during cleaning or maintenance

3
IMPORTANT SAFETY INSTRUCTIONS
WARNING! ELECTRICAL SHOCK HAZARD
Improper connection of the equipment-grounding conductor can result in a risk of electrical shock.
Check with a qualified electrician or service person if you are unsure if an outlet is properly
grounded. DO NOT modify the plug provided with the appliance to fit an outlet, have a proper outlet
installed by a qualified electrician.
MAINS POWER CONNECTION
The following should be observed when connecting the high-pressure washer to the electric
installation:
• The electric installation must be made by a certified electrician and comply with IEC-364
• It is recommended that the electric supply to this appliance should include either a residual current
device that will interrupt the supply if the leakage current to earth exceeds 30 mA for 30 ms
IMPORTANT!
Only use water without any impurities.
If there is a risk of sand in the inlet water (from boreholes etc), an additional filter should be mounted
SAFETY DEVICES
• The unloader valve can reduce pressure if it exceeds pre-set values
• The Spray Gun features a Trigger Lock device. When activated, the spray gun cannot be operated
• A thermal sensor protects the motor against overloading. The machine will restart after a few
minutes when the thermal sensor has cooled
• This high-pressure washer has been developed for domestic use for the following:
Cars, motorbikes, boats, caravans, trailers, patios/driveways/flagstones, woodwork, brickwork,
barbecues, garden furniture, garden tools
• Only use the high-pressure washer for purposes described in this manual
• The safety precautions must be observed to prevent damage to the machine, to the surface being
cleaned or from causing severe injuries to people or animals
4
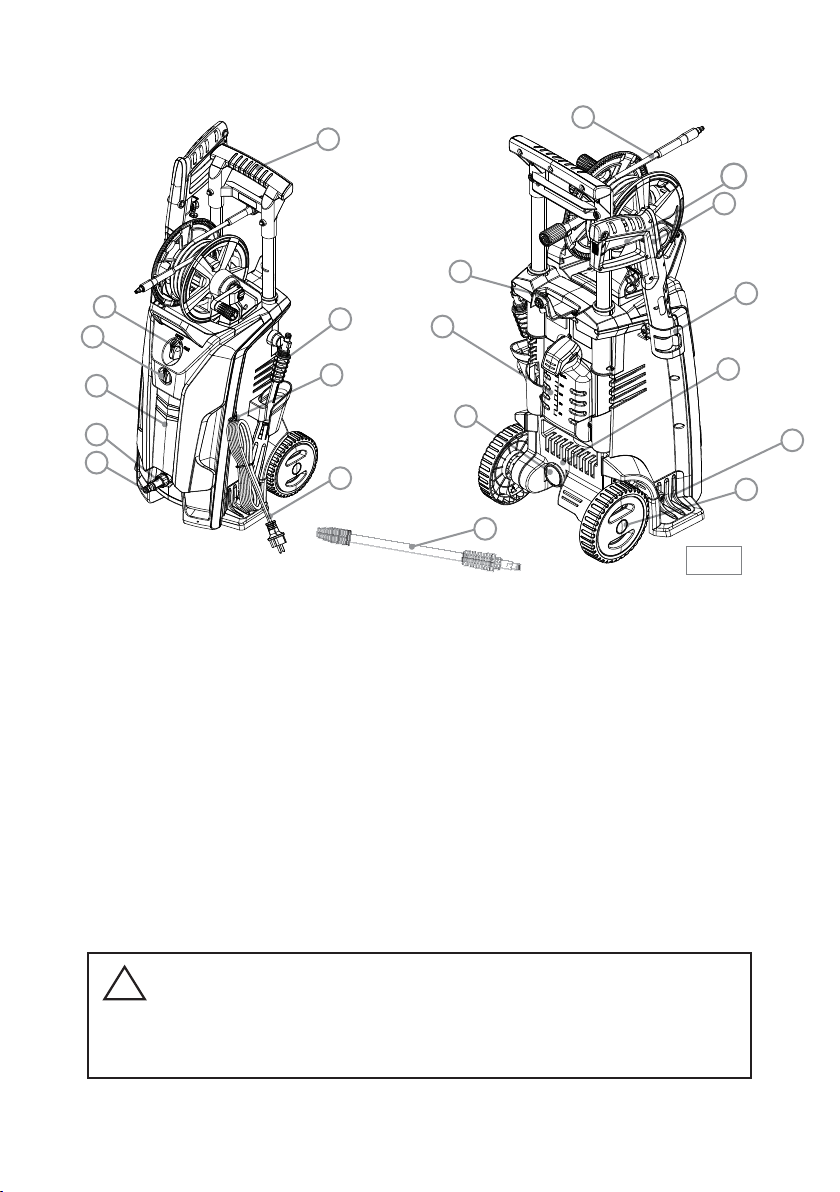
1. Carry Handle
2. ON/OFF Switch
3. Pressure Adjustment Switch
4. Power Cord Hook
5. Front Casing
6. Water Inlet with Filter (6A)
7. Power Cord
8. High Pressure Hose Hook
9. High Pressure Hose
Do not plug in your high-pressure cleaner until you are familiar with all
instructions and operating procedures.
!CAUTION:
10. Spray Gun with Trigger Lock (10A)
11. Multi-purpose Spray Lance
12. Turbo Lance
13. Onboard Detergent Bottle
14. Spray Gun Holder
15. Back Casing
16. Water Outlet
17. Wheel
18. Stabilising Stands
17
18
16
11 13
10A
2
5
PRODUCT OVERVIEW
1
4
7
Fig. 1
8
9
10
14
15
6
6A
3
12

5
ASSEMBLY
Assemble all loose parts and attachments before using your machine for the first time:
Using the included screw, install the Spray
Gun holder (14) onto the main body as
shown in Fig 2.
If the High Pressure Hose Hook (8) is not
assembled, attach it to the back of the
Carry handle as shown in Fig. 3
Using the included screws, attach the
Stabilising Stands (18) as shown in Fig 4.
Fig. 2
Fig. 3
Fig. 4
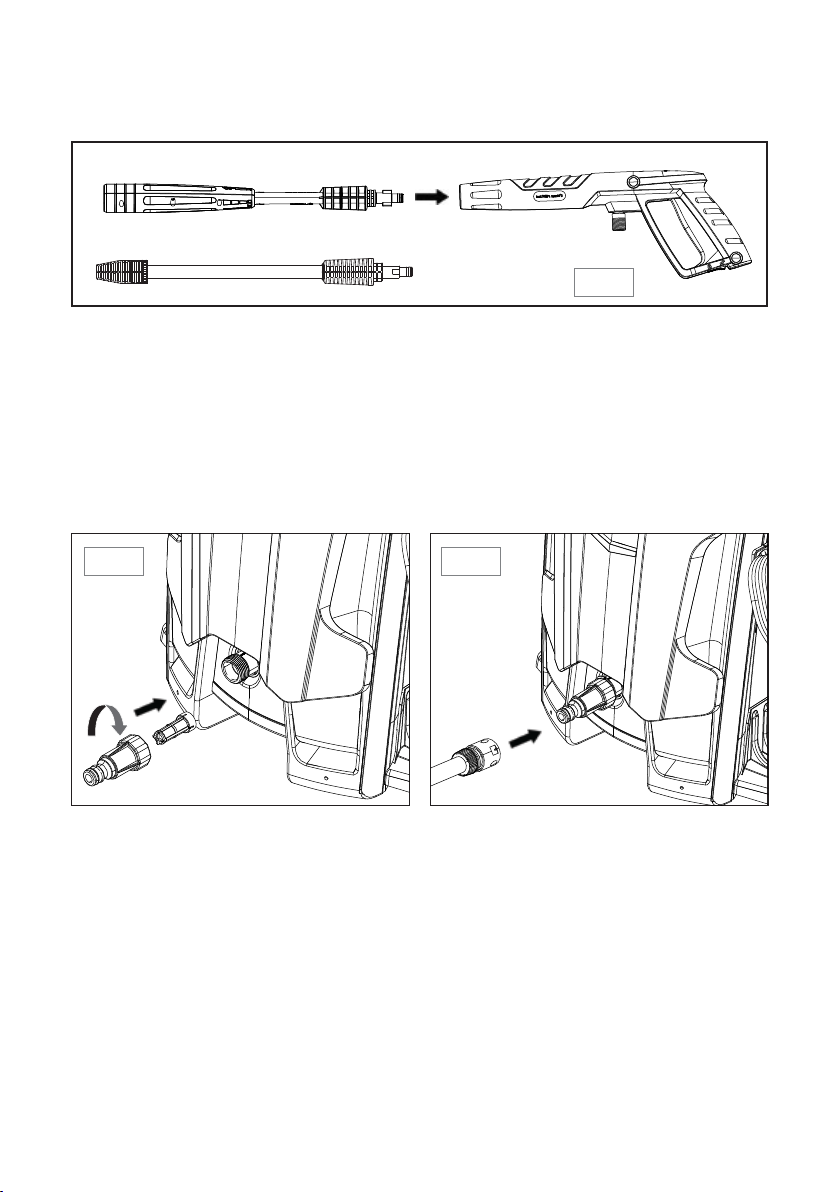
Connect the High Pressure Hose to the
Spray Gun (10) by pressing the silver end of
the Pressure Hose into the connector on the
Spray Gun and screwing the nut on tightly
(Fig. 5).
It is recommended to lock the nut with pliers
or a wrench. Take care not to overtighten
the nut, or damage the nut with excessive
force.
Fig. 5
6
ASSEMBLY
An ordinary 1/2” diameter garden hose of min. 5m and max. 25m is suitable. Make sure
that the hose is not damaged in any way and does not leak.
NOTE: Before connecting the garden hose to the machine, let the water run through the hose
to rinse out any sediment.
NOTE: The Inlet Filter (6A) must always be fitted in the Water Inlet to filter out sand, limestone
and other impurities as these will damage the pump valves.
CAUTION: Failure to fit the filter will invalidate the guarantee.
Connect the Water Inlet Attachment (6) with
Water Inlet Filter (6A) (Fig. 7).
Fig. 7
Connect your garden hose (female coupler)
to the Water Inlet (6) and turn on the water
tap (Fig. 8).
Fig. 8
To attach the Spray Lance, line up the locking tabs on the Lance with the slots in the Spray
Gun. Firmly push the Lance into the end of the Spray Gun, then turn clockwise to lock it in
place (Fig. 6). Make sure that the Lance is properly connected before using the pressure
washer. To remove the Spray Lance, press it down into the Spray Gun and turn it
anticlockwise to release.
Use the Turbo Lance when extra cleaning pressure is needed.
DO NOT USE THE TURBO LANCE ON PAINTED OR DELICATE SURFACES.
Fig. 6
Adjustable Spray Lance
Turbo Lance
7
OPERATION
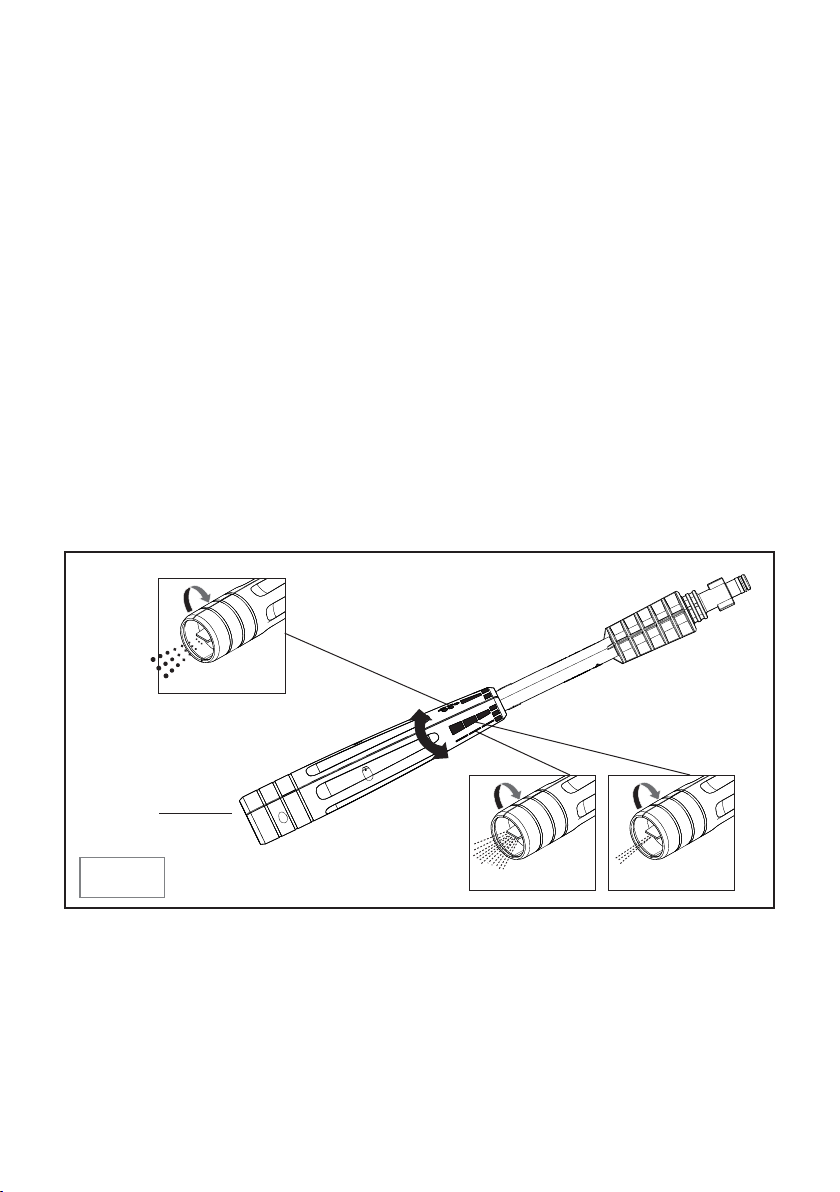
Adjust the water jet to pencil or fan by turning the end of the Spray Lance clockwise or
anticlockwise.
Adjust the pressure by turning the lower ring in the direction of the “+” or “-”
(Fig. 9).
NOTE: The Turbo Lance is not adjustable.
DO NOT use the Turbo Lance on wood, painted or other delicate surfaces as it may cause
damage.
Fig. 9 Pencil spray
Pressure adjustment ring
Nozzle tip
• Check that the machine is securely upright on level ground
• Make sure the ON/OFF Switch (2) is in the OFF position, then insert the electrical
plug into the mains socket
• Be aware that the Spray Gun will kick when the trigger is pulled. Make sure to hold
the Spray Gun and Spray Lance firmly with both hands during use
• IMPORTANT: Aim the Spray Lance at the ground to adjust before starting to clean
• Release the Trigger Lock (10A)
• Pull the trigger of the spray gun and let the water run until all air has escaped from
the water hose
• Turn the ON/OFF Switch (2) to the ON position
• Pull the trigger of the spray gun to begin spraying
• Aim the Spray Lance AWAY from the surface to be cleaned to adjust the Spray Lance
pressure to the desired settings before aiming at the intended surface
• Adjust the distance and thus the pressure of the Spray Lance to the surface which is
being cleaned
• When releasing the Spray Gun trigger the machine will stop automatically. The
machine will start again when you reactivate the Spray Gun
Fan spray
Foam spray
8
OPERATION
When ready to clean, release the Trigger
Lock (10A), then pull the trigger of the
Spray Gun to begin spraying (Fig. 10)
When releasing the Spray Gun trigger the
pressure washer will stop automatically.
The machine will start again when you
reactivate the Spray Gun.
• NOTE: Switch the machine OFF if intended to be left unused for 5 minutes or longer
WHEN CLEANING IS COMPLETED:
• Disconnect the electrical plug from the socket
• Shut off the water supply and pull the trigger to relieve all pressure from the machine
• Press the Trigger Lock on the Spray Gun
To avoid damage, keep the end of the Spray Lance at least 50cm away from the surface when
cleaning painted or sensitive surfaces. Always start by aiming the Lance away from the surface to be
cleaned and adjust the nozzle to the desired setting before starting cleaning.
!CAUTION:
Dry running of more than 2 minutes leads to damage of the high-pressure pump. If
the appliance does not build up pressure within 2 minutes, switch the machine off
and see Troubleshooting on pages 11 - 12 for more instructions.
!CAUTION:
Fig. 10

9
When using detergents, follow the manufacturers directions, especially any
instructions regarding personal protective equipment. The improper use of
detergents can cause severe injuries or oxidation.
Store cleaning agents out of reach of children.
!WARNING:
Never use fluids containing solvents, acids or toxic liquid. This includes petrol,
paint thinner and heating oil. The spray mist is highly flammable, explosive and
poisonous.
!DANGER:
Fig. 11
OPERATION
To use the foam spraying function for
washing cars, motorbikes etc, follow the
steps below:
• Before applying the soap, first rinse
the surface with the Spray Lance
• Add a detergent to the onboard
Detergent Bottle (13). Only use
detergent designed specifically for
use with pressure washers
• Replace the cap onto the Detergent
Bottle
• Attach the Adjustable Spray Lance to
the Spray Gun
• Pull the Spray Gun Trigger to spray the detergent onto the surface to be cleaned
• The appliance has been designed for use with the cleaning agent supplied or
recommended by the manufacturer. The use of the other cleaning agents or chemicals
may adversely affect the safety of the appliance
• After operating the machine with detergent, clean the Detergent Bottle and Spray Gun
before storing
• DO NOT USE THE TURBO LANCE FOR DETERGENT SPRAYING
• NOTE: Set the spray lance to the
“foam” setting then set the Pressure
Adjustment Switch (3) to the lowest
setting.
Follow the Spray Lance operating
instructions in Fig. 10 on page 8.
13
Rotate to “Foam” setting
Fig. 12

STORING
• The pump, hose and accessories should always be emptied of water prior to storing
as follows:
1. Switch OFF the machine and detach the water hose and accessories
2. Restart the machine and pull the Spray Gun Trigger. Let the machine run until no
more water runs through the spray gun
3. Stop the machine, unplug and wind up the hose and power cord
• Place the Spray Gun, Spray Lances and other accessories on the onboard storage
holders on the machine
• The machine should never be stored in any area where there is frost or where the
machine may freeze. Should the machine be frozen by mistake, it will be necessary
to check it for damage. NEVER START-UP A FROZEN MACHINE. Frost damages are
not covered under guarantee. Contact the Service Centre in such cases
• Store the machine out of reach of children
MAINTENANCE
TO ENSURE A LONG AND PROBLEM-FREE WORKING LIFE FOR YOUR PRESSURE
WASHER, PLEASE ADHERE TO THE FOLLOWING:
• Wash out water hose, high pressure hose, spray lance and accessories before storing
• Clean the connectors of dust and sand
• Rinse the Detergent Bottle after use
• Clean the Spray Lances and Spray Gun
Any necessary repairs should only be made by an authorized Tevo Service Centre with
original spare parts. See page 13 for Tevo Service Centre contact details.
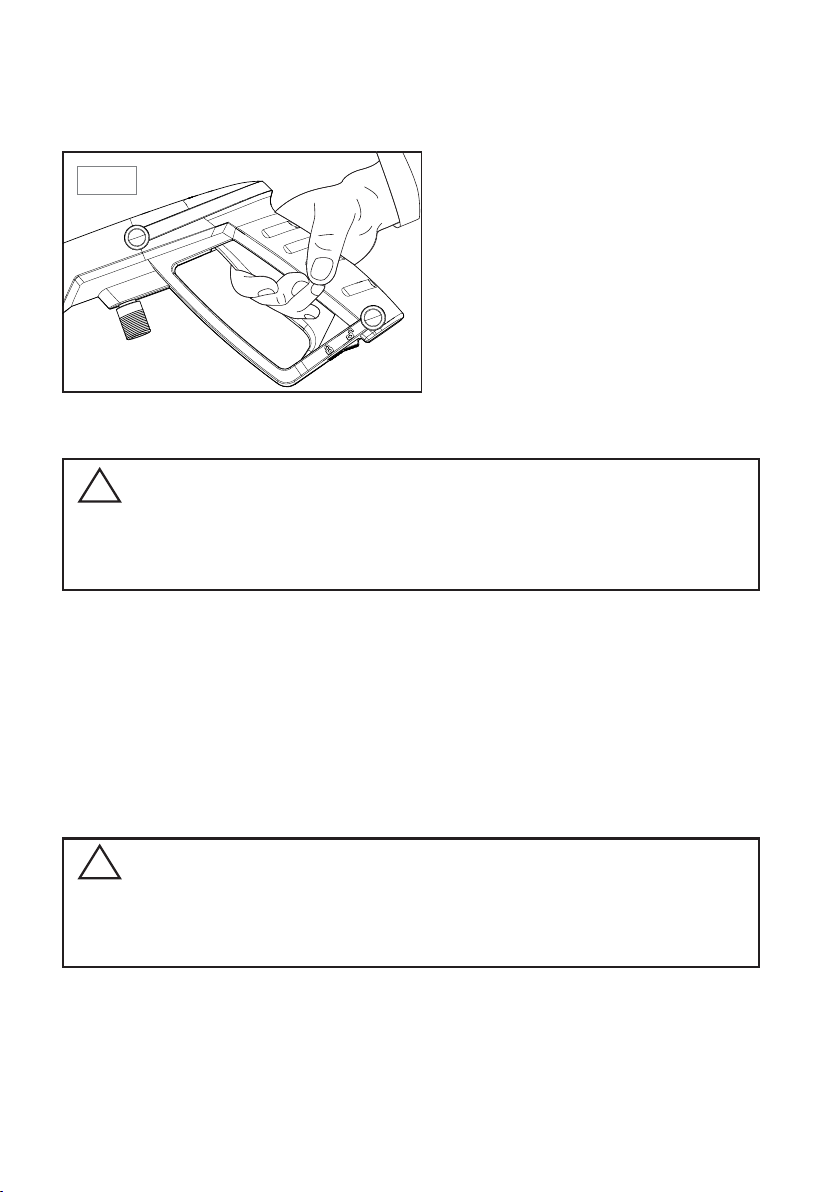
CLEANING THE WATER INLET FILTER (6A):
• Clean the Water Inlet Filter at least once a month or more frequently according to use
• Carefully loosen the filter with a screwdriver and clean it. Check that it is intact
before re-mounting it
• The Water Inlet Filter must always be fitted inside the Water Inlet Pipe (6) to filter out
sand, limestone and other impurities which will damage the pump valves
Always disconnect the electrical plug from the socket prior to maintenance or
cleaning.
!WARNING:
Failure to fit the filter will invalidate the GUARANTEE.
!CAUTION:
10

MAINTENANCE
To prevent clogging which will put the pump under strain, clean the Spray Lance nozzle
often using the following steps:
1. Switch OFF the machine and disconnect the Spray Lance
2. Use the Cleaning Tool to clean the Spray Lance Nozzle (Fig. 13)
3. Flush the nozzle backwards with water
The machine air vents should be kept clean and free from blockages to let air pass
through freely.
The couplings should be greased regularly to ensure an easy connection and that the
O-rings do not dry up.
TROUBLESHOOTING
PROBLEM POSSIBLE CAUSES SOLUTION
Machine won’t
start
1. Machine not plugged in
2. Defective socket
3. Defective extension cord
1. Plug in machine
2. Try another socket
3. Try without the
extension cord.
Fluctuating
pressure
1. Pump sucking air
2. Valves dirty, worn out or stuck
3. Pump seals worn out
1. Check that hoses and
connections are
airtight
2. Clean and replace or
refer to Service Centre
3. Clean and replace or
refer to Service Centre
11
Fig. 13
Needle clean-out tool

12
TROUBLESHOOTING
To reduce the risk of electric shock, turn the
Power Switch OFF and disconnect the plug
from the electrical outlet before performing
troubleshooting checks.
!WARNING:
Other maintenance or service not included
in the manual must be performed by an
authorized Tevo service representative. For
any questions or concerns, contact customer
care on 0861 77 88 88.
PROBLEM POSSIBLE CAUSES SOLUTION
Machine stops 1. Incorrect mains voltage
2. Thermal sensor activated
3. Nozzle partially blocked
1. Check that the mains
voltage corresponds
to specification on the
model tag
2. Leave the washer for
5 minutes to cool
down
3. Clean the nozzle
Machine pulsating 1. Air in inlet hose
2. Inadequate supply of mains water
3. Nozzle partially blocked
4. Water filter blocked
5. Hose kinked
1. Allow machine to run
with open trigger until
regular working
pressure resumes
2. Check that the water
supply corresponds to
specifications required
NB! Avoid using long,
thin hoses (min. 1/2")
3. Clean the nozzle
4. Clean the filter
5. Straighten out hose
1. Wait for pump/hoses
or accessory to thaw
2. Connect inlet water
3. Clean the filter
4. Clean the nozzle
Machine often
starts and stops by
itself
Pump/spray gun is leaking Contact your nearest
Service Centre
Machine starts, but
no water comes
out
1. Pump/hoses or accessory frozen
2. No water supply
3. Water filter blocked
4. Nozzle blocked

GUARANTEE
Your BENNETT READ IND2000 is guaranteed against manufacture faults for a period of
1 year. If you register your guarantee online at www.tevo.co.za within 14 days of
purchase, then your guarantee will be extended to 2 years.
Tevo undertakes to repair or replace this product at no charge if found to be defective
due to a manufacturing fault during the guarantee period. This guarantee excludes
damage caused by misuse, neglect, shipping accident, malicious damage, commercial
use, incorrect installation, or unauthorized repair. This guarantee does not apply to
routine maintenance components. Tevo is not liable for incidental or consequential
damages of any nature associated with the use of this product. Tevo’s liability will not
exceed the purchase price of this product.
This product is intended for domestic use only. Any commercial use will invalidate the
guarantee.
PLEASE KEEP YOUR RECEIPT TO VERIFY YOUR GUARANTEE.
Guarantee and service enquiries can be made by contacting:
Tevo (Pty) Ltd
Gauteng: 086 111 8386 or
(012) 740 5000
Durban: (031) 570 5900
Cape Town: (021) 380 0038/9
Customer Service Help Line: 0861 77 88 88
www.tevo.co.za
ENVIRONMENTALLY FRIENDLY DISPOSAL
Do not dispose of electrical appliances with general municipal waste. Hazardous substances
can leak and contaminate the groundwater, affecting the food chain and ultimately
damaging the environment and your health. Contact your local municipality for information
on safe disposal in your area.
Please think of the environment and recycle all plastic and paper in accordance with your
local recycling program.
PLEASE RECYCLE
13

Brought to you by:
www.tevo.co.za | info@tevo.co.za
0861 77 88 88
TECHNICAL SPECIFICATIONS:
220-240V~ 50Hz 2000W IPX5
Rated pressure: 10MPa
Permissible pressure: 14MPa
Rated ow: 6.67 l/min
Max. ow: 7.2 l/min
Max. Inlet Water Pressure: 0.7MPa
Weight: 8.9kg
IND2000
INDUCTION PRESSURE WASHER
Table of contents


