Berner Hot-Star BHS1 User manual

User Manual Hot-Star
BHS1(6), BHS2, BHS2S, BHS1(6)KTS
from year 2020
Be sure to read the instructions for use and assembly
before installation - installation - commissioning.
This protects you and prevents damage.
Berner- Kochsysteme GmbH & Co. KG
Sudetenstrasse 5 - D-87471 Durach
Tel. +49 (0) 831/697247-0; Fax. - 15
Email: Berner@induktion.de | www.induktion.de

Content
1Safety ............................................................................................................................................... 2
2Safety regulations............................................................................................................................. 3
2.1 Description of Hazard Symbols ............................................................................................... 3
2.2 Dangers in case ofnon-observance of safetyregulations ........................................................ 3
2.3 Safe use................................................................................................................................... 3
2.4 Improper operation .................................................................................................................. 4
2.5 Changes / use of spare parts .................................................................................................. 4
2.6 General .................................................................................................................................... 4
2.7 Application ............................................................................................................................... 4
3Installation ........................................................................................................................................ 5
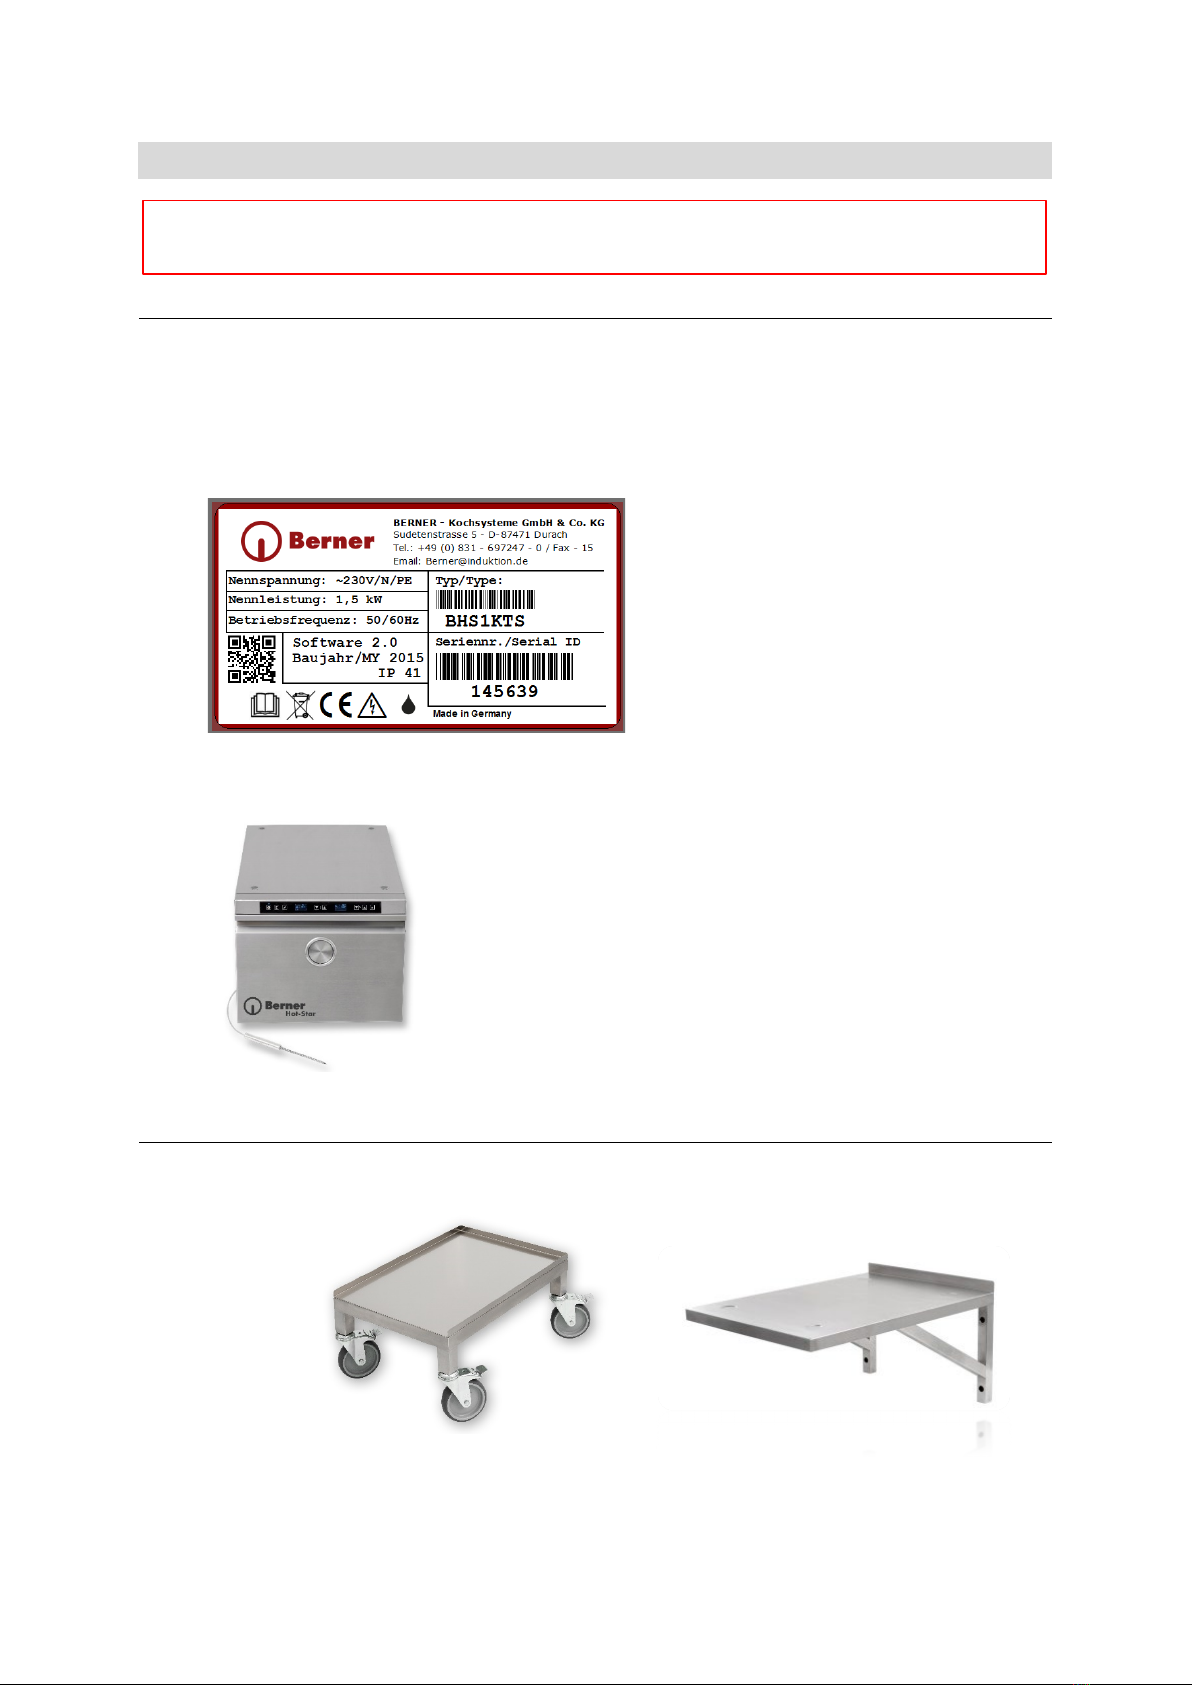
3.1 Electrical data of the device..................................................................................................... 5
3.2 Installation requirements ......................................................................................................... 5
4Commissioning................................................................................................................................. 6
4.1 Assembly ................................................................................................................................. 6
4.2 Installation of the device .......................................................................................................... 6
5Controls and displays ....................................................................................................................... 7
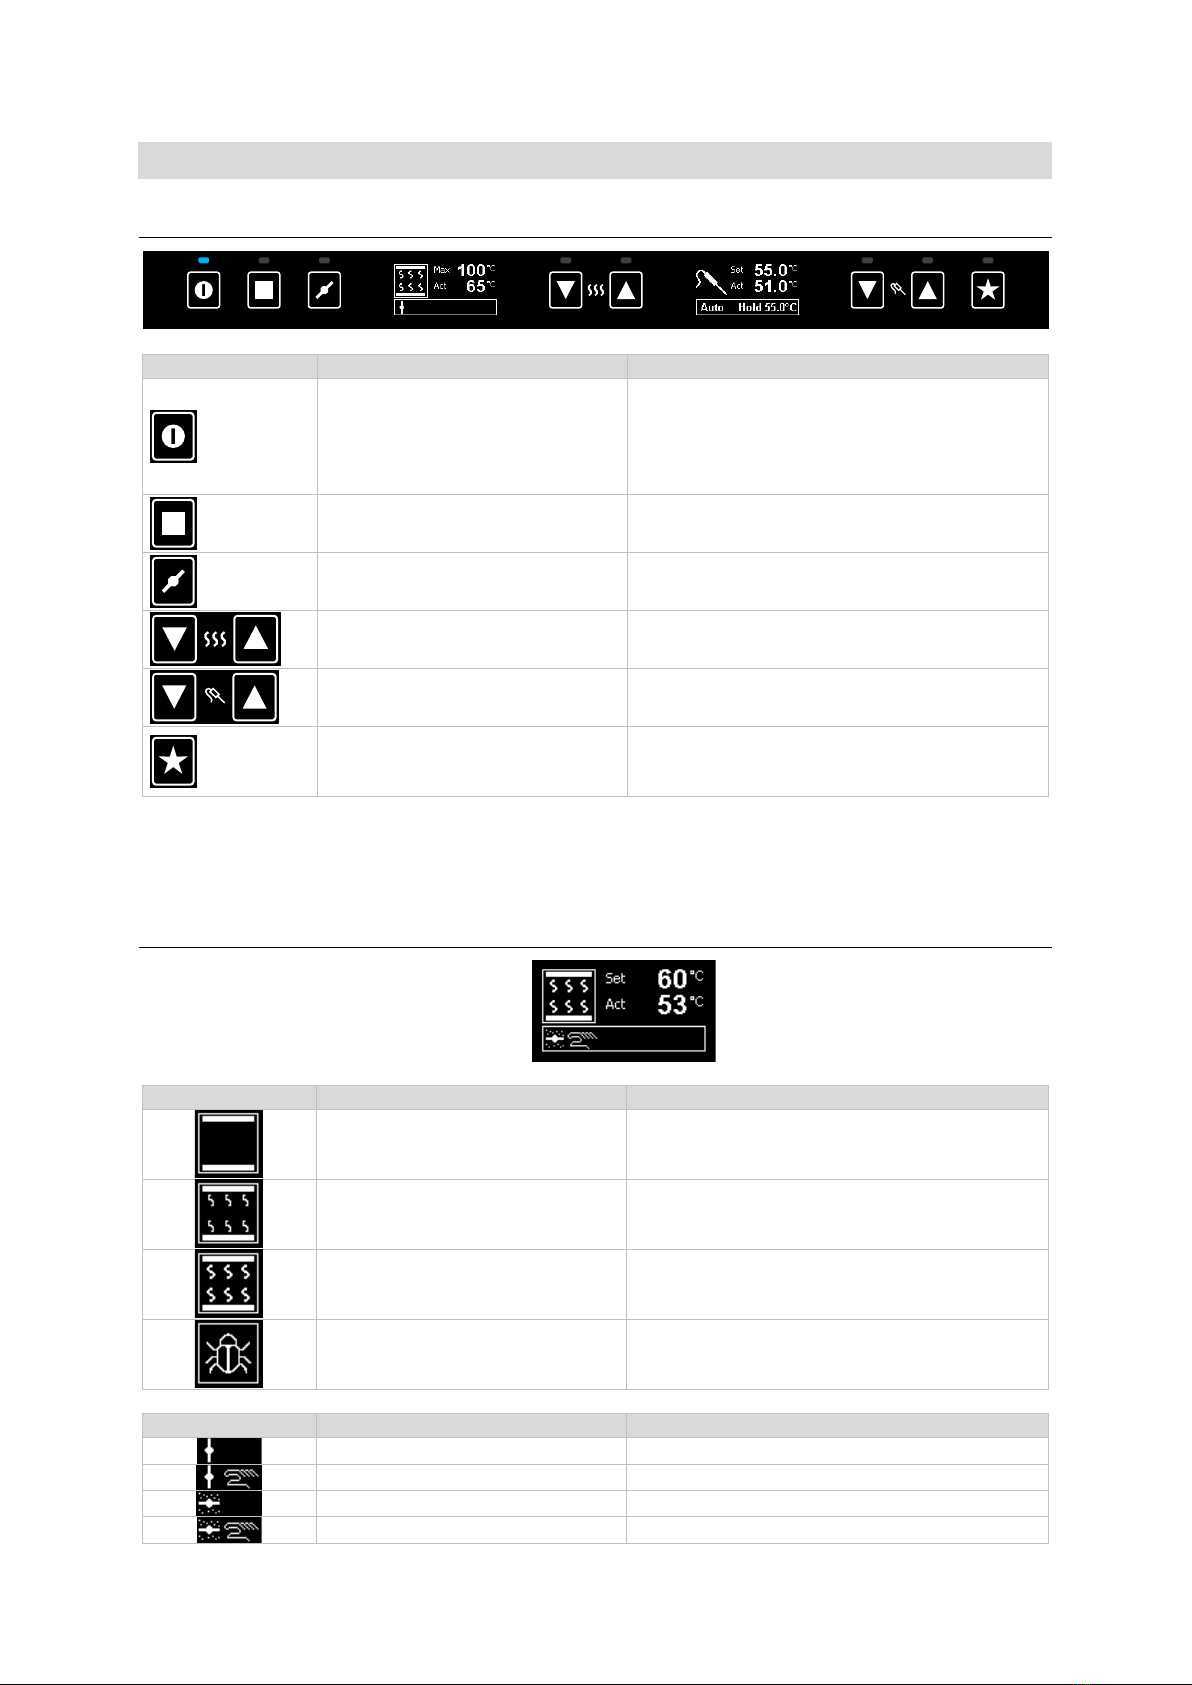
5.1 Controls ................................................................................................................................... 7
5.2 Room Temperature Display..................................................................................................... 7
5.3 Core Temperature Display ...................................................................................................... 8
6Modes............................................................................................................................................... 9
6.1 Keeping warmn........................................................................................................................ 9
6.2 Manual core temperature monitoring .................................................................................... 10
6.3 Automatic core temperatureregler ......................................................................................... 11
6.4 Automatic Delta-T controller .................................................................................................. 12
6.5 Disinfection ............................................................................................................................ 13
7Menu............................................................................................................................................... 14
8Features ......................................................................................................................................... 16
8.1 Vent control............................................................................................................................ 16
8.2 Heating function..................................................................................................................... 17
8.3 Setting Memory ..................................................................................................................... 17
8.4 Start display ........................................................................................................................... 17
8.5 Display saver ......................................................................................................................... 17
8.6 Auto-Power-Off...................................................................................................................... 17
8.7 Operation after power failure ................................................................................................. 17
8.8 Warnings................................................................................................................................ 18
9Cooking tablen ............................................................................................................................... 19
10 Cleaning..................................................................................................................................... 21
10.1 Guarantee.............................................................................................................................. 21
10.2 Repair during the warranty period ......................................................................................... 21
10.3 Maintenance .......................................................................................................................... 21
10.4 Disposal ................................................................................................................................. 22

28.01.2021 Hot Star 2020 © Bernese cooking systems 2020 Page 2 Of 23
1 Safety
Read this guide carefully. Keep the instructions for use and assembly
for later use or for subsequent owners. Check the device after
unpacking. Do not connect in the event of transport damage. Record
the damage in writing and call the customer service, otherwise the
warranty claim will not be waived. The installation or installation of
the device must be carried out in accordance with the attached installation
instructions. Use the device only for keeping food warm or cooking at low
temperature. Supervise the device during operation. Use the device only
indoors. Do not use hob covers. They can lead to accidents, e.B. due to
overheating, inflammation or cracking materials. Do not use unsuitable
protective devices or child protection screens. They can lead to accidents. This
device is not intended for operation with an external timer or remote control.
- The device and inside of the device become very hot. Never put combustible objects in
the device. Do not store any items on the device.
- The device gets hot. Never store flammable objects or spray cans in or on the device.
Risk of combustion !
- The device and its surroundings get hot. Never touch the hot surfaces. Keep children
away.
- ! The device is heating, but the display is not working. Switch off the fuse in the fuse box.
Call customer service.
- Turn off the device after each use.
Risk of electric shock !
- Improper repairs are dangerous. Only a customer service technician trained by us is
allowed to carry out repairs and replace damaged connecting lines. If the device is
defective, disconnect the power plug or turn off the fuse in the fuse box. Call customer
service.
- Invading moisture can cause an electric shock. Do not use a high-pressure cleaner or
steam cleaner.
- A defective device can cause an electric shock. Never turn on a defective device.
Disconnect the power plug or turn off the fuse in the fuse box. Call customer service.

28.01.2021 Hot Star 2020 © Bernese cooking systems 2020 Page 3 Of 23
2 Safety regulations
2.1 Description of Hazard Symbols
General danger symbol
Failure to comply with safety regulations
means danger (injuries)
This symbol warns of dangerous tension.
(Figurine 5036 of IEC 60417-1)
Dangers directly attached to the device-Symbole must be followed
and readability must be ensured at all times.
2.2 Dangers in case ofnon-observance of safetyregulations
Failure to comply with safety regulations can pose a risk to people, the
environment and the device itself. Failure to comply with the safety regulations
is not the right to claim any damages.
In detail, failure to observe the following risks may result in the
following risks
(Examples):
-Danger to persons due to electrical causes
-Danger to people due to overheating
-Danger to people from overheated parts
2.3 Safe use
The safety provisions of this manual, the existing national rules on electricity to
prevent accidents and any internal working, application and safety regulations
must be followed.
- If the device is damaged, it must be turned off and disconnected from the electrical supply.
Do not touch any parts inside the device.
- The device housing heats itself outside with the maximum temperature (=120°C) in places
sensitive to contact during prolonged operation. To avoid injuries (burns), use the
maximum temperature only for a short time for disinfection after a damp interior cleaning.
- Do not use the interior floor as a shelf for the set food.
- Only recommended types and sizes of vessels may be used.
- Avoid the entry of liquids into the device. Do not clean the device with a water jet.
Attention
In case of improper use
may cause minor injuries or
damage to property!
Attention
The user manual must be read before using or
maintaining the device.
Attention: Risk of combustion of housing parts
After prolonged operation (> 60minutes) with the maximum temperature of 120°C.
Continuous operation with open drawer/door is expressly prohibited!

28.01.2021 Hot Star 2020 © Bernese cooking systems 2020 Page 4 Of 23
2.4 Improper operation
The functionality of the device can only be guaranteed if used correctly. The limit
values in accordance with the technical data may not be exceeded or exceeded
under any circumstances.
2.5 Changes / use of spare parts
Contact the manufacturer if you intend to make changes to the device. To ensure
safety, use only original spare parts and accessories, which are manufactured by
the Released Are. When using non-original components, all liability for follow-up
costs expires. When disassembly, testing or repairs, pay attention to the
stability of the device.
2.6 General
This manual contains basic information that must be observed during assembly,
application and maintenance. It must be read completely by the installer and the
operator before installation and commissioning, and always at hand for a look-
up near the device!
2.7 Application
The hot-star cooking appliances are used to keep up warm or cook food. The
devices can be operated with commercially available GN containers (stainless
steel/porcelain). The cooking material must never have direct contact with the
interior floor. This also applies to the GN containers. The operation is carried out
via touchoperation with OLED display, which are wear-free and have an easy-
to-clean glass surface.
2.7.1 Technical device data
DimensionsExternal dimensionsTemp. Area
W x D x H in mmB x D x H in mm
BHS1400 x 650 x 390350 x 570 x 28530° - 120°C
BHS2400 x 650 x 300350 x 570 x 19530° - 120°C
BHS2S400 x 650 x 300350 x 570 x 19530° - 120°C
BHS1KTS400 x 650 x 390350 x 570 x 28530° - 120°C
BHS6400 x 650 x 600350 x 570 x 50030° - 120°C
BHS6KTS400 x 650 x 600350 x 570 x 50030° - 120°C
Device voltage powerweight
BHS1 -230V/N/PE1.5 kWca. 35 kg
BHS2-230V/N/PE1.0 kWca. 30 kg
BHS2S-230V/N/PE1.0 kWca. 30 kg
BHS1KTS-230V/N/PE1.5 kWca. 35 kg
BHS6-230V/N/PE2.5 kWca. 50 kg
BHS6KTS-230V/N/PE2.5 kWca. 50 kg
Attention! When usingspareparts, the geum must be"visibly tt" from the
power supply.

28.01.2021 Hot Star 2020 © Bernese cooking systems 2020 Page 5 Of 23
3 Installation
3.1 Electrical data of the device
3.1.1 Devices by power (1.0 - 2.5 kW)
HOT-STAR 1-phase (voltage 230Volt +5% / -10%)
Connection
Color
Frequency
Backup
Phase
Brown, Black or 1
50 Hz / 60 Hz
-
N
Blau or 2
Pe
Yellow/Green
3.1.2 Functional conditions
omax. tolerance of mains voltage nominal voltage+5%/-10%
oFrequency50 / 60 Hz
oProtection classIP 41
Installation environment
-Maximum ambient temperature
Storage >-20°C to +70°Cin function 0°C to+40°C
-maximum relative humidity
Storage> 10% to 90% in function> 30% to 90%
3.2 Installation requirements
The device must be installed/placed on a straight surface or horizontal position.
The storage area/installation compartment must allow a minimum weight of 100
kg. The mains disconnector should be easily accessible.
3.2.1 Installation regulations
The following points must be observed:
- Check and make sure that the voltage of the main supply line matches that of the type
plate.
- The electrical installations must comply with local building installation regulations. The
applicable national regulations of the electricity authorities must be complied with.
- The device is equipped with a (heat device) power cable, which can be connected to a
power outlet with the necessary plug.
- If incorrect current circuit breakers are used, they must be designed for a fault current of
at least 30mA.
- The device must not be placed near or on a hot surface.
- Operators must ensure that all installation, maintenance and inspection work is carried
out by approved personnel.
- The devices are equipped with a cable and plug in accordance with national regulations.
Make sure the power outlet has a protective conductor!
For the electrical connection of the device, the legal
regulations of the respective country!
Attention
Incorrect voltage can cause the
Damage the device
Attention
The electrical connections must be carried out
by a specialist.

28.01.2021 Hot Star 2020 © Bernese cooking systems 2020 Page 6 Of 23
4 Commissioning
4.1 Assembly
The devices are equipped with a power cable. They must be connected to a wall
socket or junction box. The electrical installations must be carried out by
approved installers in compliance with specific national and local regulations. The
installers are responsible for the correct design and installation in accordance
with the safety regulations. The warning and type plates must be strictly
followed.
Check and make sure that the voltage
of the mains current and the device
(type plate) match.
When installing this appliance in the
immediate vicinity of a wall, partition
walls, kitchen furniture, decorative
cladding, etc., it is recommended that
these are not made of combustible
material; otherwise they must be clad
with suitable non-combustible,
thermally insulating material and the fire protection regulations must be
observed with the most care!
The device must be in/out of a clean, straight surface (at
its final destination). It must be placed in such a way that
it cannot be moved over an inclined position. The
requirements according to "Installation
Requirements" must be met.
Remove all items from the device. If the device is
damaged, turn off the device and disconnect the power
plug.
4.2 Installation of the device
The device is stackable and can be placed on top of each other in a space-saving
manner. Optionally for the Hot-Star models there is an transport trolley(HSTW)
and a wall console (HSWK).
Before commissioning, the device must be set to room temperature
> heat 17°C.

28.01.2021 Hot Star 2020 © Bernese cooking systems 2020 Page 7 Of 23
5 Controls and displays
5.1 Controls
Elements
Description
Function
On-Off button
button 1sec long to press
Switching on or off
The settings are saved when the power is
switched off and restored when it is switched
on
Foursquare button Heating function button for selecting heating
and disinfection brogram
Valve Taste Control of the ventilation flap at the rear
From/On buttonn Room Room set temperature setting
short = 2°C, long = 10°C steps
Down/On Keys Core Coreset temperature setting
short = 0.5°C, long = 5°C steps
Star button
Calling the menus for setting the core
temperature control
Button 1 sec. Long press
5.2 Room Temperature Display
Heating configuration indicator
Heating status indicator
Room setpoint display
Room actual value display
Flap status indicator
Status
Elements
Description
Function
Heating down and up
No performance Power control 0%
Heating down and up
Low performance Heating controller control size 1-50%
Heating down and up
A lot of performance Heating controller control size 51-100%
Disinfection Disinfection program
Elements
Description
Function
Flap automatically closed
closes during heating and holding phase
Flap closed manually
Locked in automatic cooking mode
Flap opened automatically
opens when the temperature drops
Flap closed manually
Locked in automatic cooking mode

28.01.2021 Hot Star 2020 © Bernese cooking systems 2020 Page 8 Of 23
Elements
Description
Function
Set temperature display
Setting range: 40 to 120°C in 2°C increments
Maximum temperature selection
(automatic core temperature
controller)
Setting range: core set temperature + 10°C to
120°C in 2°C increments
Differential temperature selection
(Delta-T controller)
Setting range:15 to 45 °C in 1°C increments
Actual temperature display
Display range: -20 to 150°C in 1° increments
5.3 Core Temperature Display
Core temperature measurement
Core setpoint display
Core actual value display
Mode
Status
Elements
Description
Function
Core temperature measurement Core temperature measurement is active
The room temperature is freely selectable
Core temperature measurement
with Delta-T function
Depending on the core temperature, the room
temperature is only increased by the selected
differential temperature.
Elements
Description
Function
Manual core temperature
monitoring
Core temperature measurement without
influence on room temperature control
Reaching the target temperature is indicated
by an optical alarm signal
Automatic core temperature
control
Core temperature measurement influences
room temperature control
The cooking material is brought exactly to the
desired temperature and kept without
overcooking.
Elements
Description
Function
Core set temperature Setting range: 35 to 95°C in 0.5°C increments
Core holding temperature Setting range: 35 to 95°C in 0.5°C increments
Core is temperature Display range from -20 to 99.5°C in 0.5°C
increments from 100°C in 1°C increments

28.01.2021 Hot Star 2020 © Bernese cooking systems 2020 Page 9 Of 23
6 Modes
Various functions are available to the user for the following applications:
Application
Tools
Properties
Mode
Keeping
Food
Keeping
Meat
Cooking
meat
Nuclear
probe
optical
alarm
Full
Automatic
Warm holder
Manual core
temperature
monitoring
Automatic core
temperature
Controller
Automatic
Delta-T Controller
Disinfection
The respective operating mode is selected in the menu. see menu
6.1 Keeping warmn
The warming function is used to keep food warm without the use of the core temperature sensor.
The room is heated and held to the set set point.
6.1.1 Operation
Step
Button
Description
Display
1.
Press the button for 1sec,
the device is switched on.
2.
Press down buttons to set room temperature.
Setting range: 40-120°C in 2°C increments
During initial commissioning, the room
temperature is automatically set to 68°C and can
be changed.
3.
Press the button to select flap function
see vent control
4.
The flap at the front of the door must be set
manually and should be opened or closed when
keeping warm.
5.
Press the button for 1sec,
the device is switched off
The most recently entered settings are saved
when they are turned off and restored the next
time they are turned on.

28.01.2021 Hot Star 2020 © Bernese cooking systems 2020 Page 10 Of 23
6.2 Manual core temperature monitoring
The core temperature measurement is active, but has no influence on the room temperature control.
As soon as the set core temperature is reached, this is indicated by an optical alarmsignal. The
acknowledgment is done with any key.
6.2.1 Operation
Step
Button
Description
Display
1.
Press button 1s
Set the core temperature function to "Man"
see menu function
2.
Press buttons to set room temperature
Setting range: 40-120°C in 2°C increments
3.
Press the button to select flap function
see vent control
4.
press buttons to set core temperature.
If no kenr temperature is set ("Off instead of set
temperature"), no alarm is issued. However, the
current core temperature is always displayed.
Setting range: 35-95°C in 0.5°C increments
5.
As soon as the set core temperature is reached,
this is indicated by an optical alarm signal.
The status text appears on the display: "Core" and
the core temperature reached.
Press any button to acknowledge

28.01.2021 Hot Star 2020 © Bernese cooking systems 2020 Page 11 Of 23
6.3 Automatic core temperatureregler
The room temperature adjusts automatically due to the core temperature. The cooking material is
permanently monitored with the core probe and brought exactly to thedesired final temperature and
kept withoutovercooking.
The room temperature setting defines the maximum room temperature with which the automatic
controller is allowed to operate. The higher this is set, the faster the cooking process is usually.
6.3.1 Operation
Step
Button
Description
Display
1.
Press button 1s
Set the core temperature function to "Auto"
see menu function
2.
press buttons to set core temperature.
(The data is stored 60 seconds after you type it.)
Setting range: 35-95°C in 1°C increments
3.
Press buttons to set the maximum permissible
room temperature
Setting range: 40-120°C in 2°steps but not less
than core setpoint + 10°C
4.
As soon as the set core temperature is reached,
this is indicated by an optical alarm signal.
The status text appears on the display: "Ok" and
the core temperature reached.
Press any button to acknowledge.
The control system goes autoamically into the
warm-up mode. ("Set" becomes "Hold")
6.3.2 Warming operation after cooking
After reaching the core temperature, the controller automatically goes into warm-up mode. This allows
the cooking material to remain in the device for hours without overcooking.
During the cooking process, the warming temperature is displayed in the status window e.B. "Hold
63.0°C". As soon as the device enters the warm-up mode, it is adopted as a new core setpoint and is
labelled "Hold". In the status window, the achieved core temperature is output .B. "68.0°C Ok"
The settings for the warming operation are made in the menu.
6.3.3 Venting
During cooking, the venting is automatic. The flap control button remains locked.
For the warming operation, the function of the vent flap can be defined in the menu.

28.01.2021 Hot Star 2020 © Bernese cooking systems 2020 Page 12 Of 23
6.4 Automatic Delta-T controller
Depending on the core temperature, the room temperature is increased by the selected differential
temperature "Delta". The cooking material is permanently monitored with the core probe and precisely
brought to the desired final temperature and held without overcooking.
The room temperature setting defines how much higher the room temperature may be compared to
the core temperature. The higher this is set, the faster the cooking process is usually.
The Delta T cooking is considered a very gentle cooking process, but it can take a lot of time.
6.4.1 Operation
Step
Button
Description
Display
1.
Press button 1s
Set the core temperature function to"Delta T"
see menufunktion
2.
Press buttons to set core temperature
Setting range: 35-95°C in 1°C increments
3.
Press buttons to set the difference temperature
"Delta"
Setting range: 15-45°C in 1°C increments
(Standard = 30°C)
4.
As soon as the set core temperature is reached,
this is indicated by an optical alarmsignal.
The status text appears on the display: "Ok" and
the core temperature reached.
Press any button to acknowledge.
The control system goes autoamically into the
warm-up mode. ("Set" becomes "Hold")
6.4.2 Warming operation after cooking
After reaching the core temperature, the controller automatically goes into warm-up mode. This allows
the cooking material to remain in the device for hours without overcooking.
During the cooking process, the warming temperature is displayed in the status window e.B. "Hold
63.0°C". As soon as the device enters the warm-up mode, it is adopted as a new core setpoint and is
labelled "Hold". In the status window, the achieved core temperature is output .B. "86.0°C Ok"
The settings for the warming operation are made in the menu.
6.4.3 Venting
During cooking, the venting is automatic. The flap control button remains locked.
For the warming operation, the function of the vent flap can be defined in the menu.

28.01.2021 Hot Star 2020 © Bernese cooking systems 2020 Page 13 Of 23
6.5 Disinfection
The disinfection serves to prevent possible germformation in the cooking chamber. Useful for
applications in the low-temperature range. During disinfection, the room temperature is briefly brought
to maximum operating temperature. As soon as the set temperature is reached, the timerstarts. This is
displayed as status text. After the time has elapsed, the device automatically switches to standby
mode
6.5.1 Operation
Step
Button
Description
Display
1.
Press the button to select the disinfection program
Can only be selected in standby mode ("Off"
instead of set temperature)
2.
Close the front outlet flap in the door
3.
Press the button to activate the program.
Temperature cannot be adjusted.
4.
As soon as the disinfection temperature is
reached, the timer starts to run.
After the time has elapsed, the device
automatically switches to standby mode

28.01.2021 Hot Star 2020 © Bernese cooking systems 2020 Page 14 Of 23
7 Menu
The menu contains some settings for the core temperature control.
Hold down the button for 1 second
Selection
Setting
Off
On
Choose
Off
On
Back
Setting the
Mode
Automatic
Core temperature cooking
Manually
Core temperature cooking
No core temperature function,
display is switched off.
Automatic core temperature
cooking with
Delta-T procedure

28.01.2021 Hot Star 2020 © Bernese cooking systems 2020 Page 15 Of 23
Selection
Setting
Off
On
Choose
Off
On
Back
Setting the temperature drop for
keeping warm after reaching the
core temperature
automatic core temperature
cooking
Warming temperature is
automatically determined
depending on the core target
temperature
35-55°C no reduction
56-60°C reduction to 55°C
61-73°C Reduction by 5°C
74-95°C reduction to 68°C
reduced warming temperature
firmly adjustable from 35.0 -
95.0°C in 0.5°C increments.
No reduced warming
temperature
Setting the vent for keeping
warm after reaching the core
temperature during automatic
core temperature cooking
The vent works automatically
when keeping warm
The vent valve remains
permanently closed when
keeping warm
The vent valve remains
permanently open when kept
warm
Leaving menu

28.01.2021 Hot Star 2020 © Bernese cooking systems 2020 Page 16 Of 23
8 Features
8.1 Vent control
The controller controls the venting of the cooking chamber.
This is done with an electrically operated air flap on the back of the warming device.
This is usually in automatic mode, but can also be operated manually by means of a button. (In
automatic cooking mode, the flap cannot be controlled by hand)
Press button to change the operating mode (flap drive reacts delayed):
Automatically
open or closed
Manually
closed
Manually
open
During the heating and temperature holding phase, the rear ventilation flap is closed in order to ensure
the most homogeneous climate possible in the cooking room on the one hand and to dry out the
to prevent garguts.
As soon as the temperature in the cooking room is to be lowered, the rear ventilation flap opens to
allow cool ambient air to flow into the cooking room using natural clothing and allow moist warm air to
escape through the front outlet. The temperature is thus lowered in a controlled manner and
condensation in the cooking chamber is largely prevented.
The system is an important part of the cooking point control.
For Niedergar or Delta-T applications, make sure that the front outlet flap is always open.
M
M

28.01.2021 Hot Star 2020 © Bernese cooking systems 2020 Page 17 Of 23
8.2 Heating function
The heating function button can be used to select the type of heating or the disinfection program.
However, this selection is not available in automatic mode.
Press the button to change the operating mode:
Heating
down and
up
Disinfection
8.3 Setting Memory
The settings are saved 1 minute after the last operation. This way, they will be available again the next
time you use the device.
When the device is turned on, it is in the last selected mode.
The room and core temperature setting is set to "Off"
With the up button, the value jumps to the last setting.
8.4 Start display
After switching on the device, the software version of the multicontroller ("controller") and the Touch
Star ("front panel") is briefly displayed on the left display.
8.5 Display saver
If no operation is carried out, the backlight is dimmed after 5 minutes and switched to display saver
mode after 30 minutes. The actual temperature continuously travels via the display. Press any button
to return to the default display.
8.6 Auto-Power-Off
If the device is on standby ("Display shows "Off" instead of a setpoint) and there is no operation, it
turns off after 5 minutes.
8.7 Operation after power failure
If the current fails during operation, the current settings are saved. As soon as the mains voltage is
back on, the device continues to operate when the temperature loss in the room is less than 10°C.
Otherwise, the device switches off.

28.01.2021 Hot Star 2020 © Bernese cooking systems 2020 Page 18 Of 23
8.8 Warnings
Warnings are displayed on the display for the rum temperature display.
Elements
Description
Function
Door Open
Displayed when the device is turned on and
the door is open.
The heating is off. After closing, the heating
is only released after 60 seconds
Residual heat
Displayed when the device is turned off and
the room temperature is
> 45°C is

28.01.2021 Hot Star 2020 © Bernese cooking systems 2020 Page 19 Of 23
9 Cooking tablen
Poultry
Rare
Medium
Well Done
Duck
-
-
80-90 °C
Duck
-
62-65 °C
-
Goose
-
75-80 °C
90-92 °C
Goose liver paste
(foie gras)
- - 45 °C
Chicken
-
-
85 °C
Chicken
-
-
72 °C
Guinear chicken breast
-
-
70 °C
Turkey
-
-
80-85 °C
Strauss, fillet steak
-
-
58 °C
Calf
Rare
Medium
Well Done
Calf's back
-
65-70 °C
-
Roast veal
-
-
68-74 °C
Calf shoulder
-
-
75-80 °C
Calf breast (filled or
triggered)
- - 75-78 °C
Veal roast filled
-
-
70 °C
Haxe
-
-
80-85 °C
Nut
-
-
78 °C
Shoulder roast
-
-
74 °C
Veal
-
60 °C
-
Lamb
Rare
Medium
Well Done
Shoulder
-
-
79-85 °C
Gigot
-
60 °C
70-72 °C
Nierstück
-
55 °C
-
Chops
-
55 °C
-
Fillet
-
55 °C
-
Beef
Rare
Medium
Well Done
Beef fillet
38-55 °C
55-58 °C
-
Roast beef
53 °C
55-60 °C
-
Beef breast
-
-
90-95 °C
Roast beef
-
70 °C
80-85 °C
Tafelspitz
-
-
90 °C
Sauerbraten
-
-
85 °C
Entrecôte
-
56 °C
-
Beef Brisket
-
-
85 °C
Rouladen, braised
-
-
70 °C
Other manuals for Hot-Star BHS1
1
This manual suits for next models
5
Table of contents
Popular Oven manuals by other brands

Fri-Jado
Fri-Jado Bake Star intelligent series Service manual

Gastronoma
Gastronoma Salamander manual

Heartland
Heartland Classic 9800 Use and care guide

CASO DESIGN
CASO DESIGN TO 20 Original operating manual

Sovereign
Sovereign SBIO60SSE Installation and operating instructions

Orbegozo
Orbegozo HOT 456 instruction manual