Bertsch HolzBau Pavilion Octagon User manual

Generally two persons are required for the assembly; it is recommended to have a third person assist with larger summer houses.
Pavilions
Octagon model
ASSEMBLY INSTRUCTIONS
Recommended tools
• Cordless screwdriver • Pliers
• Spirit level • Tape measure
• Screw clamp • Hammer

As a basic principle, only build your
summer house on a level surface.
Check your foundation prior to assem-
bly!
Open the package and lay out all the
pieces (in the garden) so that you can
assemble them without great effort one
after the other. This will make assem-
bly easier. Always provide an underlay
to protect any pieces even when they
are not painted. Use leftover wood pie-
ces from the packages.
The house key
You will find the house keys on the
side of the door fixed with a screw. Re-
move them prior to the installation of
the door to avoid damages.
IMPORTANT:
Please have a close look at the dra-
wing prior to assembly because this
is the only way to visualise where the
individual components need to be
placed during assembly.
(We recommend using a cordless
screwdriver for fixing the screws. You
should only fix window and door fittings
manually with a screwdriver.)
Set the two preassembled floor ele-
ments upside down on the foundation.
Push the two floor elements together
so that groove and tongue are closed
in the centre. Make sure both pieces
are flush on the sides.
STEP 1 Before you begin!
STEP 2 Assembling the floor
We are not responsible for damages during assembly!
2

Now take screw clamps and fix the
floor elements where they meet and
screw them together with the provided
screws (approx. 6-8 screws depending
on the model).
Attaching the base frame
Take the pressure impregnated base
frame and attach it to the floor at the
edge all the way around. The individu-
al pieces are numbered and should be
screwed to the floor at the correspon-
ding positions. See the drawing for the
amount of overhang. Screw the entire
frame and the inner parts to the floor
as described.
Turn over the completely assembled
floor and set it in the proper place on
your foundation. At least two persons
are required to turn it over; you may
want to have a third person assist you.
We start with the door element. Carry
the door element to the position shown
in the drawing or where you want to
enter your pavilion and set it down on
the floor. Now take the element on the
left or right hand-side of the door and
place them at the position shown in the
drawing. The wall elements need to be
properly set on the foundation. Push
the two elements together on the frame
so that the sides (groove and tongue)
are properly connected. Screw the two
connected pieces together on the top
and bottom with a cordless screwdri-
ver. Make sure a second person holds
the wall elements from the outside
while screwing to prevent them from
falling over.
CAUTION:
Do not fix them to the floor yet because
the elements still need to be moved.
The two screwed pieces should now
STEP 3 Setting up the wall elements
Contact your specialist supplier if you experience any problems during assembly. 3
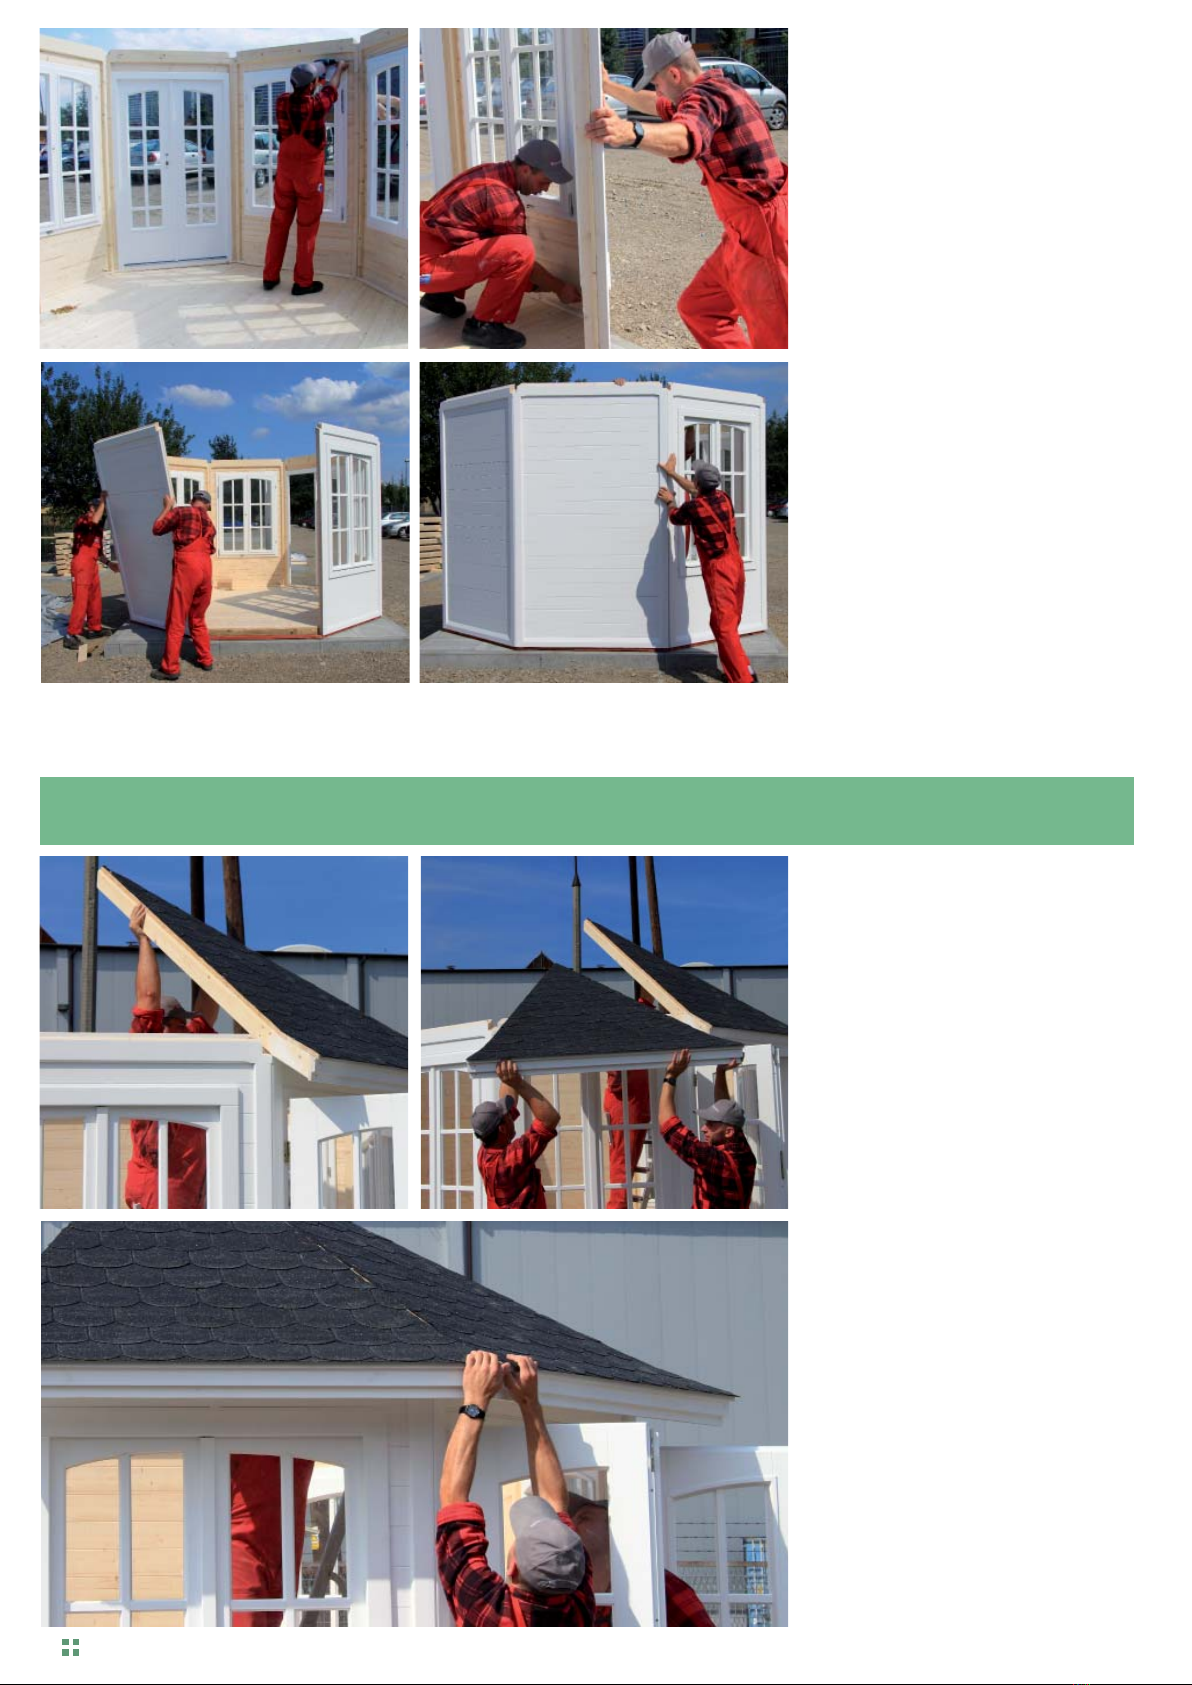
The provided roof elements are ge-
nerally inserted into the already as-
sembled wall. Set all roof elements
(the roof elements show here come
pre-shingled) carefully on the provided
tongue of the exterior walls. Support
the pieces in the centre of the pavili-
on. Use a ladder; this will also help you
when you lay the roof elements on the
walls. After laying all roof elements,
they will support themselves so that
the roof cannot collapse.
Screwing the roof elements:
Press the roof elements (one after the
other) upwards with a board (take lef-
tover pieces from the package) so that
they are flush in height with the ad-
joining elements at the roof overhang
(exterior of the pavilion).
stand on their own on the base frame.
Now assemble all pieces, one after the
other, as shown in the drawing and
described above. When inserting the
final piece you need to press one pie-
ce slightly outwards at one of the two
corners so that the wall element slides
with the tongue into the groove. Now
screw all wall elements together ensu-
ring that there are no gaps. Check to
make sure the walls are properly set
on the base frame and adjust them
if necessary. If all wall elements are
properly assembled screw them to the
base frame.
STEP 4 Setting up the roof elements
We are not responsible for damages during assembly!
4

Now take a screw clamp and tighten
the adjusted roof element at the roof
overhang (outside) and screw them
together from the left and right hand-
side. Place two small pieces of wood
underneath the clamp to protect the
wood.
Screw all pieces, one after the other,
on the outside. Make sure all roof sec-
tions are set properly on the wall ele-
ments.
If necessary, adjust the position of
the roof element with a hammer. After
screwing all roof areas on the outside,
the elements need to be aligned at
the top. Do this by pressing or gently
hammering from the outside (one per-
son on the roof). Screw all elements
together one by one.
Make sure the adjoining roof beams
are flush when adjusting the pieces.
Screw all roof elements together pro-
perly ant to the wall elements.
Contact your specialist supplier if you experience any problems during assembly. 5
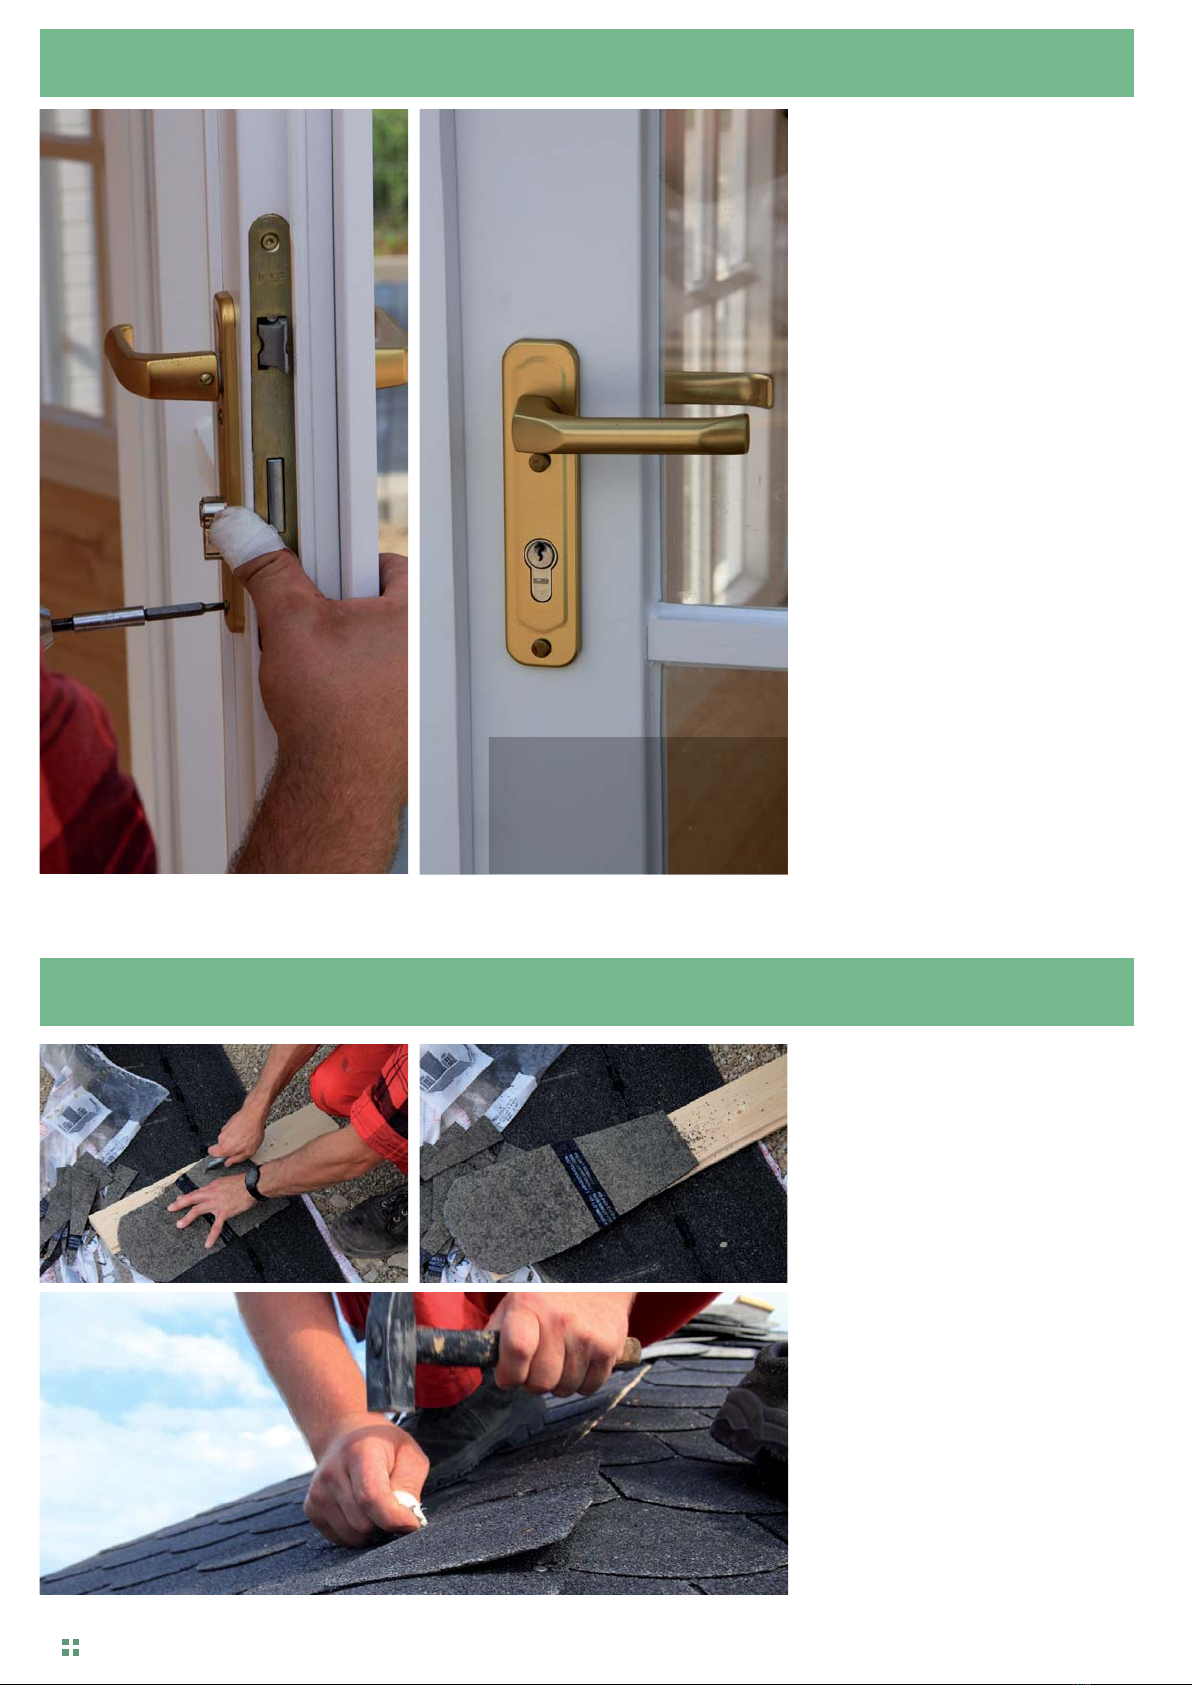
In our example the individual roof are-
as are already shingled, which means
you only need to attach some small
pieces of roof felt to the roof edges
(ridge).
Cut off the individual pieces from the
provided shingles with a knife. Make
sure the pieces get narrower from the
black adhesive surface to the back.
Cut off several pieces in advance be-
cause you will need a number of shin-
gles for the roofing of one ridge.
Start at the bottom of the eave and lay
the first shingle centred on the ridge
(roof edge) so that half of the shingle
covers each side. Nail the shingle to
the roof using two roofing nails in the
upper half of the shingle. Place the
Insert the window handle into the
lock in the window. Use a cordless
screwdriver or a screwdriver to screw
in the uppermost screw. Be careful
not to overtighten it if you work with a
cordless screwdriver. You can screw
in the bottom screw after opening the
window since the window handle will
not get in the way anymore.
Check all functions of the window as
soon as you are done.
Now take the metal mount for the door
handle and fit it in. Make sure you fix it
with a screwdriver because the screws
will be screwed in plastic nuts and they
may be easily overtightened. Please
be careful.
STEP 5 Attaching the handle sets
STEP 6 Completing the roofing
Watch a video on assem-
bly and alignment at www.
bertsch-holzbau.eu under the
menu item Video.
We are not responsible for damages during assembly!
6

next shingle above this one. Place it so
that the shingle covers the black adhe-
sive surface. Repeat this step until you
reach the top. Repeat this process for
the remaining roof edges (ridges).
After all ridges are covered with shing-
les, attach the provided copper bonnet
to the roof top. Turn the bonnet until it
has the correct position at the top and
is set properly on the roof area. Now
attach it to the roof using several roo-
fing nails. Make sure the screws do not
penetrate the roofing board. (Consider
the length of the screws!)
Laying the roof felt:
Roof felt not include in the package;
available as accessory at your speci-
alist supplier.
Roll out the roof felt from one side to
the other beginning at the lower part
of the roof. Allow approx. 30-40 cm of
excess roof felt to the adjoining roof
areas and cut it off. Attach the roof felt
to the roof boarding with roofing nails
or staples. Repeat this step for all roof
elements until you have laid one lay-
er around the entire roof. Lay the next
layers so that they overlap the underly-
ing sheet at the upper edge by approx.
30 cm. Lay them as described above.
Repeat this step until you reach the
top. Cut off a square piece of roof felt
for the top and attach it centred over
the top.
Contact your specialist supplier if you experience any problems during assembly. 7

Please note:
These assembly instructions provide support for proper assembly.
The order of the described steps is not necessarily binding.
Nevertheless, if you should experience any problems with the assembly of your summer house, please ask your specialist
supplier for help. He will gladly assist you. Bertsch Holzbau rejects any warranty for damages resulting from incorrect assem-
bly or gross negligent actions.
Always read the attached drawing and these assembly instructions before commencing the assembly.
Ensure in advance that no damages have occurred.
Thank you for choosing a Bertsch Holzbau product and we hope you enjoy your new summer house.
You can find assembly videos on our website
www.bertsch-holzbau.de
Table of contents
Other Bertsch HolzBau Garden House manuals


Popular Garden House manuals by other brands


Mercia Garden Products
Mercia Garden Products 01DTSHAX0806SDSEC-V1 Assembly instructions

Tiger
Tiger Gamma General assembly instructions

Mercia Garden Products
Mercia Garden Products 05DTMBCH0304-V1 General instructions

finnhaus
finnhaus 838 120 manual

Décor et Jardin
Décor et Jardin Paradis 53257S001 Assembly Notice

Mercia Garden Products
Mercia Garden Products HONEYSUCKLE PLAYHOUSE General instructions


