Best Choice Products SKY4153 User manual
SKY4153
Ver. 2
INSTRUCTION
MANUAL
Commercial Ice Maker

BEFORE FIRST USE
Pg. 2
WARNING
Please retain these instructions for future reference.
NOTICE
•This unit is intended for indoor use only.
•Place unit on a stable and level surface.
•Keep unit away from direct sunlight and other sources of heat.
•Using an extension cord is not recommended as it may overheat and cause a risk of fire.
•Keep ventilation openings clear of obstruction.
•This appliance is intended for household use and similar applications such as sta kitchen areas in
shops, oces and other working environments; by clients in hotels, motels and other residential type
environments; catering and similar non-retail applications.
•Unplug the machine before fitting, removing, or cleaning parts.
•This appliance is not intended for use by persons (including children) with reduced physical, sensory or
mental capabilities, or lack of experience and knowledge, unless they have been given supervision or
instruction concerning use of the appliance by a person responsible for their safety.
•If any parts are missing, broken, damaged, or worn, stop using this product until repairs are made
and/or factory replacement parts are installed.
•Do not use this item in a way inconsistent with the manufacturer’s instructions as this could void the
product warranty.
1. Remove all packaging and accessories.
2. Clean the ice scoop, cabinet, and inner parts that contact water with mild detergent, warm water, and a soft cloth.
3. Place unit on a stable and level surface. Make sure that there is at least 15 cm of space between the back of the
unit and the wall, and at least 5 cm on each side. Keep the front accessible and the air outlet clear of obstructions.
4. Place unit in position for at least 4 hours to settle the refrigerant fluid. Do not plug it in.
•Do not let children play with this machine.
•Unit must be room temperature before use.
•Do not damage the refrigerant circuit.
•Only use the 110-120V/60Hz earthed power supply.
•Do not store explosive substances such as aerosol cans with a flammable propellant in this appliance.
•This unit must be positioned so that the plug is accessible. Do not run cord over carpeting, rugs, or
similar materials.
•Do not place anything over the cord. Keep cord away from trac areas.
•Do not submerge cord in water.
•No other appliance should be plugged into the same outlet. Make sure that the plug is fully inserted
into the outlet.
•Never unplug you unit by pulling on the power cord. Always grasp the plug firmly and pull it straight
out from the outlet.
•Do not tip the machine over or lay it on its side.
•Do not use liquids other than water to make ice cubes.
•Do not place anything on top of the unit.
•Do not place anything inside the ice bin other than ice. Do not place wine or beer bottles in the ice bin.
Pg. 3
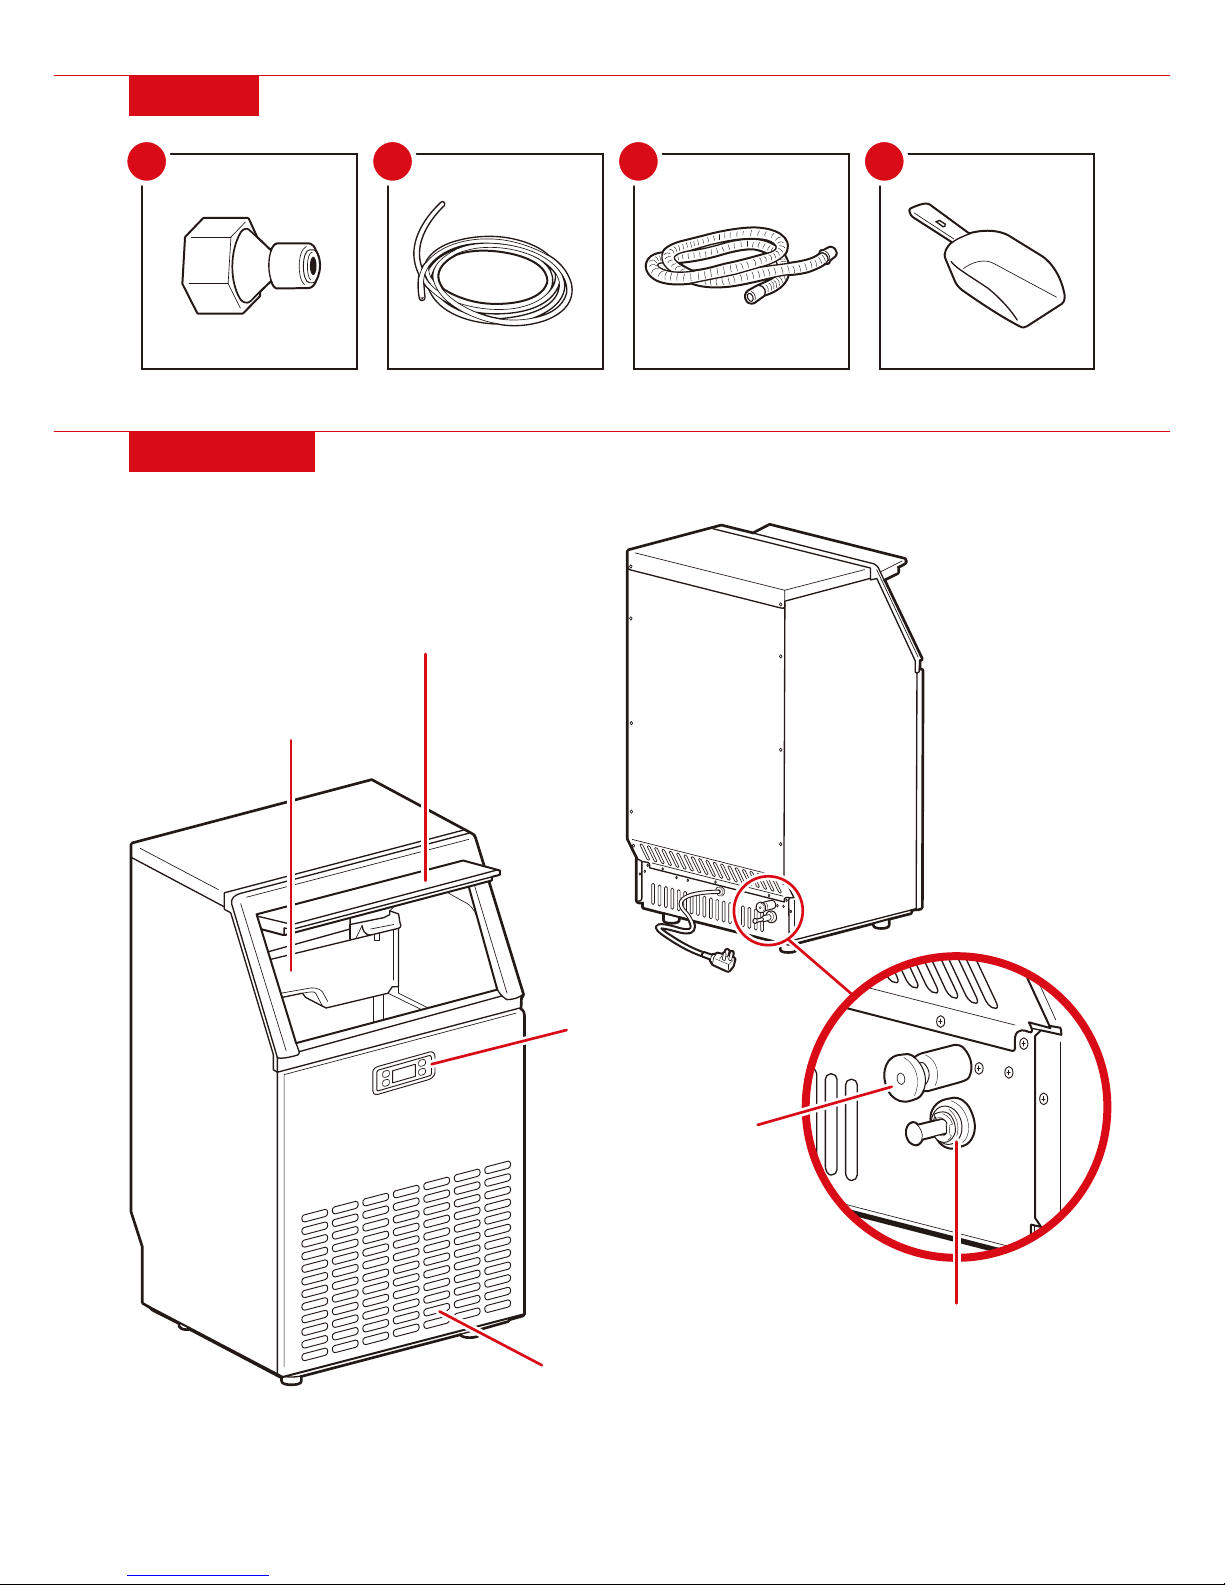
DIAGRAM
PARTS
A
1 PC
FAUCET ADAPTOR B
1 PC
WATER HOSE C
1 PC
DRAIN HOSE D
1 PC
ICE SCOOP
DOOR
WATER INLET
AIR OUTLET
WATER OUTLET
(FOR DRAINING)
CONTROL PANEL
ICE-MAKER/
WATER TANK

CONTROL PANEL
ICE MAKER/WATER TANK
Pg. 4
TIMER/CLEAN: Press to set the timer. Press and hold to enter cleaning mode.
ON/OFF: Press to turn unit on/o or cancel timer. Press and hold to forcefully switch from ice making to ice harvesting.
WATER FLOWING/ADD WATER: Flashing icon indicates water is flowing and solid icon indicates water shortage.
ICE FULL: Remove ice to resume ice making
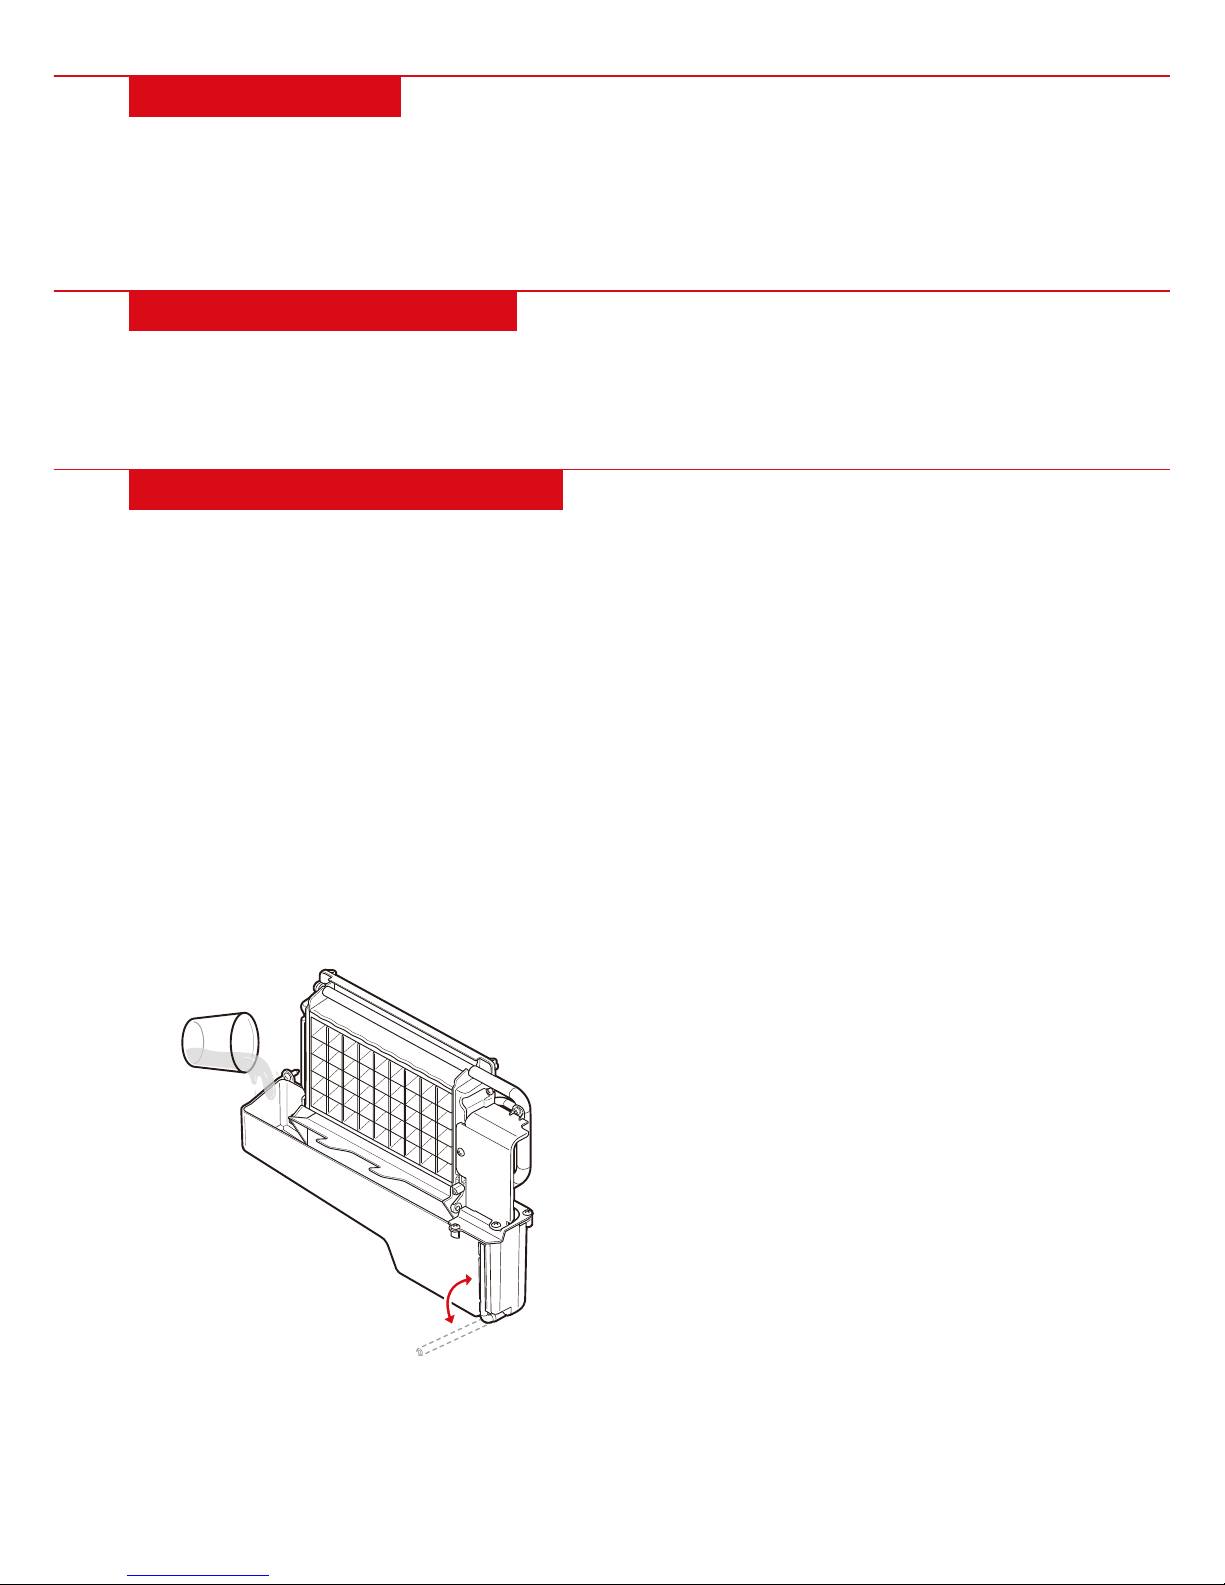
WATER SEEPING PIPE
WATER DRAIN PIPE
Pull pipe out to manually
drain water (if necessary)
ICE CUBE
MODULE
WATER TANK
ICE MAKING TIMER (MINUTES) OR
AMBIENT TEMPERATURE (°F)
TIMER DISPLAYED IN
HOURS OR MINUTES
TIMER/CLEAN
ON/OFF
ERROR CODE
ON/OFF
INCREASE OR
DECREASE ICE
THICKNESS/TIMER
MAKING
ICE
ICE FULL
SELF-CLEANING
WATER FLOWING/ADD WATER
WATER SUPPLY PIPE
ICE DETECTING
BOARD
WATER LEVEL DETECTOR
(INSIDE)
Pg. 5
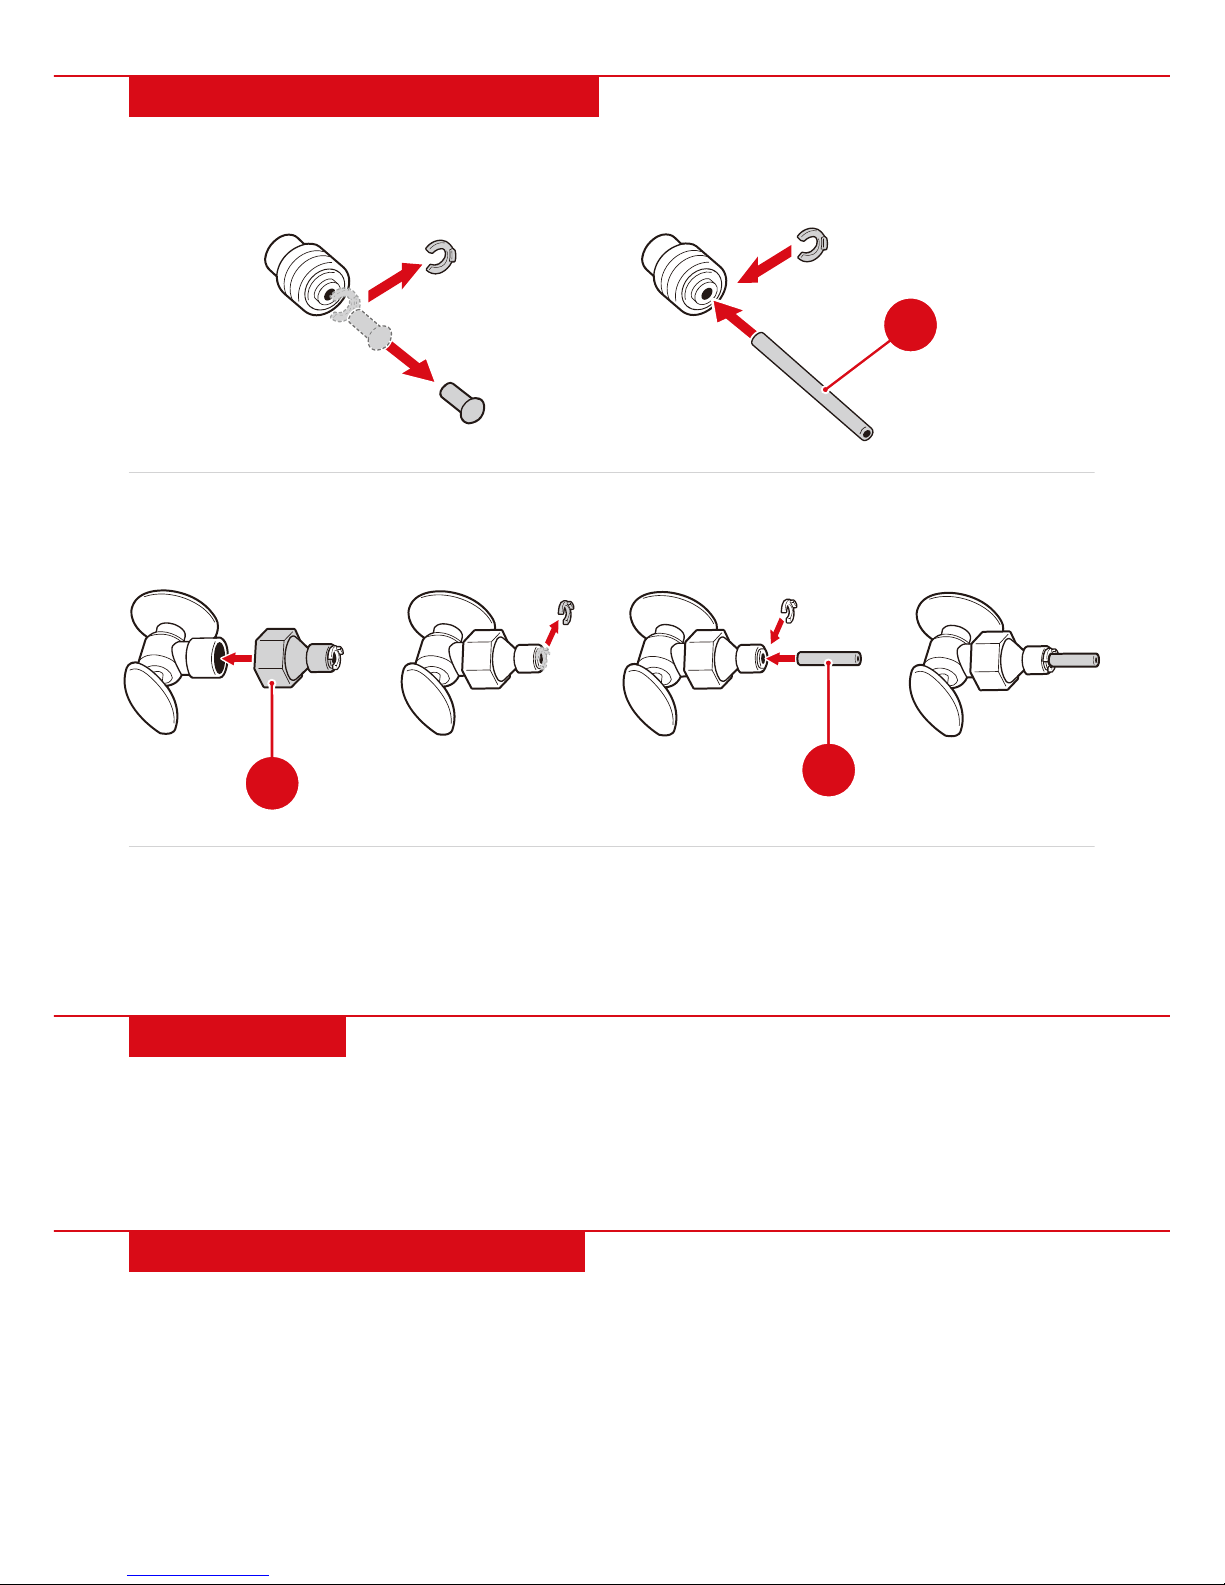
SETTING UP THE ICE MAKER
USAGE TIPS
OPERATING INSTRUCTIONS
5. Remove the plug from the water outlet. Attach one end of the part C drain hose to the water outlet and
attach the other end to your water drainage pipeline.
NOTE: Pull the water drain pipe out from within the ice maker to manually drain water.
6. Plug the power cord into a wall outlet.
1. Remove the locking ring from the water inlet. Compress the plug, then remove it.
2. Insert the part B water hose into the water inlet and secure it by replacing the locking ring.
•The ice maker requires a continuous water supply with pressure 1-8 bar.
•The temperature of the water feeding into the ice maker should be between 41°F and 77°F for proper operation.
•Connect to a potable water supplying only. Only use drinking water.
•It is recommended that you discard the first batch of ice.
1. Press the ON/OFF button to turn on the ice maker and it will automatically start filling the water tank to begin
the ice making process.
2. The top left display will show the ambient temperature (°F) or the time left in the ice making cycle (minutes).
3. Ice making will continue until the unit is turned o, at maximum capacity, or there is insucient water.
NOTE: The initial ice making cycle may take up to 30 minutes, but a typical cycle is approximately 11 to 20 minutes.
4. Press the +and –buttons to adjust ice thickness by increasing or decreasing the time of the ice making cycle
(i.e. for thicker ice increase time and for thinner ice decrease time).
AB
B
3. Screw the part A faucet adaptor onto the water faucet. Remove the locking ring.
4. Insert the other end of the water hose into the faucet adaptor and secure it by replacing the locking ring.
CLEANING AND STORAGE
SETTING TIMER
SELF-CLEANING MODE
Pg. 6
•To put the ice maker into long storage, do the following:
1. Turn o the unit, unplug it, and remove all the ice cubes.
2. Shut o the main water supply, then remove the water hose from the water inlet and faucet.
3. Pull the water drain pipe out from within the ice maker to manually drain water. Remove the drain
hose and replace the water outlet plug.
4. Dry the interior and exterior with a soft cloth. Leave the door open to allow for air circulation.
5. If necessary, cover the unit with a tarp or plastic bag.
•Unplug the machine before cleaning or storage.
•Do not clean your ice maker with alcohol or flammable fluids.
•Wipe the outside of the ice maker regularly with a soft cloth, mild detergent, and warm water.
•Wipe the inside with a soft cloth and solution of 28g of household bleach or chlorine and 7.5L of hot water.
Rinse thoroughly and drain the water.
•The water seeping pipe, water tank, and ice detecting board must be cleaned periodically with a natural cleaner
and water. Pull the water seeping pipe up and outwards to remove it. Rinse thoroughly and drain the water.
•Every 6 months you may want to deep clean the ice machine with a nickel-safe ice machine cleaner.
1. Mix 300ml of cleaner with 2.8L of warm water,
then divide it into 2 containers.
2. Pour one container of the cleaning solution into
the water tank and wait 5 minutes.
3. Turn on the unit and run the self-cleaning mode.
Manually drain the water.
4. Repeat steps 1-3 with the other container of
cleaning solution.
5. Run a normal self-cleaning mode twice to flush
out the cleaning solution. Manually drain the
water after every self-cleaning mode.
•It is recommended that you discard the batch of ice after cleaning.
1. Press the TIMER/CLEAN button, then use the +and –buttons to increase or decrease time.
2. When in standby mode, the timer sets the time until the ice making process begins.
3. When in ice making mode, the timer set the time until the ice making process ends.
4. To adjust or cancel a timer, press the TIMER/CLEAN button and increase/decrease the time.
•Press and hold the TIMER/CLEAN button to enter self-cleaning mode which lasts for 20 minutes. The machine
will pump water through the unit to clean it.
•After 20 minutes, the water pump will stop and the unit will automatically refill the water tank.

ERROR CODES
Pg. 7
TROUBLESHOOTING
Reason
No water supply
Water level detector not
functioning
Water leaking from water tank
Water leaking from drain hose
High ambient temperature
Bad air circulation
Ice bin full
High ambient temperature or
water temperature too high
Low water pressure or blocked
water hose
Clogged water seeping pipe
Bad water quality
Problem
Cloudy ice cubes
Irregular ice cubes
Thin ice cubes
Thick ice cubes
Full indicator on
Ice making cycle normal
but no ice cubes
Pump working but no
water flow from water
seeping pipe
Add water indicator
flashing but not water flow
Add water indicator on
Solution
Turn on water, increase water pressure, or
clean water hose
Clean water tank and water level detector
Make sure unit is level
Reinstall drain hose
Move to a lower ambient temperature
or increase ice making time
Place unit at least 15 cm from the wall
Remove ice cubes
Low ambient temperature Reduce ice making time
Move to a lower ambient temperature
or switch to a colder water supply
Increase water pressure or clean
water hose
Clean holes on the water seeping pipe
Change water supply/filter water
Bad water quality or dirty
water tank
Clogged water seeping pipe
Change water supply/filter water, or clean
water tank
Clean holes on the water seeping pipe
E1: Ambient temperature sensor not functioning
E2: Ice making problem or leak
E3: Ambient and suction tube temperature sensors not functioning
E4: Ice making cycling is longer than 35 minutes indicating no refrigerant or a non-functioning compressor
ICE FULL ICON ALWAYS ON: Magnetic control switch cuto

All items can be returned for any reason within 60 days of the receipt and will receive a full refund as long as the
item is returned in its original product packaging and all accessories from its original shipment are included. All
returned items will receive a full refund back to the original payment method. All returned items will not be charged
a re-stocking fee.
All returned items require an RA (Return Authorization) number, which can only be provided by a Best Choice
Products Customer Service Representative when the return request is submitted. Items received without an RA
may not be accepted or may increase your return processing time. Once an item has been received by Best Choice
Products, refunds or replacements will be processed within 5 business days.
All returns must be shipped back to the Best Choice Products Return Center at the customer’s expense. If the
reason for return is a result of an error by Best Choice Products then Best Choice Products will provide a pre-paid
shipping label via email. Boxes for return shipping will not be provided by Best Choice Products, and is the
customer’s responsibility to either use the original shipping boxes or purchase new boxes.
Pictures may be required for some returns to ensure an item is not damaged prior to its return. Items returned are
not considered undamaged until they are received by Best Choice Products and verified as such. All damages to
items are the customer’s responsibility until the item has been received by and acknowledge by Best Choice
Products as undamaged.
CONTACT US; WE’RE HERE 7 DAYS A WEEK TO HELP YOU!
WARNING
Manufacturer and seller expressly disclaim any and all liability for personal injury, property damage or
loss, whether direct, indirect, or incidental, resulting from the incorrect attachment, improper use,
inadequate maintenance, or neglect of this product.
PRODUCT WARRANTY INFORMATION
bestchoiceproducts.com customerservice@
bestchoiceproducts.com 844.948.8400 LEARN MORE!
ENJOY YOUR PRODUCT!
Table of contents


