Hatsuyuki HF-300P User manual
Model
HB32OA
Model
HF.3OOP
ffi tlat ki
Bloc Shaver
Model
HF.TOOP
Model
HF.35OP
*Before operaling lhis machine, please read and undersland lhe
instructions specified in this manualfor proper and safety use.
I Retain this manualfor your immediale and iuture referefces.
t Fot maintenance and reoairs. please contact ihe manufaciurer
(Chubu Corporation) or the local distribltors from whom you
Durchased the oroducts.
THANSFEB GE-SALH OF MACHINE
Should you sell or give lhe
machine to a 3rd party, make
sure that lhis "OPERATION
I\4ANUAL goes with it fo. safe
and correcl opetation,
Chubu Corporotion

a Before, operaling ihe machine, please read the following ,,lnstructions for Safety', in the manual very
carelully. anci operate the machine correclly.
o Each instruclion specified in the manual is very important for safety, so be sure to follow each instruc-
tion as specified.
aAttention marks and their meaninos are as follows:
Note: "l\,4aterial damages means damages io buildings, lurniture and effects, pels, etc.
Examples of Mark / Pictograph:
,'\
,/!\ WAnNIilQ [t1;""t ooe|.at'o' ol 'nachine is da'qerous and can cduse serious;njurv or
,\
/!\ cAuTroN f :iJ;i":t:H.,x'xl of machine is dangerous and can cause injury of person or
A
Electric Shock
a. represents "CAUTION" (including danger and warning).
The speci{ic contents 01 cauiion are shown neaf the ,\ mark by pictograph or letters.
The mark illustrated left represents "ELECTRIC SHOCK".
@
Do Not Disassernble
represerts "PBOHlBr I ED OPTFATION'.
The specif c contents of "Prohibited" are shown wilhin or near this ! mark by pictoo-
raph or lellers.
The mark illustraied at left represents "DO NOT DtSASSEt\,1BLE'.
unp ug
o represents "ENFORCEN,4ENT^ (Things to do).
The specif c contents of "Eniorcement" are shown within or near O the mark bv oict-
ograph or lellers.
The mark illustrated at left represenls "Unplug from outlet"_
OBe sure to ground (earth) the machine.
Never connect a ground wire (earthing) to gas pipes, waler
pjpes, lightening rods or lelephone cord/grounding wires. An ln-
complete grounding (earthing) is dangerous and can cause se-
vere electric shock.
ODedicated (Exclusive-use) outlet.
Always use an oullei dedicated to each machine. Never use ex-
tension cords or connect the unil to other power sLppiy cords.
Never connect several or many plugs into the same outlet. lt
may cause power supply cord to overheal and melvburn or elec-
tric shock or fire.
ODo not operate the machine outside.
Operaling the machine outside or in the rain will cause eleclric
bleeding or electric shock.
och

ODo not inslall the machine in a damp or wet placq.
ll can cause electric bleeding or electric shock.
ODo not install/place the machine close lo any heating appli-
ance.
Never inslall/place the machine close to any heating appliance
such as a gas burner. ll can cause melting and/or burning ol
pta$rc cover.
OThis machine is for 'CON4MERCIAL USE'.
Be sure to keep the machine away from children 10 avoid elec-
tric shock or injury.
ODo not pour water over the machine or immerse machine
in water.
It can cause a shorl circuit or electric shock, as well as rust and
other water related problems-
(tDo not damage power supply cord.
Never work on power cord and never pull, tlvist or bundle it. Do
nol place a heavy things on it. lt can damage the power cord
and can cause electric shock or fire.
OKeep plug clean and plug into outlet correctly.
Always keep plug clean and plug inio ouuet correctly. Dirty plugs
or imperfectly connected plugs can cause electric shock or iire.
ODo not touch any electrical
with wet hands.
It can cause eleciric shock,
parts (such as plug or switch) o
(tin the event of circuil breaker moving to 'OFF" posilion, please
contact the machine vendor. switching breaker to 'oN" posilion
incorrectlv or bv force can cause electric shock or iire.

Oshould accidents or irregular opefation occur, TURN OFF the
main switch and unplug from oullel. lmmediately contacl your
machrne vendor for a correct repairs. ContinLred operalion of a
fauliv machine can/will cause electric shock or fire. €@6
(tFor cleaning inside the ice hopper or changing blades, be sure
to TUNE OFF lhe main switch and always put on gloves whrle
cleaning/changing blade works. Never touch blades direclly.
They are very sharp and can cause iniury
lDNever lry 10 disassemble or repalr the machine by yourself. Al-
ways call a qualified technician. lncorreci repair will likely cause
irfegular operalion or eleciric shock, fie or injury.
ODo nol attempt to aller the machine in any way. lt can cause
eleclric shock or fire.
aDo not open the sliding door or put your hand inio the chamber
during opefation. Lower the blade tip below the shavlng lable
when cleaning the inside of the chamber. Wipe the shaving table
counterclockwise to the blade dkeciion. Otherwise, iniuries could
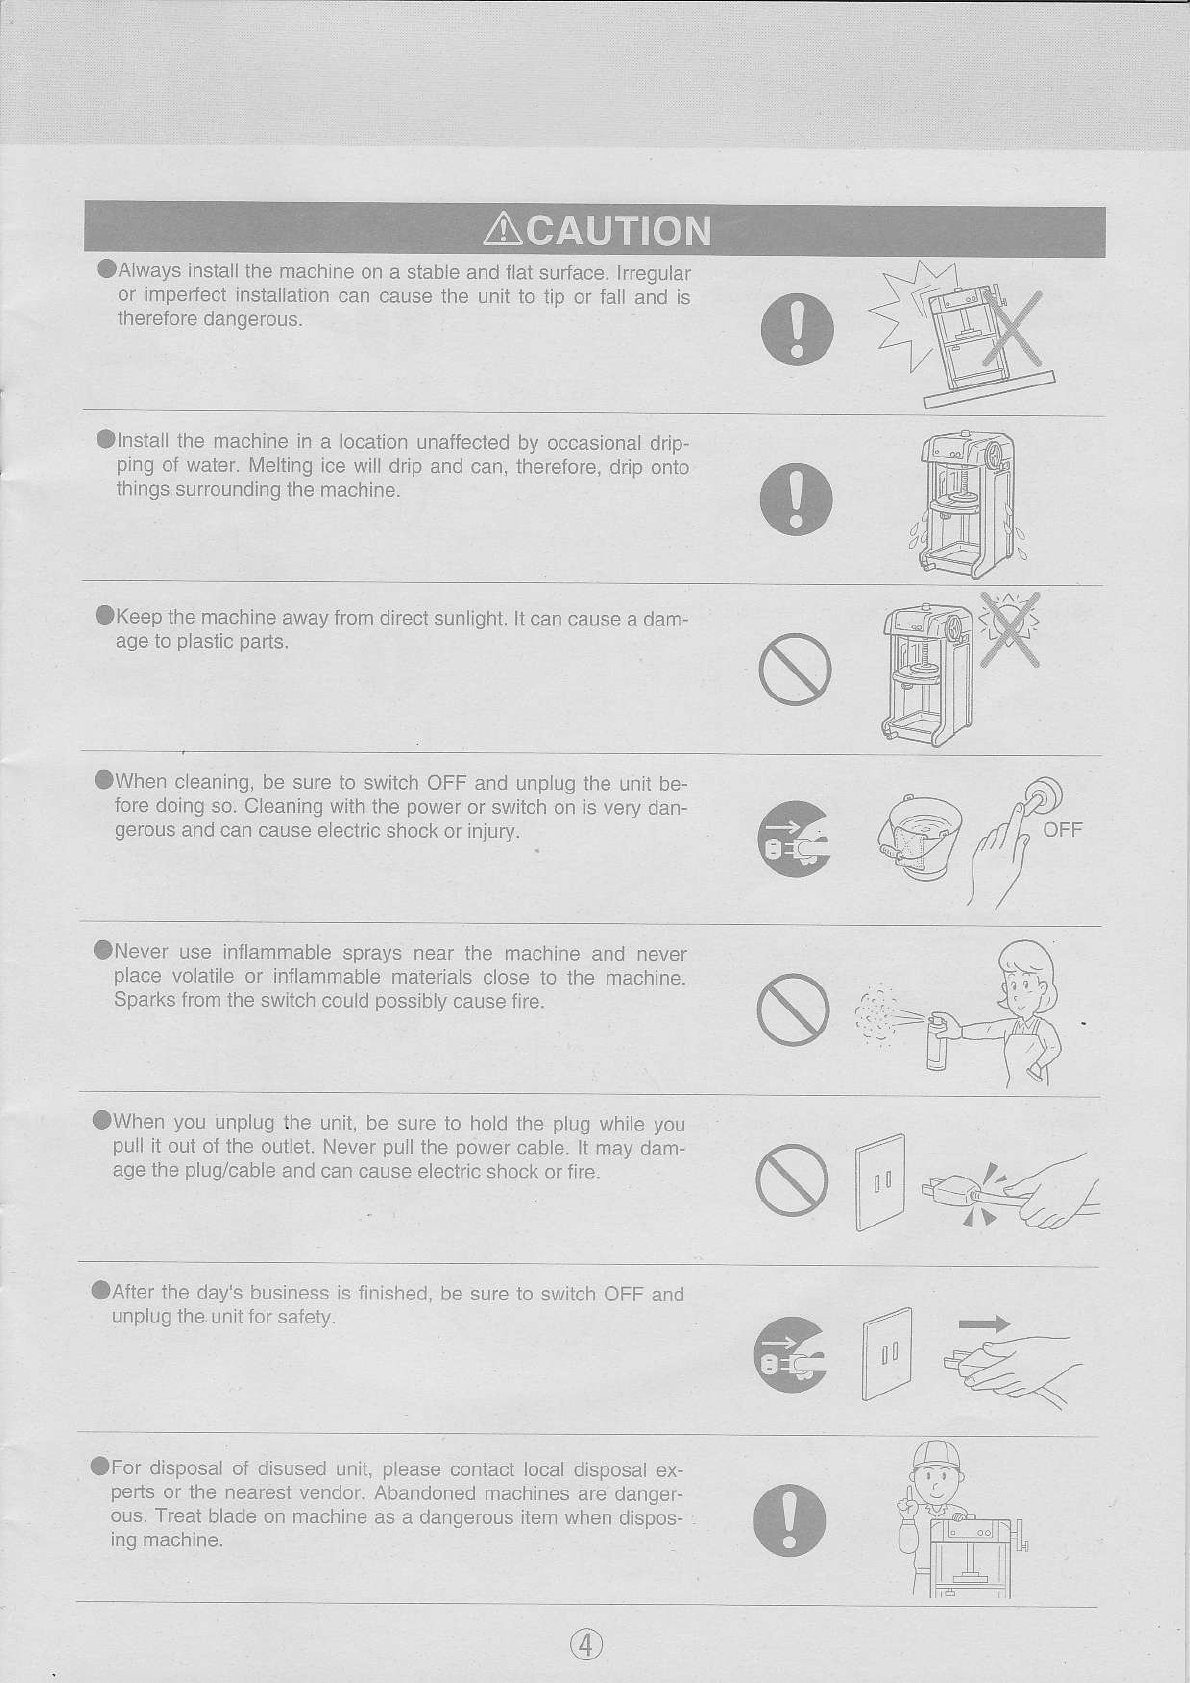
(tAlways install the machrne on a stable and flat surface. lfregular
or imperfect inslallatron can cause the unit to tip or fall and is
therefore dangetous.
alnstall the machine in
ping of water. [/e]ting
th ngs surrounding the
a location unaffected by occasional
ice will d$p and can, therefore, drip
macnrne.
It can cause a dam
dnp
onl0
OKeep the machine away from direct sunlight.
age to plaslic parts.
Owhen cleaning, be sure to switch OFF and unplug the un I be-
fore doing so. Cleaning with the power or switch on is very dan-
ge'ous ard can cduse eectric shoch or'n ury. @ @(f-,
ONever use inflammable sprays near the machine and never
place volalile or inflammable materials close 10 the machine.
Sparks from the swilch could posstblv cause fke.
Jwhen you unplug the unit, be sure to hold the plug while you
pLrll it out ol lhe ouUet. Never pull the power cable. It may dam-
age the plug/cable and can cause electric shock or fire.
OAfter the day's business rs finished, be sure to swilch OFF and
unplug the unrt for saieiy. G,@*
lrFor dlsposal of disused unit,
pens or the nearest vefdor.
ous. Treat blade on machirle
Ing machrne.
please contact local disposal ex-
Abandoned machines are' danger-
as a dangerous ilem when dispos-

'l
.l
:1
Oolean the lood zone area in the shaving chamber before use.
Not cleaning il could lncrease the chance oi conlamination and
could be the cause of ilness.
aDo not touch the rotary parts (main shaJt and crank handle) dur
ing operation.
Ocrip ihe ice block lirmly. The ice could jump out if il is not posi-
tioned firmly.
ODo not touch lhe pfongs with your lingers. Doing so could cause
InJUry.
OAdjust the tension bolt properly so thal when you do not supporl
it with vour hand. the ice holder does not descend-
Owhen yo! sell or give
that this "OPERATION
and correct operalion.
the machine to a 3rd party, make sure
N,4ANUAL goes with the unit for safety

NAMES AND FUNC
OThis machine
block of ice -
items.
is commercial block ice shaver to oroduce shaved ice from a
a dice of 13 cm approx. Use a block of ice and never use other
Inr-zoop)
ILift-up Devicel
Applicable to HB320A
Drain Hose (1pc.)
(Except HF-300P) er
ce Flag) (1pc.)
Gear Oll
(1pc.)
lnsiruclion [/lanual
(1pc.)
Crank Handle
Fixing Screw
(M6 x 35)
(t pc.)
Extra Blade (1pc.)
Crank Handle (1pc.)
/1t*s;"-
/ "?^yf /
Y'/'

HOW TO USE
. Aliach lhe enclosed crank handle in the lolowrng
manfer:
1) fhere is a hole on the rjghl side ol the head cover.
Push the crank handle shait through this note.
2)[4ount the crank shaft so that its chip and the
spfing ptn meet each other.
(HF-300P,HF,700e HF-350;Appticabte [4odets)
(l\.40del HB320A)
3) Insert the Phlllips screw through the crank handle
and fasten it {irmly using a screwdriver. Check the
handle to make sure it smoothly moves the main
shaft up and down.
. Connect the drain hose to the drip tray. place a
O,chpl lo .aceive d ip wa,er rh.ough lne orai'l hose.
. P uq rFe u-i[ inro dn appropriatp socket rvoltage .s
specrfied on the machlne plate). Refrain lrom using
a generator as this is not covered by the warranty.
. Cledn {he food zore. such as lhe ice chavtng area.
upon lrrst use, There could be dusi in the cnamoer,
l)lce that is very cold or smoky rn cotor is not
suitable for shaving because it js too cold and
hard. use transparent ice of an appropriate
lemperature. lce ihat is smoky in color will not
proouce soft and flLrtfy shaved ice. lt could damage
the blade iip and ihe blade will noi shave the ice_
Use lrarsparenI ice lo. so'1dnd ,l,,fV snaveo tce.
2) Do not pul -h.ngs on lnp ,n .. The rtai" snafl turns
when the unit starts and il could be dangerous.
<l-
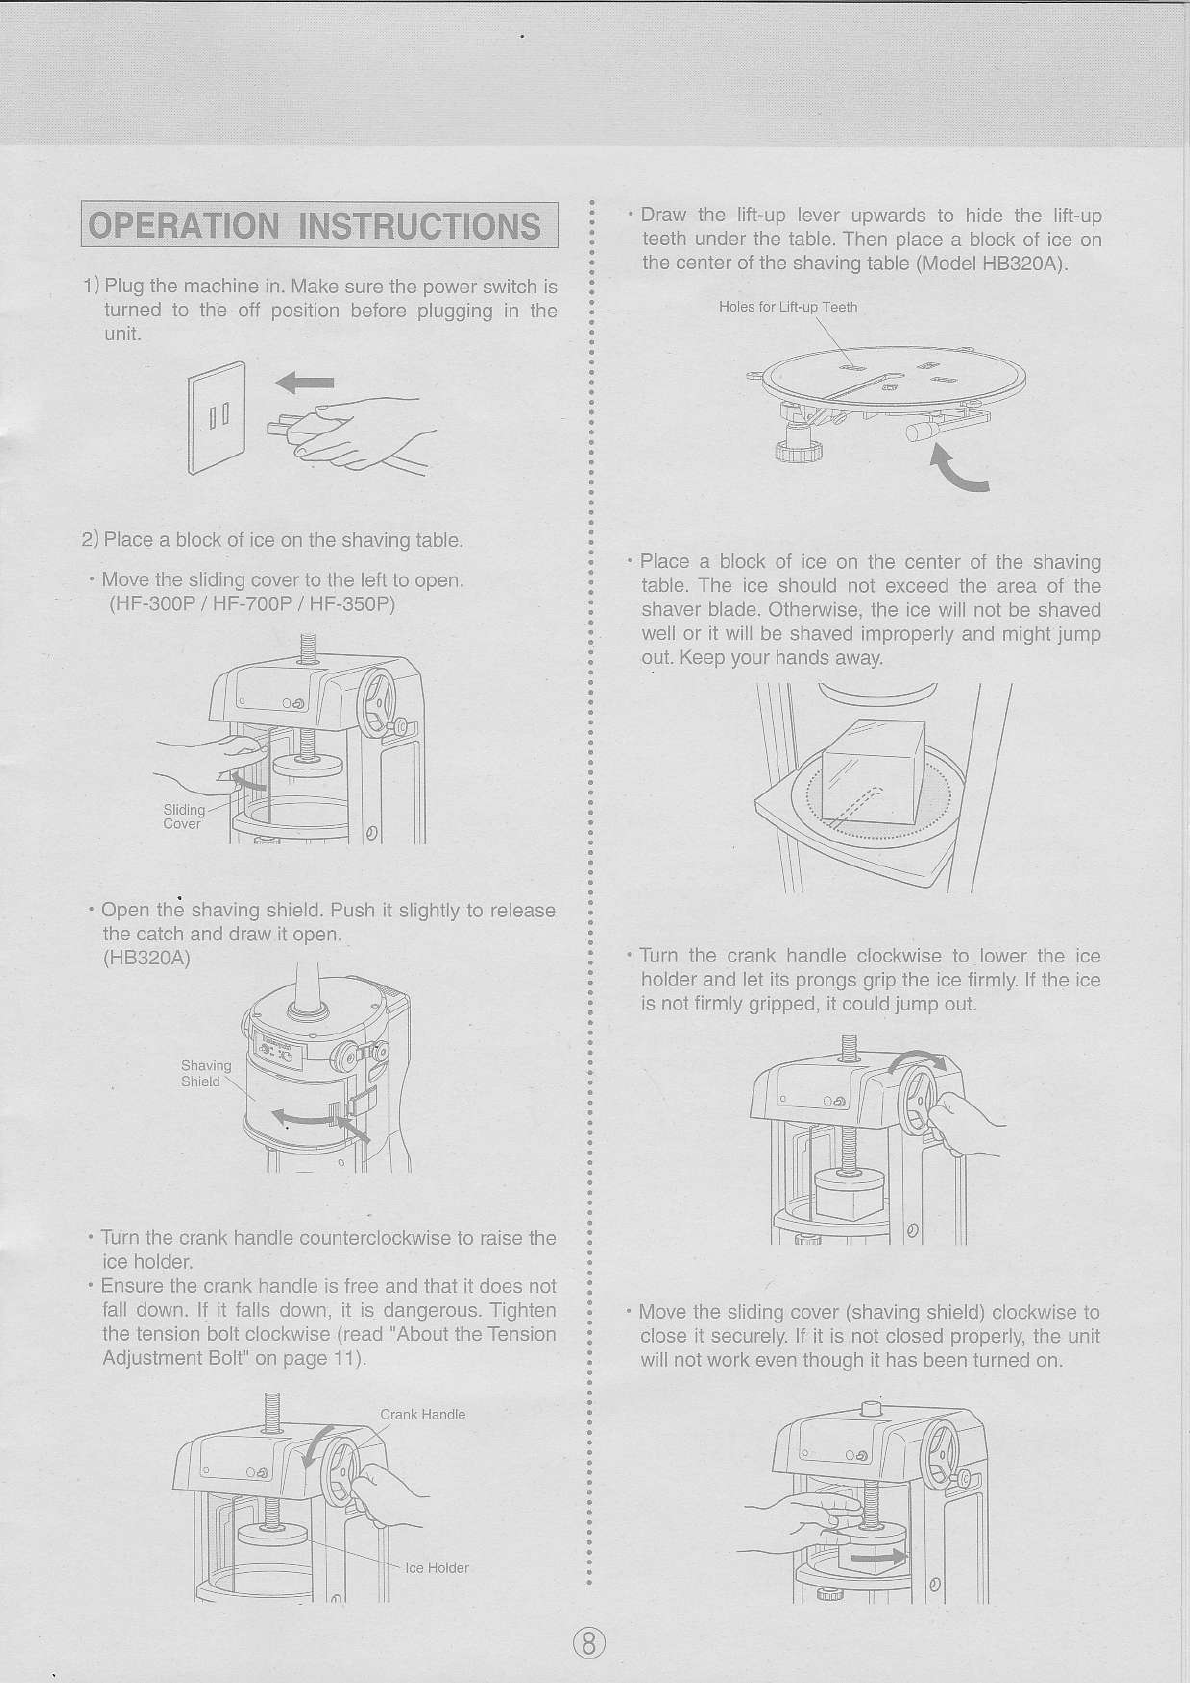
1) Plug the machine in. Make sure the power switch is
turned io the off posilion beiore plugging in the
unit.
2) Place a block of ice on the shav;ng table.
. [/ove the slidjng cover to lhe lelt to open.
(HF-300P / HF-700P / HF-350P)
. Open tha shaving shield. Push it slightly to release
the catch and draw I open.
(HB320A)
. Turn the crank handle counterclockwise to raise lhe
ice holder.
. Ensure the crank handle is free and thai it does noi
fall down. lf t lalls down, it is dangerous. Tighten
the tension bolt cLockwise Cead "About the Tension
Adjustment Bolt" on page 11).
Draw the lift-up lever upwards to hide the lift-up
teeth under lhe iab e. Then place a biock ol ice on
the cefter of the shaving table (l\,4odel HB320A).
. Place a bock of ice on the center oi the shaving
table. The ice sholld not exceed the area of the
shaver blade. Otherwise, the ice will not be shaved
well or it will be shaved irnproperly and mighl jump
out. Keep yo!r hands away.
. Turn the ctank handle clockwise to lower the ce
holder and let its prongs grip lhe ice firmly. lf lhe ce
ls nol firmly gripped, it could jump oul.
Ivlove the slid ng cover (shaving shield) clockwise to
close lt securely. li it is not closed properly, the unit
will not work evef though t has been turned on.

3) Place a cup under lhe shaving table to receive the
falling shaved ice.
4) Switch ON. The
ice. ON
machine will begin to shave the
5) Adjust lhe texture of the shaved ice. Turn the blade
adjustment knob for the desired ice texlure.
Standard shaved ice texture is 1 millimeter (mm),
as this is the pitch between the blade lip and the
shaving table.
. Turn the knob clockwise for a coarser rexrure or
counterclockwise for a Jiner texture.
. Turn the knob one full rotation to raise lhe blade 1
mm above the shaving lable. The knob can be
turned two or lhtee times.
6) Turn the unrt oif.
6)
7) Unplug the unii when you are finished.
| -n | --
ltul €:7
12 <-24
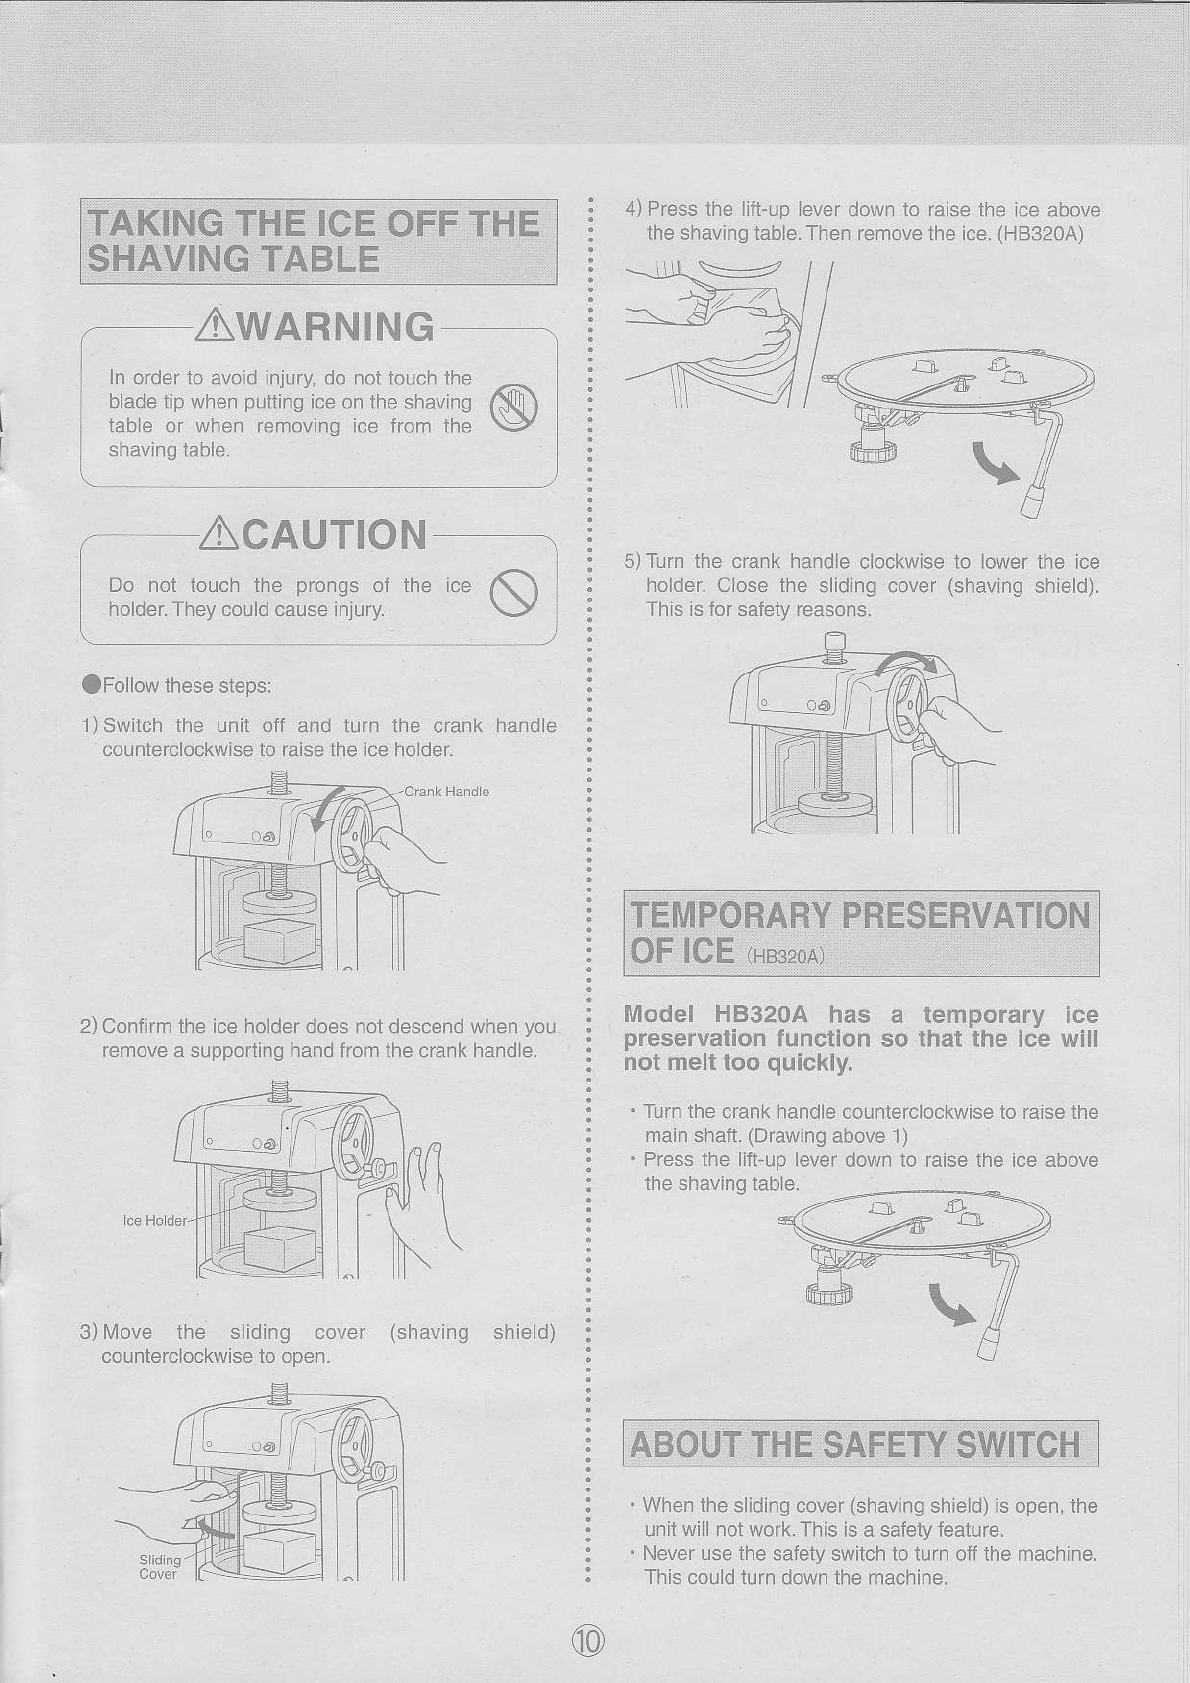
AWABNING
In order ro dvoid njrry. do nol ro-.ts ttsF
shaving iable.
r ACAUTION
Do not iouc^ l-a p'o19c of ihe :ca (S
holder. They co rld cause in ury. \-),/
(tFollow these steps:
1)Swilch the unii off and iurn lhe crank handle
counterclockwrse to raise lhe ice hoider.
2) Coniirm the ice holder does not descend when you
remove a supporling hand from the crank handle.
3) Move the sliding cover (shaving shield)
counterc ockwise to open.
blade tip when
tab e or whenpuiting ice on the shaving
removing ice from ihe @
@
4) Press the liit-up ever down to raise the lce above
the shaving table. Then remove the ice. (HB320A)
5)Turn the crank handle clockwise
holder. Ciose the sliding cover
This is for safety reasons.
10 lower the ice
(shaving shield).
TEMPORARY PRESERVATION
OF ICE r,erzon
Model HB320A has a temporary ice
Dreservation function so that the ice will
not melt too quickly.
. Turn the crank handle counterclockwise to raise the
main shaft. (Draw ng above 1)
. Press the lift up lever down to raise the ice above
lhe shaving tabe.
. When the sliding cover (shaving shield) is open, the
unii will not work. This is a safety feature.
. Never use lhe saiety switch to turn o1l the machine.
This could lurn down the machine.
HOW TO USE
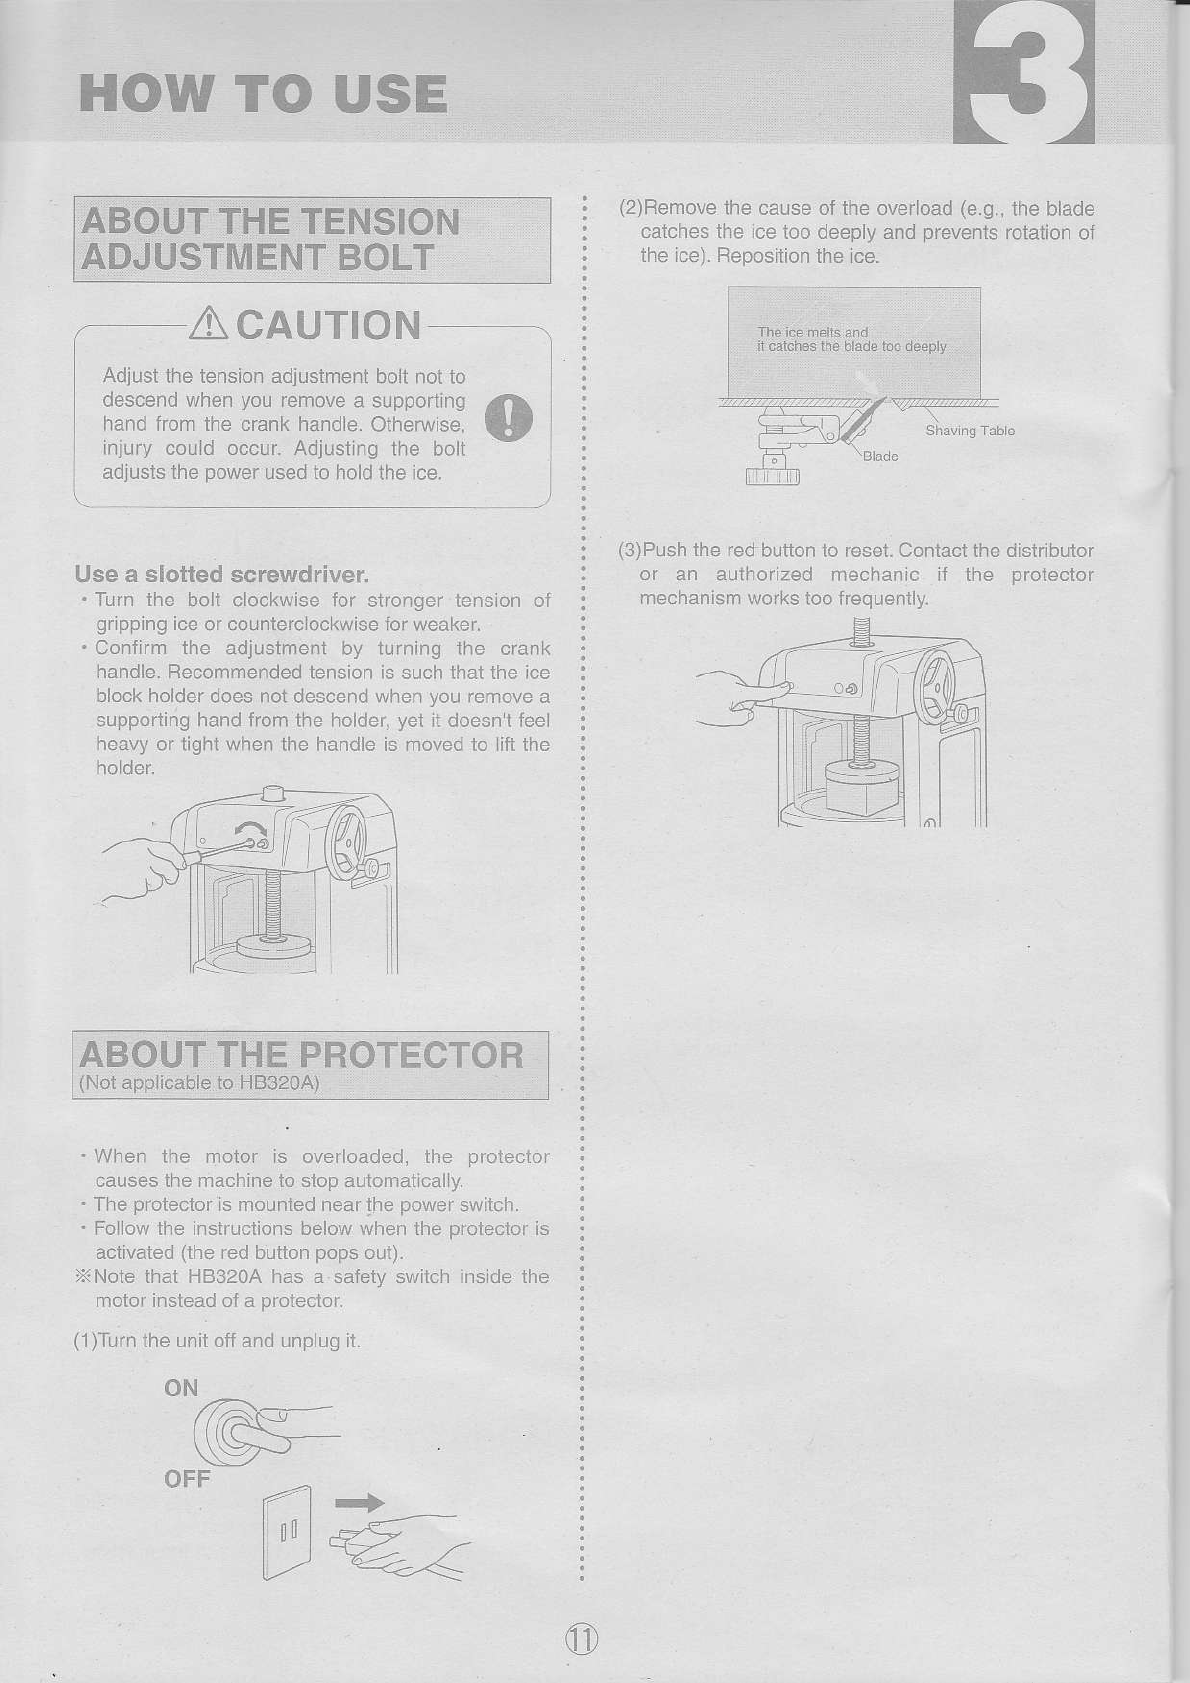
. ACAUTION
Adjust the tension adiustment bolt nol to
descend when you remove a supponing
hand from the crank handle. Otherwise,
injury coud occur. Adjusting the bolt
adjusls ihe power used to hold the ice.
Use a slotted screwdriver.
. Turn the bolt clockwise for slronger tension of
gr pping ice or counterc ockwise for weaker.
. Confirm the adjustmenl by lurning lhe crank
handle. Recommended tension is such that lhe ice
block holder does not descend when you remove a
supporiing hand from the holder, yei rt doesn t feel
heavy or tight when the handle is moved to ift the
holder.
. When the motor is overloaded, the protector
causes the machrne to stop aulomatcaly
. The protector ls mounted near the power switch.
. Fo low the instruciions below when the protecior is
activated (the red button pops oul).
XNote that HB320A has a saiety swilch inslde ihe
motor instead of a proiector.
(1)Turn the unit otf and unplug il.
ABOUTTHE PROTECTOR
(Not applicable to HB320A)
N
rtl \:_
\y 11 +
"1€-
l! .9^-
V -4'-2-<
o
:
(2)Remove the cause of the overload (e.9., the blade
catches the ice ioo deeply and prevenls rotation ol
the ice). Reposiiion the ice.
(3)Push the red button to reset. Contact the distributor
or an auihorized mechanrc if the prolector
mechanism works loo ftequenlly,
o
H
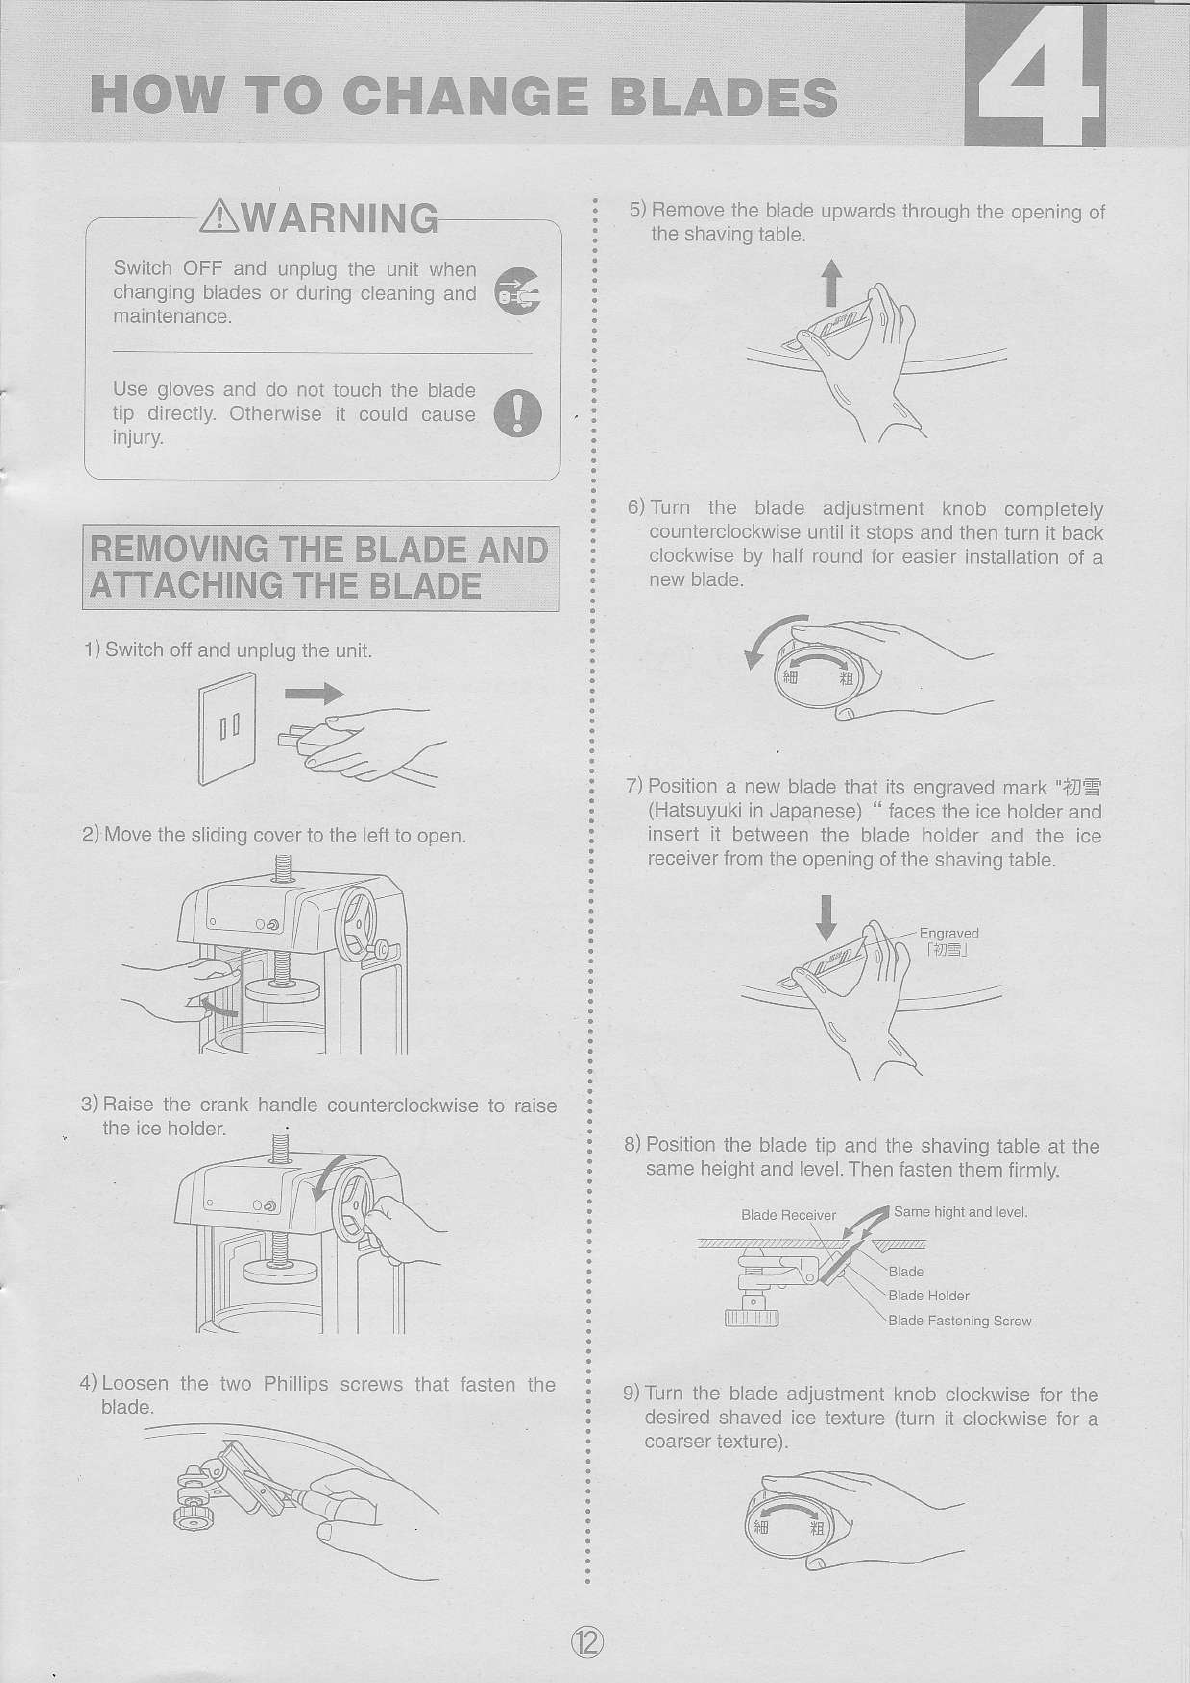
.-AWARNING
Use gloves and do not touch the
Switch OFF and unplug the unit when
changing blades or dufing cleaning and
maintenance.
TO CHANGE
o
handle counterclockwise to raise
d,
\P
Dtaoe
cause
1)Switch off
2)Move the sliding cover to the Iefl to open.
and un
llrol
lL)
plug ihe unit.
--
4=/
e+4
3) Raise the crank
the ice holder.
4) Loosen
Dlade.
REMOVING THE BLADE AND
ATTACHING THE BLADE
the lwo Phillips screws that laslen the
5) Remove the biade upwards through the openrng oi
ihe shaving table.
6)Turn lhe blade adjustmeni knob compleiely
counterclockwrse unlil it stops and then turn it back
clockwise by half round for easter installation of a
new blade.
7) Position a new blade thai its engraved mark "?nE
(Hatsuyuki in Japanese) " iaces ihe ce holder and
insert il between the blade holder and the ice
receiver from the opening of the shaving table.
8)Position the blade tip and the shaving iable at the
same height and level. Then fasten them firmly.
9) Turn the blade adjustment
deslred shaved ice texture
coarser lex1ureJ_
knob clockwise for the
(turn il cockwise for a

MAIN
AwnRrurruc-
Be sure the unit is switched off and
unp uggeo
protective
inside of
beiore cleaning. Wear -
qloves when cleanrnq lne Fr -
the chamber and when .g
changing blades. Do not touch the blade
iip dlreclly.
Lower the b ade below the conical case
sualace when cleanjng lhe inside of the
chamber. Wipe the shavlng table
counterclockwise (agalnst the blade tip
direction).
Do not immerse lhe unlt in water. This
could cause an electrical shori circuit,
rusl, or permanent damage to the unil.
Do not touch the power swiich, plug,
other electric parts wilh wet hands. *@
. Do nol use water over 40' Cels us when cleaning.
This could cause the plastic parts to become
distorted.
. Do not use the followings on plastic parts: benzine,
alcohol, pelroleum, powdered soap, polishing
powder, alkaline detergent, acid, hypoch orous
acid, scrub brushes, etc. When a chemical clolh is
used for th;s machine, iollow the instrucuon manua
oi the chemical cloth.
.HF-300P, HF-700P HF3204 Shav ng lab'e: -l-'
suriace is coaied with fiuoroplastlc. Do noi use
hard scrub brushes or coarse cleansels.
o
@
Olnside ice Shaving Chamber (inc uding the shaving
table. slide cover etc.):
1)Turn ihe blade adjustmenl knob complelely
counterclockwise to lower the blade behind the
surface of the shaving table. Otherwise, it could
injure your fingers.o
2) Turn the s ide cover counterclockwise lo open lt.
3) Clean the shaving table usjng a damp cloth in a
counterclockwise dire.lion. Do _ol clean in a
clockwise direction;this could cause injury infLicled
by the blade.
4) Clean the lnside of the slide cover using a damp
c oth (HF-300P, HF-350e HF-700P).
(HB320A - Clean after lhe shaving shield s
removeo.J

REMOVAL OF
TABLE tHeszonr THE SHAVING
. Lower the blade behind the surface of the shaving
table (see daily malntenance inslruciions).
. Remove ihe two shoulderscrews (lvl4).
. Push lhe lift-up lever toward the inside.
. Raise the shaving tab e and take t out.
. To mount the shaving table, reverse the order of
the above.
1,Qt
. Wipe covers using a so{t, dry clolh.
. Clean hardened dirt using a damp cloth and warm
waler. A gentle dish detefgeni can be !sed. Be
sure to complelely remove any traces of detergent
with a damp cloth.
. Lubrication Use the gear oil included as
standard accessory.
1)Turn the ice holder completely clockwise to the
bottom. Remove the Philips screw ihat tastens lhe
crank handle {HF-300P, HF-3508 HF-700P).
(HB320A - Removal of ihe crank hande is not
necessary.)
2) Bemove the Phi ps screws fasiening the head
3)Temporariv insert the crank handle inio the worm
gear shaft. Lubricale the following parts, turning
the crank handle:
. the two ho es of the upper part oi the worm gear
shalt holder
. the contact poinl between the Y-brake and ihe
worm geaT
4) Attach the head cover uslng the screws.
5) Aitach the crank hand e to ihe
Turning the main shail wil
holder and the main shait.
crank hand e shaft.
lubricale the shaft

AWARNING
Perlodically confirm there is no dust on
the plug prongs or blade attachmenls.
Periodically plug in the unt to check lt
works. An improper connection could
cause a iire or eleciric shock.
Do noi damage the power cord. Keep it
clean. lf it is slretched, folded, placed
under a heavy object, pinched, stained,
ot otherwrse mrsireated, rt could be
damaged. This could cause a fire or
electric shock. s
Check thal lhe earlh wire is not cLrt or
disconnecled from lhe lerminal. ' Should there be
any deiects, contact lhe d stribulor or an
authorized mechanic.
. Use an exclusive socket.
. Confirm there is no dust on ihe plug prongs or the
socket.
. Do not use a power cord ihat is damaged in any
way. Shou d there be anythlng ifiegular, contact the
distribulor or an authorized mechanic.
. To waTehouse or store the machine for more than
one week, dry it comp etely and keep the machine
in a place Jree ftom moisture.
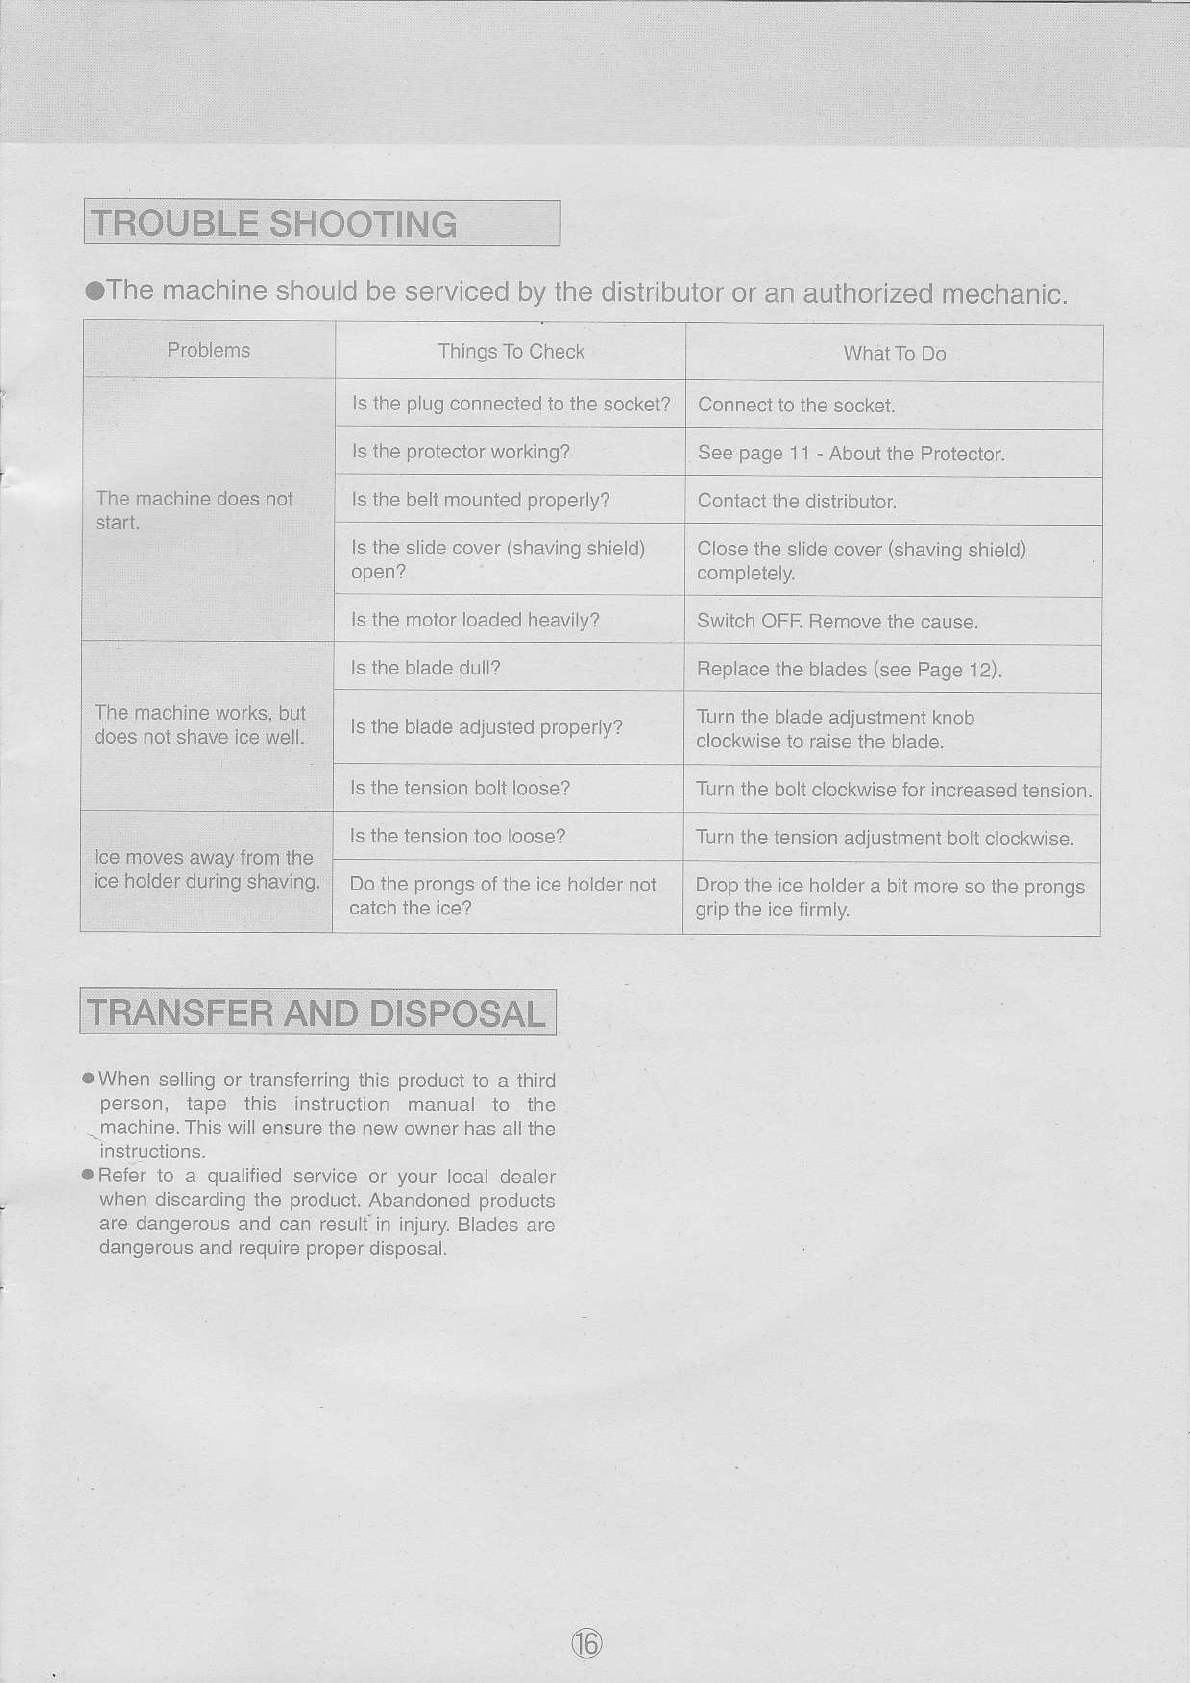
aThe machine should be serviced bV the distribulor or an authorized mechanic.
Problems Thilrgs To Check
ls the plug connecled to the socket? Connect to the sockel.
ls the protector working? See page 1'1 - About the Protector
Is the belt mounted properly? : Conlact the distribuior.
ls the slide cover (shaving shield) Close the slide cover (shaving shield)
completely.
open?
ls lhe motor loaded heavily? Switch OFF. Remove the cause.
ls the blade dulJ? Replace ihe blades (see Page 12).
Turn the blade adjuslmeni knob
clockwise to raise the blade.
ls the tension bolt loose? TJrn Ihe bollc,ockwise tor increaseo tensiorr.
ls the tension loo loose? Turr lhe lension adjusrnenl bolt Lloc(wis..
Do the pfongs of the ice holdef not
catch the ice?
ls the blade adjusled properly?
Drop the ice holder a bii more so the prongs
grlp the ice firmly.
aWhen selling or transferring this product to a third
person, tape this instruction manual to the
.machine. This will ensure the new owner has allthe
inslructions-
aReler to a qualified service or your local dealer
when discarding the product. Abandoned products
are dangerous and can resuliin in;ury. Blades are
dangerous and require proper disposal.
@
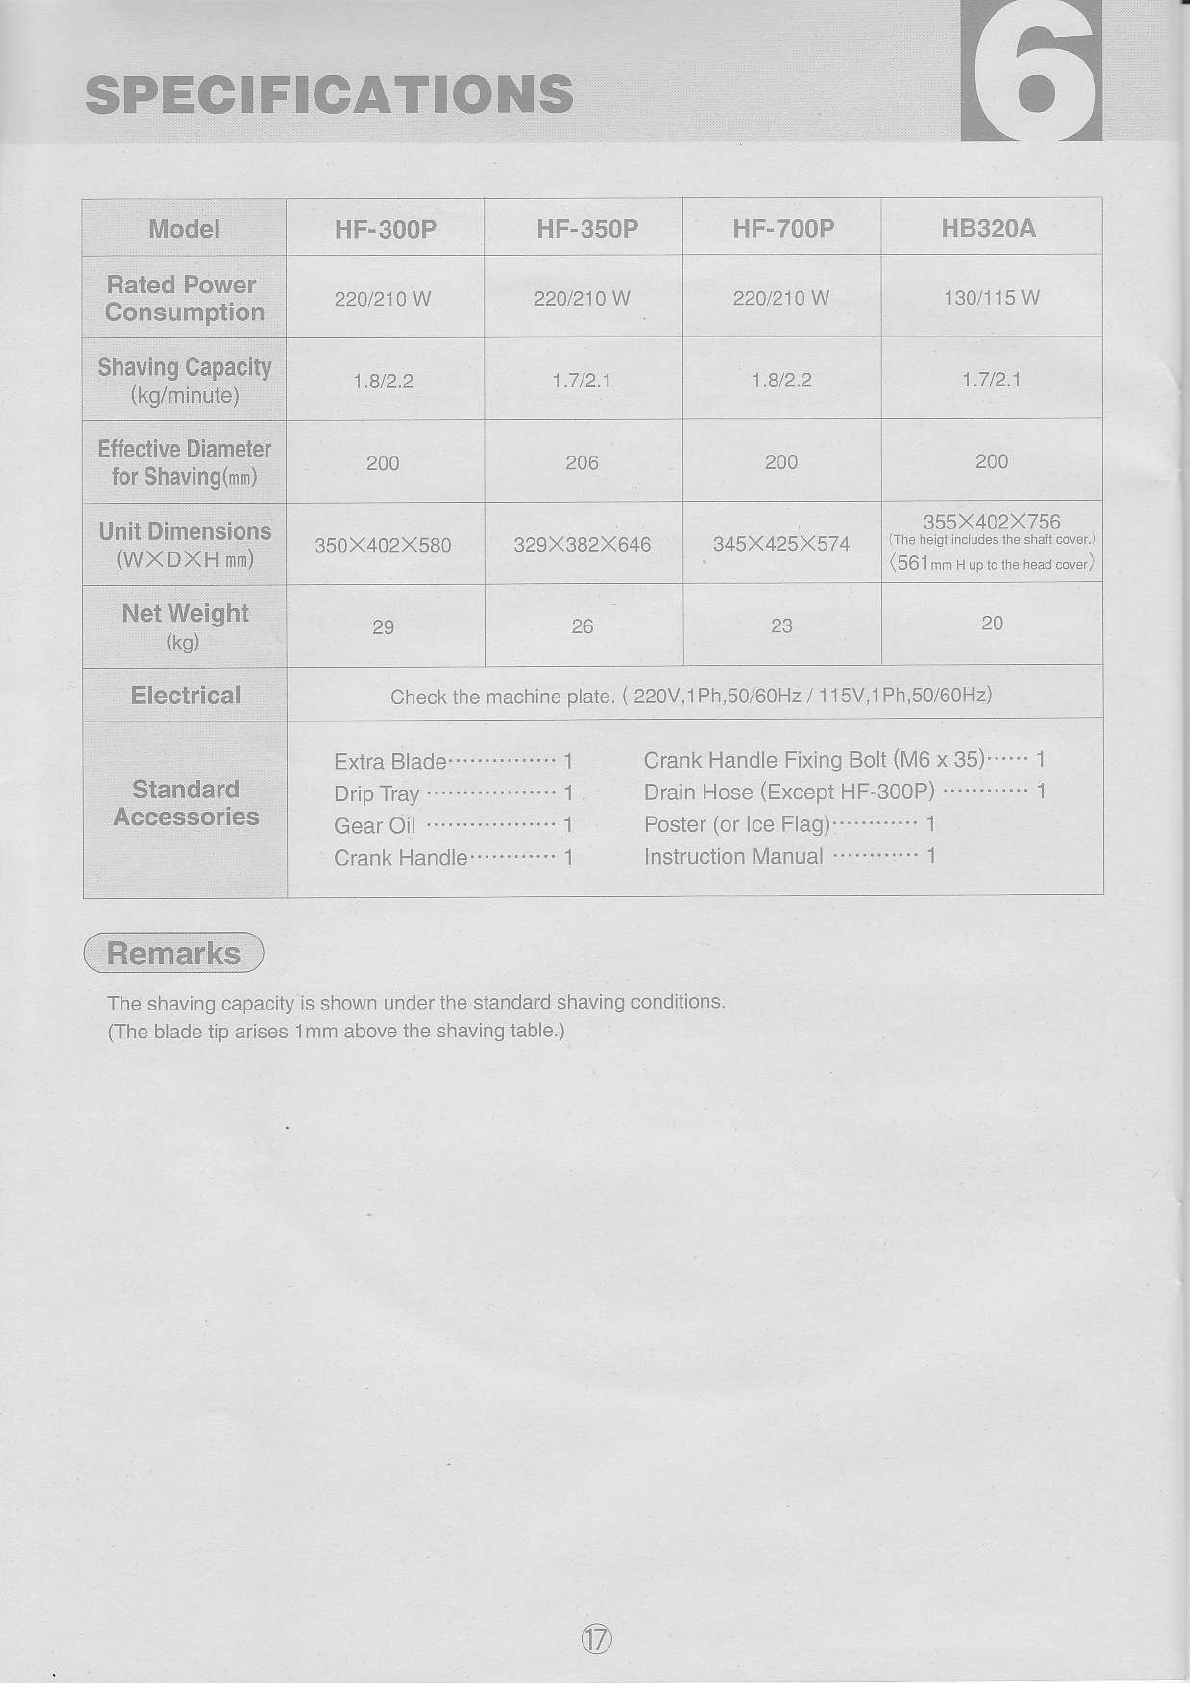
HF-3OOP HF-350P
2201210 W 220/210 W
1.7t2.1
206
329X382X646
1.4/2.2
200
350X402X580
Net Weight
(ts) 29
Electrical Checkthe machine plale. ( 22
Extra Blade "" 1
Drip Tray "'1
Gearoil " -1
Crank Handle " l
c
D
The shaving capacity is shown under the standard shaving condilions-
(The blade tip arises lmm above the shaving lable.)
@
HF-7OOP
345X425X574
130/115 W
355X402X756
lrhe he qr ncudesrhe shaftdovor.)
\fo Inm H up ro rhe hesd.over/
0V,1Ph,50/60H2 / 1 1 5V,1 Ph,50/60H2)
Crank Handle Fixing Bolt (lvl6 x 35) 1
Drain Hose (Excepr HF-300P) 1
Poster (or lce Flag) " " " 1
lnstruction Manual "'1
This manual suits for next models
3
Other Hatsuyuki Ice Maker manuals


