BESV PSF1 User manual

1
Safety Statement Consistency
Dear customers,
Darad Innovation is a company located in Taiwan. Our products sold in the market are developed
based on innovated ideas and structures. The following is the description of the product:
Product: Electric Bike E-Bike
Function: Pedelec
Model: BESV PSF1
This product is designed based on unified European standards and observes applicable and
important EU directives. The EU directives involved are shown below, including any
amendments that are in place:
•
2006/42/EC on machinery, including EN 15194:2009 + AI:2011 + IEC 62133:2002
•
EMC Directive 2004/108/EC, including EN 15194:2009 + AI:2011
•
2006/42/EC on machinery, including EN 15194:2017
The battery charger of the product is described as follows:
Product: Batter y charger
Function: Batter y charger for the electric bike
Model: BESV-072-0360
The product is designed and manufactured based on EU, USA and Australian Communications and
Media Authority (ASMA) standards, as well as relevant and important directives of EU.
•
EU Low-Voltage Directive IEC 60335 and Electromagnetic Compatibility Directive EN 55014
•
USA Directive UL 1012 and FCC Part 15B
•
Australian RCM Directive AS/NZS CISPR-14
Modification of this bike without our prior approval will render the warranty invalid. PS:
Darad Innovation is short for Darad Innovation Corporation.
E
n
g
li
s
h

2
Introduction
Start Riding
It is advised to read this user's manual thoroughly and familiarize yourself with the operations of the
bike before riding it for the first time. Please follow the instructions and warning provided in this
manual. Failure to do so may lead to damage to the bike or risk of your personal safety. This user's
manual provides you quick and accurate understanding of the major functions of your electric bike.
Your bike may be somewhat different from the descriptions and images depending on model, order,
country or optional accessories. Darad Innovation is committed to constantly innovation of
craftsmanship and products, and reserves the rights for changes in following parts, such as design,
electronic system and features of equipment or technology. If you are to sell your bike to another
user, please pass this manual onto him/her. Darad Innovation and its team hope to bring you safe
and pleasant riding experience.
Environmental Protection Topics
Environmental protection topics are part of green product policy published by Darad Innovation. The
purpose is to encourage cautious use of natural resources, which are the building blocks of the
plant we live on, and to take the needs of nature and human being into consideration. As a
responsible person for environmental protection, you may protect the environment by starting to ride
an electric bike.
The consumption of energy is related to the power controller system, gear change system, brake
system, drive system and tires installed on the bike. It all depends on how the electric bike is used
and how you ride the bike. In addition, it is advised to keep in mind the potential influences of how
the bike is used and how you ride the bike on environmental protection.
How the bike is used
•
Make sure the tire pressure is normal.
•
Do not carry extra weight that is unnecessary
•
Pay attention to battery consumption
•
Riding the bike as it is intended to helps protect the environment
•
Have anauthorized professional distributor perform repair orservice to your bike.
How you ride your bike
•
Ride the electric bike carefully and keep a proper safe distance with the vehicle in the front.
•
Avoid frequent, sudden acceleration.
A reminder for environmental protection: Recycle the waste
battery for greener world. Please go to an authorized bike
distributor for repair and service.
E
n
g
li
s
h

3
Production Information
Darad Innovation recommends you to use the power controller system, gear change system, brake
system, drive system and electric bike parts recognized and approved by Darad Innovation. Darad
Innovation has a series of rigorous tests and verification processes on these systems and electric
bike parts to ensure the reliability, safety and comfort of the product. Darad Innovation is not in the
position to evaluate other parts despite existing survey reports available in the market. Therefore,
Darad Innovation is not responsible for using these parts on our products. Do not use parts that are
not approved by Darad Innovation, as they may compromise the safety of you riding the bike.
Approved parts and replacement service, as well as technical advices, are available at
professional distributors authorized by Darad Innovation. In a professional sense, these parts
are fit for your electric bike.
User's Manual
Please read this manual carefully before riding this bike for the first time, and allow yourself to
familiarize with this bike. For the safety and longevity of your electric bike, please follow the
instructions and warnings given in this manual. Failure to do so may result in damage of the bike or
risk of your safety.
You may select an electric bike that meets your specific needs based on the model and standards
provided in the manual, but there may be slight differences depending on countries. In some cases,
your bike may not have all the features described for it due to system, function and safety.
Therefore, your bike may be somewhat different from the descriptions and images. For any question
regarding the bike itself and how it is operated, please consult with your professional distributor
authorized by Darad Innovation. The following are covered in the delivery of the electric bike:
•
Battery
•
Charger
•
User's manual
Ride Safely
•
Important safetywarning
•
Accidents or fallingobjects
•
Tipping over of bike
The following ways of riding may lead to sudden malfunction of parts; for example:
•
Damage of handle bar or saddle when riding the electric bike
•
Malfunctioning brake
These present the risks of accident and injury. When something like this happens, it is important to
have your bike checked by a professional distributor authorized by Darad Innovation immediately.
When riding the electric bike, the bike is subject to heavy loads and wearing. Parts respond to these
loads differently, and fatigue and wears are possible at various speeds. If the life cycle expires, the
part may fail suddenly and there is a risk of accident or injury.
E
n
g
li
s
h

4
•
Please have a professional distributor authorized by Darad Innovation perform routine checkups
on yourbike.
•
Check for signs of cracks, scratches or color change, since any of these are indications that the
part may be expired.
•
Have a professional distributor authorized by Darad Innovation replace the fatigued or worn
part(s).
Parts that may be compromised are:
•
Handlebars andstem
•
Saddle andseat post
•
Frame andfork
•
Tyres and wheels
•
Pedals and Pedalcranks
•
Brake Pads anddiscs
•
Chain
•
Battery
The electric bike and the power controller system may cease to function if handled incorrectly.
Modification to the power controller system may lead to the inability to correct the system back to
normal and eventually malfunction. A power controller system that does not work properly will
compromise your safety while riding the electric bike. Therefore, you should always go to a
professional distributor authorized by Darad Innovation for service of used and malfunctioned parts.
Do not perform any servicing or machining work on the bicycle frame or any of the load-bearing parts on
your own, such as drilling, welding or forging. These behaviors will impact the service life of the parts and
the stability of use. In addition, part of your body or clothing may be caught in moving or rotating parts
such as wheels, chain, pedals or pedal cranks. Make sure that any part of your body, clothing or objects
you are carrying will not be caught in these parts as they are moving or rotating. Also, scarf is not
recommended.
A few parts on this bicycle may become very hot after braking, such as the braking system, front
fork quick release, fast rotating electronic control system and the nut on the axle, particularly after
long hours of riding. Touch these parts only after they cool down. It is not allowed to ride the e- bike
without an operational lighting system. This is the law in many countries.
Qualified and Authorized Professional Ser vice
A professional distributor that is qualified and authorized has the skills, tools and qualification to
provide service for your electric bike, in particular when it comes to the safety of riding the bike.
Therefore, it is advised to go to a qualified and authorized distributor for the following services:
•
Safety-related service
•
Maintenance andservice
•
Repair
•
Correction, installation andupgrade
•
Replacement of electronic components: power controller system, gear change system, brake
system and drivesystem
•
Darad Innovation recommends that you go to an authorized professional distributor for service
and repair in order to keep your electric bike in a good working condition.
E
n
g
li
s
h

5
Correct Use
Familiarize yourself with the following information before riding your electric bike:
•
Safety notes given in the user's manual
•
Technical data provided in the user's manual
•
Traffic regulations and rules
•
Legal and safety standards regarding electric bikes
The structure of the e-bike should comply with the regulations of your country when you bought
it. Or, it may be illegal in your country to ride this e-bike. The structure of this bicycle may be
adjusted to the regulations of individual country if necessary. Please read thoroughly the laws
and regulations applicable to e-bikes for the following key points:
•
The power output of the motor and the maximum aided speed
•
Accessories required to ride on highway
•
Obligation to have a license
•
The minimum age to ride an electric bike legally
•
Requirement to wear a helmet while riding
The e-bike is designed for riding on roads and alleys with asphalt pavement. The tires maintain their
traction on such a pavement. However, this bicycle is not designed to ride or jump over obstacles
such as the curbs on roadsides. Similarly, it is not designed to carry more than one (1) person, i.e.
no passenger other than the rider him/herself. Besides, it is not a racing bicycle .
The e-bike is capable of carrying 95kg (209lbs) including the rider, accessories and luggage. Do not
carry more than the total weight allowed. The BESV e-bike is not designed to be a towing vehicle,
nor allowed to ride behind a towing vehicle, tow another bike or pull another bike with a bike linking
system.
Make sure that your e-bike is used correctly as it is intended. If the bike is not used in the way it is
designed to, the parts may break down, leading to accident or injury.
The e-bike is not intended to set limits on the size, senses or intelligence of certain people. However,
children under 14 are not recommended to ride this bike.
rear-mounted or portable design. Therefore, please remove the battery before the bicycle is
transported. In addition, it is recommended to remove parts that cannot be fastened with bolts
before transportation, such as the gauge, as they may become loose and missing during the
transportation.
Electric Bike
The electric bike of Darad Innovation is an electrically assisted bike that provides assistance when
you are pedaling. The rpm sensor located on the pedal crank bearing detects how hard you are
pedaling the bike and determines how much power the motor should provide to give you a ride. The
electric motor is turned off as soon as you stop pedaling. At the maximum aided speed, the motor
starts to reduce its power output until the aided pedals are turned off. For example, the maximum
aided speed is 25km/hr (15.5mph) in European countries. You may ride faster than this maximum
aided speed if you turn off the assisted pedaling function.
E
n
g
li
s
h

6
Torque sensor on the Bearing of Pedal Cranks
The torque sensor that determines the pedaling force may lose its electronic calibration and that
leads to the malfunctioning of assisted pedaling. Therefore, keep magnetic and metal objects, such
as a hammer, away from the crank bearing.
The Serial Number of New Darad Innovation Bike is in the Warranty Card
The serial number of your new Darad Innovation bike and its frame number validate your after- sale
(warranty) service. Therefore, check that the serial numbers of the bike and the frame are intact
when you are going to buy a bike. Do not buy a bike with a sign that these numbers are tampered
with!
•
The new bike serial number is found inthe warranty card.
•
The frame serial number is found on the base of bottom bracket shell, the rear drop-out of the
frame, or downtube.
E
n
g
li
s
h
7
Over view
1
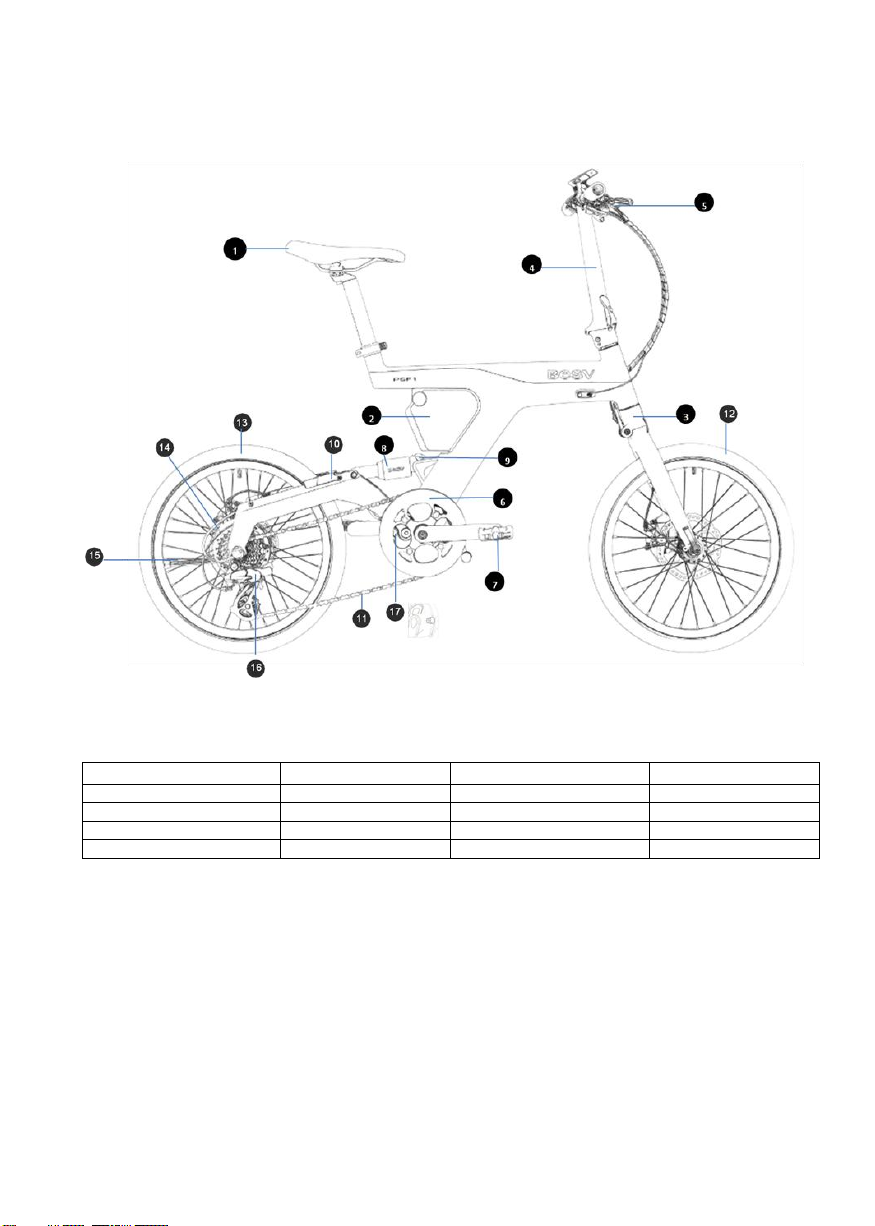
Component introduction
1. Saddle
2. Battery
3. Folding Fork
4. Folding Stem
5. Break System
6. Crank
7. Pedal
8. Rear Suspension
9. Rear Suspension Joint
10. Supporting Stand
11. Chain
12. Front Wheel
13. Rear Wheel
14. Motor
15. Kickstand
16. U-shaped Socket
17. Shaft Pull in
8
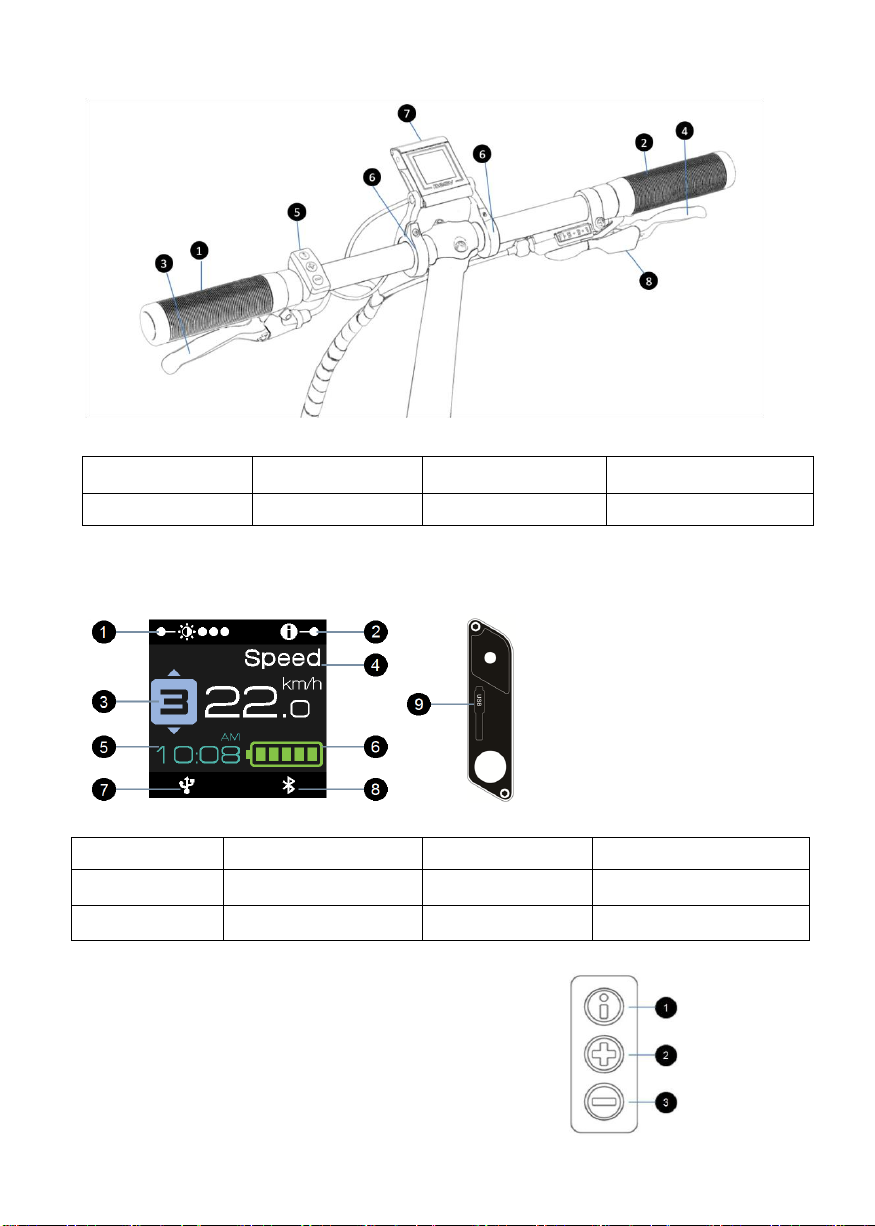
Component introduction
1.Left Grip
2.Right Grip
3.Rear Break Lever
4.Rear Break Lever
5.Function Switch
6.HMI Bracket
7.HMI
8.Derailleur Lever
HMI introduction
1.Backlight Brightness
2.Information Option
3.Assistant Mode
4.Riding Information
5.Time
6.Battery Remaining Capacity
7. USB-charging indicator
8.Bluetooth-connection indicator
9. USB charging port
Instrument Switch Button
1. Information selection/Entry menu
2. Up/Increase
3. Down/Reduce

9
Safety
Please read the information of qualified and authorized professional distributors in the
user's manual.
Safety Equipment
It is recommended to turn the light on even when riding at daytime. As an electrically assisted bike,
the Dar fon Innovation bike is subject to road traffic regulations, such as the
German Straßenverkehrs-Zulassungs-Ordnung (StVZO). The Darad Innovation bike is equipped
with the lighting system required for active and passive parts when riding on a road, and an
adequately designed brake system as well. The lighting system features that following:
•
Front reflector,white
•
Rear reflector, red
•
Reflectorsonthewheelspokes
•
Yellow reflectors onthe pedals
For the safety of rider, please go to a BESV-authorized dealer for regular service of the e-bike.
Proper Accessories
You may need a helmet to ride an electric bike depending on the country you are in. However,
Darad Innovation recommends you to wear a helmet that fits you and protective eyewear regardless
the requirement of helmet. Wear bright-colored clothing that catches attention when on a Darad
Innovation bike for a joyride, and a comfortable pair of shoes that are fit for pedaling. Familiarize
yourself with local traffic rules and requirements and keep them in mind when riding on a road. It is
for the safety of yours and others on the road.
Pre-riding Check Check
the Tires and Wheels
While riding an electric bike, the tire valve may break if you sit one-sidedly on the bike. If this
happens, the tire will lose pressure and there is a risk of accident. Therefore, always check that the
valve is at the correct location. It has to extend from the edge of tire inclining towards the right hand
side. Correct the valve immediately if the position is off. Check the following every time before you
mount your bike:
•
Check that the tires and wheels are intact without damage and whether the tires are pierced by
any foreign object. Damaged tire will lose pressure and further damage.
•
The depth of tire treads.
•
Normal activation refers to the two wheels rotating freely. If a wheel is not rotating in a perfect
circle, it is possible that the tire broken, has a damaged axle orworn spoke.
In addition, investigate the source of any unusual noise if necessary, and check the loads carried
and the tightened connection.
Check the Chain and Chain Cover
While riding an electric bike, the chain and cover that are not tightened may be slacking and cause
accident and injury. Make sure that the chain is engaged and tightened and that the cover is
secured every time before riding the bike. Check also that the chain and chain cover are installed
correctly to prevent falling off or sliding.
E
n
g
li
s
h

10
Handle the chain as instructed, particularly every time when the rear wheel is removed or installed.
Be extra careful in these situations to prevent damage to the chain and chain guard.
Check the Batter y and Batter y Lock
Check that the battery lock is correctly and
completely engaged on the bicycle every time
before you ride it, and turn the battery lock to
t
h
e
r
e
d
“
O
N
.
”
T
h
e
r
e
i
s
a
r
i
s
k
o
f
acc
i
d
e
n
t
if
t
h
e
battery
is not secured with this lock, since the battery
may fall off from the battery mount.
Check the Operation of Brake System
Test the brakes before riding the bike every time. Check
the brake lever with 2 fingers. Pull the lever to make sure
the amount of force is adequate. The brake levers should
not touch the handle bar. The brake levers should always
keep a proper distance with the handle even with the
largest force your hands can provide.
Check braking system wearing
The brake discs, motor, couplings that spin rapidly and the nuts of axle become very hot after
frequent braking particularly on a descending road for an extended period of time, and there is a risk
of injury. Do not touch them until they are cooled off. Check that the brake shoes are installed and
test the brakes every time before you ride the bike:
•
A good disc has to be free of any wearing, grease and dirt.
•
All bolts shall be fastened at the current positions.
•
Make sure that brake cables are not entangled and check the cables for signs of cracking.
Check the Bolted Parts
Check that the following parts are tightly secured every time before you ride a bike:
•
C
h
e
c
k
t
h
e
c
o
u
p
l
e
r
o
f
f
r
o
n
t
w
h
ee
l
q
u
i
c
k
r
e
l
e
a
s
e
i
s
s
e
c
ur
e
d
i
n
p
l
ac
e
a
n
d
t
h
e
w
o
r
d
“
CL
O
S
E
D
”
i
s
clearly visible. It shall notrotate.
•
Check that the rear wheel and motor are installed and secured properly. All bolted connections
shall be fastened so tightly that they do not budge under extra pulling or pushing of the rear
wheel.
•
Check that handle bar and brake levers are secured in place. Itshall beimpossible to rotate the
handle bar and brake levers.
•
Make sure that the saddle and seat post are secured in place. The attempt to pull or incline the
saddle shall not cause it to move.
•
Checkthattheluggage carrierissecuredinplace.
•
All bolted connections shall befastenedsecurely.
E
n
g
li
s
h

11
ATTENTION
Check all below joints are locked to the end correctly
1.Folding Fork Lock
2.Folding Stem Lock
3.Rear Suspension Lock
Please make sure that the folding fork joint/folding stem joint must be completely locked to
the end correctly. Any extra push and pull will not move it unless the safety lock is properly
released according to the correct unlocking steps. Please be sure to confirm it carefully,
otherwise there will be an accidental risk.
Please make sure that the rear suspension joint must be completely locked to the end correctly.
Any extra push and pull will not move it unless the safety lock is properly released according to
the correct unlocking steps. Please be sure to confirm it carefully, otherwise there will be an
accidental risk.
Control

12
Adjust the Saddle, Grips and Brake Levers
If you pull the seat post and the seat tube is too far away, the screw clamp may not support the
seat post safely. In bad weathers, the seat post will be slacking or damaged. This will lead to a
risk of accident and injury. Do not exceed the minimum insert depth when pulling the seat post.
•
adjust saddle height and position Minimum
insert depth: the seat post has to be inserted at
l
e
a
s
t
10
c
m
(
3
.
9
”
)
i
n
t
o
t
h
e
s
e
a
t
t
u
b
e
n
o
m
a
tt
e
r
how it is marked. Adjust based on personal
needs. Do not go beyond the maximum range
shown when moving the saddle back and forth.
Adjust the grips, brake levers and gear change levers Adjust the handle bars so that they fit snugly
in your hands, and move them to the position that fits you. Adjust the brake levers so that they
make proper contact with the handle bars. A proper distance shall be kept between the handle bar
and brake lever.The gear change lever is located below the handle bar where your thumb can easily
control.
When braking hard by pulling the brake levers towards the handle bars, you should not push the
braking force to its upper limit. Or, the braking distance will be extended and there is a risk of
accident. Adjust the brake levers as mentioned above.
Instrument Control
The use of the e-bike gauge while riding the bike will cause distraction in traffic, compromise your
control on the e-bike and possibly result in accident. Use the gauge only when the traffic allows it. If
this is not possible, just park the bike somewhere safe before dealing with the gauge.
O
N
:
M
a
k
e
s
ur
e
t
h
a
t
t
h
e
b
a
tt
e
r
y
i
s
i
n
s
t
a
ll
e
d
o
n
t
h
e
b
i
k
e
a
n
d
t
h
e
b
a
tt
e
r
y
l
o
c
k
i
s
s
w
i
t
c
h
e
d
t
o
“
O
N
(
r
e
d
)
.
”
T
h
e
s
c
r
ee
n
s
t
a
r
t
s
t
o
d
i
s
p
l
a
y
.
C
h
e
c
k
t
h
a
t
t
h
e
s
y
s
t
e
m
i
s
o
n
.
T
h
e
i
n
s
t
rum
e
n
t
e
n
t
e
r
s
the main page
as shown, including speed, assistance level, battery power, total distance and calorie.
Note: the instrument backlight will turn off automatically in 10 seconds to save power.
O
FF
:
S
w
i
t
c
h
t
h
e
b
a
tt
e
r
y
l
o
c
k
t
o
“
O
FF
(
w
h
i
t
e
)
”
a
n
d
t
h
e
i
n
s
t
rum
e
n
t
d
i
s
p
l
a
y
w
ill
t
urn
o
ff
.
C
h
e
c
k
that
the system is off.
Note: for increased safety, turn the lamps on every time you turn on the system. It is
recommended to ride the bike with lamps on.
E
n
g
li
s
h

13
Usage
Enters the main screen and provides the user's required riding
information including power level, speed, riding distance, battery
usage, time, calories, cadence, total mileage, remaining distance, etc
Press the button on the left side of HMI to switch
the brightness of the screen. There are three sections.
Please adjust it according to the usage situation
Press the button on the right side of HMI to
switch between different ride information displays.
As battery remaining indicator, each section represents 20% capacity.
For example, the remaining capacity was displayed as followings:
5 sections : 100%
1 section : 20%
1 section with flashing : below 10%
1 section with battery icon flashing : below 5%
Switch button use
[ ][ ] [ ]
Press the button
[ ]to enter the information settings, such as
speed, trip, calories, cadence, total mileage, remaining distance,
etc. Use [ ] 或[ ] to adjust the option and press the [ ]
button to set the completion.
Use [ ] or [ ] the set assist level can be adjusted
※
[ ] : Increase [ ] : Decrease. The assist mode has
four segments, including 0-1-2-3 segments and S Smart Mode
Information Select
•Speed : The speed of the bike.
•Trip : A total distance during a trip.
Calorie : The exhausted calorie
during a trip.
•Power :The inputting human power
•RPM : The cycling cadence
•ODO : Total experienced distance
•MAX : The maximum speed during a
trip.
•AVG : The average speed during a trip.
•Range : A remaining range which
is estimated by recent riding
behavior and environment.
14
Function Settings
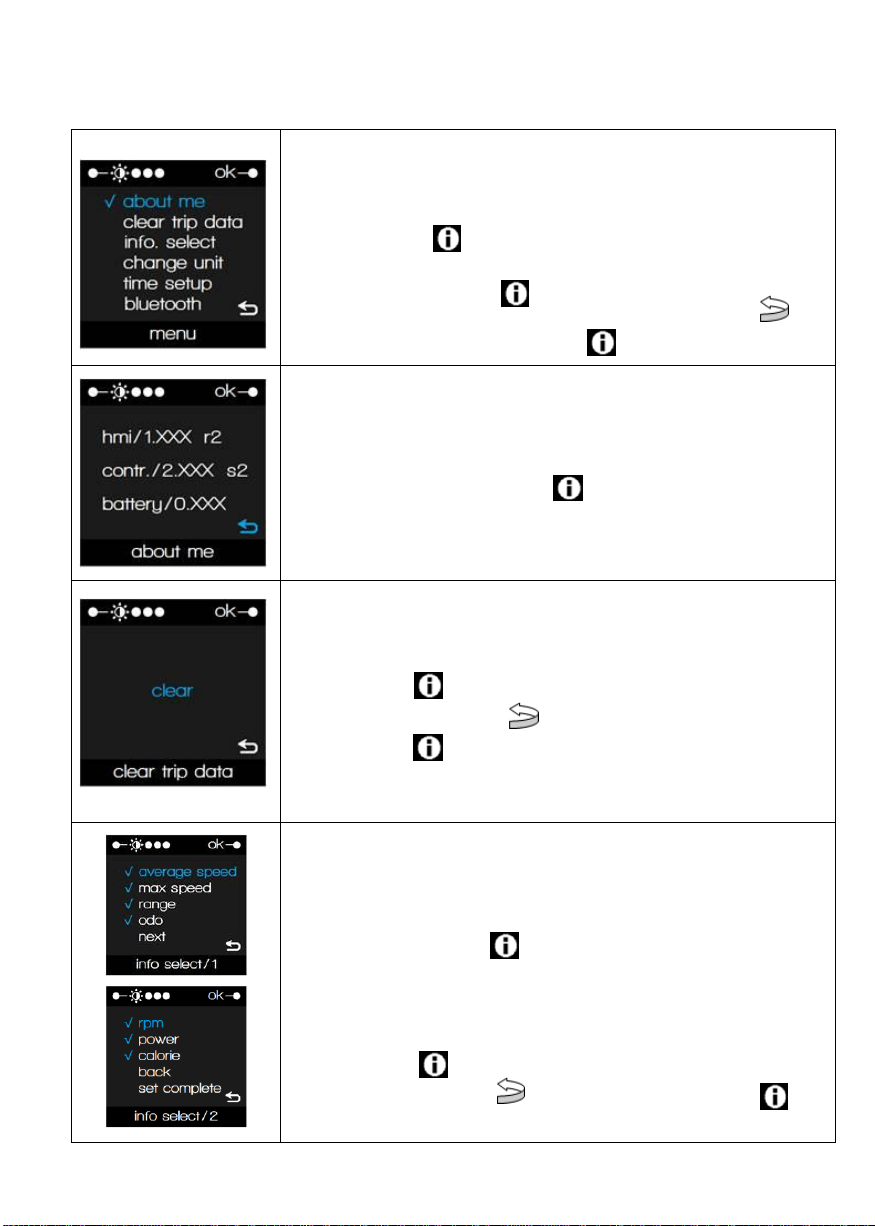
The menu page
This page is a menu of all the function settings of system
To enter this menu page, please long-press the information
button
After entering the menu page, you can use "assistance mode +"
and "assistance mode –" to change the selection, and press the
information button again to enter the next page.
If you want to leave menu page, please move your selection to
and press the information button to return main page.
About me
This function is to show the software information of controller,
HMI and battery.
Press the information button
go back main menu page.
Clear trip data
This function is for clearing trip record
Move the selection to the "clear" and then press the information
button
Move the selection to and then press the information
button to go back main menu page.
Clearing trip data will also clear "calorie", "Max speed", "Average
speed" information.
Information select
With Info selection, you can multi-choose you mostly used
information to show on main display.
Move the selection to information you want, and then press the
information button to select. You can do this repeatedly until all
your necessary information is selected
You can choice page 1 and page 2 of info selection by select
"next" and "back".
Move the selection to "set complete" and then press the information
button to complete the setting.
Move the selection to and then press the information button
go back main menu page.

15
Change unit
This function is for changing the displayed unit.
Move the selection to the unit you want and then press the
information button
Move the selection to and then press the information
button go back main menu page
Time Setup
This function is for changing 12/24 hours method to represent.
Move the selection to select "24h" or "12h" and then press the
information button
Move the selection to the "hours" and then press the information
button . The "hours" will start to flash and be able to
adjusted by "assistance mode +" or "assistance mode –" buttons.
When you finish the adjustment, please press the information
button again to confirm.
You can adjust the "minutes" as the same process as "hours", and
then press the information button to finish the setting.
Move the selection to and then press the information
button
go back main menu page.
Bluetooth
This function is to enable the Bluetooth to connect with smart
phone device.
Move the selection to select "on" to enable Bluetooth, or "off " to
disable Bluetooth, and then press the information button
to finish the setting.
Move the selection to and then press the information
button
go back main menu page.

16
•
Battery power indication: This provides the information of how much is left in your battery
when the system is on. The battery sign on the screen will tell you how much power is left.
When you see a full battery and the word FULL, the battery is 100% charged. The following
illustration shows how much power is left.
Control of Front and Rear Lamps
The use of the e-bike gauge while riding the bike will cause distraction in traffic, compromise your
control on the e-bike and possibly result in accident.
Use these gauge only when the traffic allows it. If this is not possible, just park the bike somewhere
safe before dealing with the gauge. The gauge support on the e-bike is designed exclusively for this
purpose and does not work on other products. Its adjustment requires appropriate tools. Make sure
that the gauge sits squarely and securely in the support.
Notes for Kickstand
The stand is not designed to support human weight. Do not sit on the e-bike while it is parked on the
stand. When the e-bike is not in use, put it on the stand or it will fall down, which leads to the risk of
accident and injury. Lift the stand when pushing or riding the bike.The e-bike may fall down and
become damaged if parked on a downward slope or soft ground. Park the e-bike on solid ground
whenever it is possible.
Keep an eye on the stand. If you are pushing the bike backwards while the stand is extended, the
pedals will rotate backwards and get caught with the stand. To prevent this, lift the stand before
moving the bike forwards or backwards.
E
n
g
li
s
h

17
Notes for rear luggage carrier (optional)
A loaded luggage carrier will alter the characteristics of riding the bike. The ability of riding or
braking will be weakened, and the braking distance, as well as the risk of accident, will increase.
•
Keep the center of gravity of your load as low as possible. Riding a bike with lower center of
gravity of a heavier load is faster than with a lighted load.
•
Bend you body when making a turn and be careful while doing it.
•
Consider a longer braking distance.
•
Keep in mind the added weight when stopping or parking the bike.
Poorly placed load may fall off the carrier, and worse, the falling object may get caught by the rear
wheel or chain, causing serious accident and injury.
•
Transport loads only using an electric bike with a luggage carrier or wire net.
•
Always secure the object you are about to carry, or the object may fall off causing accident and
injury.
•
Always check before every trip that the rear luggage carrier is securely fastened, or the carrier
may separate from the bike and fall off, causing risk of accident and injury.
•
Check that the screws holding the luggage carrier are secured before every trip.
•
Do not modify the luggage carrier and its fixing points.
If the luggage carrier is overloaded, the cargo may fall off the bike, causing the risk of accident
and injury.
The maximum weight allowed on the luggage carrier is 10kg (22lbs). When carrying objects on the
luggage carrier of the e-bike, make sure that the tail light and reflectors are clearly visible to others
on the road. The rear luggage carrier on the e-bike is not designed to carry a person or child.
Therefore, passenger is not allowed.
Riding Manual Electric Power
Levels for Electrically Assisted Riding
In case of slippery pedals or riding on a slippery surface, the rear wheel may skid and lose traction
when you accelerate, and there is a risk of accident. Please turn the pedaling assistance off when
on a smooth or slippery surface. The Darad Innovation electrically assisted bike is designed to
provide assistance when you pedal hard. The motor is turned off when you stop pedaling.
The pedaling assistance is turned off if you exceed the maximum aided speed (depending on
countries). The assistance power depends on the level of assistance you select. The higher the
level you select, the less force you have to apply to maintain a specific speed. By pushing the left
pedal, the rpm sensor will receive the pedaling force more effectively and the power controller
system is activated more quickly for your aid. This gives you an advantage when riding on an up
slope.
E
n
g
li
s
h

18
None Riding on leveled ground / with tail wind
2 Riding on an up slope or against the winds
Brake System
The Darad Innovation Electrically Assisted Bikes are all equipped with mechanical disc brake of the
same level. It brings you quick and safe stop if necessary. The disc brake reacts much quicker than
drum brake particularly on slippery roads. The mechanical disc brake gives you very good braking
results with only very little force from your hands. To evenly distribute the braking force in both
wheels, please brake both wheels at the same time. The following are some notes for braking the
bike:
•
On a slippery road, the friction is reduced between the surface and tires. The water reduces the
braking effects of the brake shoes and disc. As a result, the braking distance will be longer and
there is a risk of accident.
•
When riding ona wet surface, brake early to keep a longer braking distance. Beextra careful not
to allow the brake to lock the wheels up.
•
The rear wheel may be airborne when you hit the front brake too hard, and there is a risk of
accident.
•
Always slow down or stop the bike with both the front and rear brakes. Carefully maintain your
balance during a sudden brake.
The motor-assisted pedals are brake-controlled (or if you stop pedaling) for interruption. If you are
not yet familiar with the braking power of the mechanical disc brake, please do so on a surface with
good traction and away from traffic. Avoid braking consecutively. When on a long down slope, use
both brakes in a steady burst of short braking actions. The brakes will cool down when you apply
them intermittently. Stop the bike at any sign of overheating. The symptoms of overheating include
extra braking force required, a concentration of burning smell and loud noises.
Allow the braking system to cool down before riding. A wet condition reduces the braking effect and
easily causes the tires to skid.
Always keep a longer braking distance on a wet road surface. Ride slowly and brake carefully.
Wearing of Brake System
The wearing of brake shoes and discs is the result of friction. The more you ride the bike in a
mountainous terrain or in rain or mud, the more worn the bike will be. The wearing of brake shoes
and discs cannot be evaluated from the brake rods alone. Therefore, it is necessary to check before
riding. Always go to a qualified distributor for replacement of brake shoes.
Replacement of new brake pads
New brake shoes must be inserted when they reach their best braking performance. To do that, you
need to accelerate the bike up to 25km/hr (15.5mph) and apply the brakes. The replacement is
done when the force you apply to the brakes stop reducing.
3 Riding ona very steep slope oragainst high winds
Assistance level Riding condition
1 Riding on a leveled surface
E
n
g
li
s
h

19
Batter y Protection Mode
For any of the following, the battery will switch to the protection mode:
•
The bike has not be used for two months.
•
The battery has depleted and not charged within one week.
When the battery is in the protection mode, you need to start the battery after a complete charging
cycle.
Notes for Battery
The following instructions helps improve the longevity of battery:
•
Ideally, the battery should becharged at20°C (68°F). Please allow plenty of time for the battery
to reach this temperature before charging.
•
Avoid frequent discharging completely. It is preferred to discharge locally. Li batteries are not
known for the memory effect. Loss of capacity after a period of use is common in every Li
battery. The oxidation of cores occurs as the result of long period of use and aging, and leads to
loss ofcapacity.
•
Deep discharging of a battery will lead toirreversible damage and loss of capacity. If the battery
is expected not to be used for an extended period of time, it is advised to charge the battery to
its full capacity at least every 3 months.
Important Safety Notes for Batter y Charging
•
Ifthe power cable or plug is damaged, wet ordirty, there is a risk of electric shock or even mortal
injury.
•
Use only the battery charger delivered with the product.t.
•
Use only dry charger, undamaged power cable and charger.
•
Replace damaged power cable and charger immediately.
•
Remove any possible foreign object from the charging socket, such as dusts, ice or snow before
plugging in.
•
Using any battery charger other than the one delivered with the product may cause overheating
of the battery or even a risk of explosion.
•
Deep discharging of battery may result in internal damage.
•
There is a fire risk if the temperature of battery rises up to a dangerous level.
•
Avoid deep discharging of battery while in use or storage.
•
If not in use, the battery should be charged fully at least every 3 months.
•
Do not expose the battery in a storage temperature lower than -20°C (-4°F) or higher than 60°C
(140°F). Please note that the internal structure of battery may be overheated to damage due to
high temperature greater than 60°C, particularly exposed to direct sunlight.
•
Do not use the charger at a humid place or an ambient temperature lower than -10°C (14°F) or
higher than 40°C (104°F).
•
Do not put the battery in water.
•
The battery and charger are maintenance-free. Do not attempt to disassemble or modify the
battery orcharger.
•
Do not expose the battery to high voltage.
•
It is advised not use battery with damaged casing.
•
Keep the battery out of children's reach.
E
n
g
li
s
h

20
•
If you detect that the battery becomes very hot, emits a strong odor, starts to deform or
performs in an unexpected way while in use, being charged or in storage, please stop using the
battery immediately
•
The battery and charger should be placed on fire-retardant surface while charging is in
progress. If you are charging the battery while it is still mounted on the bike, make sure that the
bike is parked on an incombustible surface.
•
Do not charge the battery while it is on a carpeted floor.
•
Do not cover the battery or the charger while charging is in progress.
Notes for Batter y Charger
The charger provided is suitable for voltage ranging from 100V to 240V. The charger does not have
to be switched to the associated voltage range, as it detects the voltage automatically. There is no
on/off switch on the charger. Make sure to unplug for energy saving if no charging is required.
Connect the Charger
Connect the battery charger as illustrated. Connect the charger to the battery and the shining red
indicator light on the charger indicates the charging is underway. It takes approximately 5 hours to
fully charge the battery. Once the battery is charged, the green indicator light on the charger will
light up. While the battery is being charged on the bike and you wish to check how much it is
charged, you may turn the system on and the instrument will show the battery level. If you are done
charging, disconnect the charger from the battery before removing the power plug from power
socket.
•
There is no on/off switch on the charger. Make sure to unplug
for energy saving if no chargin is required.
•
Do not pedal the bike while the battery is being charged, or
there is a risk of damaging the charging socket on the bike.
•
The battery can be charged onboard or independently.
Do not move or pedal the bike while the battery is being charged
onboard.
Install the Batter y
The battery is not safe if the lock cylinder of battery is not
connected correctly. The battery may fall out of the battery seat
while riding and this could produce a risk of accident.
Connect the battery charger as illustrated. Connect the charger to
the battery and the shining red indicator light on the charger
indicates the charging is underway. It takes approximately 6 hours
to fully charge the battery. Once the battery is charged, the green
indicator light on the charger will light up. While the battery is
being charged on the bike and you wish to check how much it is
charged, you may turn the system on and the instrument will show
the battery level. If you are done charging, disconnect the charger
from the battery before removing the power plug from power
socket.
Store the Battery
To remove the battery, pull the clip up as shown in the picture, or the battery cannot be removed.
Always place the battery on a stable foundation with the charging socket facing upwards, or the
charging socket and connector plug to the battery seat may be damaged in other way.
•
Deep discharging of the battery may lead to internal short-circuiting, and the battery may
become very hot, resulting in a fire hazard.
•
Avoid deep discharging of battery while it is in use or storage.
•
If not in use, the battery should be charged fully at least every 3 months.
E
n
g
li
s
h
Other manuals for PSF1
1
Table of contents
Other BESV Scooter manuals


