Betonwaren Zehdenick Novus Operator's manual

2007-02 | info: betowa-zehdenick.de
Novus / Decus
1
5.1
10
7.2
7.4
8
6
2.1
4
5.2
2.2
7.3
9.2 9.1
7.1
3
Modell
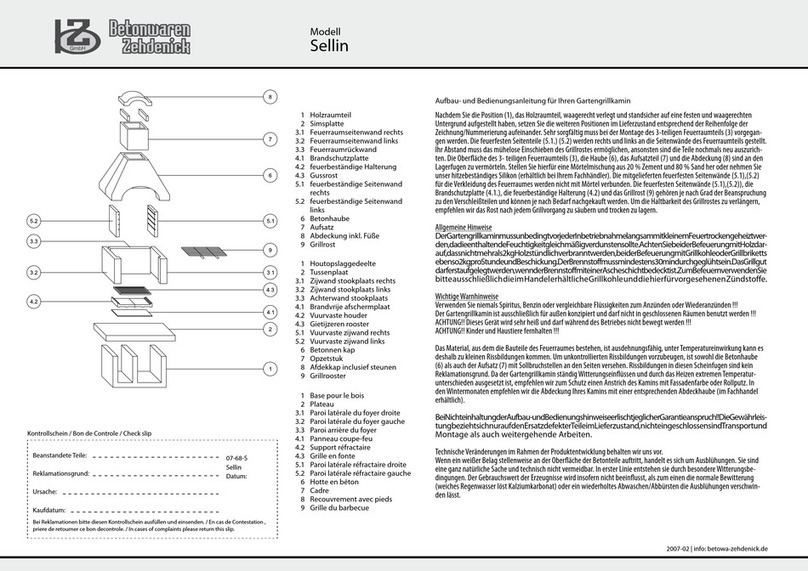
Nachdem Sie die Position (1),das Holzraumteil waagerecht und standsicher auf einen festen Untergrund aufgestellt haben,
setzen Sie die Feuerraumrückwand (3) und anschließend die Feuerraumseitenwände (rechts/links) (2) auf das Holzraumteil.
Zur Befestigung der Rückwand mit den Seitenteilen verwenden Sie bitte die mitgelieferten 2 Stück Montageklammern
(Pos.4), diese werden entsprechend der Skizze positioniert. Das mitgelieferte Grillrost (10) muss in jedem Fall in die
vorgesehenen Aussparungen der Feuerraumseitenwände geschoben werden und passen, ansonsten sind dieTeile vor der
weiteren Montage nochmals auszurichten. Jetzt können Sie die 2teilige Simsplatte (5) in die vorgesehenen Aussparungen
des Feuerraumteils einschieben.
Die Abbrandplatten (6) (Auageächen für die Holzkohle) werden auf die Simsplatte gelegt. Die Haube (7) besteht aus 4
Teilen. Die Haubenrückwand (7.1) wird auf die Rückwand des Feuerraumteils (3) gestellt und die Stirnseiten mit einem
Silikonstreifen versehen (siehe Markierung), die Seitenteile (rechts/links) (7.2) und (7.3) der Haube werden auf die Seiten-
wände des Feuerraumteils gestellt und gegen die Rückwand (7.1.) gedrückt. Jetzt werden die Stirnseiten der Seitenteile
mit einem Silikonstreifen versehen und dasVorderteil der Haube (7.4) ca. 1 - 2 Minunten darauf angedrückt.
Hinweis! Silikon darf nicht auf die Sichtbetonächen kommen, da sonst eine Haftung von Farbe oder Putz problematisch
wird. Auf die zusammengesetzte Haube kann nun der Aufsatz(8) und als Abschluss die Abdeckung (9) montiert werden.
Wir empfehlen die Lagerfuge zwischen Haube und Aufsatz mit Mörtel 1cm dick aufzutragen. Die Abbrandplatten und das
Grillrost gehören je nach Grad der Beanspruchung zu den Verschleißteilen und können je nach Bedarf nachgekauft werden.
Um das Grillrost vor Flugrost zu schützen, muss es nach jedem Grillen und Abkühlen gesäubert und vor Feuchtigkeit
geschützt aufbewahrt werden.
Allgemeine Hinweise
DerGartengrillkaminmussunbedingtvorjedemGrillvorganglangsammitkleinemFeuertrockengeheiztwerden,
damitdieindenBauteilenenthalteneFeuchtigkeitgleichmäßigverdunstet.UmMaterialschäden(Rissen)
vorzubeugen,achtenSiebeiderBefeuerung,sowohlmitGrillkohle-Brikett,alsauchanschließendmitHolz,
sorgsamdarauf,dassnichtmehrals2KgdesjeweiligenEnergieträgersproStundeverbranntwerdendürfen.
ZumBefeuernverwendenSiebitteausschließlichdieimHandeldafürvorgesehenenBrennstoe.
DasGrillgutdarferstdannaufgelegtwerden,wennderBrennstoffmindestens30Minutenlangdurchgeglüht,
und mit einer Ascheschicht bedeckt ist.
Achtung! wichtigeWarnhinweise
Verwenden Sie niemals Spiritus oder Benzin oder vergleichbare Flüssigkeiten zum Anzünden oderWiederanzünden!
Der Gartengrillkamin ist ausschließlich für außen konzipiert und darf nicht in geschlossenen Räumen benutzt werden!
ACHTUNG! Dieses Gerät wird sehr heiß und darf während des Betriebes nicht bewegt werden.
ACHTUNG! Kinder und Haustiere fernhalten. Um die Sicherheit und den optimalen Abzug zu gewährleisten, stellen Sie Ihren
Gartengrill mindestens 5 m von Häusern, Hecken, beziehungsweise brennbaren Gegenständen auf.
Da der Gartengrillkamin ständigWitterungseinüssen, und durch das Heizen extremenTemperaturunterschieden,
ausgesetzt ist, empfehlen wir zum Schutz des Kamins Fassadenfarbe oder Fassadenputz. In denWintermonaten empfehlen
wir die Abdeckung Ihres Kamins mit einer entsprechenden Abdeckhaube (im Handel erhältlich).
BeiNichteinhaltungderAufbau-undBedienungshinweiseerlischtjeglicherGarantieanspruch!
Die Gewährleistung bezieht sich nur auf den Ersatz defekter Bauteile im Lieferzustand.
Nicht eingeschlossen sind Transport und Montage als auch weitergehende Arbeiten.
Technische Veränderungen im Rahmen der Produktentwicklung behalten wir uns vor.
Wenn ein weißer Belag stellenweise an der Oberäche der Betonteile auftritt, handelt es sich um Ausblühungen. Sie sind
eine ganz natürliche Sache und technisch nicht vermeidbar. In erster Linie entstehen sie durch besondereWitterungs-
bedingungen. Der Gebrauchswert unserer Erzeugnisse wird dadurch nicht beeinusst, da die normale Bewitterung
(weiches Regenwasser löst Kalziumkarbonat) oder ein wiederholtes Abbürsten die Ausblühungen verschwinden lässt.
Wir wünschen Ihnen viel Spaß mit Ihrem Gartengrill.
Base pour le bois
Parois latérales du foyer
droite/gauche
Paroi arrière du foyer
Brides de xation
Tablette moulée
(en 2 parties)
Plaques de combustion
Souche en béton
(en 4 parties)
Couronnement
Chapeau ou
Chapeau
grill
Holzraumteil
Feuerraumseitenwände
links/rechts
Feuerraumrückwand
Montageklammern
Simsplatte (2-teilig)
Abbrandplatten
Betonhaube (4-teilig)
Aufsatz
Abdeckung oder
Abdeckung
Grillrost
Houtopslagruimte
Zijwanden van de
stookruimte links/rechts
Achterwand van de
stookruimte
Bevestigingsklemmen
Lijst (tweedelig)
Brandplaten
Betonnen kap
Opzetstuk
Afdekking of
Afdekking
grillrooster
Aufbau- und Bedienungsanleitung für Ihren Gartengrillkamin
1
2
3
4
5
6
7
8
9.1
9.2
10
1
2
3
4
5
6
7
8
9.1
9.2
10
1
2
3
4
5
6
7
8
9.1
9.2
10
Kontrollschein / Bon de Controle / Check slip
Beanstandete Teile:
Reklamationsgrund:
Ursache:
Kaufdatum:
Bei Reklamationen bitte diesen Kontrollschein ausfüllen und einsenden. / En cas de Contestation ,
priere de retourner ce bon decontrole. / In cases of complaints please return this slip.
07-19-No
07-21-D
Novus / Decus
Datum:
oder / of / ou

2007-02 | info: betowa-zehdenick.de
Après avoir posé la base pour le bois (1) horizontalement de façon très stable sur une surface en dur, placez le dos
du foyer (3) puis les parois latérales du foyer (droite/gauche) (2) sur la base pour le bois. Pour xer le dos aux parois
latérales, veuillez utiliser les brides métalliques fournies (4). Ces brides (4) doivent être positionnées conformément
au croquis.
Vous pouvez maintenant insérer les tablettes moulées en deux parties (2) dans les creux du foyer prévus à cet eet.
Les plaques de combustion (6) (surfaces de contact pour le charbon de bois) doivent être posées sur la tablette moulée.
La souche (7) est constituée de 4 éléments. Posez le dos de la souche (7.1.) sur le dos du foyer puis enduire les bords avant
de silicone (voir le marquage), posez les éléments latéraux (droite/gauche) (7.2 et 7.3) de la souche sur les parois latérales
du foyer et pressez contre la paroi latérale (7.1). Enduire ensuite les bords avant des éléments latéraux de silicone et
appliquer ensuite le devant de la souche (7.4).
REMARQUE : La silicone ne doit pas déborder sur les surfaces visibles en béton, faute de quoi la peinture ou le crépi
risqueraient de ne pas adhérer.
Vous pouvez maintenant monter le couronnement (8) sur la souche assemblée puis le chapeau (9).
Nous recommandons de lier la souche, le couronnement et le chapeau au mortier au niveau des joints. Les plaques de
combustion et le grill sont des pièces d’usure qui peuvent être rachetées en cas de besoin. Pour protéger le gril contre la
rouille, il doit être nettoyé une fois refroidi après chaque utilisation et conservé à l’abri de l’humidité.
Conseils généraux
Lebarbecuedejardindoitabsolumentêtreséchéparchauffageàpetitfeu,puisquel’humiditédoits’évaporerde
façonhomogène.Lecombustibledoitavoirbrûlépendantaumoins30min.Lesalimentsàgrillernedoiventêtre
posésquelorsquelecombustibleestrecouvertd’unecouchedecendres.Pourl’allumage,veuillezutiliser
exclusivement les matières inammables prévues à cet eet disponibles dans le commerce.
Attention! Avertissements importants
N’utilisez en aucun cas de l’alcool à brûler ou de l’essence ou des liquides de ce type pour allumer ou rallumer le barbecue!
Le barbecue de jardin est uniquement conçu pour l’extérieur, il est interdit de l’utiliser dans des pièces fermées! Cet appareil
chaue énormément et il ne faut pas le déplacer pendant qu’il fonctionne.
Tenir les enfants et animaux domestiques éloignés.
Etant donné que le barbecue de jardin est constamment exposé aux intempéries et à des diérences de températures
extrêmes en raison du chauage, nous conseillons d’utiliser de la peinture pour façades ou du crépi pour le protéger. Dans
les mois d’hiver, nous recommandons de recouvrir votre barbecue d’un couvercle adapté (en vente dans le commerce).
Lenonrespectdesconseilsdemontageetd’utilisationentraînel’extinctiontotaledelagarantie.
Lagarantieconcerneuniquementleremplacementdespiècesdéfectueusesaumomentdelalivraison.
Letransportetlemontageainsiquelestravauxultérieursnesontpascomprisdanscettegarantie.
Nous nous réservons le droit de procéder à des modications techniques dans le cadre du développement
des produits.
Les couches blanches pouvant se former à certains endroits sur la surface des éléments en béton sont des
eorescences. Il s’agit d’un phénomène naturel techniquement inévitable principalement dû à des conditions
climatiques particulières. La valeur d’usage des produits ne s’en trouve pas aectée puisque les intempéries
normales (l’eau de pluie douce dissout le carbonate de calcium) mais aussi un lavage à l’eau répété permettent
de faire disparaître ces eorescences.
Nous vous souhaitons de passer de bons moments grâce à votre barbecue de jardin.
Notice de montage et mode d’emploi de votre barbecue de jardin
Nadat u het onderdeel (1), de houtopslagruimte horizontaal en stevig op een vaste ondergrond heeft opgesteld, zet u a.u.b.
de achterkant van de stookruimte (3) en vervolgens de rechter- en linkerzijwanden van de stookruimte (2) op de
houtopslagruimte.Ter bevestiging van de achterwand met de zijwanden gebruikt u a.u.b. de bijgeleverde metalen
klemmen (4). Zij (4) worden volgens de schetsen in positie gebracht.
Nu kunt u de tweedelige lijst (5) in de daarvoor bedoelde uitsparingen van de houtopslagruimte schuiven.
De brandplaten (6) (draagvlakken waarop het houtskool ligt) worden op de lijst gelegd.
De betonbedekking (7) bestaat uit vier delen. De achterwand van de betonnen kap (7.1) wordt op de achterwand van
de houtopslagruimte gezet en de voorkanten worden voorzien van een siliconen strook (zie markering), de zijwanden
(rechts/links) (7.2 en 7.3) van de betonnen kap) worden op de zijwanden van de houtopslagruimte geplaatst en tegen de
achterwand (7.1) gedrukt. Nu worden de voorkanten van de zijwanden voorzien van een siliconen strook en de voorkant
van de betonnen kap (7.4) erop gezet.
AANWIJZING! Silicon mag niet op de zichtbare betonvlaktes komen, omdat dan een aanhechting van verf of bepleistering
moeilijk wordt.
Op de in elkaar gezette betonnen kap kan nu het opzetstuk (8) en tenslotte de afdekking (9) gemonteerd worden.
Wij raden aan om de voegen tussen de betonnen kap, het opzetstuk en de afdekking met mortel op te vullen.
De brandplaten en de grillrooster zijn al naar gelang van de graad van de belasting aan slijtage onderworpen en
kunnen later na behoefte vervangen worden. Om de grillrooster voor vliegroest te beschermen, dient het na elk
gebruik en na het afkoelen schoongemaakt en op een droge plek bewaard te worden.
Algemene aanwijzingen
Detuingrilldientiniedergevalbijkleinvuurdrooggestooktworden,omdatdevochtigheidvanbinnengelijkmatig
moetverdampen.Debrandstofmoetminstensdertigminutendoorgegloeidzijn.Hethoutskoolmagerpas
opgelegdworden,wanneerdebrandstofmeteenlaagasbedektis.Voorhetstokenmaguuitsluitenddeinde
handel verkrijgbare aanmaakblokjes gebruiken.
Attentie! Belangrijke waarschuwingen
Gebruikt u a.u.b. nooit spiritus of benzine of vergelijkbare vloeistoen voor het aansteken!
De tuingril is uitsluitend gemaakt voor gebruik in de buitenlucht en mag niet in gesloten ruimtes gebruikt worden!
Dit toestel wordt erg heet en mag tijdens het gebruik niet bewogen worden. Kinderen en huisdieren op afstand houden.
Aangezien de tuingrill voortdurend is blootgesteld aan ongunstige weersomstandigheden en aan extreme
temperatuurverschillen door het stoken, bevelen wij u ter bescherming van de tuingrill aan om deze met buitenverf
of een bepleistering te bewerken. In de wintermaanden bevelen wij u aan om de tuingrill met een geschikt dekzeil
(in de handel verkrijgbaar) af te dekken.
Bijnietinachtnemingvandemontage-engebruiksaanwijzingverliestdeaanspraakopgarantiezijn
geldigheid!!Degarantieclaimheeftalleenbetrekkingopdevervangingvandefectebouwelementenin
leveringstoestand.Nietinbegrepenzijntransportenmontagealsookverdergaandmontagewerk.
Technische veranderingen in het kader van de productontwikkeling onder voorbehoud.
Indien er op sommige plekken een witte laag op de oppervlakte van het betonnen gedeelte verschijnt, is er sprake van
verwering. Dit is een geheel natuurlijk verschijnsel en is technisch niet te vermijden. In eerste plaats ontstaat een verwering
door bijzondere weersomstandigheden. De gebruikswaarde van de tuingrill wordt hierdoor in zover niet beïnvloed, als
de verwering enerzijds door normale weersinvloeden (zacht regenwater lost calciumcarbonaat op) of anderzijds door het
herhaaldelijke wassen de verwering verdwijnen doet.
Wij wensen u veel plezier met uw tuingrill.
Montage- en gebruiksaanwijzing voor de tuingrill
Novus / Decus
Modell

2007-02 | info: betowa-zehdenick.de
Novus / Decus
1
5.1
10
7.2
7.4
8
6
2.1
4
5.2
2.2
7.3
9.2 9.1
7.1
3
Modell
Section for storing wood
Side sections of the hearth
left/right
Back wall of the hearth
Mounting clamps
Shelf (two-part)
Hearth grates
Concrete hood (four-part)
Top piece
Cover or
Cover
Barbequing grille
1
2
3
4
5
6
7
8
9.1
9.2
10
Check slip
Defective parts:
Reason for complaint:
Cause:
Purchase date:
In the event of complaint, please complete and send this check slip.
07-19-No
07-21-D
Novus / Decus
Date:
or
First of all place the lower section of the grill designed for storing wood (1) on a level and stable surface; then t the back
wall of the hearth (3) onto this lower section followed by the side walls of the hearth (right and left) (2). Use the two
mounting clamps (4) supplied to secure the back wall to the side walls; the location of these can be seen on the illustration.
It must be possible in all cases to insert the barbequing grille (10) into the grooves in the side walls of the hearth; if this is
not possible, the individual parts must be adjusted before continuing with assembly. After this, you can slide the two-part
shelf (5) into the prepared niches in the hearth area.
Place the hearth grates (6) (areas for placing charcoal) on the shelf. The chimney hood (7) is made up of 4 sections. Place
the back wall of the hood (7.1) on the back wall of the hearth (3) and ax a silicon strip to the front side (as indicated in
the illustration). Place the side sections (right and left) (7.2) and (7.3) of the hood on the side walls of the hearth and press
them into the back wall (7.1.). Ax silicon strips to the front side of the side sections, press the front section of the hood
(7.4) onto these and hold in place for 1 - 2 minutes.
Warning!The silicon must not be visible on the outer surface of the concrete sections as good adhesion would not be
achieved due to paint or plaster. The top piece (8) can then be placed on the assembled hood and nally the cover (9).We
recommend that you seal the aperture between the hood and the top piece with mortar 1 cm thick. The hearth, barbequing
grille and hearth grate are subject to wear, the intensity of which depends on the level of use. If necessary it is possible to
purchase these parts and replace them.
Protect the barbequing grille from rust lm by cleaning it after every use and storing it to protect against the eects of
moisture.
General information
Thegardengrillmustalwaysbepre-heatedbeforeeverybarbequingsessionwithasmallameinorderforthe
moisturecontainedinitsassembledpartstobeevenlyevaporated.Youcanavoiddamagingthegrill(cracks)by
thoroughlyadheringtotheprinciplethatwhenusingcharcoal–briquettes–aswellaswood,youshouldnotburn
morethan2kgofmaterialperhour.Onlyusematerials,whichyoucanregularlybuyintheshopsforbarbequing.
Onlystartplacingthefoodyouwishtobarbequeintothegrill30minutesafterthefuelhasbeenburningwhenitis
covered with a light dusting of ash.
Warning! Important notice
Never use alcohol, petrol or similar substances when igniting or kindling the re!The garden grill is intended for outside use
only and it is forbidden to use the grill in an enclosed area!
WARNING!This product heats up to high temperatures and must not be moved during operation.
WARNING! Make sure that children and household pets do not have access to the grill. In order to ensure safety and
optimum drawing through the hood, position the garden grill at least 5 m from residential buildings, bushes and ammable
items.
Because the garden grill is permanently exposed to the eects of the weather and due to operation, to extreme uctuations
in temperature, we recommend you protect the grill with a façade coating or façade plaster. We recommend you cover the
grill during the winter months with a suitable cover (available in the shops).
The guarantee will be forfeit if you do not adhere to these instructions for assembly and use!
The guarantee only applies to possible replacement of damaged parts on delivery.
The guarantee does not include transportation, assembly or any other activities.
We reserve the right to technical changes in terms of further development of the product.
If a white coating appears on the surface of the concrete sections, this concerns eorescence.
This is a natural phenomenon, which cannot technically be prevented.This mainly occurs due to the eects of the weather.
This in no way aects the utility value of your product because the eorescence will disappear due to the regular eects of
the weather (weak rainfall dissolves the calcium carbonate) or can be removed by repeated brushing.
We wish you a lot of fun using your garden grill!
Instructions for assembly and use of the garden grill

2007-02 | info: betowa-zehdenick.de
Nejprve postavte spodní část krbu určenou pro ukládání dřeva (1) na vodorovnou, stabilní plochu; na tuto spodní část
nasaďte nejdříve zadní stěnu topeniště (3) a potom boční stěny topeniště (pravou a levou) (2). Pro zpevnění zadní stěny s
bočnicemi použijte dodané 2 kusy montážních svorek (4); jejich umístění vyplývá z obrázku. Grilovací rošt (10) musí být v
každém případě možné zasunout do drážek v bočních stěnách topeniště; není-li to možné, je zapotřebí jednotlivé díly před
další montáží sestavit znovu. Poté můžete zasunout dvoudílnou římsu (5) do připravených výklenků v prostoru topeniště.
Ohništní rošty (6) (plochy pro naložení dřevěného uhlí) položte na římsu. Odkouření (7) se skládá ze 4 dílů. Zadní stěnu
odkouření (7.1) postavte na zadní stěnu topeniště (3) a čelní strany opatřete silikonovou páskou (jak je vyznačeno na
obrázku). Boční díly (pravý a levý) (7.2) a (7.3) odkouření postavte na boční stěny topeniště a přitiskněte k zadní stěně
(7.1.). Dále na čelní strany bočních dílů umístěte silikonové proužky, přitiskněte k nim přední část odkouření (7.4) a přidržte
asi 1 - 2 minuty.
Upozornění! Silikon nesmí přijít na vnější pohledové plochy betonových dílů, protože vlivem barvy nebo omítky by nebylo
dosaženo dobré přilnavosti. Na takto smontované odkouření pak lze umístit nástavec (8) a nakonec kryt (9). Štěrbinu mezi
odkouřením a nástavcem doporučujeme utěsnit maltou v síle 1 cm. Ohništní rošty a grilovací rošt podléhají opotřebení,
jehož intenzita je závislá na míře jejich namáhání, a v případě potřeby je možné je dokoupit a vyměnit.
Grilovací rošt chraňte před náletovou rzí tak, že jej po každém grilování vyčistíte a
uschováte před možným působením vlhkosti.
Všeobecné informace
Zahradníkrbjetřebapředkaždýmgrilovánímvždybezpodmínečněrozehřátnamalémohni,abysevlhkost
obsaženávjehomontážníchdílechrovnoměrněodpařila.Předcházejtepoškozeníkrbu(praskliny)tím,žebudete
důslednědodržovatzásadu,podlekterésejakpřipoužívánígrilovacíhouhlí-briket,taktakédřeva,nesmíspalovat
vícemateriálunež2kgzahodinu.Progrilovánípoužívejtevýhradněmateriályběžnědostupnévobchodech.
Potravinyurčenékegrilováníjedovolenodokrbuvkládatnejdřívepo30minutáchprohořenípaliva,kdyjepokryto
jemnou vrstvou popela.
Pozor! Důležité upozornění
Při zapalování nebo rozhoření nikdy nepoužívejte líh, benzín nebo podobné látky! Zahradní krb je určen výhradně pro
venkovní použití a je zakázáno jej používat v uzavřených prostorách!
POZOR!Tento výrobek se zahřívá na vysoké teploty a za provozu je zakázáno s ním manipulovat.
POZOR! Postarejte se, aby ke krbu neměly přístup děti a domácí zvířata. Aby byla zajištěna bezpečnost a optimální tah,
postavte zahradní krb do vzdálenosti nejméně 5 m od obytných domů, křovisek a hořlavých předmětů.
Protože je zahradní krb trvale vystaven povětrnostním vlivům a v důsledku provozu extrémním výkyvům teplot,
doporučujeme chránit krb fasádním nátěrem nebo fasádní omítkou.V zimních měsících doporučujeme krb zakrýt vhodným
krytem (k dostání v obchodě).
Při nedodržení návodu k montáži a obsluze záruka zaniká!
Záruka se vztahuje jen na případnou výměnu poškozených dílů při dodání.
Záruka nezahrnuje přepravu, montáž nebo jakékoli jiné činnosti.
Vyhrazujeme si právo technickým změn v rámci dalšího vývoje produktu.
Pokud se na povrchu betonových dílů místy objeví bílý povlak, jedná se o prokvétání.
Jde o přirozený projev, kterému nelze technicky zabránit. Dochází k němu především vlivem povětrnostních podmínek.
Užitnou hodnotu našich výrobků to nikterak neomezuje, protože běžnými účinky podnebí (slabý déšť rozpouští uhličitan
vápenatý) nebo opakovaným kartáčováním výkvěty zase mizí.
Při používání zahradního krbu vám přejeme mnoho radosti!
Návod k montáži a obsluze zahradního krbu
Novus / Decus
Modell
1
5.1
10
7.2
7.4
8
6
2.1
4
5.2
2.2
7.3
9.2 9.1
7.1
3
díl pro ukládání dřeva
boční díly topeniště levý/pravý
zadní stěna topeniště
montážní svorky
římsa (dvoudílná)
ohništní rošty
betonové odkouření (čtyřdílné)
nástavec
kryt nebo
kryt
grilovací rošt
1
2
3
4
5
6
7
8
9.1
9.2
10
Kontrolní doklad
Reklamované díly:
Důvod reklamace:
Příčina:
Datum zakoupení:
V případě reklamace vyplňte a odešlete tento kontrolní doklad.
07-19-No
07-21-D
Novus / Decus
Datum:
nebo
This manual suits for next models
1
Table of contents
Languages:
Other Betonwaren Zehdenick Grill manuals
Popular Grill manuals by other brands
ICON
ICON XR702 MAXIS owner's manual
Vermont Castings
Vermont Castings Signature VCS5037 User's manual & assembly
Captiva Designs
Captiva Designs E02GR016 Use and care guide

Napoleon
Napoleon CARBON PRO CART Assembly, use and care manual
SEVERIN
SEVERIN RG 2682 - RACLETTE GRIL Instructions for use
Char-Broil
Char-Broil 463250510 Product guide
