Outdoors MG880 User manual


Mounting Brackets, MG880 Marine Grill
For Stand Alone Operation:
Remove pins holding
arms in position.
Rotate arms as shown.
Replace pins
For Boat Attached Operation:
Remove pins holding
arms in position.
Rotate arms as shown.
Replace pins
Connecting Gas Line Or Bottle Adapter, All Models
For Coach Connection:
Locate hose connecting
fuel system from coach.
Slide retaining sleeve
back.
Push female coupler onto
male coupler.
Release retaining sleeve.
For Stand Alone Connection:
Locate AD500
Regulator / Adapter.
Slide retaining sleeve
back.
Push female coupler onto
male coupler.
Release retaining sleeve.

Horizontal Position (See Figure A)
Hang bracket on white aluminum mounting strip located on
side of RV.
Open 2 folding arms on bracket, make sure they lock in
position.
Slide grill onto 2 arms, make sure grill is fully on arms,
against stops.
Insert retaining pins into arms
To remove grill, simply slide Side-Kick off of bracket arms.
Note that boat models will be above the bracket top instead
of below as shown.
Figure 'A'
Horizontal Position
Tabletop Position (See Figure B)
Open 2 folding arms on bracket, make sure they lock in
position.
Place bracket on clean flat surface with arms pointing
upward.
Slide grill upright onto 2 arms, make sure grill is fully on
arms, against stops.
To remove grill, simply slide Side-Kick off of bracket arms.
Figure 'B'
Tabletop Position

Lighting Your Grill
NOTE: Follow the setup instructions prior to using your grill.
Check to make sure the control knob is in the OFF position.
Open hood.
Push control knob down and rotate counterclockwise to HIGH.
Using a grill lighter or match, light the burner through the lighting hole
located on the bottom of the grill.
Once burner is lit, adjust control valve to desired cooking temperature.
WARNING:
Always open hood before turning on gas and lighting burner, failure to open
the hood before lighting could cause an explosion causing property damage,
injury, or even death.
Burner Flame Pattern
The Side-Kick burner has been factory set for the correct air and gas
mixture. The correct flame pattern is shown below.
Dark Blue
Light Blue
Tips Occasionally Yellow

Re-Lighting Your Side-Kick
Should your burner flame be accidently extinguished.
Immediately make sure the control knob is in the OFF position.
Open hood (If not already open).
Wait 5 minutes for accumulated gas to clear.
Push control knob down and rotate counterclockwise to HIGH.
Using a grill lighter or match, light the burner through the lighting hole
located on the bottom of the grill.
Once burner is lit, adjust control valve to desired cooking temperature.
WARNING:
Always open hood before turning on gas and lighting burner,
failure to open the hood before lighting could cause an explosion
causing property damage, injury, or even death.
Removing Burner and Venturi Tube
1. Turn Side-Kick bottom side up.
2. Remove screw “B”(see diagram below) Do Not Lose Washer.
3. Turn nut “A” (see diagram below) counter clock wise until burner
and tube are free.
4. To install new burner and tube, reverse steps #2 and #3.
A
B
•Important - Venturi tube must fully engage valve orifice for
nut A to fully engage threads on venturi tube.
•Nut A must be turned to full length of threads.

Parts Breakdown
Cooking Grid
Valve Assembly
Handle Assembly (1 of 3) (comes with all hardware)
Bracket Assembly
If parts not listed here have failed then the grill must be replaced.
When calling Outdoors Unlimited for parts, please provide the model number and name of part.


** To check for leaks on the AD-500 and DOT-39, use a solution of 1 part dish soap detergent to 10 parts water.
Agitate solution until bubbles form and apply to all fittings. If a leak is detected and you are unable to correct,
return unit to dealer for repair.
DO NOT USE A BUTANE LIGHTER, PROPANE OR MAP GAS TORCH OR ANY OTHER SOURCE OF
FLAMABLE GAS OR LIQUID. DOING SO COULD CAUSE SERIOUS INJURY OR DEATH.
Maintenance
Keep appliance area clear and free of any combustible materials,
gasoline and other flammable vapors and liquids.
Not obstructing the flow of combustion and ventilation air.
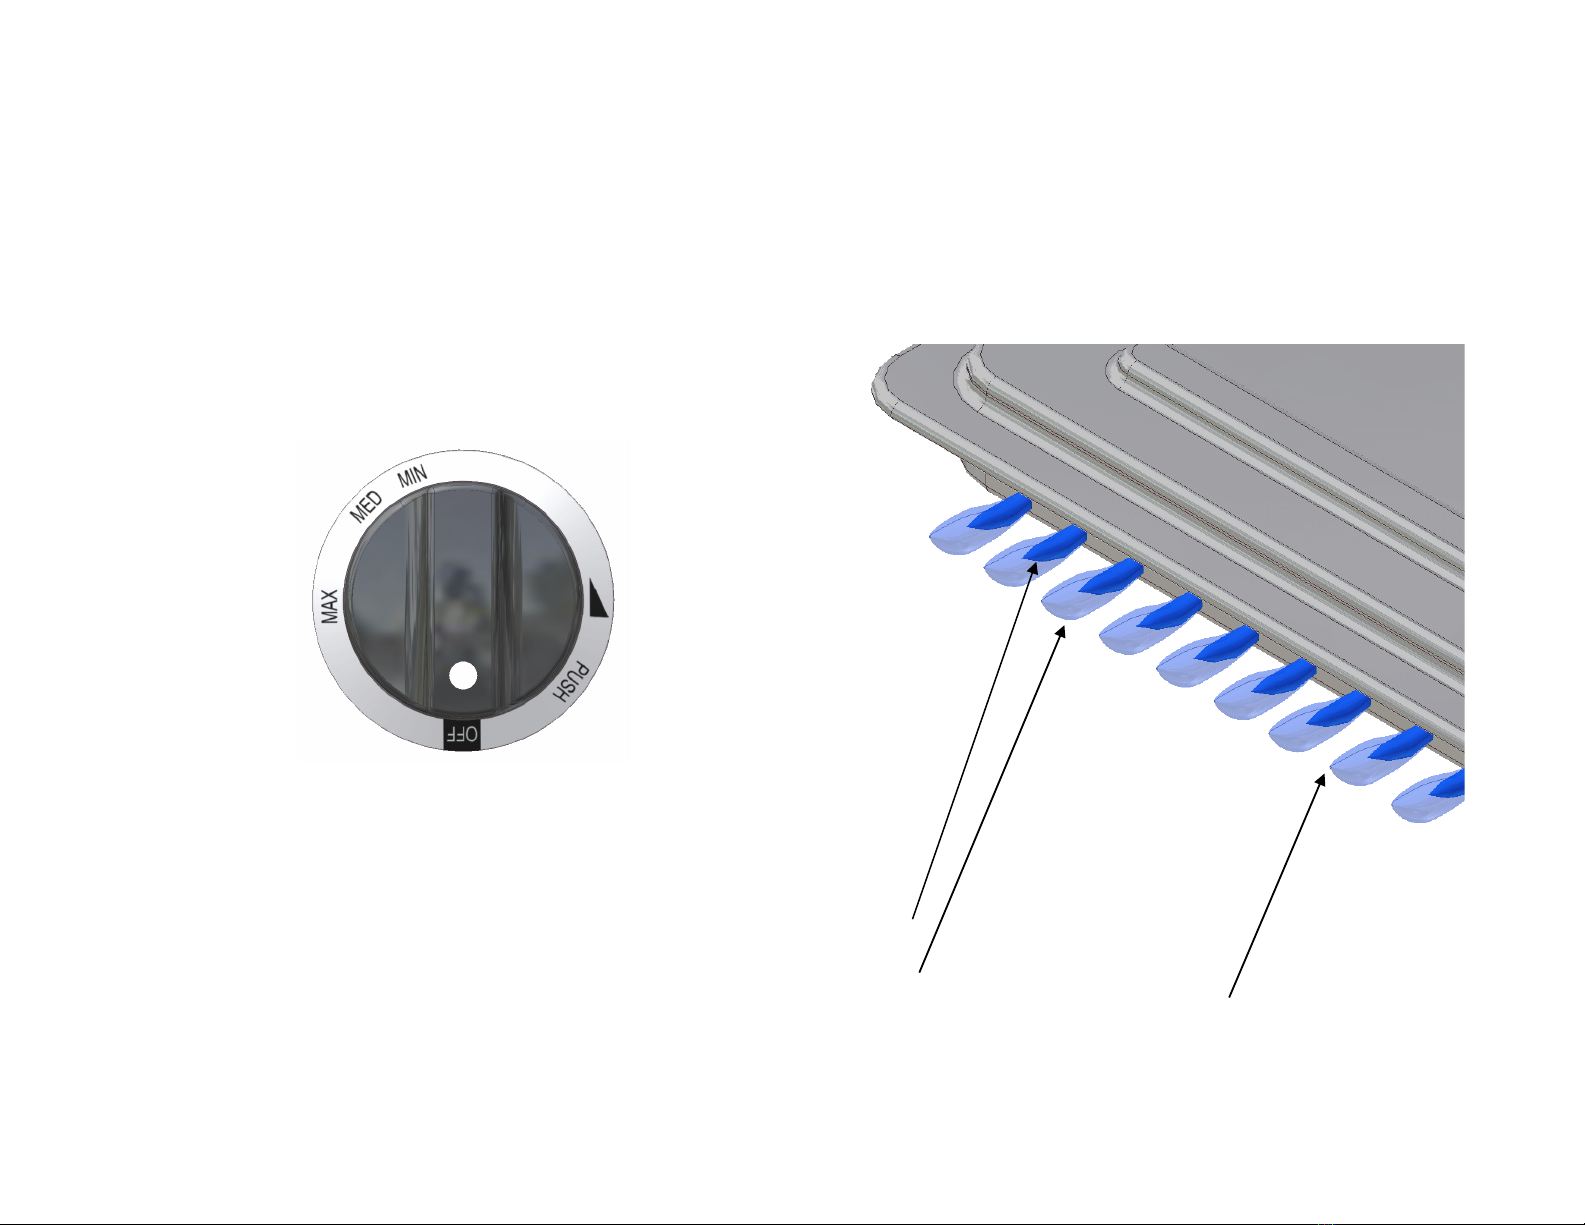
Visually check burner flames.
Grill should be cool to the touch before cleaning and storing.
After each use of the grill, the appliance must be cleaned.
To reduce the risk of a grease fire, always clean the drip tray and
remove any grease from the inside of the grill using warm
soapy water. The outside of the appliance can also be wiped
down with warm soapy water.
Use a brass bristled barbecue brush to scrub the stainless steel
cooking grates, not a steel bristled wire brush.
DO NOT use any cleaning solvents or abrasives to clean the grill.
Before each use always check/clean burner/venturi tubes for insects
and insect nests. A clogged tube can lead to a fire beneath the
appliance.
To check for gas leaks on hose or grill, use a solution of 1 part liquid
dish detergent to 10 parts water. Agitate solution until
bubbles form, then apply to all fittings and inlet to grill
control valve. If a leak is detected and you are unable to
correct; return unit to the dealer for repair.
The appliance and its individual shutoff valve must be disconnected
from the gas supply piping system during any pressure testing
of that system at test pressures in excess of ½ psi (3.5kPa).
The appliance must be isolated from the gas supply piping system
by closing its individual manual shutoff valve during any pressure
testing of the gas supply piping system at test pressures equal to or
less than 1/2psi (3.5kPa).
Replacement Parts
DO NOT RETURN to RETAILER if Merchandise
is Broken or Parts are Missing
Please Call:
Customer Service Department
1-888-226-9850
for Replacement
Thank You,
Outdoors Unlimited
2101 Industrial Parkway
Elkhart, IN 46516
This manual suits for next models
4
Table of contents