Big Bear Chopper 2009 User manual

BIG BEAR CHOPPERS STRONGLY RECOMMENDS THAT
YOU READ AND UNDERSTAND THE MATERIAL BEFORE
YOU RIDE YOUR NEW BIG BEAR CHOPPER MOTORCYCLE.
YOUR BBC MOTORCYCLE IS A THING OF BEAUTY, BUT
MORE, IT’S A MACHINE THAT REQUIRES YOUR ATTENTION
EVERY NOW AND THEN FOR OPTIMUM MOTORCYCLE LIFE,
PERFORMANCE AND SAFETY.
Version 7/30/08

SECTION 1 General Information
1.0 Warranty Registration
1.1 Starting Your Bike
1.2 Initial Break-in Procedure
1.3 Vehicle Identication
1.4 General Safety Tips
1.5 Kit BIkes and Rolling Chassis
SECTION 2 Major Components
2.0 Handlebar Controls
2.1 Shifting System
2.2 Braking System
2.3 Electrical System
2.4 Fuel System
SECTION 3 Maintenance & Storage
3.0 Inspection Overview
3.1 Fluids Inspection
3.2 Wheel/Tire Inspection
3.3 General Inspection
3.4 Drivetrain Overview
3.5 Trouble Shooting
3.6 Maintenance Overview
3.7 Maintenance Schedule
3.8 Maintenance Records
3.9 Storage
3.10 General Cleaning
SECTION 4 Warranty
4.0 Warranty
4.1 Kit Bikes and Rolling Chassis
4.2 Reporting Safety Defects
4.3 Notice of Warranty Dispute Resolution
SECTION 5 Warnings
5.0 Warnings

We want to say thank you for purchasing a Big
Bear Chopper. With your purchase comes a
commitment on our side to provide you with
support and professional customer service
for you and your bike. We developed this
Owner’s Manual to acquaint you with the
care and maintenance of your motorcycle
and to provide you with important safety
information. These instructions were put
together for the safety, performance and
pleasure of riding your Big Bear Chopper.
We want to acquaint you with your Big
Bear Chopper components. We want to
advise you of the break-in procedure
to obtain maximum life of your Big
Bear Chopper. Included in this manual
is a maintenance schedule and service
tips to maintain your bike properly. We
provide you with safety and riding tips
from seasoned riders. This manual
provides a central place to keep all
data, records, warranty info etc.
for your Big Bear Chopper. We
know how hard it is to read
product manuals, but we as-
sure you that it’s worth it.
Dig in...
Kevin & Mona Alsop
(Owners of BBC)

This manual should never leave the bike. If you decide to sell the bike, it should go with it in
order to provide a history of the bike and additional information to the new owner. This Owner’s
Manual was created for every bike in the eet. Some of the equipment described may not be
standard on your bike, but is on another. The information in this manual is based on the most
current production information available at the time of printing. Big Bear American Made Chop-
pers, Inc. reserves the right to make changes to their motorcycles without notice or obligation. As
a rst time owner of your bike, or a subsequent owner, complete the warranty registration form
and mail it in to us if your dealer has not done this for you
The engine and transmission identication numbers are assigned to the bike when it gets built.
These assigned numbers become a permanent part of the motorcycle’s identication. The en-
gine identication number can be located on the upper left of the engine case and the transmis-
sion identication number is found on the top righthand side of the case.
ENGINE IDENTIFICATION NUMBER:
TRANSMISSION IDENTIFICATION NUMBER:
VEHICLE IDENTIFICATION NUMBER [VIN]:
(stamped 17 digit number located between the regulator and engine on the front engine mount of the frame)
Owner’s Name: ______________________________________________________________
Address: ___________________________________________________________________
Phone: _____________________________________ Purchase Date: __________________
Vehicle Identification

2009 OWNER’S MANUAL [WARRANTY REGISTRATION]
TO REGISTER YOUR WARRANTY, PLEASE COMPLETE THIS WARRANTY DOCUMENT,
PHOTOCOPY AND MAIL TO BIG BEAR CHOPPERS ONLY IF YOU YOUR DEALER HAS
NOT DONE THIS.
BIG BEAR CHOPPERS
WARRANTY DEPARTMENT
PO BOX 1741
BIG BEAR LAKE, CA
92315
OWNER’S NAME ____________________________________________________________
ADDRESS __________________________________________________________________
CITY ____________________________________ STATE _______________ ZIP _________
PHONE ____________________________________EMAIL __________________________
VEHICLE IDENTIFICATION NUMBER (VIN)
(stamped 17 digit number located between the regulator and engine on the front engine mount of the frame)
YEAR & MODEL OF YOUR BIKE________________________________________________
DATE OF PURCHASE ________________________________________________________
MILES AT PURCHASE ________________________________________________________
BUILDER OF YOUR BIKE______________________________________________________
SIGNATURE OF OWNER ______________________________________________________
PURCHASE PRICE ___________________________________________________________
WARRANTY IS TRANSFERABLE ONLY WITH AUTHORIZATION FROM BIG BEAR CHOPPERS, INC.
1.0 Warranty Registration

COLD STARTING PROCEDURE FOR CARBURETED MODELS:
Make certain the bike is in neutral.
Turn fuel petcock to the ON position.
Turn ignition switch to the ON position.
Depress handlebar ENGINE STOP switch to the RUN position.
Prime the motor with two twists of the throttle.
Lift up on carburetor enrichener half way.
Depress start button for no more than ve seconds at a time until the engine starts.
Keep the engine running at fast idle or 1500 RPM using the throttle.
Depress the enrichener back to the pre-start position when the engine has achieved a constant
and steady speed.
If the enrichener is left in the starting position, the spark plugs will foul, causing poor engine per-
formance and / or failed engine start.
Allow engine to warm approximately one to two minutes before riding.
NOTE: A battery discharges up to 2% per day when idle. If your motorcycle is not ridden for ap-
proximately for a month, the battery may not have sufcient charge to start your motorcycle.
Big Bear Choppers does not recommend using a standard automotive battery charger as battery
failure is not covered under warranty.
HOT ENGINE START:
Use the same procedure as cold start. Do not prime the engine with two (2) twists of the throttle
and do not engage the carburetor enrichener.
SHUTTING DOWN:
Use the ENGINE STOP SWITCH on the right handlebar to shut off the engine. Turn the ignition key
switch to the “OFF” position. Turn the fuel petcock to the “OFF” position.
1.1 Starting and Stopping your Engine
COLD STARTING PROCEDURE FOR ELECTRONIC FUEL INJECTED MODELS:
Make certain the bike is in neutral.
Turn ignition switch to the ON position.
Depress handlebar ENGINE STOP switch to the RUN position.
Wait a few seconds until the fuel lines are pressurized.
Depress start button for no more than ve seconds at a time until the engine starts.
Allow engine to warm approximately one to two minutes before riding.
NOTE: A battery discharges up to 2% per day when idle. If your motorcycle is not ridden for ap-
proximately for a month, the battery may not have sufcient charge to start your motorcycle.
Big Bear Choppers does not recommend using a standard automotive battery charger as battery
failure is not covered under warranty.
HOT ENGINE START:
Use the same procedure as cold start.
SHUTTING DOWN:
Use the ENGINE STOP SWITCH on the right handlebar to shut off the engine. Turn the ignition key
switch to the “OFF” position.
1.1 Starting and Stopping your Engine

KEY SWITCH POSITIONS
There are two ignition key positions. When the key is horizontal, or sideways, the ignition is
OFF and you can take out the key in this position. Vertical, or up, the ignition is ON and the key
should not be able to be removed. After shutting down the engine, always turn the switch to the
OFF position. If you leave the ignition ON, the lights will run down the battery. Always lock the
ignition and remove the key from the bike when you leave. Don’t make it easy for somebody to
steel your bike. Because believe us, everyone wants your Big Bear Chopper!
ENGINE RPM CONTROL
During the break in period of your new motorcycle, gure out the relationship of the clutch and
the throttle. Try not to over-rev the engine (especially when shifting). Do not “speed shift” or shift
without using the clutch. The throttle should be closed and the clutch disengaged when shifting
gears either up or down. It’s very easy to exceed engine maximum RPM during acceleration in
rst and second gear.
The motorcycle should NOT be run for long periods at a constant RPM during the initial break in pe-
riod. Varying the RPM will help the engine during this crucial period and help prolong engine life.
1.2 Initial Break-in Procedure
CAUTION: If You Are Not An Experienced Rider,
Take Instruction from a Qualied Instructor Before
Riding Your Big Bear Chopper
If you leave your engine idling with inadequate airow over the engine, it may cause overheating
and permanent damage to the engine. Excessive stop and go riding and long periods of idling
should be avoided during the break-in period. Unlike an auto’s engine, your standard V-Twin
engine is air cooled. It relies on the constant ow of air from riding above rst gear.
INITIAL ENGINE BREAK-IN:
Your engine will give you excellent performance from the very rst miles. In the rst 3000 miles
of your new engine, all the internal component wear is critical. Obey the break-in guidelines to
assure future performance, durability, and to keep your warranty. You bought something you
will respect and cherish, so it is up to you to help protect that investment. It is your (the owner)
responsibility not to exceed the maximum RPMs during the break-in period.
FIRST 3000 MILES:
Do not rev higher than 4000 RPM at any time in or out of gear.
Do not lug the engine below 2000 RPM in any gear.
Follow the prescribed maintenance schedules.
Avoid riding at a constant RPM for a prolonged period of time.
Varying the RPM between 2000 and 4000 will prolong the life of your new engine.
AFTER 3000 MILES:
Follow the prescribed maintenance schedule located in Section 3 (Maintenance and Storage).
As the engine, drive train and other components wear with one another during the initial riding
period, lubricating uids collect small particles. So the rst 500-mile service is critical. It is rec-
ommended that you replace those lubricants to maximize the life and performance of your Big
Bear Chopper.
1.2 Initial Break-in Procedure
HEAT
The engine, drive train, exhaust pipes, etc. on your Big
Bear Chopper become very hot when the engine is
running and will remain way too hot to touch for some time after the engine is turned off. Make
sure that you, as well as any passenger you carry, wear clothing that will completely cover your
legs when riding.
EXHAUST HAZARDS
Motor exhaust contains carbon monoxide gas. Do not inhale exhaust fumes no matter how good
it smells, and never run the engine in a closed space like a garage or indoors.
GOOD JUDGEMENT
Safe riding is mental awareness and good judgement. Combine that with a defensive driving
attitude and you’re on your way to many miles on your bike.
SAFE SPEED
Ride your bike at a very manageable speed in and out of trafc until you have become very
familiar with your bike under all conditions. Different motorcycles ride different from each other.
Even though you might be riding for 3 decades, and you have the need for speed, be conserva-
tive on the throttle and in your riding style. We care about your safety and the safety of others
around you. If you are an inexperienced rider, we recommend taking a certied course on mo-
torcycle riding. Your local licensing bureau should be able to help nd an appropriate course.
ROAD CONDITIONS
Pay close attention to your environment. Please don’t ride when the weather is bad such as high
wind, heavy fog, rain, snow, ice or other factors that would make the ride dangerous. Know your
limitations and do not ride when the weather is beyond your skills or comfort zone. Be advised
that the rst 15 minutes of a rainstorm brings all oil and contaminations to the road’s surface
causing a slippery condition.
1.4 General Safety Tips Attention: Failure to read and follow
the cautions below may cause serious
Injury or death. Read carefully.
RIDING YOUR MOTORCYCLE
Make sure the kickstand is fully retracted before riding. If the kickstand is not in the fully locked
position against the frame rail, it could hit the road surface causing loss of control of the bike.
Your bike will shut off if you put it in gear while the kickstand is down. Make sure you are wearing
a D.O.T. approved helmet, eye protection, clothing and footwear suited for riding. Even though
wearing black is the only cool color to wear riding, bright or light colors are best for visibility in
trafc, especially when driving at night or in low light times. Please do not wear clothing that
may get tangled in any part of the bike, other vehicles or surrounding objects or that hinder the
operation of the controls. Never wear dark glasses at night or in low light situations. Shorts and
sandals are not a good choice while riding. Never ride under the inuence of drugs or alcohol.
PARKING YOUR BIKE
Park on solid and level ground. If you have to park on a slope, face the bike uphill and put it in
gear. If you don’t face the bike uphill while parked, it could cause the bike to tip over. Try not to
park on asphalt during an extremely hot day. The asphalt may give way under the load from the
kickstand causing your bike to go down. Ouch!
1.4 General Safety Tips

CARRYING TRAVEL GEAR
Overloading, particularly at the rear of a bike, can cause instability when you ride. Keep cargo
weight close to the bike and as low as possible to minimize the change of center of gravity. Dis-
tribute weight evenly on both sides of the bike and do not load big items or add weight to the
handlebars or front forks.
TRAILER TOWING
Do not tow a trailer behind your Big Bear Chopper for any reason.
Do not attempt “custom” alterations such as extended forks, installing a sidecar, lowering the
vehicle or anything else that would alter the safety. Those and other alterations to the bike will
have dangerous handling characteristics.
The addition of unauthorized accessories and additional weight to your Big Bear Chopper can
affect handling characteristics that can make for unsafe riding. Since we cannot test and make
recommendations with every accessory or combination of accessories, you must be respon-
sible for safe operation of the motorcycle when operating with accessories or carrying additional
weight.
The following guidelines should be used when equipping your Big Bear Chopper with accesso-
ries or carrying a passenger and cargo:
1. Big Bear Choppers’ motorcycles are carefully designed and manufactured to be ridden in
their original conguration or only with authorized accessories.
2. Unauthorized accessories that change the rider’s position may reduce reaction time and
effect the handling characteristics.
3. Overloading the bike may alter handling characteristics and reduce braking efciency.
4. Do not attempt “custom” alterations with the frontend, frame, fuel tank, oil tank, fender, and
all other components.
5. Attaching a sidecar is out of the question.
6. Modications and/or additional electrical equipment is not recommended. Any alterations of
the electrical system provided (turn signals, additional lighting, etc.) could cause an overload-
ing of printed circuits and void your warranty.
1.4 General Safety Tips
Contact Big Bear Choppers for repair of any steering or suspension system wear or damage.
Check out the shock absorbers and front forks for leaks. Worn out and damaged parts can affect
stability which results in an unsafe handling characteristics.
Use only authorized replacement fasteners and tighten them to the proper torque. Any other
fasteners can break and will void warranty and most importantly make the bike unsafe.
Riding your Big Bear Chopper is the coolest thing in the world. Guess what? Riding your bike is
risking your safety. To minimize any risk, consider these points...
1. Review and obey the operating and maintenance instructions in this manual.
2. Recognize and respect the “Rules of the Road.” Get a hold of a copy of your state’s “Motor-
cycle Handbook” and take them to heart.
3. Enroll in a Certied Rider Training Course.
4. Be sure to keep your Big Bear Chopper in proper riding condition that follows the maintenance
intervals chart in this owner’s manual. Particularly important to motorcycle stability is proper tire
pressure, tread condition, sound condition of wheel bearings and steering head bearings.
5. Do not operate a motorcycle with loose, worn or damaged steering or suspension systems.
1.5 Kit Bikes and Rolling Chassis
Your frame was designed and fabricated to ensure years of safe riding. DO NOT, UNDER ANY
CIRCUMSTANCES, grind or allow grinding of any weld for cosmetic or aesthetic purpos-
es associated with paint or powder coating of your frame. Grinding of welds will weaken the
structural integrity of your frame, void your warranty, and may cause catastrophic frame failure
which could lead to serious injury or death when operating the motorcycle.
1.4 General Safety Tips
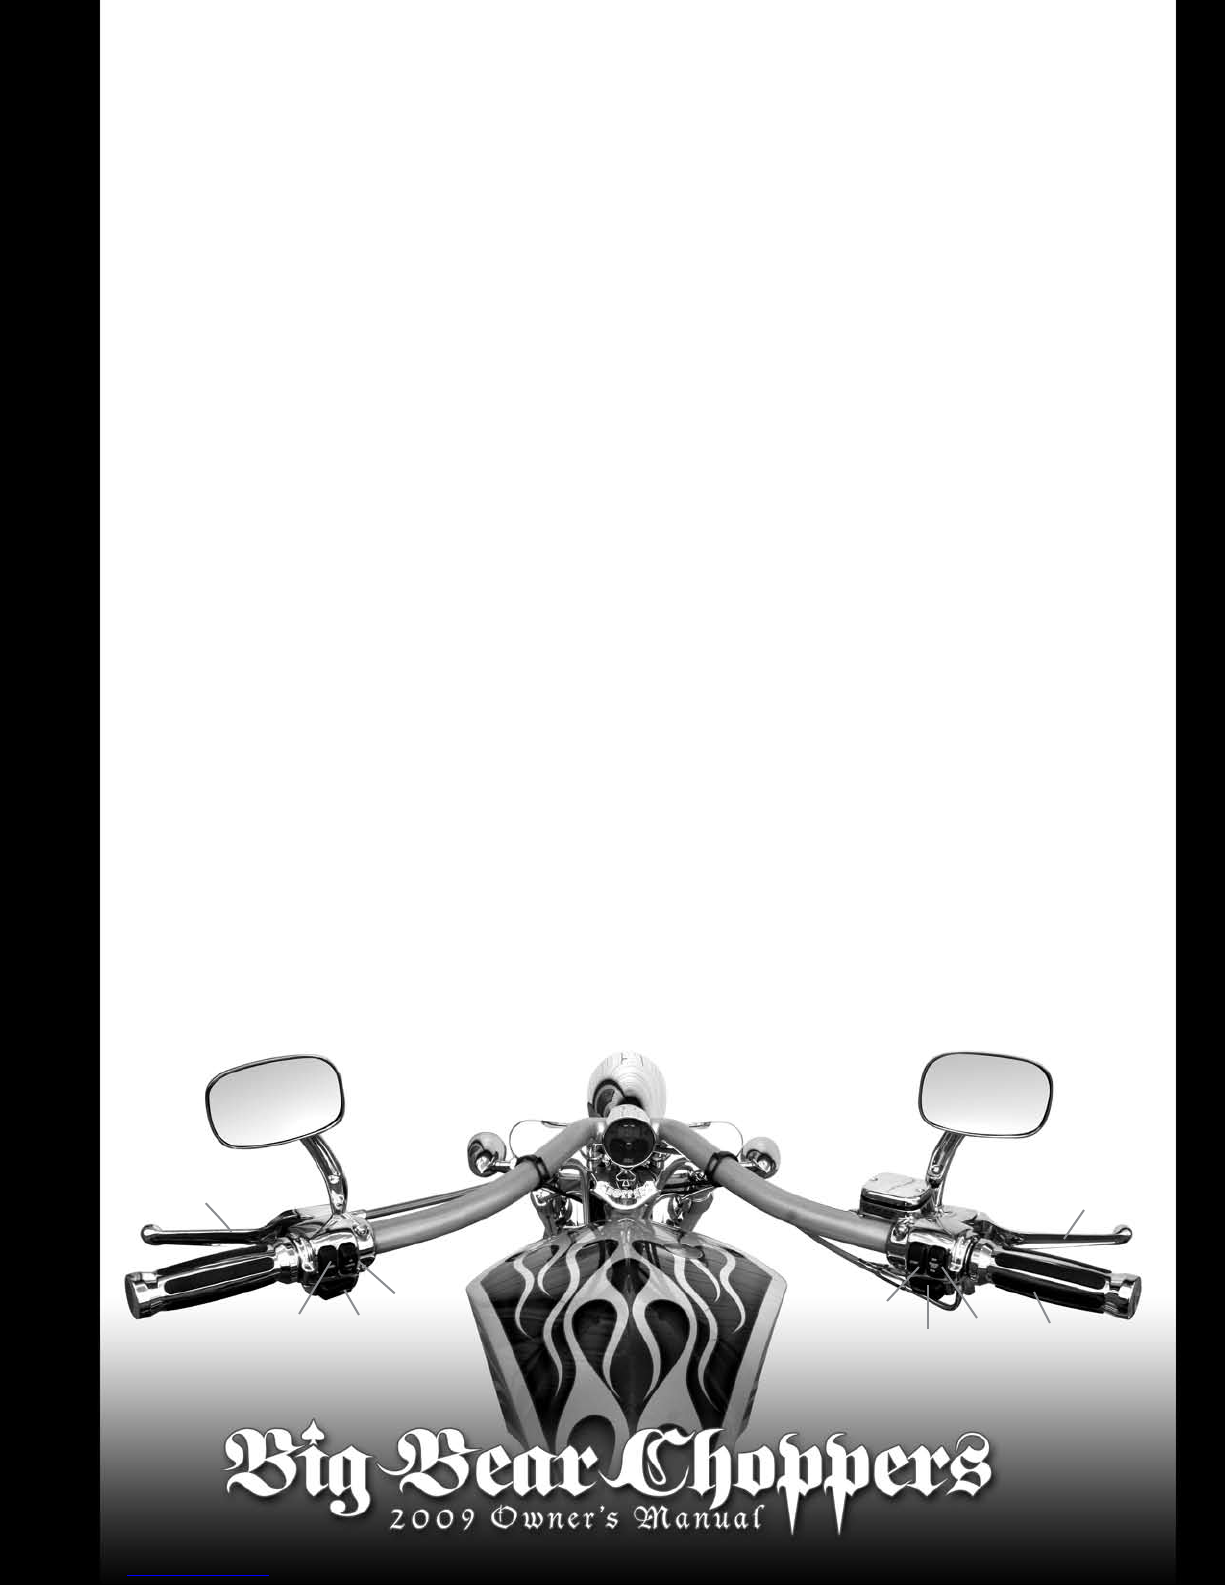
A. CLUTCH HAND LEVER:
The clutch hand lever is operated with the left hand. Pull the lever against
the handlebar grip to disengage clutch; release the lever smoothly outward to engage clutch.
B. HORN SWITCH: The horn is operated by depressing the horn switch.
C. LEFT TURN SIGNAL: The left turn signal is operated by the TURN-L switch.
D. HEAD LAMP HIGH/LOW SWITCH: The head lamp switch controls the head lamp high and
low beams.
E. ELECTRIC STARTER SWITCH: After the ignition key is turned to the ON position, press
RUN on the ENGINE STOP SWITCH before pressing the START SWITCH.
F. RIGHT TURN SIGNAL: The right turn signal is operated by the TURN-R switch.
G. ENGINE STOP SWITCH: The engine stop switch turns the ignition on or off and should be
used every time to stop the engine.
H. THROTTLE CONTROL GRIP: Turn the control grip counter clockwise to open the throttle
and clockwise to close it.
I. FRONT BRAKE HAND LEVER: The front brake hand lever is operated with the right hand.
Pull the lever in towards the handlebar grip to engage the front brake.
Adjust the mirrors before riding so that they clearly show the area behind the motorcycle. DO
NOT ADJUST while you are riding.
A.
B. C.
D. E.
F.
I.
G. H.
2.0 Handlebar Controls

GEAR SHIFTER
The gear shifter is located on the left forward foot control. There are six forward gears and no
reverse. Pushing the lever down shifts the transmission into the next lower gear while lifting
the shift lever shifts the transmission into the next higher gear. Most Big Bear Choppers come
equipped with a 6-speed transmission and a few come with 5-speeds. The rider must release
the gearshift foot lever after each gear change and allow the lever to return to its central position
before another gear change can be made. Neutral position is between rst and second gear.
To shift into neutral from rst gear raise the shift lever slightly until you feel a slight click. To shift
to neutral from second gear, reverse the procedure. If the motorcycle is not running, it may be
necessary to rock the bike backward or forward slightly with the clutch lever pulled in while main-
taining steady pressure on the shift lever to shift into neutral.
Do not force the transmission to shift. It may damage the shift lever or the primary drive train.
Do not ride with your foot on the gear shifter.
When upshifting or downshifting, the throttle should be closed and the clutch fully disengaged.
2.1 Shifting
CLUTCH
The purpose of the clutch is to engage and disengage the power from the engine to the trans-
mission. The clutch assembly is attached to the transmission input shaft. The outer basket of the
clutch includes an integral drive sprocket driven by the belt drive, and a ring gear for the electric
starter motors’ pinion gear to engage to start the engine. The clutch is operated by your hand
through a lever mounted on the left side handlebar. An improperly adjusted clutch cable can
cause clutch plates to overheat and/or warp. Clutch repairs and adjustments are a serious mat-
ter and is recommended to be xed by an authorized Big Bear Choppers Dealer.
CLUTCH ADJUSTMENTS
Maintaining the proper tension on the clutch cable is very important to the life of your bike’s
clutch. If the clutch cable is too tight, the clutch plates will not fully engage and will cause the
clutch to slip. If the clutch cable has too much slack, the clutch will not completely release and
may cause hard shifting, ‘vehicle creep’, overheating, warping of the clutch plates, and may
make nding neutral difcult.
The life of your clutch can be greatly prolonged by following these simple guidelines:
1. Resist the urge to “ride” the clutch by holding the clutch lever partially in.
2. When shifting gears, make sure the throttle is closed before you engage or disengage the
clutch.
3. Keep your ngers from between the clutch hand lever and the handlebar grip when pulling
in the lever so the clutch can fully disengage.
4. From a dead stop or at slow speeds in low gears, you should engage the clutch slowly. At
higher speeds and in higher gears, engage and disengage the clutch with a swift and purpose-
ful action.
2.1 Shifting

BRAKE PEDAL
The rear brake pedal is located on the right forward foot control. Do not ride with your foot rest-
ing on the brake pedal. This will cause premature wear of the brake pads and can reduce your
braking ability.
BRAKE PADS
Inspect at every service interval. The life expectancy is 1,500 to 2,500 miles under normal riding
conditions.
WHEN YOU BRAKE
Close the throttle while applying both brakes rmly and evenly while pulling in the clutch to
prevent the engine from stalling. “Riding” the brakes can overheat your pads reducing your
breaking power. Never ride with your foot resting on the brake pedal or your hand putting pres-
sure on the front brake lever except when stopping. Avoid prolonged brake application. This can
overheat the bakes and reduce their power. If you experience trouble with your brake system,
have it inspected by an authorized Big Bear Choppers Dealer.
FOR BIG BEAR CHOPPERS SPRINGER FRONTENDS
Be advised with a Big Bear Chopper Springer on your bike, your braking power may be reduced
by up to 50% compared to a telescopic style hydraulic frontend.
MAINTAINING BRAKE SYSTEM INTEGRITY
Keeping your braking system performance at top shape requires both master cylinder uid res-
ervoirs to be kept full of DOT5 brake uid. Having adequate wear surface on your brake pads is
just as important. Remember that the brake uid level will drop slightly as the brake pads wear.
Low brake uid level may allow air to enter the brake system causing it to feel “spongy” and
become ineffective. Inspect brake uid level and brake pads for wear frequently. Both front and
rear master cylinders should be lled to, but not above reservoir undercut.
2.2 Braking

BATTERY
The battery and some electrical components are located under the seat. Your motorcycle has a
maintenance free battery. You cannot check the battery electrolyte level or add distilled water as
you would with a conventional type battery. If your battery seems weak or causing slow starting,
charge the battery with an authorized motorcycle battery charger. Any attempt to open the bat-
tery is very dangerous and will void the warranty. Battery posts and terminals contain lead and
lead compounds. Wash your hands thoroughly after handling.
The electrical system supplies power to all the various components of your bike. The electrical
system can be broken down like this:
1. Starting
2. Ignition
3. Charging
4. Lighting
It is best to take your bike to an authorized Big Bear Choppers Dealer if you have any electrical
problems.
IGNITION
Adjusting the ignition timing on your Big Bear Chopper without proper knowledge could lead to
engine damage and void your warranty. If your bike exhibits any of the following symptoms, the
ignition timing may need diagnostic analysis by an authorized Big Bear Choppers Dealer:
1. Engine does not start or difculty in starting.
2. Starter kickback.
3. Poor running at low speeds.
4. Poor running or low power at high speeds.
5. Knocking or abnormal engine noise.
TURN SIGNALS
Your Big Bear Chopper turn signal system has a self-cancel. While in neutral, or with either brake
applied, depressing the appropriate signal switch will activate that signal continuously until the
motorcycle is put in gear. Once in gear and brakes are released, the turn signal will cancel in 10
seconds. You can manually cancel the signal by pressing the same turn signal button. By apply-
ing both turn signal buttons at the same time, both signals will ash (hazard lights).
2.3 Electrical
FUEL SYSTEM
Use only unleaded gasoline. Ethanol blended gasoline is approved as long as it has 91 octane
minimum. Methanol or methanol blended fuel is NOT approved for use in your Big Bear Chop-
per. Do not use any other gas cap than what we provide. You’ve probably noticed that your
bike does not come with a fuel gauge. If you have a speedometer gauge, always reset your trip
odometer after refueling and get to know the range of your motorcycle.
FUELING SAFETY
Gasoline is extremely ammable and is explosive under certain conditions. So be careful. Re-
move fuel ller cap slowly and when you’re done fueling, tighten the gas cap until it is not loose.
Do not over tighten it. Refuel in a well-ventilated area with the engine turned off. Do not smoke or
allow open ames or sparks when refueling or when working on the fuel system. Prevent ooding
of the carburetor by closing the fuel supply valve when the engine is not running. When you’re
fueling, leave air space to allow for fuel expansion. Wipe up spills immediately. A lot of service
stations have high volume pumps that can cause pressure to build in your fuel tank and force fuel
out the vent creating a health and re hazard. Pay close attention when fueling up your tank at a
public gas station, no matter how many people want to talk to you about your Big Bear Chopper.
2.4 Fuel System
Table of contents


 Owner's service manual")


