BIG STEEL KEG Barbecue grill User manual

READ MEFIRST
®
BIG STEEL KEG
Unpacking & Assembly Instructions
Approximate Assembly Time
20 minutes
Tools Required
• Philips head screw driver
• ½ inch or 13mm wrench

PARTS INVENTORY FOR YOUR BIG STEEL KEG
2
LINE ITEM QTY PART NAME
1 1 Grill Body
2 1 Top Cooking Grate
3 1 Main Cooking Grate
4 1 Charcoal Grate
5 1 Fire Bowl
6 2 Side Handle
7 2 Handle Screws - M5 x 35
8 2 Side Trays
9 2 Tool Holder
10 1 Multi-Tool
LINE ITEM QTY PART NAME
11 1 Hitch Pin
12 1 Hitch Pin Safety Clip
1
13 1 Stand
14 2 Wheel
1
15 2 Axle Washer
1
6 2 Axle Lock Nut : ½ inch / 13mm
17 2 Hub Cap
19 2 Leveling Feet
20 4 Tool Holder Screws - M5 x 20
Actual Size
M5 x 20
(Qty: 4)
M5 x 50
(Qty: 10)
M5 x 35
(Qty: 2)
1
2
3
4
5
6
6
22
8
9
11
14
18
15 16
17
12
10
0
2
19
20
21
22
7
20
21 1 Lid Handle
22 10 Handle Screws - M5 x 50
2
20
7
22
18 2 Grill Wedges
22
The only tools you will need:
- Philips head screw driver
- ½ inch or 13mm wrench
®
13
Optional Accessories
- Trailer Hitch Receiver Bar
- 2” Hitch Converter
Visit bigsteelkeg.com to order
17
23 1 Grill Cover (not shown)

BIG STEEL KEG ASSEMBLY INSTRUCTIONS
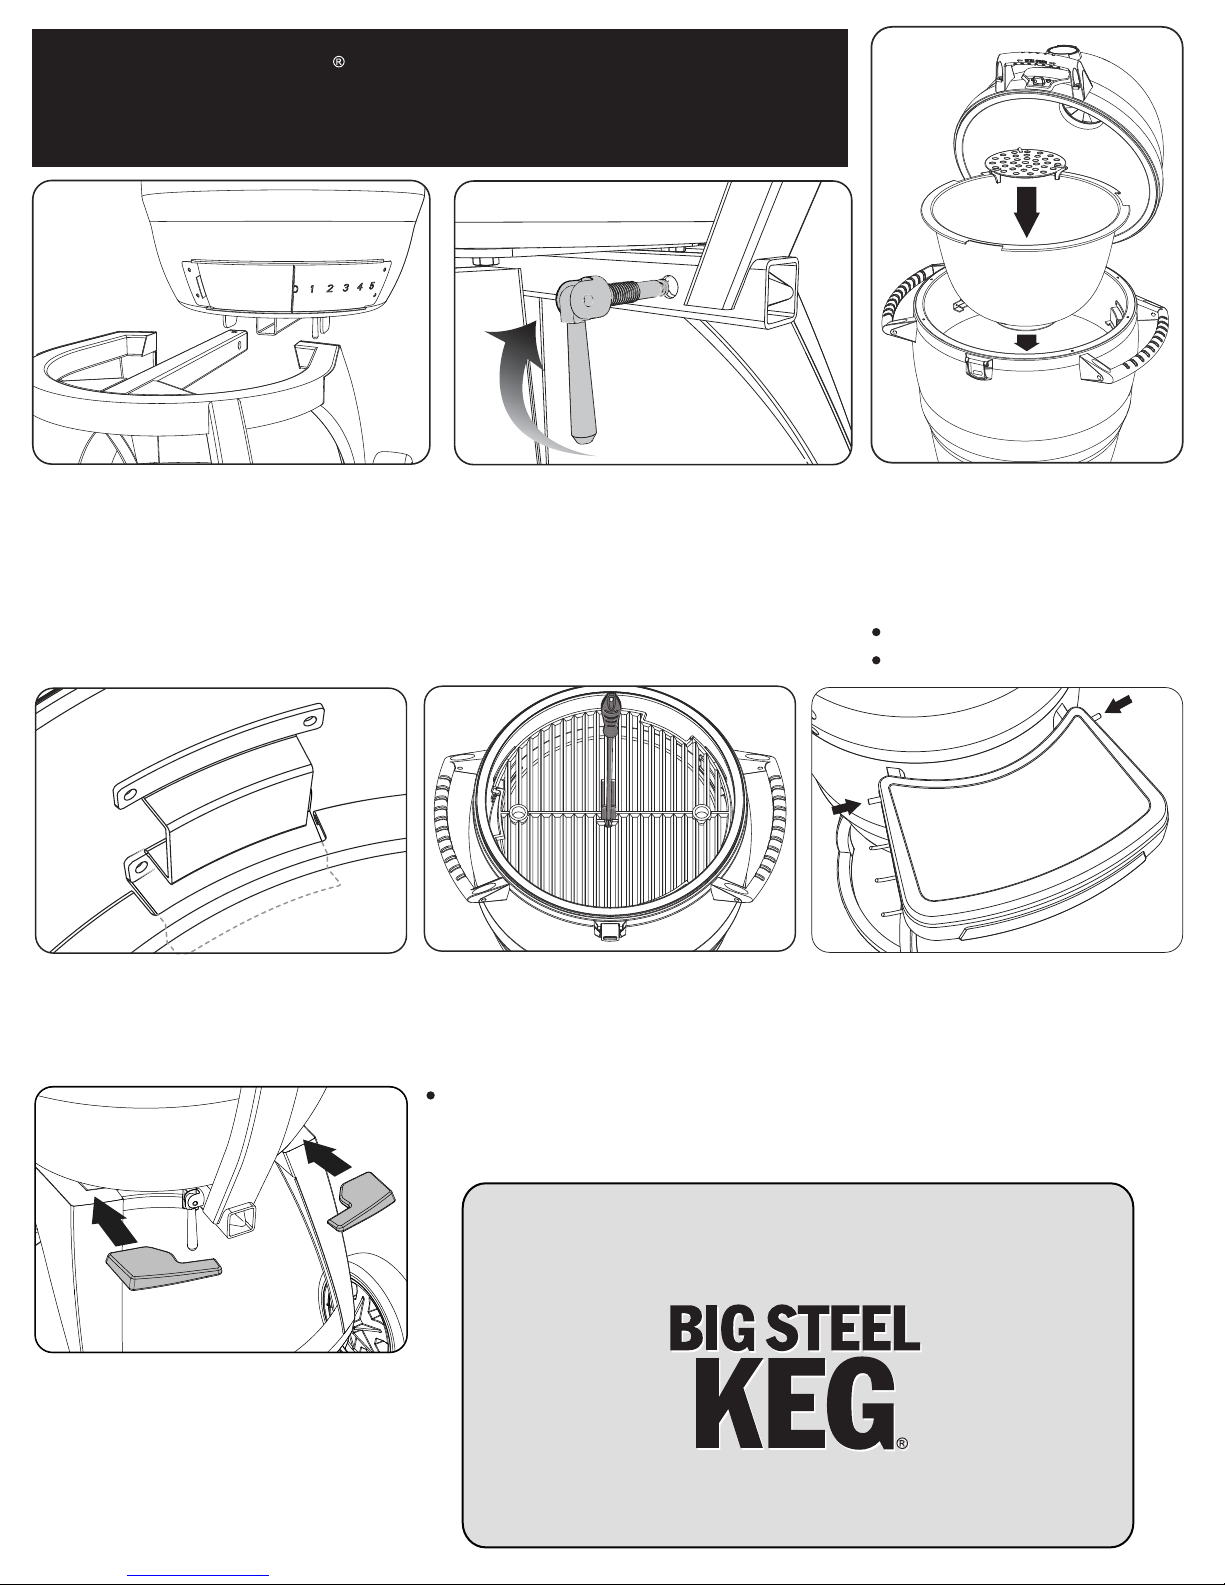
STEP 1: Remove the Keg’s stand.
STEP 5: Attach side handles (2)
using 4 (M5 x 50) screws.
(Use Philips head screwdriver)
STEP 2: Unlock clasp and open
the Keg’s lid. Remove and unpack
all contents and check against parts
inventory list.
STEP 6: Attach both wheels to
the axle posts on the stand in the
following order: wheel, washer, nut
and hub cap. Use ½ inch or 13mm wrench.
STEP 3: Rotate the cast iron grate
out of the locked position, remove
and set aside.
STEP 7: With everything out of the
grill, relock clasp on the Keg’s lid.
STEP 8:
3
M5 x 35
M5 x 50
(top screws)
(bottom screws)
STEP 4:
M5 x 50
bottle opener
tabs
Attach front handle with
Philips head screwdriver. M5x50
screws go in the bottom holes with
the bottle opener tabs. M5x35
screws go in the top holes.
With one person on each side of the Big Steel Keg, lift
out of the box gripping side and back handles only. Do not use the
front handle to lift entire grill weight.
Proper assembly of your new Big Steel Keg will only require a Philips head screw driver, a ½ inch or 13mm
wrench and a buddy (for lifting). Follow the steps outlined below and it should take approximately 15-20 minutes
to complete. Refer to illustrationonpage 2 for part(s) identification and placement positions.
Then screw in leveling feet to stand.
®
For comments, questions, and to learn more, call 1-877-KEG-HEAD
Or visit bigsteelkeg.com
STEP 9: Holding stand in a stationary
position on a firm surface and Grill
Body upright, insert hitch post on
stand into square female receiverslot
(as illustrated). Slide completely forward
until hitch pin holes are aligned.
STEP 10:It is important to install
the threaded hitch pin securely to
eliminate wobble between the stand
and grill. Turn clockwise to tighten.
Remember always use the safety clip.
STEP 11a:Now that the grill is
securely on the stand, Open
lid and put the following parts
in place starting at the bottom
of the Big Steel Keg:
Fire bowl (see 11a)
Charcoal grate
STEP 11b:Align the notches in the
fire bowl with the fire bowl supports
inside the grill (as illustrated).
STEP 11c:Use the Multi-Tool
to lift and install castiron cooking
grate by insertingitinto the center
slotas shown.
BIG STEEL KEG
ASSEMBLY INSTRUCTIONS (CONTINUED)
4
Cast iron cooking grate can be
used in either the upper or
lower position.
Now you’re ready to go! Please read the Big Steel Keg Owners
Manual for complete information about safe and proper use of
this product.
STEP 13: Insert Grill Wedges one at
a time between the Grill Body and
Grill Stand corners by firmly pushing
forward until they snap into place.
(It may be necessary to loosen hitch pin in order
to fit Wedges. Remember to tighten back.)
(Note: If your hitch pin does not fully tighten,
install the pin from the opposite side.)
STEP 12: Install Tool Holders (2) on
Side Trays using 4 (M5x20) screws.
Depress buttons and attach side trays
over both side handles.
They “click” when locked into position.
Popular Grill manuals by other brands


Landmann
Landmann Avalon PTS Plus 5.1 Plus 12122 Assembly and operating manual

Kenyon
Kenyon B70200 owner's manual

Better Homes and Gardens
Better Homes and Gardens GBC1486W owner's manual

Orbegozo
Orbegozo GR 2300 instruction manual

bora
bora PT11 Operating and installation instructions

Klarstein
Klarstein 10031664 manual

Garland
Garland MWE3W Installation and operation manual

Char-Broil
Char-Broil 463722714 Product guide

MPM
MPM MOP-03 user manual

Kenmore
Kenmore 415.16123800 Use and care guide

Tucker Barbecues
Tucker Barbecues GTR Series Assembly, installation and operating instructions

Monogram
Monogram ZGG540NCP1SS owner's manual