BioCare Medical Desert Chamber Pro User manual

www.biocare.net
Desert Chamber Pro™Manual
Turbo-Fan Slide Drying Oven
DRY2008INT

Biocare Medical
Technical Support:
800-799-9499 Option 3
Customer Service:
800-799-9499
Fax:
925-603-8080
Corporate Office:
60 Berry Drive
Pacheco CA 94553
www.biocare.net

Table of Contents
Warranty
The Desert Chamber Pro warranty is for one year from receipt of purchase and covers all parts and labor when performed solely by
Biocare Medical. Warranty is invalidated if equipment is abused, damaged, or improperly maintained by customer. Warranty is not
transferable to any other party should the equipment be resold or transferred by the customer to another party. To the extent permitted
by law, Biocare Medical disclaims any liability for any incidental or consequential damages related to this equipment or for any warranty
related services it performs.
Not for use with flammable solvents or gases
Overview ................................................................................................................................................................................ 1
Specifications ........................................................................................................................................................................ 2
Unit Specifications ................................................................................................................................................................. 2
Unit Construction ................................................................................................................................................................... 2
Contents ................................................................................................................................................................................ 2
Assembling the Oven .............................................................................................................................................................. 3
Electrical Precautions ............................................................................................................................................................. 3
Maintenance .......................................................................................................................................................................... 3
Slide Drying Protocol For Immunohistochemistry ....................................................................................................................... 4
Slide Loading Guidelines......................................................................................................................................................... 4
Manual Operation Instructions ................................................................................................................................................. 5
Preset Program Descriptions .................................................................................................................................................... 6
Preset Program Operation Instructions ...................................................................................................................................... 7
Checking the Sequence........................................................................................................................................................... 8
Changing Between Preset Programs.......................................................................................................................................... 8
Appendix 1: Program Function Map.......................................................................................................................................... 9
Appendix 2: Function Menu................................................................................................................................................... 11
Quick Operation Guide .......................................................................................................................................................... 12

1
Overview
This innovative compact oven from Biocare Medical is extremely efficient and is specially designed for the rapid drying of slides. The
combination of a small footprint, turbo fan, 365-watt element and a digital programmable temperature process controller makes this
oven superior to other conventional drying ovens. This controller will autocalibrate for the amount of mass and volume placed inside
the oven, keeping the inside temperature constant and accurate. The Desert Chamber Pro can be programmed with variable segments,
times, temperatures and alarms.
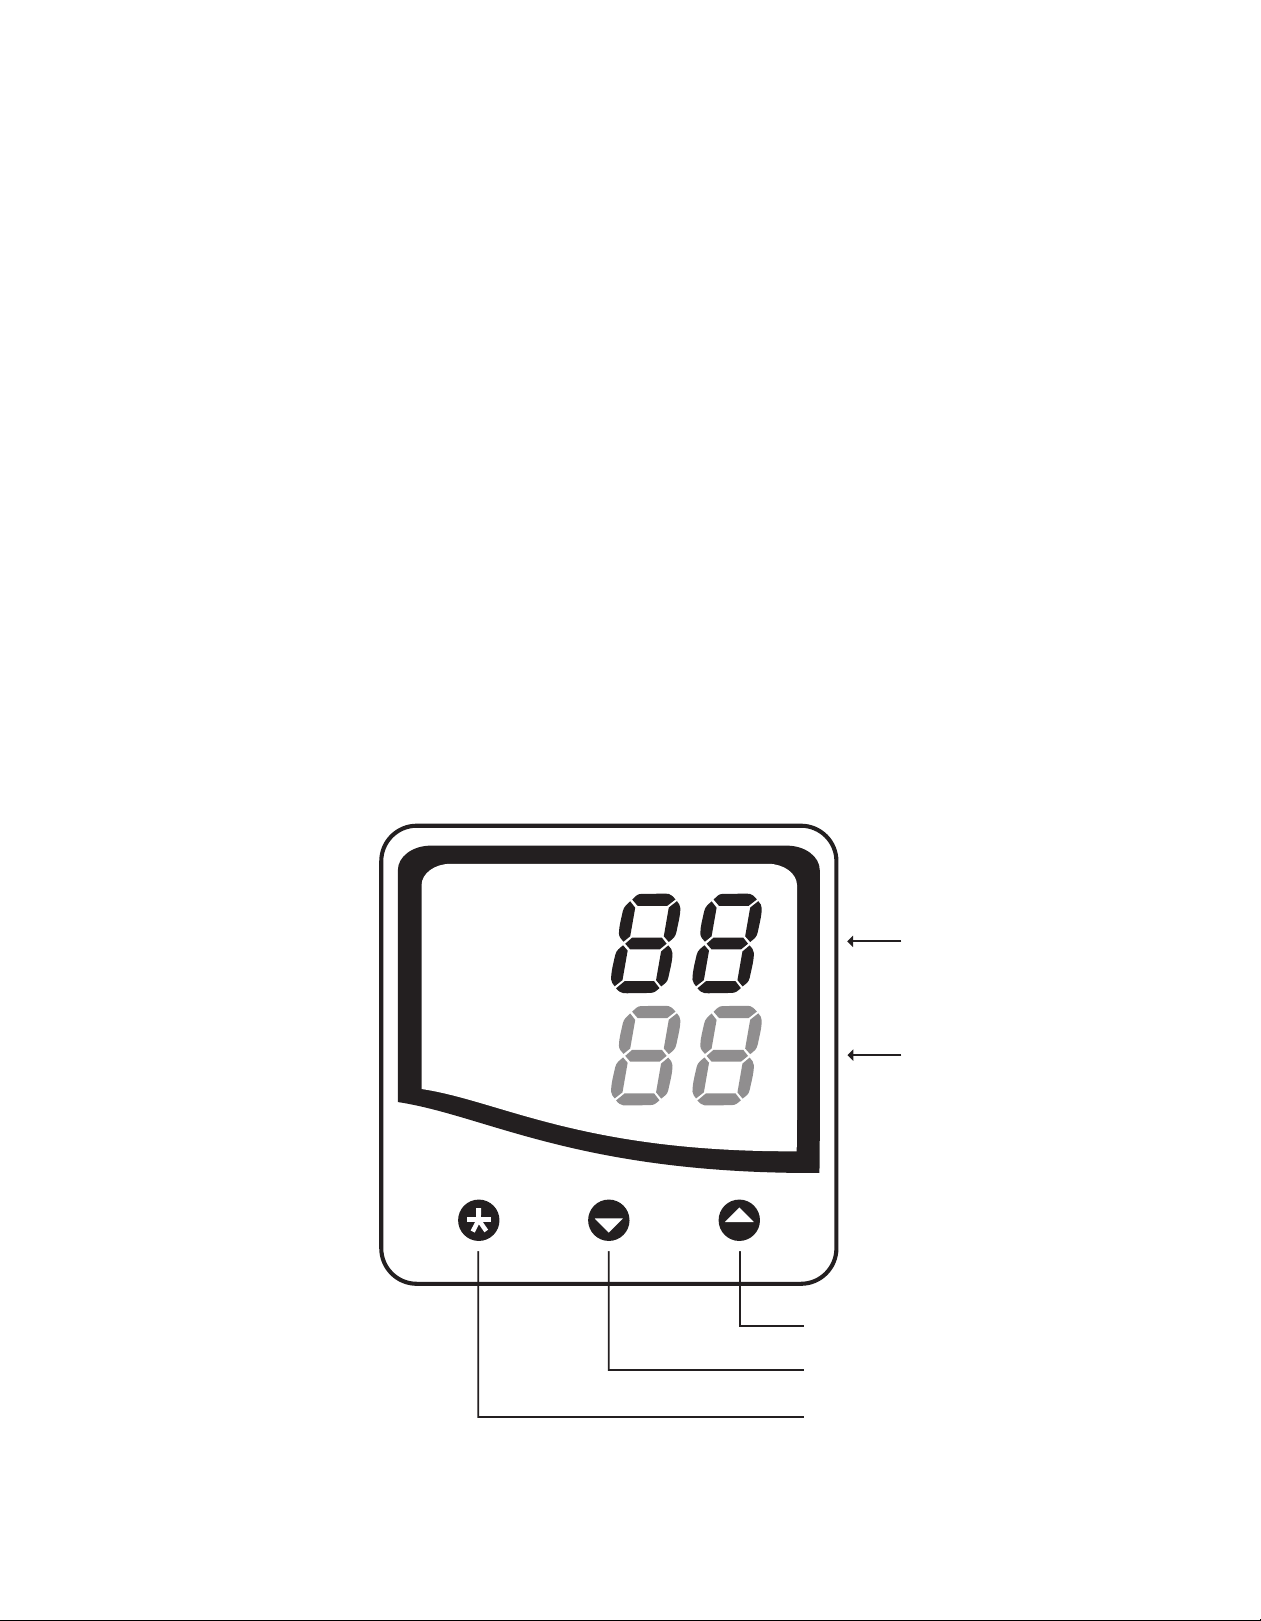
On / Off SwitchTemperature Up
Temperature Down
Main Control Button
Controller
(Program & Temperature)
DRY2008INT

2
Specifications
Interior Dimensions: 10.5 (W) x 9.5 (H) x 11.5 (D) inches / 26.7 (W) x 24.1 (H) 29.2 (D) centimeters
Exterior Dimensions: 13 (W) x 16 (H) x 13.5 (D) inches / 33.3 (W) x 40.6 (H) x 34.3 (D) centimeters
Weight: 27 pounds, 12.2 kilograms
Cubic Foot Capacity: 0.7 cubic feet
Standard Electrical: 115 volts / 365 watts (DRY2008US), 230 volts / 365 watts (DRY2008INTL)
Temperature Range: Ambient - 100 °C
Unit Specifications
Operating Environment:
Indoor use. Installation Category II, Polution Degree 2, ambient temperature
10 °C - 35 °C (50 °F - 95 °F); 80% maximum relative humidity.
Storage Temperature: -10 °C - 70 °C (14 °F - 158 °F); 70% maximum relative humidity.
Approvals: Underwriter's Laboratory Listed, Laboratory Equipment, C/UL
United States / Canadian. E212550 (115 VAC models only)
Compliance: UL Standard 61010-1, IEC 61010-1, 2nd Edition
Unit Construction
Exterior: Powder-coated steel
Insulation: Fiberglass
Thermo-control: PID microprocessor
Interior: Aluminum
Door: Steel insulated
Heater: Resistive-tubular Incoloy
Contents
Inspect the packaging and immediately report any damage to Biocare Medical.
1. Oven with Digital Programmable Temperature Process Controller
2. Adjustable Shelves
3. Wire Shelf Brackets
4. Removable Drip Tray

3
Assembling the Oven
1. Position the unit in its ultimate operating location, keeping a minimum of two inches of space around the
unit and ten inches of space above the unit.
2. Place the removable drip tray on the bottom of the oven. (Figure 1)
3. Push the ends of the wire shelf brackets into the holes until the first bend is against the wall.
Then rotate the bracket down. (Figure 2)
4. Place the adjustable shelves on top of the brackets. (Figure 3)
5. Plug the Desert Chamber into a properly grounded receptacle
(either 115 volt or 230 volt, depending upon the model).
Electrical Precautions
Basic safety precautions should always be followed when using electrical equipment.
• Do not immerse cord or plug in water.
• Unplug the instrument when not in use and before cleaning.
• Do not operate the instrument with a damaged cord or plug.
• Do not let the cord hang over the edge of a table or counter or touch hot surfaces.
Important Note
The oven temperature has been calibrated at the factory and should not be adjusted by the end-user.
If any problems arise with the oven, call Biocare Medical for technical service at 800-799-9499.
Maintenance
The Desert Chamber Pro oven is designed to be virtually maintenance-free. However, the oven does require periodic cleaning and
chamber temperature accuracy verification in order to maintain operational and safety standards. Periodically check the rear air intake
vents for dirt or dust build-up. Keep the intake and exit ports clear of obstruction and free of dust and dirt. Once a year, check the
actual oven chamber temperature against a known accurate temperature measurement device. To clean exterior and interior surfaces,
use a damp cloth with an all-purpose cleaner. Avoid commercially available oven cleaners.
1 2 3

4
Slide Drying Protocol For Immunohistochemistry
Drying slides correctly for immunohistochemistry (IHC) is essential to achieving optimal staining. Tissue sections will not adhere to the
slide if all the water is not removed prior to deparaffinization and Heat Induced Epitope Retrieval (HIER). Tissues with a high collagen
content such as skin or a high fat content such as breast can be especially problematic.
Slide Drying Protocol
Use distilled water only in the Water Bath. Do not use any organic or inorganic adhesion products such as gelatin. The water bath
temperature should be 10 - 12 °C lower than the paraffin melting point - usually 40 - 45 °C.
Use Biocare Medical Kling-On Slides or other positively charged slides for optimal tissue adhesion. Shake the slides with a snapping
action of the wrist to remove excess water that may be trapped between the tissue section and the glass slide. Drain slides in a vertical
position for 5 - 10 minutes.
Place slides in a slide rack and tap on the counter to remove residual water. Position slide rack in oven. Close oven door. Dry slides using
one of the Preset Programs. All the water should be evaporated from beneath the tissue section and the glass slide, and the paraffin
should be melted prior to deparaffinization and HIER.
Note: the times may vary according to the number of slides placed in the oven.
Technical Notes:
Under-fixed tissue is less likely to adhere to the slide properly. Ideally, the tissue should be grossed at 3mm, placed in 20X volume
of formalin and fixed for 16-24 hours to allow adequate infiltration prior to processing.
Do not dry slides for immunohistochemistry at temperatures higher than 60 - 70 °C, or for longer than one hour. Longer drying times
or higher temperatures may compromise the antigen of interest (e.g., Estrogen and Progesterone Receptors).
Slide Loading Guidelines
Load the oven so that air circulation within the oven is not impeded.
• Stagger slide racks on the shelves.
• Do not overload; leave a space between racks being processed.
• For the best processing performance for a single item, place it in the center of the oven.
• Do not use acids or corrosive reagents inside the oven.
5
Manual Operation Instructions
Operation Instructions
1. Turn on the oven by pushing the On/Off button. The button will light red when the unit is on.
2. The Temperature Controller is pre-set at 25 °C (red LED, bottom right corner). To change the target
temperature, press and hold the main temperature control (asterisk) button and at the same time, press the
up or down arrow buttons to increase or decrease the temperature readout.
The green LED is the actual temperature inside the oven. The red LED is the target temperature.
Stopping a Manual Run
1. Push the up and down arrows simultaneously, then push and release the up arrow twice and finally
push the asterisk button and down arrow simultaneously.
2. Do not end a programmed run prematurely by turning off the using the On/Off button. Make sure the LED display
shows the temperatures before stopping a manual run using the On/Off button. Run Off will be displayed until
the LED displays the temperatures. This may take several minutes.
3. To turn off the oven, push the On/Off button.
Note: Attempting to stop a manual run using the toggle switch will result in the oven retaining the current run settings.
If the program controls become jammed due to an electrical power surge or power outage, unplug the unit's power cord, wait a few
seconds and plug it back in to reset.
Temperature Down
Green LED
Red LED
Temperature Down
Main Temperature Controller

6
Preset Program Descriptions
Level P = 1
Program 1: Standard Program
Segment 1 - 37 °C for 30 minutes
Segment 2 - 60 °C for 30 minutes
Level P = 2
Program 2: Fast Dry Program
Segment 1 - 45 °C for 20 minutes
Segment 2 - 70 °C for 10 minutes*
Level P = 3
Program 3: Bulk Program
Segment 1 - 45 °C for 30 minutes
Segment 2 - 70 °C for 30 minutes*
Level P = 4
Program 4: Overnight Program
Segment 1 - 37 °C for 60 minutes
Segment 2 - 60 °C for 60 minutes
Level P = 5
Program 5: Delayed Program
Segment 1 - 25 °C for 720 minutes
Segment 2 - 37 °C for 60 minutes
Segment 3 - 60 °C for 60 minutes
Note: All programs can be customized to user-defined specification.
*Temperatures over 60 - 70 °C are not recommended for IHC

7
Preset Program Operation Instructions
Starting a Program (Run On):
1. Press the power button to activate the oven - a red light will indicate that the oven is in the “on” position, and the
screen will display the actual temperature.
2. Press and hold the up and down arrow buttons until the screen displays "Level P".
3. Press the up arrow button and immediately release. The screen will display "Program 1".
4. Press and hold the asterisk button and use the up arrow buttons to select the desired program number
(Programs 2-5). Omit this step if desired program is currently displayed.
5. Press the up arrow button once and immediately release. The screen display will read Run Off.
6. Press and hold the asterisk button down, and then press the up arrow button. Immediately release. The screen display
will read Run On.
7. Press and hold the up and down arrow buttons until the screen displays the current temperature as well as the set
temperature. The program will start immediately; however, it may take several minutes to display.
8. At the start of a run the display will read "SPr" in green with the target temperature in red. When the set temperature is
reached the display will read "SoAK" in green, alternating with the actual temperature.
Stopping a Program (Run Off):
1. To stop a program, similar steps to starting a program are repeated.
2. Press the up and down arrow buttons and hold until the screen displays "Level P".
3. Press the up arrow button and immediately release. The screen will display Program (1-5).
4. Press the up arrow button once and immediately release. The screen display will read Run On.
5. Press and hold the asterisk button down, and then press the down arrow button and immediately release.
The screen display will read Run Off.
6. Press and hold the up and down arrow buttons and hold down until screen displays current and set temperatures.
The oven can now be powered off.
7. To turn the power to the oven off, press the red power button. The red indicator light will turn off.
Note: It is important not to prematurely power down the Desert Chamber Pro before stopping a run that is in progress.

8
Checking the Sequence
Program
To check the program number which is currently selected:
1. Press and hold the asterisk button.
2. Release the asterisk button to return to the original display.
Segment
To check the segment information for the program:
1. Press and hold the asterisk button and press the up arrow button.
2. Release the asterisk and up arrow buttons to return to the original display.
Time Remaining
To display the time remaining (in minutes) for a Program:
1. Press and hold the asterisk button and press the up arrow button.
2. Continue to press and hold the asterisk button and press the up arrow button again.
3. Release both the asterisk and up arrow buttons to return to the original display.
Changing Between Preset Programs
1. Press and hold the up and down arrow buttons until the screen displays Level P.
2. Press the up arrow button and immediately release. The screen will display Program 1-5.
3. Press the up arrow button once and immediately release. The screen will display Run On.
4. Press and hold the asterisk button, and press the down arrow once, immediately release.
The screen will read Run Off.
5. Press and hold the up and down arrow buttons until the screen displays the temperature.
6. Press and hold the up and down arrows buttons and hold until the screen displays Level P.
7. Press the up arrow button and immediately release. The screen will display Program 1-5.
8. Press and hold the asterisk button, and press the up or down arrow button to the desired
program number (Programs 2-5).
9. Press and hold the asterisk button, press the up arrow button once, and immediately release.
The screen will display Run Off.
10. Press and hold the asterisk button and press the up arrow button once. The screen will read Run On.
11. Press and hold the up and down arrow buttons, until screen displays the selected temperature.
12. Press the asterisk button to verify the selected program.
9
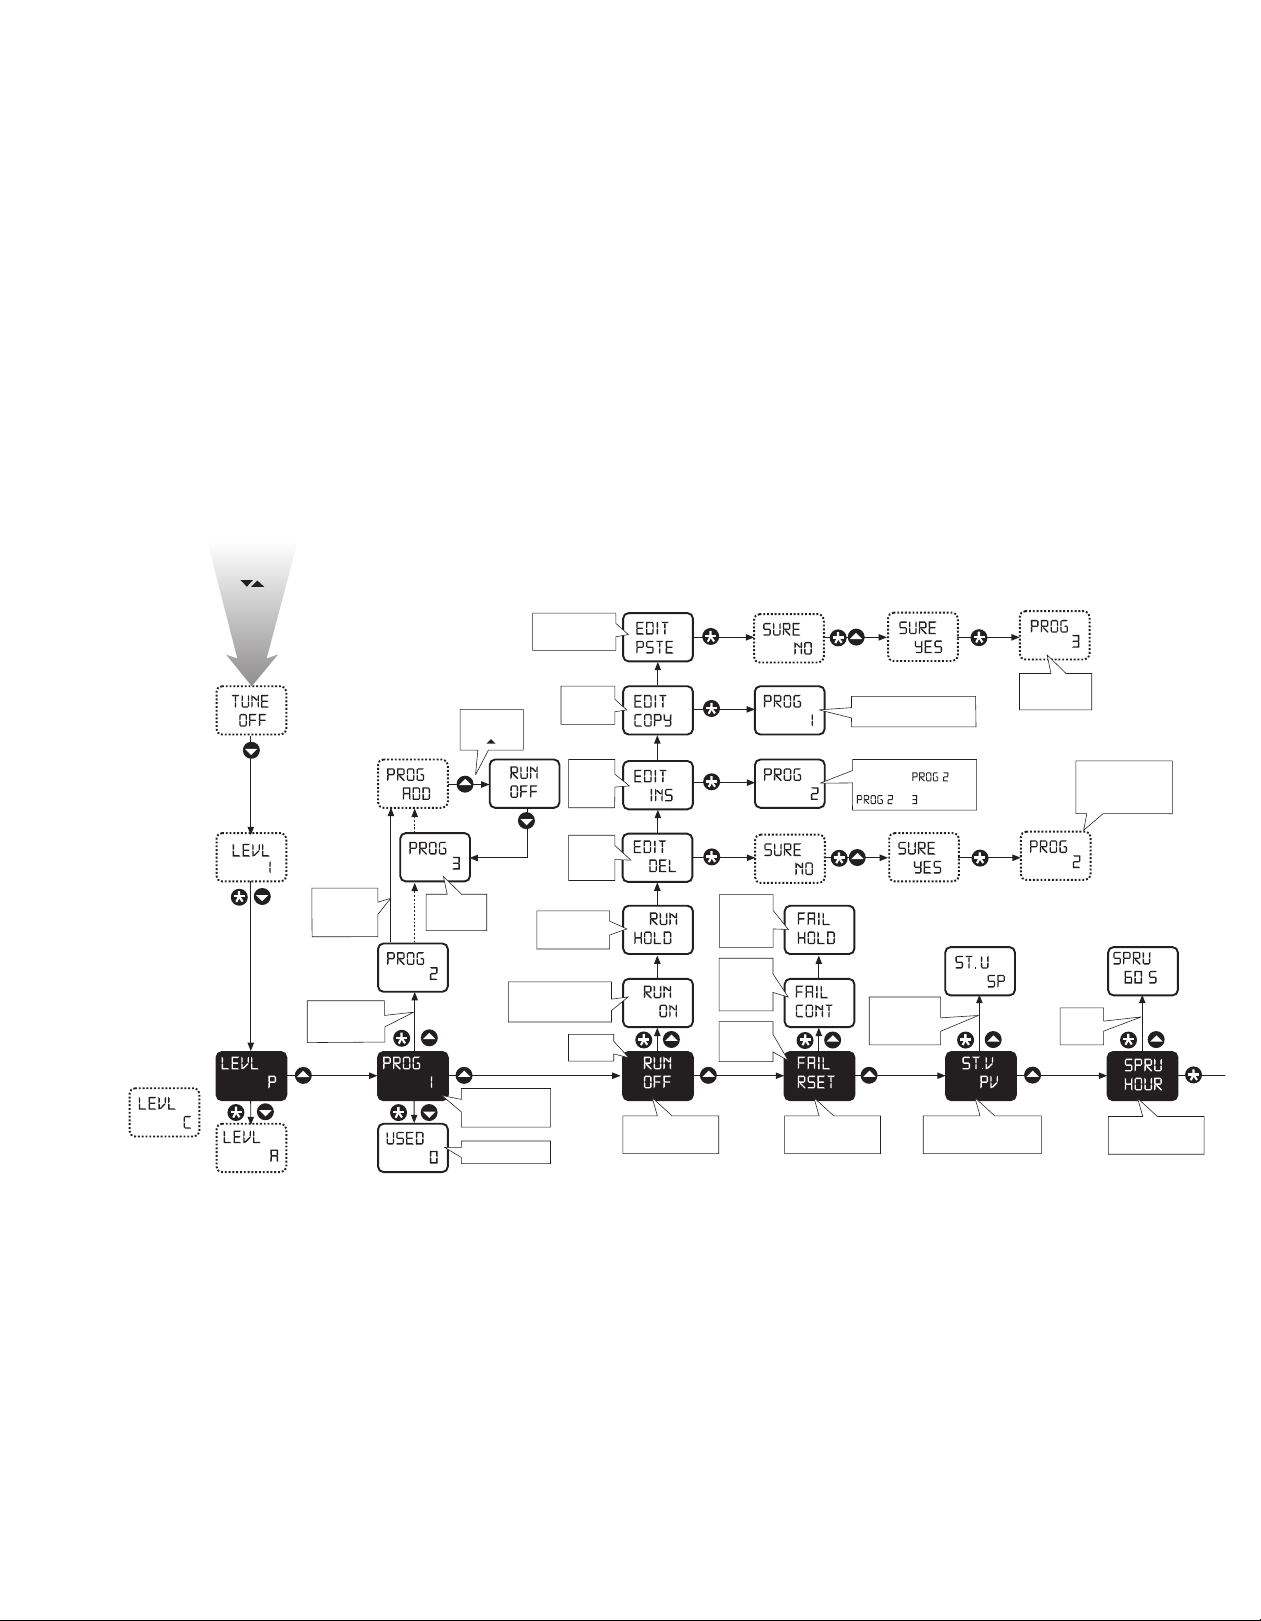
START HERE
Press and hold
for 3 seconds
ENTER
PROGRAM
If COMMS option
tted, LEVEL C
appears between
LEVEL P and LEVEL A
Hold the
program at
the point it
stopped
Continue the
program
from where
it stopped
Reset the
program at
beginning
Program
‘o’ state
Program 3
now appears
in list
Start program when ‘on’
selected. This locks
other options out
Hold the
program at
current position
Program
editing
functions.
Insert
Program
editing
functions.
Delete
Copies the
selected
program
Paste only appears
after a program is
copied
To add new
program,
press once
Add new
programs at
top of existing
menu
Select the required
program number.
Default: 1
Memory used (%)
Select program mode
of operation
Default: o
Power failure recovery
position
Default: reset
Select the starting point of
program after power up
Default: PV
Ramp rate time units
adjustment
Default: hour
Options: start
program at main
SP or process
variable
Options:
hours
minutes
3 secs 3 secs
3 secs
3 secs
3 secs 3 secs
Another program has been
inserted into
re-numbering existing
to
A copy of program 1 can be
pasted into another program
Program 1 has
been copied to
program 3
To view existing
programs 1 to 31
or full?
Program 3 has been
deleted. Display
shows next program
down from top of list
Appendix 1: Program Function Map
10
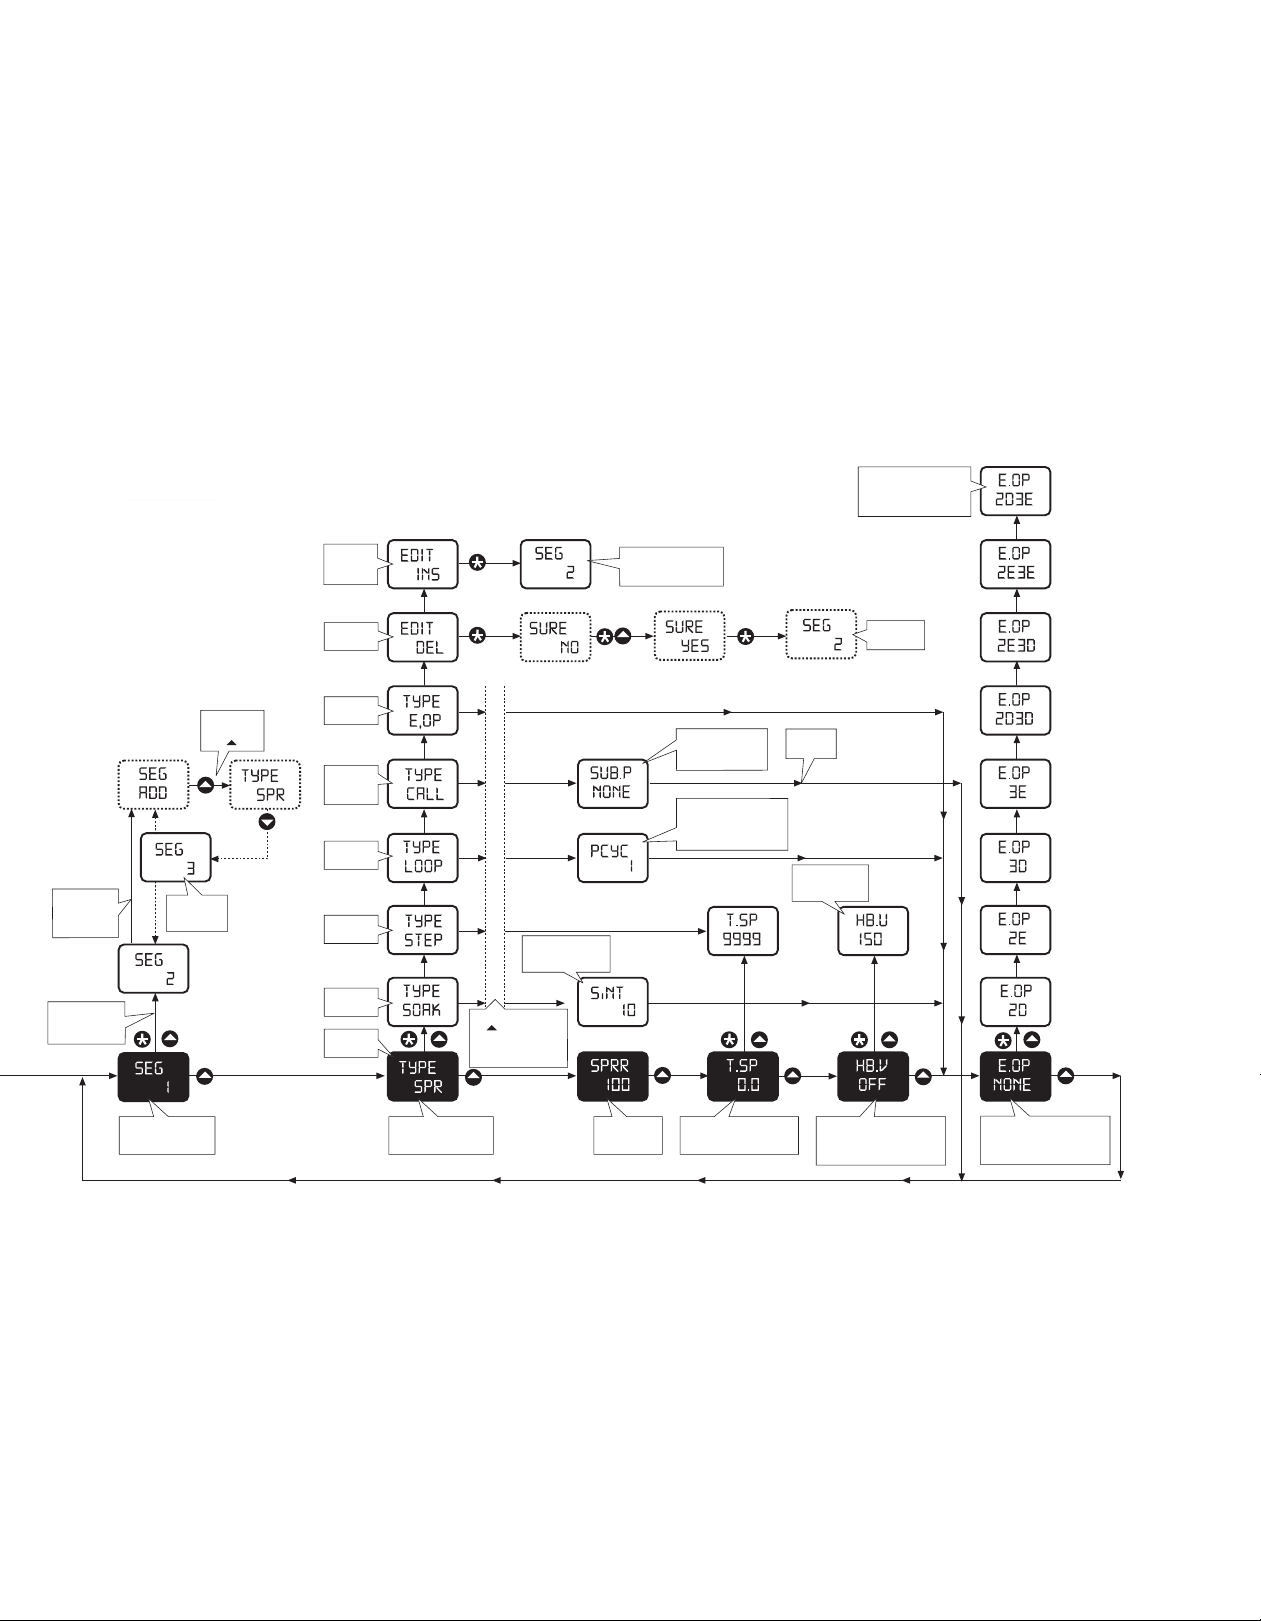
Insert new
segment in
the menu
Delete a
segment
Event
output
Call up
another
program
Program
re-cycles
Step
Soak
Ramp
Segment 3
now appears
in menu
To add new
segments
press once
Add new
segments at
top of existing
list
To view existing
segments 1 to 126
or full?
Set the segment to be
adjusted
Default: 1
3 secs 3 secs
Segment 3
deleted
3 secs
New segment now
inserted into 2. Old
segment 2 becomes 3
To select operational
mode of each segment
Default: Ramp
Important note
Up button must be
used after selecting the
segment type to
conrm it’s selection
Adjusts ramp
rate
Default: 100
Soak time in minutes
or continue
Default: 10
Dene the program
number called
Default: none
Set Numbers of
re-cycles 1 to 999 unless
full. Or continuous
Default: 1
Returns to
SEG
Target set point adjustable
over the unit’s range
Default: Current main SP
‘Hold back’ this function only
appears for ramp operational
once a value is set
Default: o
Event output – options only
appear when SP2A or SP3A
modes set to E.OP
Default: de-energise
Event output options
energise and de-energise
for all combinations of
SP2 & SP3.
‘Hold back band
size adjustable
0.1 to 150 units
Appendix 1: Program Function Map (continued)
11
Call sub-program number
nonE ; 1 to number
of programs
Soak time interval
Cont ; 0.1 to 1400
(10) min
Program re-cycle count
Cont; 1 to 999
Derivative sensitivity
0.1 to 1.0 x dEr.t ( 0.5 )
Display averaging
dir ; 1 to 32 (6)
Disable -AL- alarm
display ; on
Disable program auto-exit
Auto ; StAY
Security lock
nonE; LEV 3; LEV 2; ALL
Change program entry point
O ; on
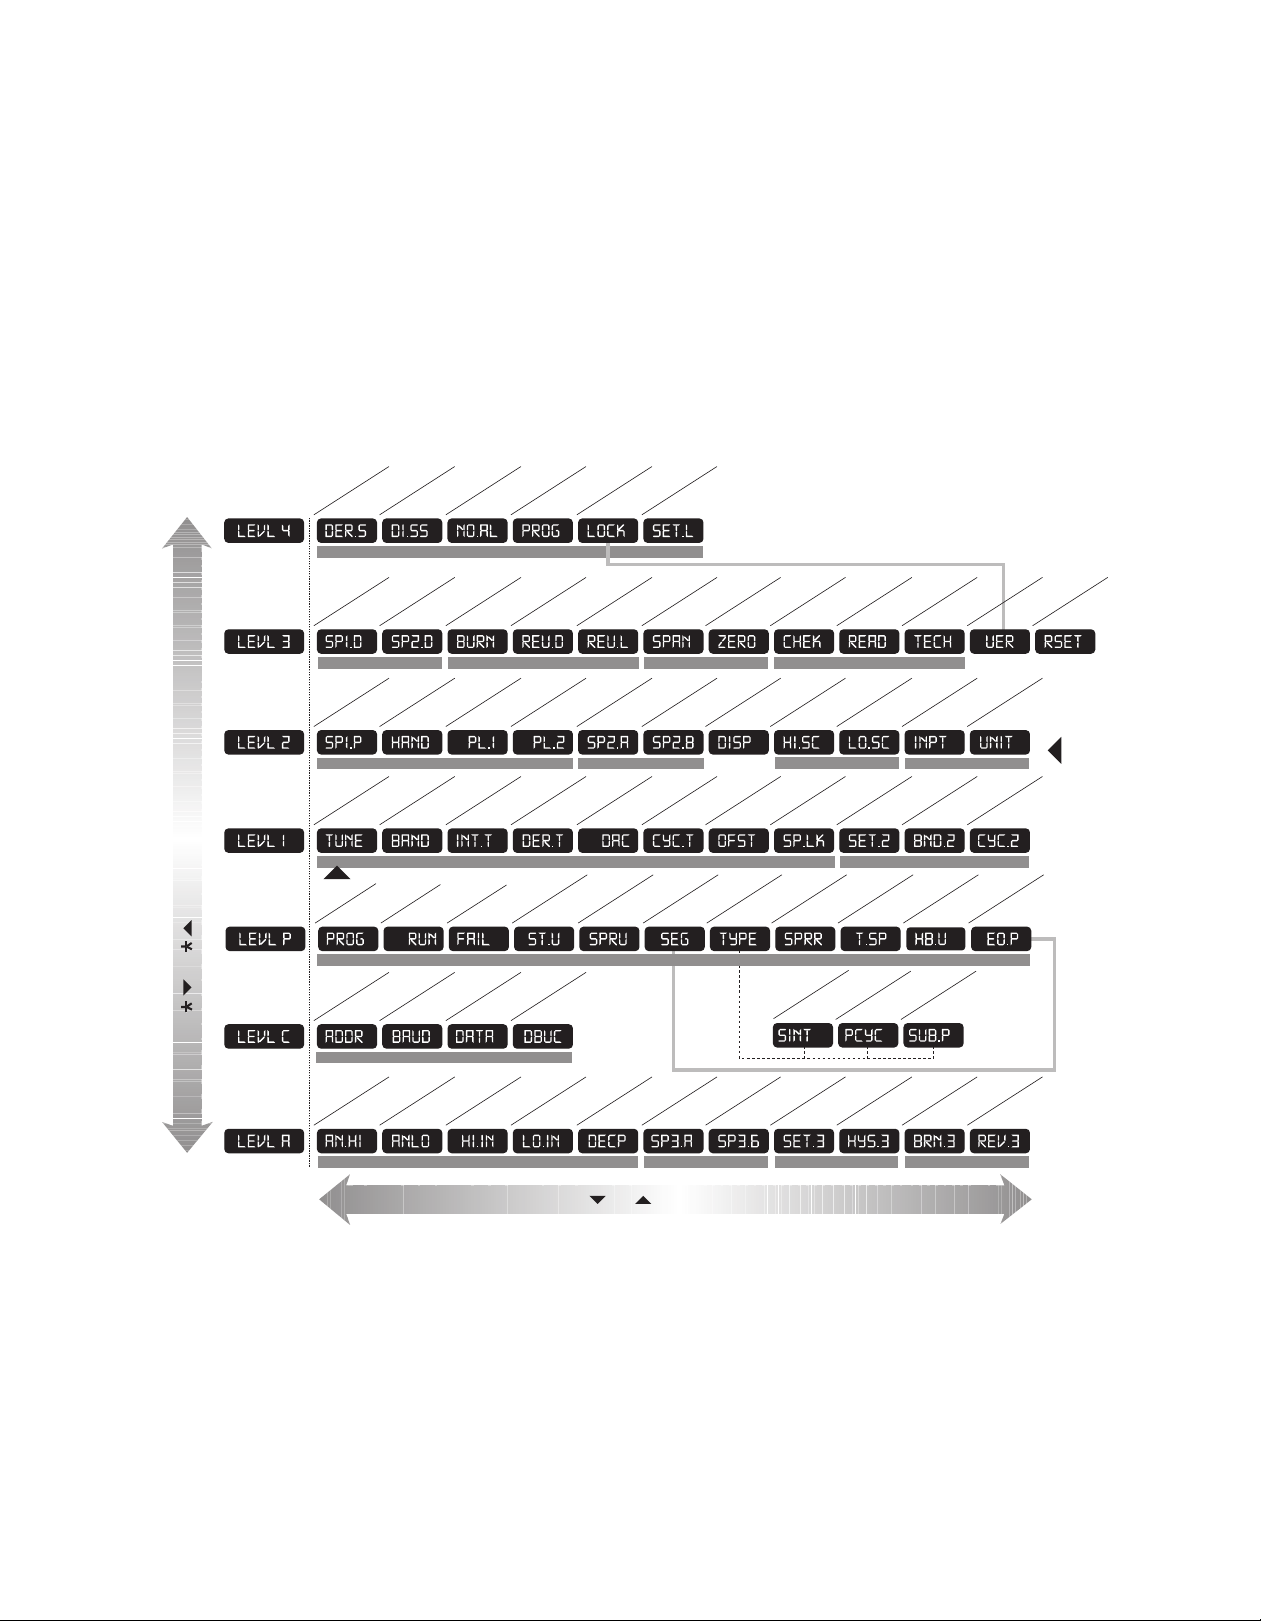
USER-PROTECTEDSETTINGS
SP2 output device
none; SSd; rly; (read only)
Sensor burn-out
uP.SC ; dn.SC; 1u.2d; 1d.2u
Zero adjustment
0.0 to 25% sensor
full scale
Set Monitor
O ; on
Read Monitor
VAr; hi; lo deg
Read Tune Data
CtA; Ctb; Ct1; Ct2; Ct3; Ct4;
oS1; uS; oS2
Software version
Consult unit
RESET
nonE; ALL
SP1 output device
none; rly; SSd; AnLG
Reverse outputs
1r.2d ; 1d.2d; 1r.2r; 1d.2r
Reverse O/P LEDs
1n.2n ; 1i.2n; 1n.2i; 1i.2i
Span adjustment
0.0 to 25% sensor
full scale
CONFIGURE OUTPUT SAFETY SETTINGS CALIBRATION PERFORMANCE DATA
Read SP1 output %
0 to 100% read only
SP1 manual output %
0 to100% proportional
mode only
Limit SP1 output %
100 to 0%
Limit SP2 output %
100 to 0%
Main SP2 mode
nonE ; dV.hi; dV.Lo; bAnd;
FS.hi; FS.Lo; Cool; EoP
Second SP2 mode
nonE; LtCH; hold; Lt.ho;
nLin
Display resolution
1or 0.1 degree
Set scale maximum
0.0 Sensor max to sensor
full scale
Set scale minimum
0.0 Sensor min to sensor
full scale
Select input sensor
nonE
Select display units
nonE;°C; °F; bAr;
PSi; Ph; rH; SEt
\\
MANUAL ADJUSTMENTS SP2 MODES CONFIGURE INPUT
RANGING
SP1 SETTINGSSP2 SETTINGS
Autotune or Park
O ; on; ParK; At.SP
SP1 Prop band (gain)/
hyst 0.1 deg to 100%
sensor f/s ( 10°C/18°F)
Integral time (reset)
O; 0.1 to 60 min
(5 min)
Derivative time (rate)
O; 1 to 200 sec
(25 sec )
Derivative approach
0.5 to 5.0 x bAnd
(1.5 )
Cycle time or on/o
On.o; 0.1 to 81 sec
( 20 sec )
Oset (manual reset)
0 to 50% x bAnd
( In.t = o )
Setpoint lock (SP1)
O ; on
Adjust SP2 setpoint
+/– sensor full scale or
full scale
SP2 prop band/Gain/
Hyst 0.1 deg to 100%
sensor f/s (2°C/3.6°F)
SP2 Cycle on/o
On.o ; 0.1 to 81 sec
Program number
1to 31
Run program
oFF; on; hoLd; dEL
inS; CoPY; PStE
Power failure
recovery mode
rSEt ; Cont; hoLd
Program start value
PV; SP
Setpoint ramp time units
hour ; 60s
Holdback value
oFF; 0.1 to 150
Event output (SP2A or SP3A)
nonE; 2d; 2E; 3d; 3E; 2d.3d;
2E.3d; 2d.3E; 2E.3E
PROGRAMMER SETTINGS
S
egment number
1to 126 max.
Dene segment type
SPr; SoAK; StEP; LooP;
Call; EoP; dEL; inS
Setpoint ramp rate
1 to 9990 ( 100 )
units/time
Adjust target setpoint
+/– sensor full scale or
full scale
Instrument address
0to 255
Baud rate
1200; 2400; 4800
9600 ; 19k2
Data format
18n1 ; 18E1; 1801
TxRx activity
O ; on
COMMS SETTINGS
High scale 1000
-1999 to 9999
Low scale 0
-1999 to 9999
Input high 50.0
0.1 to 50.0
Input low 10.0
0.0 to 49.9
Decimel 0000
000.0 or 00.00
Burnout SP3 - uPSC
dhSC
R
everse O/P3 3D
3r
SP3 SAFETY SETTINGS
Main mode nonE
dv.hi; dVLo; bAnd; Fshi;
FSLo; EoP
Second mode nonE
LtCh; hoLd; Lt.ho
Set SP3 0
0 to 2500
Hysteresis SP3 20
1–100% sensor
full scale
SP3 ADJUSTMENTSSP3 MODESLINEAR SCALING AND INPUT SETTINGS
INITIAL
SET-UP
ENTRY
PROGRAM ENTRY (DEFAULT)
Level C only visible
when COMMS
Option tted
KEY OR TOGETHER TO CHANGE LEVELS OR OPTIONS
KEY OR TO VIEW FUNCTIONS
Appendix 2: Function Menu

12
Quick Operation Guide
Manual Use
1. Turn the oven on using the On/Off button. The red light should be on.
2. Temperature control is preset at 25 °C. To change the temperature, hold the main temperature control (asterisk) button
down and at the same time, push the up or down arrows to increase or decrease the temperature.
3. When finished, turn off the oven.
Program Instructions
1. Turn the oven on using the On/Off button. The red light should be on.
2. Temperature control is preset at 25 °C.
Selecting a Program
1. Hold the up and down arrow simultaneously for five seconds. "Level P" will be displayed.
2. Push the up arrow and immediately release. "Program 1" will be displayed.
3. Push the asterisk button and up or down arrow for desired program.
Turning On a Program
1. Go through “Selecting a Program” as above.
2. Push the up arrow and release. "Run Off" will be displayed.
3. Push the asterisk button and push the up arrow and immediately release. The screen will read "Run on".
Turning Off a Program
1. Hold the up and down arrows simultaneously for five seconds. "Level P" will be displayed.
2. Push the up arrow and immediately release. "Program 1" will be displayed. Select the desired program.
3. Push the up arrow once and release. "Run On" will be displayed.
4. Push the asterisk button and push the down arrow and immediately release. The screen will read "Run Off".
Changing from One Program to Another Program
1. Hold the up and down arrows simultaneously for five seconds. "Level P" will be displayed.
2. Push the up arrow and immediately release. "Program 1" will be displayed.
3. Push the up arrow once and release. "Run On" will display.
4. Push the asterisk button and push the down arrow and immediately release. The screen will read "Run Off".
5. Push the up and down arrows and hold until the screen displays the temperature.
6. Select another program by holding the up and down arrows for five seconds. "Level P" will be displayed.
7. Push the up arrow and immediately release. "Program 1" will be displayed. Select the desired program by
holding the asterisk key down and pushing the up or down arrows.

800.799.9499
60 Berry Drive
Pacheco CA 94553 www.biocare.net
904-009-071817
Other manuals for Desert Chamber Pro
1
Table of contents
Popular Oven manuals by other brands


Bosch
Bosch HBL43S4.0A instruction manual

Euro Appliances
Euro Appliances EP8060DS instruction manual

Bosch
Bosch HBG7741 1 Series User manual and installation instructions

Fulgor Milano
Fulgor Milano SUPREME Instructions for installation and use

Bakers Pride
Bakers Pride EP series Operation manual

Solt
Solt GGSO605MS user manual