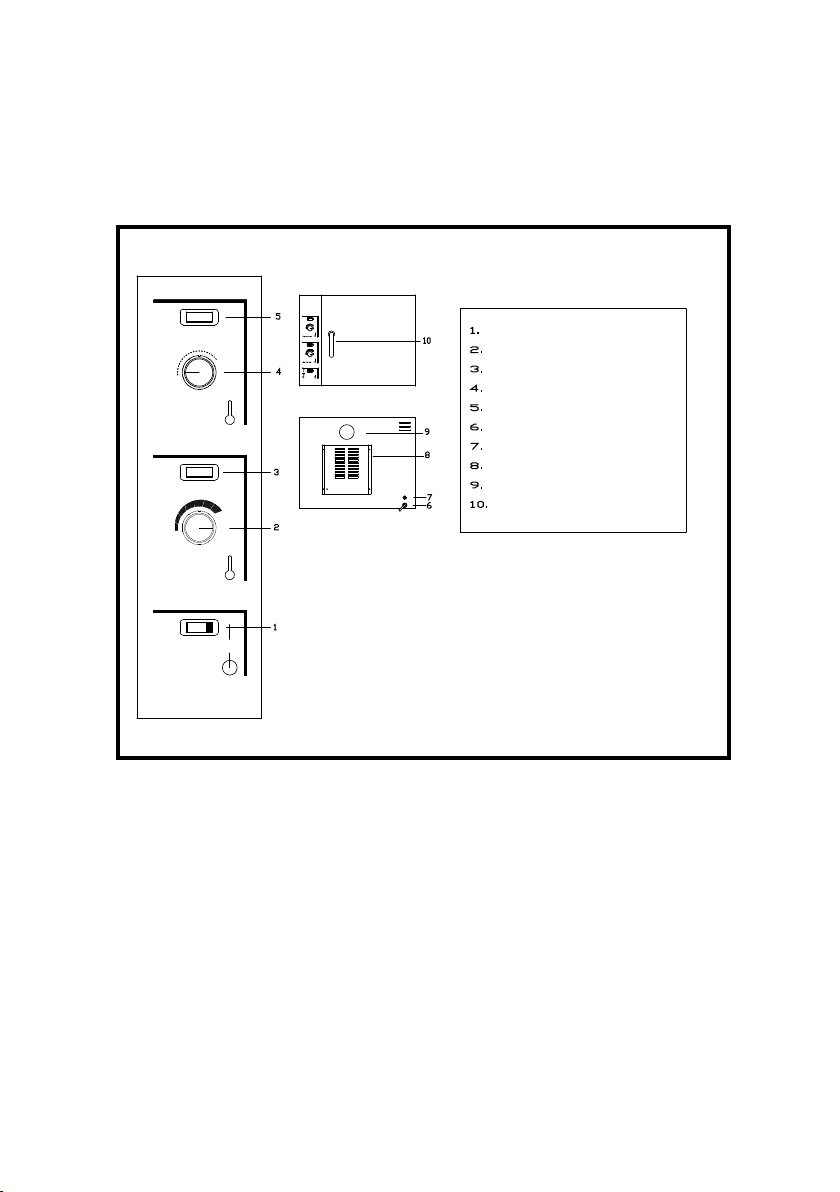
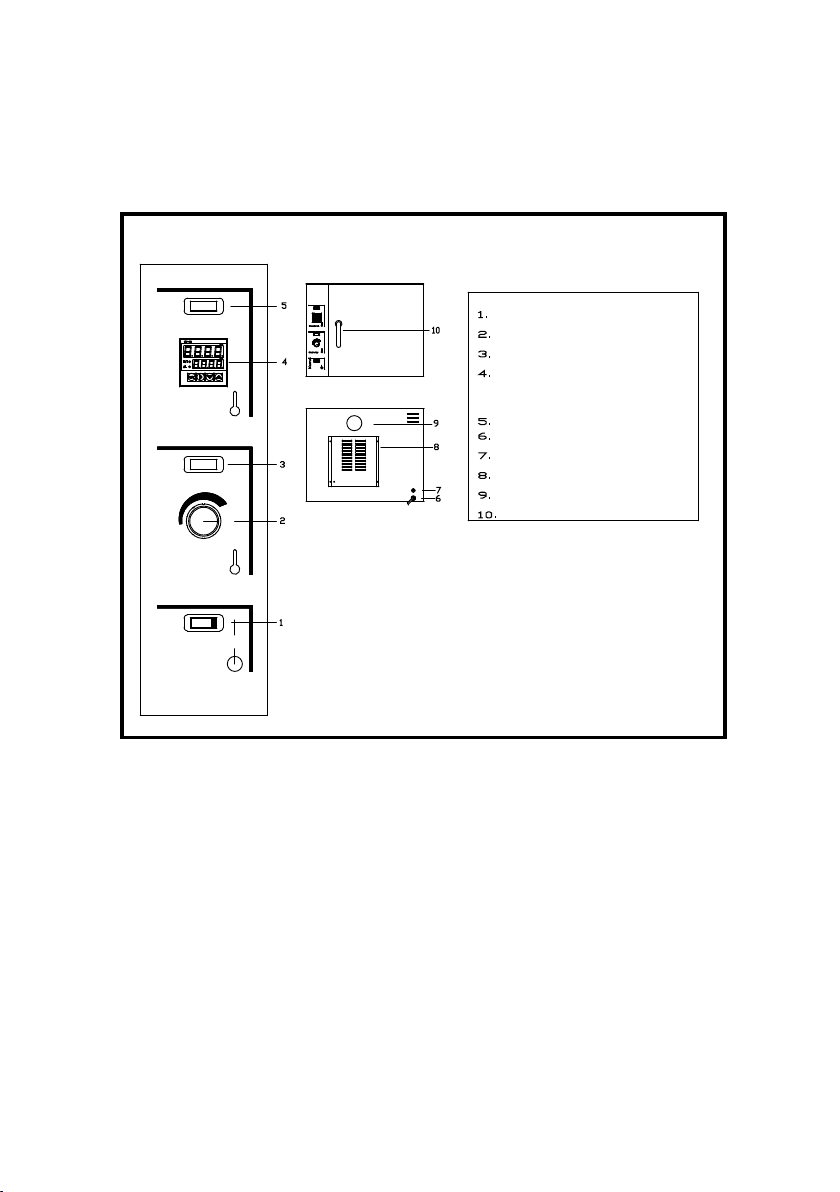
Scientific 2000 Series Owner's manual

INSTALLATION OPERATION AND CARE OF
SERIES 2000 ECONOMY OVENS AND INCUBATORS
MODELS: 220/221/222/223/224/223D/224D
225/226/227/228/229/228D/229D
275/276/277/278/279/278D/279D
295/296/297/298/299/298D/299D
ECONOMY OVENS AND INCUBATORS

THESE INSTRUCTIONS MUST BE FOLLOWED FOR US TO
GUARANTEE OUR FULL SUPPORT OF YOUR CLAIM FOR
PROTECTING AGAINST LOSS FROM CONCEALED DAMAGE.
THE FORM FOR FILING SUCH A CLAIM WILL BE PROVIDED
BY THE CARRIER.
UNPACKING
Unpack the product and check for any damage incurred during
transit. This should be reported to the responsible carrier, railway or
postal authority, and a request for a damage report should be made.
GENERAL INSTALLATION AND OPERATION INFORMATION
1. Position the unit on a stable bench.
2. Ensure that the unit is at least 100mm-200mm from the wall to
ensure that the exhaust air duct on the rear of the unit can
vent adequately.
3. Before switching on the unit, remove all leaets and contents
from the inside of the oven/incubator.
4. The oven door is opened by a 90º anti-clockwise turn of the
handle and then pull to open.
5. There are two chrome plated steelwire shelves provided, plus 4
shelf runners. Once unpacked, clip the shelf runners rmly
into position via the hooks, which clip into the recessed rails
on the inner side walls of the oven/incubator. Ensure that they
are rmly clipped into the desired position and slide the shelf
into the U-prole of the shelf runner.
6. Uniformly load the shelves and observe the maximum shelf
loadings given in the technical specication.
7. Pushing the door slightly against the silicon frame seal and
then running handle clockwise through 90º closes the oven/
incubator door.

The units are either bench-top ovens or incubators. The oven mod-
els are general-purpose units with a working temperature range
from ambient +7ºC to 250ºC. The incubator models have a working
temperature range from ambient +7ºC to 110ºC.
Either unit consists of a mild steel body coated with a textured pow-
der coated nish, while the interior chamber is made of 304 stain-
less steel. The exterior shell is separated from the interior shell by
mineral wool insulation.
PRODUCT DESCRIPTION
MAINS FUSE
The mains fuse on the rear of the unit may be exchanged using
the following fuse
MEDIUM BLOW FUSE – M15 AMP 5 X 32MM
Disconnect the power plug from the mains socket before
attempting to replace the fuse.
THESE OVENS/INCUBATORS ARE NOT EXPLOSION-
PROOF. IT IS NOT RECOMMENDED TO HEAT SOL-
VENTS AND OTHER FLAMMABLE SUBSTANCES.

1. Ensure that the power plug of the unit is plugged into the
mains power socket.
2. Ensure that the oven /incubator door is closed.
3. Switch on the mains power switch of the unit via the “MAINS”
rocker switch.
4. The rocker switch will illuminate and the circulation fan will
immediately operate.
5. Set the desired control temperature via the “CONTROL”
thermostat selector knob.
6. Set the “SAFETY” cut out temperature on the safety
thermostat by allowing the unit to reach the set “CONTROL”
temperature and setting the “SAFETY” temperature slightly
above the set temperature using the “SAFETY” thermostat selec-
tor knob.
SPECIFIC INSTALLATION AND OPERATING INFORMATION
Safety
Mains
Control
Illuminated mains rocker switch
Safety thermostat selector knob
Safety thermostat pilot light
Control Thermostat Selector Knob
Pilot light control
Power Chord with Plug
Fuse holder
Fan cover
Exhaust vent duct
Door handle
FRONT OF OVEN / INCUBATOR
REAR OF OVEN / INCUBATOR
ECONOMY OVEN / INCUBATOR
LEGEND
250
230
210
190
170
150
130
110
90
70
50
ECONOMY SERIES : 220 – 224 OVENS / 225 – 229 INCUBATORS

DIGITAL SERIES : 275 – 279 OVENS / 295 – 299 INCUBATORS
FRONT OF OVEN / INCUBATOR
DIGITAL OVEN / INCUBATOR
Safety
Mains
Control
Illuminated mains rocker switch
Safety thermostat selector knob
Safety thermostat pilot light
Digital Setpoint
Digital indicating
Did - Fuzzy
Temperature Controller
Pilot light control
Power Chord with Plug
Fuse holder
Fan cover
Exhaust vent duct
Door handle
REAR OF OVEN / INCUBATOR
LEGEND
DIGITAL TEMPERATURE CONTROLLER
1. Ensure that the oven /incubator door is closed.
2. Switch on the mains power switch of the unit via the “MAINS”
rocker switch.
3. The rocker switch will illuminate and the circulation fan will
immediately operate.
4. Set the desired control temperature via the “ELECTRONIC
TEMPERATURE CONTROLLER” As per instructions overleaf.
5. Set the “SAFETY” cut out temperature on the safety thermostat by
allowing the unit to reach the set “CONTROL” temperature and
setting the “SAFETY” temperature slightly above the set
temperature using the “SAFETY” thermostat selector knob.

1. The temperature controller has four buttons on the front face.
These are used to set the required temperature, initiate Auto-
Tuning, and enter any adjustments to the program.
2. To set the required temperature, ensure that the unit is con-
nected and switched “ON” in the appropriate manner.
3. The top display (red) shows the actual temperature (PV) in the
unit, the bottom display (green) is the setting temperature
(SV) and must be adjusted to the required temperature. To
adjust the setting, press the button that points to the left.
This action will start one of the digits in the lower display ash-
ing. By touching this button again, the ashing will move to the
left. Once the ashing red display is on the number that needs to
change, use the UP/DOWN buttons to attain the required set-
tings.
4. By moving the ashing digit left or right the desired temperature
required can be set. Once the correct temperature has been en-
tered, press SET to enter the setting.
OPERATING INSTRUCTIONS OF ELECTRONIC TEMPERATURE
CONTROLLER

SYMPTOMS POSSIBLE DIAGNOSIS POSSIBLE DIAGNOSIS
Mains switch fails to
switch on convection
fan when switched on
- Faulty power supply
- Faulty fuse
- Defective plug
- Fan faulty
- In all instances
we suggest you
contact a service
technician
The “Control” pilot
light fails to light up
- The pilot light may be faulty
or there may be a problem
in the regulation circuit.
- The safety thermostat may
be set below the control set
temperature.
Control pilot light on but
no heating - Element faulty
- Contact a service
technician.
- Contact a service
technician
- Turn safety thermostat
selector knob slightly
clockwise until control
circuit is activated.
TROUBLE-SHOOTING GUIDE

WARNING
Burn Hazard.
Do not touch hot,liquid or heating surfaces
while equipment is heating or operating
Hot surfaces and liquid can burn skin. Allow the hot surfaces to cool
before handling
CLEANING THE UNIT
BEFORE CLEANING THE UNIT, DISCONNECT THE POWER
PLUG FROM THE MAINS SOCKET!
• Clean the outside of the unit using a damp cloth with soapy
water.
• The stainless steel inner chamber should be cleaned with a
damp cloth immersed in soapy water.
• Under no circumstances should steel wool be used.
• Avoid aggressive acids since this will discolour the stainless
steel.
• It is normal for the stainless steel to adapt a slightly yellow
discolouration when exposed to continuous high temperature
use.
MAINTENANCE AND REPAIRS
The oven/incubators are designed for continuous operating
under normal conditions. Periodic maintenance other than
cleaning is not required.
Before asking for a service technician or returning the unit for
repair please contact one of our authorized dealers.
CLEAN THE STEEL PARTS WITH WATER AND SOAP.
AVOID THE USE OF DETERGENTS CONTAINING
ABRASIVE SUBSTANCES. ALWAYS RINSE WELL AND
DRY CAREFULLY AFTER CLEANING. DO NOT USE
PRODUCTS CONTAINING AGGRESSIVE CHEMICALS,
ACIDS OR CHLORINE AS THIS WILL INVALIDATE THE
WARRANTY

SAFETY
READ ALL INSTRUCTIONS BEFORE USE. FAILURE TO
FOLLOW THESE PRECAUTIONS COULD RESULT IN INJURY TO
YOURSELF AND OTHERS
1. Use the Ovens/Incubators on an individual 15A mains outlet
only. DO NOT OVERLOAD THE CIRCUIT.
2. Ensure that the equipment and the power supply cord does not
come into contact with hot surfaces.
3. This unit is only to be used by properly trained laboratory staff.
4. If the supply cord is damaged, it must be replaced with a new
cord assembly available from the suppliers agent.
5. Use only earthed outlets matching the serial plate voltage.
6. Have equipment installed by a qualied personnel in accordance
with local codes and ordinances.
7. Use equipment in a at level position.
8. Never leave oven door open because the desired set
temperature cannot be reached which can result in
over-heating of the elements.
9. Uniformly load shelves and do not overload since this may
damage the inside construction of the ovens.
10. Because these ovens are not explosion-proof, it is dangerous
to heat solvents and other ammable substances in this
equipment.
11. When opening the door of the unit, stand a distance away for
the fumes to escape which may be harmful.
12. Do not operate if equipment has been damaged or is malfunc-
tioning in any way.
13. These units are designed to run only on alternating current
(A.C.) DO NOT CONNECT TO DIRECT CURRENT (D.C)
WARNING
Electric Shock Hazard.
Keep water and other liquids from entering the inside
of the equipment. Liquid inside the equipment could
cause an electrical shock
Do not spray water or cleaning products. Liquid could contact the
electrical components and cause a short circuit or an electrical shock.
Do not use equipment if power cord is damaged or has been modied

MODEL
APPROX
INT.
VOL (L)
H
(mm)
W
(mm)
D
(mm)
NETT
WEIGHT
(KG)
MAX SHELF
LOAD RATING
(KG)
220/275
40 370 385 375 38 26
225/295 40 370 385 375 38 26
221/226 80 400 485 455 45 26
276/296 80 400 485 455 45 26
222/227 160 580 535 535 75 26
277/297 160 580 535 535 75 26
223/228 240 680 625 580 88 20
278/298 240 680 625 580 88 20
224/228 780 780 725 755 132 15
279/299 400 780 725 755 132 15
223/228 240DD 680 625 580 88 20
278/298 240DD 680 625 580 88 20
224/229 400DD 780 725 755 132 15
279/299 400DD 780 725 755 132 15
INTERNAL DIMENSIONS

LEGEND DESCRIPTION PART NUMBER
S1 ILLUMINATED ROCKER SWITCH 1-17TAF
B1 SAFETY THERMOSTAT 1-EGO-150
U1 DIGITAL ELECTRONIC CONTROLLER 1-TCD-103
D1 SOLID STATE RELAY 1-SSR-40A
FU 15AMP FUSE AND FUSE HOLDER 1-15-FU/1-15-FH
H1 PILOT LIGHT 1-18TRF
H2 CONTROL PILOT LIGHT 1-18TRF
M CIRCULATION FAN 1-EBM-FAN-320
E1 HEATING ELEMENT SEE TABLE BELOW
HEATING ELEMENTS-OVEN HEATING ELEMENTS-INCUBATOR
40L 5-1000W-OVEN 5-500W-OVEN
80L 5-1000W-OVEN 5-500W-OVEN
160L 5-1500W-OVEN 5-750W-OVEN
240L 5-2000W-OVEN 5-1000W-OVEN
400L 5-1500W-OVEN 5-750W-OVEN
TABLE OF HEATING ELEMENTS
NOTE: THE 400L OVENS AND ICUBATORS ARE FITTED WITH
TWO OF EACH OF THE SPECIFIED ELEMENTS
WIRING DIAGRAM LEGEND
MODEL: DIGITAL OVEN /DIGITAL INCUBATOR
MODEL CODES: 275/276/277/278/279
295/296/297/298/299

WIRING DIAGRAM
MODEL: DIGITAL OVEN /DIGITAL INCUBATOR
MODEL CODES: 275/276/277/278/279
295/296/297/298/299
REV-10/11/2008
SEE TABLE BELOW
HEATING ELEMENT
E1
H2
FU
M
WIRING DIAGRAM AND SPARE PARTS LIST
OVEN / INCUBATOR
DIGITAL CONTROL
MODEL CODE: 275 - 279 (OVENS); 295-299(INCUBATORS)
N
L
E
S1
E1
H1
230V
1 - SSR - 25A
3 - 32 VDC SOLID STATE RELAY
D2
1 - 15 - FU / 1 - 15 - FH
15AMP FUSE / 15AMP FUSE HOLDER
FU
1 - 18TRF
PILOT LIGHT CONTROL
H2
M
CIRCULATION FAN MOTOR
1-FAN-220
LEGEND
DESCIPTION
PART NUMBER
S1
B1
U1
H1
ILLUMINATED MAINS ROCKER SWITCH
SAFETY THERMOSTAT
DIGITAL ELECTRONIC CONTROLLER
PILOT LIGHT SAFETY
(OVEN/INCUBATOR) 1-DC-CN40-PR
1 - 17TAF
SEE TABLE BELOW
1 - 18TRF
TABLE OF HEATING ELEMENTS [E1]
HEATING ELEMENT - OVEN
HEATING ELEMENT - INCUBATOR
40LITRE
80LITRE
160LITRE
240LITRE
400LITRE
5 - 1000W - OVEN 5 - 500W - OVEN
5 - 1500W - OVEN 5 - 750W - OVEN
5 - 2000W - OVEN
5 - 1000W - OVEN
5 - 1500W - OVEN 5 - 750W - OVEN
NOTE:-
THE 400LITRE OVENS / INCUBATORS ARE FITTED
WITH TWO OF EACH OF THE SPECIFIED ELEMENTS
2
4-
1
3+
11
13
12
14
DIR
DWG ADMIN
PROD ELEC
SIGN
DATE
DEPARTMENT
1-EGO-300
1-EGO-50-LG
1-EGO-300
1-EGO-50-LG
1-EGO-1501-EGO-150
1-EGO-1501-EGO-150
1-EGO-1501-EGO-150
400LITRE
240LITRE
160LITRE
80LITRE
40LITRE
OVEN
INCUBATOR
THERMOSTATS (B1)
B1
U1
D1
A
B
B
PROBE
1
2
3

POSITIONING DIAGRAM
MODEL: ECONOMY OVEN /ECONOMY INCUBATOR
MODEL CODES: 220/221/222/223/224
225/226/227/228/229
MODEL A B C
220/225 651 510 600
221/226 750 540 690
222/227 801 720 770
223/228 890 820 810
224/229 990 920 985
A
B
C

POSITIONING DIAGRAM
MODEL: DIGITAL OVEN /DIGITAL INCUBATOR
MODEL CODES: 275/276/277/278/279
295/296/297/298/299
A
B
C
MODEL A B C
275/295 651 510 600
276/296 750 540 690
277/297 801 720 770
278/298 890 820 810
279/299 990 920 985

LEGEND DESCRIPTION PART NUMBER
S1 ILLUMINATED ROCKER SWITCH 1-17TAF
B1 SAFETY THERMOSTAT 1-EGO-150
B2 CONTROL THERMOSTAT 1-LH-355
FU 15AMP FUSE AND FUSE HOLDER 1-15-FH/1-15-FU
H1 PILOT LIGHT 1-18TRF
H2 CONTROL PILOT LIGHT 1-18TRF
M CIRCULATION FAN 1-EBM-FAN-320
E1 HEATING ELEMENT SEE TABLE
WIRING DIAGRAM LEGEND
MODEL: ECONOMY OVEN /ECONOMY INCUBATOR
MODEL CODES: 220/221/222/223/224
225/226/227/228/229
HEATING ELEMENTS-OVEN HEATING ELEMENTS-INCUBATOR
40L 5-1000W-OVEN 5-500W-OVEN
80L 5-1000W-OVEN 5-500W-OVEN
160L 5-1500W-OVEN 5-750W-OVEN
240L 5-2000W-OVEN 5-1000W-OVEN
400L 5-1500W-OVEN 5-750W-OVEN
TABLE OF HEATING ELEMENTS
NOTE: THE 400L OVENS AND INCUBATORS ARE FITTED WITH
TWO OF EACH OF THE SPECIFIED ELEMENTS

WIRING DIAGRAM
MODEL: ECONOMY OVEN /ECONOMY INCUBATOR
MODEL CODES: 220/221/222/223/224
225/226/227/228/229
1 - 15 - FU / 1 - 15 - FH
15AMP FUSE / 15AMP FUSE HOLDER
FU
1 - 18TRF
PILOT LIGHT SAFETY
H1
1-FAN-220
CIRULATION FAN MOTOR
M
E1
HEATING ELEMENT
SEE TABLE BELOW
H2
FU
B1
M
WIRING DIAGRAM AND SPARE PARTS LIST
MODEL CODE: 225 - 229 (INCUBATOR)/220-224(OVEN)
MODEL: ECONOMY OVEN / INCUBATOR
LEGEND
DESCRIPTION PART NUMBER
S1
B1
B2
H2
ILLUMINATED MAINS ROCKER SWITCH
SAFETY THERMOSTAT
CONTROL THERMOSTAT
PILOT LIGHT CONTROL
SEE TABLE BELOW
1 - 17TAF
1 - EGO - 150
1 - 18TRF
N
L
E
S1
B2
E1
H1
230V
TABLE OF HEATING ELEMENTS [E1]
HEATING ELEMENT - OVEN
HEATING ELEMENT - INCUBATOR
40LITRE
80LITRE
160LITRE
240LITRE
400LITRE
5 - 1000W - OVEN
5 - 500W - OVEN
5 - 1000W - OVEN
5 - 500W - OVEN
5 - 1500W - OVEN
5 - 750W - OVEN
5 - 2000W - OVEN
5 - 1000W - OVEN
5 - 1500W - OVEN
5 - 750W - OVEN
NOTE:-
WITH TWO OF EACH OF THE SPECIFIED ELEMENTS
THE 400LITRE OVENS / INCUBATORS ARE FITTED
DIR
DWG ADMIN
PROD ELEC
SIGN
DATE
DEPARTMENT
REV-10/11/2008
THERMOSTATS (B2)
INCUBATOR
OVEN
40LITRE
80LITRE
160LITRE
240LITRE
400LITRE
1-EGO-50
1-EGO-150
1-EGO-50
1-EGO-150
1-EGO-50
1-EGO-150
1-EGO-50
1-EGO-300
1-EGO-50
1-EGO-300

POSITIONING DIAGRAM
MODEL: 400L DOUBLE DOOR ECONOMY OVEN /INCUBATOR
MODEL CODES: 224D/279D
229D/299D
A
B
C
MODEL A B C
224 834 1005 985
229 834 1005 985
279 834 1005 985
299 834 1005 985

POSITIONING DIAGRAM
MODEL: 240L DOUBLE DOOR ECONOMY OVEN /INCUBATOR
MODEL CODES: 223D/278D
228D/298D
A
B
C
MODEL A B C
223 734 905 810
228 734 905 810
278 734 905 810
279 734 905 810

MODEL DESCRIPTION VOLTS
(V/Hz)
POWER
(WATTS)
220/275 40LT OVEN 230/50 1000
221/276 80LT OVEN 230/50 1000
222/277 160LT OVEN 230/50 1500
223/278 240LT OVEN 230/50 2000
224/279 400LT OVEN 230/50 3000
225/295 40LT INCUBATOR 230/50 500
226/296 80LT INCUBATOR 230/50 500
227/297 160LT INCUBATOR 230/50 750
228/298 240LT INCUBATOR 230/50 1000
229/299 400LT INCUBATOR 230/50 1500
ELECTRICAL CONNECTION INFORMATION
IT IS ESSENTIAL TO MAKE SURE THAT THE INCOMING
VOLTAGE IS THE SAME AS THE RATED VOLTAGE OF
THE OF THE UNIT AS FOUND ON THE SERIAL PLATE.
THE SERIAL PLATE IS LOCATED AT THE REAR OF THE
UNIT ADJACENT TO THE INCOMING CABLE ENTRY.
THE CONTROL COMPARTMENT OF THIS UNIT CON-
TAINS DANGEROUS VOLTAGES. MAINTENANCE AND
SERVICING REQUIRING THE REMOVAL OF ANY PAN-
ELS OR COVERS SHOULD BE DONE BY QUALIFIED
SERVICE PERSONNEL ONLY.

4-INS-220 R01
LIMITED WARRANTY
The manufacturer guarantees that this unit is free from defect in ma-
terials and workmanship when it leaves the factory and undertakes to
replace or repair the unit if it proves defective in normal use or during
servicing for a period of 1(one) year. The date of original installation
and is for the benet of the original purchaser only. The liability under
this warranty is limited to repairing the defective unit or any part of
the unit provided it is sent carriage paid to an authorized dealer. All
other Warranties ,expressed or implied , statutory or otherwise, in-
cluding without limitations any implied Warranty of Merchantability or
tness for purpose are excluded .The Seller shall in no event be liable
for direct,indirect or consequential damages in connection with the
products.
This unit is at all times to be used according to the instruction manual
and for its normal purpose.
This Warranty is not effective if damage occurs because of accident,
carelessness,improper installation,lack of proper set-up,supervision
when required or if the equipment is installed or operated in any
manner contrary to the installation and operating instructions. In
these cases,repairs will be made at a reasonable cost. Work per-
formed by unauthorized personnel or unauthorized service agencies
voids this Warranty.
This manual suits for next models
28
Table of contents
Popular Oven manuals by other brands

Lebensstil Kollektion
Lebensstil Kollektion LKSO-2801WD instruction manual

Electrolux
Electrolux SkyLine PremiumS 6GN2/1 installation manual

MIHM-VOGT
MIHM-VOGT Tabeo-2/M/Metal-120 Original operating manual

Hotpoint Ariston
Hotpoint Ariston 7OFH 837 C RU /HA operating instructions

Smeg
Smeg S399XPZ6 Instructions for installation and use

Zanussi
Zanussi ZOB35301 user manual