BioLife ThawSTAR CFT2 User manual

1. ThawSTAR Automated Cell Thawing System Function and Description
ThawSTAR®Automated Cell Thawing System (Item No. AST-601) is designed to rapidly thaw live biological contents of 1.8-2.0 mL cryogenic
vials taken directly from liquid nitrogen (LN2) storage, a -80°C freezer or vials equilibrated and held at dry ice temperature (-78.5°C) in a
container such as the ThawSTAR®CFT2 Transporter (Item No. AST-602). Utilizing patent-pending STAR™adaptive sensing technology, each
vial receives a customized thaw cycle based upon multiple built-in detection parameters. The intended result is a thermal prole equivalent
to a water bath thaw, but without the water, and comparable post-thaw cell recovery and viability.
LEDs
Base light
Unit
opening
On/Off
switch
Mini USB port (to be
used only by authorized
service personnel)
Speaker
Power
connection
1.1 General Safety
ThawSTAR Automated Cell Thawing System is intended for the exclusive use by trained and experienced laboratory personnel.
1.1.1. Review instructions before installing, using or cleaning the unit.
1.1.2. DANGER: To prevent risk of severe or fatal electrical shock, use only the supplied AC power supply with cables for
the US, UK and EU packaged with the unit.
1.1.3. WARNING: Do not place near ammable materials. This unit is not designed to be explosion-proof or spark-proof.
1.1.4. WARNING: Avoid prolonged exposure to ultraviolet light such as sunlight or germicidal lamps unless covered by
light resistant plastic bag or a large piece of unbroken aluminum foil placed over the unit when not in use.
1.1.5. WARNING: Do not clean unit with ketone solvents; use recommended cleaning protocol in section 5.
1.1.6. CAUTION: Do not place near or immerse in water or other liquids.
1.1.7. WARNING: Removal of shell without authorization will void your limited warranty. Do not remove exterior shell of
the unit unless instructed to do so by an authorized BioLife representative.
1.1.8. WARNING: Unit has a covered mini-USB port on the bottom; do not insert any USB plug into this port or attempt to connect unit
with any other device, (eg. a computer), unless instructed to do so by an authorized BioLife representative.
1.1.9. WARNING: Do not use ag labels or labels that have a tab extending beyond the vial body or with folds or ridges with the
unit as these features may interfere with heat transfer or cause vial to become lodged in the unit.
1.1.10. CAUTION: The unit is designed for stationary indoor laboratory bench top use; outdoor “eld” use or use on a
laboratory bench subject to strong vibrations such as near a centrifuge, shaker, or vortex mixer is not advised.
1.1.11. Ensure the unit is placed securely on a level surface during operation.
1.1.12. Recommended for use with standard 1.8 to 2.0 mL cryogenic vials containing cryopreserved cells; the ThawSTAR
system is optimized for 1.o mL volume of aqueous solution at a starting temperature of <- 70°C.
1.1.12.1. Ensure vials were frozen in an upright and vertical position and that frozen contents are at the bottom of the vial.
1.1.12.2. Vials should be gently inserted into the top opening of the unit; CAUTION: NO other objects (e.g. forceps)
should be inserted into the unit at any time.
1.1.13. CAUTION: Keep liquids out of the unit; ensure cryogenic vials have clean exteriors and are tightly capped to prevent leaks.
1.1.14. CAUTION: Do not touch the vial with hands or any other object until the thawing process is nished (after
cryogenic vial is inserted into the opening of the unit and the thawing process has been initiated).
1.1.15. Thawing time is typically 2-3 minutes from the time of vial insertion. Laboratory personnel are advised to be in close
proximity to the unit while in use so that vials may be immediately retrieved upon thaw completion.
1.1.16. Before moving the unit, ensure that any cryogenic vial has been removed from unit opening.
1.1.17. Keep unit opening covered while not in use.
1.1.18. HOT SURFACE WARNING: The heating elements inside the vial opening are heated while the unit is turned on. Avoid
inserting body parts such as ngers or any object except a 1.8 to 2.0 mL cryogenic vial into the vial opening at any time.
1.1.19. Ensure the power cord can be easily disconnected from the power supply when placing the unit on a laboratory bench.
ThawSTAR®CFT2
Automated Cell Thawing System
Instructions for Use
1.2 Use As Intended
If the ThawSTAR® Automated Cell Thawing System is used in a manner not specied by BioLife in these Instructions for Use, operators are
regarded as proceeding under their own risk and warranty terms and conditions may be voided.
1.3 Packing Components
The ThawSTAR®Automated Cell Thawing System contains the following components:
Item Quantity Photo
ThawSTAR®Automated Cell Thawing System 1
AC power supply with cable for US, UK, EU 1 power supply
3 power cables
ThawSTAR® Conrmation Vials 2 vials
Quick Start Guide 1
Instructions For Use 1
Limited Product Warranty 1
1.4 Unpacking
Remove plastic tie inserted into unit opening and associated tape/padding completely before using. If you are missing any
components, please contact BioLife. See customer service contact information in Section 8.
1.5 Specications
Instrument
Thawing temperature Equivalent to a 37°C water bath
Thawing time Typically less than 3 minutes
Operating environment temperature 5°C to 35°C; 75% room humidity (maximum)
Storage temperature -20°C to 60°C
Maximum altitude 2,000 m
Power rating 40 W maximum
Input/Output voltage (power adaptor) AC 100 - 240V / DC 12 V, 50 – 60 Hz
Output current 3A
Phase IØ
Electrical plug formats US, UK, EU
Dimensions (Diameter x Height) 10.9 cm x 14.5 cm (4.3 in x 5.7 in)
Weight without power supply 0.7 kg (1.6 lbs)
Weight with power supply 1.2 kg (2.6 lbs)
Compliance CE mark (EMC and Safety), IEC60601, IEC61010, RoHS, WEEE
Cryogenic Vial Compatibility
Vial body external diameter 12.19-12.37 mm (0.480-0.487 in)*Measured 30.4 mm (1.2 in) from bottom of vial
Vial body external height below cap ring (minimum) 26.6 mm (1.05 in)
Overall height of vial with cap (minimum) 44 mm (1.73 in)
Vial cap diameter (maximum) 14.3 mm (0.56 in)
Vial capacity One standard 1.8 to 2.0 mL cryogenic vial
Sample volume Optimized for 1.0 mL
Vial Contents Optimized for cells in cryopreservation medium such as 10% DMSO / 20% FBS /
70% DMEM
Vial label thickness (maximum) 0.1 mm

2. Instrument Assebly
Plug the power supply into the port in the back of the ThawSTAR®Automated Cell Thawing System and attach
the appropriate power cord (US, UK or EU) to the power supply.
3. Instrument Start-Up
Step Action Light Sequence Sound
3A. Check to ensure that assembled unit is plugged
into an electrical outlet
N/A N/A
3B. Turn on unit using the rocker switch above
the unit’s power source connection port,
ensuring that the side of the switch labeled “I” is
depressed.
Front: Red light ash, then full circle light
chase, one cycle
Two-tone, descending
3C. Allow up to 5 minutes for unit to warm up
Front: Rising symmetric semicircle in red
background
Base: Slow pulsing pattern
N/A
3D. The unit will shift into “ready” state
Front: Top light of light circle will be
illuminated
Base: Not pulsing
Single tone at transition to ready
Note: If unit does not reach a “ready” state within 10 minutes of powering up and the power supply was properly connected to the unit and
plugged into an electrical outlet with a provided cable, please contact BioLife customer service.
4. Operating Instructions
Note: Use of the ThawSTAR®CFT2 Transporter (Item No. AST-602) is recommended to keep samples below -70°C during sample transport
and holding time to ensure sample integrity and provide a standardized starting vial and thaw temperature. Use of a ThawSTAR® Conrmation
Vial, frozen and handled under the same conditions as biospecimens to be thawed, to evaluate and log unit thaw performance at least once
daily before thawing biospecimens, is recommended. Initial time to warm up, thawing time of ThawSTAR Conrmation Vial, vial lot number,
vial expiration date, ambient room temperature, ambient humidity level, unit serial number, evaluation start time and date are data which
could be logged.
Step Action Light Sound
4A. Carefully insert a clean, tightly capped frozen 1.8
- 2.0 mL cryogenic vial (below -70°C) containing
1.0 mL volume into the opening on the top of
the unit and allow vial to drop into place.
Tip: Before freezing, cap cryogenic vial tightly
after lling to avoid leaks and clean exterior
of vial with 70% alcohol wipe or sprayed 70%
alcohol.
Front: Top light of light circle will be
illuminated
Base: Not pulsing
N/A
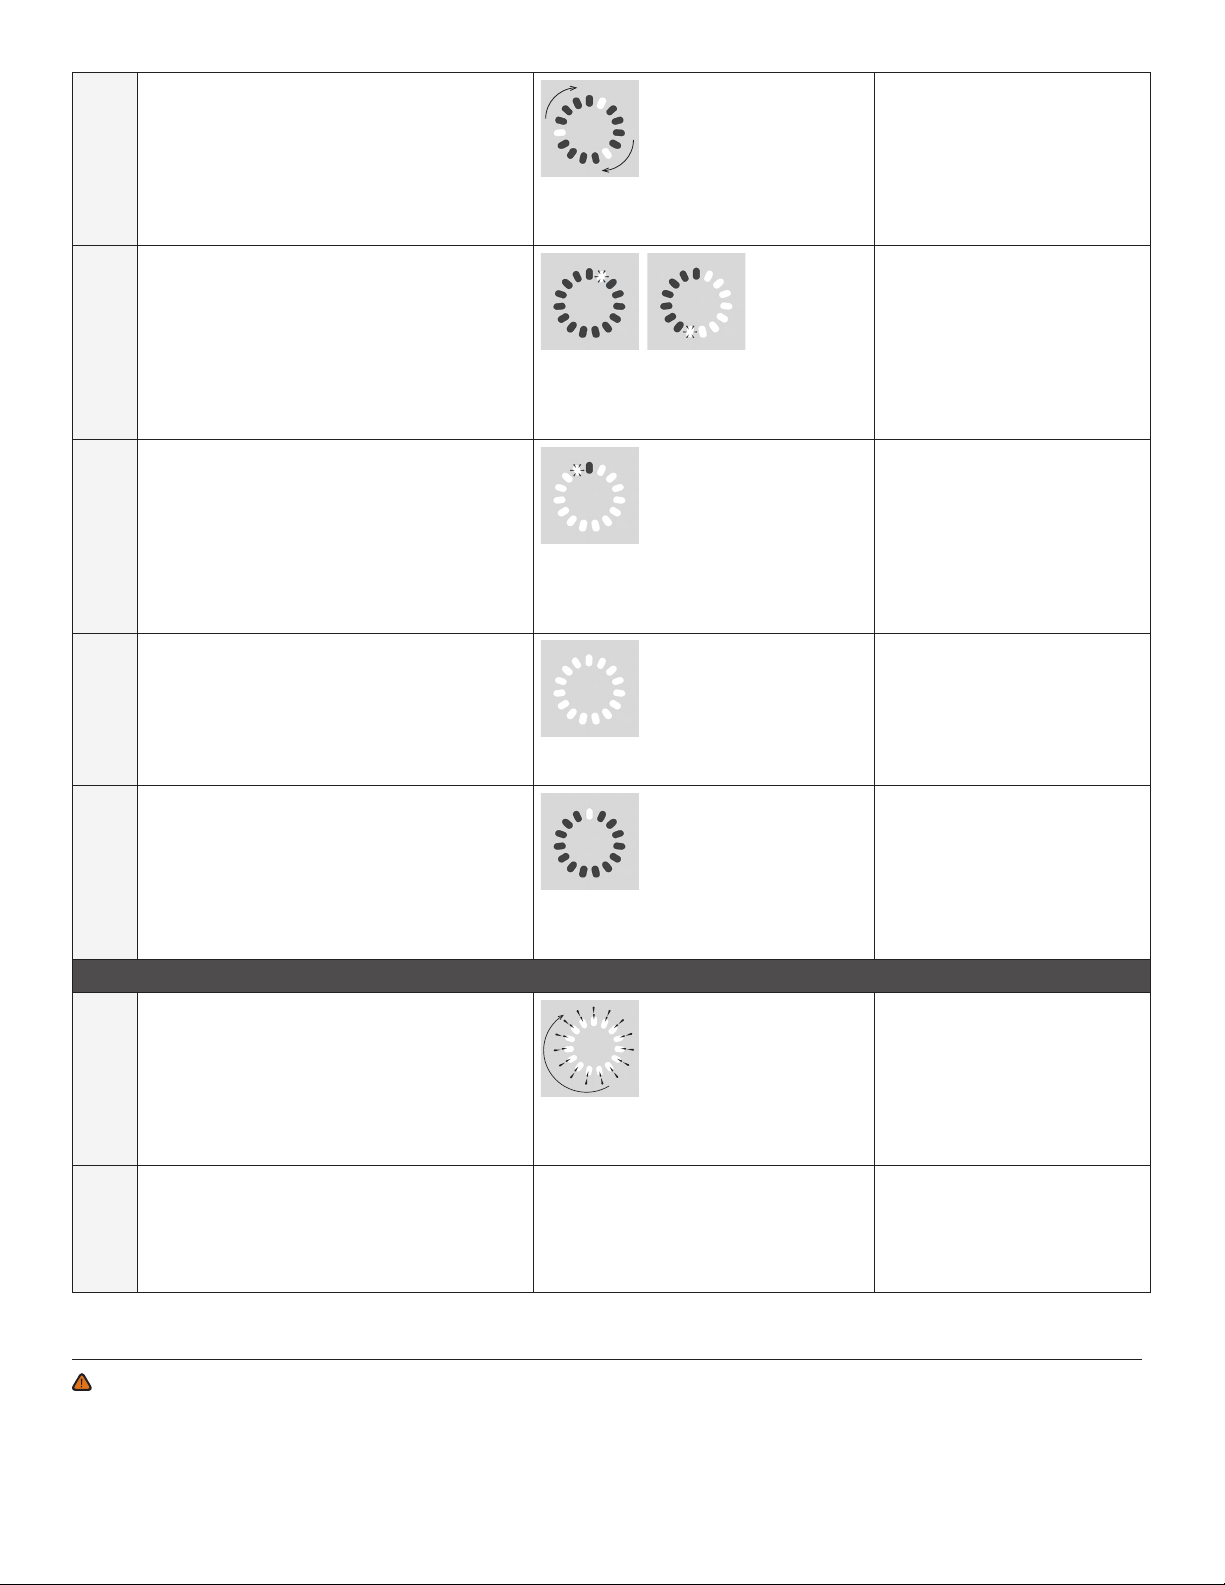
4B. Push the top of the vial down gently until the unit
emits a deep dual tone. The vial will now remain
in a depressed position.
The unit will begin phase change detection using
STAR™ sensing technology.
Front: Three LED light triangle rotating
clockwise
Base: Pulsing pattern
Two-tone, rising
4C. Beginning of solid to liquid phase change is
detected by unit.
Front: LED circle shows progressive ll-in
sequence clockwise to nish, leading light
always blinking
Base: Pulsing pattern
N/A
4D. Countdown of the last 10 seconds of the thawing
process begins.
Front: Progressive ll-in sequence
continues, leading light continues
blinking
Base: Pulsing pattern
Tone on each one second interval
4E. Upon thaw completion, the vial is raised
approximately 1 cm (0.4 in).
Front: Filled LED circle
Base: Pulsing pattern
Two tone climbing sequence
4F. Remove vial immediately and for a few seconds,
manually agitate the vial gently from side to side
to equilibrate the liquid temperature until no ice
can be seen within the vial. Begin downstream
protocol.
Front: Return to single LED illuminated at
top of the light circle (“ready” state)
Base: Not pulsing
N/A
Post-thaw Alerts
4G. If vial is not removed within 5 seconds of
ejection, unit will signal an alert.
Front: Progressive ll-in sequence
clockwise, one LED per second up to 15
seconds with double ash
Two beeps every half-second for
up to 10 seconds
4H. If vial is not removed within 15 seconds of
ejection, unit will switch into “abandoned vial”
(error code 7) mode.
See Section 5, Trouble Shooting, for “abandoned
vial” (error code 7) recovery.
Front: Display red light and error code 7. Four tone sequence for 5
seconds, then two tone sequence
every 15 seconds for 5 minutes
5. Care and Cleaning
WARNING: Do not attempt to clean internal components. Do not insert any cleaning objects or solution past the green guide chute on
the top opening of the unit. Clean exterior only with a soft, non-abrasive laboratory wipe moistened with 70% alcohol before and after each
use period. Condensation from frozen vials should not present an issue, as it will evaporate during the thawing process or stand-by interval.
6. Troubleshooting
Refer to steps in Section 3 (Instrument Start-up) and Section 4 (Operating Instructions).
Situation Error Code Light Sound Instruction
Instrument start-up (Refer to Section 3)
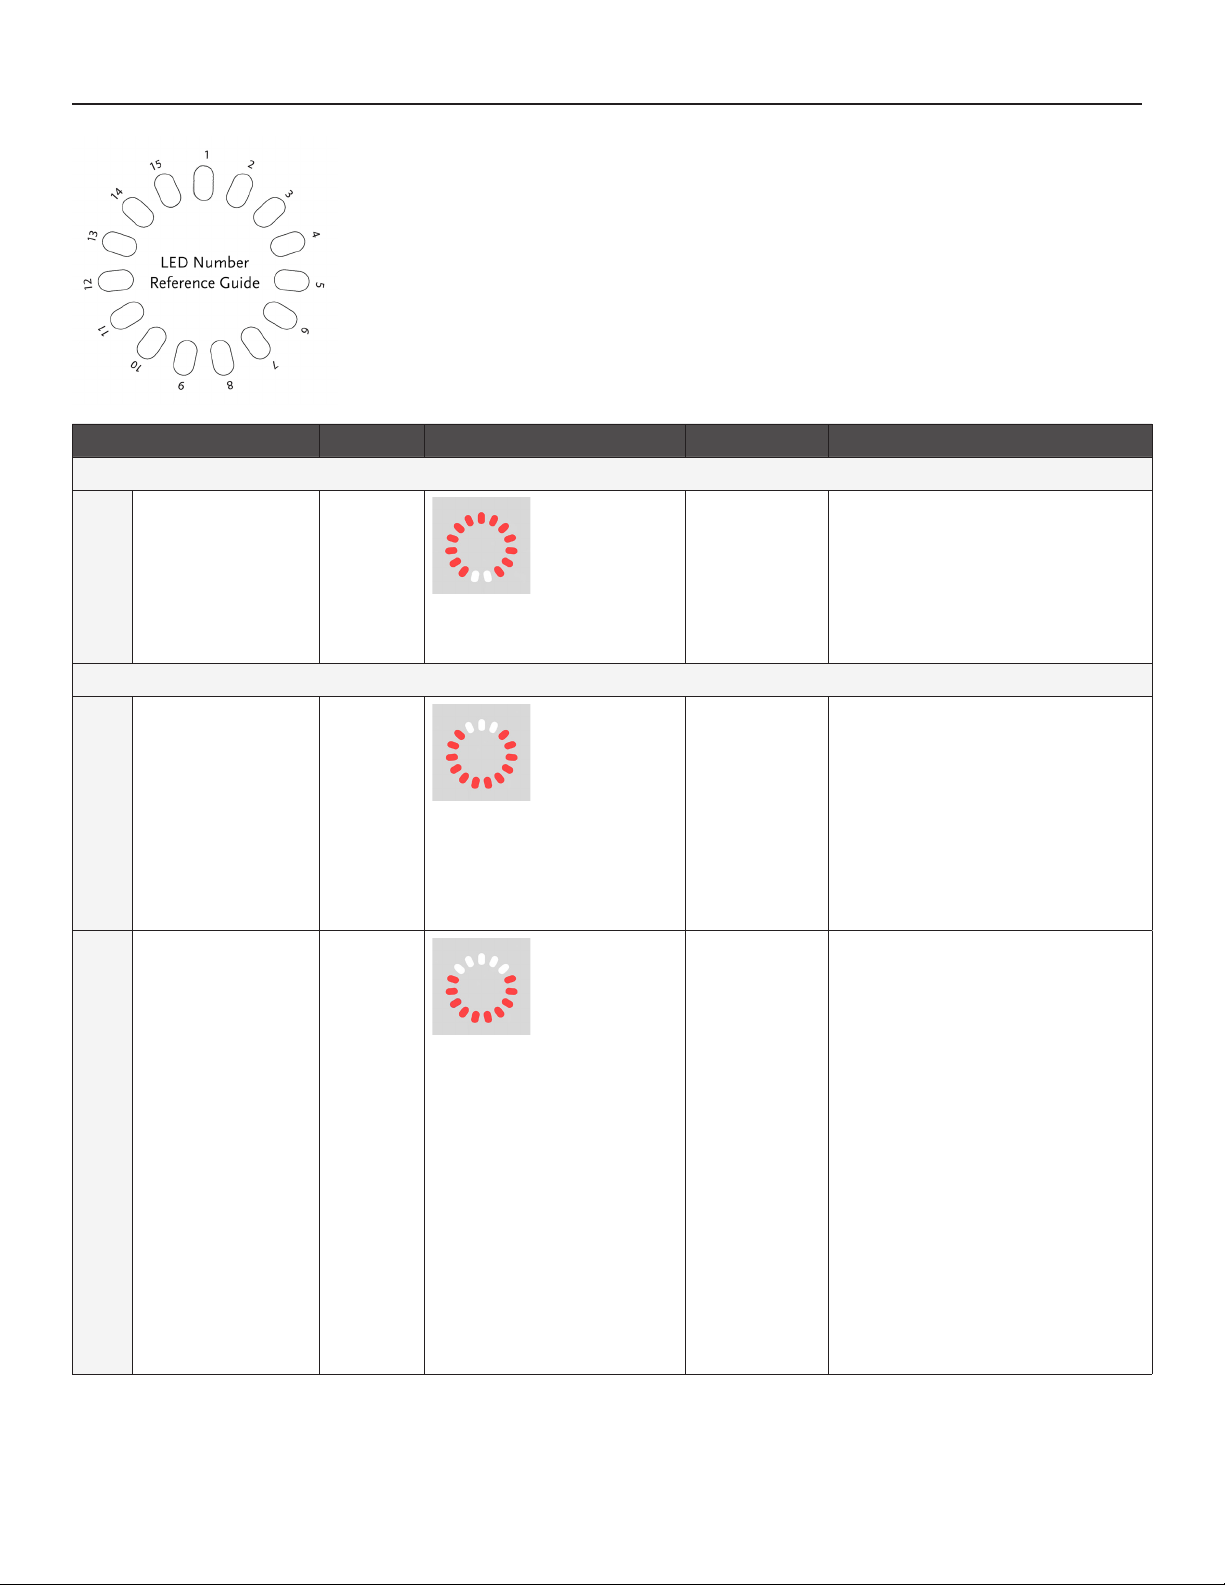
6A. Step 3C
Failure to warm up
properly; or other
mechanical fault in
the heating system
Error Code
2
Front: A red light background
with error code 2 (two LEDs at
the bottom of the circle: 8,9)
Single tone
repeated twice
Check power source connection at
back of unit, cable connection to power
adapter and the plug connection to the
electrical outlet. Turn the unit off and
back on. If the unit displays the same
error code 2, contact BioLife customer
service.
Instrument operation (Refer to Section 4)
6B. Step 4A
Vial too warm and/or
already thawed
Error Code
3
Front: Flash full circle with
red light background once
and then display red light
background with error code
3(three LEDs at the top of the
circle: 15,1,2)
Single tone
repeated twice
Gently remove vial that is too warm.
Unit will display a single light at the top,
indicating that the unit is ready for the
next thaw.
6C. Step 4B
Vial cannot be seated
properly (e.g. too
wide, too short, etc.)
Error Code
5
Front: Flash full circle with
red light background once
and then display red light
background with error code
5 (ve LEDs at the top of the
circle: 14,15,1,2,3)
Single tone
repeated twice
Gently remove the vial. Unit will display
a single light at the top, indicating
that the unit is ready for the next
thaw. (1) Look into opening to see if
there is anything lodged in the heater
grasping mechanism. Invert unit to
gently shake out obstructions, if any.
(2) Ensure that the thermal pads lining
the internal heating blocks are intact
and undamaged. Note: If thermal
pads are not intact and/or damaged,
contact BioLife customer service. (3)
Ensure vial is within specications
outlined in section 1.5. (4) Try to thaw
frozen ThawSTAR® Conrmation Vial. If
situation repeats itself with same error
code 5, hardware issue (latching fault)
may be the root cause; contact BioLife
customer service.
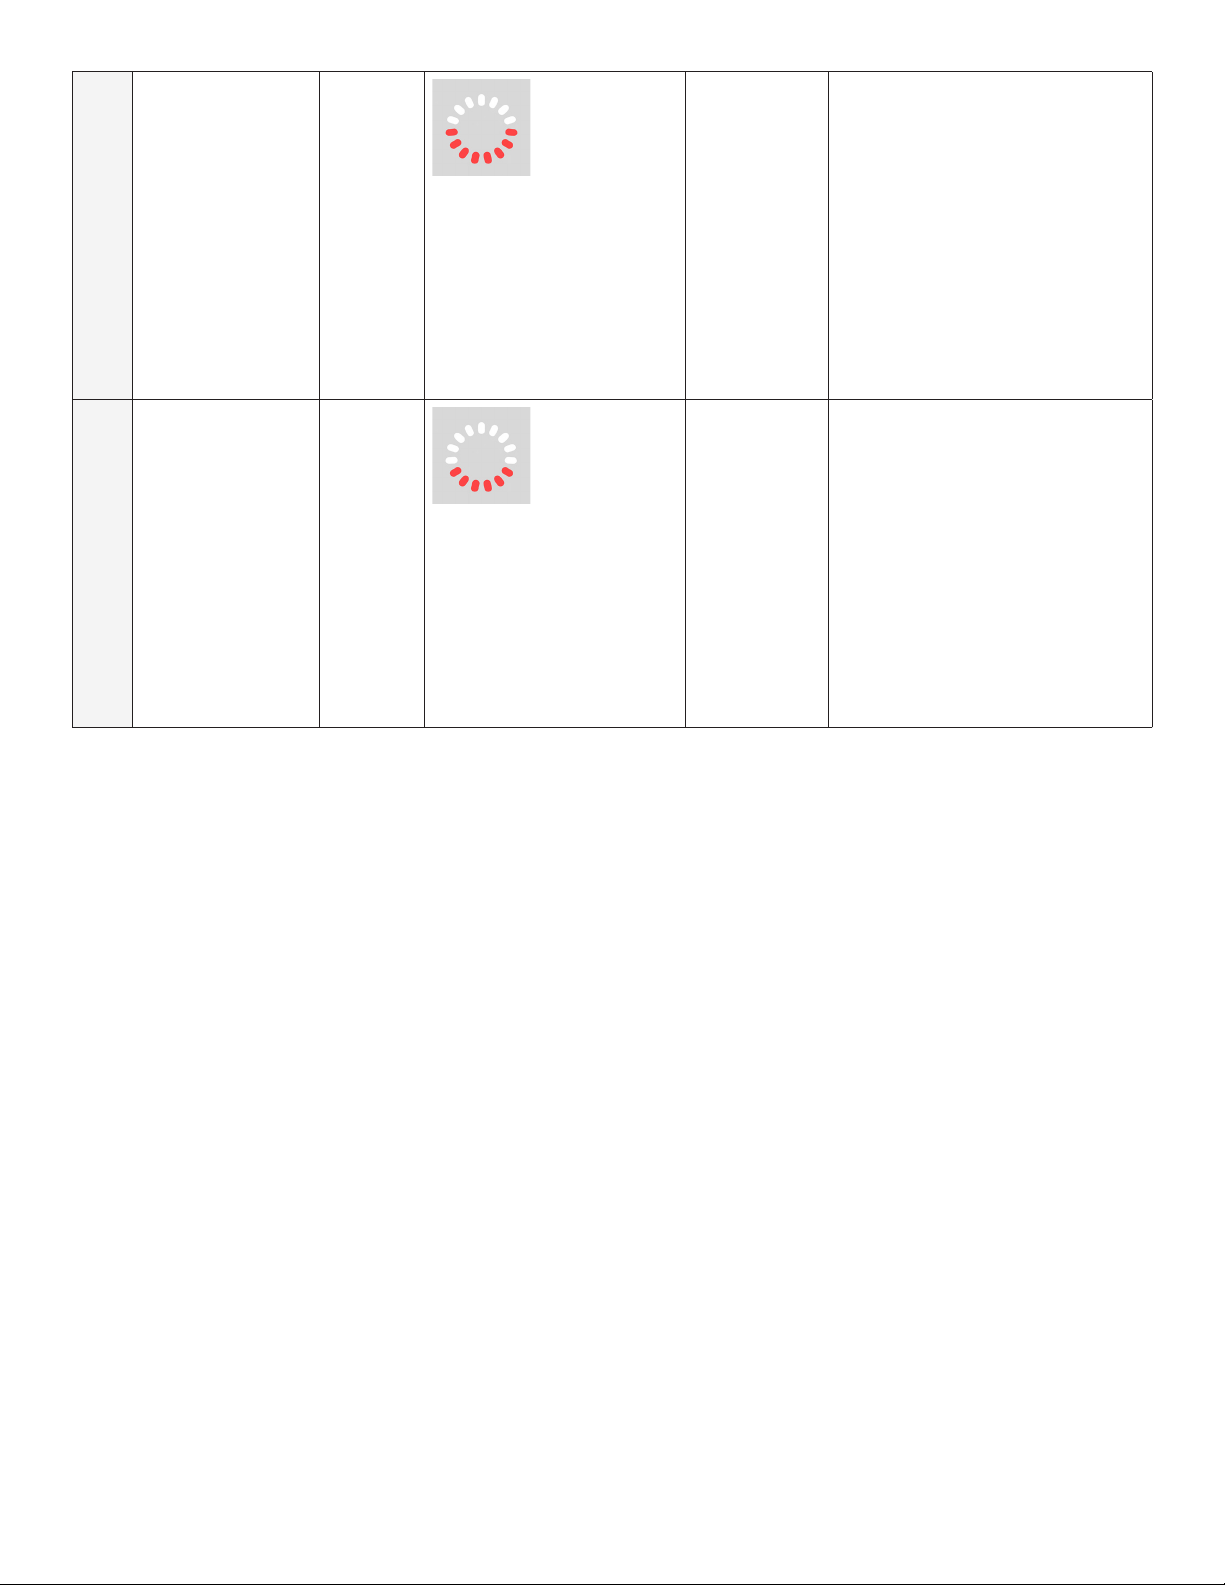
6D. Step 4H
“Abandoned” vial left
in unit more than 15
seconds after thawing
process is completed
Error Code
7
Front: Flash full circle with
red light background once
and then display red light
background with error code 7
(seven LEDs at the top of the
circle: 13,14,15,1,2,3,4)
Four tone
sequence for
5 seconds,
then two tone
sequence every
15 seconds until
vial is removed.
Gently remove vial. Unit will emit a
single tone. Unit will display a single
light at the top, indicating that the unit
is ready for the next thaw.
6E. Step 4E-H
Vial fails to rise after
thaw process is
nished
Error Code
9
Front: Flash full circle with
red light background once
and then display red light
background with error code
9 (nine LEDs at the top of the
circle: 12,13,14,15,1,2,3,4,5)
(If in step 8, error code 7
displayed after 15 seconds)
Four tone
sequence for
5 seconds,
then two tone
sequence every
15 seconds until
vial is removed.
Grasp the vial cap only with ngers or
forceps and rock vial gently to dislodge
and remove from opening, taking care
not to open the cap. Unit will display
a single light at the top, indicating
that the unit is ready for the next thaw.
Ensure that the thermal pads lining the
internal heating blocks are intact and
undamaged. Note: If thermal pads are
not intact and/or damaged, contact
BioLife customer service. Avoid sticking
forceps or other foreign objects into the
opening.
7. Registration
To register please email [email protected] and include your product serial number and contact information. In addition to
documenting your purchase date and other information related to the Limited Product Warranty, you will have the opportunity to be notied
of any other product updates.
8. Customer Service Information
8.1 Technical Service and Repair
CAUTION: If it is necessary to return your ThawSTAR®Automated Cell Thawing System for any reason, it is required that you
decontaminate the unit prior to sending. Contact BioLife technical support or a BioLife authorized representative for decontamination
instructions and a Return Material Authorization (RMA) Number.
8.2 Ordering Information
Item No. Description
AST-600 ThawSTAR®Transport and Automated Cell Thawing System, complete with ThawSTAR®Automated Cell Thawing Instrument
(AST-601) and ThawSTAR CFT2 Transporter (AST-602)
AST-601 ThawSTAR®Automated Cell Thawing Instrument
AST-602 ThawSTAR®CFT2 Transporter
AST-603 ThawSTAR® Conrmation Vials, pack of 20 vials
AST-606 AC Power Adaptor and Cables for US, UK, EU
AST-614 IOP Qualication Packet for ThawSTAR®Automated Cell Thawing System Model CFT2
The ThawSTAR®System is for research or further manufacturing use.

©2019. BioLife Solutions, Inc. All rights reserved. Patents pending.
BioLife, ThawSTAR, STAR designations are trademarks owned by BioLife Solutions, Inc.
IG-AST-19052R01
Table of contents
Other BioLife Freezer manuals


