BioLife SU105UE User manual

U LT 25NEU
O
perating
M
anual 86ºC
Ultra-Low
Temperature
Freezer

2 OF 34 |OPERATING MANUAL |ULT25NEU |02.10.2023 TABLE OF CONTENTS
U LT 25NEU Quick Guide
INITIAL SETUP
Port Stopper/
Sealant !The Port Stopper/Sealant must be in place during operation
Power Indicator AThe unit is ON when lit
Power ON BPress and hold for two beeps
Power OFF BPress and hold for three beeps
LCD Display CDisplays chamber temperature
Display Setpoint FPress/Release to display current setpoint, S ## displayed
Return to Temp
Display FPress/Release or wait eight seconds
Change Setpoint FPress and hold until Set T LED Eglows, S ## displayed,
then ^or vD
ADVANCED FUNCTIONS
Change
to Preset Press and hold Set Funtil Set T LED Eglows,
S ## displayed, then select Preset 1, 2 or 3 J
Postpone
Over Temperature
Alarm
When Over Temp LED Iglows, press Preset 3 J
until time shows (1.0 h) (If Over Temp LED is not glowing,
then Preset 3 acts as a Temp Preset)
Return to
Temp Display Wait eight seconds, press Preset 3 to return to
temperature display
See Error
Code Again If Error LED His glowing, press Preset 2 Jbriefly
(If Error LED is not glowing, then Preset 2 becomes Temp Preset)
Lock Panel Press and hold Preset 1 AND 2 AND 3 Juntil Locked
LED Gturns off (~five seconds)
Unlock Panel Press and hold Preset 1 AND 2 AND 3 Juntil Locked
LED Gturns off (~five seconds)
LCD Display
Codes P ## – Preset Temp, ## h – Alarm Silenced, E ## –
Error Code (see operating manual)

ULT25NEULITOMF |BioLifeSolutions.com |3 OF 34
TABLE OF CONTENTS
A
B D F
C E G H I
J
NOTICE:
When unit is first turned on red Over Temp LED Iwill be on until temperature
is within° of setpoint
Panel cannot be locked until temperature is within ° of setpointPanel cannot
be locked until temperature is within º of set point
ULT25NEU QUICK GUIDE (Continued)


ULT25NEULITOMF |BioLifeSolutions.com |5 OF 34
TABLE OF CONTENTS
U LT25NEU
86C PORTABLE ULTRALOW TEMPERATURE FREEZER
The ULTNEU (UltraLow Temperature liter volume) incorporates next
generation freepiston Stirling engine technology Freepiston Stirling engine
technology differs from conventional compressorbased refrigeration in
that it provides high efficiency deeptemperature cooling in a lightweight
package allowing true portable operation
TABLE OF CONTENTS
1. SAFETY PRECAUTIONS 6
1.1 Injury Prevention
1.2 Damage Prevention
1.3 Transportation Care
1.4 Flammable Refrigerant Use
2. UNPACKING AND SETUP 9
3.1 Pictorial Tour Freezer
3. FEATURES OF THE
ULT25NEU FREEZER 11
3.2 Pictorial Tour Control Panel
3.3 Power Cords
3.4 Intended Uses
4. OPERATION 15
4.1 How to Turn the Freezer On/Off
4.1.1 To Turn the Freezer On
4.1.2 To Turn the Freezer Off
4.2 Changing the Set Temperature
4.2.1 To See the Current
Set Temperature
4.2.2 Change the Setpoint
to a New Value
4.3 Using Preset Temperatures
4.4 OverTemperature Alarm
4.4.1 How to Silence the Audible
Temperature Alarm
4.4.2 To Postpone an Alarm
4.5 Error Conditions
4.6 Locking the Control Panel
4.7 How to Switch Between
Power Supplies
5. ERROR CODES 20
6. MAINTENANCE 21
6.1 Caring for Your Freezer Gasket
6.2 Air Intake Filter
6.3 Storage
6.4 Cleaning
7. TROUBLESHOOTING 22
8. CALIBRATION GUIDE 23
9. SPECIFICATIONS 26
9.1 Freezer Specifications
10. WARRANTY 30

6 OF 34 |OPERATING MANUAL |ULT25NEU |02.10.2023 TABLE OF CONTENTS
To prevent personal injury, injury to others, or damage to property,
read these safety precautions carefully before use.
1.1 INJURY PREVENTION
Do not cut change or modify the power cable*
When removing the plug hold onto the plug and not the cord
An ultralow temperature freezer is qualitatively different than a home freezer
At ºC frostbite can occur instantly
The user should establish and follow a protocol for safe ultralow temperature
operating procedures This should include (but not limited to)
>Never handle samples or freezer accessories with bare hands
>Do not use gloves which become brittle at ultralow temperatures
>Nitrile and latex gloves are inadequate
Permeable gloves are dangerous because ultralow temperature materials
can contact skin and cause damage
>Be especially careful that materials at ultralow temperature are not spilled
onto skin or clothing
>Use only sample containers that have been approved or tested for ultralow
temperature use
>Some plastics shatter at ultralow temperatures Avoid splinter hazards
>Biological and chemical hazards are still hazardous at ultralow temperature
Always wear proper protective equipment and follow appropriate
isolation protocols
>Many types of labels will fall off and/or break at ultralow temperature
Some types of ink which stick to glass and/or plastic at room temperature
lose adhesion at ultralow temperature
In addition to the ultralow temperature hazards above there are also physical
hazards to consider
>Be cautious when closing the lid to avoid a pinching hazard
>Be careful when loading the box with heavy items
>Always use the handles to carry the freezer
1. SAFETY PRECAUTIONS

ULT25NEULITOMF |BioLifeSolutions.com |7 OF 34
TABLE OF CONTENTS
1.2 DAMAGE PREVENTION
Do not disassemble modify or repair There are no user serviceable parts
inside the freezer unit*
Do not immerse in water or pour water on the unit*
Do not put ice or liquid water directly in the freezer box always use suitable
containers
Do not use glass containers when the contents might freeze and break
Do not store flammable items such as gasoline thinner or solvents in the
freezer The freezer is NOT rated as an explosionproof freezer
Do not use hard and/or sharp objects such as knives screwdrivers etc
to remove any frost or ice which has accumulated on the inside of the freezer
The inside panels are heat exchangers and can be damaged
Do not block the air intake or air discharge vents
Do not drop throw or abuse the freezer*
Do not operate under extreme environmental conditions such as in a car
trunk in very high humidity environments in rain or other severe weather*
Do not use solvents to clean the control panel or the outside or inside
of the freezer
*Warning: Unauthorized modification to the cabinet, controls or free-piston
Stirling engine is prohibited and will void all warranty provisions.
1. SAFETY PRECAUTIONS (Continued)

8 OF 34 |OPERATING MANUAL |ULT25NEU |02.10.2023 TABLE OF CONTENTS
1. SAFETY PRECAUTIONS (Continued)
1.3 TRANSPORTATION CARE
Use only factoryprovided packaging If unavailable contact the
manufacturer for replacement packaging materials
Do not place unit on sides or turn upside down
1.4 FLAMMABLE REFRIGERANT USE
ULTNEU uses grams of R (Ethane) in a hermetically sealed
thermosiphon tubing It requires caution in use and repair
A Danger – Risk of Fire or Explosion Flammable Refrigerant Used
Do Not Drill or Puncture Inner Liner
B Danger – Risk of Fire or Explosion Flammable Refrigerant Used
To be Repaired Only by Trained Service Personnel
Component Parts Shall
Be Replaced With Like Components Do Not Puncture Refrigerant Tubing
C Caution – Risk of Fire or Explosion Flammable Refrigerant Used
Consult Repair Manual/Owner’s Guide Before Attempting to Service
this Product
All Safety Precautions Must be Followed
D Caution – Risk of Fire or Explosion
Dispose of Properly in Accordance
with Federal or Local Regulations
Flammable Refrigerant Used
E Caution – Risk of Fire or Explosion Due to Puncture of Refrigerant Tubing
Follow Handling Instructions Carefully
Flammable Refrigerant Used

ULT25NEULITOMF |BioLifeSolutions.com |9 OF 34
TABLE OF CONTENTS
2. UNPACKING AND SETUP
Remove the freezer and all accessories from the box. Carefully
inspect the freezer and all accessories for any shipping damage.
Check the packing list to verify that the shipment is complete.
Ensure the access port stopper or sealant is in place.
Place the freezer on a level surface.
Make sure that the air inlets and outlets are not blocked.
Connect to a power source. While the freezer can be used
with either the AC Power Cord for lab, home or office use,
or the DC Power Cord for mobile use, it is recommended that
the initial pull-down to Setpoint be completed via AC power.
A To use the AC Power Supply
iDuring setup identify the service power and
plug configuration available and then locate
the appropriate line cord for the service type
you will be using
ii If the appropriate line cord is not currently installed
simply unplug the line cord from the unit and then
plug the appropriate line cord in its place
iii Plug the other end of the line cord into the power
source and then attempt to power on the unit
B To use the DC Power Cord in a motor vehicle
iMake sure the freezer remains level Exceeding
an angle of degrees may cause loss of cooling
ii Plug the DC Power Cord into a V outlet that is
rated at amps NOTE Not for use with volt
automotive systems
NOTE Not for use with volt automotive systems
A DC REQUIREMENT Consult your automotive
specialist if your vehicle lacks A rated V outlets
iii Plug the opposite end into the freezer Slide the male line cord adapter
into the female connection port lining up the two plastic bungs on
the male adapter with the cutouts in the female port of the freezer
Press the male adapter firmly into the connection port and turn
clockwise until an audible “click” indicates full connection
Power Cord
Available Separately.

10 OF 34 |OPERATING MANUAL |ULT25NEU |02.10.2023 TABLE OF CONTENTS
Notes on operation in a vehicle.
A The freezer will operate on vehicle battery power for a limited time before
the battery is drained and the motor vehicle cannot be started This time
will vary from vehicle to vehicle but is generally only a few hours
B The vehicle engine should be running to prevent accidental total discharge
of the battery
C The power to V outlets in some vehicles may be interrupted during engine
starting This will cause a sudden stop of the cooling unit which may produce
a sound that is different than when turning off the freezer by using the
On/Off button This is normal and will not damage the cooling engine
The cooling engine will restart automatically once power resumes
D 20 A DC REQUIREMENT: Please note that A DC service is required for
proper functioning of the freezer in a motor vehicle Some vehicles may not
be equipped with A DC service Consult your automotive specialist to
verify the level of DC service installed in your vehicle
E Do not operate the freezer in an unattended vehicle This may lead to
overheating if left in the sun and subsequent damage to stored contents
Disconnecting from power.
A Turn off the freezer (Press and hold On/Off button for three beeps)
iThe LCD display will show the word “OFF” while the unit turns off
ii Unplug the freezer after the word “OFF” disappears and the display
goes dark
iii If you unplug the freezer while it is on you will hear a sudden noise as
the freepiston Stirling engine shuts off Power outages will also cause the
same noise This noise (described as a “bonk”) is not indicative of damage
2. UNPACKING AND SETUP (Continued)
ULT25NEULITOMF |BioLifeSolutions.com |11 OF 34
TABLE OF CONTENTS
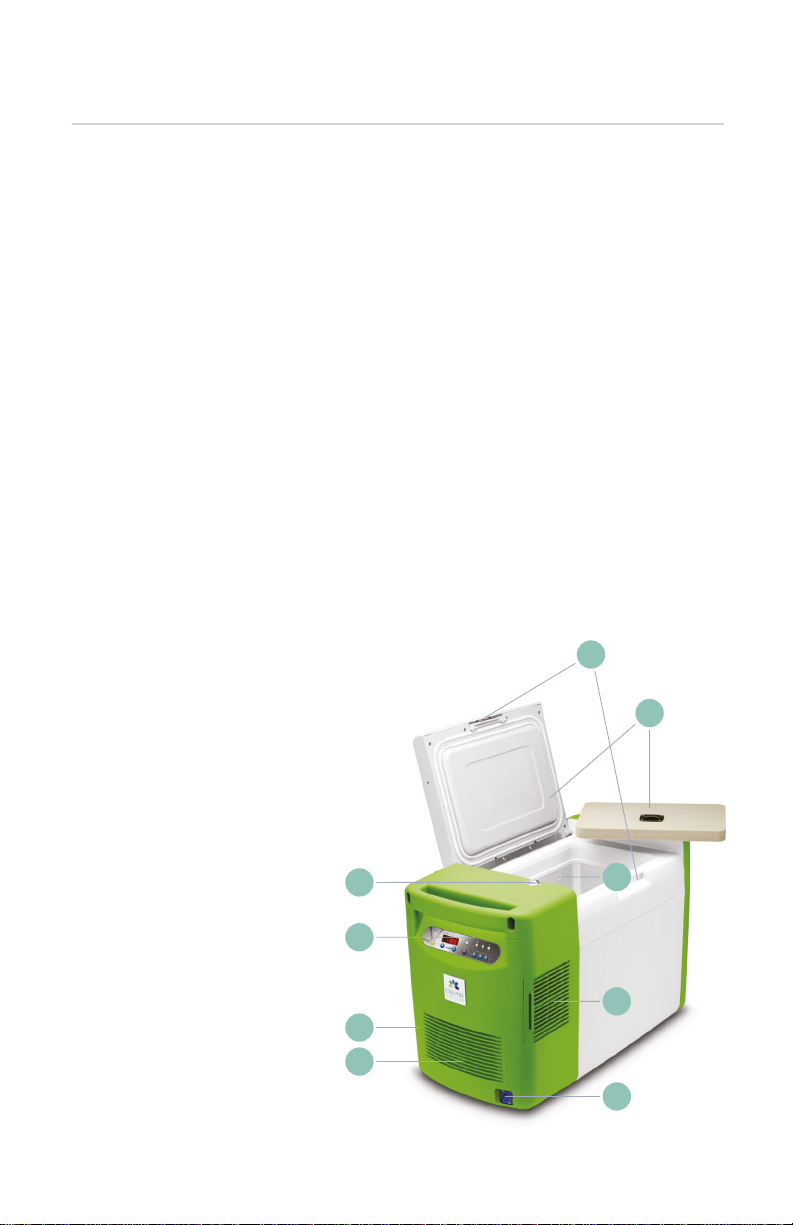
3.1 PICTORIAL TOUR, FREEZER
The Stirling Ultracold ULTNEU freepiston Stirling engine
ultralow temperature freezer has the following features
A freezer chamber which is protected by two lids
> Inner lid has a tight fitting foam lid
Control Panel
> Described in more detail on page
Lid Latch
> For positive closure
Access Port
> For thermocouple wires etc
Cleanable Filter
> Helps protect the heat rejection fins from dust
AC Power Connection
> Polarized to avoid error
DC Power Connection
Temperature Probe Clip (optional)
> For holding the temperature probe in
place for calibration and monitoring
Remote Alarm Contacts (optional)
Key Lock
> Locking lid for sample integrity
Power Supply Fan
Vent
3. FEATURES OF THE ULT25NEU FREEZER

12 OF 34 |OPERATING MANUAL |ULT25NEU |02.10.2023 TABLE OF CONTENTS
3. FEATURES OF THE ULT25NEU FREEZER (Continued)
Outer Lid:
double gasket
moisture seal.
AC Power Connection. DC Power Connection.
Inner Lid:
high-density,
closed cell,
rigid foam.
Power Cord Available
Separately.
Power Cord
Available Separately.
Access Port:
1/4” (6.3 mm).
Temperature Probe Clip
(optional).
Slide-out Filter:
easy to clean, protects
heat rejection fins.
Remote Alarm
Contacts (optional).

ULT25NEULITOMF |BioLifeSolutions.com |13 OF 34
TABLE OF CONTENTS
3.2 PICTORIAL TOUR, CONTROL PANEL
AOn/Off Indicator LED
BOn/Off button
> Turns freezer on and off
CLCD display
> Alpha/numerical display default display is chamber temperature
D^/v buttons
> Used to adjust Setpoint Temperature (when the display shows S ##)
ESet Temp LED
> Temperature can be adjusted when lit
FSet Temp button
> This must be pressed to adjust the Set Temperature
GLocked LED
> Indicates when the control panel is locked
HError LED
> Indicates when there is an electrical mechanical or similar error condition
IOver Temp LED
> Indicates when the chamber is over/under the setpoint
The audible beeper can be set to delay warning
JTemperature Preset buttons
A
B D F
C E G H I
J
3. FEATURES OF THE ULT25NEU FREEZER (Continued)

14 OF 34 |OPERATING MANUAL |ULT25NEU |02.10.2023 TABLE OF CONTENTS
3.3 POWER CORDS
A simple line cord change can allow for multiple power and receptacle types
See Section for directions
Make sure to use the cord and plug appropriate for your location
Power supply options include:
North America VAC Hz NEMA P plug and VAC Hz
NEMA P plug
Europe/International V AC Hz Standard twopin plug
3.4 INTENDED USES
The ULTNEU freezer provides ultralow temperature storage for both
medical and nonmedical purposes The storage of blood or blood products
intended for medical purposes is prohibited
3. FEATURES OF THE ULT25NEU FREEZER (Continued)

ULT25NEULITOMF |BioLifeSolutions.com |15 OF 34
TABLE OF CONTENTS
Important changes to the freezer settings require sustained button pushes
This helps prevent accidental changes to the settings during transportation
Some sequences require a threesecond button press and hold while other
sequences require a fivesecond button press and hold
For example
Turning the freezer ON requires a threesecond press and hold (two beeps)
Turning the freezer OFF requires a fivesecond press and hold (three beeps)
The default display is the chamber temperature Other displays such as
Setpoint Alarm Postpone etc are marked with a letter such as S (Setpoint)
h (Alarm Postpone) etc These secondary displays revert to the default
display after approximately eight seconds of button inactivity
4.1 HOW TO TURN THE FREEZER ON/OFF
4.1.1 To Turn the Freezer On
Press and hold the On/Off button for two beeps (~three seconds)
The freezer will display a greeting message and then display the
chamber temperature
4.1.2 To Turn the Freezer Off
Press and hold the On/Off button for three beeps (~five seconds)
The freezer will display “OFF” for seconds and then go dark
4.2 CHANGING THE SET TEMPERATURE
4.2.1 To See the Current Set Temperature
Press the Set Temp button briefly
The current set temperature will be displayed with the letter S ##
>After eight seconds of inactivity the display will revert to the
current temperature
4. OPERATION

16 OF 34 |OPERATING MANUAL |ULT25NEU |02.10.2023 TABLE OF CONTENTS
4.2.2 Change the Setpoint to a New Value
There are two ways to change the Setpoint
>Manually adjust the temperature using ^/v
>Use one of the three adjustable Preset Buttons
Adjusting the Setpoint manually
>Because of the importance of the Setpoint Temperature changing
the Setpoint requires a “twobutton procedure” This means
Method A – press/hold the Set Temp button while simultaneously
pressing ^/v
OR
Method B – press/hold the Set Temp button until the Set Temp LED
glows and then press ^/v
(Methods A and B achieve the same effect The user can use
whichever method they prefer)
To change the Setpoint by Method A
>Press and hold the Set Temp button and then push the ^/vbuttons
(do not release the Set Temp button)
The Setpoint temperature will appear with the prefix S in the LCD display
When the ^/vbuttons are first pushed the Setpoint will change by
ºC at first
If the ^/vbuttons are held for five seconds the step size will increase/
decrease by ºC
If the ^/vbuttons are briefly released (less than a half second) while
continuing to hold down the Set Temp button the increment/decrement
size will return to ºC
Release all buttons once the desired Setpoint is achieved The display
will return to chamber temperature after about eight seconds
4. OPERATION (continued)

ULT25NEULITOMF |BioLifeSolutions.com |17 OF 34
TABLE OF CONTENTS
To change the Setpoint by Method B
>Press and hold the Set Temp button until the Set Temp LED glows
The Setpoint temperature will appear with the letter S in the first
LCD display
>The ^/vbuttons can be used to change the Setpoint
When the ^/vbuttons are pushed the Setpoint will change by ºC at first
If the ^/vbuttons are held for five seconds the step size will increase
to ºC
Briefly release (a half second) the ^/vbuttons while continuing to
hold down the Set Temp button the increment/decrement size will
return to ºC
Release the ^/vbuttons once the desired Setpoint is achieved
>Press the Set Temp button briefly (less than one second) to turn off
the Set Temp LED The display will return to chamber temperature
4.3 USING PRESET TEMPERATURES
The Temperature Presets — and can be used to quickly change the
Setpoint to frequently used values When shipped the Presets are set to
ºC ºC and ºC
To choose one of the preset temperatures
>Press and hold the Set Temp button until the Set Temp LED glows
>Push one of the Temperature Preset buttons briefly
>The new Set Temperature will be shown in the LCD display
>If this is the desired Set Temperature the user can either
Briefly press the Set Temp button to turn off the Set Temp LED
OR
Wait for approximately eight seconds when the freezer control panel
will return to normal operation
4. OPERATION (continued)

18 OF 34 |OPERATING MANUAL |ULT25NEU |02.10.2023 TABLE OF CONTENTS
4.4 OVERTEMPERATURE ALARM
If the freezer compartment temperature is ºC warmer or colder than
the Setpoint for five seconds then it will go into temperature alarm mode
>The Over Temp LED will turn on (this is used for under temperature
alarms as well)
>The freezer will make a double beep every seconds
>Situations which can affect the freezer’s ability to maintain a steady
state or cooling rate include
The lid is ajar
The air vents are blocked
Addition of a large relatively warm mass
Power supply problems
Mechanical and/or electrical problems
4.4.1 How to Silence the Audible Temperature Alarm
The Over Temp LED will always be lit when the freezer’s temperature
is over or under the set temperature by more than ºC
4.4.2 To Postpone an Alarm
When the audible alarm is sounding it can be postponed
Press the Temperature Preset – 3 button (located directly beneath the
Over Temp LED) and the audible alarm will be turned off for hour
4.5 ERROR CONDITIONS
Certain conditions will cause an Error Code to be displayed on the LCD
display and the Error LED will be lit
>The error code will be of the form E ## where ## is the error code
See Section for possible error codes
>The error code will be displayed for about five seconds and then the
display will show the chamber temperature The Error LED will stay on
>The error code can be recalled by briefly pressing the Temperature
Preset – 2 button located directly under the Error LED This will recall
the error code for approximately seconds
>If the Temperature Preset – 2 button is pressed and held for five seconds
(three beeps) this will clear both the LCD display and the Error LED
However if the error condition persists the error cycle will start over again
4. OPERATION (continued)

ULT25NEULITOMF |BioLifeSolutions.com |19 OF 34
TABLE OF CONTENTS
4.6 LOCKING THE CONTROL PANEL
To Lock the Freezer Control Panel
Press and hold the Temperature Preset 1, 2 and 3 buttons until the
freezer beeps three times
>The Locked LED will light up
>The control panel cannot be locked if there is an over temperature
or other error condition
To Unlock the Freezer Control Panel
Press and hold the Temperature Preset 1, 2 and 3 buttons until the freezer
beeps three times
>The Locked indicator LED will turn off
>The freezer will still indicate overtemperature alarms or error conditions
while it is locked The user has to unlock the control panel to address
those alarms/conditions
4.7 HOW TO SWITCH BETWEEN POWER SUPPLIES
See Section for possible power sources for the ULTNEU
To change from one power supply to another
>Turn OFF the freezer (Press and hold the On/Off button)
>Wait for the freepiston Stirling engine to slow and stop ( seconds)
>Unplug the freezer from the current power source and plug into the new
approved power source Reference Section Part B for instructions
on use of a DC Power cable
>The freezer can be restarted immediately no wait time necessary
>Turn ON the freezer by pressing and holding the On/Off button
4. OPERATION (continued)

20 OF 34 |OPERATING MANUAL |ULT25NEU |02.10.2023 TABLE OF CONTENTS
These are displayed in the LCD display as E ##
The freepiston Stirling engine is not maintaining a working temperature
This could arise from blocked filters blocked air passages unusually hot
ambient temperatures (for example >ºC) or a fan failure Check air
passages and clear any blockages for good air circulation Remove from
hot environments (car interiors etc)
A component which monitors freepiston Stirling engine performance has
failed The freepiston Stirling engine cannot regulate itself Please return
for repair
5. ERROR CODES
This manual suits for next models
1
Table of contents
Other BioLife Freezer manuals


Popular Freezer manuals by other brands

AGT
AGT PSG BCR03 Installation Manual, Operating Manual, Maintenance Manual, Spare Part List

Satrap
Satrap Coop oecopIan 164 GS A++ Instruction book

Frigidaire
Frigidaire FFC07K1CW Factory parts catalog

Electrolux
Electrolux EC2200AEW user manual

Candy
Candy CTS5142 manual

Vinotemp
Vinotemp WINE-MATE WM-4500SSH Installation, operation & care manual


