Black Ice Audio FUSION DAC Transport User manual

Owner's Manual
BLACK ICE AUDIO
FUSION DAC Transport
Dual Mono Vacuum Tube Stand Alone
Digital to Analog Converter with
Compact Disc Player
Black Ice Audio
21310 Ridgecroft Drive, Brookeville, MD 20833
Phone (301) 953-2014 Fax (301) 498-0554
Email: info@blackiceaudio.com Web: www.blackiceaudio.com

2
Dear Client:
We at Black Ice Audio want to thank you for purchasing the Black Ice Audio Vacuum Tube Fusion
DAC Transport. The company that stands behind your DAC Transport draws on a two decades of
tube design and manufacturing experience. In addition to our engineering knowledge is a
commitment to our client to provide the highest level of quality sound at a value price. Our
commitment to value has resulted in audio amplifiers and associated tube equipment that has the
sonic characteristics of what is referred to as “Hi-end”. Black Ice Audio has achieved the goal through
modern design principles, quality parts, craftsmanship and strict attention to efficient purchasing and
production. We are confident that your DAC Transport will provide you with years of listening
pleasure.
Before using this unit, please take the time to carefully read and understand the safety instructions
and operating information before you install or attempt to operate your Fusion DAC Transport.
Becoming familiar with important facts about your unit and its correct operating procedures will help
assure you of safe usage, maximum musical satisfaction, and reliable operation. Take special care to
follow the warnings indicated on the unit itself as well as the safety suggestions found in the owner's
manual. The effort you invest now will be well rewarded as time goes by.
Sincerely
Black Ice Audio, Inc.
Table of Contents
Section Page No.
Safety Precautions 3, 4
General Information
About Your DAC Transport 5
Construction and Testing 5
Vacuum Tubes 5
Packaging 5
Getting Started 6
Front Panel Controls and Functions 7
Remote Control Diagram and Description 8
Where Do I Go Next: Functions 8, 9,10
Additional Information 10, 11
Should I Replace My Tubes 11
Troubleshooting and Service 11, 12
Warranty and Conditions 13
Technical Specifications 14
Important
Please check your unit's bottom panel and record in the space below:
Model Number: Fusion DAC Transport
Serial Number:
Please fill out the warranty card enclosed with this package. If the warranty card is
not sent in, the warranty time will be reduced to nine months. Keep your owner's
manual and receipt in a safe place for future reference.

3
CAUTION: TO REDUCE THE RISK OF ELECTRIC
SHOCK DO NOT REMOVE SCREWS.
NO USER-SERVICEABLE PARTS
INSIDE.
REFER SERVICING TO QUALIFIED
SERVICE PERSONNEL.
CAUTION
RISK OF ELECTRIC
SHOCK
DO NOT OPEN
The lightning flash with arrowhead symbol, within
an equilateral triangle, is intended to alert the user
to the presence of un-insulated “dangerous voltage”
within the product’s enclosure that may be of sufficient
magnitude to constitute a risk of electric shock
to persons.
The exclamation point within an equilateral triangle
is intended to alert the user to the presence of
important operating and maintenance (servicing)
instructions in the literature accompanying the
appliance.
SAFETY PRECAUTIONS
IMPORTANT SAFEGUARDS
PLEASE READ CAREFULLY ALL THE FOLLOWING IMPORTANT
SAFEGUARDS THAT ARE APPLICABLE TO YOUR EQUIPMENT.
_________________________________________________________________________
_________________________________________________________________________
_________________________________________________________________________
_________________________________________________________________________
SAFETY
1) Read the Safety Instructions in the Owner's
Manual - All the safety and operating instructions
should be read before the product is operated.
2) Retain the Owner's Manual - The safety and
operating instructions should be retained for future
reference.
3) Heed Warnings - All warnings on the product
and in the operating instructions should be adhered
to.
4) Follow Instructions - All operating and use
instructions should be followed.
5) Power Sources - This product should be
operated only from the type of power source
indicated on the marking label. If you are not sure
of the type of power supply to your home, consult
your product dealer or local power company.
6) Grounding - For proper usage, use an electrical
outlet that is grounded. If you do not know whether
the outlet is grounded, consult your electrician or
local power company.
7) Power Cord Protection - Power supply cords
should be routed so that they are not likely to be
walked on or pinched by items placed upon or
against them, paying particular attention to cords at
plugs, convenience receptacles and the point where
they exit from the product.
8) Overloading - Do not overload wall outlets,
extension cord or integral convenience receptacles
as this can result in a risk of fire or electric shock.
9) Lightning - For added protection for this product
during a lightning storm or when it is left unattended
and unused for long periods of time, unplug it from
the wall outlet.

4
SAFETY PRECAUTIONS
CONTINUED
INSTALLATION
ENVIRONMENT
1) Water and Moisture - Do not use this product
near water - for example, near a bathtub, wash
bowl, kitchen sink or laundry tub; in a wet
basement; or near a swimming pool or the like.
Damp basements should be avoided.
2) Heat - The product should be situated away from
heat sources such as radiators, heat registers,
stoves or other products that produce heat. Also
avoid putting the unit in the direct rays of the sun.
3. For indoor use only.
PLACEMENT
1) Ventilation - This product should not be placed
in a built-in installation or rack unless proper
ventilation is provided, or the manufacturer's
instructions have been adhered to. Never obstruct
the top portion of you CD Player with any objects
that could result in the unit overheating and causing
damage to the CD Player.
2) Foreign Material - Care should be taken so that
objects do not fall into and liquids are not spilled
into the unit. Do not subject this unit to excessive
smoke, dust, mechanical vibration, or shock.
3) Surface - Place the unit on a flat level surface.
4) Accessories - Do not place this product on an
unstable cart, stand, tripod, bracket or table. The
product may fall causing serious injury to a child or
adult and serious damage to the product. Use only
with a cart, stand, trips, bracket or table
recommended by the manufacturer or sold with the
product. Any mounting of the product should follow
the manufacturer's instructions and should use a
mounting accessory recommended by the
manufacturer.
5) Carts - A product and
cart combination should
be moved with care. Quick
stops, excessive force and
uneven surfaces may
cause the product and
the cart combination to
overturn.
6) Wall or Ceiling Mounting - The product should
be mounted to a wall or ceiling only as recommend
by the manufacturer.
MAINTENANCE
Cleaning - Unplug this product from the wall outlet
before cleaning. Do not use liquid cleaners or
aerosol cleaners. Use a damp cloth for cleaning.
Do not use any type of abrasive pad, scouring
powder or solvent such as alcohol or benzene.
SERVICE
1) Object and Liquid Entry - Never push objects of
any kind into this product through openings as they
may touch dangerous voltage or other hazards.
Refer all servicing to qualified service personnel.
2) Damage Requiring Service - Unplug this
product from the wall outlet and refer servicing to
qualified service personnel under the following
conditions:
a) When the power-supply cord or plug is
damaged.
b) If liquid has been spilled or objects have
fallen in the product.
c) If the product has been exposed to rain
or water.
d) If the product does not operate normally
by following the operating instructions.
Adjust only those controls that are covered
by the operating instructions as an
improper adjustment of other controls may
result in damage and will often require
extensive work by a qualified technician to
restore the product to its normal operation.
e) If the product has been dropped or
damaged in any way.
f) When the product exhibits a distinct
change in performance - this indicates the
need for service.
g) When the unit needs broken tubes to be
replaced.
3) Replacement Parts - When replacement parts
are required, be sure the service technician has
used replacement parts specified by the
manufacturer or has the same characteristics as the
original part. Unauthorized substitutions may result
in fire, electric shock or other hazards.
4) Tube Replacement - The 12AX7 /12AT7 tubes
in your unit should last up to 20,000 hours. The
reason for their long life is that the tubes are
operating on 12 volts. Should it become necessary
to replace your tubes, please take the unit to your
dealer. If the dealer has tubes in stock, it should
only take a few minutes to replace them.

5
______________________________
GENERAL INFORMATION
About Your Unit: Fusion DAC Transport
The Fusion DAC Transport combines the proven sound quality of vacuum tubes and the convenience of the
digital format. Our design objectives are 1) Sound quality, 2) High standards of build quality and sound quality at
a value price, and 3) a high level of reliability and long life. Our engineering design encompasses several
important aspects. In terms of function, the DAC Transport can operate as a stand-alone DAC with USB, Toslink
and Coaxial inputs.
Parts quality is the best currently available, and the overall circuit layout is maximized for sonic purity. The basic
electronic design is a true balanced circuit/dual mono for signal purity. Discrete operating units are
compartmentalized using steel panels to reduce interference (such as separating the power board from the signal
board). The transport is the top-of-the-line Phillips transport. The main output is a true tube gain stage, after the
digital to analog conversion; the signal processing is vacuum tube and not solid state.
Construction and Testing
Like every Black Ice Audio product, your DAC Transport has been designed and carefully hand-crafted, using
precision mechanical parts. The chassis is an all-aluminum construction. Electronic components and assembly
procedures are similar to those used in the manufacture of scientific equipment and musical instruments. To
assure consistent performance standards, each unit is visually inspected at several assembly points, test run for a
minimum of 48 hrs, electronically tested and sonically evaluated prior to shipment.
This time-consuming perfectionist approach to the design and manufacture of audio equipment is intended to
provide you with the best in musical satisfaction and lasting value.
Vacuum Tubes
The DAC Transport comes with 6 vacuum tubes, 2 pcs 12AX7A, 2 pcs. 12AT7 and 2 pcs. 12AU7. These tubes
give the player its distinct smoothness and resolution. Although you will not have to handle the vacuum tubes
since they are installed at the factory, it may be helpful to have a perspective of how to handle vacuum tubes.
Many individuals may think that they lack any experience with vacuum tubes. However, handling incandescent
light bulbs is similar to dealing with vacuum tubes. As with light bulbs, you should not touch a light bulb when it is
operating since you can burn yourself. A light bulb dropped on a hard surface will most likely lead to breakage. If
you replace a light bulb you should make certain the lamp is disconnected from the AC outlet and make certain
the light bulb has cooled down. Never force a light bulb into a socket. You should treat the light bulb gently when
holding or replacing them. Taking the commonsense precautions usually associated with light bulbs will give you
a general idea of how to handle a vacuum tube.
The tubes installed in the unit will last for at least 20,000 hours before the need for replacement. The reason for
long life is due to the low voltage required to power the tube. In this regard, the tube will not run hot, thus
eliminating the main factor for tube wear. In reality, most people change the tubes before they wear out in order
to experiment with different sounds.
Packaging
Save all the packaging in a dry place. Your unit is a precision electronic instrument and should be properly
packaged any time shipment is made. Because of its weight (28 pounds), it is highly probable that the unit will be
damaged during shipment if repackaged in a box and packing other than that designed for the unit.
You may have occasion to return the unit to the factory for service or some other situation that requires the
shipment of your unit. Should it prove necessary to ship it, the original packaging may save your investment from
unnecessary damage, delay and expense.
6
White
(L)
White
(L)
Red
(R)
Red
(R)
To an AC outlet
To an AC outlet
To an AC outlet
Line Out
Digital out
L
R
L
R
Input
Input
Output
CD
Decode
Fusion DAC-TRANSPORT
Amplifier
_________________________________________________
GETTING STARTED
Unpacking: Check that you received the following items.
1 Remote control unit
1 Power cord
_______________________________________________________________________
Inserting Batteries in the Remote Control:
You can control the player using the supplied Remote. You will have to use a Phillips screwdriver to
remove the four screws on the back panel of your remote. Once the panel is removed, then two AA
batteries matching the + and the - on the batteries need to be inserted. When using the remote, point it
at the remote sensor on the player. Batteries should last for about 6 months. When the remote no
longer operates the player, replace all the batteries with new ones. Do not expose the remote sensor to
direct sunlight or lighting apparatuses. Doing so may cause a malfunction. If you do not use the
remote for an extended period of time, remove the batteries to avoid possible damage from battery
leakage and corrosion.
_______________________________________________________________________
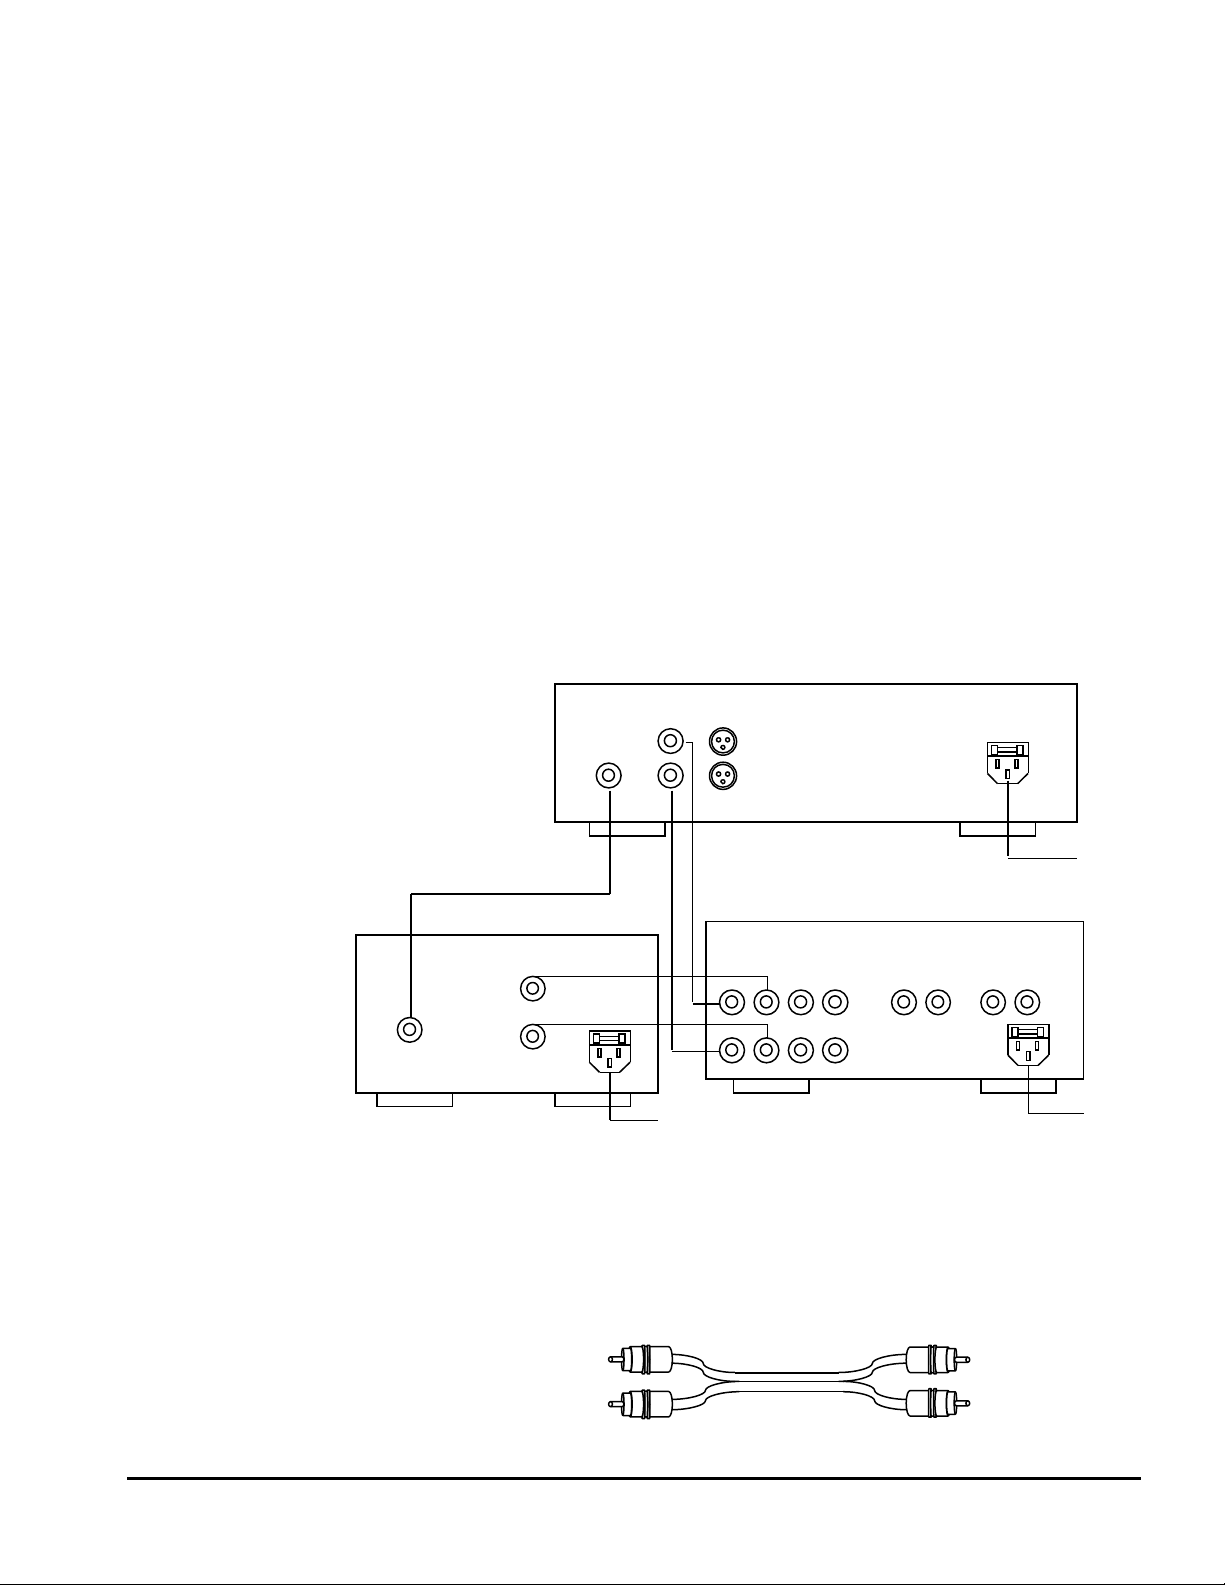
Hooking Up the System:
Overview: The diagram to the right
describes how to hook up the DAC
Transport to an amplifier. There are
two options using either the digital
output or the balanced or unbalanced
out. Be sure to turn off the power
of each component before making
the connections.
On the back of your DAC Transport there are two sets of analog outputs, balanced and unbalanced and
two digital outputs, coaxial and toslink. Both analog outputs are the fixed tube signal. The digital
outputs are placed for your convenience.
___________________________________________________________________________
What Interconnects will I need: A set
of Audio Interconnects are not supplied.
We do recommend you speak with your
Audio Dealer to choose interconnects that
will maximize sonic quality.

7
1
2
3
4
5
6
7
8
FRONT PANEL CONTROLS AND FUNCTIONS
Control Section
1. Indicator Light 6. Play/Pause Button
2. On/Standby/Off Power Switch 7. Stop Button
3. Display Window 8. Backward Skip Selection
4. Disc Holder 9. Forward Skip Selection
5. Open/Close Disc Tray Button 10. Selector Switch (CD, USB,
Toslink, Coaxial)
_____________________________________________________________________
_
Playing a CD
1. Before you Start: turn on the Amplifier.
2. Press Power Button to turn the player to on.
3. Using the selector switch, press the button until the CD lights up.
4. If the unit is in Standby, press the open/close button or play to turn the unit on.
5. Press the Open/Close button and place a CD on the tray.
6. Press the Play button. After a few seconds, the program will appear in the display.
7. Press the Play Button again to pause the disc. The indicator II will appear in the display
window. If you push the Play button again and the disc will resume playing at the same
point.
8. To stop playback. Press the Stop Button.
Using the DAC
1. Plug into the DAC Transport your digital source.
2. On the Selector Switch on the front of the DAC Transport, press the button to select the
source, USB, toslink or Coaxial.
3. Begin playing your source.
8
1
2
3
4
5
6
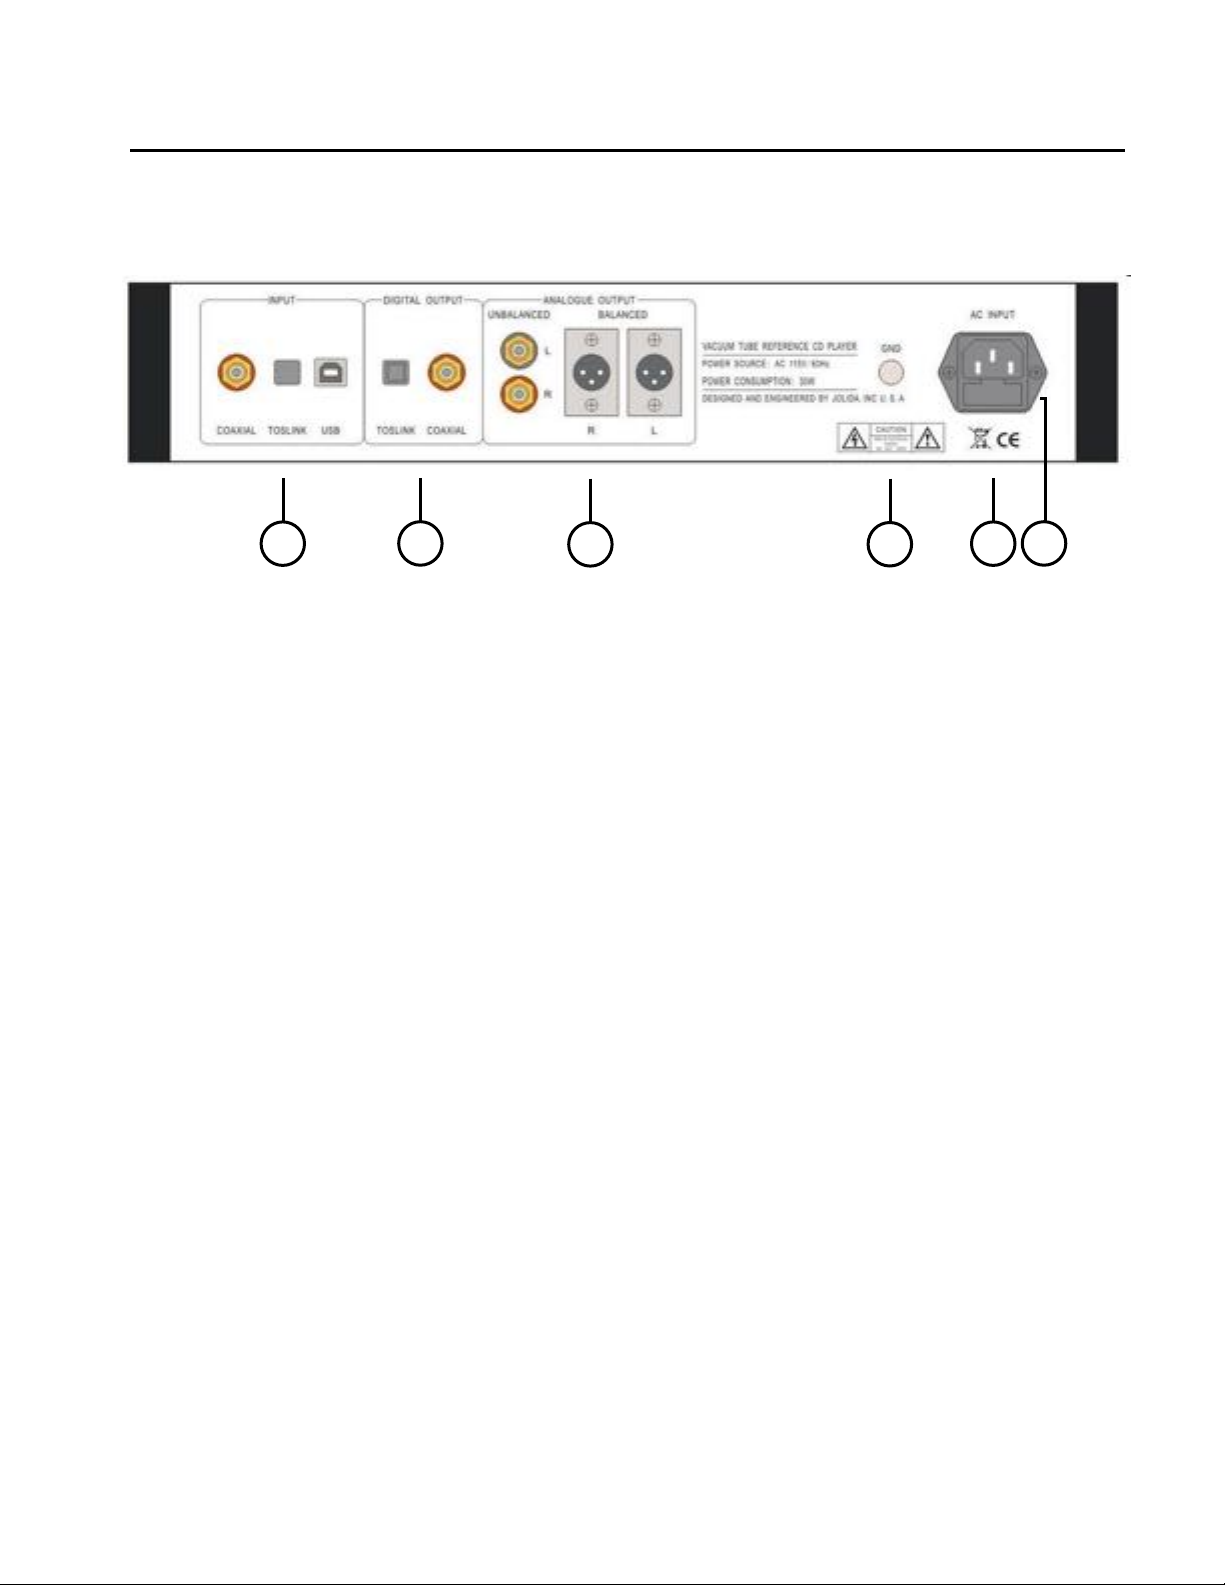
Connections_____________________________________________
1. Digital inputs: USB, toslink, or coaxial.
2. Digital outputs: toslink, coaxial
3. Analog Output: unbalanced, balanced
4. Ground Knurl: Used to ground other pieces of electronic equipment. Please Note: If
there is a hum or static coming from the speakers with the unit on, there may be a
ground loop that is being caused by a floating ground amplifier hooked up with a true
grounded unit. To solve the issue, either put a two-prong adapter on the wall plug end
of your AC cord (cheater plug). The unit will now have a floating ground and your unit
will now be grounded through the interconnect cables to the amplifier. Another option is
to run a wire from the ground knurl of the CD player to the ground knurl of the amplifier.
However, this does not always work.
5. It is essential that the DAC Transport be connected to a wall AC power receptacle, or a
similar heavy-duty source. Avoid the use of extension cords. If they must be used on a
temporary basis, use 16-gauge or heavier cords. The power cord on your unit has a
standard three-prong grounding plug to provide maximum safety when it is connected to
a ground wall receptacle. If there is any question regarding the safety of grounding
procedures, be certain to seek competent help with the installation.
6. In the upper half of the IEC part is the fuse holder with a spare fuse. When replacing the
fuse, the AC cord must be removed from the unit. To remove the fuse holder, take a
small flathead screwdriver and gently pry out the holder as if it were tray that slides
straight out. When replacing the fuse, for 110 - 120 VAC (Household AC current) use a
1.0 amp slo blow fuse and for 200-240 VAC use a 0.5 amp slo blow fuse.
9
ON’OFF PROG
REM RAN REP
INTRO 1 2
3 4 5
6 7 8
9 10 10+
1
2
3
4
5
6
7
8
9
10
12
14
11
13
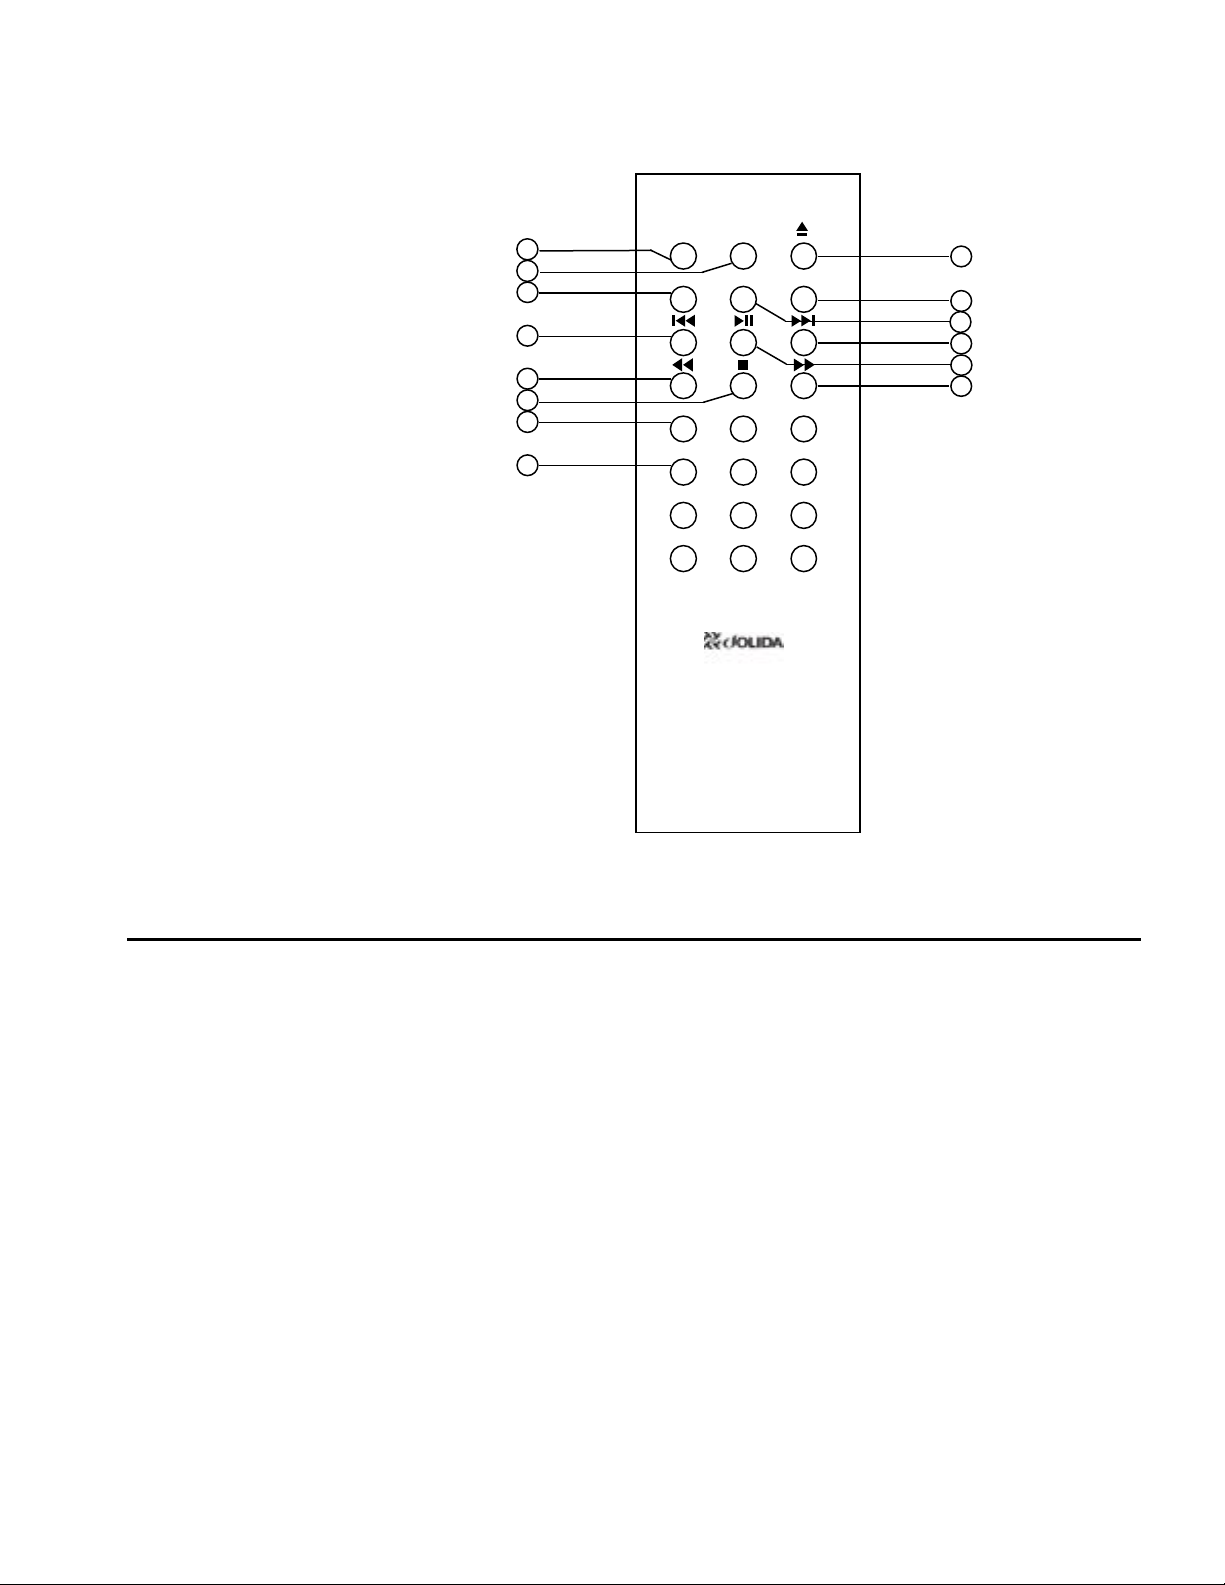
Remote Control
Overview: Some remote-control functions are the same as the front panel. In order for the
remote-control unit to function properly, while using the remote control, please point it directly
at the remote sensor on the front panel of the CD Player.
1. On/Off Button 7. Introduction Button 11. Random Button
2. Program Button 8. Number Buttons 12. Forward Skip
3. Remember Button 9. Open/Close Disc Tray 13. Forward Search
4. Backward Skip 10. Repeat Button 14. Forward Search
5. Play/Pause Button
6. Backward Search
___________________________________
Where Do I Go Next?
Now you are ready to use the functions of your DAC Transport. If there are questions
regarding the basic operating elements of your unit, how to hook the system up, turning the
unit on, or playing a Compact Disc, please refer to page 6,7 and page 8. This section will
explain functions that are beyond the playing of the transport. These instructions are
applicable for the remote control.

10
1. Pause Mode:
If the Transport is playing a disc, pushing the Play/Pause button will stop the disc and
the pause indicator II will appear in the display window. If you push the Play/Pause
button, the disc will resume playing.
2. Program Button:
a. Press the Program button while the player is in pause.
b. Push a number button to select the desired track to be saved.
d. After you have selected the track number, push the "Program" button once, and the
selected track number will be saved in the memory. At that moment the saved item
number and the "Program " indicator will appear on the display window.
e. By repeating the above two steps, you can store up to 24 items.
f. Push Play/Pause button and the player will play as programmed.
g. Push the "Stop" Button twice and it will cancel the stored program.
3. When the transport is Operating:
a. Press the “Repeat” button and the Repeat indicator will appear on the display
window. The disc player will play this same track over and over.
b. Push the Repeat Button a second time, the display window will still show the Repeat
indicator, but the disc player will play the entire CD disc continuously.
d. Push the Repeat button again (the third time), the Repeat will be canceled, and the
player will resume normal operations.
4. How to use the Skip Button when the Player is in the Stop Mode:
a. Push Forward Skip or the Backward Skip to select the desired tracks.
b. Push Play/Pause Button and the player will play your selected track.
5. How to use Skip, Search or Selection while the Player is in Operation:
Use Forward Skip or Backward Skip to select a new track.
Use Forward Search or Backward Search to go forward in the track that is in play
6. Manual Search:
If you want to hear any part forward on a track or any part previous on a track you may
push forward search or backward search to quickly reach the desired part of the track.
When you release the button, the player will play the desired part.
7. Random:
By pressing the RAN Button, the player will select tracks on the disc at random.

11
8. Remember Button:
By pressing the Rem Button while a disc is playing, the display will show the time length
of the track that is playing. If the Rem Button is pressed again, it will display the time
length of the entire CD that is playing. Press the Rem button again and the display will
show the time length of what has been played by the current track.
9. Introduction:
Press the Intro Button and the CD player will play the first ten seconds of each track on
the CD. Push the Intro Button again to cancel Introduction.
10. The Display of Track Numbers and their Playing Time:
a. When you insert the CD disc, or stop in the middle of playing the disc, the window will
automatically show the total number of tracks on the Compact Disc and the time
required to play the entire Disc.
b. While a disc is being played, the display window will show the number of tracks
played and how much time has been used.
_____________________________________
ADDITIONAL INFORMATION
_____________________________________
Changing the Vacuum Tubes
1. Using a 3mm Allen wrench, you need to remove four bolts.
2. Remove the top cover.
3. With the front of the DAC Transport toward you, the tubes are located in the left- and right-
hand compartments. The 6 tube pieces have a cover over them that are held in place with a
bayonet lock. To remove the cover, gently push the cover down, turn the cover
counterclockwise for one/eight of a turn and pull the cover off. The tube will now be exposed.
4. To remove the tube, pull the tube straight up out of the socket.
5. To put a new tube in, line the pins of the tube with the holes in the socket and gently push
the tube in. Try to do this procedure keeping the tube as vertical as possible to avoid bending
the tube pins.
Tube Placement:
2V1 = 12AX7
2V2 = 12AT7
2V3 = 12AU7

12
Notes on CDs
On Handling CDs
1. To keep the disc clean, handle the disc by its edge. Do not touch the surface.
2. Do not stick paper or tape on the disc.
3. Do not expose the disc to direct sunlight or heat sources such as hot air ducts, nor leave it in
a car parked in direct sunlight as there can be considerable rise in temperature inside the car.
4. Do not use any commercially available stabilizer. If you do, the disc and the player may be
damaged.
5. After playing, store the disc in a case.
ON CLEANING
1. Before playing, clean the disc with a cleaning cloth. Wipe the disc from the center out.
2. Do not use solvents such as Benzine,
thinner, commercially available cleaners
or anti-static intended for vinyl LPs.
Should I change my tubes
We are often asked if changing the vacuum tubes to a different manufacture will make the
DAC Transport sound better. We are not the politically correct source for that that type of
information. We state that the tubes of different manufacturers will make the sound different.
You will be judge whether it is better. Since the unit is extremely neutral, even subtleties of
harmonics found in the various tubes will be evident. Stating that tubes can sound different
does not answer the “what sounds better question”, but it points out a practical aspect of the
player. By using different tubes, you can craft sound in your system. For example, assume
that you have changed your speakers for another pair that are bright. By using Chinese Tubes
that have a smoother, rounder sound, you can balance that brightness out of your system.
Thus, in creating a system that has the sound elements you find desirable in sound can be
“fine tuned” through different tubes.

13
______________________________
Troubleshooting
If you experience any of the following difficulties while using the player, use this
troubleshooting guide to help you remedy the problem. Should any of these problems persist,
consult your nearest Black Ice Audio Dealer.
There is no sound.
>Check that the player is connected to the amplifier.
>Check that the power switch is on.
>Check to see if the unit is plugged into an outlet.
>Check the fuse located in the IEC or the place where the AC Cord is attached to the unit. Pry
the cover off carefully (slides out like a tray) to expose the fuse and check to see if it is intact.
If not, replace with the spare fuse.
The CD does not play.
>There is no CD inside the player. Insert a CD.
>Place the CD with the label side up on the disc tray correctly.
>Clean the CD.
>Moisture has condensed inside the player. Remove the disc and leave the player turned on
for about an hour.
The remote does not function.
>Remove the obstacles in the path of the remote and the player.
>Point the remote at the remote sensor on the player.
>Replace all the batteries in the remote with new ones if they are weak.
The Display is reading “No Disc” or is reading “-----“when a disc is in the unit.
>Turn the unit off, allow it to sit for three seconds and turn the unit on. Since the unit is all
metal, it is susceptible to static electricity. Turning the unit off and back on, resets the
controller.
The Display has red box reading OVR.
> There is nothing wrong with the unit. The CD player tracks up to 15 music cuts on a
CD disc. The player is only alerting that the disc playing has over (OVR) 15 cuts.

14
There is a hum or static coming from the speakers with the CD player on:
>There may be a ground loop that is being caused by a true grounded amplifier and a
true grounded CD player. To solve the issue, either put a two-prong adapter on the
wall plug end of your AC cord (cheater plug) or run a wire from the ground knurl of the
CD player to the ground knurl of the amplifier. Your unit will now be grounded through
the interconnect cables.
Servicing
Because of its careful design and exacting standards of manufacture, your Fusion DAC
Transport should normally require only minimal service to maintain its high level of
performance.
CAUTION: The Fusion Transport has sufficient levels of voltage and current to be lethal. Do
not tamper with a component or part inside the unit. Even with the power turned off, a charge
remains in the energy storage capacitors for some time. Refer any needed service to your
authorized Black Ice Audio dealer or other qualified technician.
The vacuum tubes inside the Fusion DAC Transport are high-quality and should last 20,000
hours. If you should need replacement tubes, please consult your dealer or service
representative.
Questions regarding your amplifier may be referred to the Customer Service Department of
Black Ice Audio: (301) 953-2014.
We hope you enjoy your musical experience.

15
LIMITED WARRANTY
The Black Ice Audio Fusion DAC Transport is warranted for the period
stated from the date of the original purchase.
1. Chassis and Transformers 18 months
2. Electron Tubes 6 months
WHO IS PROTECTED BY THIS WARRANTY
Your Black Ice Audio warranty protects the original owner so long as the original bill of sale is presented, or warranty card is
on file when warranty service is required. In addition, the warranty card included with your amplifier must be submitted within
thirty days of purchase otherwise the warranty will be good for only nine months. The warranty is not transferable if unit is
resold.
WHAT IS COVERED BY THE WARRANTY
Your Black Ice Audio warranty covers all defects in material and workmanship with the following specified exceptions. These
are: (1) Electron tubes are warranted for six months or 1,000 hours which ever comes first; (2) damage caused by accident,
unreasonable use or neglect (including the lack of reasonable and necessary maintenance); (3) modifications to the amplifier;
(4) damage occurring during shipment (claims must be presented to the carrier); (5) damage to or deterioration of any
accessory or decorative wooden surface; (6) damage resulting from failure to follow instructions contained in your owner's
manual; (7) damage resulting from the performance of repairs by someone other than Black Ice Audio or an authorized Black
Ice Audio warranty station; (8) any Black Ice Audio unit on which the serial number has been effaced, modified or removed;
(9) units used as demonstration or display models prior to purchase by the original consumer owner; (10) units used for the
purpose other than home use.
HOW TO OBTAIN WARRANTY PERFORMANCE
If your Black Ice Audio unit ever needs service, write to us at Black Ice Audio Inc., PO Box 218, Brookeville, MD 20833 (Att.
Customer Relations Department). We may direct you to an Authorized Black Ice Audio Warranty Station or ask you to send
your unit to the factory for repair. Either way, you'll need to present the original bill of sale to establish the date of purchase.
Along with the receipt of purchase, add a piece of paper with your name, address, phone number, and a description of the
problem. Please ship your Black Ice Audio unit to the Maryland address.
If service under this warranty is not necessary, but you have questions regarding the installation or operation of your unit,
please write to our Customer Relations department at the address above.
WHO PAYS FOR WHAT
Black Ice Audio will be happy to pay all labor and material expenses for all repairs covered by this warranty. If necessary,
repairs are not covered by this warranty, or if a unit is examined which is not in need of repair, you will be charged for the
repairs or examination.
Although you must pay any shipping charges incurred in getting your unit to an authorized warranty station or to the factory,
we will pay return shipping charges if the repairs are covered by the warranty. Please be sure to save the original shipping
cartons because a nominal charge will be made for additional cartons.
LIMITATION ON IMPLIED WARRANTIES OF MERCHANTABILITY AND FITNESS FOR PARTICULAR PURPOSE ARE
LIMITED IN DURATION TO THE LENGTH OF THIS WARRANTY, UNLESS OTHERWISE PROVIDED BY STATE LAW.
EXCLUSION OF CERTAIN DAMAGES
BLACK ICE AUDIO'S LIABILITY IS LIMITED TO THE REPAIR OR REPLACEMENT AT OUR OPTION, OF ANY DEFECTIVE
PRODUCT AND SHALL IN NO EVENT INCLUDE INCIDENTAL OR CONSEQUENTIAL COMMERCIAL DAMAGES OF ANY
KIND.
SOME STATES DO NOT ALLOW LIMITATIONS ON HOW LONG AN IMPLIED WARRANTY LASTS AND/OR DO NOT
ALLOW THE EXCLUSION OF INCIDENTAL OR CONSEQUENTIAL DAMAGES, SO THE ABOVE LIMITATIONS AND
EXCLUSIONS MAY NOT APPLY TO YOU.
This warranty gives you specific legal rights and you may also have other rights which vary from state to state. We sincerely
thank you for your expression of confidence in Black Ice Audio products. The amplifiers have been painstakingly assembled
by highly trained crafts' people. It should give you many years of musical enjoyment.

16
Fusion DAC Transport
Technical Specifications:
Frequency Response: 20-20KHz ± 0.5dB + 0.5dB
S/N Signal to Noise Ratio: > 98dB
THD + N Distortion: ≤0.02% (Balanced signal 1KHz
Channel Separation: > 96dB (1KHz)
Analog Output Signal Balanced XLR, Unbalanced RCA
Line Output Voltage: Balanced signal output 5.0V, 47Kohms
Line Output Voltage: Unbalanced 2.5V, 47Kohms
Digital Output: 0.5Vpp, 75 ohms
Tubes: 6 pcs. 12AX7 *2,12AT7*2,12AU7*2
Power: 110V or 220V AC 50Hz/60Hz
Power Consumption: 30 watts
Fuse: 1.0 amp fast blow (size 5mm X 20mm) for 110/120 VAC ---
0.5 amp fast blow for 220/240 VAC
Size: 17 in. wide by 12 in. deep and 3.5 in. high
Weight: 28 pounds
Warranty: 12 months on the chassis, 6 months on the vacuum tubes.
Parts and labor
Black Ice Audio, Inc.
21310 Ridgecroft Road, Brookeville, MD 20833
Tel: (301) 953-2014 Fax: (301) 498-0554
Table of contents


