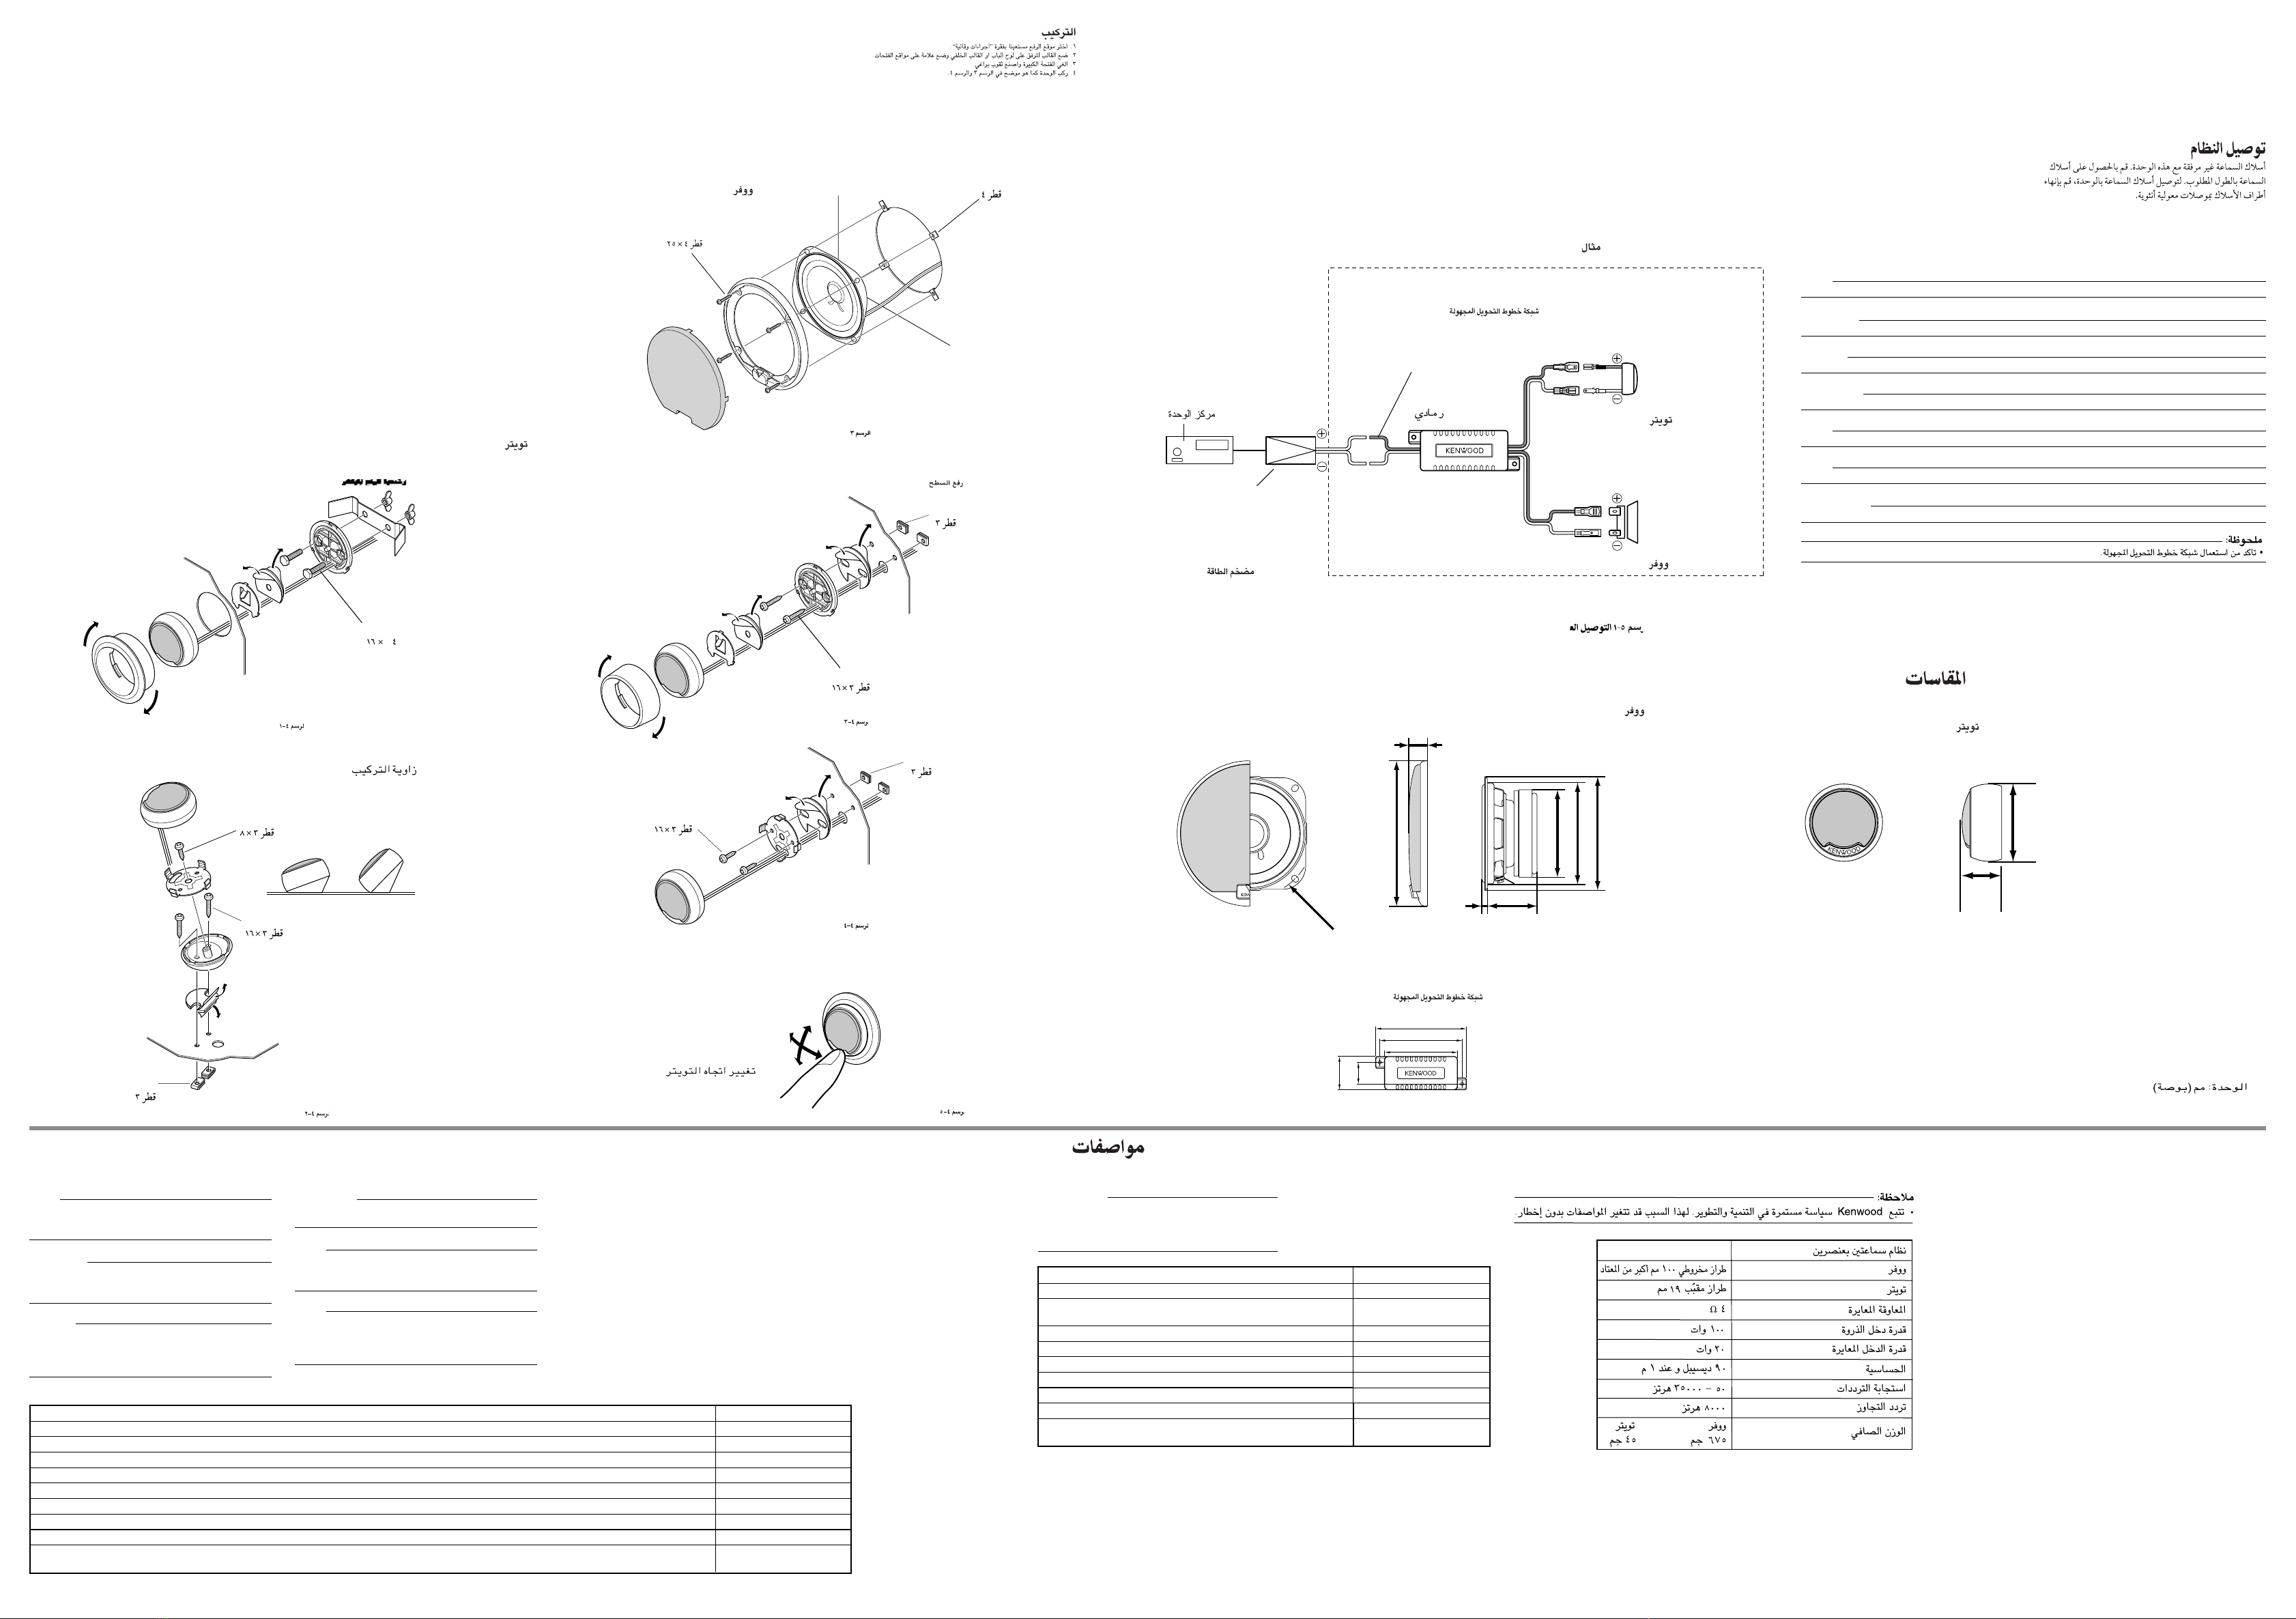
2. Power supply voltage — Connect
the illumination lamp-equipped
speakers to DC 12V, negative ground.
Tension d’alimentation — Raccorder
les haut-parleurs munis d’in éclairage
sur 12 V CC, mise à la terre négative.
Betriebsspannung — Die
Lautsprecher mit Beleuchtung an
Gleichstrom 12 V mit negativer Masse
anschließen.
Spanningvoorziening — Verbind de
luidsprekers voorzien van verlichting
met een 12 Volt, negatieve geaarde
gelijkstroombron.
Alimentazione — Se i diffusori pos-
siedono indicatori, collegateli ad una
sorgente di energia a 12V di c.c. a terra
negativa.
Tensión de alimentación — Conecte
los altavoces equipados con lámpara
de iluminación a una batería de 12 V
CC con puesta a masa negativa.
Напряжение источника питания
— подсоединяйте громкоговори-
тели, оснащенные световым инди-
катором, к сети постоянного тока
12 В с заземленным отрицательным
полюсом.
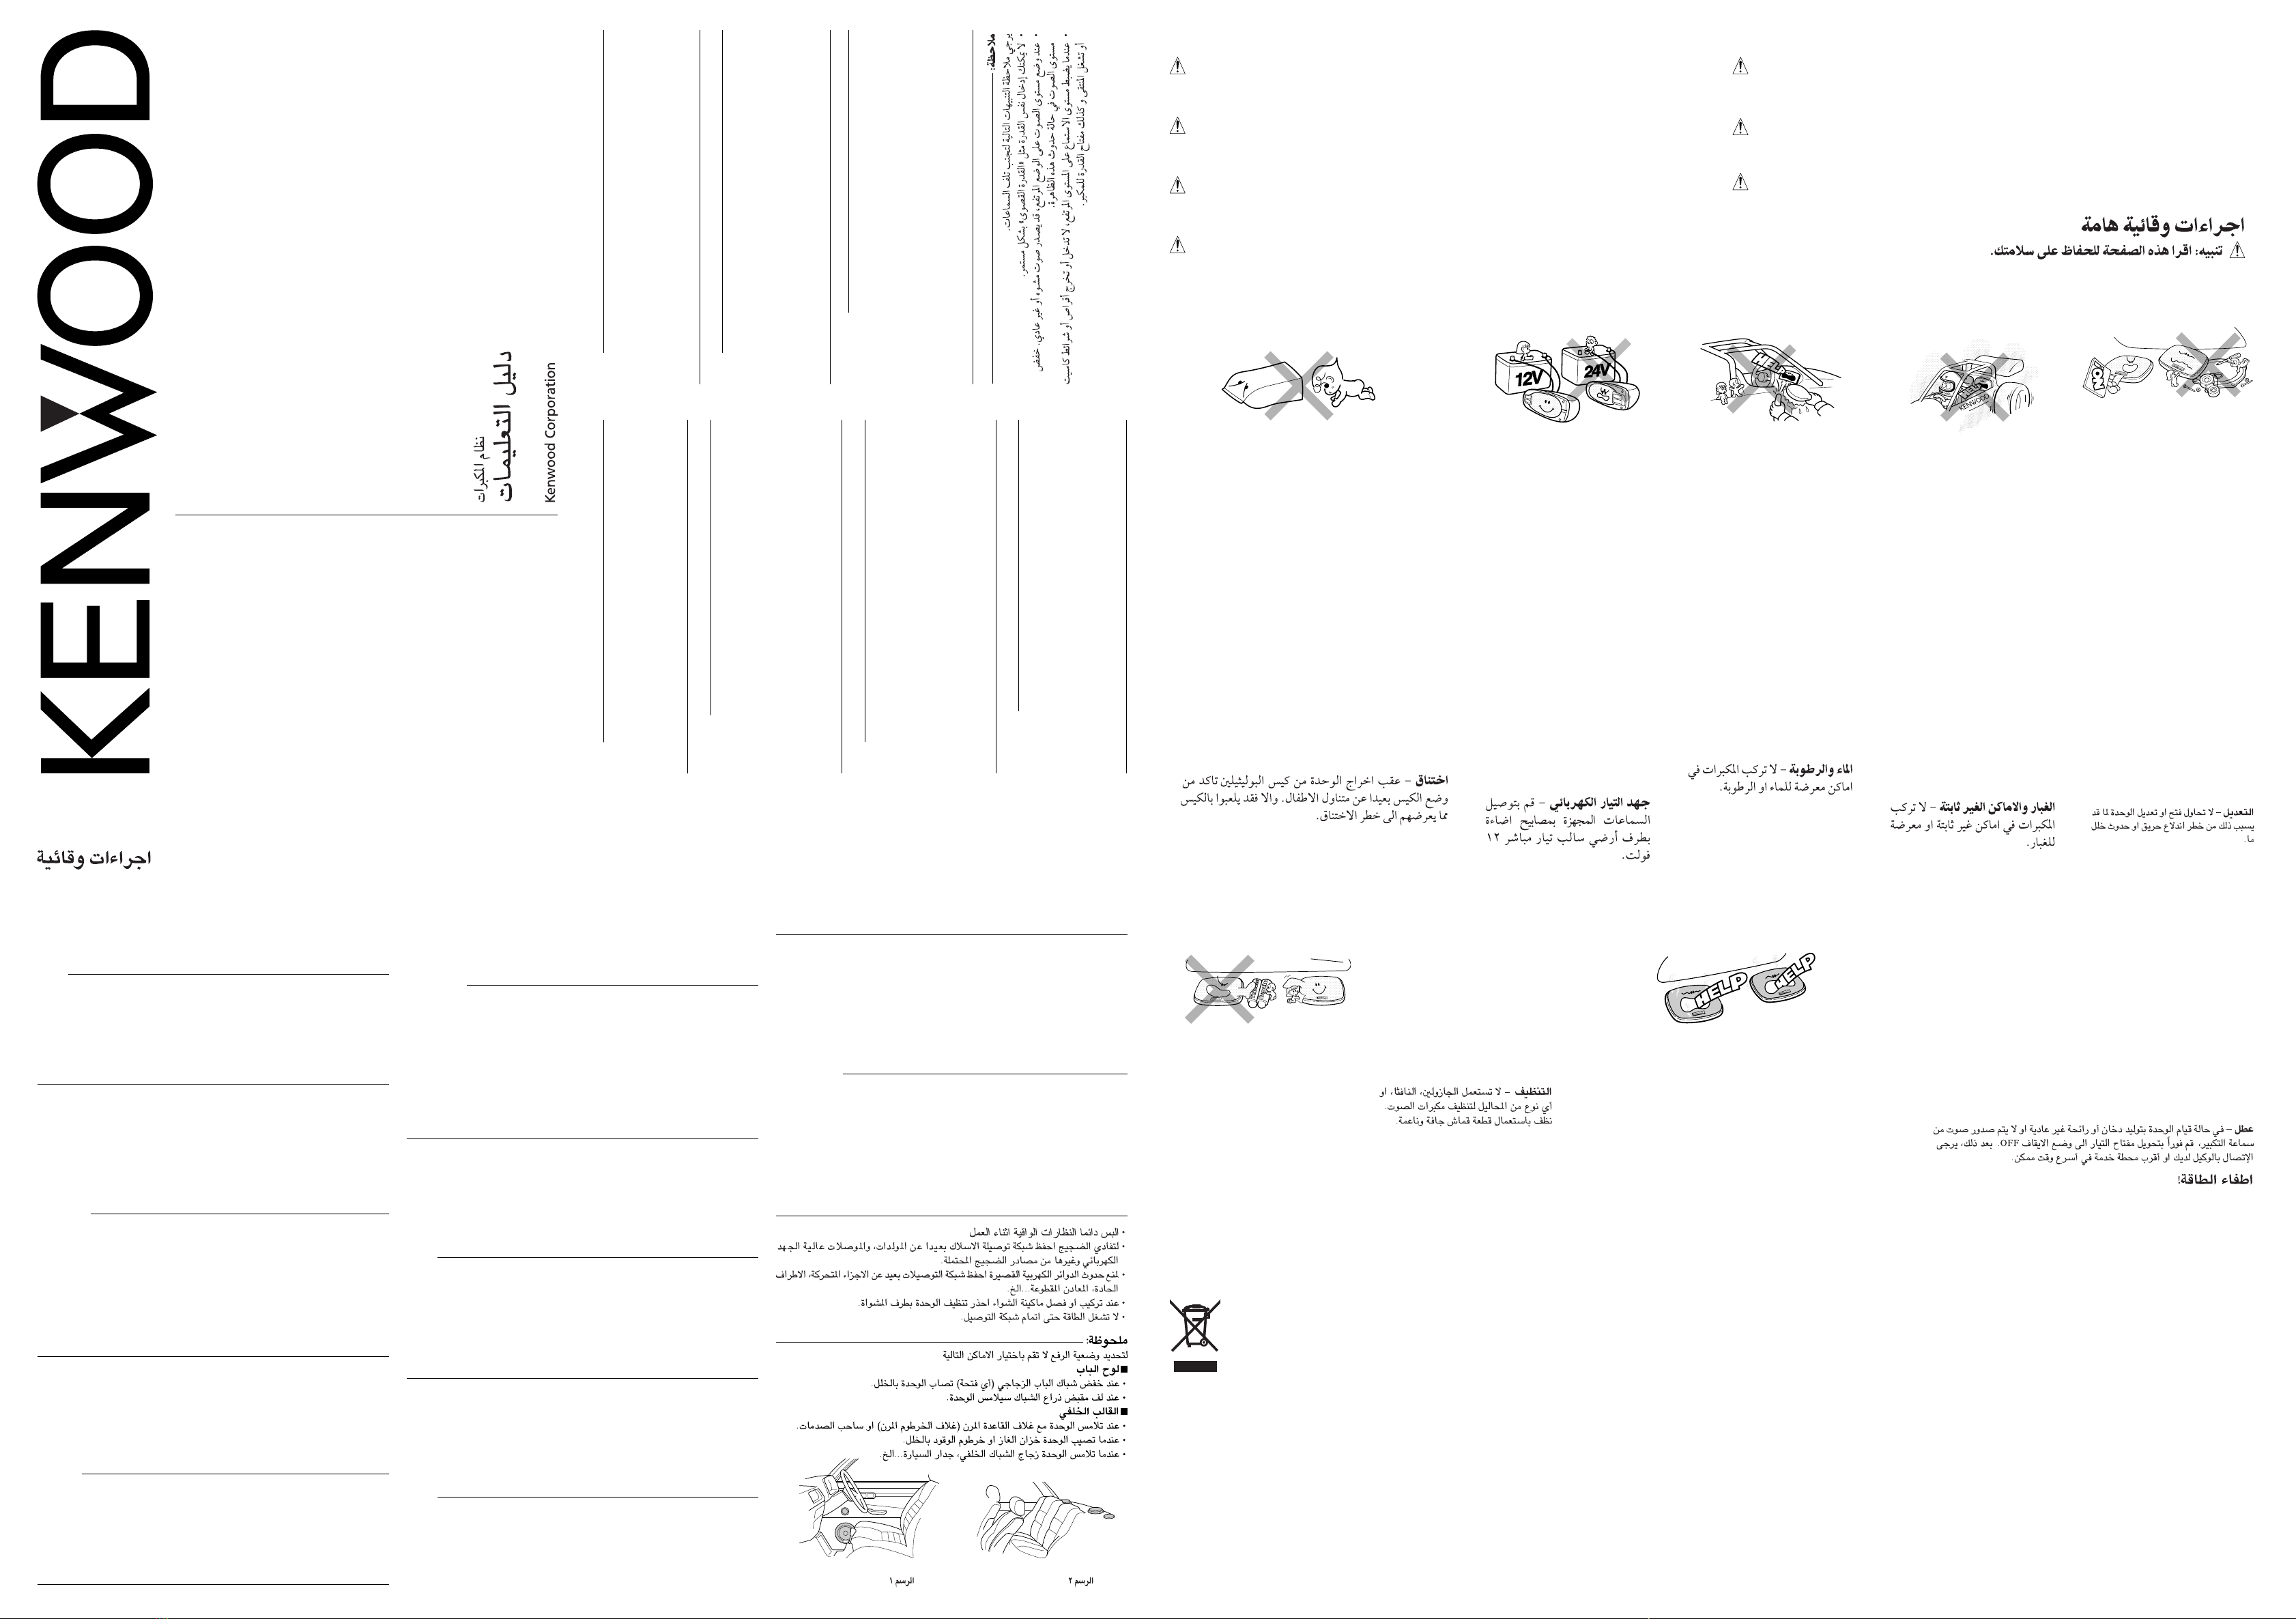
IMPORTANT SAFEGUARDS
Caution : Read this page carefully to keep your safety.
AVERTISSEMENTS IMPORTANTS
Attention : Lire attentivement cette page pour votre sécurité.
WICHTIGE SICHERHEITSHINWEISE
Achtung: Diese Seite aus Sicherheitsgründen sorgfältig durchlesen.
BELANGRIJKE VOORZORGSMAATREGELEN
Let op: Lees voor uw veiligheid deze bladzijde zorgvuldig door.
PRECAUZIONI IMPORTANTI
Attenzione : Per vostra sicurezza, leggete attentamente questa pagina.
AVISOS IMPORTANTES
Precaución: Para su seguridad, lea con atención esta página.
ВАЖНЫЕ МЕРЫ БЕЗОПАСНОСТИ
Предупреждение. В целях соблюдения безопасности внимательно прочи-
тайте информацию на этой странице.
• Always wear protective eyewear during instllation.
• To prevent noise pick-up, keep the wiring of this unit away from motors, high-
voltage leads and other possible noise sources.
• To prevent short-circuit, keep all wiring away from moving parts, sharp edges,
cut metal, etc.
• When removing or installing the grille, be careful not to brush the unit with
the edge of the grille.
• Do not switch ON power until wiring is completed.
Note :
For mounting location, do not select the following places.
■Door panel
• When the door window glass is lowered (opened), the unit is damaged.
• When the window crank handle is rotated, it comes into contact with the unit.
■Rear deck
• When the unit comes into contact with the boot lid spring (trunk lid spring) or
shock absorbers (shock towers).
• When the unit damages the gas tank or fuel hose.
• When the unit comes into contact with the rear window glass, car wall, etc.
• Portez toujours de protections oculaires pendant l'installation.
• Afin de supprimer les bruits, placer le câblage de cet appareil loin des
moteurs, câbles conducteurs de haute tension et autres sources possibles
de bruit.
• Afin d’éviter la création de courts-circuits, éloigner le câblage des pièces
mobiles, arêtes vives, métal découpé, etc.
• Faire attention, au cours de la dépose ou pose de la grille, de ne pas toucher
l’appareil avec les bords de la grille.
• Ne pas mettre l’appareil en route tant que le câblage n’est pas
complètement terminé.
Remarque :
Ne pas choisir les emplacements suivants pour effectuer le montage.
■ Panneaux de porte
• Lorsque le fait d’abaisser la vitre risque d’endommager l’appareil.
• Lorsque le fait de tourner la poignée d’ouverture de la vitre la met en contact
avec l’appareil.
■ Plage arrière
• Lorsque l’appareil vient en contact avec l’amortisseur arrière ou le renfort du
pare-choc.
• Lorsque l’appareil risque d’endommager le réservoir à gaz ou la tuyauterie
souple de carburant.
• Lorsque l’appareil entre en contact avec la vitre de la lunette arrière, les parois
de la voiture, etc.
• Tragen Sie während der Installation immer Augenschutz.
• Zur Verhinderung von Störgeräuschen die Kabel dieses Geräts von Motoren,
Hochspannungskabeln und anderen möglichen Störquellen fernhalten.
• Zur Verhinderung von Kurzschlüssen die Kabel von beweglichen Teilen,
scharfen Kanten usw, fernhalten.
• Beim Aus- und Einbauen des Grills darauf achten, daß die Membran nicht mit
der Kante des Grills beschädigt wird.
• Die Spannungsversorgung erst einschalten, wenn alle Anschlüsse
durchgeführt sind.
Hinweis :
Die folgenden Stellen sollten nicht für den Einbau gewählt werden.
■ Türverkleidung
•
Stellen, wo das Gerät durch Öffnen (Senken) der Fenster beschädigt werden kann.
•
Stellen, wo beim Öffnen der Fenster die Kurbel in Kontakt mit dem Gerät kommt.
■ Hutablage
• Stellen, wo das Gerät mit den Federn oder Dämpfern des Kofferraumdeckels
in Kontakt kommt.
•
Stellen, wo das Gerät den Kraftstofftank oder die Benzinleitungen beschädigen kann.
•
Stellen, wo das Gerät mit dem Rückfenster, der Karosserie usw. in Kontakt kommt.
• Draag altijd een beschermende bril tijdens de installatie.
• Voorkom interferentie en houd de draden van de luidsprekers uit de buurt
van de motor, spanningsdraden en andere bronnen die mogelijk ruis of
interferentie zouden kunnen veroorzaken.
• Voorkom kortsluiting en houd de draden uit de buurt van bewegende
onderdelen, scherpe randen, etc.
• Let bij het verwijderen of plaatsen van de rooster op, dat u de luidsprekers
niet met de rand van de rooster beschadigt.
• Schakel de spanning pas aan (ON) nadat alle aansluitingen zijn gemaakt.
Opmerking :
Installeer de luidsprekers niet op de volgende plaatsen
■ Portierpanelen
• Op plaatsen waar de luidsprekers mogelijk worden beschadigd wanneer het
raam wordt geopend (het raam “zakt” omlaag).
• Op plaatsen waar de luidsprekers mogelijk worden beschadigd door het
draaien van de raamhendel voor het openen en sluiten van het raam.
■ Hoedeplank
• Op plaatsen waar de luidsprekers in kontakt komen met de veer van de
kofferdeksel of schokdempers.
• Op plaatsen waar de luidsprekers mogelijk de benzinetank of -slang kan
beschadigen.
• Op plaatsen waar de luidsprekers in kontakt komen met het glas van het
achterruit, of andere onderdelen van de auto.
• Durante l'installazione portate sempre gli occhiali di protezione.
• Per evitare l’intercettazione di rumori, tenere i fili di questo apparecchio
lontani da motori, fili ad alta tensione ed altre possibili sorgenti di rumori.
• Per prevenire corti circuiti, tenere i fili di collegamento lontani da parti mobili,
spigoli, parti di metallo taglienti, ecc.
• Quando si monta o smonta la griglia, fare attenzione a non rovinare l’unità
con gli spigoli della griglia.
• Non accendere l’apparecchio fino a quando tutti i collegamenti siano
terminati.
Nota :
Non installare l’apparecchio nei punti seguenti.
■ Pannelli delle portiere
• Se abbassando il finestrino, l’apparecchio viene danneggiato.
• Se facendo girare la leva del finestrino, essa urta contro l’apparecchio.
■ Dietro i sedili posteriori
• Se l’apparecchio viene in contatto con le molle del cofano o con gli
ammortizzatori.
• Se l’apparecchio danneggia il serbatoio della benzina o il tubo del carburante.
• Se l’apparecchio viene in contatto con il vetro del finestrino posteriore, con le
pareti dell’auto, ecc.
• Siempre use protección para los ojos durante la instalación.
• Para evitar la captación de ruidos, mantenga el cableado de esta unidad
alejado de motores, conductores de alta tensión y otras posibles fuentes de
ruido.
• Para evitar cortocircuitos, mantenga todo el cableado alejado de las partes
móviles, bordes agudos, metal cortado, etc.
• Cuando extraiga o instale la rejilla, tenga cuidado para no rozar la unidad con
el borde de la rejilla.
• No conecte la alimentación hasta después de completar todas las conexiones.
Nota :
Como ubicación de montaje, no seleccione ninguno de los lugares siguientes
■ Panel de puerta
• Donde la unidad pueda estropearse cuando baje (abra) el cristal de la
ventanilla de la puerta.
• Donde la manilla de la ventana entre en contacto con la unidad al girarla.
■ Estantería trasera
• Donde la unidad entre en contacto con el muelle de la tapa del
compartimiento de equipajes (muelle de la tapa del portamaletas) o con los
amortiguadores (torres de amortiguadores).
• Donde la unidad pueda estropear el depósito o la manguera de combustible.
• Donde la unidad entre en contacto con la ventana trasera, paredes del
automóvil, etc.
• Во время установки, следует постоянно надевать защитные очки.
• Во избежание появления шумов, провода данного устройства должны
находиться вдали от моторов, высоковольтных проводов и других
возможных источников шума.
• Во избежание короткого замыкания, все провода должны находиться
вдали от передвигающихся частей, острых кромок, обрезанных
металлических частей и т.д.
• Во время извлечения или установки защитной сетки, соблюдайте
предосторожность, чтобы не задеть устройство кромкой защитной
сетки.
• Не ВКЛЮЧАЙТЕ питание, пока не завершен монтаж проводов.
Примечание.
Не следует выбирать следующие места для установки.
■Дверная панель
• Когда данное устройство может повредиться при снижении
(открывании) окна двери.
• Когда, при вращении изогнутой ручки окна, она может задевать
устройство.
■Задняя полка
• Когда устройство может соприкасаться с пружиной крышки багажника
или амортизаторами.
• Когда устройство может повредить бензобак или топливный шланг.
• Когда устройство может соприкасаться со стеклом заднего окна,
стенкой машины и т.д.
Note :
Observe the following cautions to prevent damage to the speakers.
• You cannot input the same power as “peak power” continually.
• When the volume is set too high, the sound may be distorted or abnormal.
Reduce the volume promptly in case of such phenomena.
• While the listening volume is set to a high level, do not load or eject a disc or
cassette tape or operate the selector and power switches of the amplifier.
Remarque :
Respecter les consignes suivantes pour éviter que les haut - parleurs ne soient
endommagés.
• Vous ne pouvez pas régler une puissance identique à la “puissance crête” de
façon continue.
• Si le niveau de sortie est trop puissant, les sons peuvent étre déformés ou
anormaux. Réduire le niveau de sortie aussitôt que l'on constate ce phéno-
mène.
• Si le niveau de sortie a été réglé à une valeur élevée, ne pas mettre en place
ou éjecter un disque ou une cassette, ne pas agir sur les sélecteurs ou l'inter-
rupteur d'alimentation de l'amplificateur.
Hinweis :
Die folgenden Hinweise beachten, um Schäden der Lautsprecher zu verhin-
dern.
• Es kann nicht die gleiche Leistung kontinuierlich als “Spitzenleistung” einge-
geben werden.
• Wenn die Lautstärke zu hoch eingestellt wird, kann der Klang verzerrt sein
oder unnormal klingen.
In diesem Fall sollte die Lautstärke umgehend vermindert werden.
• Während die Lautstärke auf einem hohen Pegel eingestellt ist, keine CD
oder Kassette einlegen oder entnehmen und nicht die Wahlschalter und den
Netzschalter des Verstärkers betätigen.
Opmerking :
Voorkom beschadiging van de luidspreker en let derhalve op de volgende pun-
ten.
• U kunt de luidsprekers niet continue op “piekvermogen” belasten.
• Wanneer het volume te hoog is ingesteld, wordt het geluid vervormd of
klinkt het geluid niet normaal. Verlaag in dat geval direkt het volume.
• Plaats of verwijder geen CD of cassette en bedien de keuzeschakelaar en
spannìngsschakelaar van de versterker niet wanneer het volume op een hoog
niveau is gesteld.
Nota :
Per evitare danni ai diffusori, osservate le seguenti precauzioni.
• Non è possibile alimentare continuamente i “correnti di cresta”.
• Se il volume è troppo alto, il suono può risultare distorto o anormale. In tat
caso, riducete il volume immediatamente.
• Se il volume di ascolto è stato impostato ad un livello elevato, non caricate o
espellete un disco o una cassetta, non azionate nè il selettore nè gli interrut-
tori di alimentazione dell’amplificatore.
Nota :
Tome las precauciones siguientes para evitar estropear los altavoces.
• No es posible suministrar la misma potencia como “potencia máxima” conti-
nuamente.
• Cuando ajuste un volumen demasiado alto, el sonido podrá distorsionarse o
no ser normal. Reduzca rápidamente el volumen en este caso.
• Mientras el volumen de escucha esté ajustado a un nivel alto, no introduzca
ni expulse un disco o un casete, ni utilice los selectores ni el interruptor de la
alimentación del amplificador.
Примечание :
Соблюдайте следующие меры безопасности во избежание повреждения
громкоговорителей.
• Запрещается поддерживать постоянное “пиковое напряжение”.
• Если установлен слишком высокий уровень громкости, возможно, звук
будет воспроизводиться с искажениями. Немедленно уменьшите уровень
громкости для устранения этого феномена.
• Если установлен высокий уровень громкости прослушивания, не
загружайте и не извлекайте диск или кассету, а также не используйте
регуляторы или переключатели усилителя.
Precautions / Précautions / Zur Beachtung / Voorzorgsmaatregelen / Precauzioni / Precauciones /
Мерами предосторожности
/
Information on Disposal of Old Electrical and Electronic Equipment (applicable for EU countries
that have adopted separate waste collection systems)
Products with the symbol (crossed-out wheeled bin) cannot be disposed as household waste. Old electri-
cal and electronic equipment should be recycled at a facility capable of handling these items and their
waste byproducts. Contact your local authority for details in locating a recycle facility nearest to you.
Proper recycling and waste disposal will help conserve resources whilst preventing detrimental effects on
our health and the environment.
Information sur l’élimination des anciens équipements électriques et électroniques (applicable dans les pays de l’
Union Européenne qui ont adopté des systèmes de collecte sélective)
Les produits sur lesquels le pictogramme (poubelle barrée) est apposé ne peuvent pas être éliminés comme ordures
ménagères. Les anciens équipements électriques et électroniques doivent être recyclés sur des sites capables de traiter
ces produits et leurs déchets. Contactez vos autorités locales pour connître le site de recyclage le plus proche. Un recy-
clage adapté et l’élimination des déchets aideront à conserver les ressources et à nous préserver des leurs effets nocifs
sur notre santé et sur l’environnement.
Entsorgung von gebrauchten elektrischen und elektronischen Geräten (anzuwenden in den Ländern der Europä-
ischen Union und anderen europäischen Ländern mit einem separaten Sammelsystem für solche Geräte)
Das Symbol (durchgestrichene Mülltonne) auf dem Produkt oder seiner Verpackung weist darauf hin, dass dieses Pro-
dukt nicht als normaler Haushaltsabfall behandelt werden darf, sondern an einer Annahmestelle für das Recycling von
elektrischen und elektronischen Geräten abgegeben werden muss. Durch Ihren Beitrag zur korrekten Entsorgung dieses
Produktes schützen Sie die Umwelt und die Gesundheit Ihrer Mitmenschen. Unsachgemässe oder falsche Entsorgung
gefährden Umwelt und Gesundheit. Weitere Informationen über das Recycling dieses Produktes erhalten Sie von Ihrer
Gemeinde oder den kommunalen Entsorgungsbetrieben.
Informatie over het weggooien van elektrische en elektronische apparatuur (particulieren)
Dit symbool geeft aan dat gebruikte elektrische en elektronische producten niet bij het normale huishoudelijke afval
mogen. Lever deze producten in bij de aangewezen inzamelingspunten, waar ze gratis worden geaccepteerd en op de
juiste manier worden verwerkt, teruggewonnen en hergebruikt. Voor inleveradressen zie www.nvmp.nl, www.ictmilieu.
nl, www.stibat.nl. Wanneer u dit product op de juiste manier als afval inlevert, spaart u waardevolle hulpbronnen en
voorkomt u potentiële negatieve gevolgen voor de volksgezondheid en het milieu, die anders kunnen ontstaan door
een onjuiste verwerking van afval.
Informazioni sullo smaltimento delle vecchie apparecchiature elettriche ed elettroniche (valido per i paesi euro-
pei che hanno adottato sistemi di raccolta separata)
I prodotti recanti il simbolo di un contenitore di spazzatura su ruote barrato non possono essere smaltiti insieme ai nor-
mali rifiuti di casa. I vecchi prodotti elettrici ed elettronici devono essere riciclati presso una apposita struttura in grado di
trattare questi prodotti e di smaltirne i loro componenti. Per conoscere dove e come recapitare tali prodotti nel luogo a
voi più vicino, contattare l’apposito ufficio comunale. Un appropriato riciclo e smaltimento aiuta a conservare la natura e
a prevenire effetti nocivi alla salute e all’ambiente.
Información acerca de la eliminación de equipos eléctricos y electrónicos al final de la vida útil (aplicable a los
países de la Unión Europea que hayan adoptado sistemas independientes de recogida de residuos)
Los productos con el símbolo de un contenedor con ruedas tachado no podrán ser desechados como residuos domés-
ticos. Los equipos eléctricos y electrónicos al final de la vida útil, deberán ser reciclados en instalaciones que puedan dar
el tratamiento adecuado a estos productos y a sus subproductos residuales correspondientes. Póngase en contacto con
su administración local para obtener información sobre el punto de recogida más cercano. Un tratamiento correcto del
reciclaje y la eliminación de residuos ayuda a conservar los recursos y evita al mismo tiempo efectos perjudiciales en la
salud y el medio ambiente.
1. Suffocation — After taking the unit out of the polyethylene
bag, be sure to dispose of the polyethylene bag out of the
reach of children. Otherwise, they may play with the bag,
which could cause hazard of suffocation.
Etouffement — Après avoir retiré l’appareil du sac de polyé-
thylène, bien placer ce dernier hors de la portée des enfants. S’
ils jouent avec ce sac, un risque d’étouffement est possible.
Erstickungsgefahr — Nach der Entnahme der Lautsprecher
aus dem Polyäthylenbeutel muß dieser für Kinder unerreich-
bar endsorgt werden. Wenn Kinder mit dem Beutel spielen,
besteht Erstickungsgefahr.
Verstikking — Nadat u de luidsprekers uit de polyethyleen
zak heeft verwijderd, moet u deze zak weggooien. Zorg dat
de zak uit de buurt van kinderen blijft. Kinderen zouden met
de zak kunnen gaan spelen en de zak bijvoorbeeld over hun
hoofd trekken met verstikking tot gevolg.
Pericolo di soffocamento — Estratta l’unità dal sacchetto in
polietilene, gettatelo in modo che non possa cadere in mano a
bambini. Essi potrebbero altrimenti rimanere soffocati.
Asfixia — Después de sacar la unidad de la bolsa de polietile-
no, asegúrese de poner la bolsa de polietileno donde no pue-
dan alcanzarla los niños. De otra forma, éstos podrían jugar
con la bolsa y se podría producir un peligro de asfixia.
Удушье — после извлечения устройства обязательно
уберите полиэтиленовый пакет вне досягаемости детей. В
противном случае дети могут начать играть с пакетом, что
потенциально опасно по причине удушья.
3. Water and moisture — Do not install
the speakers in locations which may
be subject to water or moisture.
Eau et humidité — Ne pas installer
les haut-parleurs dans des endroits où
ils peuvent être exposés à de l’eau ou
à l’humidité.
Wasser und Feuchtigkeit — Die
Lautsprecher nicht an Stellen einbau-
en, wo sie Wasser oder Feuchtigkeit
ausgesetzt werden.
Water en vocht — Installeer de
luidsprekers niet op plaatsen waar
ze mogelijk aan water of vocht bloot
worden gesteld.
Acqua ed umidità — Non installate i
diffusori in posizioni esposte ad acqua
ed umidità.
Agua y humedad — No instale los
altavoces en lugares sometidos al
agua o a la humedad.
Водаи влага — не устанавливайте
громкоговорители в местах,
подверженных воздействию воды
или влаги.
4. Dust and unstable locations — Do
not install the speakers in unstable
locations or locations subject to dust.
Poussière et endroits instables —
Ne pas installer les haut-parleurs dans
des endroits instables ou exposés à de
la poussière.
Staub und unstabile Stellen — Die
Lautsprecher nicht an unstabilen
Stellen oder Stellen, wo sie Staub aus-
gesetzt sind, einbauen.
Stoffige en instabiele plaatsen —
Installeer de luidsprekers niet op
stoffige plaatsen of instabiele plaatsen
onderhevig aan trillingen.
Urti e polvere — Non installate i dif-
fusori in posizioni pericolose instabili
o esposte a polvere e sporco.
Polvo y ubicaciones inestables —
No instale los altavoces en lugares
inestables ni en lugares donde haya
polvo.
Пыль и неустойчивые поверхнос-
ти — не устанавливайте громкого-
ворители на неустойчивых повер-
хностях или в местах скопления
пыли.
5. Modification — Do not attempt to
open or modify the unit, for this could
cause fire hazard or malfunction.
Modification — Ne pas essayer de
démonter ni de modifier l’appareil car
ceci risque de provoquer un risque d’
incendie ou un fonctionnement incor-
rect.
Veränderungen — Niemals versu-
chen, die Lautsprecher zu öffnen
oder zu verändern, weil dadurch
Feuergefahr und Fehlfunktionen her-
vorgerufen werden können.
Aanpassingen — Voorkom brand of
beschadiging en open derhalve de
luidsprekers niet en breng er geen
veranderingen in aan.
Modifiche — Non tentate di aprire
o modificare l’unità, dato che ciò
potrebbe causare incendi o errori di
funzionamento.
Modificación — No trate de abrir ni
modificar la unidad porque podría
producirse un peligro de incendio o
una avería.
Инженерный анализ — не
пытайтесь открыть устройство или
провести его инженерный анализ,
так как это может стать причиной
возгорания или неисправности.
6. Cleaning — Do not use gasoline, naph-
tha, or any type of solvent to clean the
speakers. Clean by wiping with a soft,
dry cloth.
Nettoyage — Ne pas utiliser d’essence,
de naphte ni de diluant pour nettoyer
les haut-parleurs. Les nettoyer avec un
chiffon doux et sec.
Reinigung — Zum Reinigen der
Lautsprecher niemals Benzin,
Farbverdünner oder andere
Lösungsmittel verwenden. Zum
Reinigen ein weiches, trockenes Tuch
verwenden.
Reinigen — Gebruik geen benzine,
thinner of andere oplosmiddelen voor
het reinigen van de luidsprekers. Reinig
de luidsprekers met een zachte, droge
doek.
Pulizia — Non pulite l’unità con ben-
zina, nafta o solventi molto volatili in
generale. Usate solo un panno morbido
ed asciutto.
Limpieza — No utilice gasolina, nafta
ni ningún otro tipo de disolvente para
limpiar los altavoces. Límpielos con un
paño suave y seco.
Чистка — для чистки громкоговори-
телей не применяйте бензин, керосин
и какие-либо другие растворители.
Протирайте сухой мягкой тканью.
7. Malfunction — In the event the unit generates smoke or abnormal smell
or no sound comes out from the speaker, immediately switch the power
OFF. After this, please contact your dealer or nearest service station as soon
as possible.
POWER OFF!
Mauvais fonctionnement — Dans le cas où l’appareil dégage de la fumée
ou une odeur anormale, ou si aucun son ne provient du haut-parleur, cou-
per immédiatement l’alimentation. Contacter ensuite votre concession-
naire ou centre de service le plus proche le plus rapidement possible.
COUPER L’ALIMENTATION!
Fehlfunktion — Wenn aus dem Gerät Rauch austritt oder kein Ton von
den Lautsprechern zu hören ist, so schalten Sie sofort die Stromversorgung
aus. Wenden Sie sich anschließend so bald wie möglich an Ihren Händler
oder an die nächstliegende Kundendienststation.
AUSSCHALTEN!
Storing — Wanneer er rook of een vreemde geur uit de luidsprekers komt
of deze in het geheel geen geluid produceren, moet u direct de stroom uit
(OFF) schakelen. Raadpleeg vervolgens uw handelaar of een erkend onder-
houdscentrum.
SPANNING UIT!
Malfunzionamento — Nel caso che l’unità producesse del fumo o un
odore anomalo, oppure non si sentisse nessun suono dagli altoparlanti,
spegnerla immediatamente (OFF).Ciò fatto, contattare appena possibile il
rivenditore di fiducia o il centro di assistenza tecnica più vicino.
SCOLLEGATE L’ALIMENTAZIONE!
Fallo de funcionamiento — En caso de que la unidad genere humos
u olores anormales o no genere sonido a través del altavoz, desconecte
inmediatamente la alimentación. Después, consulte con su concesionario
o centro de reparaciones más cercano tan pronto como sea posible.
¡DESCONECTE LA ALIMENTACION!
Неисправность — если устройство выделяет дым или необычный
запах, а также если из громкоговорителей не слышен звук,
немедленно ВЫКЛЮЧИТЕ питание. После этого в кратчайшие сроки
свяжитесь с дилером или ближайшим сервисным центром.
ВЫКЛЮЧИТЬ ПИТАНИЕ!
Fig. 1 / Abb. 1 / Afb. 1 /
Figura 1 / Pис. 1 /
Fig. 2 / Abb. 2 / Afb. 2 /
Figura 2 / Pис. 2 /
COMPONENT SPEAKER SYSTEM
INSTRUCTION MANUAL
SYSTÈME DE HAUT-PARLEURS ÉLÉMENTS
MODE D’EMPLOI
KOMPONENTEN-LAUTSPRECHERSYSTEM
BEDIENUNGSANLEITUNG
KOMPONENT LUIDSPREKERSYSTEEM
GEBRUIKSAANWIJZING
ALTOPARLANTI PER COMPONENTI AUDIO
ISTRUZIONI PER L’USO
SISTEMA DE ALTAVOCES COMPONENTES
MANUAL DE INSTRUCCIONES
СИСТЕМА КОМПОНЕНТНОГО ГРОМКОГОВОРИТЕЛЯСИСТЕМА КОМПОНЕНТНОГО ГРОМКОГОВОРИТЕЛЯ
ИHCTPУKCИЯ ПO ЭKCПЛУATAЦИИИHCTPУKCИЯ ПO ЭKCПЛУATAЦИИ
KFC-S402P
© B61-1317-00/00 (W) KW (FSB)
B61-1317-00_0_KFC-S402P_1.indd 1
07.10.18 9:55:29 AM