manuals.online logo
Brands
  1. Home
  2. •
  3. Brands
  4. •
  5. Blagdon
  6. •
  7. Outdoor Fountain
  8. •
  9. Blagdon Liberty Mains Free Woodland Pail & Urns... User manual

Blagdon Liberty Mains Free Woodland Pail & Urns... User manual

Congratulations on buying a Liberty Mains Free Woodland Pail & Urns Feature.
This product has been designed to enhance your garden with the sight and
sound of moving water.
LED Light
Woodland Pale&Unrs Feature includes
1
1
69cm (H) x 44.5cm (W) x 40.5cm (D)
7.0 litres (1.5 gallons)
77cm (H) x 35cm (W) x 33cm (D)
6Fountain Body
Top Bucket
1
Top Bucket
LED Light
Fountain Body
DC 5 ~ 8.4 Volt Low Voltage
60cm low voltage cable for LED light
Inset the top bucket into top of
fountain body. Feed the hose
through the hole towards the
bottom of fountain body.
Locate the hose from the rear of the water feature through the
rear access panel and attach the pump to the hose and feed the
pump cable through the rear access panel. Locate the LED light
cable and take it out ready for connection to the control panel.
(see diagram)
Carefully remove components from the box, lay them on a flat surface. The power set is not pre-connected,
this is a straight forward process and all connections are colour coded for easy use, please see step 4 and
step 5 for further details.
Attach the blue plug of the pump into
control panel’s blue socket (see diagram
and pic A). Attach the orange plug of the
LED light into control panel’s orange socket
(see diagram and pic B). Don’t forget to
close the control panel’s yellow port with
the rubber socket protector.
The yellow port is used for recharging and
connecting to a solar panel which is sold
separately (see pic B). Insert the control
panel into the side access panel.
Please note there is a small hole beside the
access panel. This hole will be used to feed
the solar panel cable through to connect
with control panel when you upgrade to a
solar panel.
Place the feature in your chosen location and fill the features reservoir with water, making sure the pump Is
fully submerged. The recommended amount of water is 7 litres (1.5 gallons).
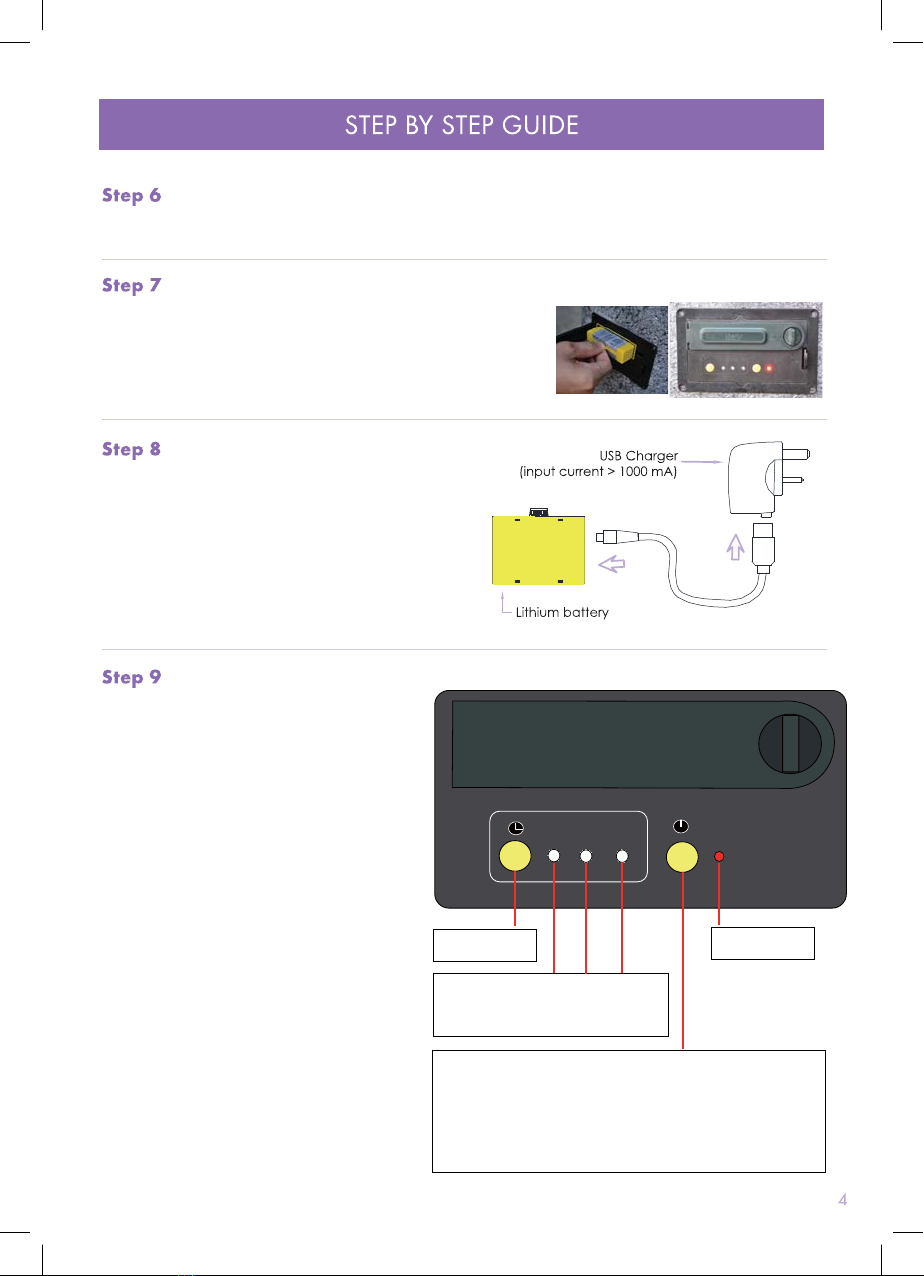
Twist the locking nut on the dark green door on the front of the control
panel. Insert the yellow lithium battery and close the door, twist the
locking nut to ensure no moisture can get to the battery.
The feature is now ready for use and is designed to turn on/off with the
manual button or the built in timer functions for 2/3/4 hour intervals
can be used.
The battery comes with a small pre-charge power for
immediate use. For best results, it is advised to charge
the battery fully before using it for the first time.
In order to charge the battery to full power, you can use
the provided USB charger and cable with micro USB
connector to charge the battery in the home. A Red
indicator light will illuminate while the battery is charging.
When the battery has full power, the indicator light will
turn Green. Charging the battery will take approximately
5 hours.
Using the control panel
Timer function modes (A,B):
Press the timer function mode switch (A) to
select the desired time, press this switch
repeatedly to select the required time 2, 3 or 4
hours (B). The indicator light on the timer
function modes will illuminate blue on the
selected time (B). The timer mode will now
come on every day at the same time for the
same length of time. For example: If you require
the feature to come on every day at 5pm for 2
hours you will need to press the timer function
mode switch (A) on at 5pm and until the blue
indicator light is lit under the number 2 (B). The
feature will now come on every day at 5pm for
2 hours, This process can be repeated for the 3
and 4 hour settings.
Continual use or Sun only mode (C):
Press the on/off switch (C)
The power indicator light will illuminate to show
that the feature has been switched on (D). The
feature will now run continuosly until the battery
runs out of power.
If the optional solar panel upgrade has been
installed the feature will run continuously all the
time the panel recieves energy from the sun
and the battery still has charge. The solar panel
will run and re-charge your feature for you,
reducing the need to manually re-charge your
battery.
A. Timer function
mode switch
2
3
4
.
B. Timer function modes: 4/3/2 hours
settings. Light will turn blue to indicate
selected setting when function mode
switch is pressed
D. Power
indicator light
C. ON/OFF switch for continual use without timer function.
This will run the feature until the battery power runs out.
If the solar panel upgrade is used this will charge the battery and
work all the time the panel receives energy from the sun or the
battery still contains charge, reducing the need to manually
re-charge the battery
Liberty Woodland Pale & Urns Feature 1052832

Popular Outdoor Fountain manuals by other brands

Profi-pumpe FELS-ZAUBER operating instructions

Profi-pumpe

Profi-pumpe FELS-ZAUBER operating instructions

Hasley Taylor 2501A owner's manual

Hasley Taylor

Hasley Taylor 2501A owner's manual

Sunnydaze Decor XSS-578 Assembly instructions

Sunnydaze Decor

Sunnydaze Decor XSS-578 Assembly instructions

Campania International Bibendum FT-400 Assembly instructions

Campania International

Campania International Bibendum FT-400 Assembly instructions

Elkay FLEXI-GUARD EFHA8 1M Series Installation, care & use manual

Elkay

Elkay FLEXI-GUARD EFHA8 1M Series Installation, care & use manual

S.R.Smith Color Light Stream 2CLSLBK instructions

S.R.Smith

S.R.Smith Color Light Stream 2CLSLBK instructions

Hozelock Cyprio Cascade 1500 Installation and operating instructions

Hozelock Cyprio

Hozelock Cyprio Cascade 1500 Installation and operating instructions

Campania International Juliet Fountain quick start guide

Campania International

Campania International Juliet Fountain quick start guide

Alpine WIN732 quick start guide

Alpine

Alpine WIN732 quick start guide

Campania International FT-320 Assembly instructions

Campania International

Campania International FT-320 Assembly instructions

Kelkay Easy Fountain Rustic Windmill instructions

Kelkay

Kelkay Easy Fountain Rustic Windmill instructions

Alpine WIN258 manual

Alpine

Alpine WIN258 manual

GardenWize SWGSL230 quick start guide

GardenWize

GardenWize SWGSL230 quick start guide

EasyPro Tranquil Décor HBB39 installation instructions

EasyPro

EasyPro Tranquil Décor HBB39 installation instructions

Campania International Girona FT-102A Assembly instructions

Campania International

Campania International Girona FT-102A Assembly instructions

Campania International FT-271 quick start guide

Campania International

Campania International FT-271 quick start guide

Campania International Bilbao GFRCFT-1111 Assembly instructions

Campania International

Campania International Bilbao GFRCFT-1111 Assembly instructions

Campania International Westover manual

Campania International

Campania International Westover manual

manuals.online logo
manuals.online logoBrands
  • About & Mission
  • Contact us
  • Privacy Policy
  • Terms and Conditions

Copyright 2025 Manuals.Online. All Rights Reserved.