Blast-It-All LITTLE BLASTER User manual
BLAST-IT-ALL®
LEADING THE INDUSTRY IN
SURFACE PREPARATION
EQUIPMENT
HESS & ASSOCIATES, INC.
185 Piper Ln.
Salisbury, NC 28147
(800) 535-2612
LIVE CHAT- www.blast-it-all.com
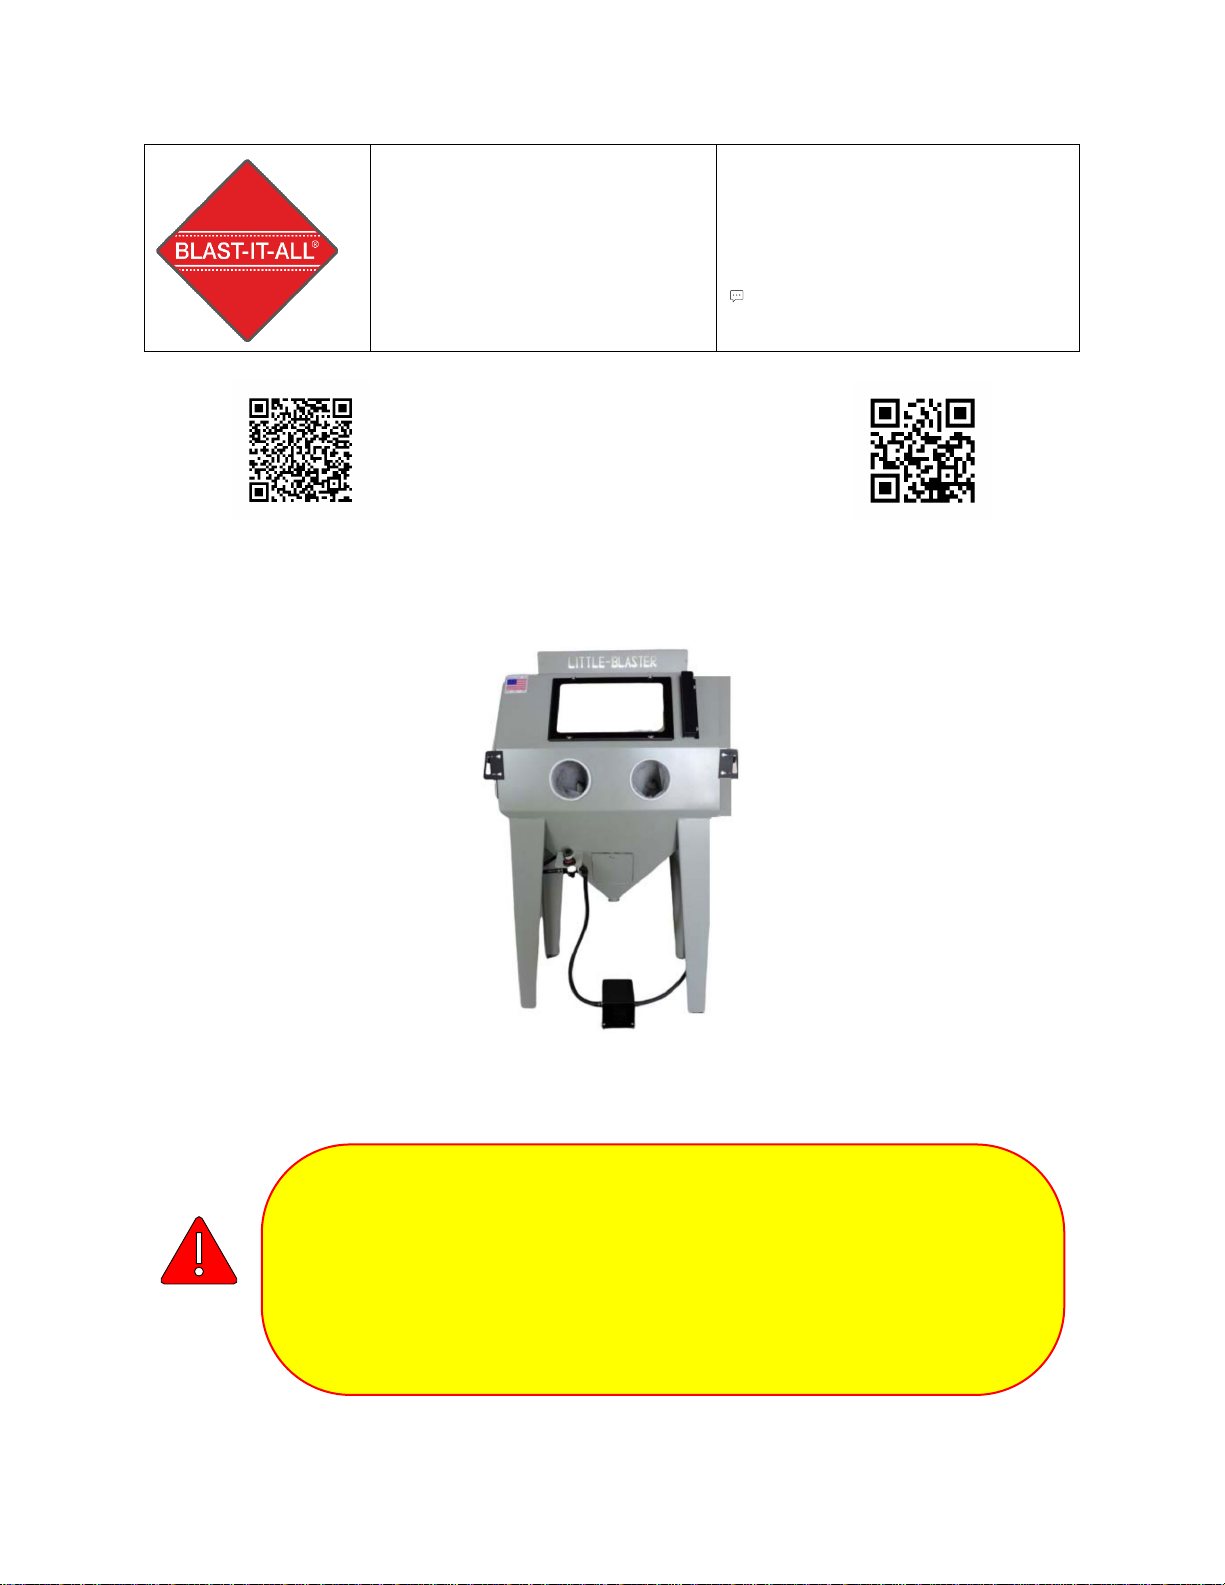
LITTLE BLASTER™
w/ DUST COLLECTOR
LB4024 / LB4824
MANUAL DOWNLOAD
www.blast-it-all.com
** WARNING **
DO NOT USE SAND. SAND WILL CAUSE SILICA DUST, WHICH IS
THE CAUSE OF SILICOSIS DISEASE, A CONDITION OF MASSIVE
FIBROSIS OF THE LUNGS. THIS STATEMENT INDICATES A
POTENTIAL PERSONNEL HAZARD. FAILURE TO COMPLY WITH
THESE INSTRUCTIONS MAY RESULT IN PERSONAL INJURY.
© 2020 Hess & Associates
Man. # 561 v02-02 8/2020

Table of Contents
SAFETY .......................................................................................................................................................... 1
OSHA FACT SHEET ................................................................................................................................. 3
INSTALATION : .............................................................................................................................................. 7
LITTLE BLASTER w/CARTRIDGE DUST COLLECTOR .................................................................................... 7
Little Blaster™ AIR CONTROLS................................................................................................................... 8
OPERATION................................................................................................................................................. 11
Little Blaster™......................................................................................................................................... 11
Little Blaster™ CARTRIDGE DUST COLLECTOR.........................................................................................12
TROUBLSHOOTING ..................................................................................................................................... 14
MAINTENANCE ........................................................................................................................................... 15
VENTURI BLAST GUN TUNING :...............................................................................................................16
PARTS :........................................................................................................................................................17
Little Blaster™ BLAST GUN ASSEMBLY PARTS.........................................................................................17
Little Blaster™ STANDARD CABINET PARTS ............................................................................................18
Little Blaster™ LIGHT BOX PARTS............................................................................................................ 19
Little Blaster™ MACHINE AIR CONTROL PARTS.......................................................................................20
Little Blaster™ CARTRIDGE DUST COLLECTOR PARTS .............................................................................21
Little Blaster™ RECOMMENDED CONSUMABLE/SPARE PARTS ..............................................................22
ELECTRICAL .................................................................................................................................................23
Little Blaster™ Electrical Diagram........................................................................................................... 23
WARRANTY................................................................................................................................................. 24
VENTURI BLAST DATA ................................................................................................................................25
INDEX .......................................................................................................................................................... 26
© 2020 Hess & Associates
Man. # 561 v02-02 8/2020
SAFETY
1. DO NOT USE SAND SAND WILL CAUSE SILICA DUST,
WHICH IS THE CAUSE OF SILICOSIS DISEASE, A
CONDITION OF MASSIVE FIBROSIS OF THE LUNGS. THIS
STATEMENT INDICATES A POTENTIAL PERSONNEL
HAZARD. FAILURE TO COMPLY WITH THESE
INSTRUCTIONS MAY RESULT IN PERSONAL INJURY.
2. (COLLECTED DUST)THE CUSTOMER (END USER) ASSUMES THE
RESPONSIBILITY FOR CONTACTING THEIR INSURANCE UNDERWRITER
AND ADVISING HESS AND ASSOCIATES, INC. IN REGARD TO SPECIFIC
APPLICATION REQUIREMENTS OF EXPLOSION VENTING OR IF
ADDITIONAL FIRE PROTECTION AND SAFETY EQUIPMENT MAY BE
REQUIRED. THE BUYER (END USER) IS ALSO CAUTIONED TO ADHERE
TO PRESCRIBED OSHA, NFPA, FEDERAL, STATE, AND LOCAL CODES
AND REGULATIONS APPLICABLE TO INDUSTRIAL VENTILATION
SYSTEMS, WHICH HESS AND ASSOCIATES, INC. EQUIPMENT MAY BE
APPLIED ON.
3. HEARING PROTECTION IS RECOMMENDED WHILE OPERATING
MACHINE
4. EYE PROTECTION IS RECOMMENDED WHILE OPERATING MACHINE
5. PROTECTIVE FOOTWEAR IS RECOMMENDED WHILE OPERATING
MACHINE
6. Machine MUST be properly Grounded
*** READ ENTIRE MANUAL BEFORE
INSTALATION/OPERATING EQUIPMENT ***
© 2020 Hess & Associates
Man. # 561 v02-02 8/2020
Page 1

SAFETY (cont’d)
7. Use CAUTION when interacting with any Electrical Components. You
MUST incorporate Lock Out / Tag Out Procedures Prior to Servicing
Equipment.
8. Gun MUST ALWAYS be pointed away from the Operator and
Towards the item being processed.
9. NEVER Blast with ANY Doors OPEN. NO ONE Should be in Front of
the Operating Station at the Front of the Blast Cabinet while Loading
or Unloading Parts.
DO NOT OPEN ANY DOOR WHILE THE MACHINE IS IN OPERATION
10. DO NOT CONNECT TO HIGH PRESSURE BOTTLE GAS, RUPTURE
AND/OR EXPLOSION CAN OCCUR.
© 2020 Hess & Associates
Man. # 561 v02-02 8/2020
Page 2

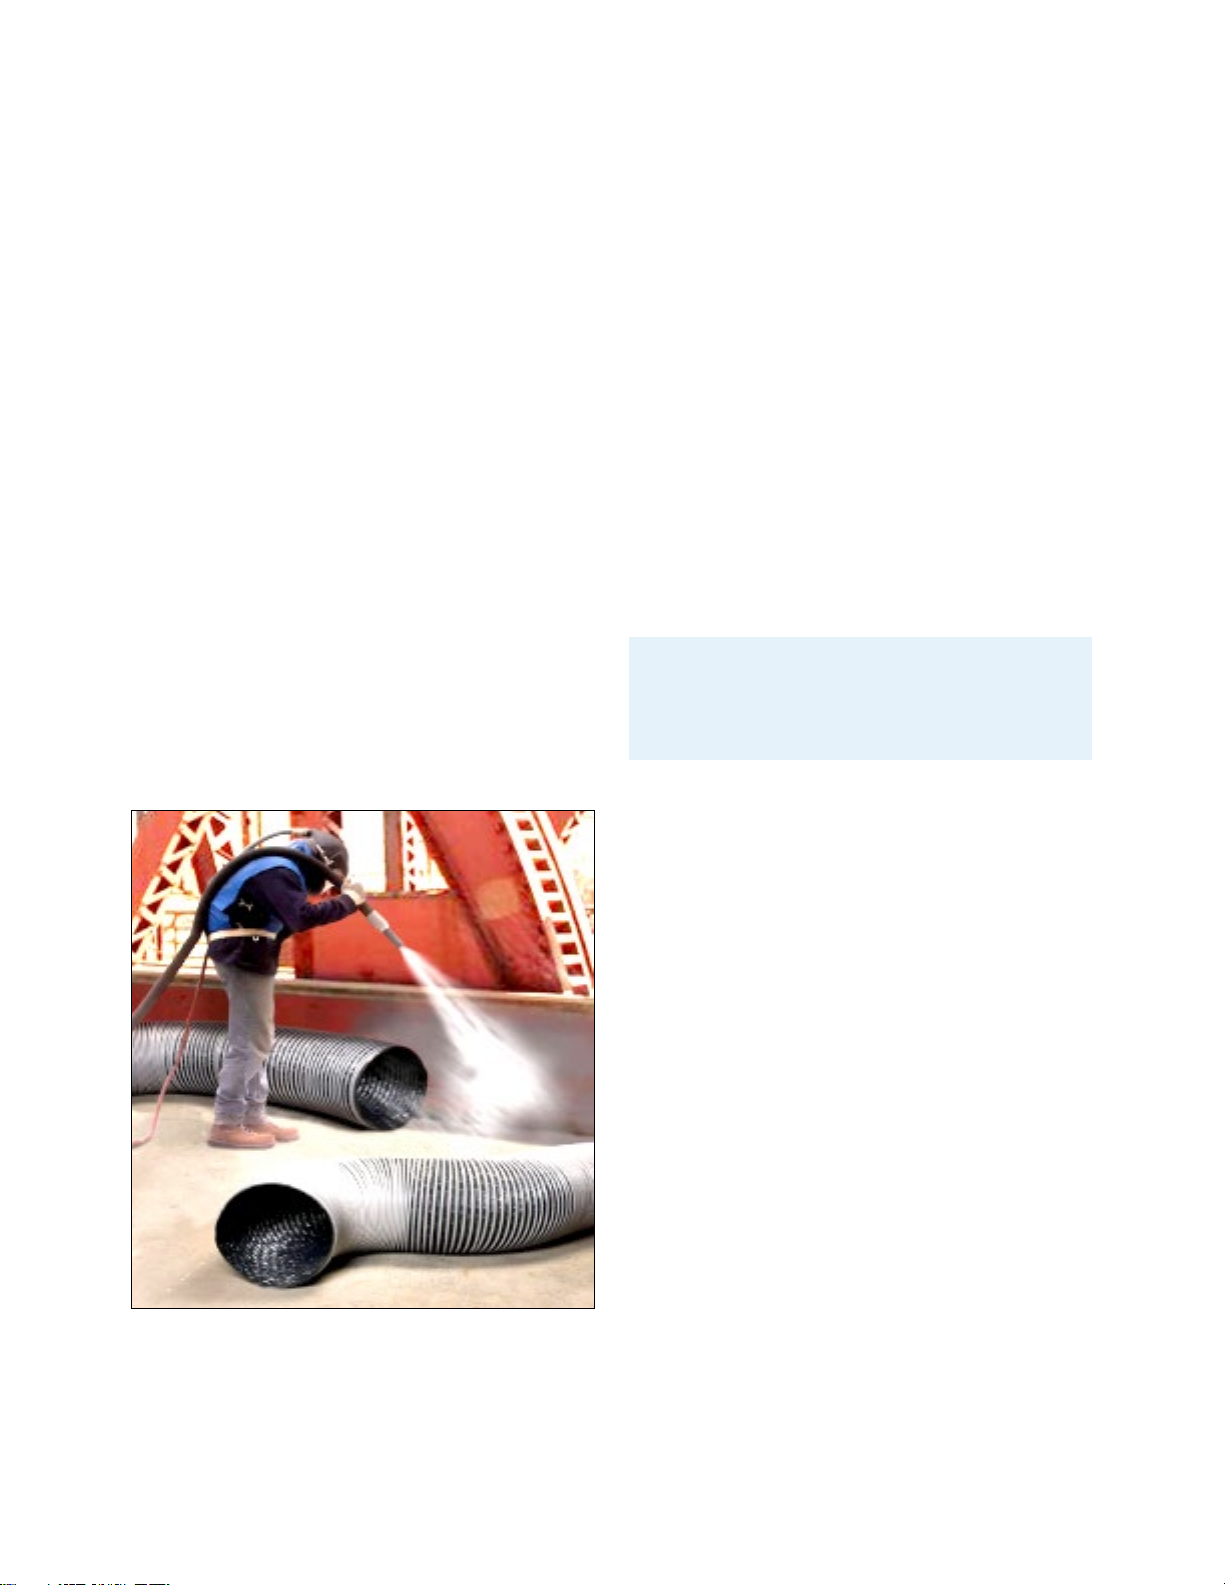
FactSheet
Protecting Workers from the Hazards of
Abrasive Blasting Materials
Abrasive blasting uses compressed air or water to direct a high velocity stream of
an abrasive material to clean an object or surface, remove burrs, apply a texture, or
prepare a surface for the application of paint or other type of coating. Employers
must protect workers from hazardous dust levels and toxic metals that may be
generated from both the blasting material and the underlying substrate and coatings
being blasted. This fact sheet provides information on abrasive blasting material,
health hazards, and methods to protect workers.
Abrasive Blasting Materials
The decision to use a certain type of abrasive
material can depend on factors such as cost, job
specifications, environment, and worker health.
Commonly used abrasive materials:
• Silica sand (crystalline)
• Coal slag
• Garnet sand
• Nickel slag
• Copper slag
• Glass (beads or crushed)
• Steel shot
• Steel grit
• Specular hematite (iron ore)
Alternative, less toxic blasting materials include:
• Ice cubes
• Dry ice
• Plastic bead media
• Sponge
• Sodium bicarbonate (baking soda)
• Ground walnut shells, ground corn cob and
other biodegradable materials
• High pressure water
Health Hazards
Abrasive blasting operations can create high
levels of dust and noise. Abrasive material
and the surface being blasted may contain
toxic materials (e.g., lead paint, silica) that are
hazardous to workers.
• Silica sand (crystalline) can cause silicosis,
lung cancer, and breathing problems in
exposed workers.
• Coal slag and garnet sand may cause lung
damage similar to silica sand (based on
preliminary animal testing).
• Copper slag, nickel slag, and glass (crushed
or beads) also have the potential to cause
lung damage.
• Steel grit and shot have less potential to cause
lung damage.
• Slags can contain trace amounts of toxic metals
such as arsenic, beryllium, and cadmium.
Abrasive blasting creates high levels of dust. Photo courtesy
of NIOSH.
**** CAUTION ****
Abrasive blasting creates high levels of
noise that can cause substantial hearing
loss. Always wear hearing protection.
Employers must administer a hearing
conservation program as required by the
OSHA Occupational Noise standard.
© 2020 Hess & Associates
Man. # 561 v02-02 8/2020
Page 3
How to Protect Workers from Exposure
to Abrasive Blasting Materials
Each abrasive blasting operation is unique,
involving different surfaces, coatings, blast
material, and working conditions. Before
beginning work, employers should identify
the hazards and assign a knowledgeable
person trained to recognize hazards and
with the authority to quickly take corrective
action to eliminate them. Use engineering and
administrative controls, personal protective
equipment (PPE), including respiratory
protection, and training to protect workers
involved in abrasive blasting activities.
Engineering controls, such as substitution,
isolation, containment, and ventilation are
the primary means of preventing or reducing
exposures to airborne hazards during abrasive
blasting operations. Administrative controls,
including the use of good work and personal
hygiene practices, can also reduce exposure.
When engineering and administrative controls
cannot keep exposures to hazardous materials
below OSHA permissible exposure limits,
respiratory protection must be used.
Engineering Controls
1. Substitution
• Use a less toxic abrasive blasting material.
• Use abrasives that can be delivered with
water (slurry) to reduce dust.
2. Isolation and Containment
• Use barriers and curtain walls to isolate the
blasting operation from other workers.
• Use blast rooms or blast cabinets for smaller
operations.
• Use restricted areas for non-enclosed blasting
operations.
• Keep coworkers away from the blaster.
3. Ventilation
• Use exhaust ventilation systems in
containment structures to capture dust.
Administrative Controls
Perform routine cleanup using wet methods
or HEPA filtered vacuuming to minimize the
accumulation of toxic dusts.
• Do not use compressed air to clean as this will
create dust in the air.
• Clean and decontaminate tarps and other
equipment on the worksite.
• Schedule blasting when the least number of
workers are at the site.
• Avoid blasting in windy conditions to prevent
the spread of any hazardous materials.
Personal Hygiene Practices
• Prohibit eating, drinking, or using tobacco
products in blasting areas.
• Provide wash stations so workers can wash
their hands and face routinely and before
eating, drinking, or smoking.
• Vacuum or remove contaminated work
clothes before eating, drinking or smoking.
Abrasive blasting using a dust collection system with
multiple exhaust ducts. (Photo courtesy of Flexaust, Inc. This
equipment is shown for illustrative purposes only and is not
intended as an endorsement by OSHA of this company, its
products or services.)
Employers can use OSHA’s free On-site
Consultation Program for advice on safety
and health issues.
© 2020 Hess & Associates
Man. # 561 v02-02 8/2020
Page 4

DSG FS-3697 09/2014
This is one in a series of informational fact sheets highlighting OSHA programs, policies or standards.
It does not impose any new compliance requirements. For a comprehensive list of compliance
requirements of OSHA standards or regulations, refer to Title 29 of the Code of Federal Regulations.
This information will be made available to sensory-impaired individuals upon request. The voice phone
is (202) 693-1999; teletypewriter (TTY) number: (877) 889-5627.
• Provide accommodations for end-of-shift
showers and change areas with separate
storage facilities for street clothes, protective
clothing and equipment.
• Keep contaminated clothing and equipment
out of the clean change area.
Respiratory Protection
An abrasive-blasting respirator must cover the
wearer’s head, neck, and shoulders to protect
the wearer from rebounding abrasive. Workers
must use only respirators approved by NIOSH to
provide protection from dusts produced during
abrasive-blasting operations.
• Type CE NIOSH-certified blasting airline
respirator with positive pressure blasting
helmet.
Support personnel involved in cleanup and
other related activities may also need respiratory
protection.
Personal Protective Equipment
• Hearing protection
• Eye and face protection
• Helmet
• Leather gloves that protect to full forearm and
aprons (or coveralls)
• Safety shoes or boots
Worker Training and Hazard Communication
• Provide training to abrasive blasters and
support personnel on blasting health and
safety hazards, how to use controls, personal
hygiene practices, safe work practices and the
use of PPE and respirators.
• Manufacturers are required to include
appropriate health hazard information on
the blasting materials on safety data sheets
(SDS) as required under OSHA’s Hazard
Communication standard (29 CFR 1910.1200).
• Obtain and read the manufacturer’s SDS for
health hazard information on the abrasive
blasting material you are using.
For more information on abrasive blasting
and control measures see: OSHA’s guidance
document: “Abrasive Blasting Hazards in
Shipyard Employment” (2006); and eTool:
Mechanical Removers (Ship Repair).
When respirators are used, employers must
establish a comprehensive respiratory
protection program as required by the
OSHA Respiratory Protection standard (29
CFR 1910.134).
Disclaimer: This OSHA Fact Sheet provides a general overview of the requirements in OSHA standards related to abrasive blasting.
It does not alter or determine compliance responsibilities in these standards or the Occupational Safety and Health Act of 1970. Since
interpretations and enforcement policy may change over time, the reader should consult current OSHA interpretations and decisions by
the Occupational Safety and Health Review Commission and the courts for additional guidance on OSHA compliance requirements.
© 2020 Hess & Associates
Man. # 561 v02-02 8/2020
Page 5

Applicable OSHA Standards and Safety and Health Topic Pages
The following table provides links to several OSHA standards (not all-inclusive) that may contain
requirements that apply to abrasive blasting operations. For example, the removal of lead paint by
abrasive blasting will likely require employers to follow provisions of the OSHA Lead standard. Safety
and health topic pages listed here provide employers and workers with information that may be useful
for safely conducting abrasive blasting.
General Industry Shipyard Industry Construction Industry OSHA Topics Page(s)
1910.94, Ventilation 1915.33 & 1915.34, Chemical &
Mechanical paint removers
Ventilation (as it applies to
shipyard employment, 1910.94)
1915 .13, Cleaning and other
cold work
1926.57, Ventilation Ventilation
1910.95, Occupational noise
exposure
1910.95, Occupational noise
exposure (as per Shipyard
“Tool Bag” Directive, CPL 02-
00 -182)
1926.52, Occupational noise
exposure
1926.101, Hearing Protection
Noise
1910.132, Personal Protective
Equipment
1915 Subpart I, Personal
Protective Equipment
1926 Subpart E, Personal
Protective Equipment
Personal Protective
Equipment
Respiratory Protection
(1910.134)
1915.154, Respiratory
Protection refers to (1910.134)
1926.10 3, Respiratory
Protection (refers to 1910 .13 4)
Respiratory Protection
1910.141, Sanitation 1915.88, Sanitation 1926.51, Sanitation
1910.1000, Air contaminants
Table Z-1, Limits for air
contaminants
Table Z-2, Toxic and
Hazardous Substances
Table Z-3, Mineral dusts
1915.1000, Air contaminants
Table Z – Shipyards
1926.55, Gases,vapors,
fumes, dusts, and mists
Appendix A, Threshold
limit values of airborne
contaminants for construction
Permissible Exposure
Limits (PELs) &
Hazardous and Toxic
Substances
Beryllium
See 1910.1000, Table Z-1 for
air contaminants
Beryllium
See 1915.1000, Table Z
Beryllium
See Table 1926.55,
Appendix A
Beryllium
Silica
See 1910.1000, Table Z-3
Silica
See 1915.1000, Table Z
Silica
See 1926.55, Appendix A
Silica
1910.1018, Inorganic Arsenic 1915 .1018 , Inorganic Arsenic 1926.1118, Inorganic Arsenic Arsenic
1910.1025, Lead 1915 .1025, Lead 1926.62, Lead Lead (General Industry)
Lead (Construction)
1910.1026, Chromium(VI) 1915 .1026,Chromium(VI) 1926.1126,Chromium(VI) Hexavalent Chromium
1910.1027, Cadmium 1915 .1027, Cadmium 1926.1127, Cadmium Cadmium
1910.1200, Hazard
Communication
1915 .1200, Hazard
Communication (refers to
1910.1200)
1926.59, Hazard
Communication (refers to
1910.1200)
Hazard Communication
© 2020 Hess & Associates
Man. # 561 v02-02 8/2020
Page 6

INSTALATION :
LITTLE BLASTER w/CARTRIDGE DUST COLLECTOR
1. Remove all shipping protection Check for any concealed shipping
damage, if discovered, report the damage to your freight carrier AS
Non-Disclosed Hidden Damage immediately.
2. Blast Cabinet should be placed in a desired location, away from any
water or moist environment. If moist compressed air is present at
this location, install a good moisture separator.
3. Install Air Controls
(READ INSTALLATION –“ Little Blaster™ AIR CONTROLS”)
4. Install Cartridge Dust Collector: Packaged with machine are bolts,
washers, nuts and gasket material.Apply gasket to back of cabinet
around large hole, press to make a firm bond to cabinet and squeeze
together at seam. Align the 4-hole bolt pattern of the Dust Collector
and install bolts, washers, and nuts. Tighten bolts and nuts securely.
5. Remove Window Frame/Window Glass and Install the Mylar Roll
into the Mylar Dispenser. Pull Mylar from the Mylar Dispenser
Across the Window Opening. Place the Window Glass/Window
Frame on Top of the Mylar, Securing with Plastic Knobs.
6. Install Gloves ( Watch the Video)
7. Plug electrical cord from side of dust collector into plug from light
box.
(READ OPERATION - “Little Blaster™ CARTRIDGE DUST COLLECTOR”)
8. Connect your air supply line to machine air inlet on left rear leg, we
recommend using 1/2" I.D. Hose or Pipe minimum supply line.
(Again, make sure your air supply line is free from oil and moisture).
(If not, install a good moisture separator).
Part #: 16-815 (DO NOT USE ANY QUICK DISCONNECT COUPLINGS)
9. Connect the electrical cord from light box to a grounded electrical
source.
120-volt/60 cycle, single phase
A 20 AMP breaker or fuse should be used.
MAKE SURE MACHINE HAS PROPER GROUND
10. Charge blast machine with abrasive. Pour media into cabinet
through one of the doors and fill to bottom of screen in sump of
cabinet. Media Sold Separately @ Blast-It-All Online Store
DO NOT FILL ABOVE SCREEN.
*** READ BEFORE OPERATING EQUIPMENT ***
© 2020 Hess & Associates
Man. # 561 v02-02 8/2020
Page 7
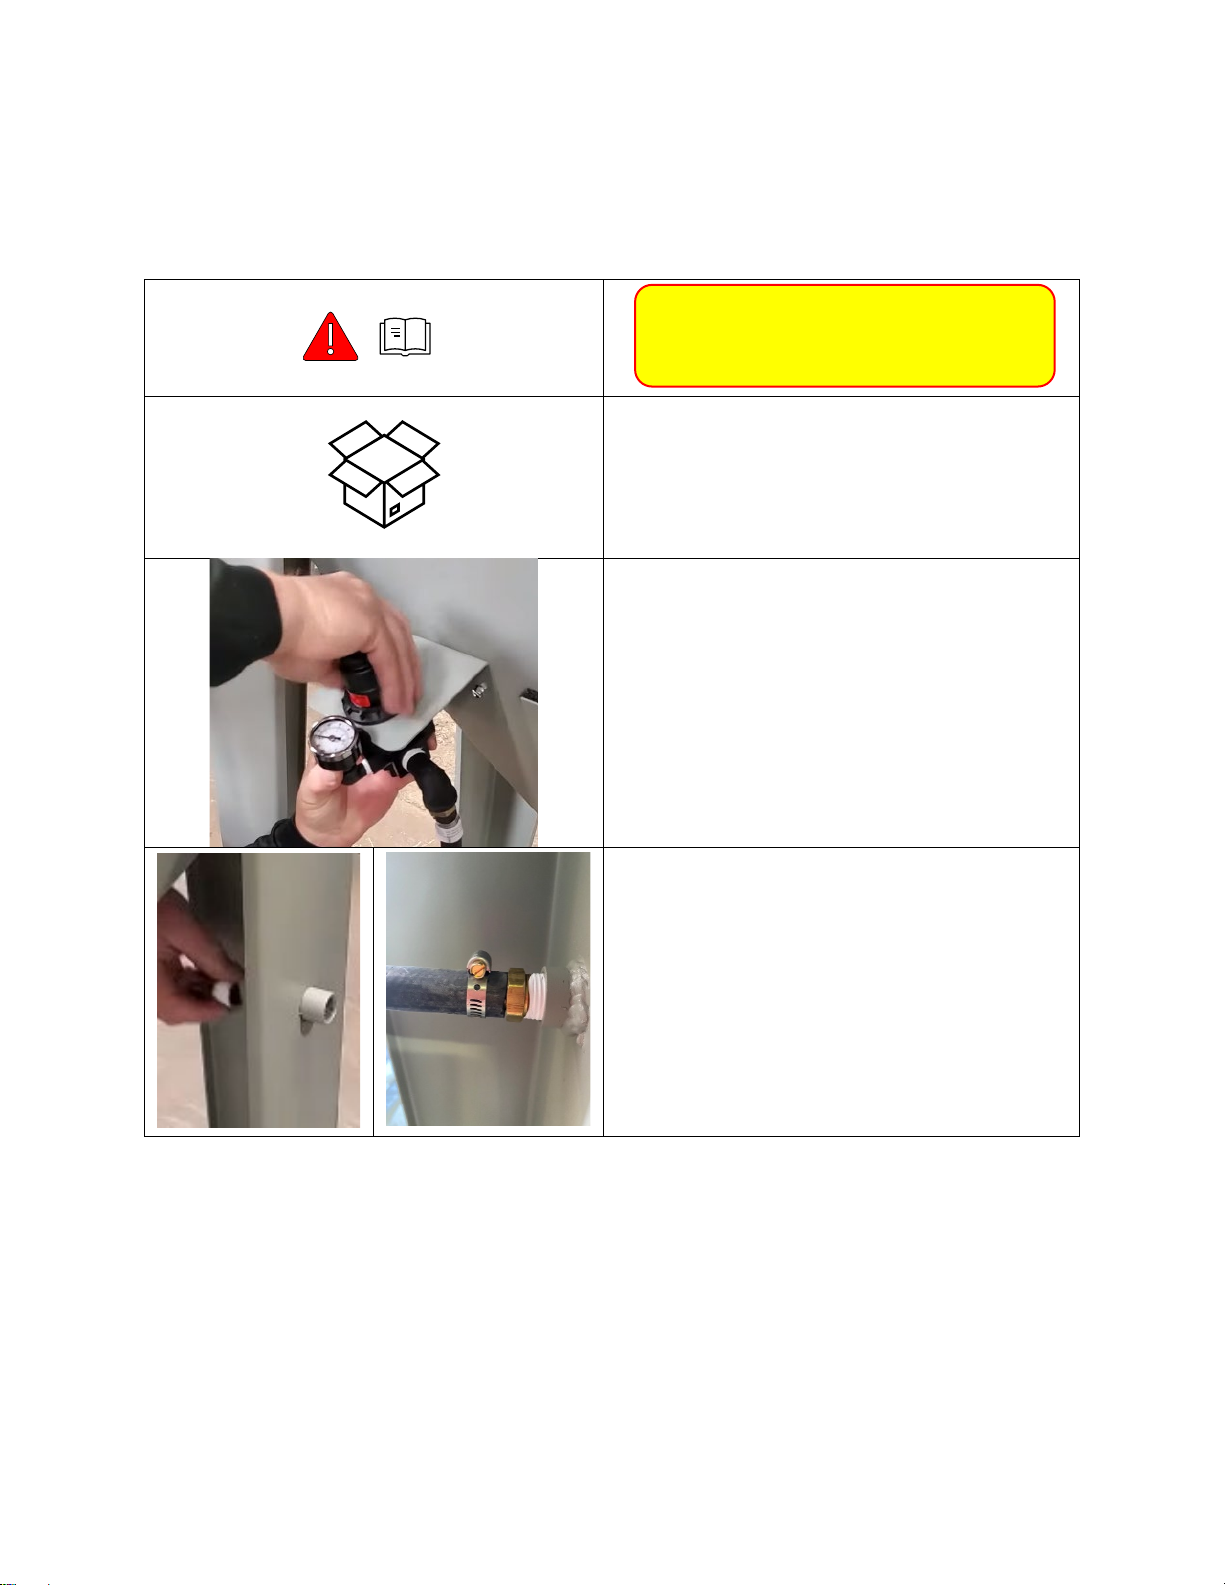
INSTALATION :
Little Blaster™ AIR CONTROLS
1. Remove Box from inside of the Machine.
Box contains :
Foot Petal, ½” Air Regulator
w/Assembled Hoses
Blast Gun w/Assembled Hose
½” Barbed Brass Fitting
2. Connect Air Regulator to the Bracket on
the Front of the Machine w/Lock Ring
3. Apply Teflon Tape to the ½” Barbed Brass
Fitting and install to the to the Inside Left
Leg of the Machine (Coupler).
Attach/Secure Inlet Air Hose to the Barbed
Brass Fitting.
*** READ BEFORE
OPERATING EQUIPMENT ***
© 2020 Hess & Associates
Man. # 561 v02-02 8/2020
Page 8
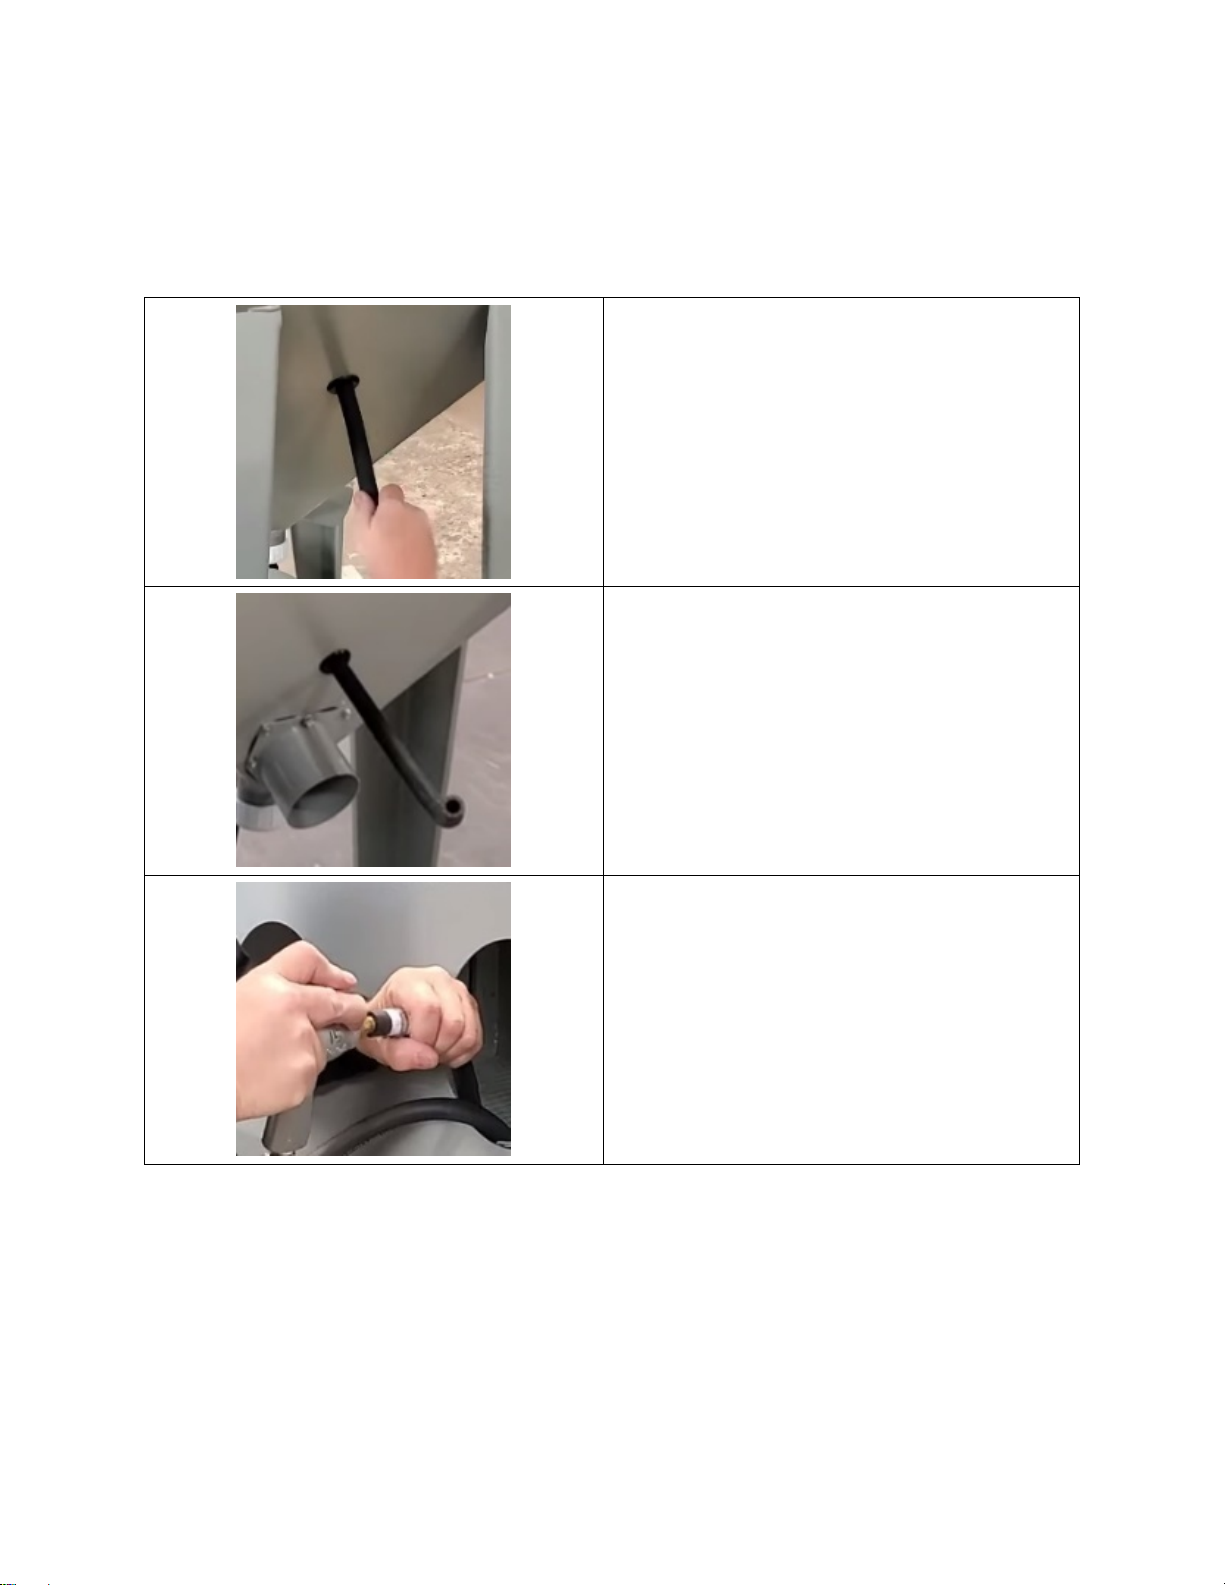
INSTALATION :
Little Blaster™ AIR CONTROLS (cont’d)
4. Insert Air Hose from the Foot Petal
through the Rubber Grommet on the Right
Side of the Sump.
5. Remove Work Grate from inside of the
Machine. Insert the Media Hose
(attached to Gun) from the Inside, through
the Rubber Grommet on the Back Sump.
Replace the Work Grate, ensuring the
hoses are routed through the Work Grate
Opening.
6. Attach/Secure Air Hose to the Back of the
Blast Gun.
© 2020 Hess & Associates
Man. # 561 v02-02 8/2020
Page 9
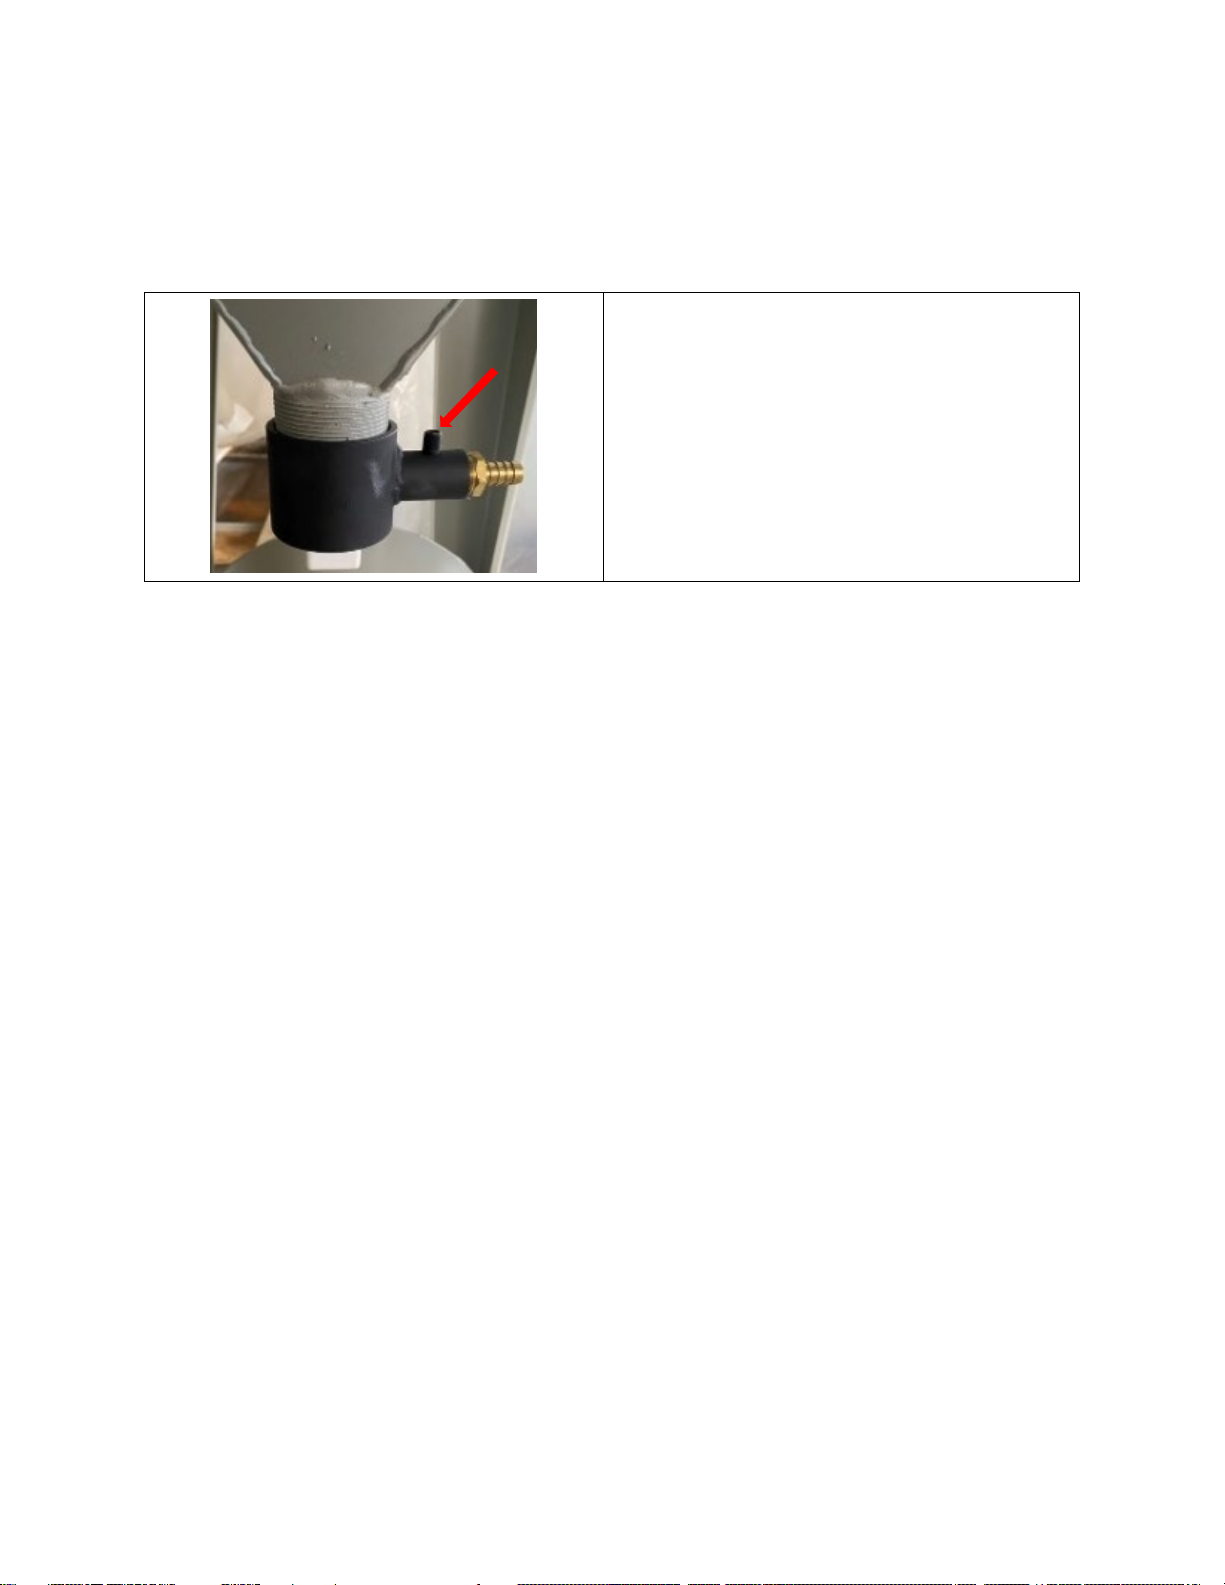
INSTALATION :
Little Blaster™ AIR CONTROLS (cont’d)
7. Teflon Tape and Attach the Media Valve to
the Bottom of the Sump and
Attach/Secure the Media Hose from the
Back of the Sump to the Media Valve’s
Barbed Brass Fitting. Small Fitting Should
Always be Facing Up an Remain Open.
© 2020 Hess & Associates
Man. # 561 v02-02 8/2020
Page 10

OPERATION
Little Blaster™
1. Preparing Parts for Blasting :
All parts to be processed must be free of oil, grease, and moisture. Make
sure parts are dry before putting into cabinet for processing.
2. Air Pressure :
Set air pressure at 40 ~ 80 PSI. Most parts for blasting should be blasted at
80 PSI. Designate parts to be processed, start at lower pressure, and work up
the PSI scale to obtain desired finish.
DO NOT CONNECT TO HIGH PRESSURE BOTTLE GAS, RUPTURE AND
EXPLOSION CAN OCCUR.
3. Gun Angle and Distance:
Direct blast at part with an approximate (45-60) degree angle
with ricochet toward the back side of cabinet. Do not hold at
90 degree to part being processed. This will cause the media to
blast to bounce back into the blast stream and slow blasting
action. Also 90-degree angle will cause excessive wear on gun
and viewing window. Hold gun approximately 6 inches from
part being cleaned.
GUN MUST ALWAYS BE POINTED AWAY FROM THE OPERATOR AND
TOWARD ITEM BEING PROCESSED. NEVER BLAST WITH ANY OF THE
CABINET DOORS OPEN. WHILE LOADING AND UNLOADING, NO ONE
SHOULD BE AT THE OPERATOR STATION AT FRONT OF THE BLAST
CABINET.
4. Media :
Media should be good quality and dry. Damp media will cause the media
not to flow and will clog abrasive flow.
Media Available @ Blast-It-All Online Store
IF YOU ARE HAVING A PROBLEM SELECTING MEDIA FOR A SPECIFIED JOB,
CONTACT YOUR DISTRIBUTOR FOR THEIR RECOMMENDATIONS
*** READ BEFORE OPERATING EQUIPMENT ***
© 2020 Hess & Associates
Man. # 561 v02-02 8/2020
Page 11
OPERATION
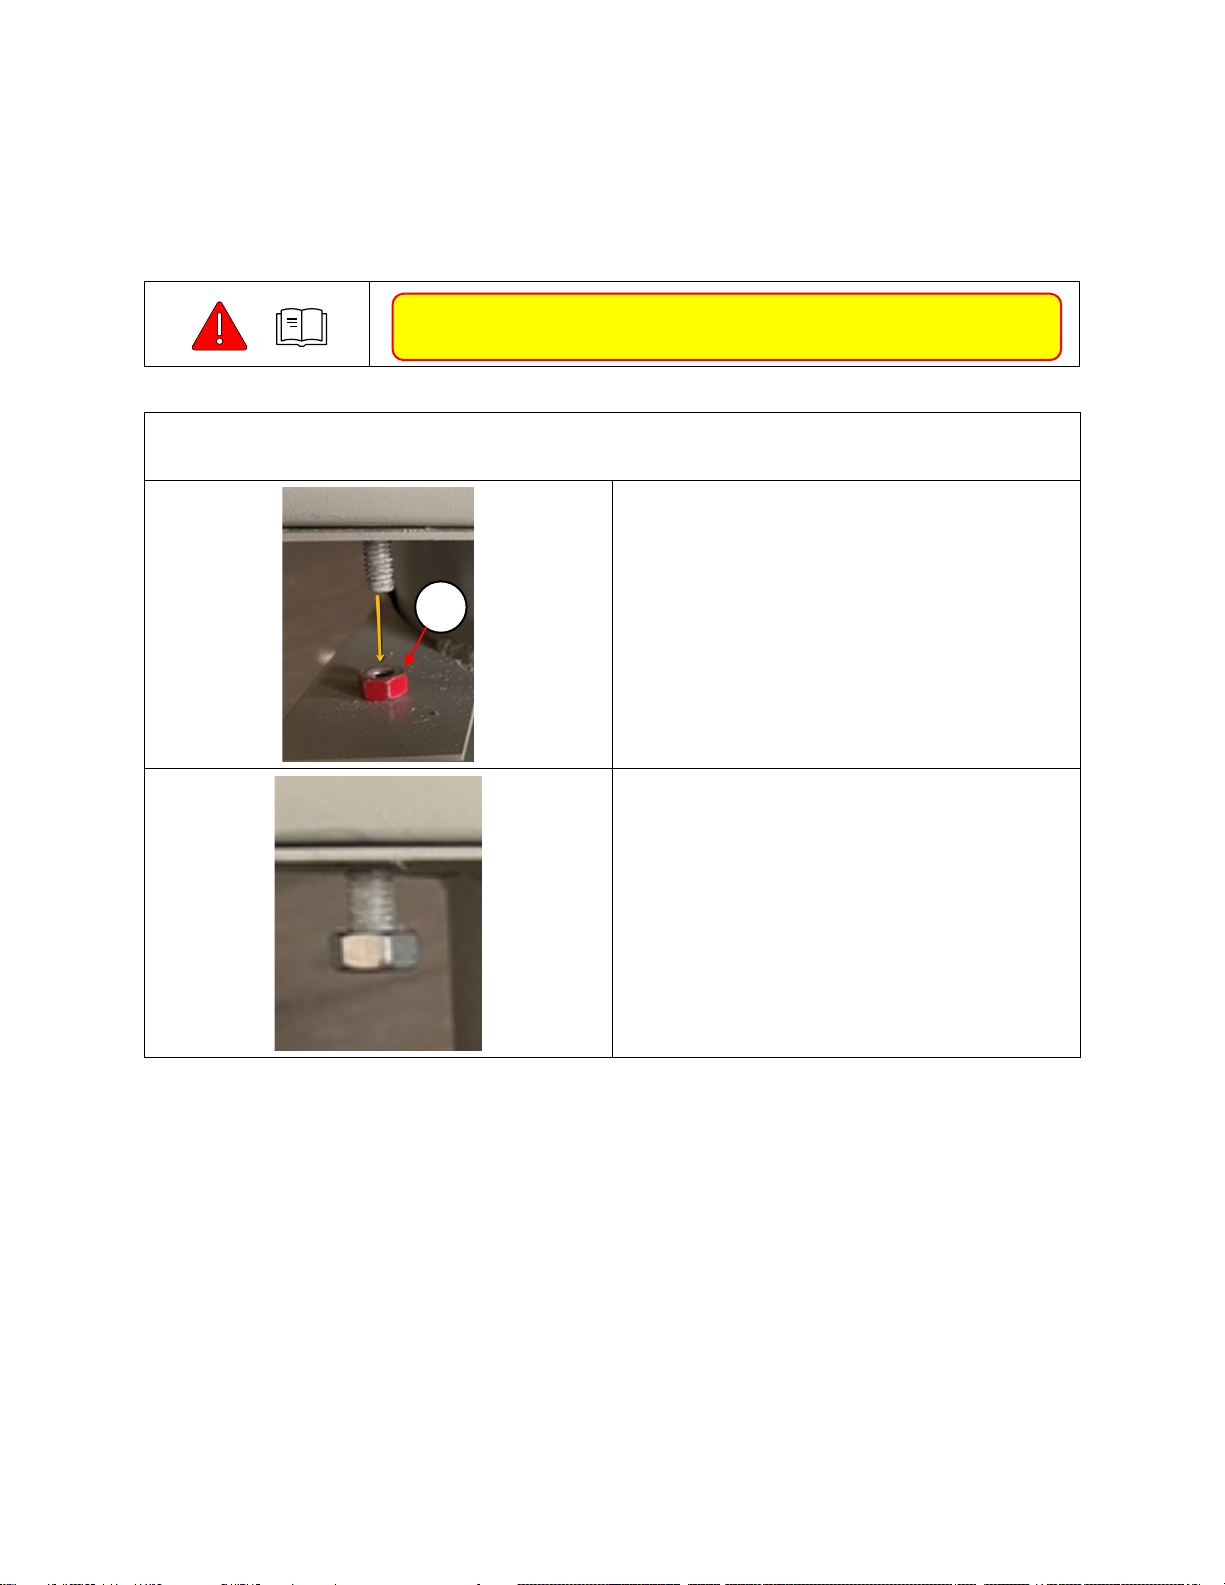
Little Blaster™ CARTRIDGE DUST COLLECTOR
After installing the Dust Collector, it is very IMPORTANT to follow the next steps. This will ensure your
machine will blast satisfactorily and have good visibility in blast chamber.
1. Remove RED nuts securing the motor
housing and cartridge holder to dust
collector body. (Item 1) Discard these
nuts, they are not used.
2. Loosen nuts on back corners. Loosen until
the nut is to the bottom on the bolt
thread. This will allow the motor housing
and cartridge holder to rest securely on
the gasket seal.
*** READ BEFORE OPERATING EQUIPMENT ***
1
© 2020 Hess & Associates
Man. # 561 v02-02 8/2020
Page 12

OPERATION
Little Blaster™ CARTRIDGE DUST COLLECTOR (cont’d)
3. To clean cartridge: Turn Dust
Collector switch off. Grasp lift handle
and raise up and down vigorously
allowing the top housing to thump on
the body lip. Do this repeatedly, until
loose dust on the cartridge falls off
into the dust sump. This should be
done every 30 minutes of blasting, or
each time before use. It is a good
idea occasionally to remove motor
housing and with 10-15 PSIof airline
pressure from air nozzle, blow the
cartridge pleats clean.
4. After thumping the cartridge, the drain
cap should be removed and the dust
emptied from dust collector sump into a
box, bag or container, for ease of
disposing.
Maintained properly, you will enjoy the performance of this reliable type dust collector.
Lift
Handle
Top
Housing
Body
Lip
Cartridge
Drain Cap
© 2020 Hess & Associates
Man. # 561 v02-02 8/2020
Page 13

TROUBLSHOOTING
1. Caking of Media :
A. Media caking is caused by moisture in compressed air supply or
oily and greasy parts. If this is not corrected, media will not flow
and will clog gun. Check air supply. If water or moisture is present,
install a good moisture trap. If oily or greasy parts are being blast
treated, you should first degrease and dry parts.
B. If blast gun should occasionally clog, tightly seal the front of the
nozzle against the inside front the blast cabinet and push foot
valve down 3 to 4 seconds. This will cause the system to back blast
through the gun and media hose and clear the media hose.
2. Gun Air Pressure Drop :
Set air regulator at 80 PSI on air gauge. Push foot valve and if
gauge reading should drop, check the air supply pipe or hose. A
restriction in the supply line such as reducers or quick couplers will
cause pressure drop. Also, if the blast cabinet is too far from the
air compressor, a pressure drop can occur. We recommend 1/2" -
1" I.D. air supply line. The bigger the better.
3. Poor Visibility - Excessive Dust :
A. Cabinet Air inlet blocked, check for blockage.
B. Dust collector sump full and needs emptied.
C. Cartridge contaminated. Clean by pushing up and down.
D. Media breakdown - replace media and clean dust collector.
4. Poor Media Flow :
A. Wet or damp media caused from moisture or oil in compressed air
line.
Use dry air or install a moisture filter.
B. Replace media and clean media sump and hose.
C. Media level should be below media screen.
D. Hole in media hose from wear, replace hose assembly.
E. Poor Air Flow/CFM
F. Worn Gun Body, Nozzle or Orifice
© 2020 Hess & Associates
Man. # 561 v02-02 8/2020
Page 14
MAINTENANCE
1. Blasting Gun :
After 10 - 12 hours of blasting time the air
orifice and nozzle should be checked. If
the nozzle shows wear, rotate 1/4 Turn to
prevent uneven wear. If this is not
checked, it could result in the destruction
of nozzle and damage to the gun housing.
If wear is detected on the orifice tip,
replace.
2. After thumping the cartridge, the drain
cap should be removed and the dust
emptied from dust collector sump into a
box, bag or container, for ease of
disposing.
ITEM
DESCRIPTION
FREQUENCY
NOZZLES
INSPECT FOR WEAR
DAILY
MEDIA HOSE
INSPECT FOR WEAR / HOLES
MONTHLY
GUN BODY
INSPECT FOR WEAR
MONTHLY
GUN ORIFICE
INSPECT FOR WEAR
MONTHLY
MYLAR
INSPECT FOR POOR VISABILITY
PER USE
VIEW WINDOW
INSPECT FOR DAMAGE
PER USE
DUST / DEBRIS
REMOVAL
REMOVE DUST / DEBRIS ACCUMULATION PER USE
DUST FILTERS
CLEAN
AS NEEDED
FLEX HOSE
INSPECT FOR WEAR / LEAKS
WEEKLY
GLOVES
INSPECT FOR WEAR / HOLES
WEEKLY
WEAR PLATES
INSPECT WEAR PLATE / LINERS FOR WEAR
MONTHLY
Drain Cap
© 2020 Hess & Associates
Man. # 561 v02-02 8/2020
Page 15

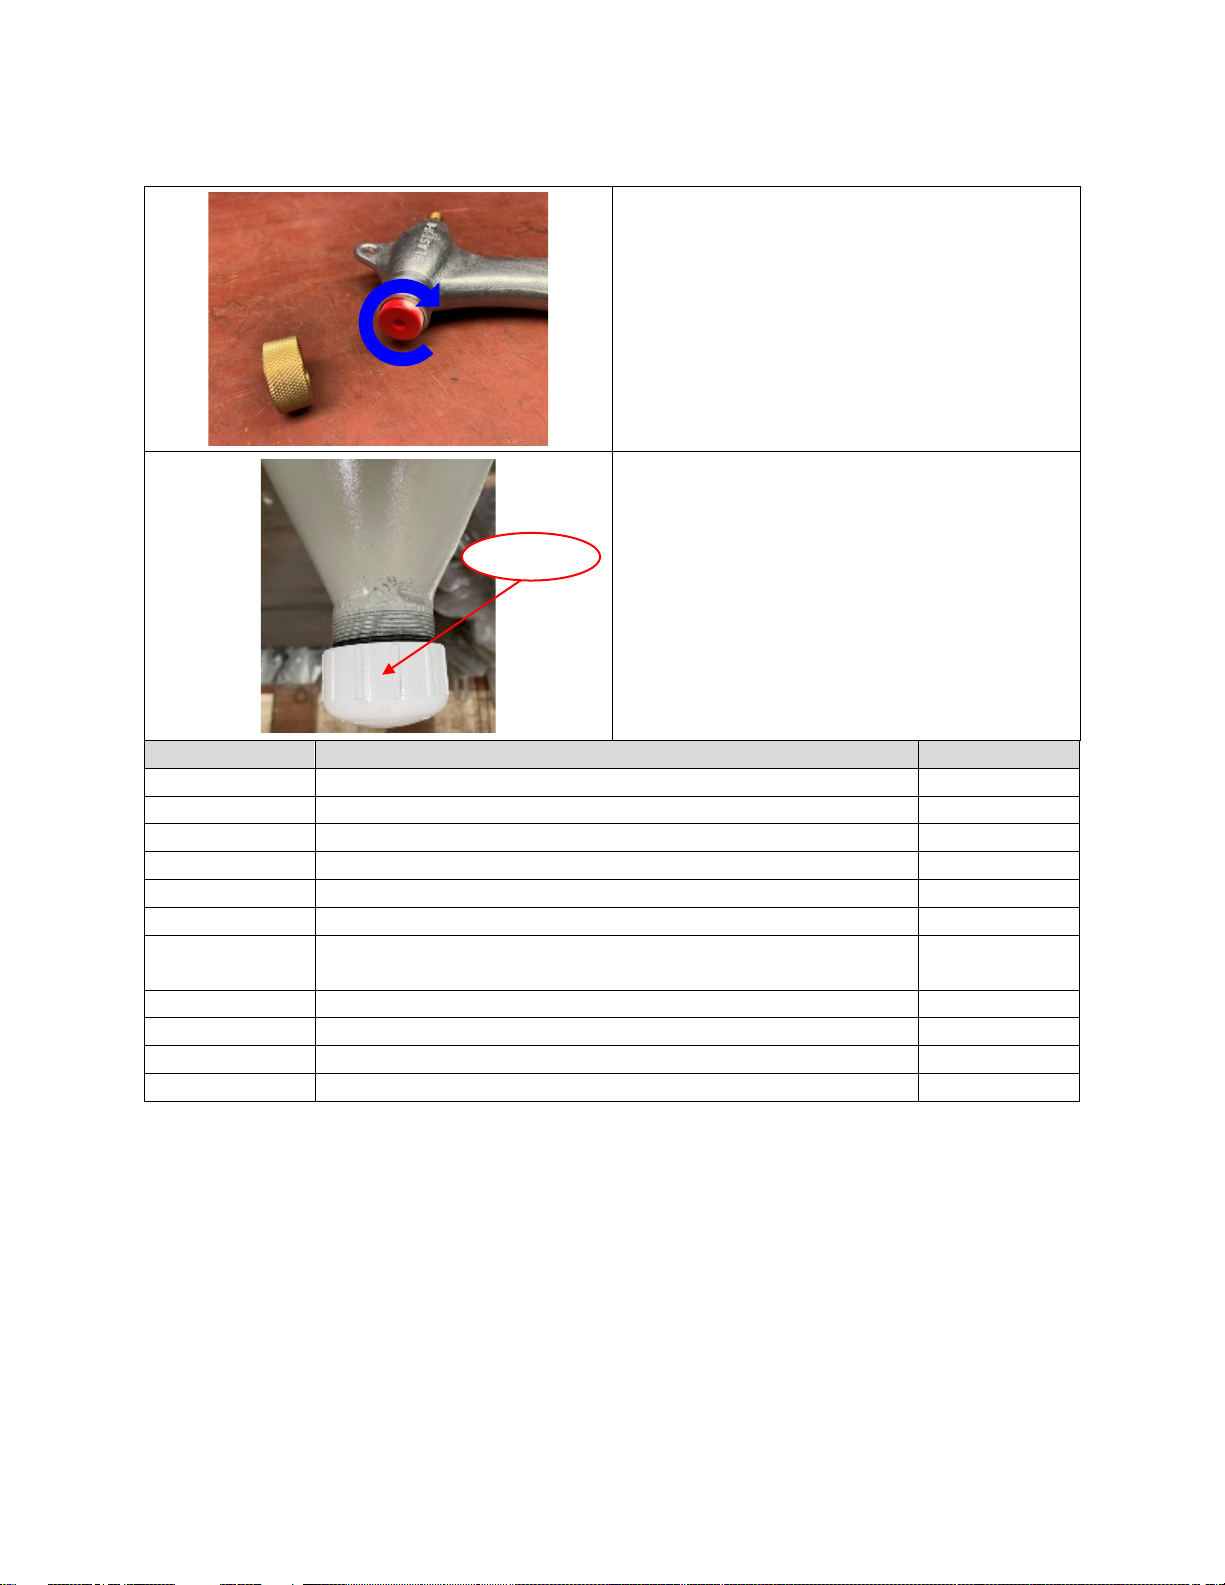
VENTURI BLAST GUN TUNING :
WATCH THE VIDEO FROM BLAST-IT-ALL®
https://www.youtube.com/watch?v=dKT9XeFhNNY
1. Attach & Secure Vacuum Gage Hose to the
Bottom of the gun.
Vacuum Gauge Part # 011267
Vacuum Gauge Kit Part # ( TBD )
2. Attach & Secure Compressed Air (80psi) Hose
to the Orifice Inlet.
3. Open Air Flow into the Orifice Inlet and Adjust
the Orifice Inlet IN or OUT until 15 ~ 18 in Hg
Vacuum is Achieved. Tighten Lock Nut to
Maintain Position.
4. When Range of Vacuum Can Not be Achieved,
Part/Parts Replacement will be Required.
© 2020 Hess & Associates
Man. # 561 v02-02 8/2020
Page 16
7
F
F
E
D
2
C
B
A
1 1234F5678
F
E
D
C
B
A
2
F
1F 1234568
CONSENT OF LARRY
CONFIDENTIAL
THE INFORMATION
CONTAINED IN THIS
DRAWING IS THE
EXCLUSIVE PROPERTY
OF BLAST-IT-ALL ©, A
DIVISION OF LARRY
HESS & ASSOCIATES,
INC. ANY AND ALL
REPRODUCTION,
REGARDLESS OF
FORM, IS STRICTLY
PROHIBITED WITHOUT
THE EXPRESS WRITTEN
HESS & ASSOC., INC.
©
BLAST-IT-ALL
DREV:
LARRY HESS & ASSOCIATES, INC.
185 PIPER LANE, SALISBURY, NC 28147-7949
P: 1.800.535.2612 ■F: 1.704.638.9311 ■WWW.BLAST-IT-ALL.COM
DWG BY: DATE: SCALE:
SIZE:
PART#
TITLE /
DESC:
MAT: SHT#: OF DWG TYPE:
DWG#
XXXX:
BDP 05-Aug-20 1:1
MANUAL: GUN, BLAST, STD, BIA
11 MDSEE BOM
---
C
.A-WM9009B.A--
X
-WM9009B.A--
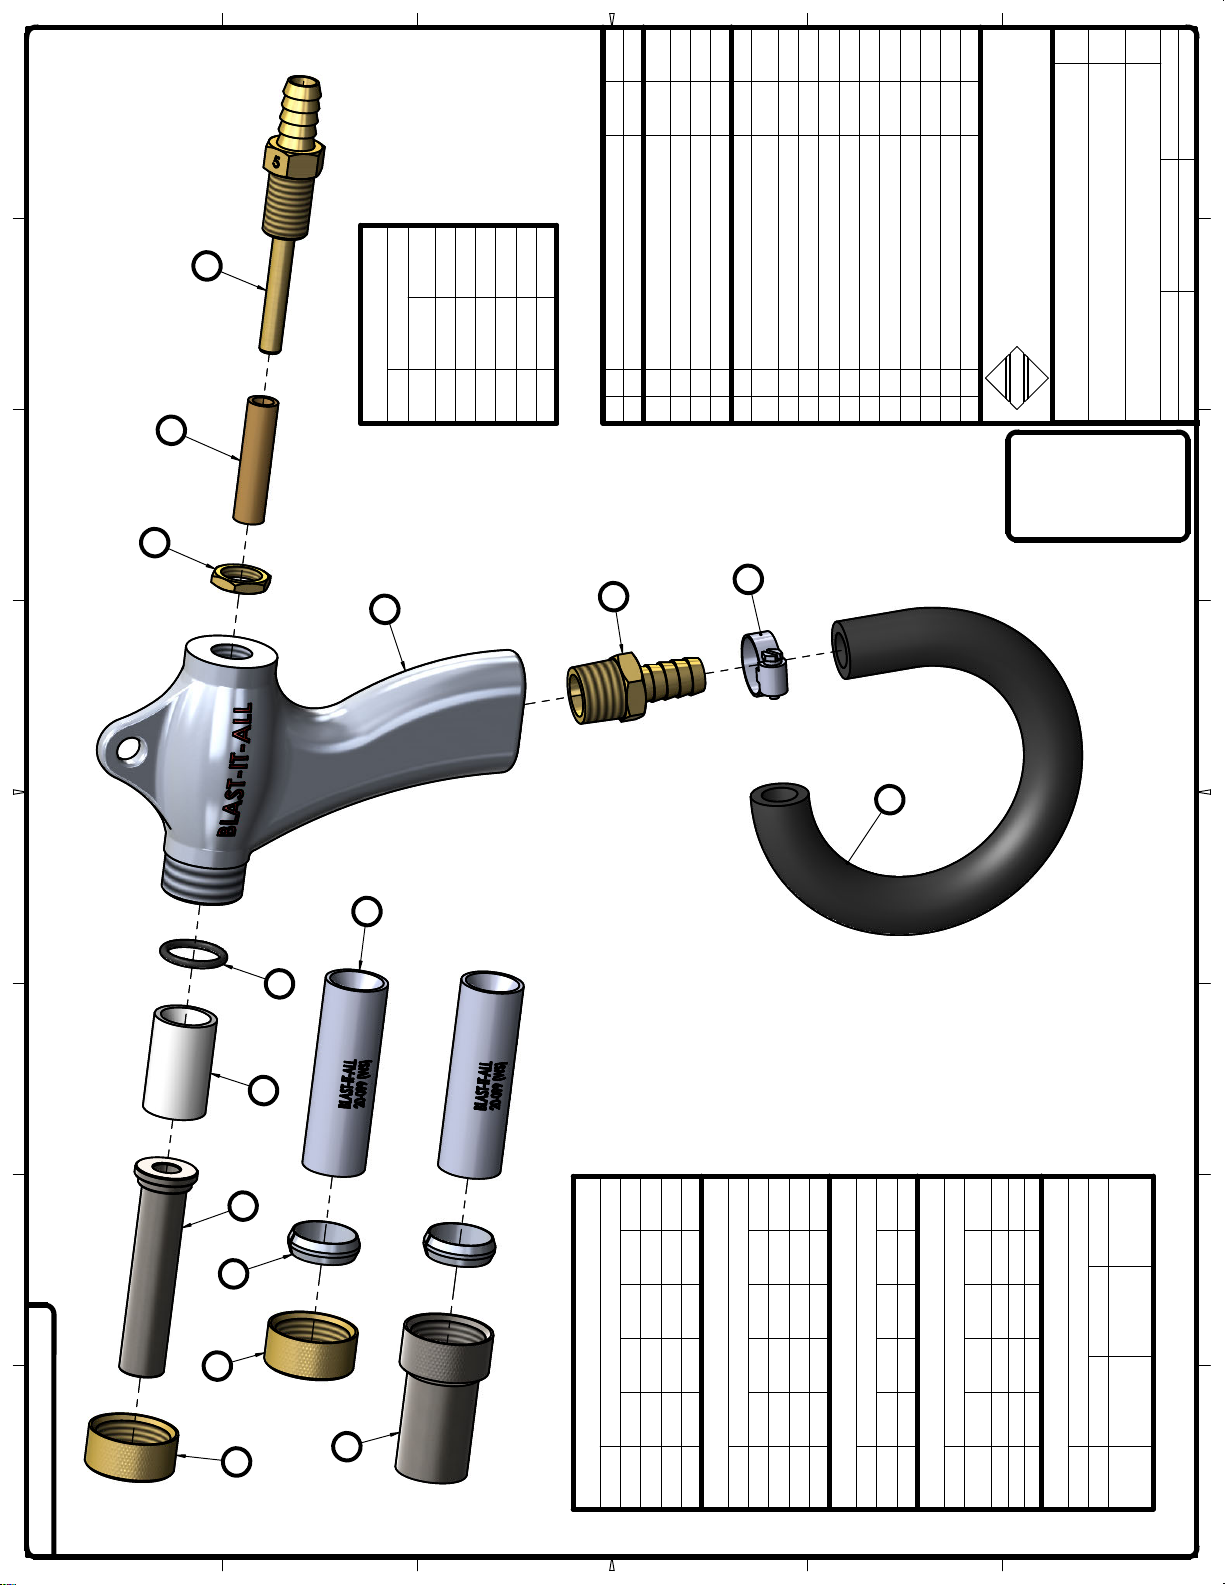
#: QTY: DESC/ MAT: PRT#: DWG#:
11 1 HOSE, MEDIA, 1/2 ID (SEE TABLE) * EPDM 18-084 ---
10 1 CLAMPS, DRIVE, WORM, SAE:006, 1/2" (7/16 - 25/32) *
BAND, S.S. & SCREW, STEEL, ZINC 21-031 ---
9 1 FITTING, BRASS, 1/2 BARB X 1/2 MNPT 14-301 ---
81
ORIFICE, AIR, 5/32 ID, #5 * BRASS, YELLOW, 360,
HEXBAR, 3/4IN 20-065 ---
7 1 COVER, ORIFICE * TUBE, LATEX, RUBBER, NATURAL 20-063 ---
6 1 LOCKNUT, ORIFICE * BRASS 20-052 ---
5 1 NUT, HOLDING, NOZZLE * BRASS, YELLOW, 360 20-054 ---
***4 1 EXTENSION, NOZZLE, 3IN * STEEL, 1018, CARBON
NITRATE HARDENED 20-502 ---
3 1 NOZZLE, 5/16 ID, #5 * CERAMIC 20-075 ---
2 1 O-RING, SEAL, NOZZLE * RUBBER, BUNA-N 20-053 ---
1 1 BODY, GUN, BLAST * ALUM, TENZALOY 20-040 ---
STANDARD GUN NOZZLES: (#3)
NOZZLE - # & (IN):
MATERIAL: #4 (1/4) #5 (5/16) #6 (3/8) #7 (7/16) #8 (1/2)
CERAMIC 20-074 20-075 20-076 20-077 20-078
TUNGSTEN 20-084 20-085 20-086 20-087 20-088
BORON 20-094 20-095 20-096 20-097 20-098
STANDARD GUN ORIFICES: (#8)
ORIFICE - # & (IN):
MATERAIL: #4 (4/32) #5 (5/32) #6 (6/32) #7 (7/32) #8 (8/32)
BRASS 20-064 20-065 20-066 20-067 20-068
STANDARD GUN ASSYS: (#1 - #8, NOT # ***4)
TOP - NOZZLE # & (IN) * BOTTOM: ORIFICE # & (IN):
MATERAIL: #4 (1/4)
#4 (4/32)
#5 (5/16)
#5 (5/32)
#6 (3/8)
#6 (6/32)
#7 (7/16)
#7 (7/32)
#8 (1/2)
#8 (8/32)
CERAMIC: 20-041-4 20-041-5 20-041-6 20-041-7 20-041-8
TUNGSTEN: 20-042-4 20-042-5 20-042-6 20-042-7 20-042-8
BORON: 20-043-4 20-043-5 20-043-6 20-043-7 20-043-8
#: QTY: DESC/ MAT: PRT#: DWG#:
*14 1 NUT, NOZZLE, WIDE SPRAY, NO COVER * BRASS,
YELLOW, 360 20-055NC ---
*13 1 RING, COMPRESSION, NOZZLE * ALUM 20-056 ---
*12 1 NOZZLE, WIDE SPRAY, #6 (3/8) * BORON 20-099 (WS) ---
#: QTY: DESC/ MAT: PRT#: DWG#:
*15 1 NUT, NOZZLE, WIDE SPRAY, W/ COVER * STEEL, CRS 20-055 ---
BLAST HOSE REQ'D: (#10)
HOSE, MEDIA, 1/2IN
MACH
MODEL 700 CFM 900 CFM
3636 18-084 7FT N/A
4426 18-084 6FT N/A
4836 18-084 7FT 18-084 10FT
4848 18-084 8FT 18-084 11FT
6048 18-084 8FT 18-084 11FT
6060 18-084 9FT 18-084 12FT
WIDE SPRAY STANDARD GUN NOZZLES: (#12)
NOZZLE - # & (IN):
MATERIAL: #4 (1/4) #5 (5/16) #6 (3/8) #7 (7/16) #8 (1/2)
CERAMIC --- --- 20-079(WS) --- ---
TUNGSTEN --- 20-085WS 20-090(WS) --- ---
BORON --- 20-095WS 20-099(WS) --- ---
STANDARD GUN NOZZLE EXTENSIONS: (# ***4)
EXTENSION LENGTH
MATERIAL: 3 IN 6 IN 9 IN
CARBON
NITRATED
STEEL
20-502 20-505 20-508
8
5
3
2
10
9
6
1
7
11
***4
*** OPTIONAL NON-STANDARDPART
D:\Users\Pete2\Documents\000_SW19Data\01_OTSParts\GUNS&NOZZ\20-04X_GunBlastSTD_BIA_20200805\UWM9009B.A_MANUAL-A_GunBlastStandard.SLDDRW
LAST SAVED: Tuesday, 18 August, 2020 01:30:39 PM
*14
*13
*12
*15
© 2020 Hess & Associates
Man. # 561 v02-02 8/2020
Page 17

Little Blaster™ STANDARD CABINET ASSEMBLY PARTS
© 2020 Hess & Associates
Man. # 561 v02-02 8/2020
Page 18
This manual suits for next models
2
Table of contents
Other Blast-It-All Power Tools manuals

Popular Power Tools manuals by other brands


Powerfix Profi
Powerfix Profi 276186 Operation and safety notes

Bosch
Bosch GDS 18 V-LI Original instructions

Bosch
Bosch GST Professional 90 E Original instructions

Black & Decker
Black & Decker LI2000 instruction manual

Black & Decker
Black & Decker Mouse MS100 instruction manual

CPS
CPS BLACKMAX BTLDTW manual