BLUE JAY TH-192 User manual

TH-192 Microcomputer Time Switch Instruction
Function and purposes
The maximum is 16 on/off per day. It is easy to set up 16 different sets each day.
The shortest interval is one minute. It is manual or automatic, and with the function of sleep,
auto- calibration time, 24-hour clock conversion and countdown function.
Direct connection. It is small size, low power consumption, extra-wide operating temperature
range, anti-jamming ability, easy installation and so on.
It can control the neon signs, advertising lights, street lighting and automatic water supply and
feed in aquaculture, the machine automatically moves and automatic control of a variety of
electrical cabinets, distribution boxes and so on. In the family can turn on and turn off the lights,
timing open and close the TV, Air-conditioner and other household appliances, so that your
family early enter into the Intelligentization.
Performance
Instructions
●Set the current time
Hold down the clock button while holding down the H + , M + or D + keys to adjust hours,
minutes and days to make LCD screen show the current time.
●Procedures Time Settings
●nine kinds of automatic on / off timing, use the following procedure combination of setting can
reduce the set-up steps.
When there is without any key operation in 30secods after completing the setting process, the
system will automatically switch to the current time. Or press the clock button can also be switched
to the current time.
Manual Function
Reset
Press the RESET button, the entire system will restart.
Automatically adjust the time
Press the Manual key and " ", it displays:
●Adjust D +, H +, M + until
reach the time you need, once
again press button. This
LCD screen displays:
OFFAUTO
SUSAFRTHWETUMO
OFFAUT O
AUTO OFF
MO TU WE TH FR SA SU
OFFAUTO
AUTO OFF
MO TU WE TH FR SA SU
SUSAFRTHWETUMO
OFFAUTO
●Standard Voltage: AC220V/50/60Hz
●power range: 180-250V
●Resistive load switching capacity: 16A
●Contacts: one normally open and one
normally closed
●Power consumption: <2VA
●Display Devices: LED display
●Set Switch Views: 16 on and 16 off
●Minimum switching time: 1 minute
●t iming range: 1MIN ~ 168HOUR
●Timing Error: <± 0.5 sec / day
●Electrical Life: 100000 times (rated load)
●Mechanical life: 10 million times
●Operational temperature: -30 ℃~ 80 ℃
●Storage Temperature: -40 ℃~ 100 ℃
●Relative humidity: <95% RH
●Press key to make the
product into the set state, at
this time the screen displays:
●set the time of ON for the first
operation. press D +, H +, M +
keys,
at this time the LCD screen displays:
●set the time of OFF for the first operation as
set ON time. repeat to set 16 groups of on / off
time. If you don’t need all of group, you can
press manual key, so that you can cancel your
set-up time, it displays:
●Monday, Tuesday, Wednesday
●Thursday, Friday, Saturday
●Monday to Friday
●Monday to Saturday
●Monday to Sunday
●One day of the week
●Monday, Wednesday, Friday
●Tuesday, Thursday, Saturday
●Saturday to Sunday
Press "Manual" key several times the LCD screen will
show "ON, AUTO, OFF" respectively showing that a
product is open mode, automatic mode and off mode.
Select the automatic mode, the timer will be set based on
your program to run automatically to control the time.
Into the current interface you can press D + key to adjust the time.
:
System automatically adjust the error time every week according to your settings,
Automatically adjust time: ± 30 s
Hibernation settings:
At the same time press the D + and H + keys, system can enter the sleep state. At this time LCD
screen does not show, if you want to open, press the RESET button to restart the system.
Countdown features:
●Press the clock button " ", while press respectively H + and M + button to set the countdown
time and up to 24-hour clock conversion.
●Press Manual key to start the countdown.
●press " " key to stop the countdown.
12-hour and 24-hour clock conversion:
Boot time, when the controller defaults to a 24-hour system, if you need 12-hour clock, press the
clock key " " 3 seconds, when upper left corner on LCD screen displays AM, it provides
12-hour system, then press the clock key " " 3 seconds, back to 24-hour system, ICON AM
closes, (12-hour system: AM for morning, PM for afternoon).
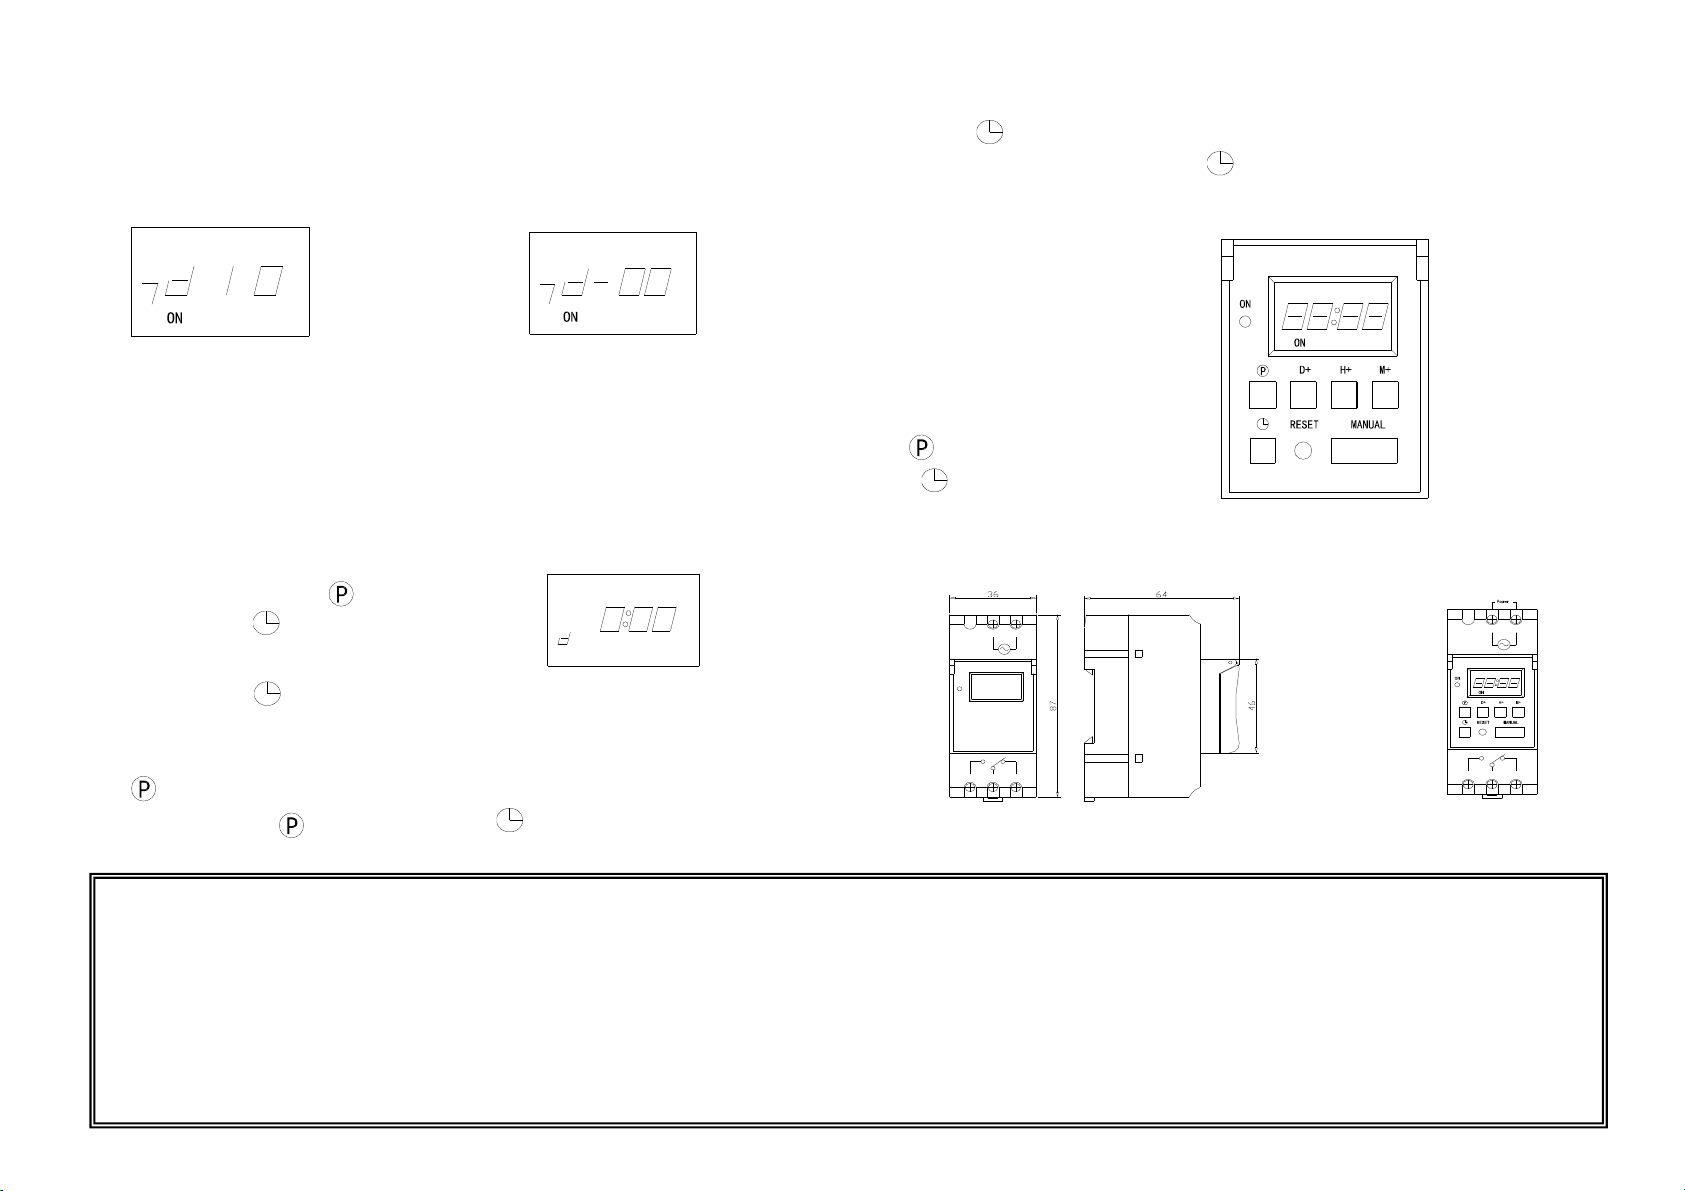
Panel Function Keys Description:
"D +" - set the day
"H +" - set the hours
"M +" - set the minutes
"RESET" - Reset
"Manual" - Cancel / recover settings,
or manual, automatic
" " - Set time control procedures
" " - Clock Keys
"ON" - LED indicator
Installation size:
Wiring Diagram:
DIN standard size, DIN35MM standard rail mounting
AUTO OFF
MO TU WE TH FR SA SU
SUSAFRTHWETUMO
OFFAUTO
1 2
5 4 3
SUSAFRTHWETUMO
OFFAUTO
1 2
5 4 3
SUSAFRT HWETUMO
OF FAU T O
●If every week lessen 10
seconds, press D + key to
plus 10 seconds,the screen
displays
●If every week adds 10
seconds, press D + button to
reduce 10 seconds, the
screen displays:
●At the same time press the " " button
and clock keys " " for 3 seconds,
the screen displays:
Attentions
●at the first time, or after a long time without use, when the controller without display, it should be in power for 5 seconds, press the RESET button to turn on
●it can not exceed the maximum power load range.
●This product is best not to link to tube heater which is without watch or the heater with electric wires.
●Do not place where is humid or the tem`perature is too high or too low. Don’t place where is vulnerable to impact or vibrate.
●you can not open the timer by yourself, maintenance should be looking for professionals.
●use a soft cloth to clear LCD screen and shelf, don’t use corrosive chemical cleaning agents or immerse in water.
●If the product is in the sleep state, press RESET button can boot,
●At the same time press the " " button and clock keys " " for 3 seconds to end the countdown.
Popular Switch manuals by other brands


US Robotics
US Robotics Courier USR997624 Quick installation guide

Cisco
Cisco SFS 7012 InfiniBand Hardware user's guide

EtherWAN
EtherWAN L-EX17008A quick start guide

HP
HP ProCurve 4204vl Quick reference guide

Kathrein
Kathrein EXD 1524 Instructions for use

Equinox Systems
Equinox Systems ESP-2 MI installation guide


