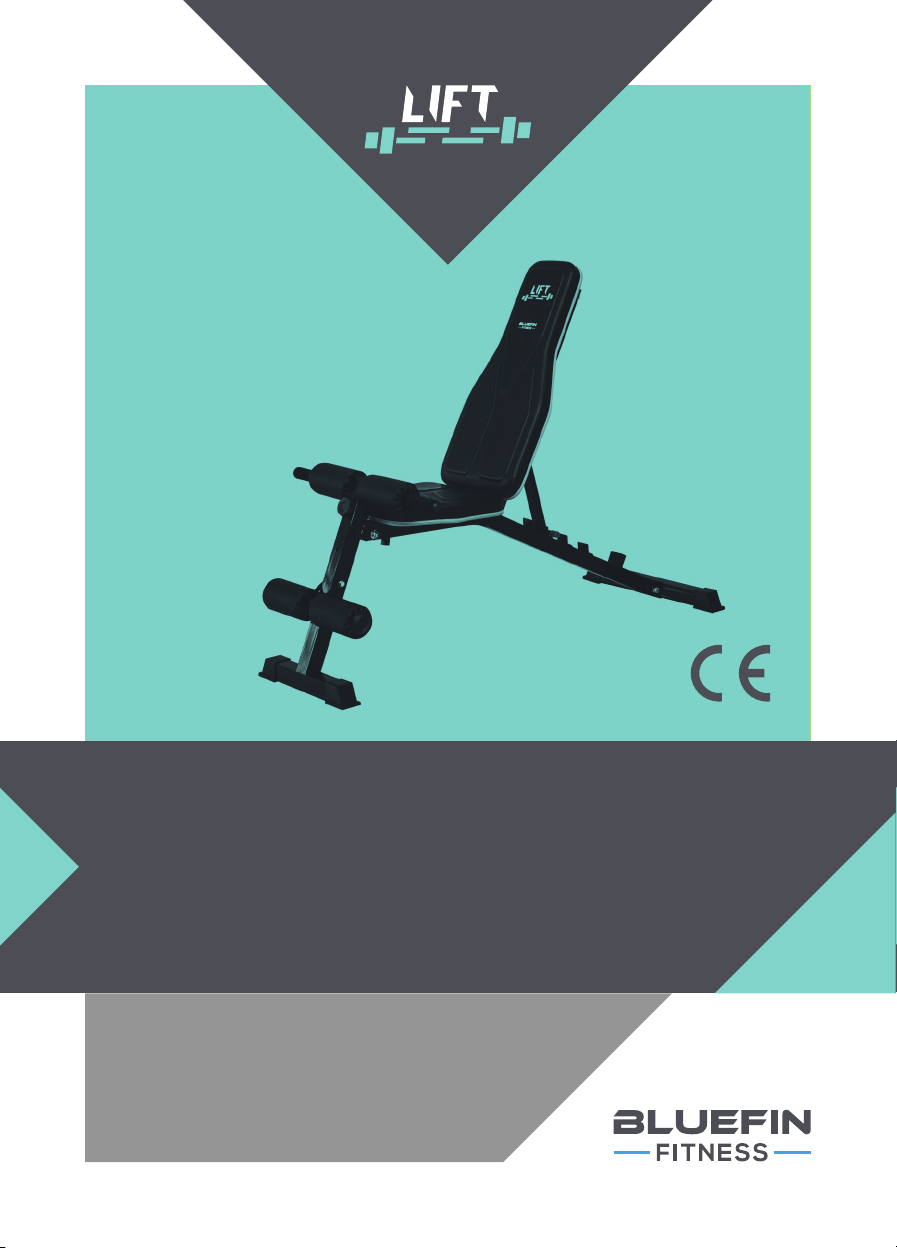
BLUEFIN Fitness LIFT Multi Functional Folding Weights Bench User manual
INSTRUCTION
MANUAL.
[ DE ] BEDIENUNGSANLEITUNG
[ ES ] MANUAL DE INSTRUCCIONES
[ FR ] GUIDE D’UTILISATION
[ IT ] MANUALE DELLE ISTRUZIONI
[ NL ] HANDLEIDING


[ EN ]
WELCOME TO
BLUEFIN FITNESS
Dear Customer,
We are pleased that you have chosen a device from the BLUEFIN FITNESS
product range. BLUEFIN FITNESS sports equipment offers you the highest
quality & latest technology.
In order to take full advantage of the device‘s performance, & to have many
years of pleasure in your device, please read this manual carefully before
commissioning & starting the training & use the device according to the
instructions. The operational safety & function of the device can only be
guaranteed if the general safety & accident prevention regulations of the
legislator as well as the safety instructions in this user manual are observed.
We assume no liability for damages caused by improper use or incorrect
operation.
Please make sure that all persons
using the device have read &
understood the user manual.

[ EN ]
SAFETY
PRECAUTIONS
This general safety information must be observed when
using this product. Read all instructions before using the
product. Keep the user manual in a safe place to be able to
access it at any time if necessary.
Please keep this manual for future reference.
1. Before commencing assembly & use of your new equipment, carefully read
the instruction manual to understand the information provided. The correct
installation, maintenance & use of your equipment is important to ensure you get
the safest & most effective tness workout.
2. Please ensure the equipment has been assembled according to the assembly
manual.
3. If you are over 45 years old, have health or medical problems and/or this is your
rst time exercising in over 12 months, please consult your local Doctor or Medical
Professional before use.
4. The maximum user weight is 120Kg.
5. Should you experience any of the following symptoms including: headache, chest
tightness, irregular heartbeat, shortness of breath, dizziness, nausea or any sharp
muscle or joint pain, immediately stop training & consult your Doctor or Medical
Professional.
6. Ensure that young children & pets are kept away from the equipment to prevent
injury, the equipment is for adult use only.
7. The equipment should be placed on a hard, at surface & at least 0.6 meters away
from any obstacles.

[ EN ]
SAFETY
PRECAUTIONS
8. Before using the equipment, please check all nuts & bolts of the equipment are
tightened securely.
9. Care must be taken when lifting, moving or stowing the equipment so as not to
injure your back. Always use proper lifting techniques and/or seek assistance if
necessary.
10. It is strongly recommended you wear appropriate clothing & footwear when using
your equipment for your own personal comfort.
11. The equipment is not suitable for use as a medical device.
12. Lubricate moving parts regularly.
13. Use a wet towel & a soft cleaning product to wipe down the product after each use.
WARNING: Before beginning any exercise
program, consult your physician. This is
especially important for individuals over
the age of 45 or persons with pre-existing
health problems. Read all instructions
before using any tness equipment. We
assume no responsibility for personal
injury or property damage sustained by or
through the use of this product.
Save these instructions!
[ EN ]
ASSEMBLY
INSTRUCTIONS
Before you start installation inspect &
prepare all parts & screws featured in this
manual. When you open the carton, you
will nd the following parts.
NB/ Some of the smaller components may
be pre-tted to larger components.
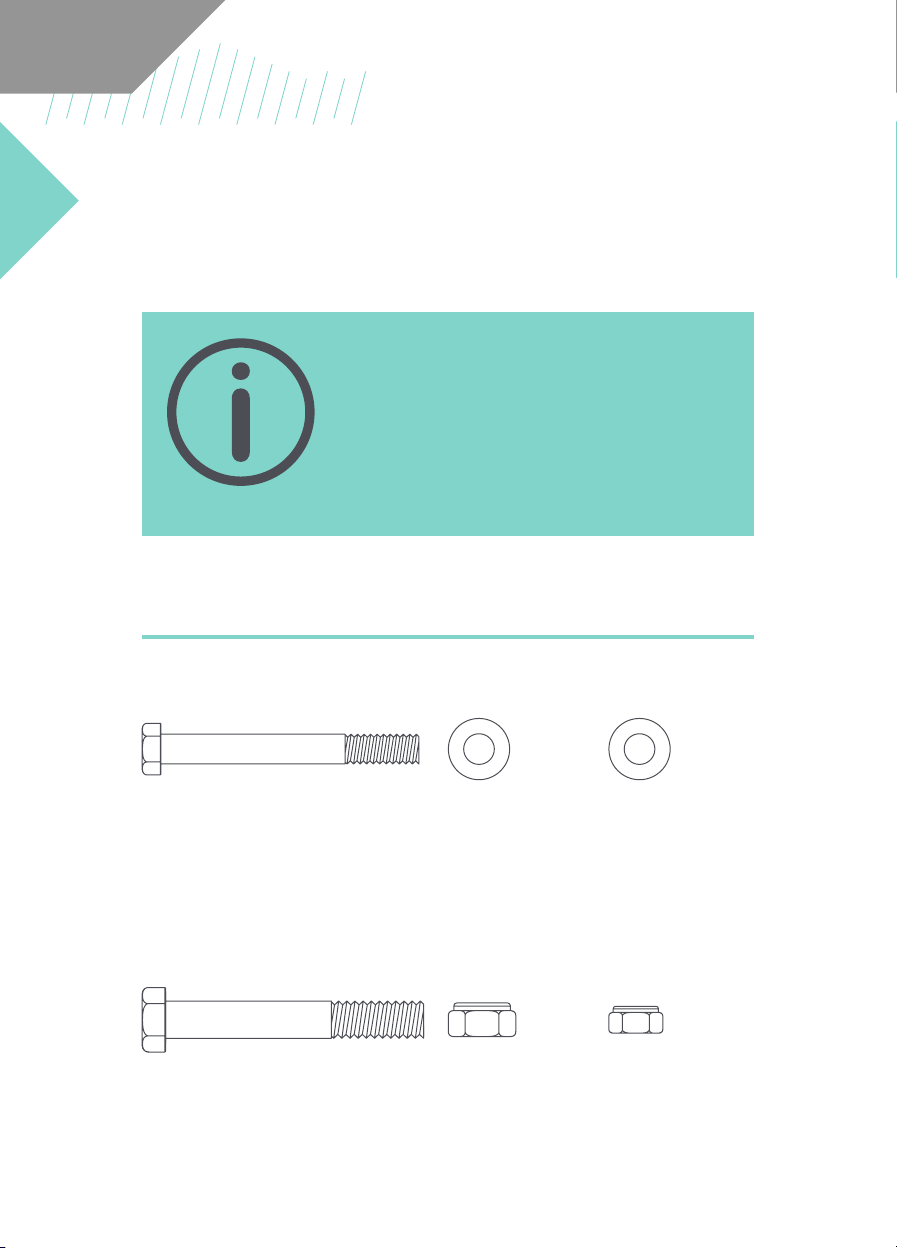
Hardware Packing List
#14.
1 x Hexagon Bolt M8x70mm
2 x Hexagon Bolt M10x70mm
12 x Ø8 Flat
Washers
4 x M10 Locknut
8 x Ø10 Flat
Washers
1 x M8 Locknut
#15.
#19. #20.
#22.#21.
[ EN ]
ASSEMBLY
INSTRUCTIONS
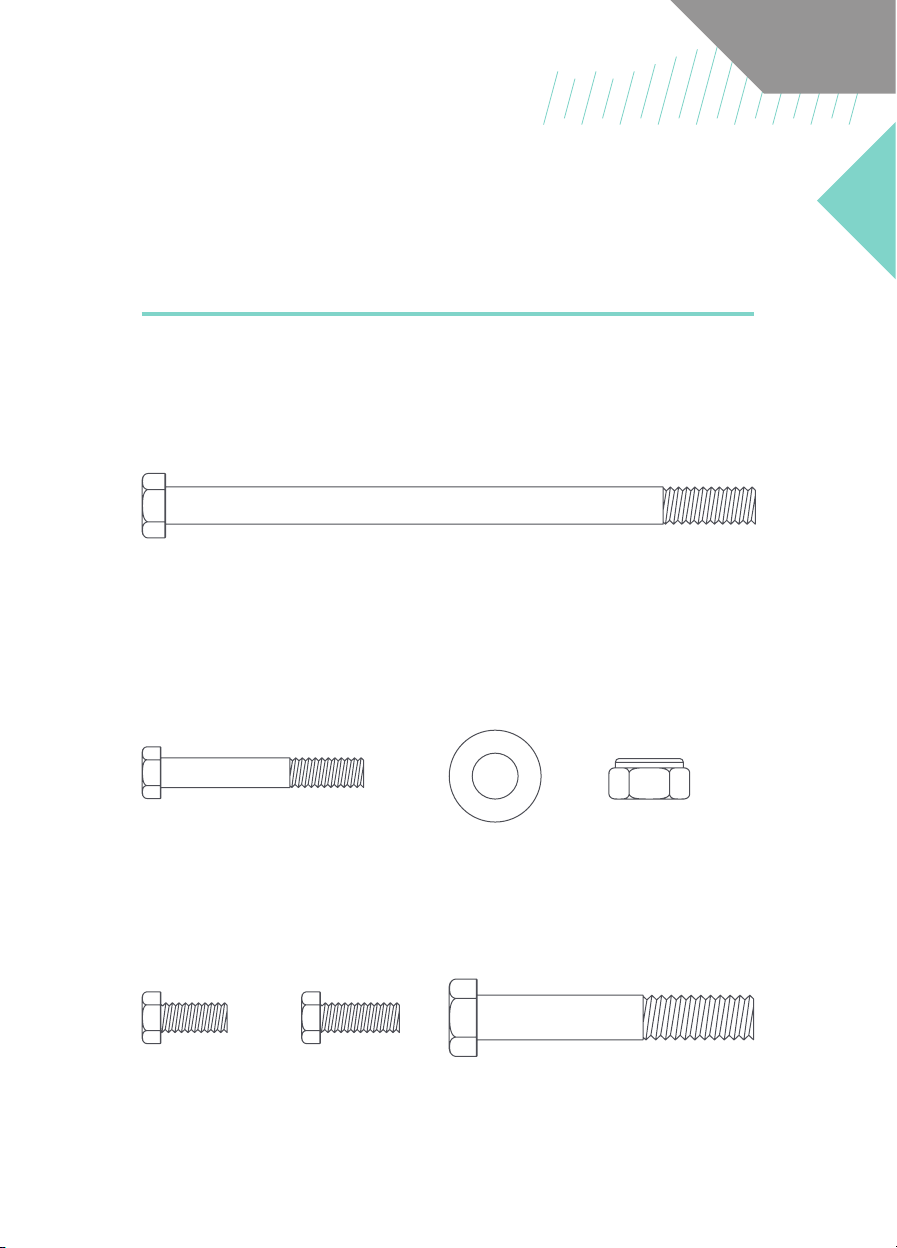
#16.
2 x Hexagon Bolt M10x160mm
4 x Hexagon Bolt M8x55mm
4 x Hexagon
Bolt M8x18mm
1 x Hexagon
Bolt M8x25mm
2 x Ø12 Flat
Washers
1 x Hexagon Bolt M12x75mm
3 x M12 Locknut
#17.
#18. #34.
#25.#24.
#23.
[ EN ]
ASSEMBLY
INSTRUCTIONS
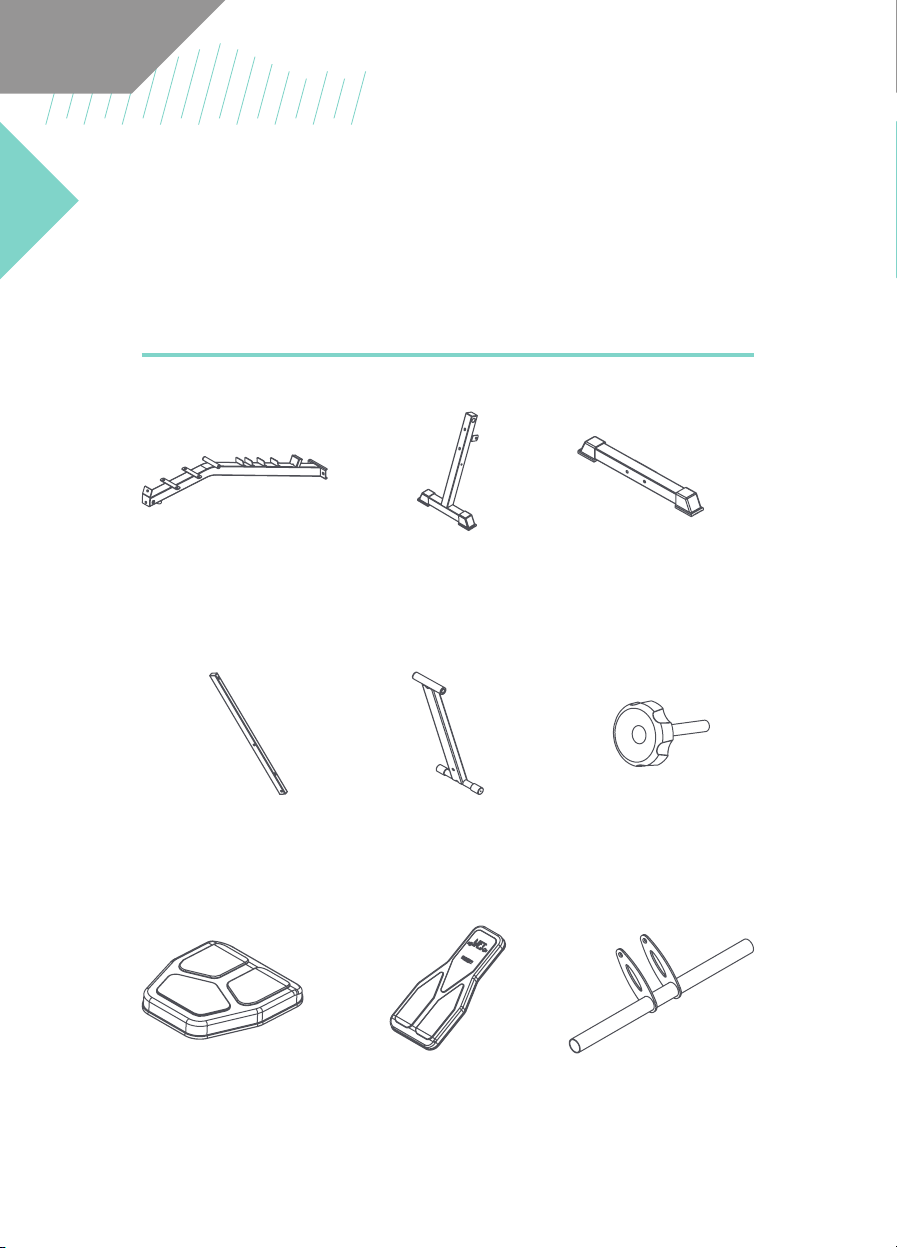
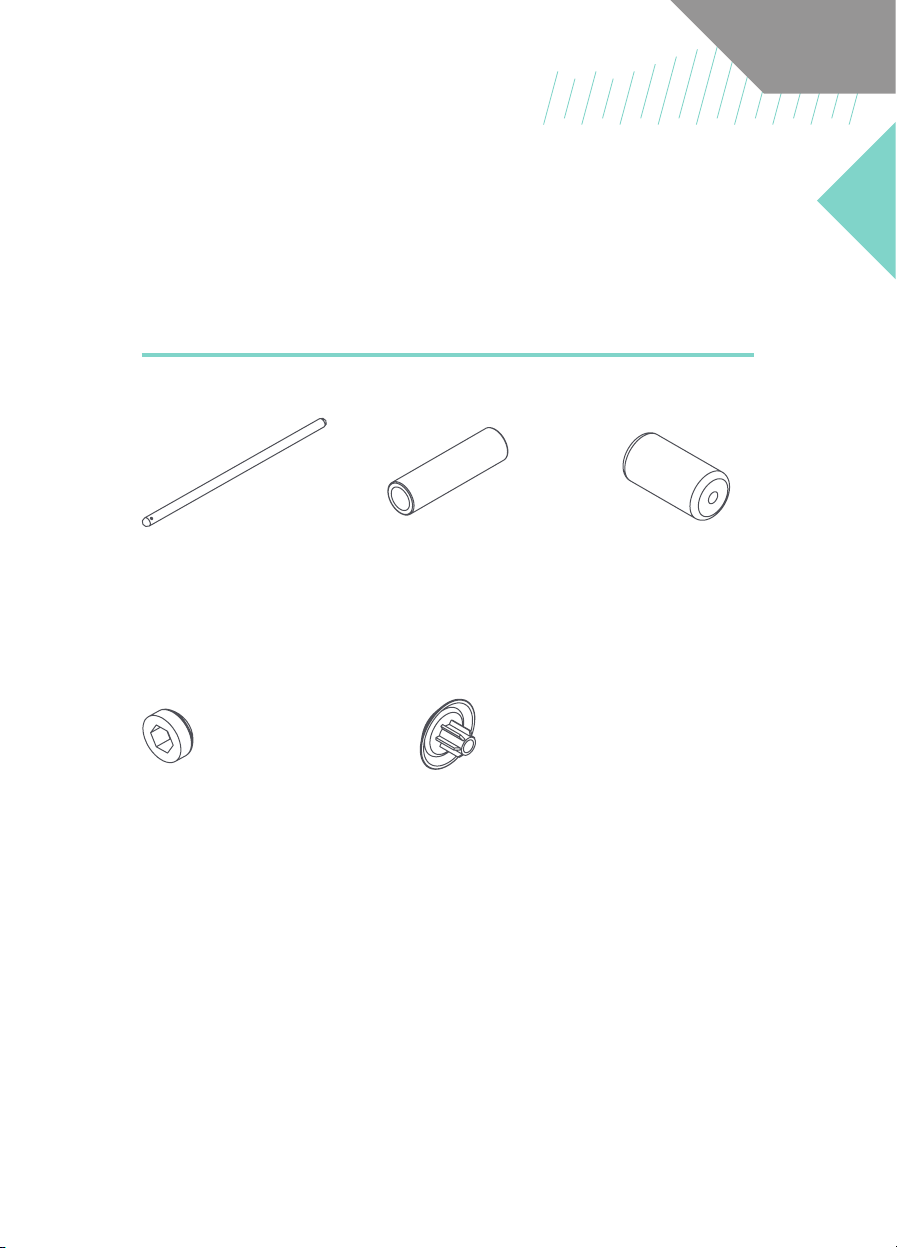
Main Parts List
#1. #2. #3.
#4. #5. #6.
#7. #8. #9.
1 x Main Frame 1 x Front Support
Bracket
1 x Rear Floor Rack
2 x Backrest Pipe 1 x Adjustable
Backrest Frame
1 x M10 Knob
1 x Seat 1 x Backrest 1 x Leg Bar
[ EN ]
ASSEMBLY
INSTRUCTIONS
#10. #11. #12.
#26. #32.
1 x Long Handlebar
Pipe
2 x Handlebar Cover 4 x Foam Cover
1 x M8 Nut Cap 2 x Leg Bar Cap
[ EN ]
ASSEMBLY
INSTRUCTIONS
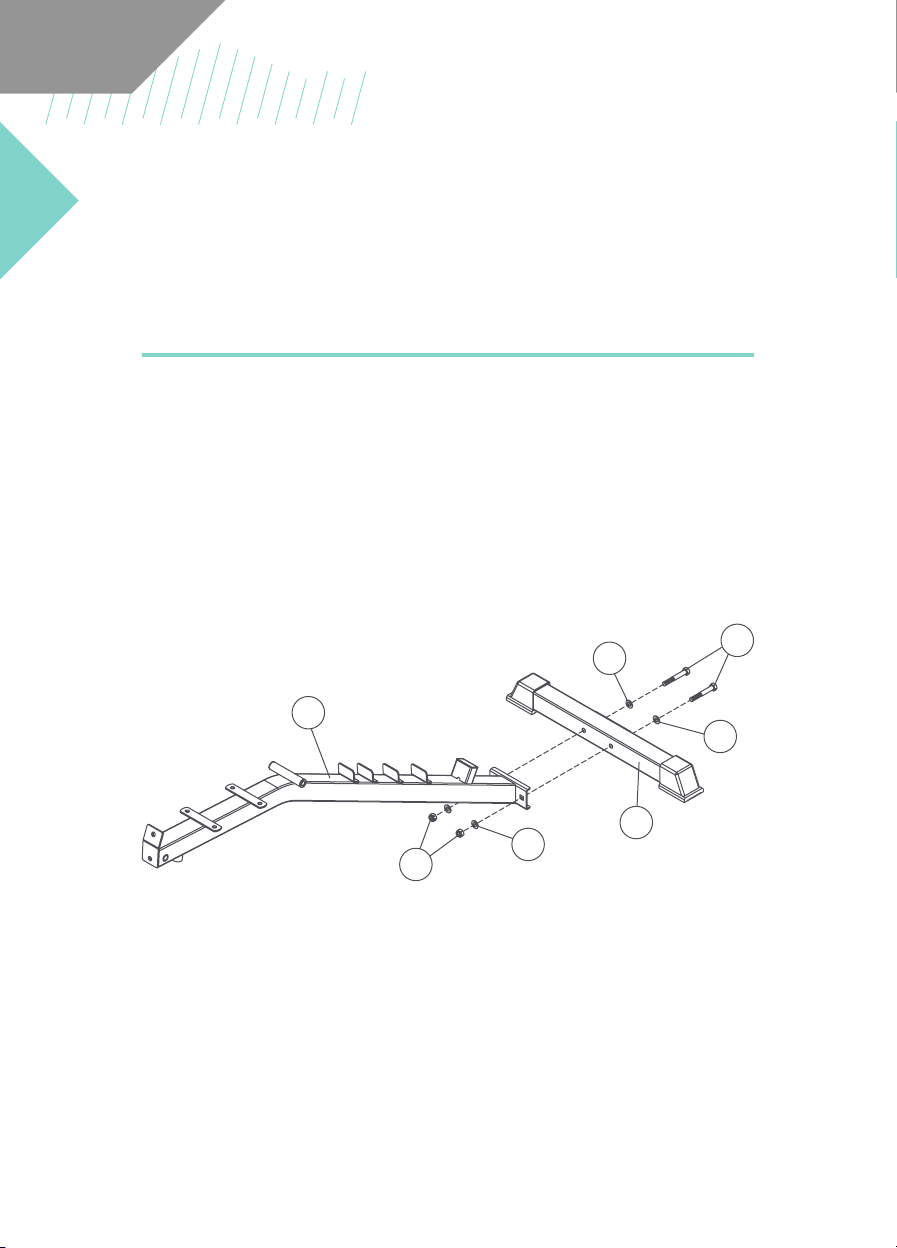
Step 1.
Attach the Main Frame (#1) to the Rear Floor Rack (#3) using 2 x Hexagon
Bolts M10x70mm (#15), 2 x Ø10 Flat Washers (#20) & 2 x M10 Locknuts
(#21). Securely tighten.
1
3
21 20
20
20
15

[ EN ]
ASSEMBLY
INSTRUCTIONS
Step 2.
• Attach the Main Frame (#1) to the Front Support Bracket (#2) using 1
x Hexagon Bolt M12x75mm (#23), 2 x Ø12 Flat Washers & 1 x M12
Locknut. Securely tighten.
• Insert M10 Knob (#6) into the top hole on the Front Support Bracket (#2)
& securely tighten to bracket on the Main Frame (#1).
6
2
1
24
23
24
25

[ EN ]
ASSEMBLY
INSTRUCTIONS
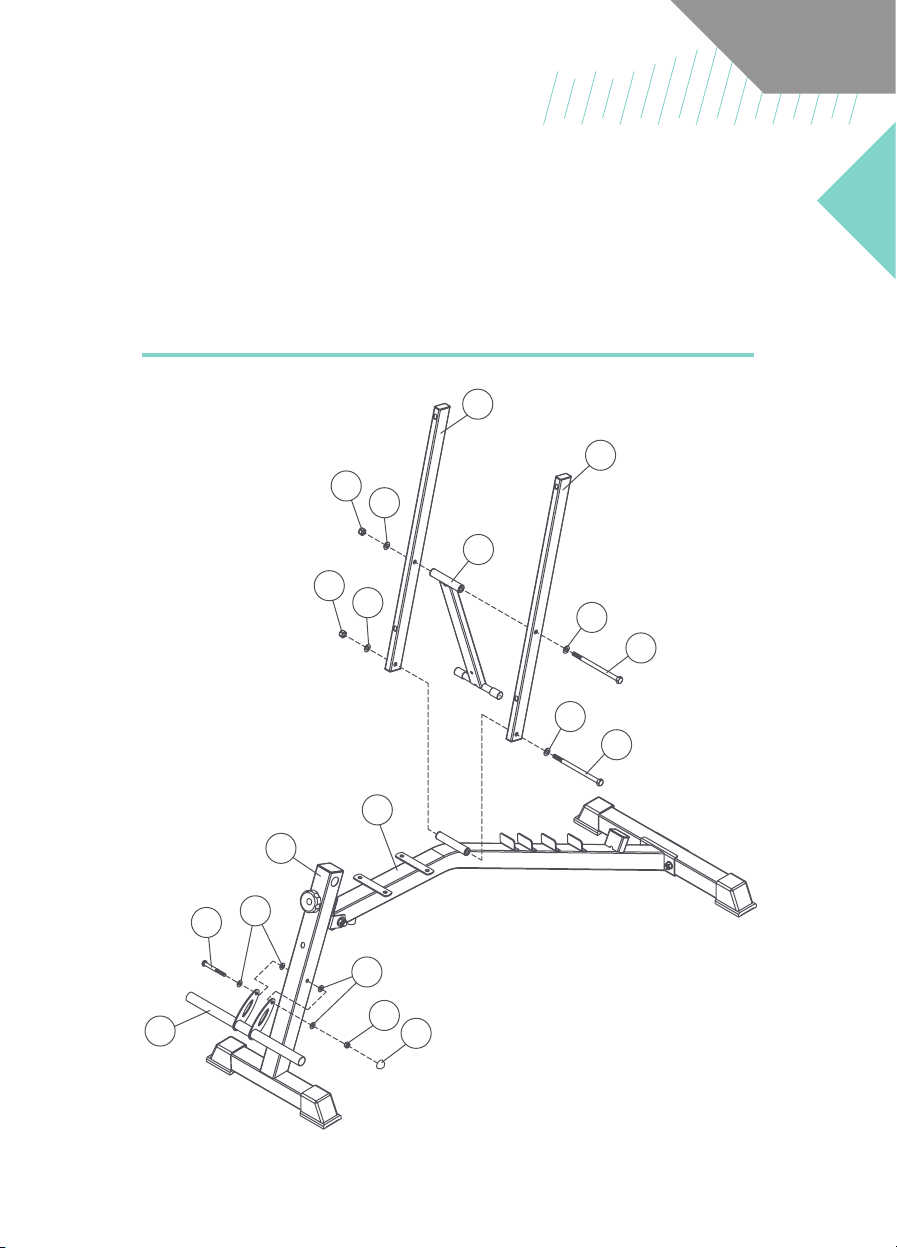
Step 3.
• Attach the Left & Right Backrest Pipes (#4) to the Main Frame (#1) by
tilting the mounting hole upwards & using 1 x Hexagon Bolt M10x160mm
(#16), 2 x Ø10 Flat Washers (#20) & 1 x M10 Locknut (#21). Securely
tighten.
• Attach the Adjustable Backrest Frame (#5) to the Backrest Pipes (#4)
using 1 x Hexagon Bolt M10x160mm (#16), 2 x Ø10 Flat Washers (#20) &
1 x M10 Locknut (#21). Securely tighten.
• Attach the Leg Bar (#9) to the Front Support Bracket (#2) using 1 x
Hexagon Bolt M8x70mm (#14), 4 x Ø8 Flat Washers (#19) & 1 x M8
Locknut (#22). Securely tighten.
• Cover M8 Locknut (#22) with 1 x M8 Nut Cap (#26).
[ EN ]
ASSEMBLY
INSTRUCTIONS
4
1
2
19
19
22 26
14
9
5
21
21
20
20 20
20
16
16
4

[ EN ]
ASSEMBLY
INSTRUCTIONS
Step 4.
• Attach the Backrest (#8) to the Backrest Pipes (#4) using 4 x Hexagon
Bolts M8x55mm (#17) & 4 x Ø8 Flat Washers (#19). Securely tighten.
• Attach the Seat (#7) to the Main Frame (#1) using 4 x Hexagon Bolts
M8x18mm (#18) & 4 x Ø8 Flat Washers (#19). Securely tighten.
8
7
4
19
19
19
18
18
19
17 17 1
19
17
17
19

[ EN ]
ASSEMBLY
INSTRUCTIONS
Step 5.
• Insert the Long Handlebar Pipe (#10) into the hole on the Front Support
Bracket (#2) & attach in the centre with 1 x Hexagon Bolt M8x25mm
(#34). Securely tighten.
• Attach 2 x Handlebar Covers (#11) to the Long Handlebar Pipe (#10).
• Attach 2 x Foam Covers (#12) over the Handlebar Covers (#11) & the
Long Handlebar Pipe (#10). Push rmly to the centre of the join between
the Long Handlebar Pipe (#10) & Front Support Bracket (#2).
• Attach 2 x Foam Covers (#12) to the Leg Bar (#9) & insert 2 x Leg Bar Caps
(#32).
11
11
12
12
12
12
10
2
9
32
32

[ EN ]
ASSEMBLY
INSTRUCTIONS
How to Fold
• Remove M10 Knob (#6) from the Front Support Bracket (#2).
• Fold down the Backrest (#8) & rotate the Front Support Bracket inwards
towards the Main Frame (#1).
• To secure, insert the M10 Knob (#6) into the hole underneath the Seat
(#7). Reverse the process to unfold.
6

[ EN ]
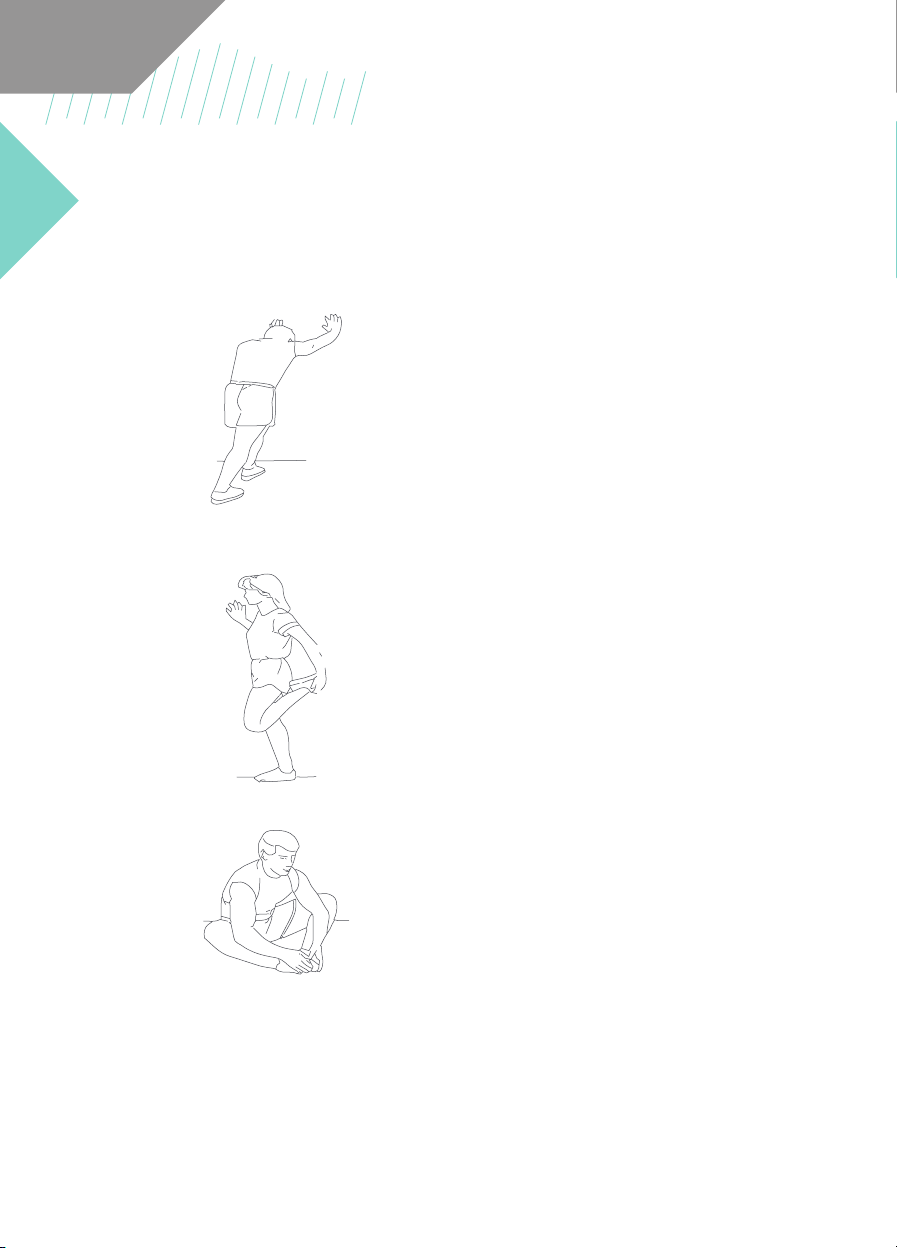
Side Bends:
Pass your arm over your head & bend your
upper body in the same direction. Hold
this position for 10 to 15 seconds & slowly
straighten yourself up. Repeat this 3 times
for each side.
Toe Touch:
Slowly bend forward from your waist,
letting your back & shoulders relax as you
stretch towards your toes. Reach down as
far as you can & hold for 15 counts. Relax
& repeat 3 times.
WARM UP &
COOL DOWN!
To prevent injuries you should start with
warm-up, cool-down & stretching exercises
before & after each workout.
No matter how much you do sports, please
do some stretches to begin. The warm
muscles will extend more easily. This
reduces the risk of a spasm or muscle injury
during exercise. To warm up we suggest the
following stretching exercises as shown.
Please do not overstretch or pull your
muscles: “IF IT HURTS, STOP IT!”
[ EN ]
WARM UP &
COOL DOWN!
Calf-Achilles Stretch:
Lean against a wall with your left leg in
front of the right & your arms forward.
Keep your right leg straight & the left foot
on the oor, then bend the left leg & lean
forward by moving your hips towards the
wall. Hold, then repeat on the other side
for 15 counts. Relax & repeat 3 times for
each leg.
Quadriceps Stretch:
With one hand against a wall for balance,
reach behind you & pull your right foot up.
Bring your heel close to your buttocks &
hold for 10-15 counts. Relax & repeat 3
times for each foot.
Inner Thigh Stretch:
Sit with the soles of your feet together
with your knees pointing outward. Pull
your feet as close into your groin as
possible. Gently push your knees towards
the oor & hold for 15 counts. Relax &
repeat 3 times.
[ EN ]
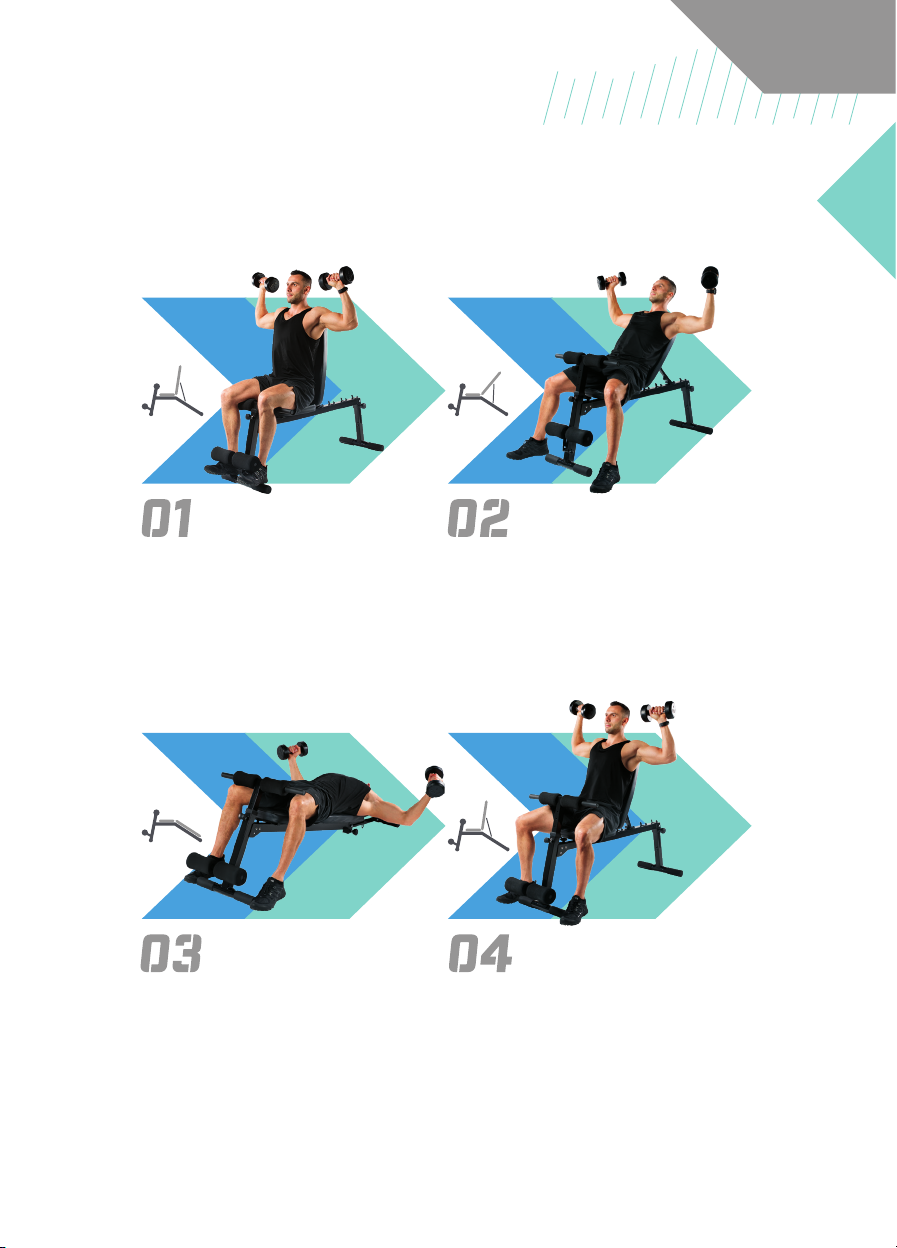
TRAINING
INSTRUCTIONS
SHOULDER
PRESS
DECLINE
PECTORAL FLYS
INCLINE
PECTORAL FLYS
INCLINE
CHEST PRESS
• Adjust backrest to the seated upright position.
• Select a manageable weight.
• Start with dumbbells positioned near your
shoulders & keep arms slightly bent at the elbows.
• End by pushing the dumbbells upwards above your
head. Return to the starting position in a slow &
controlled manner.
• Adjust backrest to the decline position.
• Select a manageable weight.
• Start with dumbbells positioned outwards from
your chest & keep arms slightly bent at the elbows.
• End by bringing the dumbbells together above
your chest.
• Adjust backrest to the incline position.
• Select a manageable weight.
• Start with dumbbells positioned outwards from
your chest & keep arms slightly bent at the elbows.
• End by bringing the dumbbells together above
your chest.
• Adjust backrest to the incline position.
• Select a manageable weight.
• Start with dumbbells positioned near your upper
chest & keep arms at shoulder width.
• End by pushing the dumbbells upwards above your
head. Return to the starting position in a slow &
controlled manner.

[ EN ]
TRAINING
INSTRUCTIONS
DECLINE
CHEST PRESS
BULGARIAN
SPLIT SQUAT
PREACHER
BICEPS CURL
BENT ARM
PULLOVER
• Adjust backrest to the decline position.
• Select a manageable weight.
• Start with dumbbells positioned near your upper
chest & keep arms at shoulder width.
• End by pushing the dumbbells upwards above your
head. Return to the starting position in a slow &
controlled manner.
• Adjust backrest to the at position.
• Select a manageable weight.
• Hold dumbbells in each hand & rest back foot on
bench.
• Bend knee to lower yourself. At parallel, straighten
front leg to raise yourself. Repeat movement.
• Adjust backrest to the incline position.
• Select a manageable weight.
• Put your elbow & upper arm rmly on top of the
handlebars. Start with the dumbbell positioned
near your upper chest. Lower the dumbbell slowly
until your upper arm is nearly extended.
• Return to your starting position in a slow &
controlled manner.
• Adjust backrest to the at position.
• Select a lighter weight than usual.
• Start with weight overhead & slight bend in elbow.
• Grip weight rmly & slowly lower arms behind
head maintaining angle. Repeat movement.
Table of contents
Languages:


