Finer Form FF-TB022302 User manual

SKU: FF-TB022302
Please Read User Manual Before Assembling
and Using the Bench
Lea el manual del usuario antes de armar y utilizar el banco /
Veuillez lire le manuel d’utilisation avant d’assembler et
d’utiliser le banc / Bitte vor Montage und Handhabung der
Hantelbank die Benutzeranleitung lesen / Si prega di leggere il
Manuale per l’uso prima di montare e usare la panca / Lees
deze gebruikershandleiding door voordat u de halterbank
monteert en in gebruik neemt / Čeština: Před montáží a
použitím lavice si přečtěte uživatelský manuál / Przed
użyciem ławy prosimy przeczytać instrukcję obsługi.
Multi-Functional Adjustable Weight Bench

Table of Contents
English.................................................................1
Español ............................................................. 11
Français.............................................................21
Deutsch .............................................................31
Italiano...............................................................41
Nederlands ........................................................51
Czech ................................................................61
Polski.................................................................71

English Spanish French German Italian Dutch Czech Polish
Thank You!
Before we get started, we want to thank you for choosing Finer Form for your new
exercise bench. We know you have many choices for at-home exercise equipment,
so thank you for joining so many others and choosing us!
Customer Service: Contact Us First!
- If you have any questions about assembling the bench, missing parts or pieces, or
you need replacement parts, we want to help you!
- It helps if you can include a picture or video of any issues you may be having
- Please include your order ID so that we can help you even more quickly
For exercise instruction videos, please check out our Youtube Channel: Finer Form
Visit finerform.com for savings on more gym-quality fitness equipment.
1

Product Safety
WARNING: Please consult a physician before exercising or using this equipment. This
equipment should not be used without your physician's review and approval. If you
have any of the following conditions or use any of the following medications, please do
not use use this bench –
•High doses of aspirin or anti-coagulant medications
•Bone ailments that include fractures, unhealed fractures, Surgical pins, plates or
supports, or Osteoporosis
•Hernias
•Heart conditions, heart weakness or circulatory issues that you are being
treated for
•Ear infections or balance disorders
•Injuries to the back, spinal injuries, extremely swollen joints or cerebral sclerosis
•Pregnancy
•Obesity
The Maximum Weight Capacity for this product is 400 lbs. Only one person should use
this piece of equipment at one time.
This equipment was designed to be used safely and responsibly. Please read all
instructions and use caution before using this equipment. All nuts, bolts and screws
included in the package should be used during assembly. Please consult the assembly
instructions as you assemble the equipment, and then follow these safety instructions:
1) Consult your doctor or a physician before using this exercise equipment.
2) Use extreme care as you get on and off of the bench.
3) Stop use of equipment if you experience dizziness, light-headedness or you feel
faint. Then contact your doctor or a physician.
4) Stop using this equipment if you feel any type of pain or discomfort.
5) Wear clothing appropriate to exercise and fitness when using this piece of
equipment.
6) Do not allow children to operate this equipment.
7) Keep pets away from equipment while exercising.
8) Cease using this equipment if you feel nauseous or dizzy during a workout.
9) Do not operate equipment if it is malfunctioning or is damaged.
10) Place bench on a level surface. Do not place bench outside.
11) Do not place hands, feet, fingers or toes near any moving parts.
12) Do not insert any item into open parts of the bench.
13) Do not wear long jewelry, baggy or loose clothing, or long hair while exercising on
the bench.
14) No individual under the age of 12 should attempt to operate this bench.
Polish Czech Dutch Italian German French Spanish English
2

Product Diagram
English Spanish French German Italian Dutch Czech Polish
3
Rear foot (5)
Front foot (3)
Leg lever (4)
Front vertical frame (2)
Adjustment frame (10)
Handle (12) Knee pads (11)
Seat assembly (7)
Connecting
rods (6)
Adjustment
plate (8)
Connecting
plate (9)
Main frame (1)

Polish Czech Dutch Italian German French Spanish English
4
Main frame x1
PART LIST
Part 1
Part 2
Part 3 Part 4
Part 5 Part 6
Part 7 Part 8
Part 9 Part 10
Part 11 Part 12
Front vertical frame x 1
Front foot x1 Leg lever x1
Rear foot x1 Connecting rod x2
Seat assembly x1 Adjustment plate x1
Connecting plate x1 Adjustment frame x1
Knee pads x2 Handles x2

English Spanish French German Italian Dutch Czech Polish
5
HARDWARE LIST
Part 13 Part 14 Part 15 Part 16
Part 17 Part 18 Part 19 Part 20
Part 21 Part 22 Part 23 Part 24
Part 25 Part 26 Part 27 Part 28
Part 29
Carriage bolt M 8*60 x4 Curved washer 8 x4 Cap nut M 8 x4 Hex screw M 10*70 x5
Hex screw M 10*60 x1 Hex screw M 10*15 x2 Washer 10 x15 Washer 8 x4
Lock nut M 10 x7 Hex screw M 8*35 x4 Hex screw M 8*15 x2 Lock pin with ring 10 x1
Casing x4 Rotary knob x1 Hex wrench 5mm x1 Hex wrench 6mm x1
Wrench 14-17 x1
We recommend you to tighten all screws after all steps are done, instead of tightening
screws at every step.
BEFORE ASSEMBLY
!

Polish Czech Dutch Italian German French Spanish English
6
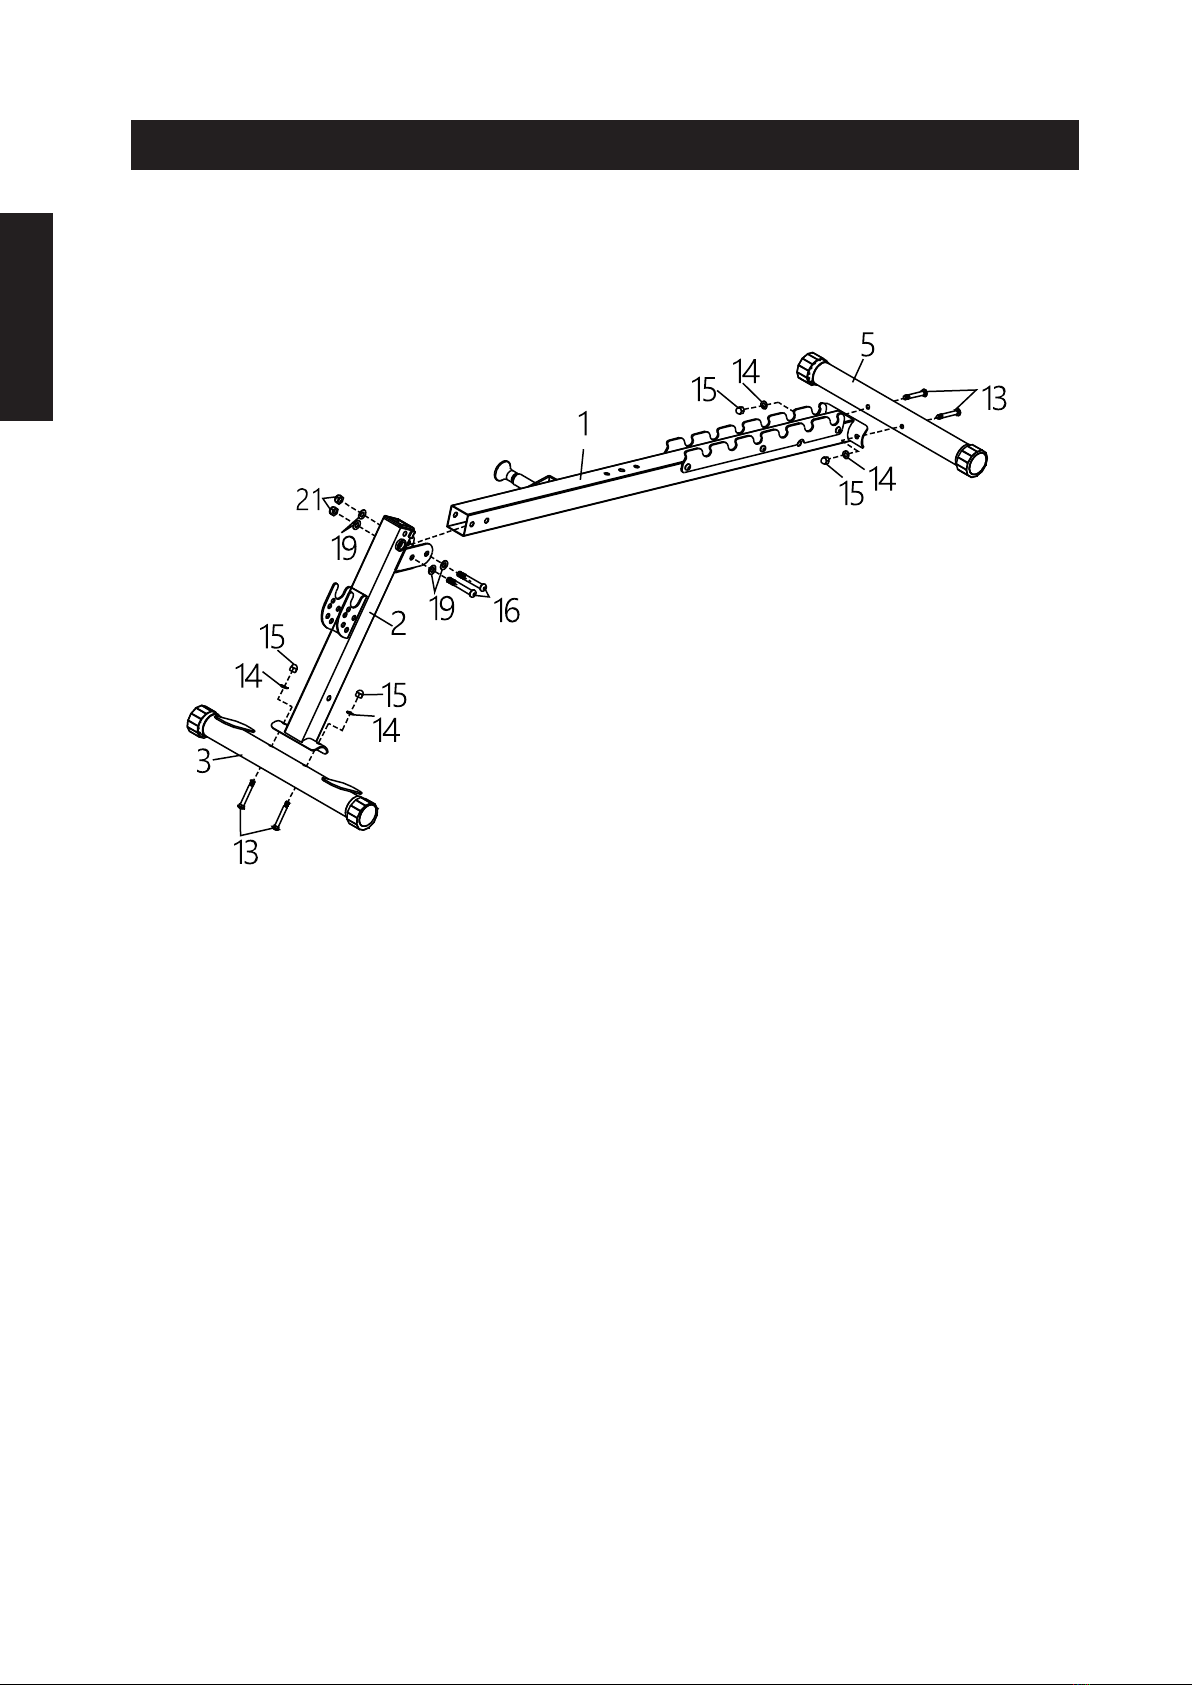
Step 1
a. Use carriage bolts (13), curved washers (14) and cap nuts (15) to secure front foot (3)
onto front frame (2).
b. Use carriage bolts (13), curued washers (14) and lock nuts (15) to secure rear foot
onto main frame.
c. Tighten all nuts and bolts for front and rear feet.
d. Use round-head hex screws (16), washers (19) and lock nuts (21) to connect front
frame (2) and main frame (1).
Note: DO NOT tighten these screws yet.
ASSEMBLY INSTRUCTIONS

Step 2
a. Use hex screw (18), rotary knob (26), washer (19) and lock nuts (21) as shown to connect ends
of connecting rods (6) to main frame (1) and front frame (2).
b. If the holes do not line up during assembly, raise the connection point between the main frame
(1) and front frame (2) to adjust.
c. Tighten screws. Then tighten all screws installed in step 1 that were not tightened at that time.
d. Use hex screw (17), washer (19) and lock nuts (21) to attach leg lever (4) to front frame (2) and
insert lock pin with ring (24).
English Spanish French German Italian Dutch Czech Polish
7
Step 4
Step 3
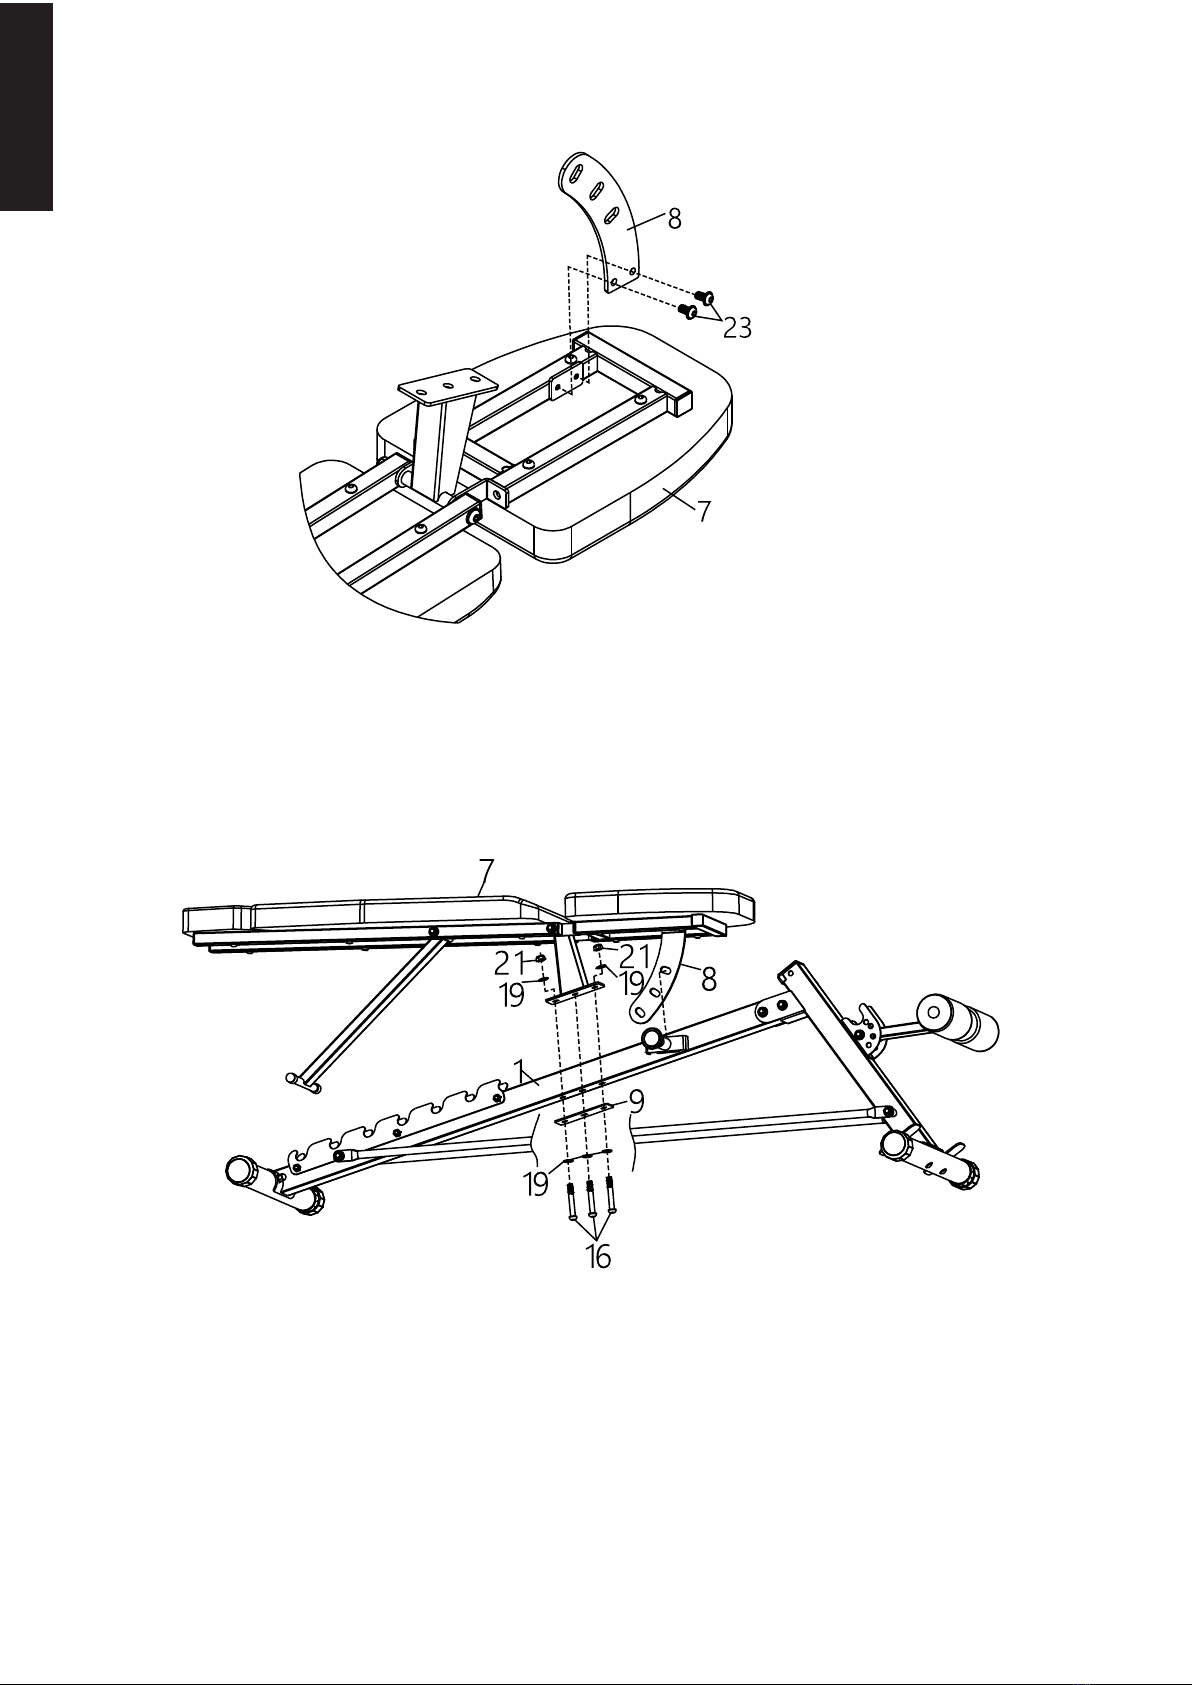
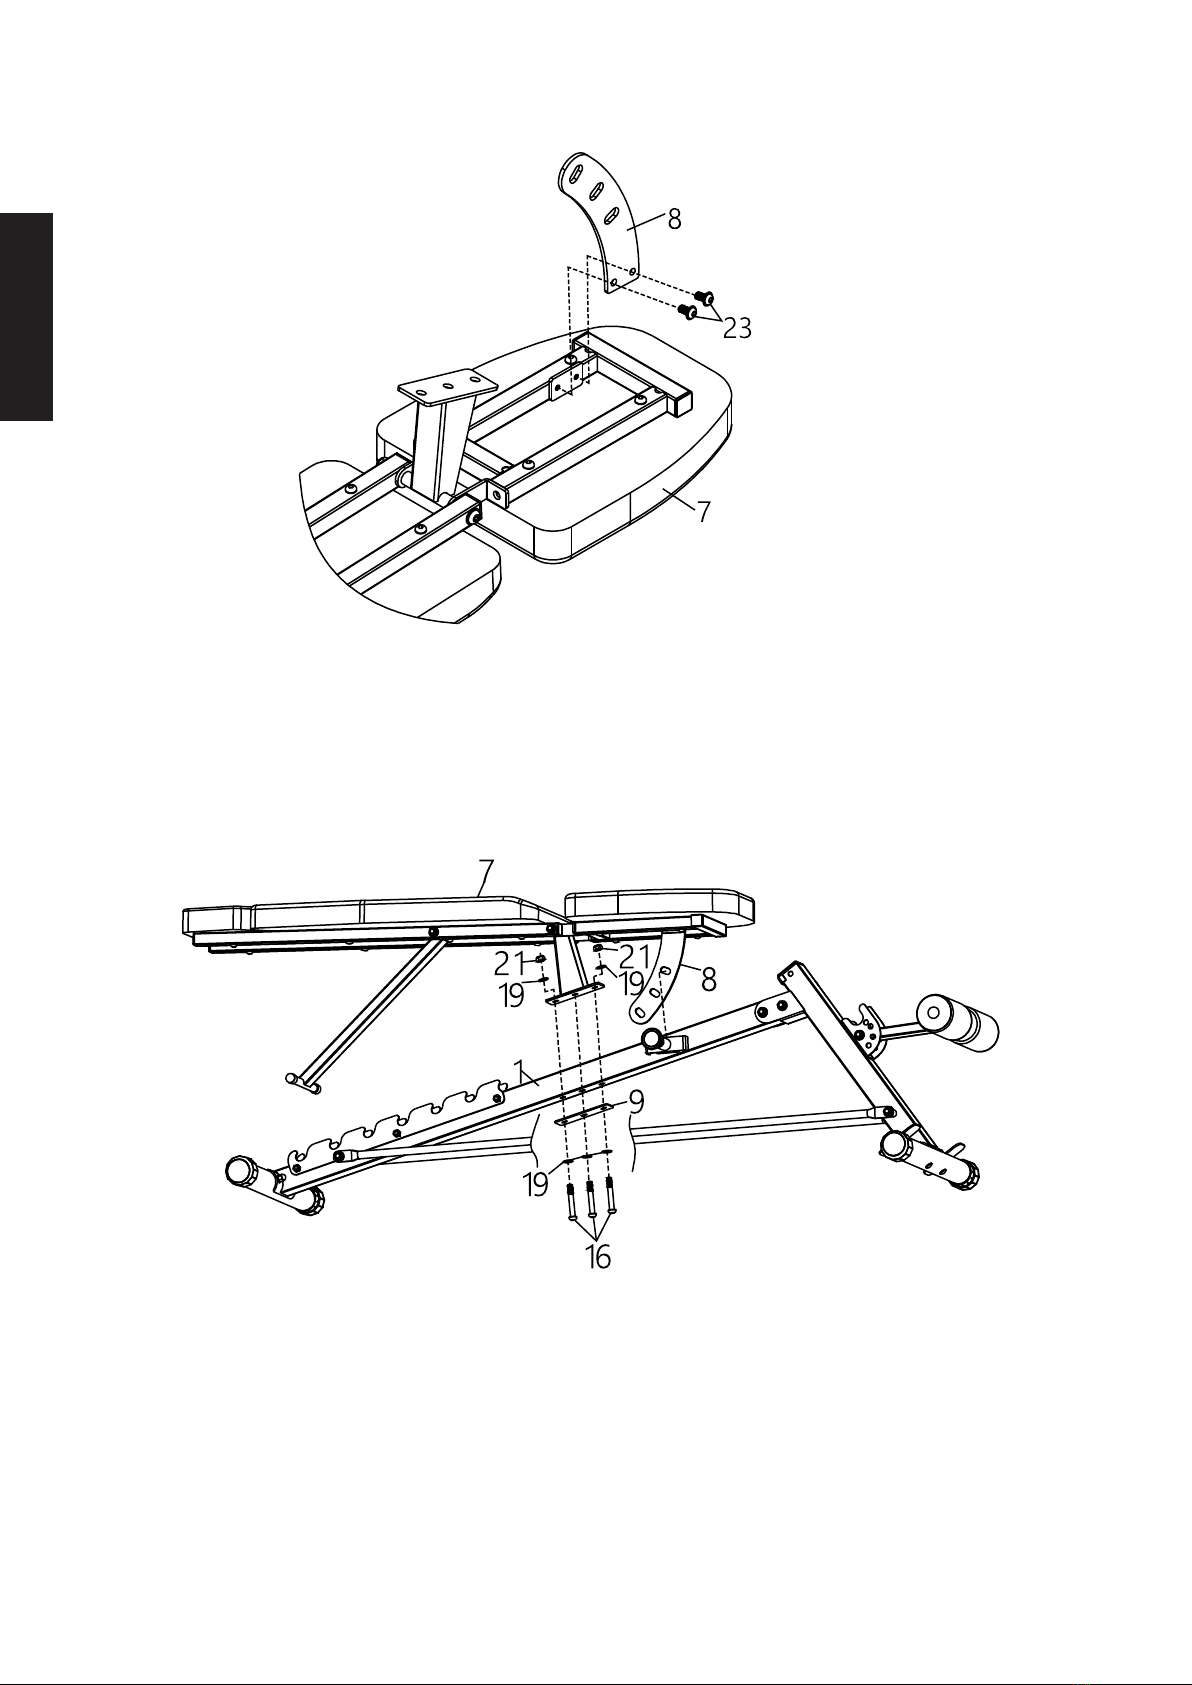
a. Lay seat assembly (7) flat, and attach adjustment plate (8) to seat assembly (7) using
hex screws (23). Tighten screws.
a. Pull the lock pin on main frame (1) and position the hole on adjustment plate (8) onto the
lock pin.
b. Line up holes on seat assembly (7) and main frame (1) as shown.
c. Attach using hex screws (16), flat washers (19), connecting plate (9) and lock nuts (21),
then tighten.
Polish Czech Dutch Italian German French Spanish English
8

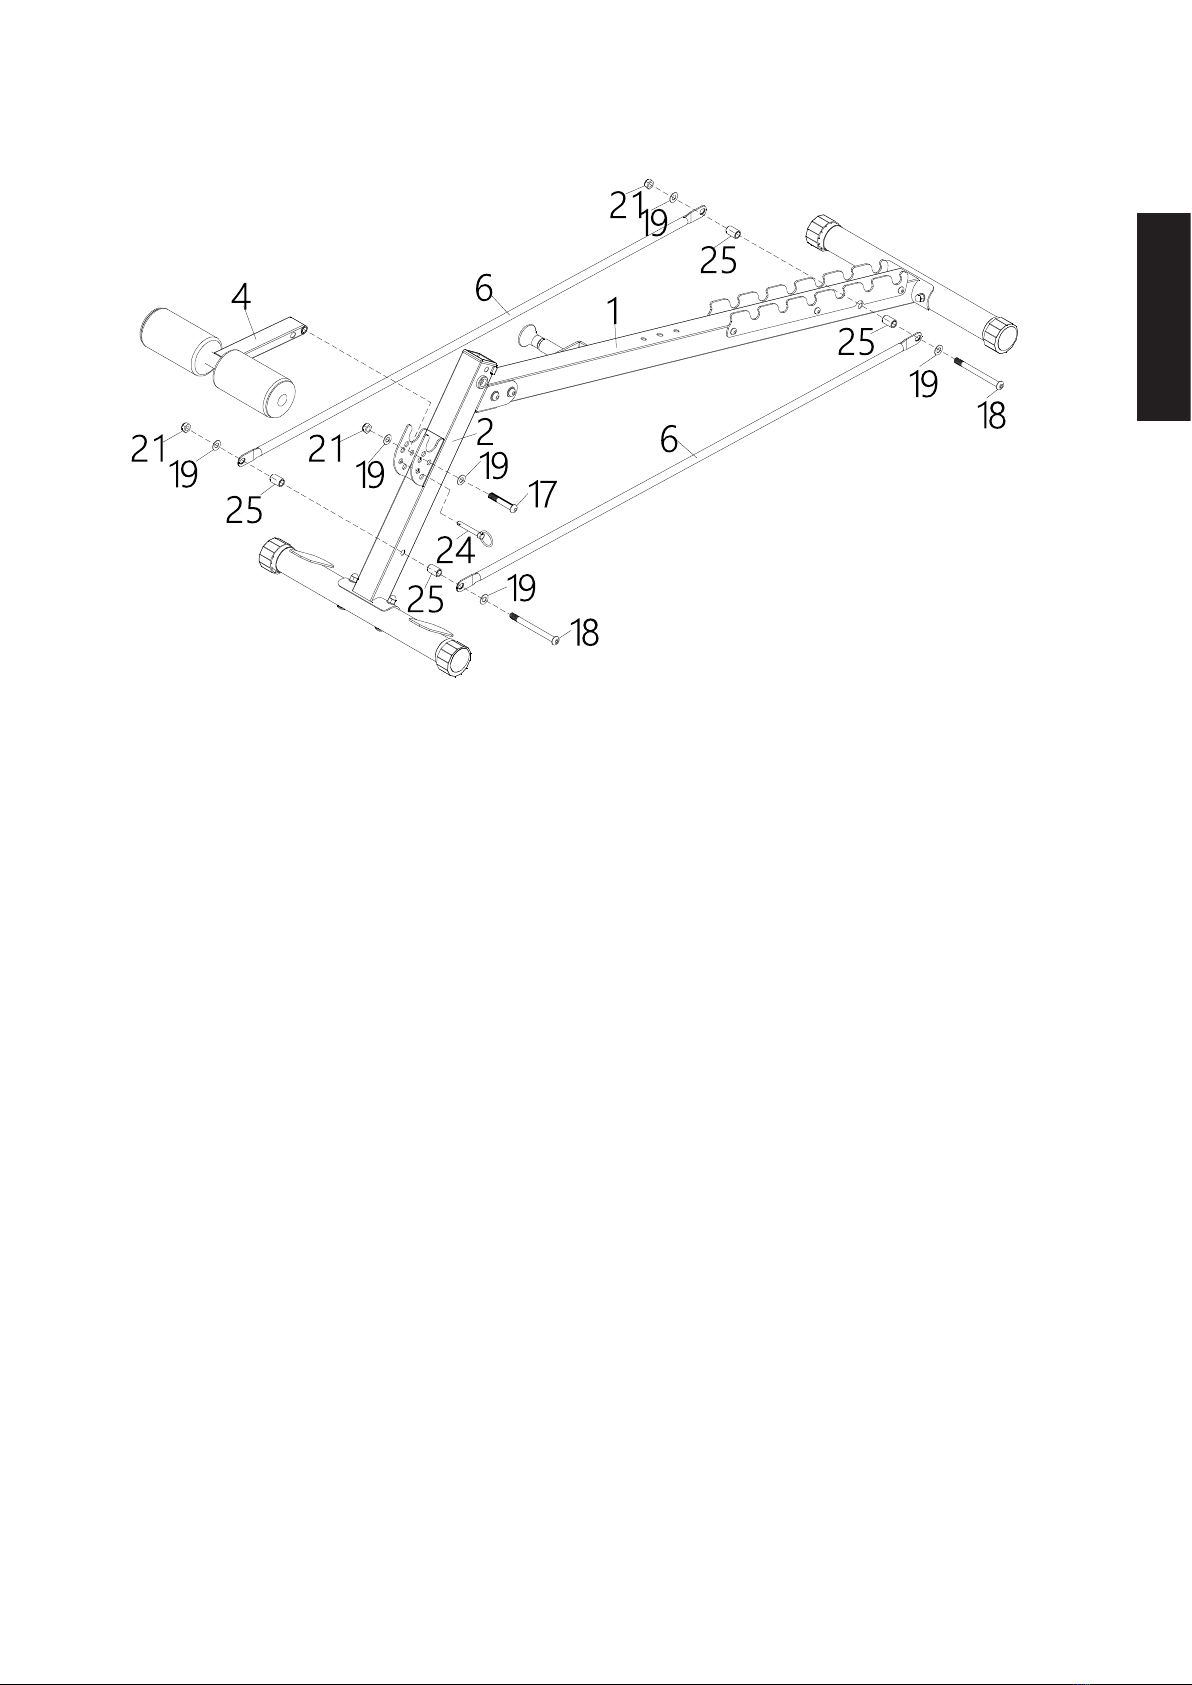
Step 5
Step 6
a. Use hex screws (22) and washers (20) to attach knee pads to adjustment frame (10)
and tighten.
a. Rotary knob (26) into front vertical frame (2). It need not be screwed in very
deeply.
b. Insert adjustment frame (10) into front frame (2) and use rotary knob (26) to
adjust height of adjustment frame.
c. Insert handles (12) into the openings on adjustment frame (10) as shown.
If product does not sit flat
after assembly, adjust
rotating foot knobs to level.
English Spanish French German Italian Dutch Czech Polish
9

Congratulations. You’re Finished!
Polish Czech Dutch Italian German French Spanish English
10
If you find the bench wobbling or
unbalanced, try the following fixes:
1. Loosen all screws, put some weight on the bench until it finds its own balance.
Then, tighten screws again.
2. Tighten screws in Step 1 (B) and Step 2 (A)
3. The four rubber caps on the bench feet work as floor levelers. Rotate them to
fit uneven surfaces.
LIMITED WARRANTY
Finer Form warrants that this product will be free from defects in materials and
workmanship for One Year. This warranty is not transferable.
All Finer Form products are manufactured and tested with the highest quality
standards and quality control processes. This warranty is limited to the
non-commercial use of Finer Form products purchased in the United States.
Finer Form will not be liable for any loss or damage, including incidental or
consequential damages of any kind, whether based upon warranty, contract or
negligence, and arising in connection with the sale, use or repair of the product.
This warranty does not cover damage caused by accident (including in transit),
repairs or attempted repairs by any person not authorized by Finer Form, or by
vandalism, misuse, abuse, or alteration.
©Finer Form. All rights reserved.
!

English Españo French German Italian Dutch Czech Polish
11
¡Gracias!
Antes de comenzar, queremos agradecerle que haya elegido un banco de ejercicio de
Finer Form. Sabemos que tiene muchas opciones de equipo para hacer ejercicio en
casa, y por eso, le agradecemos que se haya unido a tantas otras personas y que
nos haya elegido.
¡Atención al Cliente: Contáctenos primero!
- Si tiene preguntas sobre cómo armar el banco, faltan piezas o necesita piezas de
repuesto, ¡le ayudaremos!
- Es útil si puede incluir una foto o vídeo del problema que tenga
- Incluya su ID de pedido para poder ayudarle con aún mayor rapidez
Para vídeos sobre ejercicios, vea nuestro canal de Youtube: Finer Form
Visite finerform.com para ahorrar en otro equipo de ejercicios de calidad de gimnasio.

Polish Czech Dutch Italian German French Españo English
12
Seguridad del producto
ADVERTENCIA: Consulte a un médico antes de hacer ejercicio o de utilizar este
equipo. No se debe utilizar este ejercicio sin la revisión y aprobación de un médico.
Si tiene alguna de las siguientes enfermedades o utiliza alguno de los medicamentos
siguientes, no utilice este banco –
•Dosis alta de aspirina o medicamentos anticoagulantes
•Lesiones óseas que incluyen fracturas, fracturas no curadas, clavos quirúrgicos,
placas o apoyos, u osteoporosis
•Hernias
•Enfermedades cardíacas, debilidad de corazón o problemas de circulación para los
que tiene tratamiento
•Infecciones de oído o trastornos de equilibrio
•Lesiones de espalda, lesiones espinales, articulaciones extremadamente hinchadas o
esclerosis cerebral
•Embarazo
•Obesidad
El peso máximo soportado para este producto es 400 libras. Este equipo debe ser
utilizado solamente por una persona a la vez.
Este equipo ha sido diseñado para un uso seguro y responsable. Lea todas las
instrucciones y tenga precaución antes de utilizarlo. Deben utilizarse todos los
pernos, tuercas y tornillos incluidos en el paquete para armarlo. Consulte las
instrucciones de montaje a medida que vaya armando el equipo y luego siga estas
instrucciones de seguridad:
1) Consulte a su médico antes de utilizar este equipo de ejercicio.
2) Tenga extremado cuidado al subirse y bajarse del banco.
3) Deje de utilizar el equipo si tiene mareos, se siente aturdido o siente que va a
desmayarse. Luego contacte a su médico.
4) Deje de usar este equipo si siente cualquier tipo de dolor o molestia.
5) Lleve ropa adecuada para hacer ejercicio y fitness cuando utilice este equipo.
6) No permita que los niños manejen este equipo.
7) Mantenga a las mascotas alejadas del equipo mientras esté haciendo ejercicio.
8) Deje de utilizar este equipo si siente náuseas o se marea durante su sesión de
ejercicio.
9) No maneje el equipo si no está funcionando bien o si está dañado.
10) Coloque el banco en una superficie nivelada. No lo coloque fuera.
11) No coloque las manos, pies, dedos de la mano o de los pies cerca de piezas en
movimiento.
12) No introduzca ningún objeto en partes abiertas del banco.
13) No lleve puestas joyas largas, ropa holgada o floja, ni el pelo largo suelto
mientras haga ejercicio en el banco.
14) Nadie menor de 12 años debe intentar operar este banco

English Españo French German Italian Dutch Czech Polish
13
Diagrama del producto
Pata traser (5)
Pata delantera (3)
Palanca para
las piernas (4)
Estructura vertical
delantera (2)
Estructura de ajuste (10)
Mango (12) Cojines para
las rodillas (11)
Conjunto del asiento (7)
Barras de
conexión (6)
Placa de
ajuste (8)
Placa de
conexión (9)
Estructura
principal (1)

Polish Czech Dutch Italian German French Españo English
14
Estructura principal x 1
LISTA DE PIEZAS
Pieza1
Pieza 2
Pieza 3 Pieza 4
Pieza 5 Pieza 6
Pieza 7 Pieza 8
Pieza 9 Pieza 10
Pieza 11 Pieza 12
Estructura vertical delantera x 1
Pata delantera x 1 Palanca para las piernas x 1
Pata trasera x 1 Barra de conexión x 2
Ensamblaje del asiento x 1 Placa de ajuste x 1
Placa de conexión x 1 Estructura de ajuste x 1
Cojines para las rodillas x 2 Mangos x 2

English Españo French German Italian Dutch Czech Polish
15
LISTA DE TORNILLOS LIST
Pieza 13 Pieza 14 Pieza 15 Pieza 16
Pieza 17 Pieza 18 Pieza 19 Pieza 20
Pieza 21 Pieza 22 Pieza 23 Pieza 24
Pieza 25 Pieza 26 Pieza 27 Pieza 28
Pieza 29
Perno de carro M 8*60 x 4 Arandela curva 8 x 4 Tuerca de tapa M 8 x 4
Tornillo hexagonal M 10*70 x 5
Tornillo hexagonal M
10*60 x 1 Tornillo hexagonal M
10*15 x 2 Arandela 10 x 15 Arandela 8 x 4
Tuerca M 10 x 7 Tornillo hexagonal M
8*35 x 4
Tornillo hexagonal M
8*15 x 2 Clavija con anillo 10 x1
Manguito x 4 Mando giratorio x 1 Llave hexagonal 5 mm x 1 Llave hexagonal 6 mm x 1
Llave inglesa 14-17 x 1
Le recomendamos que apriete todos los tornillos después de haber completado todos
los pasos, en vez de ir apretándolos en cada paso.
ANTES DE ARMAR EL BANCO
!
Polish Czech Dutch Italian German French Españo English
16
Paso 1
a. Utilice los pernos de carro (13), arandelas curvas (14) y tuercas de tapa (15) para fijar
la pata delantera (3) a la estructura frontal (2).
b. Utilice los pernos de carro (13), arandelas curvas (14) y tuercas de tapa (15) para fijar
la pata trasera a la estructura principal.
c. Apriete todas las tuercas y pernos para las patas delantera y trasera.
d. Utilice los tornillos hexagonales de cabezal redondo (16), arandelas (19) y tuercas (21)
para conectar la estructura delantera (2) y la estructura principal (1).
Nota: NO apriete estos tornillos todavía.
INSTRUCCIONES DE MONTAJE
English Españo French German Italian Dutch Czech Polish
17
Paso 2
a. Utilice el tornillo hexagonal (18), mando de giro (26), arandela (19) y tuercas (21) como se
muestra en el dibujo para conectar los extremos de las barras de conexión (6) a la estructura
principal (1) y a la estructura delantera (2).
b. Si los orificios no están alineados durante el ensamblaje, eleve el punto de conexión entre la
estructura principal (1) y la estructura delantera (2) para ajustarlos.
c. Apriete los tornillos. Luego, apriete todos los tornillos instalados en el paso 1 que no estaban
apretados hasta ahora.
d. Utilice el tornillo hexagonal (17), arandela (19) y tuercas (21) para sujetar la palanca para las
piernas (4) a la estructura delantera (2) e inserte la clavija con anillo (24).
Polish Czech Dutch Italian German French Españo English
18
Paso 4
Paso 3
a. Coloque el ensamblaje del asiento (7) plano, y sujete la placa de ajuste (8) al
ensamblaje del asiento (7) con tornillos hexagonales (23). Apriete los tornillos.
a. Tire de la clavija en la estructura principal (1) y coloque el orificio en la placa de ajuste
(8) en la clavija.
b. Alinee los orificios en el ensamblaje del asiento (7) y la estructura principal (1) según
se muestra.
c. Fíjelo utilizando los tornillos hexagonales (16), arandelas planas (19), placa de
conexión (9) y tuercas (21), y luego apriete.
Table of contents
Languages:
Other Finer Form Home Gym manuals

Popular Home Gym manuals by other brands


Sportplus
Sportplus SP-MR-011 user manual

Impex
Impex Iron Grip Strength IGS-705 owner's manual

Skywalker
Skywalker SJG201 Assembly installation, care maintenance and user instructions manual

Impex
Impex POWERHOUSE PHC 2000 owner's manual

Nautilus
Nautilus ONE CP02 owner's manual

Keiser
Keiser Infinity Series Operation & maintenance manual