Bluetti AC500 User manual

How to build
a partial home backup system with
AC500+B300S
User Manual

How to build a partial home backup system with
AC500+B300S
Entry type:FAQ, Entry ID:10220706,Entry date:14/11/2022

Franch
Germany
Netherlands
Thank You!
Thank you for making BLUETTI a part of your family.
From the very beginning, BLUETTI has tried to stay true to a sustainable future
through green energy storage solutions for both indoor and outdoor use while
delivering an exceptional eco-friendly experience for our homes and our world.
That's why BLUETTI makes its presence in 70+ countries and is trusted by
millions of customers across the globe.

1. 120 Volts AC500+B300S Backup System
2. 240 Volts AC500+B300S Backup System
3. Accessories
3.1 Transfer switch
3.2 50A AC Charging Cable
3.3 BLUETTI AC500 split-phase output cable
3.4 BLUETTI AC500 split-phase AC charging cable
3.5 Communication cable for split-phase function
3.6 NEMA 14-50R socket
3.7 NEMA 14-50P to SS2-50R extension cord
3.8 Circuit breaker & protection box
3.9 Solar extension cable
4. How to install Reliance Controls
Please refer to Reliance Controls website: www.reliancecontrols.com
4.1 How to install Reliance Controls ProTran2 - Part1, Tools and Planning
4.2 How to install Reliance Controls ProTran2 - Part2, Mounting
4.3 How to install Reliance Controls ProTran2 - Part3, Wiring
4.4 How to install Reliance Controls ProTran2 - Part4, Replacing Circuit Breakers
4.5 How to install Reliance Controls ProTran2 - Part5, Installing The Power
Inlet Box
4.6 How to install dd Controls ProTran2 - Part6, How To Operate
5. More information:
01
04
11
11
11
12
12
13
13
13
14
15
15
15
15
16
16
16
16
16
16
Contents

Accessories Qty.
Transfer switch: Reliance TRK0505BR 1
NEMA 14-50P to SS2-50R cord 1
AC charging cable 1
How to build a partial home backup system with AC500+B300S (Only for US standard) 01
Declaration
•The installation should be performed by a licensed electrician. Improper
installation may result in death or serious injury and property damage.
•This document is provided for reference purpose ONLY and does not constitute
legal advice. Please consult the local licensed electrician for details.
BLUETTI shall not be liable for any damage or injury caused by improper
installation of the backup system.
1. 120 Volts AC500+B300S Backup System
AC500+B300S's Machine Type is set to "Single Phase" by default. DO NOT change
this setting if you are operating a single AC500+B300S set.
To build the backup system, you need the following:

How to build a partial home backup system with AC500+B300S (Only for US standard)
02
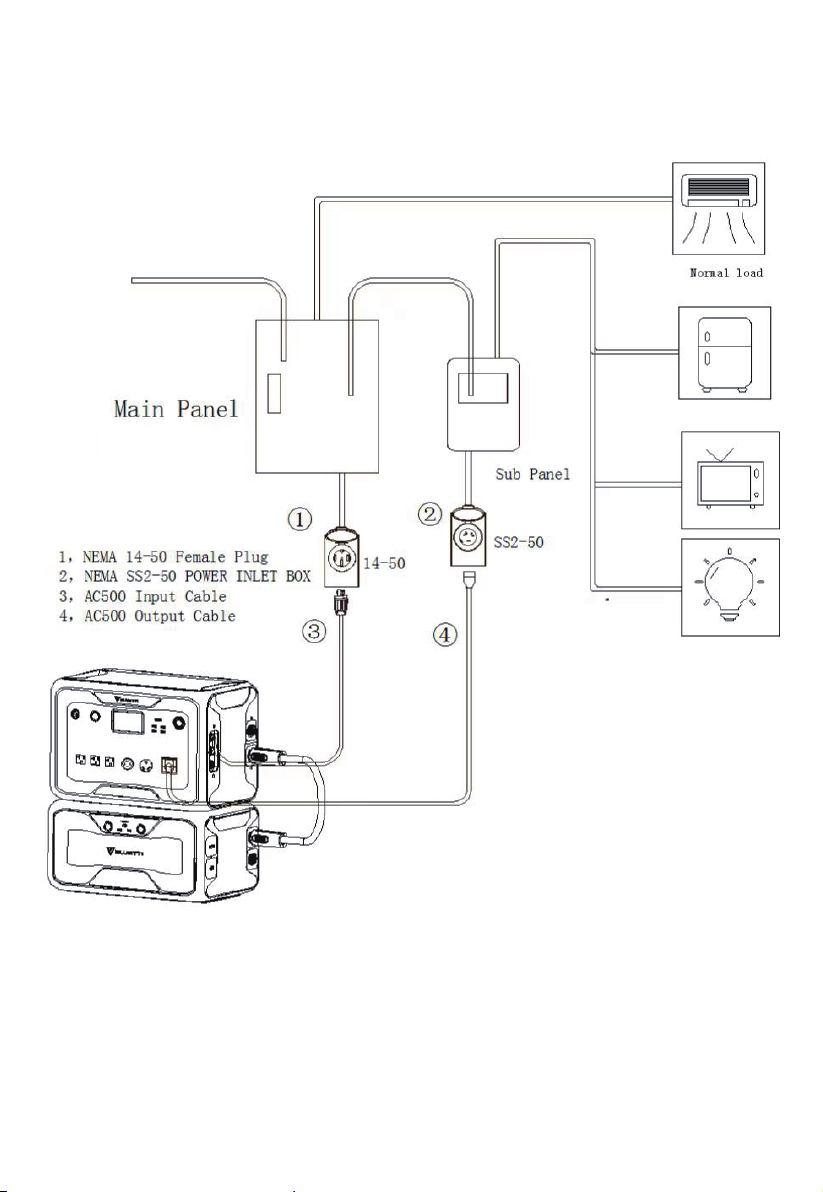
Refer to the diagram below for proper installationof AC500+B300S
backup system.
Essential Load

How to build a partial home backup system with AC500+B300S (Only for US standard) 03
NOTE:
•The backup system must be properly installed by a licensed electrician.
•Please check the voltage at outlets before plugging in your
household appliances.
•It is a electrical schematic. For the actual wiring diagram, please refer to
Reliance PRO/TRAN2 installation instructions.
Essential
Load

Accessories Qty.
Transfer switch: Reliance TRK0505BR 1
AC500 split-phase output cable 1
NEMA 14-50 socket 1
AC500 split phase AC charging cable 1
How to build a partial home backup system with AC500+B300S (Only for US standard)
04
2. 240 Volts AC500+B300S Backup System
You can build the 240V Split Phase System by pairing two sets of AC500+B300S
together. The system also has double the available output power and capacity.
Besides TWO sets of AC500+B300S, you also need the following:
Before installing the Reliance Controls transfer switch system, please make a
emergency energy plan that includes which appliances you need during a power
outage. It is highly recommended to “balance the load” between the two phases of
transfer switch, that’s to say, do not connect high-wattage appliances centrally to a
single AC500+B300S set.

How to build a partial home backup system with AC500+B300S (Only for US standard) 05
Split Phase Backup System
Caution! The backup split phase system must be properly installed by a
licensed electrician.
How to configure the AC500+B300S sets:
Step 1: Turn off both AC500+B300S sets.
Step 2: Connect AC500+B300S sets to transfer switch via the AC500 split-phase
output cable. One NEMA 14-50 plug goes to a set.
Step 3: Connect two AC500 units via the communication cable.
Step 4: Turn on either AC500+B300Sset.
Essential Load

How to build a partial home backup system with AC500+B300S (Only for US standard)
06
Step 5: Go to “Settings” and tap “Next”.
Step 6: Tap “Single Phase”, the machine type option pops up and select
“Split phase”.
•Machine Type: Select Split Phase
Step 7: Select the “Master” in the Machine Address pop up.
Step 8: Turn on the other AC500+B300S set. Repeat step 5 and 6 to set its machine
type to “Split phase”.

How to build a partial home backup system with AC500+B300S (Only for US standard) 07
Step 9: Select the “Slave” in the Machine Address pop up.
If the connection fails, clear the alarm history, wait for a moment or then try again.
Please watch the video from: https://www.youtube.com/watch?v=quvcX8mEUCo
NOTE:
•Disconnect the AC charging cables from AC500+B300S sets before connecting to
the transfer switch.
•The split phase system can be controlled ONLY on the “Master” set.
•If one of the AC500+B300S sets is out of power, the split phase system
fails automatically.
NOTE:
•The backup system must be properly installed by a licensed electrician.
•Please check the voltage at outlets before plugging in your household appliances.
•It is a electrical schematic. For the actual wiring diagram, please refer to Reliance
PRO/TRAN2 installation instructions.
•In the main panel, two Neutral/Ground bus bars have been connected together
with copper strips.

How to build a partial home backup system with AC500+B300S (Only for US standard)
08
Connect the AC500+B300S sets to the main panel
Charge the 240V split phase system with AC500 split phase AC charging cable. Plug
the cable to a NEMA 14-50 socket (240V )and the other two connectors into AC500s’
AC input ports.
The AC input ports should be connected to L1/N/PE and L2/N/PE, respectively. The
current capacity of AC input plug shall be ≥ 50A.
WRONG CONNECTION
Warning! DO NOT charge AC500+B300S with standard AC charging cable in the
split phase system, as this may cause damage to the batteries inside B300s and
invalidate your warranty.

How to build a partial home backup system with AC500+B300S (Only for US standard) 09
L: Live wire N: Neutral wire

How to build a partial home backup system with AC500+B300S (Only for US standard)
10
NOTE:
The split phase system supports charging via solar panels. You can charge it by PV
and the AC500 split-phase AC charging cable simultaneously. (AC input onlythrough
Essential
Load

How to build a partial home backup system with AC500+B300S (Only for US standard) 11
3. Accessories
3.1 Transfer switch
Recommendation: Reliance Controls TRK0505BR transfer switch.
https://www.bluettipower.com/collections/accessories
3.2 50A AC Charging Cable
https://www.bluettipower.com/collections/accessories

How to build a partial home backup system with AC500+B300S (Only for US standard)
12
3.3 BLUETTI AC500 split-phase output cable
https://www.bluettipower.com/collections/accessories
3.4 BLUETTI AC500 split-phase AC charging cable
https://www.bluettipower.com/collections/accessories

How to build a partial home backup system with AC500+B300S (Only for US standard) 13
3.5 Communication cable for split-phase function
Please buy it from BLUETTI official store.
https://www.bluettipower.com/products/communication-cable-for-split
-phase-function
3.6 NEMA 14-50R socket
For charging the 240V AC500+B300S split phase system.
https://www.bluettipower.com/collections/accessories
3.7 NEMA 14-50P to SS2-50R extension cord
For connecting AC500+B300S to the sub panel.
https://www.bluettipower.com/collections/accessories

How to build a partial home backup system with AC500+B300S (Only for US standard)
14
3.8 Circuit breaker & protection box
If you have a residential solar array with a voltage of 12V-150V, you’re strongly
recommended to use a DC circuit breaker panel to enable or disable solar charging.
NOTE : If there are two solar panel arrays with a total open circuit voltage of 12-150V,
you also need two 2P 16A DC circuit breakers.
Circuit breaker: https://www.amazon.com/gp/product/B07GR32KCT/ref=ppx_yo_dt_
b_asin_title_o00_s00?ie=UTF8&psc=1
Protection box: https://www.amazon.com/gp/product/B07S75TV3V/ref=ppx_yo_dt_b_
asin_title_o00_s00?ie=UTF8&psc=1

How to build a partial home backup system with AC500+B300S (Only for US standard) 15
3.9 Solar extension cable
Recommendation: iGreely 12 AWG solar extension cable
https://www.amazon.com/gp/product/B08KZNTYP5/ref=ppx_yo_dt_b_asin_title_o00_
s00?ie=UTF8&th=1
NOTE: The length of cable is based on the actual demand.
4. How to install Reliance Controls
Please refer to Reliance Controls website: www.reliancecontrols.com
4.1 How to install Reliance Controls ProTran2 - Part1, Tools
and Planning
https://www.youtube.com/watch?v=xTqjwt6WJ7o&list=PLpYCE0n7d22iDNwpVnOF9
HULSUYBBRY86

How to build a partial home backup system with AC500+B300S (Only for US standard)
16
4.2 How to install Reliance Controls ProTran2 - Part2, Mounting
https://www.youtube.com/watch?v=wNbBHVHgw0Y&list=PLpYCE0n7d22iDNwpVnO
F9HULSUYBBRY86&index=2
4.3 How to install Reliance Controls ProTran2 - Part3, Wiring
https://www.youtube.com/watch?v=TKruj9BpZM8&list=PLpYCE0n7d22iDNwpVnOF9
HULSUYBBRY86&index=3
4.4 How to install Reliance Controls ProTran2 - Part4, Replacing
Circuit Breakers
https://www.youtube.com/watch?v=lkOuauT-YP8&list=PLpYCE0n7d22iDNwpVnOF9
HULSUYBBRY86&index=4
4.5 How to install Reliance Controls ProTran2 - Part5, Installing
The Power Inlet Box
https://www.youtube.com/watch?v=0M8sYRhEVPY&list=PLpYCE0n7d22iDNwpVnOF
9HULSUYBBRY86&index=5
4.6 How to install dd Controls ProTran2 - Part6, How To Operate
https://www.youtube.com/watch?v=O4GA9AK8Tmo&list=PLpYCE0n7d22iDNwpVnO
F9HULSUYBBRY86&index=6
5. More information:
Website: www.bluettipower.com Email: service@bluettipower.com
Other manuals for AC500
2
This manual suits for next models
1
Table of contents