blupura COOL1 Specification sheet

1
6
0
4
5
5
1
7
0
5
E
N
Before Install or use the product read to the precautions and
general recommendations inside.
COOL1
U
s
e
&
M
a
i
n
t
e
n
a
n
c
e
M
a
n
u
a
l

3
Precautions and general recommendations
This appliance is intended to be used in household and similar
applications such. Appliance for internal use only. Place the unit
away from water jets.
Always connect the water cooler to a water main that supplies
drinking water only.
Before each installation, the unit must be sanitized by an
authorized technician.
After installation, ensure that the unit is not resting on the power
cable.
Check that the unit is level and that it is resting on a floor with
sufficient load-bearing capacity, in an environment that is suitable for its dimensions and its use.
Before any maintenance or cleaning operation is carried out, remove the plug from the socket or
disconnect the power supply.
Ensure that the product is not sited close to sources of heat.
To guarantee adequate ventilation, leave at least 10 cm of space around the unit.
Install the product in a clean, dry, well-ventilated environment. The product is designed to
function in environments with a temperature range of between 5°C and 32°C - Climate Class N.
Take care not to damage the cooling fluid circuit: it is filled with R290, which is a highly flammable
gas. It is essential to ensure that the tubes of the refrigerant circuit are not damaged.
Ensure that it is possible to disconnect the power supply either by removing the plug or via a two-
pole circuit-breaker, with an opening distance of the contacts that allows complete disconnection
in the conditions of overvoltage category III, placed upstream of the plug.
Check that the voltage shown on the serial number plate corresponds to the voltage being
supplied at the installation site.
The unit must not be cleaned with a water jet. Do not position other electrical equipment in the
immediate vicinity of the water cooler.
Turn off the main water inlet tap if the unit is not to be used for a long period.
Keep the areas surrounding the unit dry to avoid the risk of people slipping.
If the supply cord is damaged, it must be replaced by the manufacturer, its service agent
or similarly qualified person in order to avoid a hazard. Do not use extension leads or
adapters.
This appliance is intended to be used by persons (including children aged from 8 years)
with reduced physical, sensory or mental capabilities, or lack of experience and knowledge,
provided that they have been given supervision or instruction concerning use of the
appliance by a person responsible for their safety. Children should be supervised to ensure
that they do not play with the appliance. The appliance is only to be installed in locations
where it can be overseen by trained personnel.
The Appliance shall be protected by a ground-fault circuit interrupter.
This equipment is to be installed in compliance with the local plumbing codes. Water
pipe connections and fixtures directly connected to a potable water supply shall be sized,
installed, and maintained in accordance with federal, state, and local codes.
This publication is based on information available when approved for printing. Continuing design
refinements could cause changes that may not be included in this publication.

4
Index
• BEFORE INSTALLING THE WATER COOLER 5
• RECOMMENDATIONS FOR SAFEGUARDING THE ENVIRONMENT 6
• CERTIFIED 7
• ASSOCIATIONS 8
• INTERNATIONAL AWARDS 8
• DESCRIPTION OF THE UNIT 9
• KEYPAD DESCRIPTION 12
• TECHNICAL FEATURES 13
• INSTALLATION 16
• INSTALLATION OF THE CO2CYLINDER (FIZZ MODEL) 20
• HANDLING THE GAS CYLINDERS 21
• SANITIZATION – NOTES 24
• ORDINARY MAINTENANCE 25
• SERVICE HISTORY 26
• WARRANTY CONDITIONS 27

5
Before installing the water cooler
Congratulations for choosing a BLUPURA product.
We have designed and manufactured this product with great care to ensure that it
will dispense water of the highest quality.
In order to get the most out of your water cooler, please read the instructions in
this manual and retain the manual for future reference.

6
Recommendations for safeguarding the environment
Packaging materials
The packaging materials are 100% recyclable.
Please follow the local guidelines on waste
disposal. For safety reasons keep the packaging
material out of the reach and sight of children.
Scrappage
The water cooler is made using recyclable material.
This unit is marked in compliance with European Directive 2012/19/UE
on Waste Electrical and Electronic Equipment (WEEE). By ensuring that
the product is scrapped correctly, you are helping to prevent potential
negative consequences for the environment and for health. The symbol
on the unit indicates that the product should not be treated as domestic waste
but should be taken to a dedicated recycling centre for electrical and electronic
equipment. Immediately prior to scrapping, cut off the power cable.
For more information on the treatment, recovery and recycling of this product,
please contact the appropriate local office, the waste disposal service or the
reseller from which the product was purchased.
Information on the natural, eco-friendly refrigerant gas used in
this cooler
This product contains no CFCs or HFCs, which contribute to global warming.
Indeed, it is the first water cooler on the market to use natural refrigerant.
The refrigerating system is filled with HC R290 – Propane: a natural gas that does
not contribute to global warming and that, thanks to its specific characteristics,
allows for substantial energy savings to be made.

7
Certified
See official list
Materials compliant for contact with drinking water
This unit is intended for the dispensing of drinking water, and so the materials
that enter into direct contact with water meet the criteria for food-grade
components pursuant to the current legislation. In addition, the unit is
manufactured in compliance with Italian Ministerial Decrees 174 of 06/04/2004
and 25 of 07/02/2012.
Electrical safety
This water cooler is designed, manufactured and marketed in compliance with:
• the safety objectives of the Machinery Directive 2006/42/CE;
• the protection requirements of the Electromagnetic Compatibility Directive
2014/30/EU.
The electrical safety of the product is ensured only when it is properly connected
to an efficient, legally compliant grounding circuit.
D.M. 174
1
0
0
%
M
A
D
E
I
N
I
T
A
L
Y
C
E
R
T
I
F
I
C
A
T
E
I
T
P
I
rosso 032 c
UNI EN ISO 9001:2015
UNI EN ISO 14001:2015
ANSI/UL 399

8
Associations
International Awards
2015 - BEST PROMOTION OF HEALTH AND HYDRATION
EUROPEAN AQUA AWARDS 2015, ROME
2015 - BEST ENVIRONMENTAL PRACTICE/GREEN INITIATIVE
EUROPEAN AQUA AWARDS 2015, ROME
2014 - BEST PROMOTION OF HEALTH AND HYDRATION
EUROPEAN AQUA AWARDS 2014, BUDAPEST
2013 - BEST PRODUCT INNOVATION
EUROPEAN AQUA AWARDS 2013, BERLIN
2012 - BEST ENVIRONMENTALLY FRIENDLY PRACTICE
EUROPEAN AQUA AWARDS 2012, ISTANBUL
2011 - BEST PRODUCT DESIGN/INNOVATION
EUROPEAN AQUA AWARDS 2011, ODESSA
2010 - BEST ENVIRONMENTALLY FRIENDLY PRACTICE
EUROPEAN AQUA AWARD 2010, PRAGUE
9
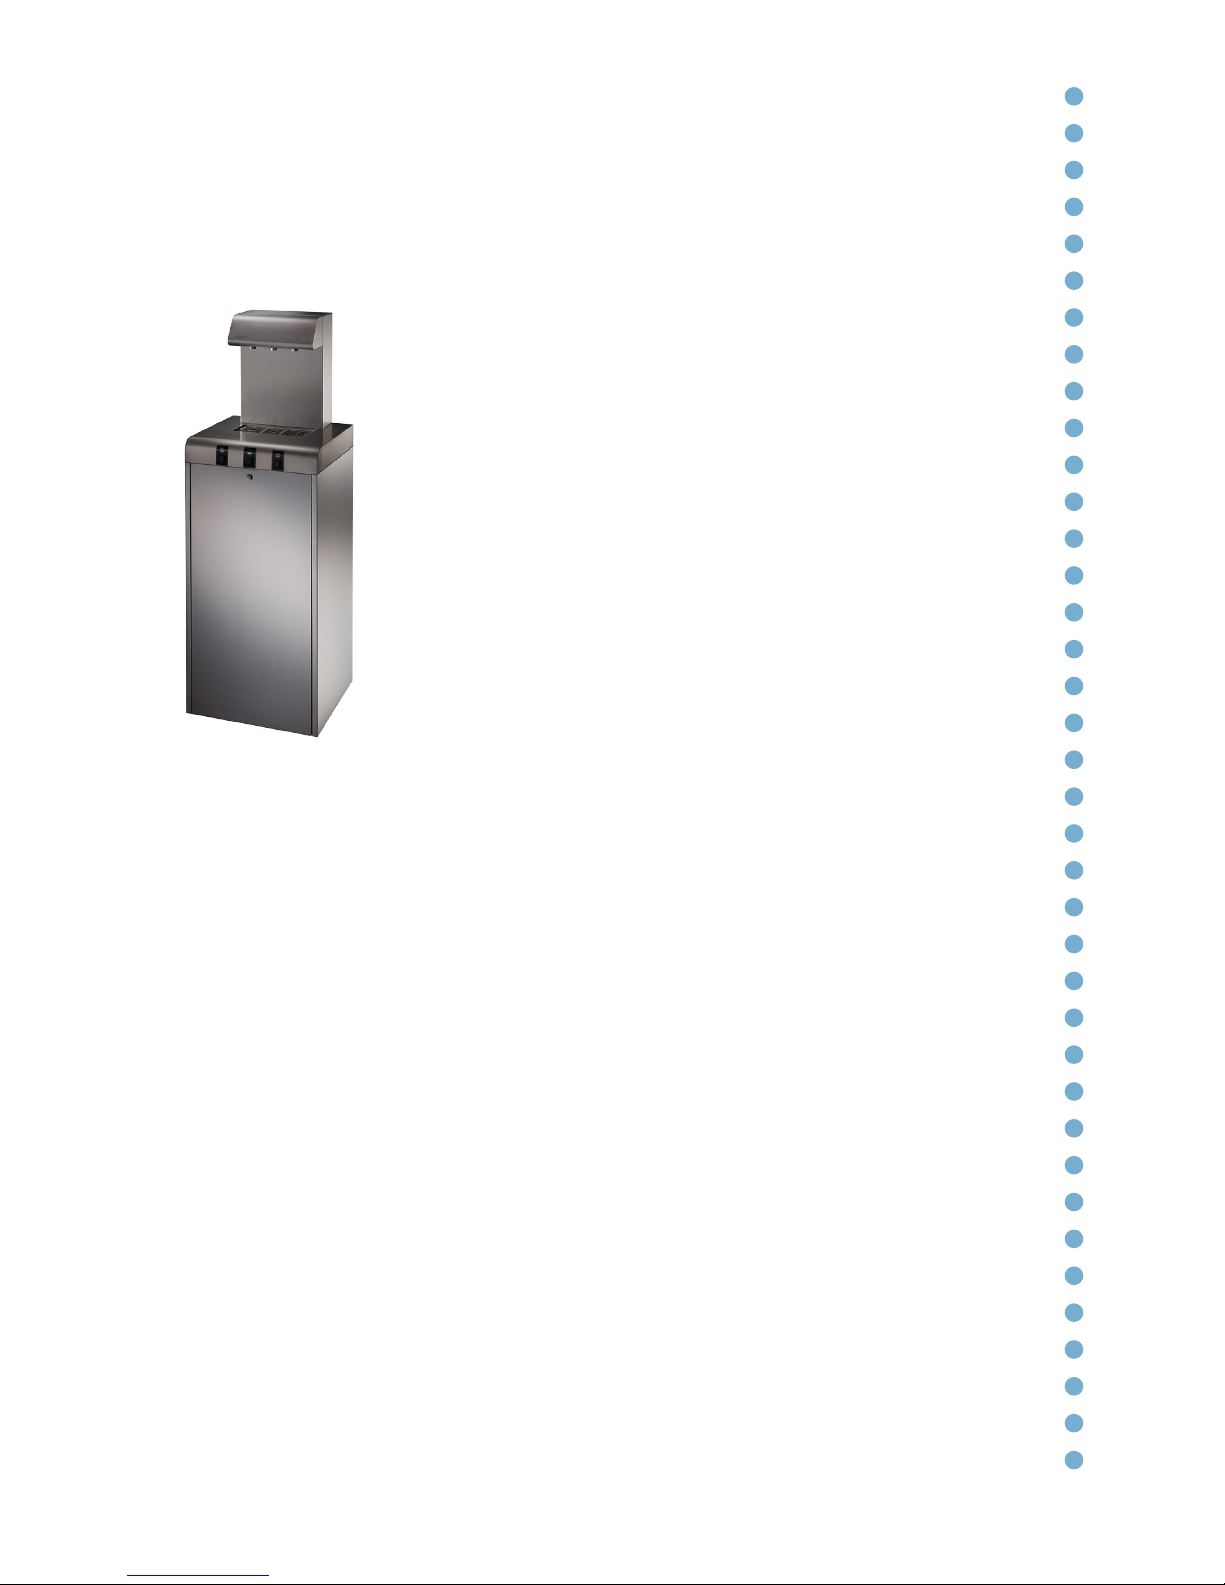
Description of the unit
COOL1 - The best solution for canteens, self service areas, schools, gyms.
The main features of the unit are as follows:
• Refrigerant system with natural gas.
• Modern design and and main body in stainless
steel.
• High-insulation ice bank, with a high output of cold,
still and sparkling water, available in versions 150 lt/hr and
80 lt/hr.
• 3 dispensing options (FIZZ model): cold water +
room-temperature water + cold sparkling water.
• Professional stainless-steel carbonator.
• Electromechanical dispensing buttons.
• Front opening and internal space for UV IN filters
and CO2cylinder.

10
Frontal view
1
4
3
2
1
7
6
5
2
3
4
5
6
7
Cold sparkling water dispensing
nozzle (detachable)
Room temperature water
dispensing nozzle (detachable)
Drip tray with grid
Cold water dispensing nozzle
(detachable)
Dispensing buttons
Front panel security lock
Adjustable feet

11
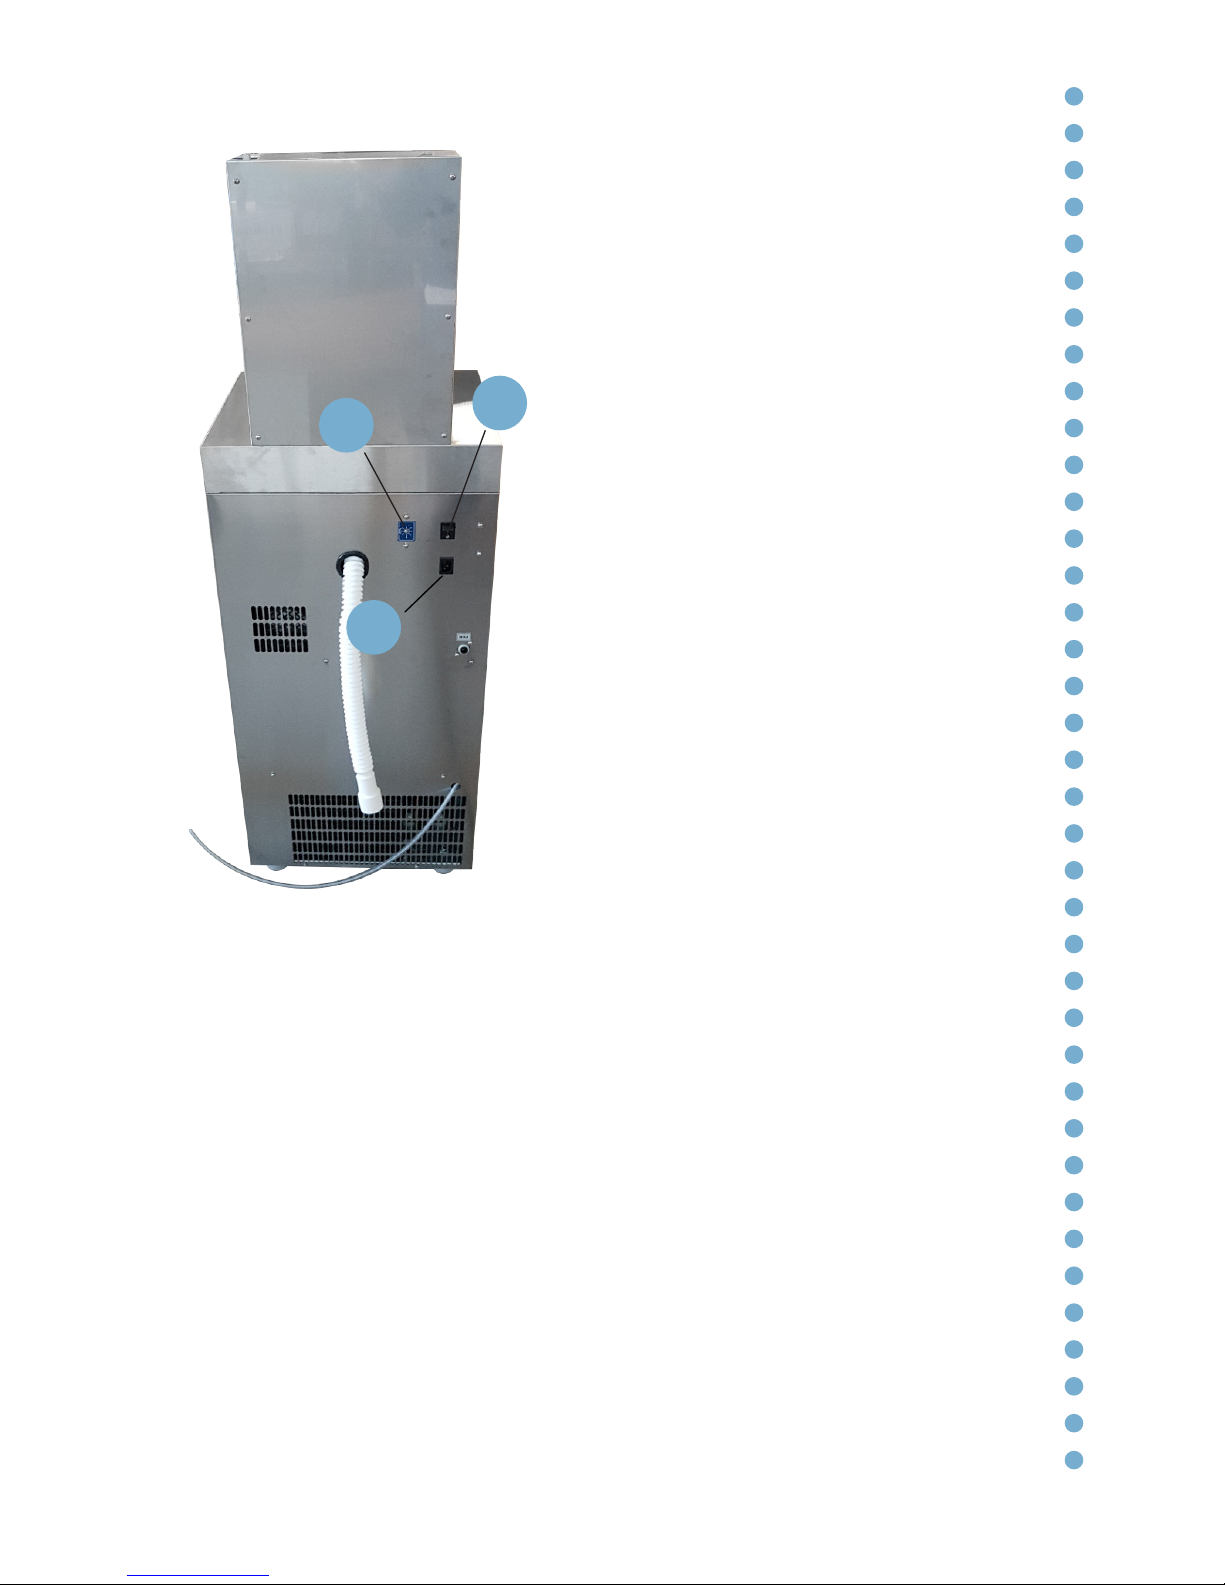
Rear view
3
2
1
6
5
4
1
4
5
6
3
Ice bank overflow waste pipe
(Ø8mm)
Power button
Adjustable thermostat
Drinkable water inlet pipe joint
(Ø8mm)
Drip tray waste pipe (Ø40mm)
2
IEC power cord plug

12
P. 3
P. 2
P. 5 P. 7
P. 4 P. 6
The water cooler features a mechanical button keypad.
FUNCTIONS OF THE BUTTONS:
- SPARKLING WATER PRESSURE-ACTIVATED DISPENSING button (P.3)
- ROOM-TEMPERATURE WATER PRESSURE-ACTIVATED DISPENSING button
(P.5)
- COLD WATER PRESSURE-ACTIVATED DISPENSING button (P.7)
The water is dispensed while pressure is being applied to the button.
- SPARKLING WATER START-STOP DISPENSING button (P.2)
- ROOM-TEMPERATURE WATER START-STOP DISPENSING button (P.4)
- COLD WATER START-STOP DISPENSING button (P.6)
Pressing the button causes the water to be dispensed. Pressing the same button
again stops the dispensing of the water.
Keypad description
13
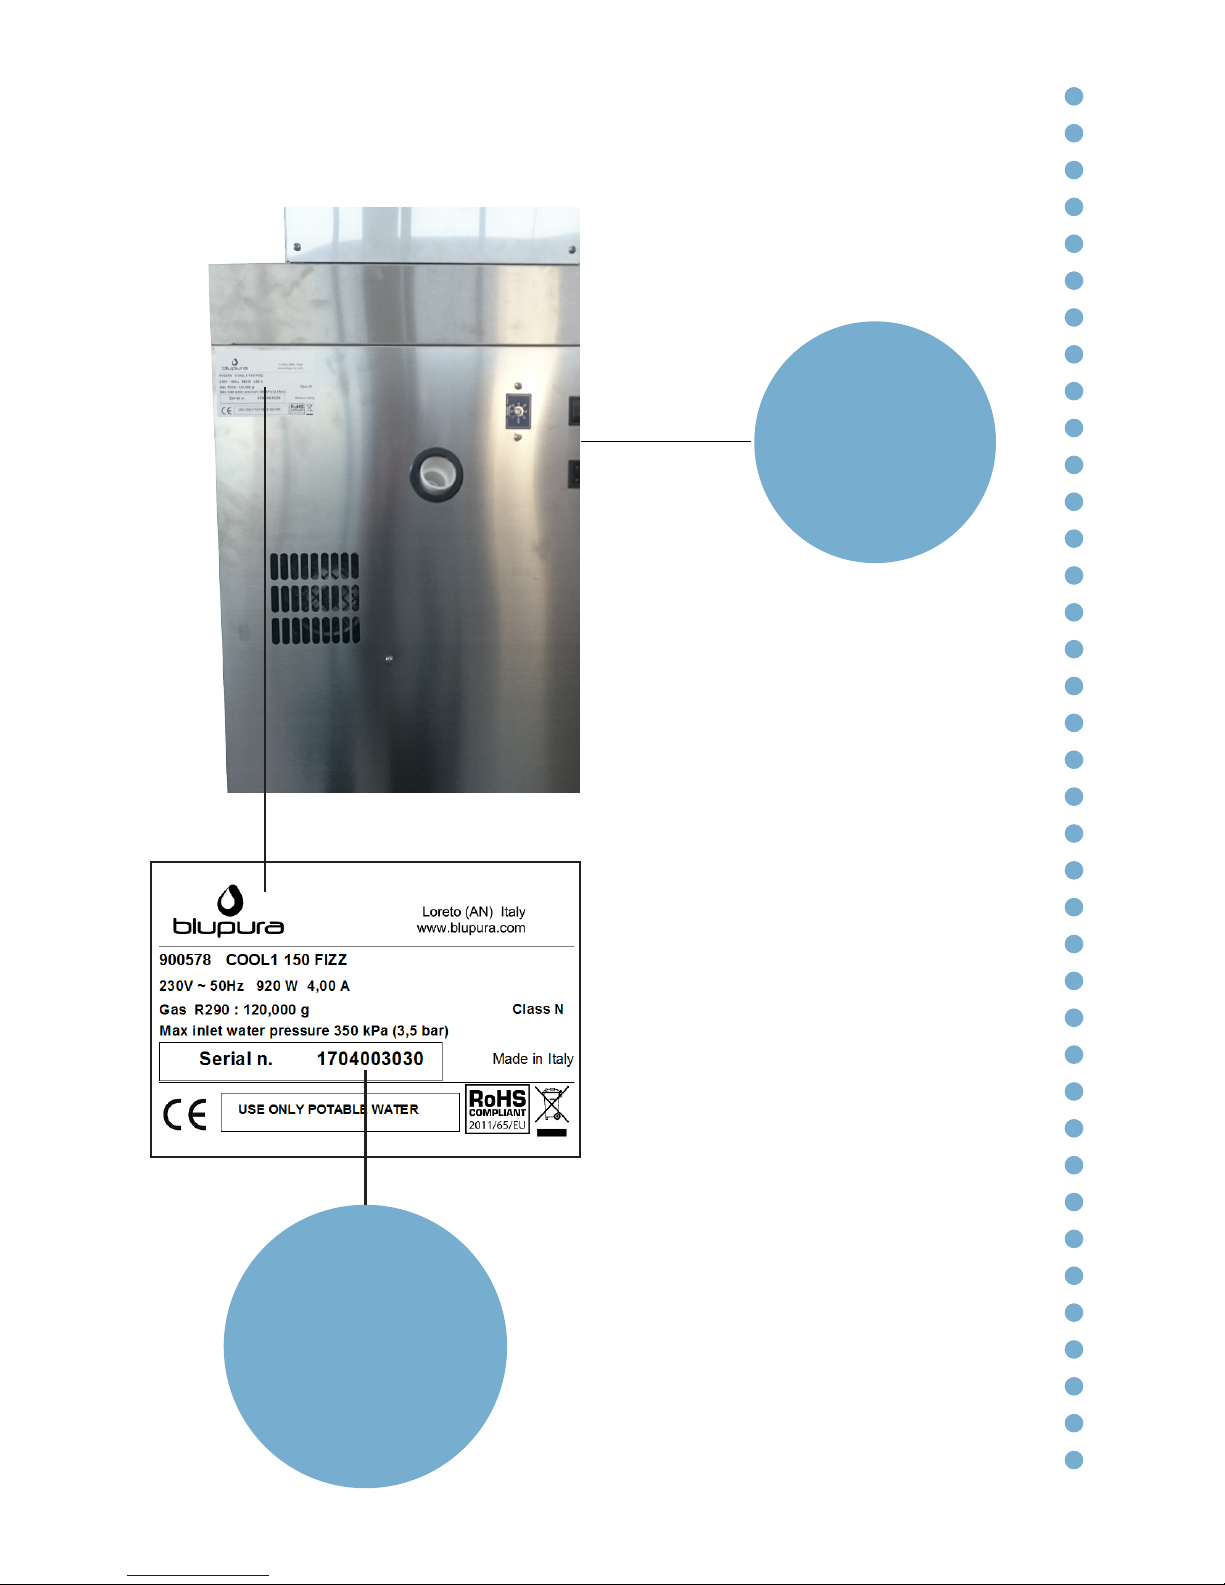
Technical Features – Technical Data Plate
17 Year of manufacture
04 Month of manufacture
03030 Serial number
[mod. Cool1]

14
Technical Features - dimensions (mm)
3,150in
80mm
3,150in
80mm
12,480in
317mm
40,224in
1022mm
16,449in
418mm
56,673in
1440mm
18,866in
479mm
2,926in
74mm
4,598in
117mm
11,685in
297mm
16,864in
428mm
Water Inlet
27,547in
700mm
Drip Tray Drainage
31,418in
798mm
Ice Bank Drain
10,894in
277mm
Power Cord IEC
31,421in
798mm
1,575in
40mm
[mod. Cool1]

15
Technical data
sheet
Cool1
150 lt
Cool1
80 lt
Cooling capacity 150 lt/h 80 lt/h
Max continuous
dispensing 80 lt 45 lt
Water temperature 5°-12°C *
Cooling system Dual-coil ice bank Single-coil ice bank
Tank capacity 18 lt 14 lt
Ice bank 8 kg 5 kg
Pump Professional rotary
carbonation pump
Professional membrane
carbonation pump
Power supply Single-phase 230V-50Hz
Power consumption 920 W - 4 A 300W - 1,3 A
Compressor power 1/3 HP 1/3 HP
Cooling Forced ventilation
Refrigerant gas Natural gas HC R290
Ambient cooling
temperature Min 5°C - Max 35°C
Dimensions LxDxH (mm) 479 x 428 x 1440
Packaging dimensions (mm) 520 x 474 x 1562
Net weight (kg) 49 42
Gross weight (kg) 55 48
* rated at a room temp. of 25°C and inlet water temp. of 20°C
For the technical data sheet of other models, examine the technical data plate attached in the unit.
16
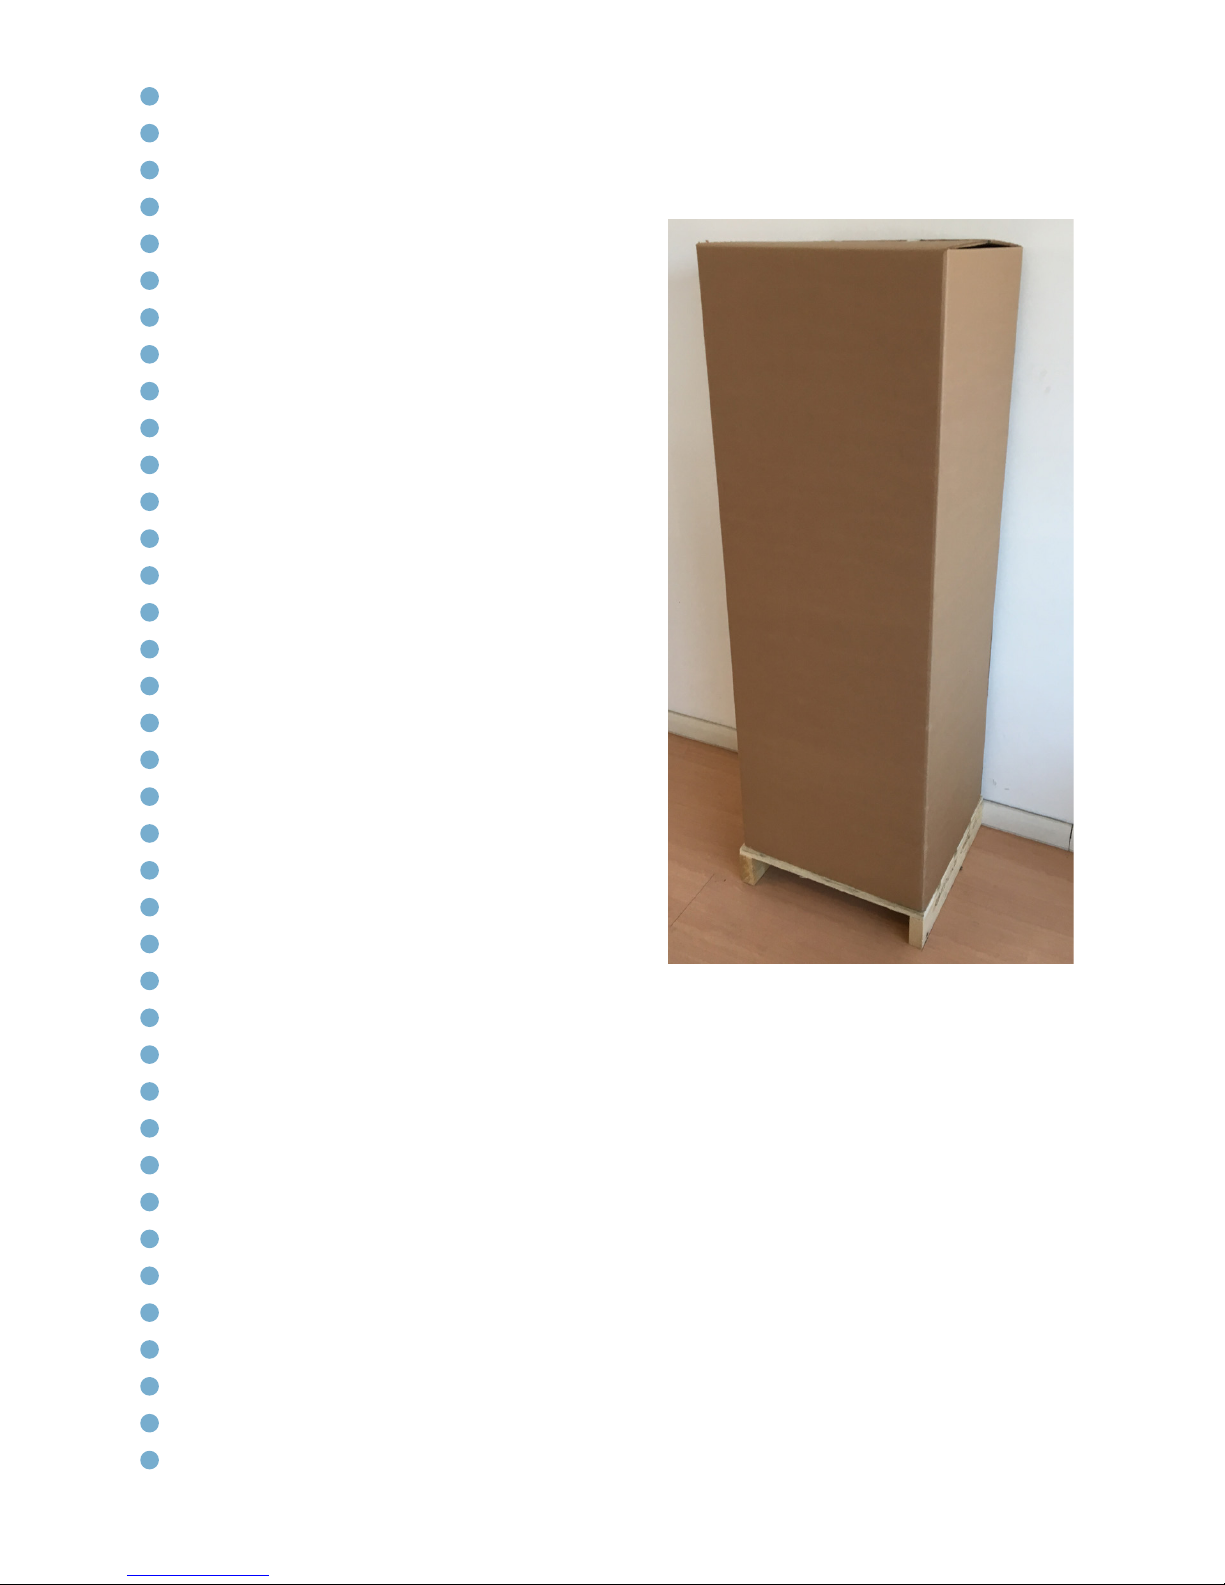
Installation
Unpacking
Cut the packing tab and pull up the
cardboard box and the inner caps.
Carefully check that the watercooler has
not been damaged during transport. Any
signs of damage must be reported to the
Agent immediately.
If the watercooler has been transported in
a horizontal or inclined position, a wait of
8 hours is needed before turning it on so
that the refrigeration circuit can function
perfectly.
Ensure that a qualified technician
connects it to the electric supply following
the manufacturer’s instructions and
according to the local safety regulations
The end user is not permitted to access
the internal service parts of the unit.
Only technical personnel should carry
out operations of this nature.
17
Fig. 17.1 - Mod. 150 lt
1
Siting the unit
Wear safety gloves when handling the unit.
The unit must be handled by two people.
Site the unit away from sources of heat.
The machine is equipped with 4 adjustable
feet. Do not place on inclined surfaces.
Leave at least 10 cm around the unit to
allow for aeration.
SANITIZE the machine as described in the
paragraph on page 24.
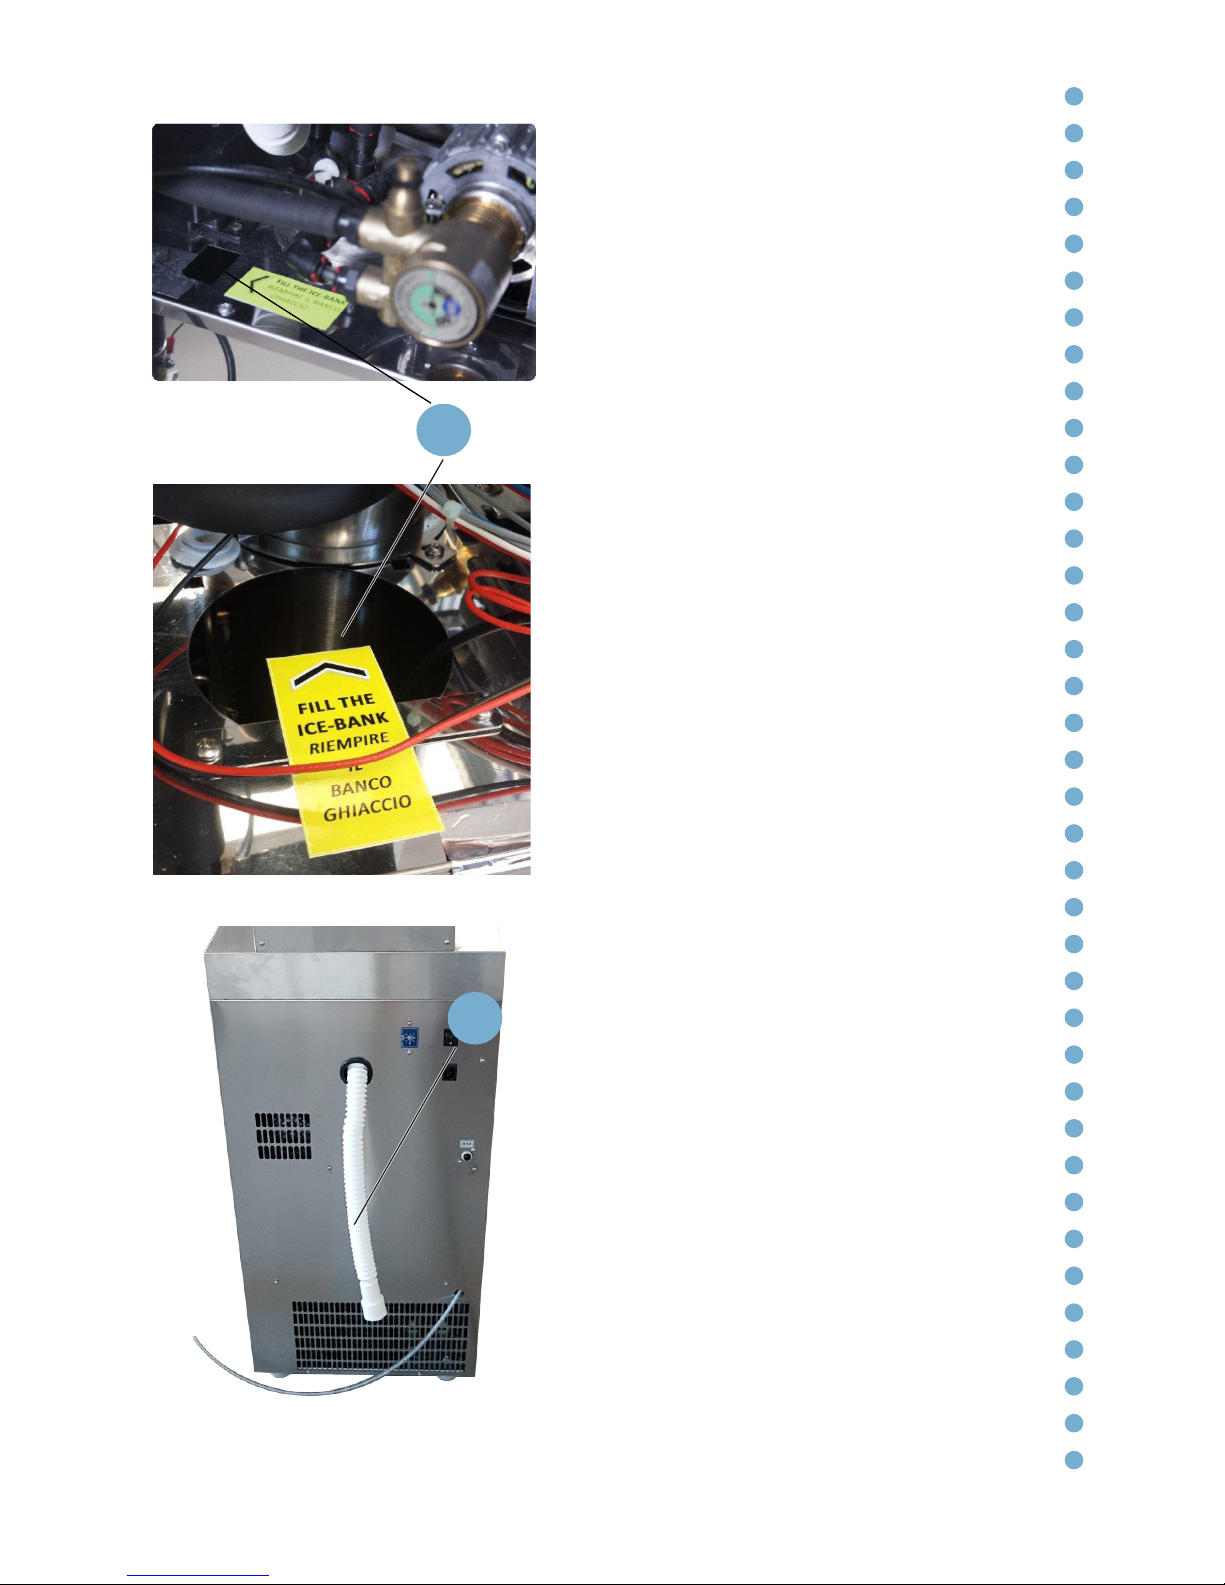
Filling the ice bank
Open the front panel using the key
supplied.
Pour drinking water into the ice-bank using
the hole (1).
The ice-bank is full when water flows out of
the drain tube positioned on the back of
the machine (2)
Once you have filled the ice bank, avoid
moving the unit.
If you have to move the unit, remember to
empty the ice bank first.
Fig. 17.2 - Mod. 80 lt
Fig. 17.3
1

18
Fig. 18.1
1
2
3
Connection to the mains water
supply
Check that the mains pressure is between
1 bar and 3,5 bar. To enhance the quality
of the sparkling water dispensed, an
incoming flow rate in excess of 3,5 lt/min is
recommended.
Connect incoming water tube Ø8 mm (2)
to the drinking-water main, ideally with a
tap upstream of the unit.
The unit is equipped with a safety valve
and a non-return valve.
Connect waste pipes (3) and (1) to a
waste water manifold. Once the pipes are
attached, turn on the tap. Ensure there are
no leaks.
Before drinking the water from the system,
perform a thorough rinse of the circuit by
dispensing water from each product line.
CAUTION!
To connect the water cooler to the mains
water supply, you will need to use a new set
of connectors (joints, gaskets and pipes).
Do not use a set of connectors that has
already been used elsewhere.
The water pressure entering the unit must
be between a minimum of 1,0 bar (0,10
MPa) and a maximum of 3,5 bar (0,35 MPa)
19
Fig. 19.1
1
32
Electrical connection
The connections must comply with local
regulations. The grounding of the unit is
a legal requirement.
Connect the power supply cable to the
IEC plug (1) and to the electric socket.
Turn the unit on by selecting the “I”
position on the main on/off rocker switch
(2). The ice-bank pump, compressor
and fan are now activated. On the
FIZZ models, the pump for filling the
carbonator with water is also activated.
Press the “Sparkling Water” button in
order to release any air in the circuit and
to allow the pump to fill the carbonator
with water.
After around 1-2 minutes, the sparkling
water pump stops.
Thermostat
The thermostat (3) is set in the maximum
position to control the ice bank.
If you want to avoid the formation of ice
in the bank, turn the thermostat screw at
least 1/4” anti-clockwise.
In the case of freezing of the water
circuit, turn off the unit and keep it off for
at least 12 hours.
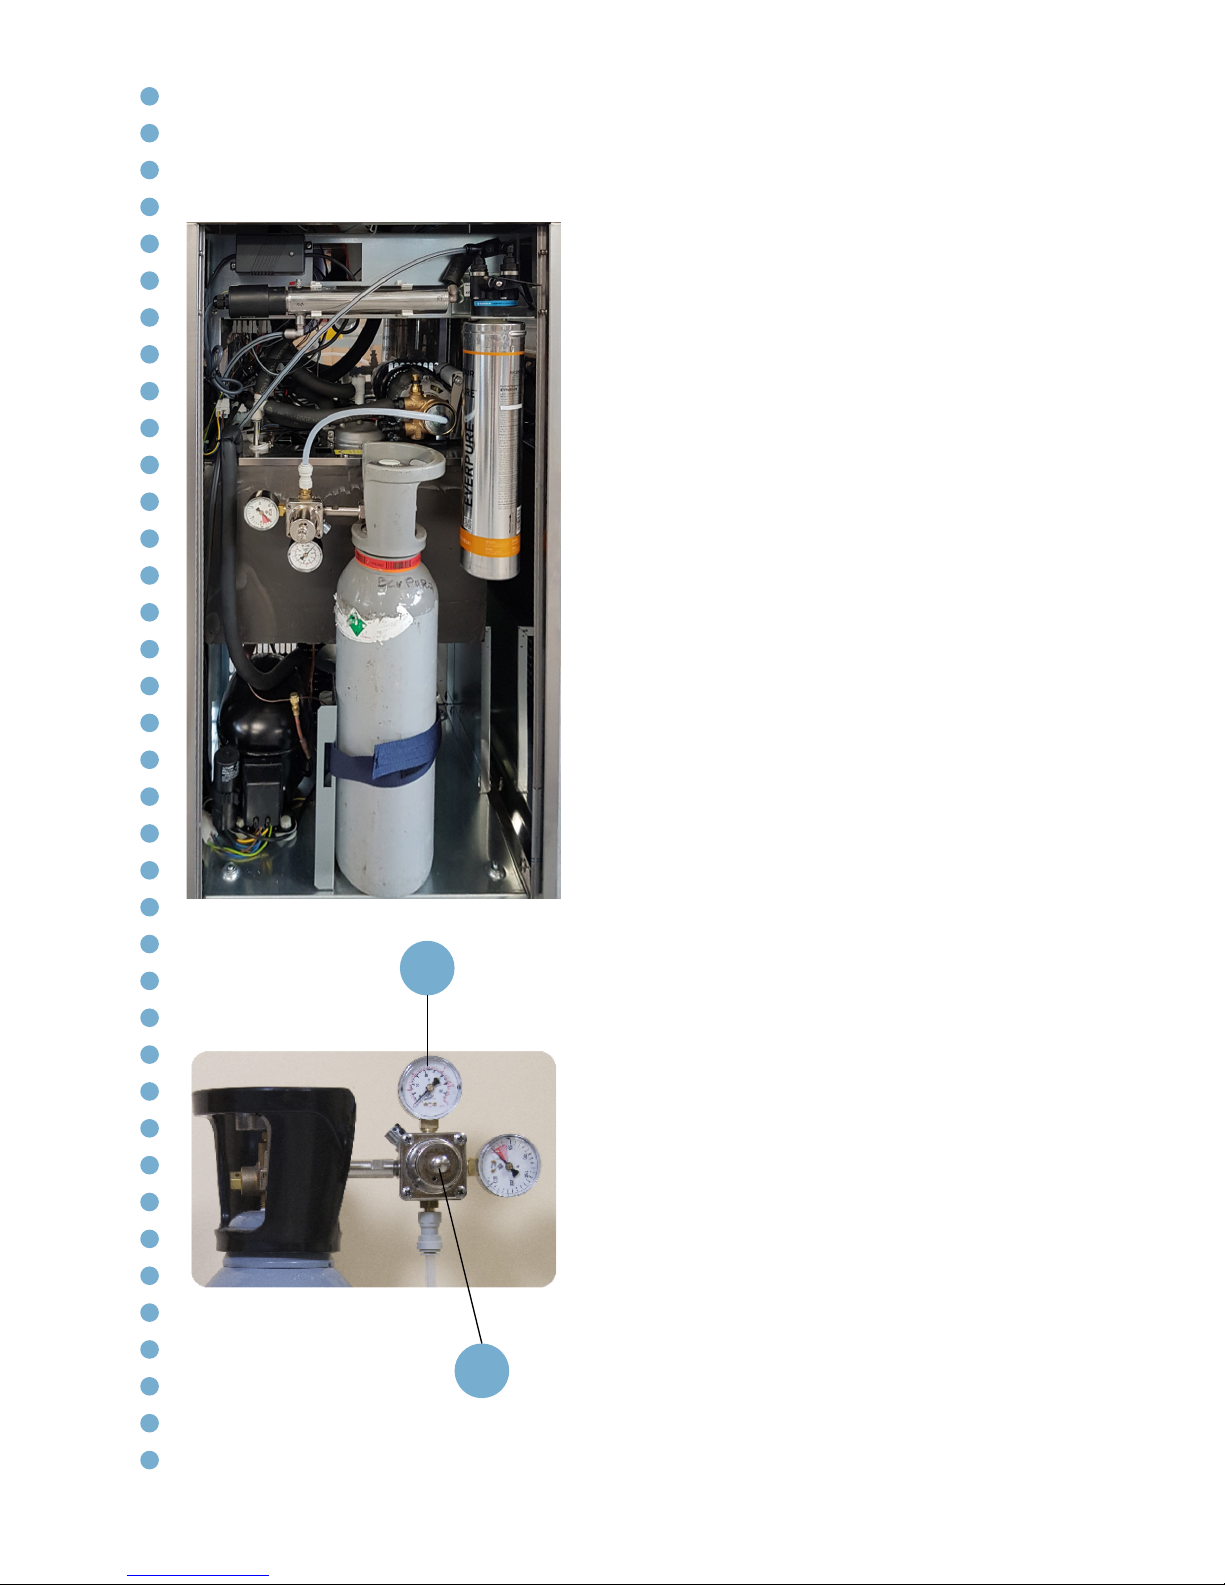
20
Fig. 20.2
Once the unit is connected to the mains
water and electricity, and the ice-bank
tank has been filled, you can install the
E290 food-grade carbon dioxide (CO2)
cylinder.
The machine is not equipped with a
CO2pressure reducer or CO2cylinder
(optional).
Inside the machine, you can install
cylinders with a maximum diameter of
160 mm and a maximum height of 780
mm – standard 5 kg or 6 kg cylinders are
generally within these dimensions. The
unit is equipped with a tear tape for the
safety fixing of the cylinder.
To increase or decrease the level of
carbonation of the water, you need to
adjust the screw (1). Turning it clockwise
increases the level of carbonation. We
recommend that you do not exceed 4
bar of pressure (2).
To reduce the carbonation level, turn
the screw anti-clockwise. The level will
decrease as soon as sparkling water is
dispensed.
To achieve a good level of carbonation,
you need to wait until the water is
sufficiently cold – i.e. at least one hour
after installation.
Installation of the CO2cylinder (FIZZ model)
1
2
Fig. 20.1
This manual suits for next models
4
Table of contents


